1
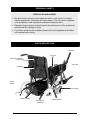
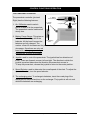
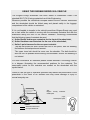
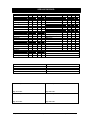
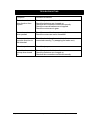
Enigma ENERGi Powerchair
Owner’s handbook
Energi Powered Wheelchair
Page 1 of 1
Owners Handbook (Code: Z20949 Rev D)
CONTENTS
1. CONTENTS
2. INTRODUCTION
3. QUALITY CONTROL DOCUMENTATION
4. PERSONAL SAFETY
5. PARTS DESCRIPTION
6. ADJUSTMENTS FOR COMFORT
7. CONTROL FUNCTIONS OPERATION
8. TRANSPORTATION, DISASSEMBLY AND ASSEMBLY
9. BATTERY CHARGING
10. CARE AND MAINTENANCE
11. SERVICE RECORD
12. WARRANTY
13. TROUBLESHOOTING
Energi Powered Wheelchair
Page 2 of 2
Owners Handbook (Code: Z20949 Rev D)
INTRODUCTION
The Enigma powerchair has been designed for a single occupant user mass of
up to 115Kg. The design of the powerchair assumes that the user has limited
mobility but has the physical, visual and cognitive ability to operate the power
safely.
The powerchair is suitable for everyday indoor use and limited outdoor use. The
attributes of this powerchair are it’s versatility and comfort. Using tried and tested
industry electronics gives a highly reliable product.
All Enigma powerchairs are manufactured to the highest standards and are CE
compliant. Medicare Technology is an ISO 9001 and ISO 13485 accredited
medical device manufacturer.
The Enigma powerchair is a robust and visually appealing product whilst being a
cost-effective solution to mobility problems.
It is essential that you read this manual before using your Enigma powerchair. If
you have any questions about the manual or the powerchair in general, please
contact:
Medicare Technology,
Dale House,
Armytage Road, Brighouse,
Great Britain HD6 1PT
Telephone:
Fax:
01484 727301
01484 401498
QUALITY CONTROL DOCUMENTATION
SERIAL NUMBER:
Energi Powered Wheelchair
INSPECTED BY:
Page 3 of 3
Owners Handbook (Code: Z20949 Rev D)
PERSONAL SAFETY
GENERAL OPERATING SAFETY PROCEDURES
•
•
•
•
Make sure that the power is switched off before mounting or dismounting from
the chair.
For your health and comfort, make sure that you adopt a comfortable posture
and that you can operate the controller unit with ease.
Make sure you are visible when using the chair at night or in poorly lit
conditions.
Ensure that all modifications made the powerchair are approved by Medicare
Technology. Unauthorised modifications may reduce the performance of the
powerchair, invalidate warranty, or result in injury or damage.
EMERGENCY BRAKING
•
•
•
To apply emergency braking whilst using the power chair release the grip on
the control joystick.
You can also apply emergency braking by turning off the powerchair. However,
this is an abrupt braking method and should only be used as a last resort.
There is a brake at each side of the wheel. These brakes should only be used
when the powerchair is stationary and when in freewheel mode.
TURNING AND USING ON A GRADIENT GUIDELINES
•
•
Avoid sharp turns at high speed as this could result in the powerchair tipping
over. This is especially relevant when turning on a gradient.
The powerchair has been designed for use on gradients up to 1 in 4 (25%).
However, other factors such as the surface of the gradient or the attributes of
the user can vary this figure. If you are in any a doubt about travelling up or
down a gradient please find an alternative route.
EMERGENCY FREEWHEEL
•
Warning:
The powerchair has a freewheel option device fitted on the top of each motor.
Always re-engage the emergency freewheel device after use. Failure to do so
may result in injury.
Energi Powered Wheelchair
Page 4 of 4
Owners Handbook (Code: Z20949 Rev D)
PERSONAL SAFETY
OBSTACLES AND KERBS
•
Be careful when driving to avoid obstacles which could come in to contact
with the powerchair, in particular the front castors. If you do have to negotiate
such an obstacle, then negotiate the obstacle slowly with care.
Repeated heavy impacts could will reduce the performance of the powerchair
and may result in damage or injury.
If you have a kerb climber installed, please refer to the separate kerb climber
user manual before using.
•
•
PARTS DESCRIPTION
Controller
Arm rest
Seat back canvas /
back rest
Foot rest
Seat Bag
Anti-tip
wheels
Front castor
Battery Packs
Manual brake
Emergency
freewheel
Energi Powered Wheelchair
Page 5 of 5
Owners Handbook (Code: Z20949 Rev D)
ADJUSTMENTS FOR COMFORT
To adjust the foot rests:
• To use the foot rest, pull each foot rest forward until it locks into position
• To store the footrest, press the lever back whilst pushing the footrest out of
position.
To adjust the arms:
• Push the silver button on the locking pin whilst at the same time pulling out the
pin. Once the arm has been adjusted to your positional requirement, insert the
locking pin with the silver button pressed to secure.
To adjust the arm rests:
• Unscrew the handle on the armrest. Adjust the armrest to the correct position
and screw the handle back in to secure it in place.
Adjusting the controller position:
• Unscrew the two bolts on the controller bracket using a 5mm Allen key. Adjust
the controller to suit you and replace the bolts using the Allen key.
Adjusting the seat sling canvas tautness:
• Loosen the screws on sides of the seat with an Allen key. Retighten or
slacken the seat sling canvas to suit you and retighten the screws with the
Allen key.
Adjusting the height of the seat back.
• To adjust the height of the seat back, unscrew the two quick release screws at
bottom of each push handle. Adjust the push handles to move the back
canvas up or down until the user is comfortable. Then fix the push handles
back into place using the quick release screws.
Adjusting the tautness of the seat back canvas.
• To adjust the tautness of the seat back canvas, first lift the flap at the back of
the canvas which is held in place with Velcro.
• You will then see four straps which determine the tautness of the canvas.
Adjust these until you are comfortable, then secure the straps with Velcro.
Energi Powered Wheelchair
Page 6 of 6
Owners Handbook (Code: Z20949 Rev D)
CONTROL FUNCTIONS OPERATION
The Powerchair Controller:
The powerchair controller (pictured
Right) has the following features:
2. Battery
Power Gauge
1. On / Off button used to switch
power on and off to the powerchair.
The powerchair can be switched off
at any time.
4. Speed
Selector
3. Joystick
1. On/Off
Button
2. Battery Power Gauge. This gives an
Indication of the charge left in the
5. Recharging
batteries. All the bars lit means the
point
batteries are fully charged. The
number of bars lit decreases as the power
decreases. Once there are only red
bars left lit on the gauge, recharge
the batteries as soon as possible.
3. Joystick used to control the powerchair. The joystick has four directions of
travel. These are forward, reverse, left and right. The direction in which the
joystick is pushed determines the direction the powerchair moves in.
To stop the powerchair, release the joystick to return to the centre position.
4. Speed Selector used to determine the overall speed of the chair. To adjust the
speed of the chair, turn the speed selector.
5. The recharging point. To recharge to batteries, insert the round plug of the
recharger into the point and turn on the recharger. The joystick is will not work
whilst the batteries are recharging.
Energi Powered Wheelchair
Page 7 of 7
Owners Handbook (Code: Z20949 Rev D)
TRANSPORTATION, DISASSEMBLY AND ASSEMBLY
ASSEMBLING THE POWERCHAIR
•
•
•
•
•
•
•
•
Unfold the powerchair and lock the frame in position by pushing down on the
sides of the seat with the palms of your hand.
Place the battery basket into position and lock with the pins attached to the
basket.
Insert the batteries and then connect the batteries together (Please see the
section on BATTERY CHARGING AND CARE)
Connect the controller to the batteries and check that the controller is
connected to the motors (Please see the section on BATTERY CHARGING
AND CARE)
Fold out the footrests until they are locked in place.
Pull up both push handles and ensure that the half fold back mechanism locks
securely (if half fold back mechanism is fitted).
Make sure that the motors are placed in gear
Make sure that there is sufficient power in the batteries
DISASSEMBLING THE POWERCHAIR FOR TRANSPORTATION
•
•
•
•
•
•
•
Switch off the powerchair.
Fold and remove the footrests by turning them backwards whilst pushing the
lever at the same time
Disconnect and remove the batteries
Lift the locking pins of the battery basket and take out, then remove the battery
basket.
Fold the back posts using the half fold back mechanisms (if fitted). To use the
half fold mechanism, push the plastic lever and pull the push handles down
and towards you.
Unlock the sides of the seat by lifting the seat canvas centre holding both the
front and rear edges of the canvas
Fold the chair and transport
Energi Powered Wheelchair
Page 8 of 8
Owners Handbook (Code: Z20949 Rev D)
USING THE ENIGMA ENERGi IN A VEHICLE
The Enigma Energi wheelchair has been tested to Wheelchair Crash Test
standard ISO 7176/19 using restraints from Koller Engineering.
Wherever possible the wheelchair occupant should use the vehicle’s fitted seats
and the wheelchair should be folded away and placed safely in the luggage
compartment of the vehicle or restrained.
If it is not feasible to transfer to the vehicle’s seat then Enigma Energi may used
as a chair whilst the vehicle is moving with the necessary restraints and with the
wheelchair facing the front of the vehicle. Medicare Technology recommends
that the following types of restraints be used:
a) Koller Buckle and tongue restraints for the front of the wheelchair,
b) Koller Karabiner rear restraints for the rear of the wheelchair,
c) Koller 3-point harness for the occupant restraint.
The lap belt should be worn across the front of the pelvis, with the webbing
fed between the backposts and armrest.
The upper torso belt should be worn over the shoulder. The belt should be
worn as firm as possible without being uncomfortable. Ensure the webbing is
not twisted.
For more information on restraints please contact Medicare Technology. Below
is a diagram illustrating the recommended positions for the restraints. The
securement points for the restraints are marked on the wheelchair with the
symbol below.
Failure to use the type of restraints specified may reduce the performance of the
powerchair in the event of an accident and may cause damage or injury in
normal everyday use.
(left)
Diagram showing
restraint points
wheelchair
45
(right)
Restraint point symbol
LEGEND
Wheelchair Restraints
Occupant Restraints
Energi Powered Wheelchair
Page 9 of 9
Owners Handbook (Code: Z20949 Rev D)
BATTERY CHARGING AND CARE
CONNECTING THE CONTROLLER, MOTORS AND BATTERIES
To connect the leads for the
powerchair:
•
•
•
•
Connect the left motor cable to
the controller using the 3 pin
adapter marked “LEFT”
Connect the right motor cable
to the controller using the 3 pin
adapter marked “RIGHT”
Connect the two batteries
together using the 2 pin
adapters off each battery
Connect the batteries to the
controller using it’s 4 pin
adapter and the 4 pin adapter
off the first battery
MAINS
CHARGING
LEFT
RIGHT
LEFT
MOTOR
BATTERY 1
RIGHT
MOTOR
BATTERY 2
CHARGING THE BATTERIES
The batteries require charging on a regular basis to minimise the risk of your
being stranded due to the batteries being flat. Ideally, you should charge the
batteries whenever the powerchair is not in use to make sure that there is always
the maximum available range for the powerchair.
A power gauge is supplied on the controller which displays the amount of charge
left in the batteries. This gauge however should only be used as an approximate
guide. The battery is at full charge when all the lights are lit and the number of
lights lit will reduce once power is used.
When the only the red lights are lit, recharge the powerchair batteries as soon as
possible, as this is a warning that the powerchair is running low on power.
To charge the batteries:
• Turn on the powerchair
• Insert the DIN plug from the recharger into the controller and switch the
charger on.
• Charge the batteries for 12 hours for maximum capacity
Energi Powered Wheelchair
Page 10 of 10
Owners Handbook (Code: Z20949 Rev D)
BATTERY WARRANTY
Your batteries are warranted for 12 months from the date of purchase. The
warranty is conditional on the basis that they have been used in the correct way
and recharged on a regular basis.
CARE AND MAINTENANCE
CLEANING YOUR POWERCHAIR
Wipe the powerchair as least once a week with a damp cloth and dust the
powerchair and motors should they require it.
TYRE WEAR AND PRESSURES
Make sure that the air pressure of the tyres on the rear wheels is checked
regularly. The correct air tyre pressures are stated on the side of the tyres.
Also, regularly check the tyres for signs of wear such as significant scuffmarks
and reduced tyre tread.
NOTE – NEVER INFLATE THE TYRES WITH A PNEUMATIC AIR PUMP
OTHER ITEMS TO CHECK
Check the electrics on the powerchair, especially the battery connections, battery
connections to the controller and the controller connections to the motor.
Check the upholstery for signs of wear, tear and slackening. Failure to do this
could lead to a bad posture and eventual discomfort.
REGULAR SERVICING
The powerchair should be serviced annually by an approved Medicare
Technology service agent. A service log should be filled in this book once the
approved service agent has completed the service.
During the annual service, the front castor housing bolts (if present) should be
replaced. Please see the relevant Technical Bulletin for more details about this.
Energi Powered Wheelchair
Page 11 of 11
Owners Handbook (Code: Z20949 Rev D)
SERVICE RECORD
YEAR
Service Dates
Controller
On/off switch
Joystick
Braking
Recharge point
Batteries
Levels
Connections
Discharge test
Wheels and Tyres
Wear
Pressure
Bearings
Wheel nuts
Motors
Wiring
Noise
Connections
Brake
Brushes
Chassis
Condition
Steering
Customer Name
Address
1
2
3
4
YEAR
Service Dates
Upholstery
Seat
Back
Armrests
Electrics
Connections condition
Lights
Test run
Forwards
Reverse
Emergency stop
Left turn
Right turn
Slope test
Over obstacles
Front castors
Bolts and fasteners
Tyre wear
Housing condition
List Items repaired
1
2
3
4
Date of Purchase
Colour
Serial No.
Options included
Postcode
Dealer Stamp
Dealer Stamp
Sign and Date:
Dealer Stamp
Sign and Date:
Dealer Stamp
Sign and Date:
Sign and Date:
Energi Powered Wheelchair
Page 12 of 12
Owners Handbook (Code: Z20949 Rev D)
WARRANTY
ENERGi POWERCHAIR WARRANTY
There is a comprehensive twelve-month warranty from the date on which your
new Energi powerchair is delivered. The warranty covers the powerchair for
repairs or replacement during this period. For more detail, please see the
Warranty Conditions below.
Warranty Conditions:
1.
Any work or replacement part installation must be carried out by an authorised Medicare Technology dealer / service
agent.
2.
To apply the warranty should your powerchair require attention please contact the designated service agent listed
below.
3.
Should any part of the powerchair require repair or full or part replacement, as a result of a manufacturing or material
defect within twelve months of receiving the powerchair, parts will be supplied free of charge.
Note:
The guarantee is not transferable
4.
Any repaired or replaced parts will be covered by this warranty for the balance of the warranty period on the
powerchair.
5.
Parts replaced after the original warranty has expired will by covered by a three months warranty.
6.
Consumable items supplied will not generally be covered during the normal warranty period unless such items
require repair or replacement clearly as a direct result of a manufacturing or material defect.
Such items include (among others):
upholstery, tyres and similar parts.
7.
The above warranty conditions apply to brand new chairs purchased at the full retail price. If you are unsure whether
your chair is covered, check with the service agent.
8.
Under normal circumstances, no responsibility will be accepted where the powerchair has required assistance as a
direct result of:
a)
The powerchair part not having been maintained in accordance with the manufacturer’s recommendations.
b)
Failure to use the manufacturer’s specified parts
c)
The powerchair or part having been damaged due to neglect, accident or improper use
d)
The powerchair or part having been altered from the manufacturer’s specifications or repairs having been
attempted before the service agent is notified
Please note your local service agent’s contact details in the box below. In the event of your powerchair requiring attention,
contact them and give all relevant details so they can act quickly.
The manufacturer reserves the right to alter without notice any weights, measurements or other technical data shown in
this manual. All figures, measurements and capacities shown in this manual are approximate and do not constitute
specifications.
Medicare Technology authorised Service Agent
Name
Address
Tel
Postcode
Energi Powered Wheelchair
Page 13 of 13
Owners Handbook (Code: Z20949 Rev D)
TROUBLESHOOTING
Symptom
Possible Remedies
Chair does not move
after direction from
joystick
Check the powerchair is turned on.
Check the batteries are charged up.
Check all the connections are linked correctly.
Check the manual brakes are not applied.
Check the motors are in gear.
Chair does not move
when pushed
Check the manual brakes are not applied.
Check the motors are set to freewheel.
Chair moves in
opposite direction to
that intended
Check the leads from the controller to the motors are
connected correctly (Try swapping the leads over).
Wheels squeak
Check the tyre pressure
Controller does not
light up when turned
on
Check the powerchair is turned on.
Check the batteries are charged up.
Check all the connections are linked correctly.
Energi Powered Wheelchair
Page 14 of 14
Owners Handbook (Code: Z20949 Rev D)