1
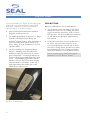
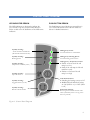
ProSEAL ® 25 & ProSEAL ® 44 Laminators Owner’s Operation Manual ProSEAL ® 25 & ProSEAL ® 44 Laminators TABLE OF CONT ENTS TABLE OF CONT ENTS..................................................................................................................................................................2 INTRODUCTION................................................................................................................................................................................3 IMPORTANT SAFEGUARDS.........................................................................................................................................................4 INSTALLATION...................................................................................................................................................................................5 UNPACKING, SET-UP AND INSTALLATION....................................................................................................................6 CONTROL KNOB...............................................................................................................................................................................7 CONTROL PANEL .............................................................................................................................................................................8 CONTROL PANEL DIAGRAM ....................................................................................................................................................9 MOUNTING USING A ProSEAL ® MOUNTING BOARD..............................................................................................10 MOUNTING USING A ProSEAL ® POUCH BOARD .........................................................................................................11 ENCAPSULATING USING A ProSEAL ® FLEXIBLE POUCH WITH A ProSEAL ® SLED...............................12 CLEANING YOUR LAMINATOR..............................................................................................................................................13 TROUBLESHOOTING GUIDE....................................................................................................................................................14 SPARE PARTS.........................................................................................................................................................................................15 GLOSSARY OF TERMS.....................................................................................................................................................................16 PROCESS APPLICATION NOTES ..............................................................................................................................................17 TECHNICAL SPECIFICATIONS..................................................................................................................................................18 LIMITED WARRANTY......................................................................................................................................................................19 ProSEAL ® CONTACT INFORMATION ....................................................................................................................................20 2 INTRODUCTION Thank you for purchasing a ProSEAL ® Laminator. We have designed the ProSEAL Laminator to give you years of reliable service. As you become familiar with the ProSEAL Laminator, you will appreciate the high quality of its production and the excellence in its engineering design. By following the guidelines for proper care and use of the ProSEAL Laminator, you can depend on many years of trouble-free profitability from your investment. The purpose of this manual is to outline the materials and process when using ProSEAL supplies with your laminator to create signs, displays, and flexible graphics with professional results. The manual includes instructions of various laminating procedures, which are meant to give you comprehensive information needed for the efficient use of your laminator. Please read and fully understand the entire manual before proceeding to use your laminator. STATEMENT OF INTENDED USE Your ProSEAL Laminator meets the CE Machinery Directive (89/392/EEC & applicable amendments). It is ETL and cETL listed per directive UL 1950 3rd Edition 1995 and CAN/CSA C22.2 No. 950-95. The ProSEAL Laminator has been designed to be used with ProSEAL ® Pouch Boards and ProSEAL ® Flexible Pouches. When used with these products, you are able to mount, mount and laminate, and encapsulate prints in one step. Your laminator has not been tested with any other materials and is not recommended for use with products other than ProSEAL supplies. WARNING! This laminator is designed for mounting and laminating. Any use other than the intended may cause damage to the laminator or physical harm to the user. WARNING! Any unauthorized changes or modifications to this unit without our prior written approval will void the user’s warranty and will transfer health and safety obligations to the user. LIABILITY STATEMENT The details given in this manual are based on the most recent information available to us. They may be subject to change in the future. We retain the right to make changes to the construction or the design of our products without accepting any responsibility for modifying earlier versions previously delivered. CAUTION! Please pay attention to all passages marked this way. This information is vital to preventing user injury and/or damage to the unit. Failure to follow this information could void the user’s warranties and transfer all safety obligations to the user. 3 I M P O R T A N T S A F E G U AR D S When using electrical appliances, basic precautions should always be taken to reduce the risk of electrical shock and injury to persons, including the following: 1. Read all instructions before connecting or operating this unit. 2. Retain this Owners Manual for future reference. For technical assistance beyond what is covered in this manual contact Technical Service (details on rear cover). 3. Save your carton! ProSEAL laminators are shipped in special cartons that protect them from damage. Please store your carton in case your ProSEAL ® Laminator should ever require service or need to be transported. NOTICE! Failure to return machines properly packed in original packaging will impose a fifteen percent restocking fee plus costs to repair shipping damage. Contact Technical Service for Return Authorization (see rear cover). 4. Do not use the laminator for other than its intended use. 5. The laminator case may be cleaned with a lint-free cloth, lightly dampened with a mild soap and water solution. Do not use spray-on cleaners. NOTE: Disconnect the laminator from the mains supply before cleaning! 6. Do not immerse any part of the laminator in water or other liquids. 4 7. This unit should be situated away from heat sources such as heat registers or stoves/ovens. 8. The laminators’ location or position should not interfere with its proper ventilation. Do not install or place in a built-in enclosure such as a bookcase. 9. Do not operate the laminator with a damaged cord or plug, or after the laminator has been dropped or damaged in any manner. If purchased in U.S./Canada, return the laminator to SEAL Graphics or if purchased in Europe or Asia, return to your ProSEAL ® reseller for examination, repair, or adjustment. 10. Do not let the cord hang over the edge of a counter/bench or touch hot surfaces. 11. Always unplug the laminator when it is not to be in use for a long period. 12. This unit should only be connected to a power supply outlet of the voltage, amperage, and frequency marked on the rear panel. The laminator has a grounded plug (three prongs). To reduce the risk of electrical shock, this plug is intended to fit only a grounded outlet of the proper amperage, and in only one way. If it does not fit in the outlet, contact a qualified electrician. WARNING! Do not modify the plug in anyway. Save these instructions. INSTALLATION The ProSEAL 25 and ProSEAL 44 are professional laminators designed for ease of use. The process speed and temperature have been preset to eliminate operator guesswork. The factory settings will facilitate good quality results using the ProSEAL Flexible Pouches and Pouch boards. The ProSEAL Laminators also have a Cold Operation Mode for future pressure sensitive applications. Installation of Your ProSEAL Laminator The ProSEAL 25 can handle Flexible Pouches and Pouch boards up to 25 inches (635 mm) wide, the ProSEAL 44 up to 44 inches (1120 mm) wide. Keep the area around your laminator clear with adequate space around it so you can feed, receive and trim mounted and/or laminated images. Please familiarize yourself with the operations for Installation, operating the Control Panel and the Control Knob. G L 5-15P Using 15 Amp Breaker ProSEAL 25 G N L 5-20P Using 20 Amp Breaker ProSEAL 44 N Please read and fully understand the entire manual before proceeding to use your laminator. Your ProSEAL laminator must be lifted and carried to the place where it will be used. This should be done by at least two people, one on each side. Grasp the machine 8” – 10” (20cm – 25 cm) from the side. It should only be placed on a sturdy, clean, flat level surface. The ProSEAL 25 weighs 77 lbs. (35kg) and the ProSEAL 44, 154 lbs. (70kg). The ProSEAL laminator must be installed next to a power/mains outlet. Do not use extension cords. The plug and the outlet must be easily accessible. Please ensure that you plug your laminator into a grounded, (EARTHED) three-prong outlet. Please ensure that the total load of the other items using the same circuit breaker do not exceed its breaking-value. The US versions of the ProSEAL machines are provided with fixed power cables and NEMA plugs; the European versions are provided with Euro appliance inlets. NOTE: There are two types of outlets (in the U.S.), as shown. If not available, contact a qualified electrician. 5 UNPACKING, SET -UP AND INSTALLATION 1. Open the box, and lift the machine out (at least two persons necessary!). Grasp the machine 8”-10” (200mm-250mm) from either side, at the bottom aluminum extrusions. Be careful: the polyethylene bag is slippery! 2. Place the machine on the work area described in the previous page. 3. Remove the protective polystyrene foam end covers. 4. Remove the polyethylene bag. 5. Remove the protective sheet, placed between the rollers. To do this: push the knob, situated at the right-hand side, fully inward, and rotate fully clockwise. 6. Inspect the machine for any physical damage (if damage does exist, report this to the Freight Company or Dealer to file a claim). Contact Technical Service (see rear cover) to determine if a replacement machine should be shipped to you. NOTICE! Retain original packaging. Failure to return machines properly packed in original packaging will impose a fifteen percent restocking fee plus costs to repair shipping damage. Contact Technical Service for Return Authorization (see rear cover). 6 7. Plug the power cable into the grounded outlet with appropriate service as described in the previous page. 8. Push in and turn the Control Knob to the 3/16” (5mm) setting (the motor and heater will turn on automatically.) Refer to the Control Knob section. 9. Wait 10-15 minutes to determine if the unit has achieved operating temperature (the bottom LED indicator light will be on (it will flash while coming up to temperature.) 10. When the bottom (heat) LED indicator is constantly lit, you are ready to use your ProSEAL laminator. NOTE: Set the nip to a position other than fully closed when not in use. NOTE: The laminator may emit vapors the first few times it is used. There is no need for alarm. This is normal and will cease after several minutes of use. CONTROL KNOB The Control Knob (see Figure 1) is located on the right hand side of the laminator and is operated from the front of the machine. To Switch the Power ON: • Push the knob in and rotate it slowly towards you (counter clockwise as viewed from the right side of the unit). The Control Knob has four (4) purposes. • The top LED indicator will light up to indicate that the power is on. 1. Turn the power on. 2. Turn the heat on. 3. Turn the rollers on. To Set the Height of the Rollers: 4. Adjust the height of the rollers. • Continue to rotate the knob until the desired measurement corresponds with the indicator window at the base of the knob. To Operate the Control Knob: • Select the measurement that indicates the thickness of the material you will be using with the machine. • Releasing the knob so that it moves back to the right and clicks into place will set the rollers for use. • The measurements on the knob, 1/4” (6mm), 3/16” (5mm), 1/8” (3mm) and 1/16” (1.5mm) correspond to ‘Pouch board thickness’. • There is also a fully closed stop, 0” (0mm) for future film only applications. • Grasp it with your right hand and push in approximately 1/4” (6mm) to the left. • Once the knob has disengaged from the stop, it may be rotated forward or backward (clockwise or counterclockwise, as viewed from the right hand side of the unit). To Turn the laminator OFF: • Grasp the control knob and push to the left. • Rotate the knob away from you as far as it will go (clockwise). • This will shut off the machine and open the rollers to permit objects to be removed. Figure 1. Control Knob 7 CONTROL PANEL The Control Panel (see Figure 2) is located on the front right of the machine and has three LED indicators. A diagram of the Control Panel is shown in Figure 3, on the next page. • The top LED when lit indicates the machine is plugged in and the power is on. • The middle LED indicates if the heat is on. Heat is required for ProSEAL Pouch Boards and ProSEAL Flexible Pouches. If lit, the laminator is in Hot Operation Mode and will heat up to its factory setting. If not lit, the laminator is in Cold Operation Mode. • The bottom LED is the Temperature Ready Indicator. If flashing slowly this indicates the laminator is heating up and has not yet reached process temperature. A steady light indicates the unit has reached process temperature and is ready for use. A rapid blinking light indicates that the machine is too hot. This occurs when changing from Hot Mode to Cold Mode. In this case, a steady light indicates the machine has cooled sufficiently for cold processes. Figure 2. Control Panel 8 PUSH BUTTONS: Below the LED indicators are two Push Buttons. • The top button controls the heating of the roller; it switches the heater on or off. Pushing this button toggles the machine from Hot to Cold or Cold to Hot Operation. The bottom LED, when constantly on, will indicate the appropriate temperature has been reached. • Pressing the lower button reverses the direction of the motor. The motor will continue to run in reverse until the button is released. This is used to clear jams or foreign objects, should one be drawn into the laminator. In Case of Emergency: Either Shut Off the laminator or use the Reverse Feature. In Case of Emergency: Either Shut Off the laminator or use the Reverse Feature. CONTROL PANEL DIAGRAM LED INDICATOR DESIGN PUSH BUTTON DESIGN The LED indicators are designed to indicate the on/off status of power, heat, and roller direction. Please see below for the definitions of the LED status indicators. The Push Buttons control whether power and heat is on or off and the direction the rolls turn. Please see below for detailed instructions. Symbol, meaning: - Power has been switched ON (All electronic functions are ON) LED (green) – Power Lit when laminator is switched ON. Symbol, meaning: Heating System LED (green) – Heating System Lit when heating system is active Symbol, meaning: Temperature controller (status) • Flashes at a slow rate if the roll temp is too low • Steady if the roll temp is OK and machine is ready • Flashes at a fast rate if the roll temp is too high Symbol, meaning: Top roller heater LED (green) – Temperature control Push button function: Symbol, meaning: Toggle Function (on/off) Symbol, meaning: Reverse roller movement • Switching the heating system on/off • Middle LED will indicate if heaters are ON (LED is on) or OFF (LED is off) Push button function: Reversing the forward movement of the rollers (momentary action: as long as this button is pressed) Figure 3. Control Panel Diagram 9 MOUNTING USING A ProSEAL ® MOUNTING BOARD USING A ProSEAL MOUNTING BOARD • • Refer to the instruction sheet packed with each box of ProSEAL Mounting Boards for specific instructions on mounting with a ProSEAL Board. Place the image to be mounted on the adhesivecoated side of the mounting board (dull side of the board). • Cover your print with the “cover sheet” as marked; (included with each box of ProSEAL Mounting Boards); please be sure that the board is completely covered by this sheet. • Set the Nip-knob to the correct setting that matches the Mounting Board thickness. • Insert the board into the inlet opening. Ensure the board will enter centered and straight. A gentle push may be required to start the board into the laminator. • Hold the edges of the board until it is engaged in the unit and the laminator begins pulling it on its own. The board will feed through the laminator and automatically exit at the rear of the unit. CAUTION! The board will be hot! Allow it to lie flat while cooling. Also, refer to the instruction sheet for information on Compatible Media, Process Conditions and Technical Information. • 10 • CAUTION! USE ONLY WITH ProSEAL MOUNTING BOARDS 1/4” (6mm) THICK OR LESS. DO NOT USE PLYWOOD, METAL, CARDBOARD, SHARP OR HARD BOARD WITH RAGGED EDGES OR ANY TYPE OF PLASTIC. MAKE SURE THAT ALL MEDIA FED INTO THE LAMINATOR IS FREE OF STAPLES, PAPER CLIPS, OR OTHER HARD OBJECTS. • Foam board may be cut or trimmed using a sharp hobby knife such as an X-Acto Knife. • Lightly score the paper first. Several passes of the knife may be required. • NOTE: Ragged cuts or pulling of the foam board indicates a dull blade. MOUNTING USING A ProSEAL ® POUCH BOARD • Refer to the instruction sheet packed with each box of ProSEAL Pouch Boards for specific instructions on mounting/laminating with a ProSEAL Board. • Also, refer to the instruction sheet for information on Compatible Media, Process Conditions and Technical Information. Slowly insert the Pouch Board into the inlet opening. Ensure that the Pouch Board will enter centered and straight. A gentle push may be required to start the board into the laminator. • • • Carefully examine the board to determine which edge is sealed. There is a 1/8” (3mm) tape edge on the sealed end. Hold the edges of the Pouch Board until it is engaged and the laminator begins pulling it on its own. • The Pouch Board will feed through the laminator and automatically exit at the rear of the unit. • Starting at one of the corners, opposite the sealed edge, gently lift and peel back the film. Care should be taken not to break the sealed hinge. • Center the image to be laminated on the board and lay the film back over it. • Set the Control Knob to the correct setting that matches the Pouch Board thickness. • Ensure that the unit is set to Hot Mode and that the middle LED is not flashing. CAUTION! The board will be hot! Allow it to lie flat while cooling. • If there is any dirt or adhesive on the surface of the board, it can be removed by dampening a lint free cloth with ISO Propyl Alcohol (IPA) and wiping the surface. CAUTION! Always use care when using Isopropyl Alcohol (IPA)! IPA is very flammable. The flash point of IPA is 11°C (51.8°F). The self-ignition temperature is 400°C (752°F). 11 ENCAPSULATING USING A ProSEAL ® FLEXIBLE POUCH WITH A ProSEAL ® SLED 1. Refer to the instruction sheet packed with each box of ProSEAL Flexible Pouches for specific instructions on encapsulating. 2. Also, refer to the instruction sheet for information on Compatible Media, Process Conditions and Technical Information. 3. The ProSEAL Flexible Pouch consists of two pieces of film that are hinged at one end, along a short side. Separate the two pieces starting at the end opposite the hinge. Take care not to break the hinged seal. 4. Insert the article to be laminated in the pouch so there is at least a 1/8” (3.5mm) border around each of the sides. This ensures that moisture never reaches the image. 5. Place the pouch with the image on the sled included with the Flexible Pouches or ProSEAL Sled. (The ProSEAL Sled is a sled to assist in the handling of large Flexible Pouches. It is made of materials that will not damage or cause excessive wear to your ProSEAL Laminator.) 6. Smooth out any wrinkles with the side of the hand or a soft flexible squeegee. 7. Tape the leading edge of the pouch to the sled using masking tape. 12 8. Adjust the Control Knob to the 3/16” (5mm) setting for the ProSEAL Sled. 9. Be sure that the heat is on (the middle LED is ON and the bottom LED is constantly ON. 10. Slowly insert the sled with the Flexible Pouch on top into the inlet opening. 11. Ensure that the sled is centered and straight. A gentle push may be required to start the sled into the laminator. 12. Hold the edge of the sled until it is engaged and the laminator begins pulling it on its own. 13. The sled will feed through the laminator and automatically exit at the rear of the laminator. CAUTION! The sled will be hot! Allow it to lie flat and cool before removing the tape. 14. If there is any dirt or adhesive on the surface of the Flexible Pouch, it can be removed by dampening a lint free cloth with ISO Propyl Alcohol (IPA) and wiping the surface. CAUTION! Always use care when using Isopropyl Alcohol (IPA)! IPA is very flammable. The flash point of IPA is 11°C (51.8°F). The self-ignition temperature is 400°C (752°F). CLEANING YOUR LAMINATOR CLEANING THE LAMINATOR CLEANING THE ROLLERS WITH ProSEAL CLEANING BOARDS: CAUTION! Disconnect the laminator from the power supply before cleaning. • • The laminator may be cleaned with a lint-free cloth, lightly dampened with a mild soap and water solution. Do not use spray-on cleaners. Do not immerse any part of the laminator in water or other liquids. • Do not use an abrasive cleaner, which can damage the painted surfaces. • Do not allow water or liquids to enter the electrical circuits, which may cause personal injury and/or damage the equipment when power is applied. The laminating rollers of your ProSEAL laminator should be periodically cleaned of adhesive build up that might occur during normal operation. IMPORTANT! Clean the laminating rollers to prevent adhesive build-up and to ensure quality output. Adhesive build up may eventually damage the rollers. • When laminating, a small amount of adhesive will squeeze out between the laminate films and onto the top and bottom rollers. This residue accumulates through normal use and can be easily cleaned off the rollers. • ProSEAL Cleaning Boards are specially designed to attract and capture any adhesive that may be clinging to the rollers. They are made from materials that will not damage or cause excessive wear to the ProSEAL Laminator. • Turn on the unit and set for Hot Temperature Operation. Once the machine has reached process temperature set the Control Knob to 3/16” (5mm). • Slowly insert the Cleaning Board into the inlet opening. Ensure that the board enters centered and straight. A gentle push may be required to start the board into the machine. Hold the edges of the board until it is engaged in the unit and the laminator begins pulling it on its own. • The board will feed through the laminator and automatically exit at the rear of the unit. CAUTION! THE BOARD WILL BE HOT! Allow the board to lie flat while cooling. 13 TROUBLESHOOTING GUIDE Problem Cause Solution The power LED does not come on, when the nip setting knob has been set to one of the nip settings (board thickness). • The power cable has not been plugged in the mains wall outlet. • • The (external) mains circuit breaker is tripped. Check if the power cable is plugged into the mains wall outlet. • Reset the mains circuit breaker. Pouch Boards are not drawn in by the machine, and the motor is making a louder humming noise [it’s stalling]. Only after pushing very hard, the boards are accepted. • The pouch board is too thick for the chosen nip setting. • Change the nip setting to the next thickness. • Boards of another make are used. • Use only ProSEAL Pouch Boards. Use of other boards will void your warranty. The quality of the lamination is poor: silvery areas on dark surfaces are visible, or the edges of the image are not sealed well. • The roller temperature is too low. • Contact your Technical Service Representative. • The roller pressure is too low. • Change the nip setting to the next thickness. The quality of the lamination is poor: especially laminated Inkjet prints show bubbles. • The roller temperature is too high. • Contact your Technical Service Representative. TECHNICAL SERVICE SERVICING AND REPLACEMENT PARTS If the machine does not reach temperature or you do not get the results you desire, please contact your Technical Service representative (see rear cover). Service and maintenance must be performed fully in accordance with the instructions. Servicing by any unauthorized technician voids the warranty. The service technician must use replacement parts specified by SEAL ® Graphics. When calling for Technical Service please have the Laminator Serial Number (listed on the Identification Plate) available. The Laminator Serial Number is located on the rear side of the laminator. 14 NOTE: Service Technicians must perform safety checks after completing any service or repairs to the laminator. SPARE PARTS PART DESCRIPTION SPARE PART CODE SPARE PART CODE ProSEAL 25 ProSEAL 44 Top Cover SP 144-165 SP 144-164 Right-Hand Interlock Top Cover SP 144-204 SP 144-204 Left-Hand Interlock Top Cover SP 144-198 SP 144-198 Right-Hand Cover SP 144-194 SP 144-194 Left-Hand Cover SP 144-149 SP 144-149 Top Pouch Guide SP 144-189 SP 144-188 Machine Foot SP 957-0000 SP 957-0000 Top Roller SP 144-026 SP 144-003 Top Pull Roller SP 144-055 SP 144-009 Heating Element SP 144-158 SP 144-157 Temperature Sensor SP 144-143 SP 144-137 Main Plug/Cable SP 144-211 SP 144-208 Nip (Control) Knob SP 144-195 SP 144-021 Sticker Knob SP 144-138 SP 144-138 Please contact your distributor or sales person for replacement parts. Technical Service: There are no end user serviceable parts in a ProSEAL Laminator! If the machine does not reach temperature or you do not get the results you desire, please call Technical Service (details on rear cover). Your laminator is covered by a Full One-Year Warranty as described in this manual. SEAL ® Graphics has a fixed Fee Service Policy. A copy may be obtained by contacting Technical Service. 15 GLOSSARY OF TERMS Cleaning Board: Mounting Board: Boards specifically designed to attract and capture any adhesive that may be clinging to the rollers. An adhesive-coated board for mounting images. Nip: Cold Mode: Heat is Off The spot where the top and bottom rollers meet Cover Sheet: Out-Feed: Release paper to be placed on the surface of mounting boards. The side of the laminator from which completed images emerge Control Knob: Pouch Board: Turns on the power, heat and rollers. Also, adjusts height of the rollers. An adhesive-coated board with an over laminate. Flashing Temperature Light: Pre-Coating: The machine is too hot. The process of coating a substrate with an adhesive mounting film onto which an image can be mounted. Film: Pressure-Sensitive Films: A synonym for laminate. The material used in the laminating and encapsulating process. Films with an adhesive that is activated when pressure is applied, forming a bond between the protective laminate and the surface of the image. Used primarily for fast mounting applications and recommended for heatsensitive thermal and photographic prints. Flexible Pouch: Plastic Film Pouch Heat-Activated Films: Films with an adhesive that is activated when heat is applied. Once applied to an image the adhesive forms a strong bond adhering the laminate and the image together. Release Liner: Hot Mode: Heat is On Roller Height: Laminator: The amount of space between the rollers to compensate the board’s thickness. The backing on a pressure-sensitive film or mounting adhesive. After peeling the release liner off, the adhesive layer becomes exposed. A machine that mounts and laminates images. Sled: LED: Light Emitting Diode 16 A 3/16” (5mm) board to place flexible pouches on while laminating. PROCESS APPLICATION NOTES ________________________________________ _______________________________________ ________________________________________ _______________________________________ ________________________________________ _______________________________________ ________________________________________ _______________________________________ ________________________________________ _______________________________________ ________________________________________ _______________________________________ ________________________________________ _______________________________________ ________________________________________ _______________________________________ ________________________________________ _______________________________________ ________________________________________ _______________________________________ ________________________________________ _______________________________________ ________________________________________ _______________________________________ ________________________________________ _______________________________________ ________________________________________ _______________________________________ ________________________________________ _______________________________________ ________________________________________ _______________________________________ ________________________________________ _______________________________________ ________________________________________ _______________________________________ ________________________________________ _______________________________________ ________________________________________ _______________________________________ ________________________________________ _______________________________________ ________________________________________ _______________________________________ ________________________________________ _______________________________________ ________________________________________ _______________________________________ 17 TECHNICAL SPECIFICATIONS Mechanical Height 12” (305 mm) 12” (305 mm) Overall Width 40” (1016 mm) 58” (1473 mm) Depth 15” (380 mm) 15” (380 mm) Net Weight 77 lbs. (35 kg) 154 lbs. (70 kg) Shipping Weight 90 lbs. (41 kg) 172 lbs. (78 kg) Maximum Working Width 25” (635 mm) 44” (1120 mm) Process Speed 1 ft/min (305 mm/min) 1 ft/min (305 mm/min) Roller Line Pressure 1 N/mm 0.8 N/mm Process Temperature 311-320°F (155-160°C) 311-320°F (155-160°C) Nip Settings 0 0 Process (closed nip) (closed nip) 1/16" (1.5mm) 1/16" (1.5mm) 1/8" (3mm) 1/8" (3mm) 3/16" (5mm) 3/16" (5mm) 1/4" (6mm) 1/4" (6mm) U.S. version 110 VAC / 60 Hz / 12A 110 VAC / 60 Hz / 16A EU version 230 VAC / 50 Hz / 7A 230 VAC / 50 Hz / 9A U.S. version 60766 60824 EU version 60794 60853 Electrical Order Codes Each SEAL ® Brands laminator has a Serial Number Label. This is located to the rear of the laminator. This label indicates the model type, the electrical requirements, and the laminator serial number (important for reference if any servicing is required). 18 LIMITED WARRANTY SEAL ® Graphics warrants to the original consumer purchaser that each new SEAL ® Image® Laminator, which proves defective in materials or workmanship within the applicable warranty period, will be repaired or, at our option, replaced without charge. Effective November 1st, 2002 the applicable warranty period for New Equipment shall be one year (parts), six months (labor and rollers) from date of purchase. This warranty extends to and is enforceable by only the original consumer purchaser, and only for the period (during the applicable term), which the product remains in the possession of the original consumer purchaser. "Original consumer purchaser" means the person who first purchased the product covered by this warranty other than for purpose of resale. This warranty does not apply if it is found that at any time the equipment has not been used for its intended purpose. Effective November 1st, 2002 the applicable warranty period for Refurbished Equipment shall be ninety days (parts and labor, excluding rollers). Rollers are not covered under warranty. The applicable warranty period for Demo Equipment shall vary, not exceeding the maximum warranty period stated herein. All Demo Equipment comes with a specific warranty, which will be stated at the time of purchase. If warranty period is not detailed in writing, there is no remaining warranty. Please ask your dealer, distributor, or sales representative for details. NOTE: Used and Not Refurbished Equipment is sold on an “AS IS” basis with No Warranty. For more information regarding this warranty, please contact your distributor. WARNING! Any unauthorized changes or modifications to this unit without our prior written approval will void the user’s warranty and will transfer health and safety obligations to the user. WARNING! Changes or modifications to this unit not expressly approved by the party responsible for compliance could void the user's authority to operate the equipment NOTE: This equipment has been tested and found to comply with the limits for a class A digital device, pursuant to part 15 of the FCC rules. These limits are designed to provide reasonable protection against harmful interference when the equipment is operated in a commercial environment. This equipment generates uses and can radiate radio frequency energy and, if not installed and used in accordance with Owner’s Manual, may cause harmful interference to radio communications. Operation of this equipment in a residential area is likely to cause harmful interference in which case the user will be required to correct the interference at their own expense. ©Copyright SEAL ® Graphics 2002 All rights are reserved. No part of the document may be photocopied, reproduced, or translated to another language without the prior written consent of SEAL Graphics. The information contained in this document is subject to change without notice and should not be construed as a commitment by SEAL Graphics. SEAL Graphics assumes no responsibility for any errors that may appear in this document. Nor does it make expressed or implied warranty of any kind with regard to this material, including, but not limited to, the implied warranties of merchantability and fitness for a particular purpose. SEAL Graphics shall not be liable for incidental or consequential damages in connection with, or arising out of the furnishing, performance, or use of this document and the program material, which it describes. Trademarks Credits SEAL ® is a registered trademark of SEAL Graphics. Image® is a registered trademark of SEAL Graphics. AquaSEAL ® is a registered trademark of SEAL Graphics. ProSEAL ® is a registered trademark of SEAL Graphics. 19 ProSEAL ® C O N T A C T I N F O R M A T I O N NOTICE: Retain original machine packaging. Failure to return machines properly packed in oringinal packaging will impose a fifteen percent restocking fee plus costs to repair shipping damage. For service or return authorization call Seal Brands Technical Service. SEAL BRANDS TECHNICAL SERVICE SEAL BRANDS TECHNICAL SERVICE – EUROPE AND ASIA PACIFIC (For technical assistance & service) (For technical assistance & service) Tel: 1-800-486-6502 For UK: Tel: +44 1268 722 400 Fax: 1-800-966-4554 Fax: +44 1268 729 442 or +44 870 125 5798 For NL: Tel: +31 572 345 500 Fax: +31 572 345 501 SEAL BRANDS CUSTOMER SERVICE SEAL BRANDS CUSTOMER SERVICE – EUROPE AND ASIA PACIFIC (For information and placing orders) (For information and placing orders) Tel: 1-800-257-7325 Tel: +31 572 345 500 Fax: 1-800-966-4554 Fax: +31 572 345 501 Specifications subject to change without notice. Seal Graphics Americas Corporation 7091 Troy Hill Drive Elkridge, MD 21075 Tel: 410-379-5400 Fax: 410-579-8960 Seal Graphics Canada 1601 Matheson Blvd. E. Unit #4 Mississauga, Ontario Canada, L4W 1H9 Tel: 905-212-9232 Fax: 905-212-9313 Seal Graphics U.K. Ltd Unit 1, 1 Watkins Close Burnt Mills Industrial Estate Basildon, Essex SS13 1BJ United Kingdom Tel: +44 1268 722 400 Fax: +44 1268 729 442 www.sealbrands.com © 2002 SEAL Graphics SEAL and IMAGE are registered trademarks of SEAL Graphics Part #OMProSEAL-E REV. C (11/02) 20 Seal Graphics Europe BV Kanaaldijk O.Z.3 P.O. Box 29, 8100 AA Raalte The Netherlands Tel: +31 572 345 500 Fax: +31 572 345 501 Seal Graphics Pacific Limited Unit A, 13th Floor, Block 1 Leader Industrial Centre Tsuen Wan, New Territories, Hong Kong Tel: +852 2407 3738 Fax: +852 2408 0973