1
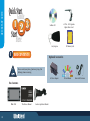
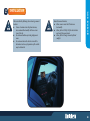
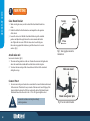
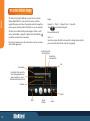
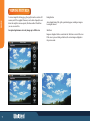
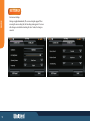
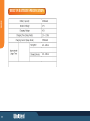
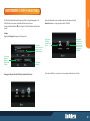
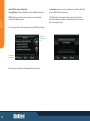
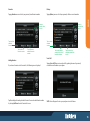
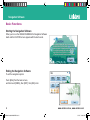
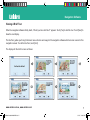
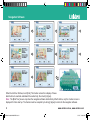
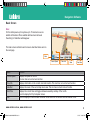
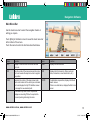
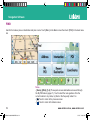
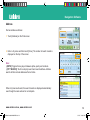
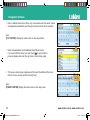
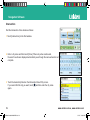
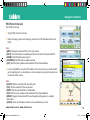
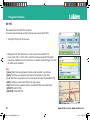
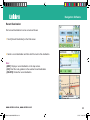
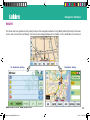
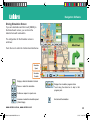
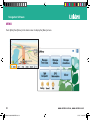
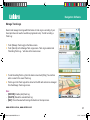
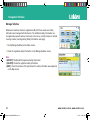
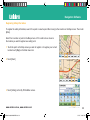
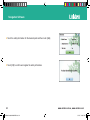
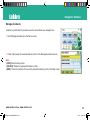
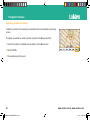
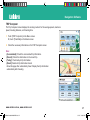
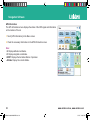
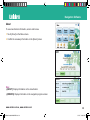
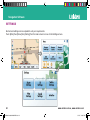
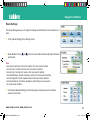
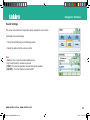
Owner's Manual for the
GNS8431
and
GNS8436
In Car Navigation System
OWNER’S MANUAL
When used correctly, the GNS8431/8436 enhances
your driving experience. The voice and map
information in the GNS8431/8436 cannot be
guaranteed accurate as road layout may change.
Always follow the posted road signs and traffic laws.
The Global Positioning System is operated and
maintained by the US Government. The US
Government is completely responsible for the
accuracy of the Global Positioning System.
Do not mount the GNS8431/8436 in a position which
may obstruct the driver's view or prevent the safe
operation of the vehicle.
The US Government reserves the right to make
changes to the Global Positioning System in
accordance with the Department of Defence civil GPS
user policy and the Federal Radio navigation plan.
These changes along with poor satellite geometry
could cause inaccurate readings.
Do not mount the GNS8431/8436 in a position within
an air bag field of deployment.
GPS signal reception can be affected by the location
of satellites, tall buildings, tunnels, bridges, etc. If the
GNS8431/8436 is not receiving a signal, you will
need to change your location until a signal is
received.
WARNINGS
WARNINGS & NOTIFICATIONS
i
QUICKSTART GUIDE
Quick Start
Guide
1
3
2
StartHere
Software CD
+12V to +24V Cigarette
Lighter Power Cord
Carrying Case
1 BOX CONTENTS
SD Memory Card
Optional Accessories
Please contact your place of purchase if any of the
following items are missing.
AC Power Adaptor
Box Contents
Main Unit
ii
This Owners Manual
Suction-Cup Mount Bracket
SD Card Reader
External GPS Antenna
Please consider the following when choosing a mount
location:
! Choose a location where the fixed antenna,
when extended horizontally will have a clear
view of the sky.
! Do not mount within any Airbag deployment
areas.
! Do not mount where the driver's view will be
obstructed or where safe operation of the vehicle
may be obstructed.
Ensure the mount location;
! Allows room to raise the GPS antenna
horizontally.
! Allows for the GNS8431/8436 to be slotted in
and out of the mount stand.
! Allows for the tilt angle to avoid reflected
sunlight.
QUICKSTART GUIDE
2 INSTALLATION
iii
i
QUICKSTART GUIDE
3 MOUNTING
Glass Mount Bracket
1. Make sure the glass area you wish to attach the Glass Mount Bracket to is
clean.
2. Double check that the final location does not impede the safe operation
of the vehicle.
3. Loosen the turn screw. Hold the Glass Mount Bracket up to the intended
position and adjust the angle between the suction mount and bracket
arm. Tighten the turn screw. With the release lever loose firmly press
the suction cup against the windscreen, push the release lever to secure
suction. (fig 1).
Attach main unit
Secure unit to bracket. (fig 2).
1. The main unit has guide slots at the rear. Position the main unit with guide slots
above the mount bracket stand and then slide it down to lock into place.
2. To release the main unit push the release button at the front of the stand and
sliding the unit up.
Connect Power
1. For convenience the power lead can be connected to the mount bracket stand instead
of the main unit. This allows for easy removal of the main unit. Insert DC plug of the
Cigarette Lighter Lead into the DC Power socket at the back of the Mount Bracket
Stand and connect the other end to the +12V to 24V Cigarette lighter socket.
.
Ensure the cord does not interfere with safe
vehicle operation
iv
Secure
Turn
screw
Press
Fig 1: Line up glass mount to
windscreen
Slide onto stand
Release
Button
Mount stand power jack
Fig 2: Secure unit to bracket
QUICKSTART GUIDE
4 POWER ON SCREEN
Turn the ignition on and GNS8431/8436 will power on.
The GNS8431/8436 is On when the buttons left and right of the screen are lit
with a blue LED backlight.
Press the POWER button at the left side of the GNS8431/8436 momentarily to
turn power On or Off.
The screen may be turned on or off by pressing
(GNS8431 model only).
When the GNS8431/8436 powers on for the first time you will be prompted to
view A Brief Tour. Please take the opportunity to view the brief tour as this
feature will not appear again whether you choose to view the brief tour or not.
This Quick Start Guide is now complete.
THIS OWNER’S MANUAL
The remainder of this OM describes the
GNS8431/8436 operating functions and other (non
navigation) applications which can be performed.
NAVIGATION MANUAL
The Uniden Navigation software is loaded onto the
supplied SD card. A separate manual is supplied with
instructions to use the Uniden Navigation software.
vii
CONTENTS
CONTENTS
Contents..................................................................................................................1
Features...................................................................................................................1
Controls & Views.......................................................................................................2
Using the Touchscreen.............................................................................................3
Care & Maintenance.................................................................................................3
Main Menu............................................................................................................4
Playing Music Files....................................................................................5
Playing Movie Files....................................................................................6
Viewing Pictures........................................................................................7
Game........................................................................................................8
Settings.....................................................................................................9
Built-In Battery Specification....................................................................11
Bluetooth (GNS8436 Model Only).............................................................12
Pairing Your Phone with the GNS8436....................................... 12
Making a Bluetooth Call............................................................. 15
Answering a Bluetooth Call......................................................... 17
Future Software Improvements.............................................................................18
CD Contents.............................................................................................18
Troubleshooting.....................................................................................................19
Warranty................................................................................................................20
FEATURES
Car Navigation
! Navigate to pre-programmed State/City locations
! Navigate to street address
! Navigate to over 500,000 pre-installed points of interest (POI)
! Mark often used destinations as My POI
! Dynamic voice and visual guidance: Constant route verification and
!
re-calculation with turn by turn instructions
Road Map
Speed and Safety Warning System
! Receive audio and visual warnings when you approach:
Fixed Speed camera
Red Light camera
Moving speed alerts
Other Great Features
! 4.3 inch Widescreen High Definition Non reflective LCD Screen
! Touchscreen
! Intuitive technology
! Built in GPS antenna
! 400MHz processor SIRF III GPS
! Bluetooth capability for hands-free Mobile phone use
(GNS8436 model only)
Updateable Software* for;
Operation
Map data
* Yearly map updates are licensed from a third party and a license fee is
required for future map updates. For the latest update information please
visit the webpage for your GNS model at www.uniden.com.au (Australian
model) or www.uniden.co.nz (New Zealand model).
11
13
3
2
4
R
WE
PO
1
14
LEFT SIDE
FRONT
6
8
9
10 12
11
BACK
RIGHT SIDE
5
1
2
7
OPERATION
CONTROLS & VIEWS
3&4
5
6
7
8
9
10
11
12
13
14
Main Menu Button
Screen On/Off Button
(Bluetooth Button - for GNS8436 model only)
Map Zoom In/Out
SD Card Slot
GPS Antenna
Mount Bracket Slots
External GPS Antenna Jack
Speaker
Audio-Out Jack
Power Jack
USB Jack
Power ON/OFF Button
Volume Control
BOTTOM
2
OPERATION
USING THE TOUCHSCREEN
The GNS8361/8436 is designed to respond to touchscreen input. Momentarily
touch the screen with the tip of your finger when making a selection (fig 3).
Avoid applying excessive pressure to the screen or holding a finger for more
than a moment (fig 4).
CARE & MAINTENANCE
Please take the following steps to ensure your GNS8431/8436 is looked
after.
!
Always transport and store the GNS8431/8436 using the carry case.
+
Do not use sharp objects which may scratch or damage
the screen.
!
Keep the GNS8431/8436 free from dust by regularly cleaning the
screen with an LCD cleaner.
Fig 3
Take measures to reduce the risk of theft by covering the unit or remove
the unit from your dash when not in use.
!
Do not leave unattended in direct
sunlight for extended periods.
!
Avoid any moisture contact.
Fig 4
3
The Main Menu facility gives you access to additional application modes.
Press M to access the Main Menu screen.
Multitasking two applications in the Main Menu is
available for the GNS8431 model only.
Using SD Cards
· The supplied SD memory card has the map file stored with room for
additional files. If the supplied SD memory card is short of capacity for new
files do not delete the map file to increase capacity. Purchase another SD
card then you can save more files. If the map file is deleted, the navigation
function will not perform properly.
·
Multitasking is disabled for the GNS8436 to accommodate
the Bluetooth facility. To access the Main Menu when
running the Navigation software press M to go to the
Navigation main screen and then close and exit the
Navigation software.
MODE
MAIN MENU
Total number of files on SD card: Up to 9999 files for each application can
be read. Note that performance may decrease if more than 200 files are
read.
Running more than one mode (GNS8431 model only)
To perform multitasking (for example, navigation plus audio playback).
1
Select an application in the main menu (Navi, Music…) to get on.
2
Press M to come back on main menu. The available applications
will have coloured icons, those which are not available are in grey color.
3
Select an available application: applications are working simultaneously.
Turning the screen off temporarily (GNS8431 model only)
This function is used to turn the LCD screen off temporarily without ending the
current program.
1 Press
briefly; The LCD is turned off to prevent dazzle at night or to save
power. The current program continues to be executed even though nothing
appears on the screen, voice alerts and instructions are still heard. Press
again to display the screen.
4
MODE
PLAYING MUSIC FILES
The GNS8431/8436 will play MP3 and wav music files (converted for
Windows Mobile(WIN CE)) saved onto the SD memory card. If the
Mode
supplied SD memory card is short of capacity do not delete the
map file to
increase capacity. Purchase another SD card then you can save more files.
Repeat
The Music Screen with the last file played is displayed. If there is no SD
memory card installed, a sample file is played. Touch the End Button
to end Music and return to the main menu.
Previous/Next Music File
If you press the main menu key, the music continues and you can choose
other available applications.
Repeat All --> Play All --> Repeat 1 Track --> Repeat All ...
Touch
to select the desired option
Zoom -/+:
Select the next music file while the last music file is being played or select the
previous music file while the first music file is being played.
Current Playing Time/
Total Playing Time
Current Status
Play/Pause/Stop
End
Previous Music
Current Music: If the name of the
music file being played does not
appear completely in one line,
the file name flows from right to left.
Next Music
Playlist
Mute
5
Repeat
Activated
Repeat
When a movie file (avi file converted for Windows Mobile (WIN CE)) exists in the
SD memory card that is inserted into the device, it automatically searches and
shows both the file list and the movie start screen.
MODE
PLAYING MOVIE FILES
If the supplied SD memory card is short of capacity do not delete the map file to
increase capacity. Purchase another SD card then you can save more files.
Full screen is optimized to the movie size of 480 x 272.
Control Bar/Button
6
MODE
VIEWING PICTURES
To view an image file, the bmp, jpeg, gif or png file must be saved in a SD
memory card. If the supplied SD memory card is short of capacity do not
delete the map file to increase capacity. Purchase another SD card then
you can save more files.
Enlarge/Reduce
For optimal performance view only images up to 1MB in size.
Slide Show
Arrow-shaped buttons (left, right, up and down) appear, enabling an image to
be enlarged/reduced.
Images are displayed at three second intervals. Slide show occurs in full screen.
If the screen is pressed during a slide show, the current image is displayed in
the previous mode
7
GAME
This is a simple pairs game where you pair 2 cards with the same picture from among 32
different picture cards.
MODE
PAIRS GAME
Once you start the game, the preview mode will display all the cards for 5 seconds before
starting actual game. The initial card selected will be reversed and the game time will begin.
Once your game time is over, you can start new game by pressing the "New Game" button.
Score
. Each single failure of a card pairing will deduct 10 points from your score.
. Each single success of a card pairing will add 100 points to your score.
Once your game time is over, the below screen will be pop-up. You can start new game by
pressing "Play again" button.
8
SETTINGS
MODE
Environment Settings
9
Settings are applied immediately. The screen setting tabs appear. When
accessing the screen setting tab, the last setting status appears. If a screen
with changes is exited without touching the ‘Save’ button, the change is
canceled.
MODE
Setting Options
Calibrate
(Screen)
Opening
Screen
Setting
Auto
Booting
ON
Boot up automatically
with ignition ON
Navigation
10
MODE
BUILT IN BATTERY SPECIFICATION
2100mAH
1050mAH
4.0 - 4.5hrs
3.0 - 3.5hrs
11
BLUETOOTH (GNS8436 Model Only)
Ensure that Bluetooth is active and discoverable on your phone and tap the
Hands Free button to set up your phone with the GNS8436
MODE
The GNS8436 includes Bluetooth® connectivity. With its integrated microphone, the
GNS8436 allows you to answer and make calls from the touch screen.
Pressing the Bluetooth button on the front of the GNS8436 launches the Bluetooth
system.
Settings
Tapping the Settings button opens the Settings Screen.
Shows the
current name and
address of your
GNS8436 device
Tap to toggle
between
Bluetooth
“Enable” and
“Disable”
Pairing your Phone with the GNS8436 as a Hands Free Device
Tap to have
GNS8436
connect to your
phone
Tap to allow
GNS8436 to be
found by your
phone. You will
use your phone
to connect to
GNS8436.
Tap to reset
Bluetooth
If you choose Add Device, you may have to set your phone to allow devices to find it.
12
MODE
Using GNS8436 to Connect to Your Phone
Tapping Add Device will cause the GNS8436 to search for available Bluetooth devices.
Tap Touch pad to open the on-screen key board and enter your PIN code. The default
pin code is 0000. Tap OK to record your entry.
NOTE: During this process, please watch your phone screen for any additional
response that the phone may require.
The GNS8436 will pair with your phone. You may need to enter the PIN code or
perform other functions on your phone to complete the pairing. Please watch your
phone screen during this process.
Select your phone from the list and tap Connect to connect the GNS8436 to your phone.
Select your
phone from the
list
Tap to connect
to your phone
When connection is successful, you will be prompted to enter your PIN code.
13
Tapping Find Me will cause the
GNS8436 to enter "discoverable
mode," allowing other Bluetooth
devices to connect to it.
You may pair your phone with the GNS8436 as a headset by tapping the Headset
button from the Main Menu. This method of connecting the GNS8436 to your phone is
useful only if there has been difficulty connecting the GNS8436 as a hands free device.
When you pair the GNS8436 and your phone this way, the GNS8436 allows you to
answer calls only. You cannot initiate calls using the GNS8436 in headset mode.
MODE
Pairing your Phone with the GNS8436 as a Headset
Using your Phone to Connect to GNS8436
You can now use your device to pair with the GNS8436. Once you enter the PIN number
on your phone, the GNS8436 will ask that you verify the PIN.
Tap Touch pad to open the on-screen key board and enter your PIN code. The default
pin code is 000. Tap OK to record your entry.
14
MODE
Managing Bluetooth Devices
Making a Bluetooth Call
You may have multiple phones set up for connection with your GNS8436.
You can add and remove phones from your list and disconnect and connect to different
phones using the List Screen. If you have phones already paired to the GNS8436, but
have none of them currently connected, the following screen appears when you select
Hands Free from the Main Menu.
Select the Hands Free button from the Bluetooth menu to place a call using a
currently connected device.
Currently
selected device
Tap to connect
to the currently
selected device
Tap to put
GNS8436 in
“Discoverable
Mode” allowing
Bluetooth
devices to find it
Tap to display
the device list
screen
This screen allows you to connect to a device, add devices, and remove devices.
Select a device
to connect to or
remove from the
list
15
Tap to access
previously
stored favourite
nuambers
Tap to select
recent call history
and select a
number to call
Tap to make a
voice call (voice
calling must be
enabled on the
phone)
Touch Call-Tapping Touch Call opens the keypad
Device List Screen
Tap to
connect
to the
selected
device
Tap to open the
number keypad
and dial the call
Tap to add a
device
Tap to remove
the selected
device
Numbers
appear here
as you tap
the keys
Tap to
backspace
a character
Tap the keys for the number you wish to call and then tap Call to initiate the call.
History
Tapping Favorites accesses a list of your previously stored favorite numbers
Tapping History accesses a list of your previously called or received numbers.
Select a
number from
the list
Tap to call the
selected
favourite
Select a
number from
the list
MODE
Favorites
Tap to call the
selected
number
Tap to add a
favourite number
Tap to remove a
selected favourite
number
Adding Favorites
Tap to add selected
number to your list of
favourite numbers
Tap to remove the
selected number from
the list
Voice Call
If you have no Favorites on the Favorites list, the following screen is displayed.
Tapping Voice Call allows you to make a call by speaking the name of a previously
recorded voice call number on your phone.
Tap Yes to display the touch pad to add a Favorite. You can also add a favorite number
by selecting Add Favor. from the Favorites list screen.
NOTE: Voice calling must be set up on your phone to use this feature.
16
MODE
Answering a Bluetooth Call
When a call is received by a paired phone, the GNS8436 will display the Incoming Call
screen which shows the number calling. In case the number is unknown, it will display
"Absent".
In-call Options
During a call, you may press the Bluetooth button on the front case of the GNS8436 to
open the screen of the in-call options.
Tap on this
button to send
DTMF
Tap on this
button to move
the call from
GNS8436 to
your phone
Tap on this
button to open
the touch pad
and make a
new call
Tap on this
button to end
the call
When having 3-way
calling, you may
switch to other party
When having 3-way
calling, you may end the
current call and switch to
other party's call
When having 3-way calling,
except the current call, all
waiting calls will be ended
NOTE: Voice calling must be set up on your phone to use this feature.
17
The supplied SD memory card can be connected, with use of an SD card reader
(not supplied) to a PC for updating the navigation software or uploading media
files.
MODE
FUTURE SOFTWARE IMPROVEMENTS
The supplied CD disc contains a PDF copy of this owner's manual, the
GNS8431/8436 Navigation manual and a back up copy of the GNS8431/8436
Navigation software.
CD Contents:
1. User Guide
GNS8431/8436 Owner's Manual PDF
GNS8431/8436 Navigation manual PDF
2. GNS8431/8436 Navigation Program (MobileNavigator)
3. End User Licence Agreement
Minimum PC Requirements
Windows 98/ME/XP/Vista
From time to time the operation software may be updated. Please visit our
website for information on map releases and operation software updates.
For Australian model: www.uniden.com.au
For New Zealand model: www.uniden.co.nz
18
TROUBLESHOOTING
TROUBLESHOOTING
PROBLEM
No Display
SOLUTION
Make sure power supply is +12V
or +24V
! Check power connection.
!
Touchscreen not responding
!
!
No Sound
!
Check volume.
!
Make sure GPS antenna is
raised to a horizontal position.
Make sure the unit has a clear
view of the sky.
Searching For Satellites' still
showing.
19
Turn off power. Wait a moment
and turn back on.
Clean LCD with LCD cleaner.
Make sure you are only
momentarily touching screen.
!
PROBLEM
The unit powers on but does not
boot up.
SOLUTION
!
!
Check the power connection.
If unit has been exposed to hot
temperatures for long periods
turn off for a few minutes to
cool down.
UNIDEN GNS8431 and GNS8436 CAR NAVIGATION
Limited One Year Warranty
Please keep your sales docket as it provides evidence of
warranty.
Important: Evidence of original purchase is required for warranty
service.
Warrantor: Uniden Australia Pty Limited A.B.N. 58 001 865 498
Uniden New Zealand Limited
Warranty is only valid in the original country of purchase.
ELEMENT OF WARRANTY: Uniden warrants to the original retail
owner for the duration of this warranty, its GNS8431 and GNS8436
(herein after referred to as the Product), to be free from defects in
materials and craftsmanship with only the limitations or exclusions
set out below.
WARRANTY DURATION: This warranty to the original retail owner
only, shall terminate and be of no further effect ONE (1) year after
the date of original retail sale. This warranty will be deemed invalid if
the product is;
(A) Damaged or not maintained as reasonable and
necessary,
(B) Modified, altered or used as part of any conversion kits,
subassemblies, or any configurations not sold by Uniden,
(C) Improperly installed,
(D) Repaired by someone other than an authorized Uniden
Repair Agent for a defect or malfunction covered by this
warranty,
(E) Used in conjunction with any equipment or parts or as
part of a system not manufactured by Uniden, or
(F) Where the Serial Number label of the product has been
removed or damaged beyond recognition.
Warranty only valid in the country of original retail/sale.
PARTS COVERED: This warranty covers for one (1) year, the
Product and included accessories.
WARRANTY
WARRANTY
STATEMENT OF REMEDY: In the event that the Product does
not conform to this warranty at any time while this warranty is in
effect, the warrantor at its discretion, will repair the defect or
replace the Product and return it to you without charge for parts
or service. This warranty does not provide for reimbursement or
payment of incidental or consequential damages.
This EXPRESS WARRANTY is in addition to and does not in
any way affect your rights under the TRADE PRACTICES ACT
1974 (Cth) (Australia) or the CONSUMER GUARANTEES ACT
(New Zealand).
PROCEDURE FOR OBTAINING PERFORMANCE OR
WARRANTY: In the event that the product does not conform to
this warranty, the Product should be shipped or delivered,
freight pre-paid, with evidence of original purchase (e.g. a copy
of the sales docket), to the warrantor at:
UNIDEN AUSTRALIA PTY
LIMITED
Service Division
345 Princes Highway,
Rockdale, NSW 2216
Fax (02) 9599 3278
www.uniden.com.au
UNIDEN NEW ZEALAND
LIMITED
Service Division
150 Harris Road,
East Tamaki, Auckland
Fax (09) 274 4253
www.uniden.co.nz
20
THANK YOU FOR BUYING A UNIDEN PRODUCT.
© 2007 Uniden Australia Pty Limited. Uniden New Zealand Ltd. Printed in China
Navigation Manual for
GNS 8431 and GNS 8436
Car Navigation System
NAVIGATION MANUAL
GNS8431-8436 OM-COVERS.indd 1
5/11/07 3:28:21 PM
Navigation Software
www.uniden.com.au, www.uniden.co.nz
GNS8431-8436 OM-COVERS.indd 1
5/11/07 3:28:22 PM
Navigation Software
Navigation Software
Navigation Software User’s Manual
2
GNS8431-8436 OM-COVERS.indd 2
www.uniden.com.au,
www.uniden.co.nz
www.uniden.com.au
5/11/07 3:28:22 PM
Navigation Software
Table of Contents
Table of Contents
3
Warnings and Notifications
5
Basic Functions
Starting the Navigation System
Ending the Navigation System
Viewing a Brief Tour
Basic Screen
Main Menu Bar
FIND
Address
Intersection
POI(POI)
MY POI
Adding MY POI
Recent Destination
Coordinates
6
6
6
7
10
11
ROUTE
When no destination is not specified (Edit Route)
When a destination is specified
Driving Simulation Window
25
26
27
29
www.uniden.com.au, www.uniden.co.nz
GNS8431-8436 OM-COVERS.indd 3
12
13
16
19
20
21
23
24
5/11/07 3:28:22 PM
Navigation Software
MENU
Manage Track Logs
Manage Safeties
Registering the Safety Information
Manage Avoidance
Registering Avoidance Points
TRIP Computer
GPS Information
About
30
31
32
33
35
36
37
38
39
SETTINGS
Route Settings
UI Settings
Safety Settings
Map Settings
Volume Settings
Initialise
40
41
42
43
44
45
46
GNS8431-8436 OM-COVERS.indd 4
www.uniden.com.au, www.uniden.co.nz
5/11/07 3:28:22 PM
Navigation Software
Warnings and Notifications
Before using the Navigation software please read carefully the owner’s manual for the correct installation of the GNS8431/
GNS8436 car navigation unit.
!
Do not attempt to change the Navigation settings while driving.
Park the vehicle at a safe place before making changes to the Navigation settings.
For your safety the Safe Mode setting (page 43) is default ON which prevents changes from the touchscreen while the car is moving.
!
Road layouts change and the voice guidance and the route on the map may differ from the actual road layout.
Drive safely, observing actual road layout and traffic signals.
!
If the Navigation software guides you to a place where it is difficult to travel because of poor road conditions,
use another road to travel safely. The Navigation software will automatically recalculate the route if a different road is followed.
!
The Navigation software displays the moving speed as a navigation reference only. Always refer to the car’s speedometer for final guidance.
www.uniden.com.au, www.uniden.co.nz
GNS8431-8436 OM-COVERS.indd 5
5/11/07 3:28:23 PM
Navigation Software
Software
Navigation
Basic Functions
Basic Functions
Starting
the Navigation
Software
Starting
the Navigation
Software
When you turn on the GNS8431/GNS8436 the Navigation Software
you turn on the GNS8431/GNS8436 the Navigation Software
starts When
and the
CAUTION screen appears with the start sound.
starts and the start window appears with the start sound.
Ending the Navigation Software
Ending the Navigation Software
exitnavigation
the navigation
system:
To exitTothe
system:
TouchTouch
[Main][Main]
from menu
the basic
from screen,
the basic window,
and then
touch
[MENU],
then
[EXIT],
then
[OK]
in inturn.
and then touch [MENU], then
[EXIT],
then
[OK]
turn.
www.uniden.com.au, www.uniden.co.nz
6
GNS8431-8436 OM-COVERS.indd 6
www.uniden.co.nz
5/11/07 3:28:23 PM
Navigation Software
Viewing A Brief Tour
Navigation Software
the navigation
initially
“Would
WhenWhen
the navigation
software initiallysoftware
starts, “Would
you like astarts,
brief tour?”
appears.you
Touchlike
[Yes]ato brief
start thetour?”
tour. Touch [Next] to
appears.
Touch
[Yes]
to
start
the
tour.
Touch
[Next]
to
show
the
next
display.
show the next display.
The brief
tour guides you through the basic menu structure and usage for the navigation software which are also covered in this
The brief tour guides you through the basic menu structure and usage for the navigation software which are also covered in
navigation
manual. manual.
To end the
briefthe
tour,
touch
this navigation
To end
brief
tour, [End].
touch [End].
The displays for the brief tour are as follows:
The displays for the brief tour are as follows:
www.uniden.com.au, www.uniden.co.nz
GNS8431-8436
OM-COVERS.indd 7
www.uniden.co.nz
5/11/07
7 3:28:25 PM
Navigation Software
Software
Navigation
When the brief tour finishes, touch [End]. The Caution screen then displays. Please
When the brief tour finishes, touch [End]. The Caution screen then displays. Please
take the time to read and understanding the caution fully, then touch [I Agree].
take the time to read and understand the caution fully, then touch [I Agree].
The [Brief
is seen
when
navigation
softwarestarts
starts initially.
initially. After
After that
screen
is is
Note Note
: The :[Brief
Tour]Tour]
is seen
only only
when
the the
navigation
software
that time,
time,only
onlythe
theCaution
Caution
screen
displayed
for
future
start
up.
The
Caution
must
be
accepted
by
touching
[I
Agree]
to
enter
into
the
navigation
software.
displayed for future start up. The Caution must be accepted by touching [I Agree] to enter into the navigation software.
www.uniden.com.au, www.uniden.co.nz
8
GNS8431-8436 OM-COVERS.indd 8
www.uniden.co.nz
5/11/07 3:28:26 PM
Navigation Software
Basic Screen
Note:
For the initial power up it may take up to 15 minutes to secure
satellite information. When satellite data has been retrieved
‘Searching for Satellites’ will disappear.
The basic screen indicators and icons are described below and on
the next page.
Main
Current Speed
Drive Info.
Scale
Name
Function
Current speed
Displays the speed of the car.
This icon has no touch screen function.
Drive Info.
Displays information on the current road and location. This icon has no touch screen function.
Scale Bar
Displays the scale of the current map level view. This icon has no touch screen function.
Date/Time
Displays the current time and toggles between weekday and day of the month.
Touch to display the Trip Computer screen.
Main
Touch to display or hide the main menu bar at the bottom of the screen and the side bar icons.
Date/Time
www.uniden.com.au, www.uniden.co.nz
GNS8431-8436 OM-COVERS.indd 9
5/11/07 3:28:27 PM
Navigation Software
Basic Screen (Continued)
Touch anywhere on the map to show the side bar
icons ([Main] icon will change to [ ]).
Touch the screen icon to action the
functions described below.
Compas
Level
Control
Map’s Angle
Adjustment
Day/Night
Mode
Name
Function
Compass
The red point indicates North. Touch to change the map between NorthUp view and Heading-Up view.
Level Control
Touch to scale the map screen level (size).
Map’s Angle Adjustment Touch to adjust the angle of the 3D map view.
Day/Night Mode
Selects Day/Night mode.
Touch to go back to [Main] icon.
10
GNS8431-8436 OM-COVERS.indd 10
www.uniden.com.au, www.uniden.co.nz
5/11/07 3:28:28 PM
Navigation
NavigationSoftware
Software
MainMain
MenuMenu
Bar Bar
Touch
[Main]
in bar
the to
Basic
screen
reveal thefeature
main or
Use the
main
menu
select
the to
navigation
menu
bar.
setting you require.
Touch the name to action the functions described below.
Touch [Main] in the Basic screen to reveal the main menu bar
at the bottom of the screen.
Touch the name to action the functions described below.
Name
Main
MAP
MARK
POI
Function
Name
Function
Display or hide the main menu
bar and side
MENU Name Displays the Menu screen.
Name
Function
Function
bar icons.
Main
Displays or hides the main menu bar.
MENU
Displays the Menu screen.
Sets the centre of the map screen as the route FIND
Displays the Find screen to find a route (adSets thethe
centre
of thebar
map
screen as the
point and reveals
map menu
to register
dress,
intersection,
destination,
Displays
the recent
Find screen
to etc.).
find a route
MAP
FIND
route
point
and
reveals
the
map
menu bar
the position.
(address, intersection, recent destination, etc.).
to register the position.
Registers the centre of the map screen (also
ROUTE
If a destination is specified, displays the Route
the currentRegisters
location of
the
vehicle)
as
a
marked
Search
If a screen.
destination is specified, displays the Route
the centre of the map screen as
point and displays
the
My
POI
Addition
screen
If
there
is
noscreen.
destination, displays the Edit route
Search
a marked point and displays the My POI
MARK
ROUTEscreen.
to manageAddition
the new marked
point.
screen to manage the new
If there is no destination, displays the Edit route
Is activated
only when
marked
point.a route is specified.
screen.
Displays surrounding POI such as petrol staIs activated
only when
a route is specified.
tions and parking
lots along
the route.
POI
Displays the surrounding POI such as petrol stations and parking lots nearby the route.
www.uniden.com.au, www.uniden.co.nz
www.uniden.co.nz
GNS8431-8436 OM-COVERS.indd 11
11
11
5/11/07 3:28:29 PM
Navigation Software
Navigation Software
FIND
FIND
Use Find to locate a place or destination and plan a route. Touch [Main] on the basic screen then touch [FIND] in the menu
Use Find
bar.. to locate a place or destination and plan a route. Touch [Main] on the Basic screen then touch [FIND] in the main menu
bar.
12
www.uniden.co.nz
GNS8431-8436 OM-COVERS.indd 12
Note:
Note:
- [Home], [Work], [1~4]: These quick access destinations are saved through [Home]:
Start the (page
route guidance
from the
location
to guidance
my Home. from the the -My
POI feature
21). Touch
to current
start the
route
current
location
Home,
myfrom
Work
the location
frequently
- [Work]:
Start to
themy
route
guidance
the or
current
to myvisited
place of1~4.
work.
- [ ]: Touch to return to the previous screen.
Start
routetoguidance
to the
points registered as frequently visited
- [ -]:[1~4]:
Touch
to the
return
the Basic
screen.
places.
23
www.uniden.com.au, www.uniden.co.nz
5/11/07 3:28:30 PM
Navigation Software
Navigation Software
Address
Address
Find an address as follows:
Find an address as follows:
1. Touch
[Address]
on Find
the Find
screen.
1. Touch
[Address]
on the
screen.
2. Enter a city name and then touch [Done]. The number of search results is
2. Enter a city name and then touch [Done]. The number of search results is
displayed on the top of the screen.
?|
displayed on the top of the Find screen.
Note:
- [KEYS]: Toggles the key layout between alpha, qwerty and numbers.
- [CITY SEARCH]: Touch to skip city search and search address. Address
search will then include addresses from all cities.
When only few results exist, the search results are displayed automatically
even though the input is not complete.
WhenNote:
only few results exist, the search results are displayed automatically
even though
name
entered
not complete.
- [Keys]: the
Toggles
the key
layout is
between
alpha, qwerty and numbers.
?|
www.uniden.com.au, www.uniden.co.nz
24
GNS8431-8436 OM-COVERS.indd 13
13
www.uniden.co.nz
5/11/07 3:28:31 PM
Navigation Software
4. Enter a desired street name. When only a few results exist, the search results
are displayed automatically even though the name entered is not complete.
Note:
[CITY CENTRE]: Display the urban centre on the map window.
5. Select a desired street on the Address Result Street screen.
If you cannot find the street you want, touch [ ] to go back to the
previous displays and enter the city name or street name again.
6. The house number range is displayed at the top of the Address HN screen.
Enter the house number and then touch [Done].
Note :
[STREET CENTRE]: Display the street center on the map screen.
14
GNS8431-8436 OM-COVERS.indd 14
www.uniden.com.au, www.uniden.co.nz
5/11/07 3:28:32 PM
Navigation Software
7. Navigation Software
The address location is shown on the map screen.
7. The address location is shown on the map screen.
to begin
route
guidancefrom
from your
location.
TouchTouch
[GO] [GO]
to begin
route
guidance
yourcurrent
current
location.
Or,
you
can
set
the
location
as
the
starting
point
or
as
a
destination,
mark or
avoidance,
Or, you can set the location as the starting point or asvia,
a via,
destination,
mark
or
by
using
the
menu
bar
at
the
bottom
of
the
map
screen.
avoidance, by using the menu bar at the bottom of the map screen.
:
Note Note
:
- [START]: Set the searched address as a start point.
- [START]: Set the searched address as a start point.
- [VIA]: Set the searched address as a via-point.
- [VIA]:
Set the searched address as a via-point.
- [DEST]: Set the searched address as a destination.
- [DEST]:
Set the searched address as a destination.
- [GO]: Start the route guidance with searched address as the destination.
- [GO]:
Start the route guidance with searched address as the destination.
- [MARK]: Register the searched point as a frequently visiting place or as safety information.
- [MARK]: Register the searched point as a frequently visiting place or as safety information.
- [AVOID]: Set as Avoidance.
- [AVOID]: Set as Avoidance.
www.uniden.com.au, www.uniden.co.nz
26
GNS8431-8436 OM-COVERS.indd 15
15
www.uniden.co.nz
5/11/07 3:28:32 PM
Navigation Software
Navigation Software
Intersection
Intersection
Find the intersection of two streets as follows:
Find the intersection of two streets as follows:
1. [Intersection]
Touch [Intersection]
the window.
Find window.
1. Touch
on theonFind
2. Enter an intersection name and then touch [Done]. When only a few results exist,
2. Enter a city name and then touch [Done]. When only a few results exist,
the search results are displayed automatically even though the input is not complete.
the search
results are displayed automatically even though the name entered is not
complete.
?|
3. Touch the desired city listed on the Intersection Result City screen.
you
cannotcity
findlisted
the city
touch [Back]
and
then
enter the city name
3. Touch Ifthe
desired
onyou
the want,
Intersection
Result
City
screen.
Again. find the city you want, touch [ ] and then enter the city name
If you cannot
again.
16
?|
www.uniden.com.au, www.uniden.co.nz
www.uniden.co.nz
GNS8431-8436 OM-COVERS.indd 16
27
5/11/07 3:28:34 PM
Navigation Software
Navigation Software
4. Enter a desired street name. When only few results exist, the search results are
4. Enterautomatically
a desired street
name.
When
few entered
results exist,
search results are
displayed
even
though
theonly
name
is notthe
complete.
displayed automatically even though the input is not complete.
Note Note
:
:
[CITY CENTRE]: Display the urban centre on the map window.
CITY CENTRE: Display the urban centre on the map window.
5. Touch
the desired
streetstreet
listedlisted
on the
Result
Street
5. Touch
the desired
on Intersection
the Intersection
Result
Streetscreen.
screen.
]
If you cannot
find
the
street
you
want,
touch
[
If you cannot find the street you want, touch [Back]
and then
namename
again.
andenter
then the
enterstreet
the street
again.
6. Touch
the intersection
your want from the listed streets.
6. Touch
the intersection your want from the listed streets.
www.uniden.com.au, www.uniden.co.nz
28
GNS8431-8436 OM-COVERS.indd 17
17
www.uniden.co.nz
5/11/07 3:28:34 PM
Navigation Software
Navigation Software
The intersection
location
shownon
on the
the map
7. The7.intersection
location
is is
shown
mapscreen.
screen.
to begin
route
guidancefrom
from your
location.
TouchTouch
[GO] [GO]
to begin
route
guidance
yourcurrent
current
location.
Or,
you
can
set
the
location
as
the
starting
point
or
as
a
destination,
mark or
avoidance,
Or, you can set the location as the starting point or asvia,
a via,
destination,
mark
or
by
using
the
menu
bar
at
the
bottom
of
the
map
screen.
avoidance, by using the menu bar at the bottom of the map screen.
:
Note Note
:
[
START]: Set the searched intersection as a start point.
- [START]: Set the searched intersection as a start point.
- [VIA]: Set the searched intersection as a via-point.
- [VIA]:
Set the searched intersection as a via-point.
- [DEST]: Set the searched intersection as a destination.
- [DEST]:
Set the searched intersection as a destination.
- [GO]: Start the route guidance with searched intersection as the destination.
- [GO]:
Start the route guidance with searched intersection as the destination.
- [MARK]: Register the searched intersection as a frequently visiting place or as safety information.
- [MARK]: Register the searched intersection as a frequently visiting place or as safety information.
- [AVOID]: Set as Avoidance.
- [AVOID]: Set as Avoidance.
18
www.uniden.com.au, www.uniden.co.nz
www.uniden.co.nz
GNS8431-8436 OM-COVERS.indd 18
29
5/11/07 3:28:35 PM
Navigation Software
Navigation Software
POI (Point
of Interest)
POI (Point
of Interest)
Find a POI as follows:
The Find a POI as follows:
1. Touch [POI] on the Find screen.
1. Touch [POI] on the Find screen.
2. Select
category
and/or sub-category and search a POI destination then touch
1. aSelect
a category and/or sub-category and search a POI destination then touch [GO].
[GO].
Note :
Note : - [MAP]: Display the searched POI on the map screen.
- [MAP]:
Display the searched POI on the map screen.
- [Info]: Check information on address and phone number for the searched POI.
- [INFO]:
CheckFind
information
on address
- [NAME]:
POI with a name
search. and phone number for the searched POI.
- [NAME]:
Find
POI
with
a
name
search.
- [ADDRESS]: Find POI with an address
search.
- [ADDRESS]:
Find
POI
with
an
address
- [GO]: Start the route guidance with searchedsearch.
POI as the destination.
- [GO]: Start the route guidance with searched POI as the destination.
3. If you touch [MAP] to view the POI location on the map screen you can then set it as the
3. If you touch
[MAP]
view
the POImark
location
on the map
screen
you bar
canatthen
set it of
starting
point,tovia,
destination,
or avoidance
by using
the menu
the bottom
as the starting
point, via, destination, mark or avoidance by using the menu bar at
the screen.
the bottom of the screen.
?|
?|
Note :
Note : - [START]: Set the searched POI as a start point.
- [START]:
searched
as a start point.
- [VIA]:Set
Set the
the searched
POI POI
as a via-point.
- [VIA]:- Set
theSet
searched
POI
asasaa via-point.
[DEST]:
the searched
POI
destination.
- [DEST]:
SetStart
thethe
searched
POIwith
as searched
a destination.
- [GO]:
route guidance
POI as the destination.
- [GO]: -Start
theRegister
routethe
guidance
withassearched
asplace
theordestination.
[MARK]:
searched POI
a frequently POI
visiting
as safety information.
- [MARK]:
Register
searched POI as a frequently visiting place or as safety
- [AVOID]:
Set asthe
Avoidance.
information.
- [AVOID]: Set as an Avoidance location to be avoided during a route.
www.uniden.com.au, www.uniden.co.nz
30
GNS8431-8436 OM-COVERS.indd 19
19
www.uniden.co.nz
5/11/07 3:28:36 PM
Navigation Software
Navigation Software
MY POI
Find a destination from MY POI as follows:
MY POI
You can check and manage all points that you have saved as MY POI.
Find a destination from MY POI as follows:
You can check and manage all points that you have saved as MY POI.
1. Touch [MY POI] on the Find screen.
1. Touch [MY POI] on the Find screen.
2. Manage the MY POI information or start a route to selected MY POI.
Home, Work, POI 1, POI 2, POI 3 and POI 4 are fixed name MY POI which
2. Manage the MY POI information or start a route to selected MY POI.
cannot be modified but can be stored over or deleted and stored again. All other
MyNote
POIs
can be modified.
:
- [Home]: Start the route guidance from the current position to your Home.
Note -: [Work]: Start the route guidance from the current position to your Work.
- [Home]:
Start the route guidance from the current position to your Home.
- [1~4]: Start the route guidance to the points saved as frequently-visited MY POI.
- [Work]:
Start
the route guidance from the current position to your Work.
- [MAP]: Display a searched MY POI on the map screen.
- [1~4]:
Start
the
guidance
points
asdestination.
frequently-visited MY POI.
- [GO]: Start theroute
route guidance
withto
thethe
selected
MYsaved
POI as the
- [MAP]:
Display
a
searched
MY
POI
on
the
map
screen.
- [MODIFY]: Edit MY POI.
- [GO]:
Start theDelete
route
with the selected MY POI as the destination.
- [DELETE]:
MYguidance
POI.
- [MODIFY]: Edit MY POI.
- [DELETE]: Delete MY POI.
20
?|
www.uniden.com.au, www.uniden.co.nz
www.uniden.co.nz
GNS8431-8436 OM-COVERS.indd 20
31
5/11/07 3:28:38 PM
Navigation Software
Navigation Software
Adding MY POI
Adding MY POI
Frequently visited places can be saved as a MY POI. You can then set a destination easily from the MY POI list.
Frequently visited places can be saved as a MY POI. You can then set a destination easily from the MY POI list.
To add a MY POI, search a location first or select a location after moving on the Map screen. Then touch [Main].
To add a MY POI, search a location first or select a location after moving on the Map screen. Then touch [Main].
1. Touch
on Main
the Main
menu
1. Touch
[Mark][Mark]
on the
menu
bar.bar.
2. Touch [Group].
2. Touch [Group].
?|
3. Select a group to be added to MY POI and then touch [OK].
3. Select a group to be added to MY POI and then touch [OK].
?|
www.uniden.com.au,
www.uniden.co.nz
32
GNS8431-8436 OM-COVERS.indd 21
www.uniden.co.nz
21
5/11/07 3:28:39 PM
Navigation Software
Navigation Software
4. Select an icon to be assigned to the new MY POI and touch [SAVE].
4. Select an icon to be assigned to the new MY POI and touch [SAVE].
5. The registration of the new MY POI is completed.
5. The registration of the new MY POI is completed.
Note:Note:
The POIs
registered
to HOME,toWORK,
1, POI
4 can
selected
at the at
bottom
of theofFind
The POIs
to be registered
HOME, POI
WORK,
POI2,
1,POI
POI 32,and
POIPOI
3 and
POIbe
4 can
be selected
the bottom
the screen.
Find
screen.
22
www.uniden.com.au, www.uniden.co.nz
www.uniden.co.nz
GNS8431-8436 OM-COVERS.indd 22
33
5/11/07 3:28:39 PM
Navigation Software
Recent
Destination
Recent
Destination
Navigation Software
?|
Find a recent destination to set as a route as follows:
Find a recent destination to set as a route as follows:
1. Touch
[Recent
Destination]
on the
screen.
1. Touch
[Recent
Destination]
on Find
the Find
screen.
2. Select
a recent
destination
route
to this
destination.
2. Select
a recent
destination
and and
thenthen
startstart
thethe
route
to this
destination.
?|
Note :
Note -: [MAP]: Display a recent destination on the map screen.
- [MAP]:
Display
a recent
destination
on the map
- [GO]:
Start the
route guidance
to the selected
recent screen.
destination.
- [GO]:
Start
the
route
guidance
to
the
selected
recent
destination.
- [DELETE]: Delete the recent destination.
- [DELETE]: Delete the recent destination.
www.uniden.com.au, www.uniden.co.nz
34
GNS8431-8436 OM-COVERS.indd 23
23
www.uniden.co.nz
5/11/07 3:28:40 PM
Navigation Software
Navigation Software
Coordinates
Coordinates
Find a destination with coordinates as follows:
?|
Find a destination with coordinates as follows:
1. Touch [Coordinates] on the Find screen.
1. Touch [Coordinates] on the Find screen.
2. Enter the coordinates for latitude and longitude and then touch [GO].
Note :
2.
- [Longitude]:
Select longitude
Enter
the coordinates
for latitude
?|
and longitude and then touch [GO].
- [Latitude]: Select latitude
Note -: [MAP]: Display the coordinates position on the map screen.
- [Longitude]:
longitude
- [GO]: StartSelect
the route
guidance to the entered coordinates.
- [Latitude]:
Select
latitude
- [DELETE]: Delete the entered coordinate data one character at a time.
- [MAP]: Display the coordinates position on the map screen.
- [CLEAR]: Delete all coordinates entered.
- [GO]: Start the route guidance to the entered coordinates.
- [DELETE]: Delete the entered coordinate data one character at a time.
- [CLEAR]: Delete all coordinates entered.
24
www.uniden.com.au, www.uniden.co.nz
www.uniden.co.nz
GNS8431-8436 OM-COVERS.indd 24
35
5/11/07 3:28:42 PM
Navigation Software
ROUTE
The Route and route guidance is the primary feature of the navigation software. Touch [Main] and then [Route] on the basic
screen, and a route screen will display. The route screen displayed depends on whether or not a destination is currently set.
No Destination Setting
Destination Setting
? |
www.uniden.com.au, www.uniden.co.nz
GNS8431-8436 OM-COVERS.indd 25
25
5/11/07 3:28:43 PM
Navigation Software
Navigation Software
When
no destination
is specified
(Edit Route)
When
no destination
is specified
(Edit Route)
?|
no destination
is specified,
route
canbebecreated
createdas
asfollows:
follows:
WhenWhen
no destination
is specified,
thethe
route
can
1. Touch
the first
on the
screen.
1. Touch
the[ADD]
first [ADD]
onEdit
the Route
Edit Route
screen.
2. Specify your route (start point, via points and destination point)
2. Specify your route (start point, via points and destination point)
3. If the route setting is completed, select the [GO] button to start the route guidance.
3. If the route setting is completed, select the [GO] button to start the route guidance.
Note :
Note
: the route guidance according to the specified route.
- [GO]:
Start
- [GO]: Start Specify
the route the
guidance
the specified
route. for each section of
- [MULTIPLE]:
routeaccording
search tooptions
differently
[Start
Point - ViaSpecify
Point]the
and
[Via
Point
- Destination].
- [MULTIPLE]:
route
search
options
differently for each section of
- [OPTIMIZE]:
[Start Point -Optimize
Via Point] the
and specified
[Via Point - route.
Destination].
- [UP]: Move a via-point to the previous stage.
- [OPTIMIZE]: Optimize the specified route.
- [DONE]: Move a via-point to the next stage.
?|
- [UP]: Move a via-point to the previous stage.
- [DONE]: Move a via-point to the next stage.
26
www.uniden.com.au, www.uniden.co.nz
www.uniden.co.nz
GNS8431-8436 OM-COVERS.indd 26
37
5/11/07 3:28:44 PM
Navigation Software
Navigation Software
When a destination is specified
When
a destination is specified
a destination
is specified,
configurationofofthe
theroute
route search
search screen
WhenWhen
a destination
is specified,
thethe
configuration
screenisisas
asfollows:
follows:
1. Check
the overall
routeroute
through
a mini
map.
1. Check
the overall
through
a mini
map.
Note :
Note :
- Quickest: Search the quickest route and display its distance and estimated time.
- Quickest:
Search the quickest route and display its distance and estimated time.
- Shortest:
Search
theshortest
shortest route
display
its distance
and estimated
time.
- Shortest:
Search
the
routeand
and
display
its distance
and estimated
time.
Easiest:
Search
the
easiest
route
and
display
its
distance
and
estimated
time.
- Easiest: Search the easiest route and display its distance and estimated time.
- [GO]:
StartStart
thethe
route
according
to the
specified
- [GO]:
routeguidance
guidance according
to the
specified
route. route.
- [DELETE]:
Delete
specified.
- [DELETE]:
Deleteallallroutes
routes specified.
- [DEMO]:
Start a simulation of the specified route guidance.
- [DEMO]: Start a simulation of the specified route guidance.
- [EDIT]: Edit a route.
- [EDIT]: Edit a route.
- [DETOUR]: Avoid a turn or road.
- [DETOUR]:
Search
a detour.
- [CLOSE]:
Close
the route
search screen and display a map screen.
- [CLOSE]: Close the route search screen and display a map screen.
2. To avoid
turn ora road,
2. To asearch
detour,touch
touch[DETOUR].
[DETOUR].
www.uniden.com.au, www.uniden.co.nz
38
GNS8431-8436 OM-COVERS.indd 27
27
www.uniden.co.nz
5/11/07 3:28:45 PM
Navigation Software
3. For a guidance point you want to avoid, touch [Next Turn].
3. select
For a guidance
pointpoint
you to
want
avoid, touch
[Nexttouch
Turn].[DETOUR], the
If you
a guidance
be to
avoided
and then
route isIf re-searched,
excluding
thetocorresponding
you select a guidance
point
be avoided andpoint.
then touch [DETOUR], the
Navigation Software
?|
route is re-searched, excluding the corresponding point.
4. Touch
to select
roads
to avoided.
be avoided.
4. Touch
[Road][Road]
to select
majormajor
roads
to be
If you select
a roada be
avoided
and then
press
[DETOUR],
thethe
route
If you select
road
be avoided
and then
press
[DETOUR],
routeis is
re-searched,
excluding
the
corresponding
road.
re-searched, excluding the corresponding road.
?|
5. When the route setting is completed, touch [GO] to start the route guidance.
5. When the route setting is completed, touch [GO] to start the route guidance.
28
www.uniden.com.au, www.uniden.co.nz
www.uniden.co.nz
GNS8431-8436 OM-COVERS.indd 28
39
5/11/07 3:28:46 PM
Navigation Software
Driving Simulation Screen
If you set a destination and then touch [DEMO] on
the Route Search screen, you can check the
intended route with a simulation.
The configuration for the Simulation screen is
as follows:
Touch the icon to action the function described below.
Simulation
Speed
Simulation
Controller
Display or Hide the Simulation Controls.
Pause or restart the simulation.
Displays the simulation progress status.
Touch along the status bar to skip to that
progress point.
Continuous repeat or repeat once.
Increase or reduce the simulation speed.
(50km/h steps)
End and exit the simulation.
www.uniden.com.au, www.uniden.co.nz
12
GNS8431-8436 OM-COVERS.indd 29
29
www.uniden.co.nz
5/11/07 3:28:47 PM
Navigation Software
Navigation Software
MENU
MENU
TouchTouch
[Main][Main]
then then
[Menu]
on the
basic
screen
to to
display
[Menu]
on the
basic
screen
displaythe
the[Menu]
[Menu]screen.
screen.
30
www.uniden.com.au, www.uniden.co.nz
www.uniden.co.nz
GNS8431-8436 OM-COVERS.indd 30
13
5/11/07 3:28:48 PM
Navigation Software
Navigation Software
Manage
TrackTrack
Logs Logs
Manage
The menu is the function to store and manage a traveling route.
Record and manage track logs with this feature. A track log is a recording of your
Routes can be tracked and then stored as a log on the SD card for future
travel (and does not need to be within a programed route). To start recording a
To enable the storing and managing a traveled Routes (Track Logs):
Trackreference.
Log:
1. Touch [Manage Track Logs] on the Menu screen.
1. Touch
[Manage
TrackonLogs]
on the Menu
screen.
2. Touch
[Record]
the Manage
Track Logs
screen. Track log is enabled and
2. Touch "Recording
[Record] on
the
Manage
Track
Logs
Track log is enabled and
Track Log..." will show in the screen.
basic screen.
“Recording Track Log...” will show in the basic screen.
3. To save the current track log touch [Save] in the Manage Track Logs screen
before turning off the ignition. A new track log begins.
4. To disable Recording Track Log from the basic screen touch [Stop] then [No].
5. Track Logs in the Track logs will be stored on the SD card and can be managed
from the Manage Track Logs screen.
Note:
3. To end Recording Track Log from the basic screen touch [Stop]. You can then
[RECORD]: Enable (start) track log.
enter a name for the saved Track Log.
[SAVE]: When recording is enabled, save the current recording as a track log.
4. Track Logs in the Track logs will be stored on the SD card and can be managed
A new
track log
begins.
from the
Manage
Track
Logs screen.
-
[DELETE]: Delete the selected track log.
Note:[MAP]: Check the selected track log information on the map screen.
- [RECORD]: Enable (start) track log.
- [DELETE]: Delete the selected track log.
- [MAP]: Check the selected track log information on the map screen.
www.uniden.com.au, www.uniden.co.nz
14
GNS8431-8436 OM-COVERS.indd 31
31
www.uniden.co.nz
5/11/07 3:28:49 PM
Navigation Software
Navigation Software
Manage
Safeties
Manage
Safeties
The Marked locations can be saved as a safety point.
Safeties
locations
which
are registered
My saved
POI, then
saved as a Safety
To are
manage
the safety
information
which hasas
been
by a user:
information and managed with this feature. The additional safety information can
be registered
speedSafeties]
camera,menu
black
school
zone, red light camera or railroad
1. Touchas
[Manage
onspot,
the Menu
window.
crossing location (see Registering Safety Information next page).
2. Check the registered safety information on the Manage Safeties screen.
1. Touch [Manage Safeties] on the Menu screen.
Note:
2. Check
the registered
information
on the Manage Safeties screen.
- [MODIFY]:
Modify/edit safety
the registered
safety information.
- [DELETE]: Delete the registered safety information.
Note: - [MAP]: Check the location of the point where the safety information was registered on the Map screen.
- [MODIFY]: Modify/edit the registered safety information.
- [DELETE]: Delete the registered safety information.
- [MAP]: Check the location of the point where the safety information was registered
on the Map screen.
32
www.uniden.com.au, www.uniden.co.nz
www.uniden.co.nz
GNS8431-8436 OM-COVERS.indd 32
15
5/11/07 3:28:50 PM
Navigation Software
Navigation Software
Registering
Information
Registering
SafetySafety
Information
Register safety information as follows:
To register
the safety
information,
search
forfor
a point
to the
the location
locationononthe
theMap
Mapscreen.
screen.
Then touch
To register
the safety
information,
search
a pointororselect
selectaapoint
pointafter
after moving
moving to
Then
[Main].
touch [Main].
Search for a location or point on the Map screen or if it is safe to do so move to
Search for a location or point on the Map screen or if it is safe to do so move to
the location you wish to register as a safety point.
the location you wish to register as a safety point.
1. Touch the point on the Map screen you wish to register or to register your current
location
touchthe
[Map]
menu bar.
1. Touch
pointon
onthe
the Main
Map screen
you wish to register of to register your current
location touch [Map] on the Main menu bar.
2. Touch [Mark]
2. Touch [Mark]
3. Touch [Safety] on the My POI Addition screen.
3. Touch [Safety] on the My POI Addition screen.
www.uniden.com.au,
www.uniden.co.nz
16
GNS8431-8436 OM-COVERS.indd 33
www.uniden.co.nz
33
5/11/07 3:28:51 PM
Navigation Software
Navigation Software
4. Touch the safety information for the desired point and then touch [Add].
4. Touch the safety information for the desired point and then touch [Add].
5. Touch [OK] to confirm and register the safety information.
5. Touch [OK] to confirm and register the safety information.
34
www.uniden.com.au, www.uniden.co.nz
www.uniden.co.nz
GNS8431-8436 OM-COVERS.indd 34
17
5/11/07 3:28:51 PM
Navigation Software
Navigation Software
ManageManage
Avoidance
Avoidance
Locations or points which have been saved as an Avoidance are managed here.
Locations or points which have been saved as an Avoidance are managed here.
1. Touch [Manage Avoidance] on the Menu screen.
1. Touch [Manage Avoidance] on the Menu screen.
2. Check and manage the saved avoidance points on the Manage Avoidance screen.
Note:
2.
- [ADD]: Add avoidance points.
- [DELETE]: Delete the registered avoidance points.
Check -and
manage
the
saved
avoidance
points
on the point
Manage
[MAP]:
Check the
location
of the
currently selected
avoidance
on the Avoidance
Map screen.
screen.
Note:
- [ADD]: Add avoidance points.
- [DELETE]: Delete the registered avoidance points.
- [MAP]: Check the location of the currently selected avoidance point on the Map screen.
www.uniden.com.au, www.uniden.co.nz
18
GNS8431-8436 OM-COVERS.indd 35
35
www.uniden.co.nz
5/11/07 3:28:52 PM
Navigation Software
Navigation Software
Registering
Avoidance
Locations
Registering
Avoidance
Locations
Locations or points can be saved as an avoidance to be excluded when searching
Locations or points can be saved as an avoidance to be excluded when searching
a route.
a route.
To register an avoidance, select a location or point on the Map screen first.
To register an avoidance, select a location or point on the Map screen first.
1. Touch the location to be added as an avoidance on the Map screen.
1. Touch
the location to be added as an avoidance on the Map screen.
2. Touch
[AVOID].
Touch [AVOID].
3. The2.avoidance
point is saved.
3. The avoidance point is saved.
36
www.uniden.com.au, www.uniden.co.nz
www.uniden.co.nz
GNS8431-8436 OM-COVERS.indd 36
19
5/11/07 3:28:53 PM
Navigation Software
Navigation Software
TRIP Computer
TRIP
Computer
The Trip
Computer
screen displays the running counters for the average speed, maximum
speed,The
traveling
distance,
anddisplays
traveling
Trip Computer
screen
the time.
running counters for the average speed, maximum
speed, traveling distance, and traveling time.
1. Touch [TRIP Computer] on the Menu screen.
Or,1.touch
on the
screen.
Touch[Time/Date]
[TRIP Computer]
on Basic
the Menu
screen.
Or, touch [Time/Date] on the map screen.
Navigation
Software
2. Check
the necessary
information on the TRIP Computer screen.
2. Check the necessary information on the TRIP Computer screen.
Note:TRIP Computer
Note:
- [Accumulated]:
Check
the displays
accumulated
trip information.
The Trip Computer
screen
the running
counters for the average speed, maximum
- [Accumulated]:
Check the accumulated
trip information.
- [Recent]:
Check
the
information
on
the
recent
trip.
speed, traveling distance, and traveling time.
- [Recent]:
Check the
information
on the recent trip.
- [Today]:
Check today’s
trip
information.
- [Today]:
Check
trip information.
- [Reset]:
Delete
all Computer]
triptoday’s
information
stored.
1. Touch
[TRIP
on the Menu
screen.
[Reset]:
Delete
all
trip
information
stored.
- ShowOr,this
page
after
automatically
travel:
Display the trip information
touch [Time/Date] on the map screen.
- Show after
this page
after automatically travel: Display the trip information automatically
automatically
traveling.
?|
after traveling.
2. Check the necessary information on the TRIP Computer screen.
Note:
- [Accumulated]: Check the accumulated trip information.
- [Recent]: Check the information on the recent trip.
- [Today]: Check today’s trip information.
- [Reset]: Delete all trip information stored.
- Show this page after automatically travel: Display the trip information automatically
after traveling.
?|
www.uniden.com.au, www.uniden.co.nz
20
GNS8431-8436 OM-COVERS.indd 37
37
www.uniden.co.nz
5/11/07 3:28:54 PM
Navigation Software
Navigation Software
GPS Information
GPS Information
The GPS Information screen displays the status of the GPS signal and information
The GPS Information screen displays the status of the GPS signal and information on the
on the location of the car.
location of the car.
1. Touch [GPS information] on the Menu screen.
1. Touch [GPS information] on the Menu screen.
Or, touch [Time/Date] on the map screen.
2. Check the necessary information on the GPS Information screen.
2. Check the necessary information on the GPS Information screen.
Note :
- S: Displays
Note : latitude coordinates.
- E: Displays
longitude
coordinates.
- S: Displays
latitude coordinates.
- HDOP:
Displays
the
horizontal
- E: Displays longitude coordinates.dilution of precision.
- Altitude:
Display
current altitude.
- HDOP:
Displaysthe
the horizontal
dilution of precision.
- Altitude: Display the current altitude.
38
?|
www.uniden.com.au, www.uniden.co.nz
www.uniden.co.nz
GNS8431-8436 OM-COVERS.indd 38
21
5/11/07 3:28:55 PM
avigation Software
Navigation Software
bout
o view manufacturer
About information, version and license.
To view manufacturer information, version and license.
. Touch [About] on the Menu screen.
1. Touch [About] on the Menu screen.
Confirm
the necessary
information
on the screen.
[About] screen.
. Confirm 2.
the
necessary
information
on the [About]
ote:
?|
?|
?|
Note:
- [ABOUT]: Display information on the manufacturer.
[ABOUT]: Display information on the manufacturer.
[VERSION]:
Display
information
the navigation
[VERSION]: -Display
information
on the
navigationon
program
version. program version.
[LICENCE]: Display information on Software licence.
2
www.uniden.com.au, www.uniden.co.nz
GNS8431-8436 OM-COVERS.indd 39
39
5/11/07 3:28:56 PM
www.uniden.co.nz
Navigation Software
Software
Navigation
SETTINGS
Environment Setting
Environment
settings
cancan
be be
adjusted
to to
suit
Environment
settings
adjusted
suityour
yourrequirements.
requirements.
TouchTouch
[Main][Main]
then then
[Menu]
thenthen
[Setting]
from
thethebasic
screen.
[Menu]
[Setting]
from
basicscreen
screento
tomove
move to
to the
the Settings
Settings screen.
40
www.uniden.com.au, www.uniden.co.nz
40
GNS8431-8436 OM-COVERS.indd 40
www.uniden.co.nz
5/11/07 3:28:57 PM
Navigation Software
Navigation Software
Route Settings
The Route Settings allow you to adjust the settings which determine the calculation for a
route.
1. Touch [Route Setting] on the Setting screen.
2. Route Method: Touch [ ] or [ ] to set the route method between Quickest, Shortest
and Easiest.
Note :
- Include toll road route: Include toll roads in the route search method.
- Include U-turn: Include U-turns in the route search method.
- Include Ferry: Include ferry routes in the route search method.
- Include Motorways: Include motorway routes in the route search method.
- Include Unpaved: Include unpaved roads in the route search method.
- Include Avoidance: Include the Avoidance points that you have saved in
the route search method.
?|
?|
3. Touch [Road Speed Settings] to set the average road speeds used to calculate
expected arrival time.
www.uniden.com.au, www.uniden.co.nz
GNS8431-8436 OM-COVERS.indd 41
41
5/11/07 3:30:09 PM
Navigation Software
Software
Navigation
UI Settings
UI Settings
The UI Settings allows for customization of the UI (User Interface).
The UI Settings allows for customization of the UI (User Interface).
1. Touch[UI
Settings]
on the
Setting
screen.
1. Touch
[UI Settings]
on the
Setting
screen.
2. Specify
UI setting
options.
2. Specify
UI setting
options.
?|
Guidance Mode-Auto
Guidance Mode-Text
Guidance Mode-Split
3. To change the icon of the car displayed on the map window,
touch
[Change
Car].
3. To
change the
icon of the car displayed on the map window,
touch [Change Car].
Note :
- [Language]:
Select your language (English/Korean).
Note :
- [Guidance
Mode]:
the guidance
mode for the map window (Auto/Split/Text).
- [Language]: SelectSelect
your language
(English/Korean).
- [Side
Bar]:
Select
the
location
of
the
side
(Left
Side/Right
Side/Hide).
- [Guidance Mode]: Select the guidance mode for bar
the map
window
(Auto/Split/Text).
- [Change
Car]:
Change
the
icon
of
the
car
to
be
displayed
on
the
map window.
- [Side Bar]: Select the location of the side bar (Left Side/Right Side/Hide).
?|
- [Change Car]: Change the icon of the car to be displayed on the map window.
42
www.uniden.com.au, www.uniden.co.nz
42
GNS8431-8436 OM-COVERS.indd 42
www.uniden.co.nz
5/11/07 3:30:10 PM
Navigation Software
Navigation Software
Safety Settings
Safety Settings allows for customization of the safety options.
1. Touch [Safety Setting] on the Settings screen.
2. Safety Mode: Touch [ ] or [ ] to set Safety Mode On or Off. When set On the
touchscreen is disabled while the car is in motion.
Speed Warning: Touch [ ] or [ ] to set the speed warning tolerance when
approaching
Speed Cameras. The tolerance level can be set in +/- 5km/h increments.
?|
Note :
- Include Speed Camera: Show information on speed cameras.
- Include Black Spot: Show information on black spots for motorways.
- Include Railroad Crossing: Show information on railway crossings.
- Include Red light Camera: Show information on red light cameras.
- Include School Zone: Show the information on school zones.
- Include User Safety: Show the user safety information.
www.uniden.com.au, www.uniden.co.nz
GNS8431-8436 OM-COVERS.indd 43
43
5/11/07 3:30:11 PM
Navigation Software
Map Settings
This menu is the function to set the map window options suitable for user’s taste.
The Map Settings allows for customization of the map screen.
1. Touch [Map Setting] on the Settings screen.
2. Map Colour: Touch [ ] or [ ] to set the Map Colour between Warm and Cool.
Note :
- Include POI Icon: Display POI icons on the map screen.
- Include Street Name: Display road names on the map screen.
- Include Brand Icon: Display brand icons on the map screen.
- Include POI Name: Display POI names on the map screen.
- Include Traffic Light: Display traffic lights on the map screen.
- Include Bread Crumb: Display bread crumb trails on the map screen.
3. Touch [Auto Zoom Settings] to set the Auto Zoom Settings function.
44
GNS8431-8436 OM-COVERS.indd 44
?|
?|
www.uniden.com.au, www.uniden.co.nz
5/11/07 3:30:12 PM
Navigation
NavigationSoftware
Software
Sound
Settings
Sound
Settings
The menu is the function to adjust the volume suitable for user’s taste.
The menu is the function to adjust the volume suitable for user’s taste.
Customize the sound settings.
Customize the sound settings.
1. Touch [Sound Settings] on the Settings screen.
1. Touch [Sound Settings] on the Settings screen.
2. Select the options for the volume control.
2. Select the options for the volume control.
Note :
Note :
- Attention Tone : Select to enable attention tone.
- Attention Tone : Select to enable attention tone.
- Key Sound: Select to enable key sound.
- Key -Sound:
Select to enable key sound.
[TEST] : Preview the specified volume through the speaker.
- [TEST]
:
Preview
the specified volume through the speaker.
- [ON/OFF] : Turn the Volume function On/Off.
- [ON/OFF] : Turn the Volume function On/Off.
www.uniden.com.au, www.uniden.co.nz
www.uniden.co.nz
GNS8431-8436 OM-COVERS.indd 45
45
45
5/11/07 3:30:13 PM
Navigation Software
Software
Navigation
Initialise
Initialise
Initialize all settings back to the factory default status as follows.
Initialize all settings back to the factory default status as follows.
1. Touch [Initialise] on the Settings window.
1. Touch [Initialise] on the Settings window.
2. Touch [OK] to initialize all settings.
2. Touch [OK] to initialize all settings.
46
www.uniden.com.au, www.uniden.co.nz
46
GNS8431-8436 OM-COVERS.indd 46
www.uniden.co.nz
5/11/07 3:30:14 PM
Navigation Software
© 2007
Uniden Australia Pty Limited
Uniden New Zealand Limited
Printed in China
www.uniden.com.au, www.uniden.co.nz
GNS8431-8436 OM-COVERS.indd 47
47
5/11/07 3:30:14 PM