1
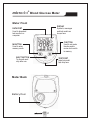
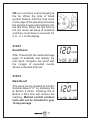
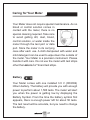
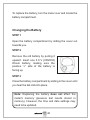
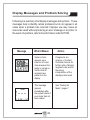
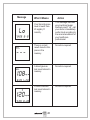
l nua User Ma Welcome You have chosen the microdot® Blood Glucose Monitoring System. microdot® is very easy to use and is designed to help you manage your blood sugar level and control your diabetes. This manual contains important information about the microdot® System. Please read it carefully before you start using the microdot® System. The microdot® System has many features to help you manage your blood sugar level including; Tiny blood sample requirement Quick response Beeper Insulin data entry Averaging and trend analysis Ability to mark results Strip eject button Table of Contents Page Getting Started ................................................................1 microdot® Blood Glucose Meter ................................2 microdot® Meter Display ................................................3 microdot® Test Strip .........................................................4 Before Testing .................................................................6 Check the Display ...........................................................6 Code the Meter..................................................................6 Performing a Control Solution Test How to do a control solution test ........................8 ..........................10 Comparing control solution results ......................12 Testing Your Blood.....................................................13 Preparing the Lancing Device Getting a drop of blood ................................13 ..............................................15 Performing Test Procedure ......................................16 Marking Result ................................................................19 Entering Insulin Data ..................................................19 Removing Test Strip .....................................................21 Special Messages .........................................................22 Using Meter Memory .................................................23 Enter the Memory Mode ............................................23 Recall Test Results .......................................................24 Stored Insulin Data .........................................25 14-Day Average ..............................................25 Downloading Results to a Computer..........27 Setting the Meter ..........................................29 Setting the Time, Date, Year, Beeper and Alarms .........................................29 Selecting Insulin data, Average, Event and Alarm .............................................38 Caring for Your Meter ...................................41 Changing the battery ......................................42 Display Messages and Problem Solving....43 Message, What it means, Action Problem Solving .............................................51 Specifications ...............................................52 Guarantee......................................................53 Lancing Device and Sterile Lancets ...........53 Packing Symbols..........................................54 Getting Started ® The microdot Blood Glucose Monitoring System ® consists of three main products: the microdot Blood ® ® Glucose Meter, microdot test Strips, and microdot Normal Control Solution. These products have been designed to work together to give accurate blood glucose ® test results. Use only microdot Test Strips and ® microdot Control Solutions with the microdot® Blood Glucose Meter. Your system includes: microdot® Meter with battery installed microdot® Test Strips microdot® Normal Control Solution Lancing Device and Lancets Compact Carrying Case User Manual User Instruction Sheet Quick Reference Guide Warranty Registration Card Logbook 1 ® microdot Blood Glucose Meter Meter Front DISPLAY Symbols, messages and test results as shown here DATA PORT Used to download test results to a computer C BUTTON Used to set meter function and to review test results in memory M BUTTON Used to enter memory mode EJECT BUTTON To discard used strip after use TEST PORT Insert microdot test strip here Meter Back Battery Door 2 microdot® Meter Display MEMORY SYMBOL For test results stored in Memory TEST RESULT AREA CODE Appears with code number for test strips in current use 14-day average INSULIN SYMBOL Appears with Insulin data UNIT Appears with Insulin data FLASHING DROP Tells you when to apply sample AVERAGE TREND ARROWS BEEPER SYMBOL Preset to ON ALARM SYMBOL THERMOMETER Indicates temperature out of range UNITS OF MEASUREMENT HOUR MONTH DAY MINUTES DAY MONTH Initial Screen Display 3 BATTERY SYMBOL Indicates how battery microdot® Test Strips The microdot® system is designed to measure glucose in capillary whole blood. You must apply the blood by holding it against the top edge of the test zone you will see on the test strip. Do not attempt to smear or put the blood on the strip. Simply let the blood be drawn into the test zone until it is full. TOP EDGE Apply blood here TEST ZONE This channel should fill with blood CONTACT BARS This is the end that should go into the meter 4 Important Information about the Test Strip Keep the test strips in their original container in a cool, dry place between 10° and 30°C (50° and 86°F). Keep away from direct sunlight and heat. Do not refrigerate. Check the expiration date on the vial. If the expiration date is passed do not use the strips. When you take a Test Strip from the vial, close the cap immediately. Use the strip immediately. Do not use the Test Strips 3 months after the vial is first opened. Write the discard date on the vial label after first opening. Do not bend, cut or change the Test Strip. Always check that the code number on the meter matches the code number on the vial of strips you are using. 5 Before Testing Check the Display. When a strip is inserted into the meter, the meter performs a system check. You will see all the display segments appear for 2 seconds. When the system check is completed, the strip code number (example 82) will appear. The code number on the display has to match with the code number on the vial of test strips! If the code number displayed on the meter does not match the number printed on the vial, the test results may be inaccurate. STEP 1 Enter the Code Mode. Insert a test strip to turn on the meter. All the segments of the display will appear. Next the code number will be displayed until a sample is applied or the meter is turned off. 6 STEP 2 Match the Code Numbers. Do they match? Compare the code number on the display with the code number shown on the vial label. If the code number on the meter display matches the code number on the vial, you may begin testing. STEP 3 Code the Meter. If no number appears or the code number does not match the code on your vial, change the code number by pressing and holding the C button on the meter until CODE starts to flash. You can increase or decrease the number by pressing the M or C button until the displayed number matches the number on the test strip vial. The code will be accepted if no button is pressed and the strip is not removed for 3 seconds. 7 Performing a Control Solution Test Practice with control solution before you test your blood with the microdot® System for the first time. When you can do three tests in a row correctly with the control solution you are ready to test with your own blood. Using Control Solutions properly is important for accurate testing. You should test with control solutions: When you first use your microdot® meter. When you can do three tests in a row correctly, you will be able to use the meter successfully. When you begin using a new vial of strips. When your test results are not consistent with your symptoms, or when you think your results are not accurate. If the meter is dropped. 8 Important Information about the Control Solution Use only microdot® Control Solution. Check the expiration date on the control solution vial. Do not use if expired. Control solution, meter, and test strips should come to room temperature 20° to 25°C (68° to 77°F) before testing. Shake the vial, discard the first drop of microdot® Control Solution, and wipe off the dispenser tip to ensure a good sample and an accurate result. Use only for three months after first opening. Record the discard date (opening date plus three months) on the control solution vial. Discard after three months. Store the control solution tightly closed at temperatures below 30°C (86°F). Do not refrigerate. Caution: The control solution range printed on the test strip vial is for microdot® Control Solution only. It is used to test meter and test strip performance. It is not a recommended range for your blood glucose level. 9 How to do a control solution test STEP 1 Insert Test Strip. Insert a test strip into the microdot® meter. Be sure the black contact bars go in first and that the “test zone” is facing you. Push the strip in firmly. Be sure it can go no further. The meter turns on automatically. The code number ( example 82) will appear on the display. If the code number does not match the code number on the vial label, code the meter following the instructions in step 3 on page 7 STEP 2 Apply Control Solution. Be sure the control solution is at room temperature. Shake bottle vigorously. Remove cap; invert bottle and squeeze out one drop of control solution. Place a drop on your finger just as if it were a drop of blood. Be sure to wash your hands before doing this 10 OR you can leave a drop hanging at the tip. When the drop of blood symbol flashes, hold the drop close to the edge of the test strip and allow the sample to wick automatically into the test zone. When the test zone is full, the meter will beep (if enabled) and then count down in seconds 10, 9, 8…2, 1 on the display. STEP 3 Read Result After 10 seconds, the meter will beep again (if enabled) and display the test result. Compare the result with the ranges of expected results shown on the test strip vial. STEP 4 Mark Result The result can be marked as Control Solution-Result “C” by pressing the C Button 2 times. Pressing the C Button a third time will remove the marking. Marked control solution tests will not be included in your 14-day average. 11 Comparing Control Solution Results You should get results within the expected range printed on the test strip vial. If this is not so, repeat the test. If the results are out of the range printed on the control solution vial, check the following: Was the vial at room temperature? Did you shake the vial vigorously before using? Did you discard the first drop of control solution and wipe the dispenser tip clean? Was the meter coded properly? Has the control solution or test strip expired? Is the meter malfunctioning? Caution If you continue to get control solution test results that are not in the expected range printed on the test strip vial, the system may not be working properly. DO NOT USE the system to test your blood. 12 Testing Your Blood Preparing the Lancing Device STEP 1 Unscrew and remove the adjustable tip of the lancing device. STEP 2 Insert a new disposable lancet firmly into the lancet holder. STEP 3 Twist off and remove the protective disk from the lancet. 13 STEP 4 Replace the adjustable tip. Choose the penetration depth until the setting number matches the arrow. Settings are based on skin type: 1-2 for soft skin, 3 for average skin, 4-5 for thick or callused skin. STEP 5 Hold the adjustable tip in one hand and pull the top of the sleeve with the other hand. The device will be armed when a click is felt as the ends are pulled apart. STEP 6 Release the top of the sleeve. The lancing device is ready for use. 14 Getting a drop of blood STEP 1 Wash your hands in warm, soapy water. Dry thoroughly. STEP 2 Hold your hand down at your side for a short time (15 seconds is good.) STEP 3 Lance a puncture site on your finger. Use the lancing device provided to get a drop of blood. 15 STEP 4 Squeeze gently until you get a rounded drop of blood. Be careful not to squeeze the finger too hard. Performing Test Procedure STEP 1 Insert Test Strip. Take a test strip from the vial and put it into the meter. Be sure you do this with the black contact bars facing the meter and the “test zone” facing you. Put the vial cap back on right away. Push the strip in firmly until it stops. You will see the meter turn on automatically. All segments will appear on the display and after 2 seconds, the code number will appear. 16 Check that the code number on the screen and the code number printed on the vial are the same. If they are not the same, code the meter, following instructions on page 7. After the code number appears, the drop of blood symbol will appear and begin to flash. It is now time to apply the blood sample. STEP 2 Apply Sample. Obtain a rounded drop of blood by using the adjustable lancet on your finger. The blood sample must be at least 0.6microliter (600 nanoliters) in volume to get an accurate test result. Touch and hold the blood drop to the TOP EDGE of the test strip until blood has completely filled the “test zone”. 17 Do not smear or attempt to scrape blood into the strip. Once, the test zone of the strip is full, the meter will beep (if enabled) and the 10 seconds count down will start. If the “test zone” does not fill up, stop the test and retest with a new strip. If you continue to have trouble, call Customer Service for assistance. STEP 3 Accurate Results in Just 10 Seconds. Your blood glucose result will appear in just a few seconds. Blood glucose results are automatically stored in the meter memory. You should also store them in your logbook. Turn the meter off by removing the test strip. 18 STEP 4 Optional: Marking Result ( to enable go to page 39) The Result can be marked as an Event “E” (i.e. after meal) by pressing the C button once. Pressing the C button three times will remove the marking. A marked result will not be included in your 14-day average. The trend down arrow is displayed if the drop in the glucose result is more than 30mgl/dL per hour Beware if you take insulin. STEP 5 Optional: Entering Insulin Data ( to enable go to page 38) If this option is already enabled, you can input you insulin data while your test result is on display by pressing the M button. If the meter is off, to enter your insulin data, turn the meter on by pressing and holding the M button until the insulin input display appears. By pressing the C button, a Pen-identification number (i.e P2) can be selected. This number shall help to differentiate between different insulin types used (i. e. P1: fast acting, P2: slow acting) 19 The instrument can handle up to 4 different insulin types. Press the M Button once the correct Penidentification number is selected. Set the correct number of Units by pressing the C button accordingly. Press the M button once the correct amount of units is displayed, the flashing will stop. The insulin data can be marked as an Event by pressing the C button once. To accept marking, press the M button, to remove marking, press the C button You may want to mark a data to indicate the you entered the information at a different time than you actually injected or you may want to indicate that the value entered was different than what you normally take at that time. Press the M button, the meter will display “End” and switch off. The instrument can store Units from 1 to 99 A setting of 0 units will not be stored. 20 STEP 6 Removing Test Strip You can now eject the strip into a safe disposal bin by pressing on the handy eject button at the bottom of the meter. To eject the strip hold the meter vertically above the disposal container with the strip pointing into the safe disposal bin and push the eject button. 21 Special Messages The Meter displays results between 1.1 and 29.2mmol/L (20 to 525mg/dL). If your test result is lower than 1.1mmol/L (20mg/dL), “Lo” will appear on the meter display. This indicates hypoglycemia (low blood glucose). You should contact your doctor immediately and /or treat hypoglycemia as recommended by your healthcare professional. Note: Lo and Hi readings may be caused by other factors. See Important Information on pages 6-7 If your blood glucose test result is above 29.2 mmol/L (525 mg/dL), “Hi” will appear on the meter display. This indicates severe hyperglycemia (high blood glucose).You should seek immediate medical help and/or treat hyperglycemia as recommended by your healthcare professional. 22 Using Meter Memory Your microdot® Meter stores the 500 most recent blood glucose and control solution test results AND insulin data with date and time in its memory. It also provides you with 14-day averages of your blood glucose test results. You can review the test results in memory with these easy steps. STEP 1 Enter the Memory Mode. To enter Memory Mode, turn On the meter by pressing the M button. The meter will display the last result with Mem. symbol, time and date. 23 STEP 2 Recall Test Results Previous results can be displayed by pressing the C button. As long as the C button is held, the meter will scroll through the memory displaying the result and the memory location, 001 indicates the last (most recent) result. Once the button is released, the meter will display the selected result with its Time and Date. When the memory is full (500 results stored), the oldest result is dropped as the newest is added. Note: When using the meter for the first time “Mem.- - “ will appear, showing that there are no test results in memory. 24 STEP 3 Stored Insulin Data Pressing the M button again will lead to the display of stored insulin data. Insulin data will be displayed with time and date. Pen identification number and Units will be alternately displayed. Previous insulin data can be displayed by pressing the C button As long as the C button is held the memory location number is displayed instead of time and date. 001 indicates the last insulin data. STEP 4 14-Day Average Pressing the M button again will display the 14-day average, once at least 3 results over that timeframe are available. 25 Once the actual average changes by more than 5% compared to the average of 3 days ago, the meter will display a Trend Arrow, indicating the change direction (up or down). A HI result will be included in your averages as 29.2mmol/L (525mg/dL) and a LO result as 1.1mmol/L (20 mg/dL). Marked control solution tests will not be included in your 14-day averages. STEP 5 Exit Memory Mode Press the M button and hold until the meter turns off 26 Downloading Test Results to a Computer This option for transferring your test results with date and time from the meter memory to your personal computer requires software and an interface cable. Contact your Customer Service for more information. When you connect the interface cable to your meter data port and a personal computer, the meter will display “PC” to indicate that it is now in PC communication mode. The display will flash during the Data download. 27 When the download is complete, The display will show “OK”. NOTE: If the meter is in either memory or setting mode and it is connected to a PC, it will automatically enter the PC communication mode. However if a strip is inserted while in PC communication mode, the meter will switch off and enter the test mode. 28 Setting the Meter Before using the microdot® meter the first time you should set the actual Time and Date and Year. The unit of measurement is pre-set and cannot be changed. Setting the Time, Date, Year, Beeper and Alarms Enter the Set mode. To enter the set mode, turn the meter on by pressing the C button. After the segmental test, the time and date will start to flash. STEP 1 Set the Time and Date Format Pressing the C button again will now toggle between the US- and the International Time and Date Format. US: 12h Time format, mm-dd (Begins with AM Setting) 29 Int.: 24h Time format, dd.mm. (Begins with Blank Setting) To accept the desired setting, press the M button. STEP 2 Set the Hour The Hour will start to flash. It can now be changed by pressing the C button. The US setting will begin at 12:01 AM and will move to PM. The international setting will begin at 12:01 and go to 23:59. To accept the correct setting, press the M button. STEP 3 Set the Minutes. The Minute will start to flash, It can now be changed by pressing the C button. To accept the correct setting, press the M button. 30 STEP 4 Set the Year The Year will start to flash, it can now be changed by pressing the C button. To accept the correct setting, press the M button. STEP 5 Set the Month The Month will start to flash and can now be changed by pressing the C button. To accept the correct setting, press the M button. STEP 6 Set the Day The Day will start to flash and can now be changed by pressing the C button. To accept the correct setting, press the M button. 31 STEP 7 Set the BEEPER The sound symbol will appear and can now be changed by pressing the C button. To accept the setting, press the M button. ON This option is used to switch on or off the beeper. When turned on, a sound will be heard when blood or control solution is applied to the strip and when the test is finished. The sound will be heard when an error has occurred or if an alarm is triggered even if the Beeper is not enabled. If the alarm option is set to OFF, the meter will display End and Switch off. 32 OFF STEP 8 Set Alarms Four alarm settings are available and can be used as reminders for taking medication or carrying out a test. When an alarm is triggered, the meter will display the alarm symbol, “AL” will flash and the beeper will always sound if enabled. To set the alarms, you must first enable the alarm option according to page 40. Then carry out steps 1-7 of Setting the Meter (pages 29-32), the meter will then display “AL1” with the alarm symbol and OFF. Pressing the C button will toggle between the alarm time flashing and OFF. To change the time, when the zero hour is flashing, press the M button and the hour will start to flash. Press the C button to change the setting. To accept the correct setting, press the M button. 33 The minutes will start to flash. To change the minute setting, press the C button. To accept the correct setting, press the M button. The meter will display “AL2” with the alarm symbol and OFF. Pressing the C button will toggle between the alarm time flashing and OFF. To change the time, when the zero hour is flashing, press the M button and the hour will start to flash. Press the C button to change the setting. To accept the correct setting, press the M button 34 The minutes will start to flash. To change the minute setting, press the C button. To accept the correct setting, press the M button. The meter will display “AL3” with the alarm symbol and OFF. Pressing the C button will toggle between the alarm time flashing and OFF. To change the time, when the zero hour is flashing, press the M button and the hour will start to flash. Press the C button to change the setting. To accept the correct setting, press the M button. 35 The minutes will start to flash. To change the minute setting, press the C button. To accept the correct setting, press the M button. The meter will display “AL4” with the alarm symbol and OFF. Pressing the C button will toggle between the alarm time flashing and OFF. To change the time, when the zero hour is flashing, press the M button and the hour will start to flash. Press the C button to change the setting. To accept the correct setting, press the M button. 36 The minutes will start to flash. To change the minute setting, press the C button. To accept the correct setting, press the M button. The meter will display “End” and Switch off. The alarms will trigger automatically when the time corresponds to the time set for each alarm. When triggered the meter will display the alarm symbol, “AL” will flash and the beeper will sound if the BEEPER is enabled. Press the M or C button to stop the alarm or the alarm will turn off automatically after 30 seconds. 37 Selecting Options: Insulin data input, Average, Event and Alarm. Your microdot® Blood Glucose meter has optional functions that can help you and your healthcare professional manage your diabetes STEP 1 Select Insulin data input Hold the C button down for 3 seconds and the insulin data symbol will appear with either “ON” or “OFF” flashing. To change the setting, press the C button. To accept the correct setting, press the M button. 38 STEP 2 Select Average (14-day average) The Avg symbol will appear with either “ON” or “OFF” flashing. To change the setting, press the C button. To accept the correct setting, press the M button. STEP 3 Select Event The Event symbol will appear with either “ON” or “OFF” flashing. To change the setting, press the C button. To accept the correct setting, press the M button. 39 STEP 4 Select Alarm The Alarm symbol will appear with either “ON” or “OFF” flashing. To change the setting, press the C button. To accept the correct setting, press the M button. Finally, the meter will display End and Switch off. 40 Caring for Your Meter Your Meter does not require special maintenance. As no blood or control solution comes in contact with the meter, there is no special cleaning required. Take care to avoid getting dirt, dust, blood, control solution, or water inside the meter through the test port or data port. Store the meter in its carrying case after each use. A cloth dampened with water and mild detergent can be used to wipe down the outside of the meter. Your Meter is a precision instrument. Please handle it with care. Do not use the meter with test strips ® other than microdot brand test strips. Battery Your Meter comes with one installed 3.0 V (CR2032) lithium battery. The battery will provide you with enough power to perform about 1,500 tests. The meter will alert you when the power is getting low by displaying the Battery Symbol. From the time the battery symbol first appears, there is enough power left for about 50 tests. The test result will be accurate, but you need to change the battery. 41 To replace the battery, turn the meter over and locate the battery compartment. Changing the Battery STEP 1 Open the battery compartment by sliding the cover out towards you. STEP 2 Remove the old battery by pulling it upward. Insert one 3.0 V (CR2032) lithium battery, making sure the positive “+” side of the battery is facing up. STEP 3 Close the battery compartment by sliding in the cover until you hear the tab click into place. Note: Replacing the battery does not affect the meter's memory (previous test results stored in memory). However, the time and date settings may need to be updated. 42 Display Messages and Problem Solving Following is a summary of all display messages and symbols. These messages help to identify certain problems but do not appear in all cases when a problem has occurred. Improper use may cause an inaccurate result without producing an error message or a symbol. In the event of a problem, refer to the information under ACTION. Message What it Means Action System check appears upon insertion of a test strip whenever the meter is turned on. Verifies that all segments are present on the display If segments are missing, or Contact Customer Service for further action. Missing segments can lead to the wrong interpretation of the displayed test result This message appears immediately after the system check if your meter has not been coded See “Coding the Meter,” pages 7 43 Message What it Means Action This is the code number stored in the meter The system is ready to accept a blood sample. Make sure that this code number matches the code number on the vial of the test strips you are using. You may now apply the blood sample. Ten-second count down. The meter is calculating the result. At the end of the countdown, the meter will display the test result.. No action required. A blood glucose test result . No action required. Your blood glucose level is higher than 29.2 mmol/L (525 mg/dL). This message indicates very high blood sugar. Recheck your sugar level and if “HI” call your doctor immediately and/ or treat according to the recommendations of your healthcare professional. 44 Message What it Means Your blood glucose level is lower than 20 mg/dL(1.1 mmol/L). Action This message indicates very low blood sugar. Recheck and if “Lo”, call your doctor immediately and/or treat according to the recommendations of your healthcare professional. There is no test result stored in this place in the memory. No action required. A blood glucose test result stored in memory. No action required. A control solution test result stored in memory. No action required. 45 Message What it Means Action A test result marked as an “Event”, for example after a meal, stored in memory. No action required. An insulin type record in the meter memory. Example shows P2 that refers to the insulin type as labeled by the user. No action required. An insulin dose record in the memory. Example shows 4 units of insulin. No action required. A marked insulin dose. No action required. 46 Message What it Means Action The battery sign appears on the display. The power of the battery is getting low. You can complete about 50 more tests from the time this symbol first appears. Test results will still be accurate, but replace the battery as soon as possible. End of setup. No action required. The average of all blood glucose test results taken in the last 14 days. No action required. 47 Message What it Means Action The average of all blood glucose test results taken in the last 14 days. The arrow up shows that the average has changed by more than 5% compared to the average of 3 days ago. No action required. Error message that indicates that there is a problem with the meter. Review the instructions and try again with a new test strip. If the problem persists, contact Customer Service. Error message that indicates that the temperature is out of range. Repeat the test with a new test strip. If the error message appears again, contact Customer Service. 48 Message What it Means Action Error message that indicates that there is a problem with the test strip. Repeat the test with a new test strip. If the error message appears again, contact Customer Service. Error message indicates serial communications error. If error persists, contact Customer Service. The flashing strip indicates that it is a used strip or the blood or control solution was applied before the flashing drop symbol appeared on the display. Repeat the test with a new test strip. Apply the sample only after the flashing drop symbol appears. This display indicates that a PC has been detected. No action required. 49 Message What it Means Action This display indicates that the meter is downloading data to the PC. No action required This display indicates that the data download is completed. No action required The flashing “AL” with the alarm symbol indicates that a preset time for an alarm has been triggered. 50 Press M or C button to turn off the alarm or the alarm turn off automatically after 30 seconds. Problem Solving If the meter does not display a message after inserting a test strip. PROBABLE CAUSE WHAT TO DO a. Battery exhausted Replace battery b. Battery incorrectly installed or absent. Check that the battery is correctly installed with the positive “+” side up. c. Test strip inserted upside down or incompletely. Insert the test strip correctly with the contact bars end first and facing up. d. Defective meter. Call Customer Service. If the test does not start after applying the sample: PROBABLE CAUSE WHAT TO DO a. Insufficient blood sample. Repeat the test with a new test strip and a larger sample. b. Defective test strip. c. Sample applied after automatic shutoff (2 minutes after last user action). Repeat the test with a new test strip. Repeat the test with a new test strip; apply sample only when flashing drop of blood appears on the display. d. Defective meter. Call Customer Service. 51 Specifications Operating Ranges: Temperature: 50°F-104°F(10°C-40°C ) Relative Humidity: 20-90% Haematocrit: 25-55% Result Range: 20 to 525 mg/dL (1.1 to 29.2 mmol/L) Calibration: Plasma-equivalent Sample: Fresh capillary whole blood Sample Size: Minimum 0.6 microliter (600 nanoliters) Test Time: 10 seconds Assay Method: Glucose dehydrogenase biosensor Power Source: One replaceable 3.0V (CR2032 or equivalent) lithium battery Battery Life: 1,500 tests, or about one year at three tests per day Glucose Units: mg/dL or mmol/L Memory: 500 glucose results and insulin-input data in total Automatic shut-off: One minute after last user action 52 Guarantee The makers guarantee that the microdot®Meter shall be free of defects in material and workmanship for a period of three years. This guarantee is valid from the date of purchase. The guarantee extends only to the original purchaser and is not transferable. Lancing Device and Sterile Lancets Manufactured by Suzhou SPR Mdical Devices Development Co., Ltd 32 XinLian RD., Pingjiang, Suzhou City, China. European Authorized Representative EMDAR BV Ijsselburcht 3, Postbus 5486, 6802 El Arnhem Netherlands In accordance with EC Directive 93/42/EEC Annex V 53 Packaging Symbols Lot Number Expiry Date For in vitro diagnostic use Caution symbol: See Instructions for use Manufactured by Storage Temperature Product fulfils the requirement of EC Directive 98/79/EC concerning in vitro diagnostic medical devices. 54 Important Information Severe dehydration and excessive water loss may cause false low results. If you believe you are suffering from severe dehydration, consult your healthcare professional immediately. Very high haematocrit levels (above 55%) may cause falsely low readings. Very low haematocrit levels (below 25%) may produce falsely high readings. Consult your healthcare professional if you do not know your haematocrit level. If you get results below 3.3 mmol/L (hypoglycemia) or above 13.3 mmol/L (hyperglycemia) and do not have symptoms, first repeat the test. If you do have symptoms or continue to get results that fall below 3.3 mmol/L or above 13.3 mmol/L, follow the treatment advice of your healthcare professional. If you are experiencing symptoms that are not consistent with your blood glucose test results AND you have followed all instructions described in the microdot® Blood Glucose Monitoring System User Manual, call your healthcare professional. Intended Use ® The microdot Blood Glucose Monitoring System is designed to measure glucose (sugar) in whole capillary blood outside of the body (in vitro diagnostic use). microdot® Meters read the glucose level of a capillary blood sample on a microdot® Test Strip. Use only microdot® Test Strips with the microdot® Blood Glucose Meter. microdot® Test Strips are plasma calibrated to allow easy comparison of results with laboratory methods. Do not use microdot® blood glucose monitoring system for diagnosis of diabetes or for testing newborns. Caution Before using the microdot® Blood Glucose Monitoring System, read all of the instructions provided and practice the test using microdot® Control Solution. Notes Notes Notes Customer Service Deudraa Impex Limited Shivaji's Enclave, 23 Rathenam Street, Gopalapuram, Chennai 600 086. Phone : 044-32519225 www.microdot.co.in Cambridge Sensors Limited Cambridgeshire PE29 2XG United Kingdom www.cs-limited.co.uk LBL-130-06A