1
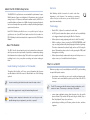
Workshop
RC-50 Loop Station
Patches
© 2006 BOSS Corporation U.S.
All rights reserved. No part of this publication may be reproduced in any form without the
written permission of BOSS Corporation U.S.
RC50WS03
About the RC-50 Workshop Series
The BOSS RC-50 Loop Station sets a new standard for performance loopers.
With 49 minutes of mono recording time (or 24 minutes in stereo), onboard
storage for up to 297 phrases, and massive realtime control, the RC-50 is a
powerful realtime performance tool. While looping is its primary function, it
can be used in many other ways as well: as a sampler, a backing track player,
a practice aid, and more.
Each RC-50 Workshop booklet focuses on a specific topic to help you
get the most out of your RC-50 and spark some ideas for its creative use.
RC-50 Workshop booklets are intended as companions to the RC-50 Owner’s
Manual.
Hot Links
Each Workshop booklet is meant to be read in order from
beginning to end. However, if we mention an upcoming
section—and you see this arrow—you can click the arrow to
jump there immediately.
Terminology
•
•
On the RC-50, a “phrase” is a container for audio data.
•
•
When a phrase is empty, capturing audio into it is called “recording.”
•
When a phrase already contains audio and you wish to layer more—or
replace some—you “overdub” audio into the phrase.
About This Booklet
The RC-50 has 99 onboard patches, and each contains three phrases into
which you can record or import audio. A patch also contains many settings
that determine how its phrases play. This booklet covers patches in detail,
including how to store your phrase recordings and custom settings in
them.
Understanding the Symbols in This Booklet
Throughout this booklet, you’ll come across information that deserves
special attention—that’s the reason it’s labeled with one of the following
symbols.
While recording a phrase, pressing the REC/PLAY/OVERDUB pedal
stops recording and starts the phrase playing back from the beginning.
This action determines the phrase’s length, and we call it “closing the
phrase.” Alternately, a phrase can be closed by pressing the STOP pedal
during phrase recording.
What’s in a Patch?
Whenever you play, record, or overdub phrases on the RC-50, you’re working
in a patch. Each patch contains:
•
A note is something that adds information about the topic at hand.
three phrases—into which you can record, overdub, and import audio.
This audio can be saved with the patch, up to the limit of the RC-50’s
memory.
The RC-50’s memory provides 49 minutes of mono recording time, or 24
minutes of stereo. This memory is shared by all 99 patches.
A tip offers suggestions for using the feature being discussed.
Warnings contain important information that can help you avoid
possible damage to your equipment, your data, or yourself.
An RC-50 patch contains three phrases, and each can loop indefinitely
or be triggered sampler-style using the “One Shot” function.
•
various phrase playback settings—that determine how the patch’s
phrases behave. They include the Play mode (Single or Multi), loop or
One Shot playback, Tempo Sync, and more.
•
guide settings—including on/off status, pattern selection, and time
signature.
•
realtime control assignments—for the onboard TEMPO and UNDO
pedals, optional external pedals, and MIDI controllers.
•
a master tempo setting—used by the guide, Tempo Sync, and Loop
Quantize.
The RC-50 features 99 patch locations into which you can save your work.
The PATCH Display and the Play Screen
The RC-50’s front panel provides two patch status displays.
The current patch number is displayed in the PATCH
display, shown in the illustration to the right.
The Play screen is the RC-50’s “home” screen. It’s the screen that’s displayed
after the RC-50 finishes its power-up sequence. At a glance, you can see the
current patch’s name, the remaining recording time, and information about
the phrases’ content.
Current patch name
1BUDI/BNF
NlvPvkP
Remaining recording time
Phrase Content
The phrase content area of the Play screen provides the following information
about the patch’s three phrases:
•
•
•
o is displayed when a phrase contains audio.
- is displayed when a phrase is empty.
During playback, level meters— ¢∞—indicate the current phrase
volume.
Selecting Patches
If the current patch contains any newly recorded phrase data
or parameter changes that you wish to keep, you need to save
it to one of the RC-50’s 99 patch locations before selecting a
new patch or turning off the power. If you don’t, this data will
be lost. The patch-saving procedure is covered later in this
booklet.
Patches can be selected using a number of different methods, either when
the RC-50 is stopped or during phrase playback.
Phrase content
The Play screen.
You can always return to the Play screen from any other screen by
pressing EXIT.
Technically, the RC-50 allows you to select a patch during phrase
recording or overdubbing as well. In actual use, however, you’ll
probably never want to; since your new recording/overdub won’t
be saved to the patch before a new patch is selected, it’ll be lost
immediately when the newly selected patch is loaded.
Using the PATCH/VALUE Dial
When the Play screen is displayed, patches can be
selected using the PATCH/VALUE dial. Simply turn the
dial to select the desired patch.
Using the Onboard Pedals
When the RC-50’s in Patch Select mode, patches can be selected with the
REC/PLAY/OVERDUB, STOP, and TEMPO pedals.
�
To enter Patch Select mode, press and hold the TEMPO pedal for at least
two seconds. When the PATCH display flashes, release the pedal.
�
Use the following pedals to select the desired patch:
•
•
Using MIDI
Specific MIDI messages sent from an external device connected to the
RC-50’s MIDI IN jack can select patches.
•
•
Press REC/PLAY/OVERDUB—to step down through patch numbers.
Control Change (CC) #80—can control one user-assignable RC-50
parameter per patch. Among the parameters available for assignment
are PATCH INC (increment) and PATCH DEC (decrement).
Press STOP—to step up through patch numbers.
The number in the flashing PATCH display indicates the selected patch.
�
Program Changes 1-99—select Patches 1-99, respectively.
To learn about using MIDI devices with the RC-50, see Chapter 8 in the
RC-50 Owner’s Manual.
To finalize your selection, press TEMPO.
The Patch Select mode pedal functions are labeled next to the
pedals.
What Happens When a Patch is Selected
When you select a patch, one of two things will happen: it’ll load immediately,
or it’ll be put on “standby” temporarily before it loads. The behavior that
takes place depends on the playback status of the current phrase.
As you might have guessed, the “current phrase” is the
phrase that’s currently selected with a PHRASE SELECT pedal
(when a phrase is the current phrase, the left indicator on
its PHRASE SELECT pedal lights solid). The current phrase
selection is retained when the patch is saved; this is
important to know, as we’ll see shortly.
Using External Pedals
If the onboard pedals aren’t enough, you can connect optional external
pedals (BOSS FS-5U and/or FS-6) to the CTL 1, 2 PEDAL and EXP/CTL 3, 4
PEDAL jacks.
Many different functions can be assigned for external control, and these
assignments can be saved in a patch. Among them are PATCH INC (increment)
and PATCH DEC (decrement). We’ll discuss pedal settings a little later.
•
If the current phrase is stopped when a new patch is selected—the new
patch loads immediately.
•
If the current phrase is playing when a new patch is selected—the patch
loads according to the Phrase Change mode setting. When the Phrase
Change mode is set to:
•
IMMEDIATE—the current phrase stops playing, and the newly
selected patch loads immediately.
•
LOOP END—the current phrase plays to its end, and then the newly
selected patch loads.
We’ll show you how to set the Phrase Change mode a little
later.
When a phrase is selected with a MIDI Program Change message, it
always loads immediately, even if the Phrase Change mode is set to
LOOP END.
When the RC-50’s in Single mode, the Phrase Change mode also affects
phrase selection within the patch. We’ll discuss this when we show you
how to set the Phrase Change mode.
Phrase Change Mode: LOOP END
�
In the current patch, select a phrase that contains audio by pressing its
PHRASE SELECT pedal.
�
Start the phrase playing by pressing REC/PLAY/OVERDUB.
�
While the current phrase is playing, enter Patch Select mode by pressing
and holding TEMPO until the PATCH display flashes.
�
Select the desired patch with the REC/PLAY/OVERDUB and/or STOP
pedal. The flashing PATCH display shows the currently selected patch
number.
5�
At the desired moment, finalize your selection by pressing TEMPO. The
current phrase continues to play until it ends, and then the selected
patch loads.
Until the current phrase ends, the new patch selection is put on
standby, and both the PATCH display and the TAP TEMPO button flash
in time with the current patch tempo.
Phrase Change Mode Examples
Now, let’s take a look at what happens when a new patch is selected during
playback using the two different Phrase Change modes.
During this standby state, a flashing PHRASE SELECT pedal shows you
which phrase will be the current phrase in the selected patch. At this
time, you can press any PHRASE SELECT pedal to choose a different
phrase to be the current phrase when the new patch loads.
In the following examples, we’re using Patch Select mode to select the
patch, since this is the method you’ll probably want to use while performing.
However, you’ll see the same behavior regardless of the patch-selection
method you use.
�
Phrase Change Mode: IMMEDIATE
�
In the current patch, select a phrase that contains audio by pressing its
PHRASE SELECT pedal.
�
Start the phrase playing by pressing REC/PLAY/OVERDUB.
�
While the current phrase is playing, enter Patch Select mode by pressing
and holding TEMPO until the PATCH display flashes.
�
Select the desired patch with the REC/PLAY/OVERDUB and/or STOP
pedal. The flashing PATCH display shows the currently selected patch
number.
5�
At the desired moment, finalize your selection by pressing TEMPO. The
new patch loads immediately, with it’s last-selected phrase becoming
the current phrase. If the current phrase:
•
•
When the phrase ends, the new patch loads. If the current phrase:
•
•
contains audio—it begins playing as soon as the patch loads.
is empty—it begins recording as soon as the patch loads.
Patch Settings
Each patch offers a multitude of settings that allow you to configure the
RC-50 the way you like for any particular composition or live looping
performance. Following is a rundown of the various patch settings, with
brief descriptions of their functions. In most cases, we’ll show you how to
adjust patch settings, too. However, some require more explanation than
we can provide here—in these cases, we’ll refer you to the RC-50 Owner’s
Manual and/or another RC-50 Workshop booklet for more information.
contains audio—it begins playing as soon as the patch loads.
is empty—it begins recording as soon as the patch loads.
Play Mode
Input Mode
The RC-50 provides two Play modes: Single and Multi.
In Single mode, only one phrase can play at a time.
In Multi mode, all three phrases can play at once.
Additionally, Multi mode offers a feature called Loop
Sync, which provides an easy way to keep a patch’s
three phrases synchronized with each other.
The Input mode settings affect how audio signals are
recorded from the RC-50’s audio inputs, including
whether they’re captured as stereo or mono phrase
recordings. To adjust Input mode settings:
To select a Play mode:
�
�
�
Press INPUT MODE.
�
Use the PARAMETER buttons to display the desired Input mode screen.
�
Turn the PATCH/VALUE dial to choose the desired setting.
Press the PLAY MODE button to select the desired setting. To choose:
�
Repeat Steps 2-3 to adjust other Input mode settings.
•
•
5�
Press EXIT when you’re done.
Single mode—press PLAY MODE so its indicator is dark.
Multi mode—press PLAY MODE so its indicator lights.
If you’ve chosen Multi mode, you can enable Loop Sync by pressing the
LOOP SYNC button so its indicator lights. (The LOOP SYNC button is
disabled when the RC-50’s in Single mode.)
To learn more about the Play modes, see the RC-50 Workshop booklets
Using Single Mode and Using Multi Mode, and Chapters 5 and 6 in the
RC-50 Owner’s Manual.
Auto Recording
To learn about the Input mode screens, see the RC-50 Workshop booklet
Audio Inputs and Outputs and Page 48 in the RC-50 Owner’s Manual.
Overdub Mode
The Overdub mode determines how audio is overdubbed
into a phrase. Repeatedly press the OVERDUB MODE
button to cycle through the three different Overdub
modes.
The OVERDUB MODE indicators light to reflect the current setting.
When the Auto Recording feature is enabled, recording doesn’t begin until
the RC-50 receives audio from one of its input jacks.
To enable Auto Recording, press AUTO REC so its indicator
lights.
To learn more about Auto Recording, see Page 47 in the RC-50 Owner’s
Manual.
•
When OVERDUB is lit—overdubbed audio is combined with the audio
previously recorded in the phrase.
•
When REPLACE is lit—overdubbed audio replaces audio that was
recorded previously.
•
When MOMENTARY PUNCH-IN is lit—overdubbed audio replaces audio
that was recorded previously, but only while the REC/PLAY/OVERDUB
pedal is pressed. This is convenient for fixing—or “punching in”—
mistakes in a previously recorded performance.
When REPLACE or MOMENTARY PUNCH-IN is selected as the Overdub
mode, the previously recorded audio is heard during the overdubbing;
the newly overdubbed audio won’t be heard until the phrase loops.
NAME/PATCH Parameter Screens
•
Patch Tempo
When an optional EV-5 or FV-500H Expression Pedal is connected to the
EXP/CTL 3, 4 PEDAL jack, it can be assigned to control the patch level.
In this case, the Patch:Level setting determines the patch level when
the pedal is at its maximum setting (fully forward).
The patch tempo provides the tempo reference for a number of functions,
including the guide, Tempo Sync, and Loop Quantize.
The patch tempo can be set many different ways. To learn how, see the
RC-50 Workshop booklet Tempos and Tempo Sync and Chapter 3 in the RC-50
Owner’s Manual.
Guide Settings
•
Patch:PhraseChng—This parameter determines the RC-50’s Phrase
Change mode. As discussed earlier in “Selecting Patches,” it affects how
patches load during phrase playback.
When the RC-50’s in Single mode, the Phrase Change mode also affects
what happens when a new phrase is selected while the current phrase
is playing or being overdubbed. When Phrase Change is set to:
The RC-50’s built-in guide provides a rhythmic backing for you to play with
while you’re recording and playing phrases. The guide offers many different
patterns in various time signatures and musical styles, as well as high-quality
audio using sampled drum and percussion sounds.
To learn about the guide and its various settings, see the RC-50 Workshop
booklet The Guide and Loop Quantize and Chapter 3 in the RC-50 Owner’s
Manual.
Other Patch Settings (NAME/PATCH Button)
Various other patch settings can be accessed by pressing
the NAME/PATCH button:
�
Press NAME/PATCH twice.
�
Use the PARAMETER buttons to display the desired parameter screen.
�
Turn the PATCH/VALUE dial to choose the desired setting.
�
Repeat Steps 2-3 to set other parameters.
5�
Press EXIT when you’re done.
Patch:Level—Set the overall patch level here, from 0 to 200. 100 is the
default level.
•
IMMEDIATE—the newly selected phrase begins playing or recording
immediately.
•
LOOP END—the newly selected phrase begins playback or
recording when the end of the current phrase is reached.
To learn more about recording and playing phrases in Single mode, see
the RC-50 Workshop booklet Using Single Mode.
•
Patch:Fade In—When a phrase’s Start mode is set to FADE IN, this
parameter determines the fade-in time. The available values are 0-100,
with a higher number resulting in a longer fade-in time.
•
Patch:Fade Out—When a phrase’s Stop mode is set to FADE OUT, this
parameter determines the fade-out time. The available values are 0100, with a higher number resulting in a longer fade-out time.
We’ll cover phrases’ Start and Stop modes in the next
section.
As the button name implies, the patch can be named from one
of the NAME/PATCH parameter screens. We’ll show you how a
bit later.
•
Patch:SimulStart—In Multi mode, there may be instances where you’d
like two or more phrases to start playing simultaneously when you
press the REC/PLAY/OVERDUB pedal, or when the patch is selected
during phrase playback. This can be achieved using the Simul-Start
function.
1BUDI4JNVM4UBSU
0''0''0''
While on this screen, you can select the Simul-Start status for each
phrase: Use the parameter buttons to select the desired phrase, and
then turn the PATCH/VALUE dial to choose the desired setting (ON or
OFF).
Simul-Start settings have no effect when the RC-50’s in Single mode.
To learn more about Simul-Start, see the RC-50 Workshop booklet Using
Multi Mode and Page 50 in the RC-50 Owner’s Manual.
The RC-50 has system input settings that allow you to override the
settings made in a patch. When they’re set this way, changes made on
the Patch:Input Out screen won’t have any effect. To learn more about
system input settings, see the RC-50 Workshop booklet Audio Inputs
and Outputs and Page 69 in the RC-50 Owner’s Manual.
•
Phrase Settings
There are a number of settings that determine the behavior of individual
phrases within the patch. These settings are made on the phrases’ Phrase
Edit screens:
�
Press the PHRASE EDIT button for the desired phrase: PHRASE 1, 2, or
3.
�
Use the PARAMETER buttons to display the desired Phrase Edit screen
for the selected phrase.
You can also turn on Simul-Start for a phrase by pressing and holding
its PHRASE SELECT pedal for at least two seconds. When Simul-Start is
already on, you can turn it off using the same procedure.
1ISBTF0OF4IPU
-001
In this example we’ve selected Phrase 2’s One Shot screen.
In Multi mode, you can start and stop all phrases at once by
simultaneously pressing both the PHRASE 2 and PHRASE 3 pedals.
•
Patch:Input Out—This parameter determines the output pair (or pairs)—
MAIN, SUB, or MAIN+SUB—used to output sounds arriving at the
RC-50’s INPUT jacks.
Patch:MIDI Sync—This parameter determines how the RC-50 behaves
when receiving MIDI synchronization messages from an external
device. The available settings are AUTO, INTERNAL, or REMOTE. To learn
about these settings, see Page 50 in the RC-50 Owner’s Manual.
�
Turn the PATCH/VALUE dial to choose the desired setting.
�
Repeat Steps 2-3 to make additional settings. (While you’re on any
Phrase Edit screen, you can select a different phrase by pressing its
PHRASE EDIT button.)
5�
Press EXIT when you’re done.
Sounds assigned to the MAIN outputs are also sent to the PHONES
jack.
Phrase Edit Screens
•
Phrase(1, 2, or 3):One Shot—This parameter determines how a phrase
plays back. When it’s set to:
•
•
•
LOOP—the phrase loops continuously.
ONE SHOT—the phrase plays once and then stops. While a One
Shot phrase is playing, you can:
•
restart it from its beginning—by pressing REC/PLAY/
OVERDUB.
•
make it loop continuously—by pressing and holding REC/
PLAY/OVERDUB.
Each phrase has a front-panel ONE SHOT indicator that lights when it’s
set for One Shot playback.
Phrase(1, 2, or 3):Stop—This parameter determines what happens when
phrase playback is stopped. When it’s set to:
•
•
IMMEDIATE—the phrase stops immediately.
•
LOOP END—the phrase plays to its ending and then stops.
FADE OUT—the phrase gradually fades out. When the volume
reaches 0, phrase playback stops. The fade-out time is determined
by the Patch:Fade Out setting.
When a playing phrase is set to FADE OUT or LOOP END, selecting the
phrase and pressing the STOP pedal initiates the phrase’s stop behavior.
If desired, you can stop the phrase immediately with a second press
of the STOP pedal.
•
Phrase(1, 2, or 3):Level—Set the phrase’s volume level, from 0-200, here.
You can also use the front panel PHRASE EDIT LEVEL knobs to set the
phrases’ volume levels.
Audio can’t be overdubbed in a phrase when it’s set to ONE SHOT.
•
Phrase(1, 2, or 3):Reverse—When this parameter is set to ON, the phrase
plays in reverse. Choose OFF for normal playback.
Each phrase has a front-panel REVERSE indicator that lights when
reverse playback is on.
•
Phrase(1, 2, or 3):Start—This parameter determines what happens when
phrase playback is started. When it’s set to:
•
•
•
Phrase(1, 2, or 3):Pan—This parameter sets the phrase’s pan position in
its assigned output pair(s) and the PHONES jack. You can set the phrase’s
panning to any of the following values: L50-L1, CENTER, or R1-R50.
If you’re using the RC-50 with a mono amplification system and/or
you’re only using a mono output (MAIN OUTPUT R/MONO or SUB
OUTPUT R/MONO), the pan setting won’t have any audible effect on
the sound.
•
IMMEDIATE—the phrase starts playing at normal volume.
FADE IN—the phrase gradually fades in until normal volume is
reached. The fade-in time is determined by the Patch:Fade In
setting.
Phrase(1, 2, or 3):Tempo Sync—When this parameter is set to ON, the
phrase plays at the current patch tempo. When it’s set to OFF, the phrase
plays at the tempo at which it was originally recorded.
To learn more about Tempo Sync, see the RC-50 Workshop booklet
Tempos and Tempo Sync.
•
Phrase(1, 2, or 3):Output—This parameter determines the output jacks
that the phrase is sent to. You can select MAIN, SUB, or MAIN+SUB.
Sounds assigned to the MAIN outputs are also sent to the PHONES
jack.
If you prefer not to have your control assignments change with
each patch selection, you can set them so they’re the same for all
patches.
The RC-50 has system output settings that allow you to override the
settings made in a patch. When they’re set this way, changes made on
the Phrase(1, 2, 3):Output screen won’t have any effect. To learn more
about system output settings, see the RC-50 Workshop booklet Audio
Inputs and Outputs and Page 69 in the RC-50 Owner’s Manual.
Pedal and MIDI CC settings are adjusted on the CTL/EXP PEDAL parameter
screens.
Pedal Settings
The RC-50 offers an enormous amount of realtime control via its seven
onboard foot pedals. While five of the onboard pedals are “hard-wired” to
control the primary functions found on their labels...
•
•
•
REC/PLAY/OVERDUB
STOP
PHRASE 1, 2, and 3
...two pedals—TEMPO and UNDO/REDO—can be reassigned to control
alternate functions if desired.
If you wish to have even more control, you can connect optional pedals to
the CTL 1, 2 PEDAL and EXP/CTL 3, 4 PEDAL jacks (four footswitches or two
footswitches and an expression pedal) and use them to control numerous
RC-50 functions. Additionally, MIDI CC messages (#1, #7, and #80) received at
the MIDI IN jack can be used to control up to three different functions.
Adding it all together, up to fourteen different functions can be controlled
in realtime when you incorporate external pedals and MIDI, and eleven of
these are user-assignable. That’s a lot of control! What’s great is that your
user assignments can be stored with patches, allowing you to reconfigure all
of your control assignments with a simple patch selection.
�
Press CTL/EXP PEDAL.
�
Use the PARAMETER buttons to display the desired
screen.
�
Use the parameter buttons to place the onscreen cursor under the
desired parameter.
�
Turn the PATCH/VALUE dial to choose the desired setting.
5�
Repeat Steps 2-4 to set other parameters.
�
Press EXIT when you’re done.
To learn how to connect external pedals and MIDI devices and check out the
RC-50 parameters that can be assigned on the CTL/EXP PEDAL screens, see
Chapters 7 and 8 in the RC-50 Owner’s Manual.
Naming a Patch
Use the following procedure to name the currently selected patch:
�
Press NAME/PATCH.
�
Use the parameter buttons to select the desired
character position.
�
To enter characters:
•
•
Turn the PATCH/VALUE dial—to select the desired character.
•
•
Press CTL/EXP PEDAL—to insert a blank space.
Press TAP TEMPO—to switch between uppercase and lowercase
characters.
Press SYSTEM/USB—to delete a character.
�
Repeat Steps 2-3 to enter additional characters.
5�
Press EXIT when you’re done.
10
Saving and Organizing Patches
Destination patch number
About Preset Protect
8SJUFUP
1BUDI/BNF
The RC-50 has a feature called Preset Protect that protects Patches 1-5 from
being overwritten accidentally.
Destination patch name
When shipped from the factory, the RC-50 has demonstration audio saved in
Patches 1-5, and Preset Protect is enabled. If you want to use Patches 1-5 to
save your own data, you’ll need to disable Preset Protect first.
Saving a patch overwrites any data existing in the destination patch.
If the destination patch contains data you want to keep, select a
different patch, or back up its data to a computer via USB before
proceeding.
If you wish to save the factory data in Patches 1-5 for later use, you
can back it up to a computer via USB. To learn how, see Chapter 9 in
the RC-50 Owner’s Manual.
If you wish to cancel the patch-saving process at this point, press
EXIT.
Here’s how to turn Preset Protect on and off:
�
Press SYSTEM/USB.
�
Use the parameter buttons to display the Sys:PresetPrtct screen.
�
Turn the PATCH/VALUE dial to turn Preset Protect on or off.
�
Press EXIT when you’re done.
Saving a Patch
If the current patch contains any newly recorded phrase data or parameter
changes that you wish to keep, you’ll want to save it to one of the RC-50’s
99 patch locations before selecting a new patch or turning off the RC-50’s
power. If you don’t, the new data and/or changes will be lost.
Use the following procedure to save a patch.
�
Press WRITE.
�
Turn the PATCH/VALUE dial to select the desired destination patch
number. The display shows the name and number of the selected
patch.
�
Press WRITE. “Now writing...” is displayed during the writing process.
When it’s complete, the RC-50 automatically returns to the Play screen.
Don’t turn off the power to the RC-50 while “Now writing...” is
displayed. Doing so can result in the loss of data you’ve saved in the
RC-50.
If there isn’t enough free memory to store the contents of the patch,
“Memory Full” is displayed and the patch-saving process fails. To avoid
this situation, check the Play screen to make sure there’s enough free
memory before recording to a patch’s phrases.
11
Copying Patches and Phrases
Copying a Patch
Use the following procedure to copy a previously saved patch to another
patch location.
Copying a Phrase to Another Patch
The RC-50 allows you to copy a single phrase to a phrase location in another
patch.
�
Select the patch that contains the phrase you wish to copy.
�
Select the phrase you wish to copy by pressing its PHRASE SELECT
pedal.
�
Select the desired source patch.
�
Press WRITE. The Patch Copy screen appears.
�
Press WRITE.
�
Turn the PATCH/VALUE dial to select the destination patch number. The
display shows the name and number of the selected patch.
�
Use the parameter buttons to display the Copy Phrase screen.
Source phrase number
Copying a patch overwrites any data existing in the destination patch.
If the destination patch contains data you want to keep, select a
different patch, or back up its data to a computer via USB before
proceeding.
If you wish to cancel the patch-copying process at this point, press
EXIT.
�
$PQZ1ISBTFUP
1BUDI1ISBTF
Destination patch number
5�
Use the parameter buttons and PATCH/VALUE dial to select the desired
patch and phrase destinations.
Copying a phrase overwrites the data in the selected destination
phrase. If the phrase contains data you want to keep, select a different
patch, or back up its data to a computer via USB before proceeding.
Press WRITE. “Now copying...” is displayed during the copying process.
When it’s complete, the RC-50 automatically returns to the Play screen.
Don’t turn off the power to the RC-50 while “Now copying...” is
displayed. Doing so can result in the loss of data you’ve saved in the
RC-50.
If there isn’t enough free memory to copy the contents of the patch,
“Memory Full” is displayed and the patch-copying process fails.
Destination phrase number
If you wish to cancel the phrase-copying process at this point, press
EXIT.
�
Press WRITE. “Now copying...” is displayed during the copying process.
When it’s complete, the RC-50 automatically returns to the Play screen.
Don’t turn off the power to the RC-50 while “Now copying...” is
displayed. Doing so can result in the loss of data you’ve saved in the
RC-50.
If there isn’t enough free memory to copy the phrase, “Memory Full”
is displayed and the phrase-copying process fails.
12
Exchanging a Patch
Initializing a Patch
To aid in organizing your patches, you can exchange the entire contents of
one saved patch with another.
�
Select the desired source patch.
�
Press WRITE.
�
Use the parameter buttons to display the Patch Exchange screen.
Initializing a patch clears its contents and returns all patch parameters to the
factory defaults. A newly initialized patch is named “INIT PATCH.”
Initializing a patch clears any data existing in it. If the patch contains
data you want to keep, select a different patch, or back up its data to
a computer via USB before proceeding.
Exchange destination patch number
&YDIBOHF
1BUDI/BNF
Exchange destination patch name
�
Turn the PATCH/VALUE dial to select the patch you want to exchange
locations with. The display shows the name and number of the selected
patch.
If you wish to cancel the patch-exchange process at this point, press
EXIT.
5�
Press WRITE. “Exchanging...” is displayed during the exchange process.
When it’s complete, the RC-50 automatically returns to the Play screen.
Don’t turn off the power to the RC-50 while “Exchanging...” is
displayed. Doing so can result in the loss of data you’ve saved in the
RC-50.
If there isn’t enough free memory to store the contents of the patch,
“Memory Full” is displayed and the patch-exchange process fails.
�
Press WRITE.
�
Use the parameter buttons to display “Initialize.”
�
Turn the PATCH/VALUE dial to select the patch you wish to initialize.
�
Press WRITE. “Initializing...” is displayed during the initialization process.
When it’s complete, the RC-50 automatically returns to the Play screen.
Don’t turn off the power to the RC-50 while “Initializing...” is
displayed. Doing so can result in the loss of any data you’ve saved in
the RC-50.
Patch Strategies
Performance Setups
The RC-50 excels as a live performance tool for recording and looping
phrases and building compositions on the fly. As you work with the RC-50,
you’ll probably find that specific parameter settings suit certain musical
situations better than others.
For example, Single mode is perfect for creating song sections one after
the other, with each section captured in a separate phrase. Multi mode, on
the other hand, is great for complex, layered multi-phrase performances. In
either mode, sometimes you’ll want to use the guide, while at other times
you may not need it. With other options such as Loop Sync, Tempo Sync,
etc.—not to mention external pedal and MIDI control assignments—the
creative possibilities are nearly endless.
13
With so many options, pre-saved patches can be a great help, especially
during live performances. By saving your favorite parameter and realtime
control setups in various blank patches, you can have a number of “blank
slates” at the ready for any looping adventure.
Backing Track Storage
C
With its large onboard memory and the ability to
O V
C
store audio in phrases, the RC-50 makes a great
backing track player. You can pre-record a song’s
backing into phrases and save them to patches, or you can import audio
into phrases from your computer via USB. In this way, the RC-50 becomes
your own personal “band,” ready to support your performance at your
command.
While we’re on the subject, a backing track doesn’t always have to be
a full-blown ensemble arrangement. It can be as simple as a harmony
vocal that you trigger on-command using One Shot playback, or a
stored chord progression that you sneak in as a bit of audio “slight
of hand” during an otherwise-live looping performance. Whether
obvious or subtle, backing tracks can be used to great effect in many
situations.
Using Patch Extent
Another handy performance feature is the Patch Extent function. It defines a
lower and upper limit of patch numbers that can be selected.
For example, say that all the patches you plan to use for a particular
performance are located within Patches 10-22. Using Patch Extent, you can
set the RC-50 to limit patch selection to only this patch range, eliminating
the need to increment or decrement through unnecessary patches.
Use the following procedure to set the patch selection range:
�
Press SYSTEM/USB.
�
Use the parameter buttons to display the Sys:Patch Extent screen.
4ZT1BUDI&YUFOU
Low patch number
�
Use the parameter buttons to place the cursor under the low patch
number, and then turn the PATCH/VALUE dial to choose the desired
patch.
�
Use the parameter buttons to place the cursor under the high patch
number, and then turn the PATCH/VALUE dial to choose the desired
patch.
5�
Press EXIT when you’re done.
Using Preset Protect
As discussed earlier, the RC-50’s Preset Protect function
protects Patches 1-5 from being overwritten accidentally. If
you’ve created some custom performance setups—or have some critical
backing tracks stored in a few patches—you might want to save them in
Patches 1-5 and enable Preset Protect to keep them safe.
High patch number
The End
We hope you’ve found this workshop helpful. Keep an eye out for other
RC-50 Workshop booklets, available for downloading at www.BOSSUS.com
and www.RolandUS.com.
For the latest RC-50 updates and support tools, visit the BOSS U.S.
Web site at www.BOSSUS.com. If you need personal assistance, call our
amazing Product Support team at 323-890-3743.
14