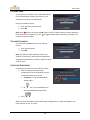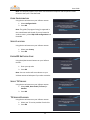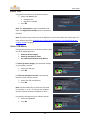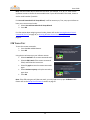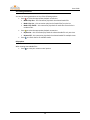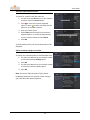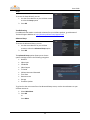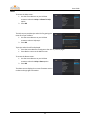
1
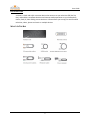
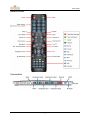
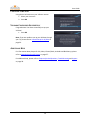
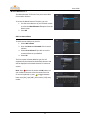
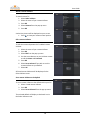
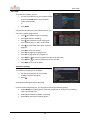
MONSOON MULTIMEDIA User Guide © 2011 Monsoon Multimedia, Inc. All Rights Reserved. User Guide Contents INTRODUCTION ................................................................................................................................................ 2 HOOK UP THE CABLES ...................................................................................................................................... 4 CONFIGURE YOUR VULKANO ............................................................................................................................. 7 CONFIGURE YOUR VULKANO F ROM YOUR TV ..................................................................................................... 7 USING YOUR VULKANO ................................................................................................................................... 15 WATCH TV ..................................................................................................................................................... 15 WATCH REMOTE TV ........................................................................................................................................ 17 TV GUIDE ...................................................................................................................................................... 20 MY RECORDINGS ............................................................................................................................................. 25 HOME MEDIA ................................................................................................................................................. 28 INTERNET APPS ............................................................................................................................................... 30 SETTINGS ....................................................................................................................................................... 32 HELP ............................................................................................................................................................. 35 VULKANO SETUP FOR PC/MAC ....................................................................................................................... 36 VULKANO SETUP FOR WINDOWS 7 AND VISTA ................................................................................................. 36 VULKANO SETUP FOR WINDOWS XP ................................................................................................................ 40 VULKANO SETUP FOR PC (CONTINUED) ........................................................................................................... 44 VULKANO SETUP FOR MAC ............................................................................................................................. 48 SETUP THE STB CONTROL ............................................................................................................................... 55 DOWNLOAD AND INSTALL PLAYERS .................................................................................................................. 57 FREQUENTLY ASKED QUESTIONS ...................................................................................................................... 58 TROUBLESHOOTING ........................................................................................................................................ 58 SUPPORT ....................................................................................................................................................... 58 1 User Guide INTRODUCTION Vulkano is a sleek and stylish consumer device that connects to your television STB (Set Top Box), and enables a complete television and Internet media experience on your Smartphone, iPhone, iPad, PC, Mac and big-screen television. Vulkano allows you to enjoy live and recorded television, videos, photos and music on multiple devices. WHAT’S IN THE BOX 2 User Guide REMOTE CONTROL VULKANO UNIT 3 User Guide HOOK UP THE CABLES Congratulations on buying your Vulkano. We will take you through a few simple steps to get you up and running. You can also setup your Vulkano from your PC. If you cannot set up your Vulkano through your TV, please refer to the Vulkano Setup For PC/Mac section on page 36. CONNECT VULKANO TO YOUR STB Your STB has output connectors on the back for Component setup, Composite setup or both. If you have both, use the Component setup for better video quality. You will need a STB to use Vulkano. Connect the cables from your STB output connectors to your Vulkano’s input connectors as shown below. For the Component setup option, you will use two sets of cables. For the Composite option, you will only use one set. Suggestion: Be sure to write down your STB brand and model number. You will need it later in the setup process. 4 User Guide CONNECT VULKANO TO YOUR TV This step assumes that your STB was previously connected to your TV. You will re-use your existing cables. For the setup process, it is not mandatory to connect your Vulkano output to a TV. Your TV has audio and video input connectors for Component setup, Composite setup or both. Make sure you use the same cable types, either Component or Composite, for this connection as used in the previous section. Connect the cables from your Vulkano output connectors to your TV’s input connectors, as shown below. For the Component setup option, you will use two sets of cables. For the Composite option, you will only use one set. If your TV has an HDMI input connector, use the HDMI setup option for better audio and video quality. 5 User Guide CONNECT VULKANO TO THE HOME NETWORK Vulkano can work on your home network, whether it is Wi-Fi or Ethernet. If using Wi-Fi: You will configure Vulkano’s Wi-Fi during the setup process If using Ethernet: Connect your Vulkano to your router as shown CONNECT VULKANO TO THE POWER ADAPTOR Plug the power adapter into your Vulkano and a wall plug or power strip. 6 User Guide CONFIGURE YOUR VULKANO This section describes how to setup your Vulkano from your TV, using your Vulkano remote control. Note: Before you begin setup, use your TV remote to select the proper input source (Composite, Component or HDMI). CONFIGURE YOUR VULKANO FROM YOUR TV After switching on your Vulkano, the Get Started screen will be displayed on your television. If you have connected your Vulkano to your TV with the HDMI input: Press “1” on your Vulkano remote If you have connected your Vulkano to your TV with the Composite output: Press “2: on your Vulkano remote If you have connected your Vulkano to your TV with the Component input: Press “OK” on your Vulkano remote Note: The Get Started screen is only displayed for a short period of time. This is normal. If you have not pressed “1”, “2”, or “OK” when the Get Started screen is displayed, don’t worry. The Get Started screen will be re-displayed momentarily. ETHERNET (WIRED) HOME NETWORKS If you connected your Vulkano to your router using Ethernet, the Network Configuration screen will be displayed. Press OK 7 User Guide WIRELESS NETWORK NAME You have the option to either select or manually input a wireless network name. Select a wireless network name Using the Arrow buttons on your Vulkano remote: 1. Select your wireless network 2. Press OK Using your Vulkano remote: 1. Enter your key or passphrase 2. Press OK Note: Press and use the Arrow and OK buttons on your Vulkano remote to select characters from the on-screen keyboard, or press to toggle between lower case [abc], caps [ABC], and numeric [123] entry modes. A Network Configuration confirmation screen will be displayed. Press OK Note: To refresh the list of available wireless network names: select Refresh SSID List and press OK Manually input a wireless network name Using the Arrow buttons on your Vulkano remote: 1. Select Enter another SSID 2. Press OK 8 User Guide Using your Vulkano remote: 1. Enter a wireless network network name (SSID) 2. Press OK Note: Press and use the Arrow and OK buttons on your Vulkano remote to select characters from the on-screen keyboard, or press to toggle between lower case [abc], caps [ABC], and numeric [123] entry modes. Using the Arrow buttons on your Vulkano remote: 1. Select your Security type None WEP WPA 2. Press OK Using your Vulkano remote: 1. Enter the key or passphrase 2. Select Done 3. Press OK Note: Press and use the Arrow and OK buttons on your Vulkano remote to select characters from the on-screen keyboard, or press to toggle between lower case [abc], caps [ABC], and numeric [123] entry modes. A Network Configuration confirmation screen will be displayed. Press OK 9 User Guide VULKANO NAME You can give your Vulkano a name and password. This name and password will allow you access to your Vulkano from your PC or mobile device. Using your Vulkano remote: 1. Enter your own Vulkano name 2. Press OK Note: Press and use the Arrow and OK buttons on your Vulkano remote to select characters from the on-screen keyboard, or press to toggle between lower case [abc], caps [ABC], and numeric [123] entry modes. VULAKNO PASSWORD Use the Arrow and OK buttons on your Vulkano remote: 1. Enter your password 2. Press OK Note: The Vulkano name and password are case sensitive. If you enter a name that has already been assigned to someone else, you will be asked to choose another name. CONFIGURE VIDEO INPUT Using the Arrow buttons on your Vulkano remote: 1. Select the appropriate video input configuration that corresponds to how you connected Vulkano to your STB: Composite – if you used Red/White/ Yellow cables Component – if you used Red/Green/ Blue and Red/White/Yellow cables 2. Press OK When you have selected the correct video input configuration, the video will appear in the lower-left part of your TV screen. 10 User Guide Note: This step only appears if you have connected both Composite and Component cables. Otherwise the input is auto-detected. GUIDE CONFIGURATION Using the Arrow buttons on your Vulkano remote: 1. Select Configure Guide 2. Press OK Note: The guide (TV program listing) is supported in the United States and Canada. If you are located in another country, select Skip Guide configuration and Press OK SELECT LOCATION Using the Arrow buttons on your Vulkano remote: 1. Select your Country 2. Press OK ENTER ZIP OR POSTAL CODE Using the Alpha Numeric buttons on your Vulkano remote: 1. Enter your zip code 2. Press OK Note: You can use the Left Arrow button on your Vulkano remote to backspace if you make a mistake. SELECT TV SERVICE Using the Arrow buttons on your Vulkano remote: 1. Select Cable, Over the Air (TV Tuner) or Satellite 2. Press OK TV SERVICE PROVIDER Using the Arrow buttons on your Vulkano remote: 1. Select your TV service provider from the list 2. Press OK 11 User Guide DEVICE TYPE Using the Arrow buttons on the Vulkano remote: 1. Select your Device Type: Analog Device Digital (non-rebuild) 2. Press OK Note: The Analog Device option corresponds to SD cable. The Digital (non-rebuild) option corresponds to HD cable. Note: The Device Type screen may not be displayed. If you cannot specify your device type in TV setup, please refer to the Configure Your TV From Your PC (Wireless) > Set Up EPG (Electronic Program Guide) on page 45. SELECT STB MODEL Using the Arrow buttons on the Vulkano remote, select one of the following options: Select by device category Select by manufacturer name Use code learned with PC Setup Wizard For Select by device category, use the Arrow buttons on your Vulkano remote: 1. Select your STB type 2. Press OK For Select by manufacturer name, use the Arrow buttons on your Vulkano remote: 1. Select your STB manufacturer 2. Press OK Note: Use the number keys to select the first letter. For example, 2 = A, B, C, 2. Then use the Up/Down Arrows to choose the exact manufacturer name. Using the Arrow buttons on your Vulkano remote: 1. Select the STB Model 2. Press OK 12 User Guide Note: Use the number keys to select the first letter. For example, 2 = A, B, C, 2. Then use the Up/Down Arrows to choose the exact model name. If your device model is not listed, choose a similar model number if possible. For Use code learned with PC Setup Wizard, it will be necessary to, first, setup your Vulkano to learn your remote control codes. 1. Select Use code learned with PC Setup Wizard 2. Press OK For information about assigning control codes, please refer to the Learning Remote Control Commands (For PC) on page 46, or Learning Remote Control Commands (For Mac) section on page 54. STB TUNING TEST To test the remote commands: 1. Press the CH+ and CH- buttons 2. Press OK Using the Arrow buttons on your Vulkano remote: Select It worked if the remote commands work Select It didn’t work if the remote commands failed, and follow the instructions Select Try again to test the remote commands again Select Continue anyway to skip the test and try again later Press OK Note: If the STB tuning test still does not work, you may need to set up your IR Blaster cable. Please refer to the Setup The STB Control section on page 55. 13 User Guide CONFIGURE TIME ZONE Using the Arrow buttons on your Vulkano remote: 1. Select your time zone 2. Press OK VULKANO CONFIGURED SUCCESSFULLY Congratulations! You have successfully set up your Vulkano! Press OK Note: If you are unable to set up your Vulkano through your TV, please refer to Vulkano Setup For PC/Mac on page 36. ADDITIONAL HELP For information about players for PCs, Macs, iPhone/iPads, Androids and Blackberrys, please refer to Download And Install Players on page 57. For additional help, please refer to Frequently Asked Questions, Troubleshooting and Support on page 58. 14 User Guide USING YOUR VULKANO This section covers the following: Watch TV Watch Remote TV TV Guide My Recordings Home Media Internet Apps Settings Help WATCH TV To watch Live TV, you can: Use the Arrow buttons on your Vulkano remote to select the Watch TV option from the Menu screen and press OK or Press TV A television picture will be displayed on your screen. Press to view your remote control options Note: Some STB Cable and Satellite boxes require users to enter leading zeros in front of single-digit channels. For example: 7, 07, 007, 0007. Record a program To record a program: 1. Press to initiate a recording of the program you are currently viewing 2. Use the Left/Right Arrow buttons on your Vulkano remote to specify a longer or shorter recording time 3. Press OK or to begin the recording Note: Hold down the Right Arrow button to advance the recording time in fifteen minute increments. Stop a recording To stop a recording: 1. Press again 2. Use the Left/Right Arrow buttons on your Vulkano remote and select Stop 3. Press OK 15 User Guide Note: If you selected a TV channel from the Guide, you can press the Back button to return back to the Guide. Schedule this recording To schedule a recording: Press In the Schedule this recording pop-up window, you can perform any of the following options: Use the left and right Arrow buttons on your Vulkano remote to navigate to the Clip Name, Channel No, Profile, Quality, Start Time and End Time setting options Use the alpha numeric key pad to edit the Clip Name and Channel No Use the up and down Arrow buttons on your Vulkano remote to adjust the Profile, Quality, Start Time and End Time settings options Profile options are used to specify the type of video format for a recording. The higher resolution and quality formats provide a better video quality, but uses more disk space and takes longer to transfer to your tablet, smartphone or PC. Choose the best profile from the list. Profile options include the following: PC/Mac/TV; iPhone, iPod touch; iPad; Droid, Milestone; Cliq, Devour; General-high(640x480); General-medium(480x320); General-small(320x240); Google Nexus; and BlackBerry. Quality options include the following: Standard, and High (Large Size). Using the Arrow buttons on your Vulkano remote: Select Yes to manually schedule a recording Select No to cancel the scheduling option 16 User Guide WATCH REMOTE TV The Watch Remote TV function lets you stream video from another Vulkano. To access the Watch Remote TV option, you can: 1. Use the Arrow buttons on your Vulkano remote to select the Watch Remote TV option from the Menu screen 2. Press OK Add a remote Vulkano To add a remote Vulkano to your list: 1. Select Add Vulkano 2. Enter the Name and Password of the remote Vulkano 3. Select Set as selected if you wish to set this remote Vulkano as your default 4. Select OK The first remote Vulkano added to your list will automatically be selected as the default selection and will be displayed in the Watch Remote TV sub-menu section. Note: Press and use the Arrow and OK buttons on your Vulkano remote to select characters from the on-screen keyboard, or press to toggle between lower case [abc], caps [ABC], and numeric [123] entry modes. 17 User Guide Watch a remote Vulkano To watch remote TV: 1. Select Select Vulkano 2. Select the name of your remote Vulkano 3. Press OK 4. Select Connect from the pop-up menu 5. Press OK A television picture will be displayed on your screen. Press to view your remote control options Edit a remote Vulkano To edit the name and password of an added remote Vulkano: 1. Select the name of your remote Vulkano 2. Press OK 3. Select Edit from the pop-up menu 4. Use the Arrow buttons on your Vulkano remote to edit the Name and Password 5. Press OK 6. Select Set as selected if you wish to set this remote Vulkano as your default 7. Select OK All listed remote Vulkanos will be displayed in the Select Vulkano menu. Set a remote Vulkano as the default To set a remote Vulkano as the default within your list: 1. Select a listed remote Vulkano 2. Press OK 3. Select Set as Selected from the pop-up menu The selected default will display a checkmark icon in the Select Vulkano menu. 18 User Guide Delete a remote Vulkano To delete a remote Vulkano from your list: 1. Use the Arrow buttons on your Vulkano remote to select a remote Vulkano 2. Press OK 3. Select Delete from the pop-up menu 4. Select OK in the Confirmation pop-up window The deleted remote Vulkano will be removed from the Select Vulkano menu. 19 User Guide TV GUIDE To access the TV Guide, you can: Use the Arrow buttons on your Vulkano remote to select the Guide option from the Menu screen and press OK or Press Guide Using the Arrow buttons on your Vulkano remote, you can select a specific program and: Press to schedule or stop a recording Press to delete a recording Press add a channel to your favorites list, show favorites only, or return to the Guide Press to view information about a specific program Press OK to tune to a channel Press CH+ to page up the program list Press CH- to page down the program list Press PREV or |<< to view the program list from the previous day Press NEXT or >>| to view the program list for the next day Press Back to return to the Menu Schedule a recording To schedule a recording from the Guide: 1. Use the Arrow buttons on your Vulkano remote to select the program 2. Press An information dialog box will be displayed. From the Information dialog box, you can perform one of the following options: Select Modify to manually specify clip name, profile format, quality of the recording, start time and end time Select Yes to manually schedule a recording Select No to cancel the scheduling option 20 User Guide Modify settings In the Modify Settings dialog box, you can perform any of the following options: Use the left and right Arrow buttons on your Vulkano remote to navigate to the Clip Name, Profile, Quality, Start Time and End Time setting options Use the alpha numeric key pad to edit the Clip Name Use the up and down Arrow buttons on your Vulkano remote to adjust the Profile, Quality, Start Time and End Time settings options Profile options are used to specify the type of video format for a recording. The higher resolution and quality formats provide a better video quality, but uses more disk space and takes longer to transfer to your tablet, smartphone or PC. Choose the best profile from the list. Profile options include the following: PC/Mac/TV; iPhone, iPod touch; iPad; Droid, Milestone; Cliq, Devour; General-high(640x480); General-medium(480x320); General-small(320x240); Google Nexus; and BlackBerry. Quality options include the following: Standard and High (Large Size). Using the Arrow buttons on your Vulkano remote: Select Save to make the Profile and Quality settings the default settings for future recordings. This will return you to the previous screen Select Yes to manually schedule a recording Select No to cancel the scheduling option If the amount of space required for a recording exceeds your available space, an information dialog box will be displayed. Press OK Note: If you wish to free up available space, you can delete existing or scheduled recordings from the storage. For additional information, please refer to the My Recordings section on page 25. 21 User Guide Stop a recording To stop a recording in progress: 1. Use the Arrow buttons on your Vulkano remote to select the program 2. Press to stop the recording 3. Select Yes A confirmation dialog box will be displayed. 4. Press OK Delete a recording To delete a recording: 1. Use the Arrow buttons on your Vulkano remote to select the previously recorded program from the Guide 2. Press 3. Select Delete Recording(s) A confirmation dialog box will be displayed. 4. Press OK Search for a program / add to favorites To search for a program from the Guide: 1. Press and select Search or Press Search on your Vulkano remote 2. Use the alpha numeric key pad to enter a Keyword 3. Use the Arrow buttons to select Search and specify either Programs or Channels 4. For programs, use the Arrows and OK buttons to specify the keyword search to include a Title and/or Description 5. Select Exact Phrase (Optional) 6. Press OK 22 User Guide The search results will be displayed. You can perform any of the following options: 1. Press to schedule or stop a recording 2. Press to add a channel to your favorites list, show favorites only, or return to the Guide 3. Press to view information about a program 4. Press CH+ to page up the search results 5. Press CH- to page down the search results To add a channel to your favorites list: 1. Use the Arrow buttons on your Vulkano remote to select a program 2. Press 3. Select Add to favorites Channels that have been added to your favorites list will display a in the channel listing. To remove a channel from your favorites list: 1. Use the Arrow buttons on your Vulkano remote to select the favorites channel 2. Press 3. Select Remove from favorites The icon will be removed from the TV Guide listing. Show favorites only To view your favorites list: 1. Press 2. Select favorites All programs that have been added to the favorites list will be displayed. View program information To view specific information about a program: 1. Use the Arrow buttons on your Vulkano remote to select the scheduled program 2. Press Information will be displayed at the bottom of the screen. 23 User Guide Recording a show from the Guide – Indicator icons When viewing the Guide: The Red Circle Indicator is displayed for recordings that are currently in progress The Orange Circle Indicator for scheduled recordings The Green Circle Indicator is displayed is displayed for recordings that have been completed. 24 User Guide MY RECORDINGS To access My Recordings, you can: Use the Arrow buttons on your Vulkano remote to select the My Recordings option from the Menu screen and press OK or Press DVR Ready to watch Using the Arrow buttons on your Vulkano remote: 1. Select Ready to watch to view recordings that have been completed 2. Press OK The Ready to watch screen displays a list of programs that have already been recorded. The name of the program, program description, record profile and file size will be displayed on the left side of the screen. 1. Press to delete the selected recording 2. Press to refresh the list 3. Press >/|| or OK to view the selected recording 4. Press CH+ to page up the Ready to watch list 5. Press CH- to page down the Ready to watch list 6. Press Back to return to the previous screen To view a program, you can: 1. Use the Arrow buttons on your Vulkano remote to select a recorded program 2. Press OK A recorded program will be displayed on your screen. Press to view your remote control options 25 User Guide Recorded programs can be viewed in your PC, Mac or Mobile device Ready to Transfer list, if they have been recorded in the correct format for that device. When viewing a recording, you have the following options: Press c and select Resume playback Press c and select Start from beginning Press c and select Erase this recording Press c and select Watch TV Press c and select Recording (Ready to Watch) Scheduled Using the Arrow buttons on your Vulkano remote: 1. Select Scheduled to view programs that are scheduled for recording 2. Press OK The Scheduled screen displays a list of programs that are currently being recorded and are scheduled to be recorded. Use the Arrow buttons on your Vulkano remote to select a scheduled program: Press to stop a recording in progress and keep that part which has already been recorded Press to cancel a scheduled recording that is not yet in progress Press to refresh the list Press CH+ to page up Press CH- to page down Press Back to return to the previous screen 26 User Guide Schedule Now Using the Arrow buttons on your Vulkano remote: 1. Select Schedule now to record a program that is currently in progress 2. Press OK In the Schedule this recording pop-up window, you can perform any of the following options: Use the left and right Arrow buttons on your Vulkano remote to navigate to the Clip Name, Channel No, Profile, Quality, Start Time and End Time setting options Use the alpha numeric key pad to edit the Clip Name and Channel No Use the up and down Arrow buttons on your Vulkano remote to adjust the Profile, Quality, Start Time and End Time settings options Profile options are used to specify the type of video format for a recording. The higher resolution and quality formats provide a better video quality, but uses more disk space and takes longer to transfer to your tablet, smartphone or PC. Choose the best profile from the list. Profile options include the following: PC/Mac/TV; iPhone, iPod touch; iPad; Droid, Milestone; Cliq, Devour; General-high(640x480); General-medium(480x320); General-small(320x240); Google Nexus; and BlackBerry. Quality options include the following: Standard, and High (Large Size). Using the Arrow buttons on your Vulkano remote: Select Yes to manually schedule a recording Select No to cancel the scheduling option 27 User Guide HOME MEDIA Home Media provides a Universal Plug and Play (UPnP) option that enables your Vulkano to access videos, photos and music files from external PCs, Macs, Tablets and smartphones. To access video, photo and music files from an external device, that device must be enabled with a UPnP AV server application. To access Home Media, you can: Use the Arrow buttons on your Vulkano remote to select the Home Media option and press OK or Press Media All external devices with a UPnP AV server application will be displayed. Note: The Monsoon Vulkano player provides the UPnP server feature for iPhone and iPad. Access media files on shared devices To view media files from a specific external device: 1. Use the Arrow buttons on your Vulkano remote to select the device 2. Press Ok Note: It will be necessary to synch your device into the same network. Access media files on a USB device To view media files on a USB device: 1. Plug the device into the USB port 2. Use the Arrow buttons on your Vulkano remote to select the USB device 3. Press OK 28 User Guide Set viewing parameters You can set viewing parameters to any of the following options: Press to select the appropriate playback convention: Mode: Play One – this convention plays back the selected media file. Mode: Play List – this convention plays back all media files from the list. Mode: Play Shuffle – this convention plays back all media files from the list in random order. Press to select the appropriate playback convention: Repeat: On – this convention plays back the selected media file only one time. Repeat: Off – this convention plays back the selected media file multiple times. Press to refresh the list of available media Help options When viewing Home Media files: Press to view your remote control options 29 User Guide INTERNET APPS To access Internet Apps, you can: Use the Arrow buttons on your Vulkano remote to select the Internet Apps option and press OK or Press Apps Access YouTube To access the YouTube feature, you can: 1. Use the Arrow buttons on your Vulkano remote to select YouTube 2. Press OK The Internet Apps > YouTube feature contains the following options that can be accessed using the Arrow buttons on your Vulkano remote: Recently Featured Top Rated Most Viewed Top Favorites Search Settings When viewing the Recently Featured, Top Rated, Most Viewed or Top Favorited options: Press to view your remote control options 30 User Guide Search for video clips on YouTube To search for a specific YouTube video clip: 1. Use the Arrow and OK buttons on your Vulkano remote to select the Search option 2. Press to select the onscreen keyboard option, or press to select the alpha numeric option on your Vulkano remote 3. Enter your search terms 4. Select Done when finished, for the onscreen keyboard option, or use the left/right Arrows on your Vulkano remote to select Search 5. Press OK YouTube videos that fit your search parameters will be displayed. Adjust resolution settings on YouTube To specify the resolution quality of YouTube video clips: 1. Use the Arrow buttons on your Vulkano remote to select the YouTube Settings option 2. Press OK 3. Use the Arrow buttons on your Vulkano remote to select the resolution quality option 4. Press OK Note: Choose the 720p HD option if high network bandwidth conditions exist. Choose a lower setting if your YouTube videos pause frequently. 31 User Guide SETTINGS To view and adjust your settings, you can: 1. Use the Arrow buttons on your Vulkano remote to select the Settings option from the Menu screen 2. Press OK The Settings menu contains the following options: Setup Advanced Setup Storage Options Eject Storage Reboot The Setup option allows you to configure your Vulkano. The Advanced Setup option allows you to choose specific settings to edit in the following categories: Network Video Input STB Model Video Output TV Guide Vulkano Name and Password Time Zone Remote Access Storage Firmware Update Storage Options allows you to specify the primary storage you want to associate with your Vulkano. Primary storage is used for recording and other media related functions. Use Eject Storage before disconnecting a USB device from your Vulkano, to help avoid data corruption. The Reboot option allows you to restart your Vulkano. 32 User Guide Setup To access the Setup Wizard, you can: 1. Use the Arrow buttons on your Vulkano remote to select the Setup option 2. Press OK Troubleshooting For additional information or technical assistance for your Vulkano product, go to Monsoon’s Technical Support Website at: http://www.myvulkano.com/support.html. Advanced Setup To access the Advanced Setup, you can: 1. Use the Arrow buttons on your Vulkano remote to select the Advanced Setup option 2. Press OK The Advanced Setup option allows you to choose specific settings to edit in the following categories: Network Video Input STB Model Video Output TV Guide Vulkano Name and Password Time Zone Remote Access Storage Firmware Update To go back to the main menu from the Advanced Setup screen, use the Arrow buttons on your Vulkano remote to: 1. Select Main Menu 2. Press OK or Press Menu 33 User Guide Storage Options To specify the primary storage you wish to associate with your Vulkano: 1. Select Storage Options 2. Select the primary storage option and press OK Eject Storage To disconnect a USB storage device from your Vulkano: 1. Select Eject Storage 2. Press OK 3. Disconnect your USB storage device Reboot The Reboot option allows you to restart Vulkano. To reboot your device: 1. Use the Arrow buttons on your Vulkano remote to select the Reboot option 2. Press OK Vulkano will restart and return you to the Menu screen. 34 User Guide HELP To access the Help screen: 1. Use the Arrow buttons on your Vulkano remote to select the Help > Vulkano TV Help option 2. Press OK The Help screen provides tips and tricks for getting the most out of your Vulkano. 1. Use the Arrow buttons on your Vulkano remote to select a Help topic 2. Press OK Topic tips and tricks will be displayed. Press the Arrow buttons to navigate to the next or previous pages Press Back to return to the Menu screen To access the About screen: 1. Use the Arrow buttons on your Vulkano remote to select the Help > About option 2. Press OK The About screen displays the current firmware version number and copyright information. 35 User Guide VULKANO SETUP FOR PC/MAC To set up your Vulkano through your computer, please refer to the following options: Vulkano Setup For Windows 7 And Vista Vulkano Setup For Windows XP Vulkano Setup for Mac VULKANO SETUP FOR WINDOWS 7 AND VISTA These steps are for setting up your Vulkano for Windows 7 or Vista. If you are using Windows XP, please refer to the Vulkano Setup For XP section on page 40. If you are using a Mac, please refer to the Vulkano Setup For Mac section on page 48. CONNECT VULKANO TO YOUR STB Your STB has output connectors on the back for Component setup, Composite setup or both. If you have both, use the Component setup for better video quality. You will need a STB to use Vulkano. Connect the cables from your STB output connectors to your Vulkano’s input connectors as shown below. For the Component setup option, you will use two sets of cables. For the Composite option, you will only use one set. Suggestion: Be sure to write down your STB brand and model number. You will need it later in the setup process. 36 User Guide CONNECT VULKANO TO YOUR TV This step assumes that your STB was previously connected to your TV. You will re-use your existing cables. For the setup process, it is not mandatory to connect your Vulkano output to a TV. Your TV has audio and video input connectors for Component setup, Composite setup or both. Make sure you use the same cable types, either Component or Composite, for this connection as used in the previous section. Connect the cables from your Vulkano output connectors to your TV’s input connectors, as shown below. For the Component setup option, you will use two sets of cables. For the Composite option, you will only use one set. If your TV has an HDMI input connector, use the HDMI setup option for better audio and video quality. 37 User Guide CONNECT VULKANO TO THE NETWORK You can use either a wired connection or Wi-Fi connection to connect your Vulkano to your home network. Wired connection If your router is close to your Vulkano: Connect your Vulkano to your router using the supplied Ethernet cable Note: You can connect your Vulkano to your router, your PC or an open Ethernet connection on your network. Wi-Fi connection If you are connecting your Vulkano to your home network through a Wi-Fi connection, then your PC setup wizard will connect wirelessly to your home network. CONNECT VULKANO TO THE POWER ADAPTOR Plug the power adapter into your Vulkano and a wall plug or power strip. 38 User Guide INSTALL AND RUN THE VULKANO SETUP WIZARD The Vulkano setup wizard is installed when you run the Vulkano PC Player program. 1. Go to: www.myvulkano.com/players.html 2. Click for the PC Player 3. Launch the downloaded Vulkano setup file 4. Click Save in the dialog box 5. Click Run in the Download Complete dialog box. 6. Select Run Vulkano Setup Wizard 7. Click Finish 8. Follow through the remaining steps in the setup wizard, or refer to the Vulkano Setup For PC (Continued) > Set Up Wireless Settings section on page 44. 39 User Guide VULKANO SETUP FOR WINDOWS XP These steps are for setting up your Vulkano for Windows XP. If you are using Windows 7 or Vista, please refer to the Vulkano Setup For Windows 7 And Vista section on page 36. If you are using a Mac, please refer to the Vulkano Setup for Mac section on page 48. CONNECT VULKANO TO THE NETWORK You can use either a wired connection or Wi-Fi connection to connect your Vulkano to your home network. Wired connection If your router is close to your Vulkano: Connect your Vulkano to your router using the supplied Ethernet cable Note: You can connect your Vulkano to your router, your PC or an open Ethernet connection on your network. Wi-Fi connection If you are connecting your Vulkano to your home network through a Wi-Fi connection, then your PC setup wizard will connect wirelessly to your home network. CONNECT VULKANO TO THE POWER ADAPTOR Plug the power adapter into your Vulkano and a wall plug or power strip. 40 User Guide INSTALL AND RUN THE VULKANO SETUP WIZARD The Vulkano setup wizard is installed when you run the Vulkano PC Player program. 1. Go to: www.myvulkano.com/players.html 2. Click for the PC Player 3. Launch the downloaded Vulkano setup file 4. Click Save in the dialog box 5. Click Run in the Download Complete dialog box. 6. Select Run Vulkano Setup Wizard 7. Click Finish 41 User Guide CONNECT TO STB Once your Vulkano has been connected to your wireless network, it will no longer be necessary to have your Vulkano connected directly to your router. 1. Disconnect the Ethernet cable from your Vulkano 2. If necessary, unplug the power supply from your Vulkano and reconnect the audio and video cables from your STB to your Vulkano 3. Reconnect the power supply 4. Click Next Note: If your PC Player does not connect wirelessly to your Vulkano, connect your PC to your router with an Ethernet cable and click Retry. CONNECT VULKANO TO YOUR STB Your STB has output connectors on the back for Component setup, Composite setup or both. If you have both, use the Component setup for better video quality. You will need a STB to use your Vulkano. Connect the cables from your STB output connectors to your Vulkano’s input connectors as shown below. For the Component setup option, you will use two sets of cables. For the Composite option, you will only use one set. Suggestion: Be sure to write down your STB brand and model number. You will need it later in the setup process. 42 User Guide CONNECT VULKANO TO YOUR TV This step assumes that your STB was previously connected to your TV. You will re-use your existing cables. For the setup process, it is not mandatory to connect your Vulkano output to a TV. Your TV has audio and video input connectors for Component setup, Composite setup or both. Make sure you use the same cable types, either Component or Composite, for this connection as used in the previous section. Connect the cables from your Vulkano output connectors to your TV’s input connectors, as shown below. For the Component setup option, you will use two sets of cables. For the Composite option, you will only use one set. If your TV has an HDMI input connector, use the HDMI setup option for better audio and video quality. Follow through the remaining steps in the setup wizard, or refer to the Vulkano Setup For PC (Continued)/Select Video Input section on page 45. 43 User Guide VULKANO SETUP FOR PC (CONTINUED) This section describes how to continue the setup process using your PC. SET UP WIRELESS SETTINGS In the Set Up Wireless Settings window: 1. Select your Home Network from the drop-down list, or Enter your network name 2. Select your Security Type: None WEP WPA 3. Enter the appropriate Network key or passphrase 4. Click Next CONNECT TO STB Once your Vulkano has been connected to your wireless network, it will no longer be necessary to have your Vulkano connected directly to your router. 1. Disconnect the Ethernet cable from your Vulkano 2. If necessary, unplug the power supply from your Vulkano and reconnect the audio and video cables from your STB to your Vulkano 3. Reconnect the power supply 4. Click Next 44 User Guide Select VIDEO INPUT In the Select Video Input window: 1. Select the appropriate video input configuration that corresponds to how you connected Vulkano to your STB: Composite – if you used Red/White/ Yellow cables Component – if you used Red/Green/ Blue and Red/White/Yellow cables 2. Click Next When you have selected the correct video input configuration, the video will be displayed in the Video Input Configuration window. Note: This step only appears if you have connected both Composite and Component cables. Otherwise the input is auto-detected. SET UP EPG (ELECTRONIC PROGRAM GUIDE) In the Set Up EPG window: 1. Select your Country 2. Enter your ZIP/Postal Code 3. Click Next Note: If your country is not listed here, then the EPG is not available for it. Press Skip to continue. In the Set Up EPG window: 1. Select your Service Provider from the drop-down list 2. Select your Device Type: Analog Device Digital (non-rebuild) 3. Click Next Note: The Analog Device option corresponds to SD cable. The Digital (non-rebuild) option corresponds to HD cable. 45 User Guide SELECT SET TOP BOX In the Select Set Top Box window: 1. Select your STB Manufacturer 2. Select your STB Model 3. Click Next If you do not know your STB manufacturer name or model number, you can perform one of the following options: Select the I couldn’t find the manufacturer check box option, or Select the I couldn’t find the model number check box option I couldn’t find the manufacturer If you selected the I couldn’t find the manufacturer check box option: 1. Click Next 2. Select the first code from the list 3. Click Channel Up or Channel Down and wait a few seconds to see if the channel changes If the channel does not change, select the next code from the list and click Next again. Repeat this process until you find the code that works. I couldn’t find my model number. If you selected the I couldn’t find the model number check box: 1. Click Next 2. Select a Set Top Box command 3. Click Test If the selected set top box command does not respond, click Test Next Code and click Test, or select a Code from the drop-down list and click Test. Repeat this process until you find the code that works. 46 User Guide Learning remote control commands If you have exhausted the list of manufacturer and model number test codes and still have no response from your Vulkano: 1. Select both the I couldn’t find the manufacturer and I couldn’t find my model number check box options 2. Click Next In the Learning Remote Control Commands window: 1. Select the Set Top Box type 2. Select a command from the Unlearned Commands list 3. Press Learn 4. Follow the onscreen instructions TEST REMOTE CONTROL In the Test remote control window: 1. Select a Set Top Box Command to Test option 2. Click Test If the STB does not work properly, click Back and choose a different model. 3. Click Next SELECT NAME AND PASSWORD In the Select name and Password window: 1. Choose and enter a Name and Password in the Name and Password fields 2. Re-enter the Password in the Confirm password field 3. Click Next VULKANO CONFIGURED SUCCESSFULLY Congratulations! You have successfully set up your Vulkano! Click Finish 47 User Guide ADDITIONAL HELP For information about players for PCs, Macs, iPhone/iPads, Androids and Blackberrys, please refer to Download And Install Players on page 57. For additional help, please refer to Frequently Asked Questions, Troubleshooting and Support on page 58. VULKANO SETUP FOR MAC These steps are for setting up your Vulkano for Windows XP. If you are using Windows 7 or Vista, please refer to the Vulkano Setup For Windows 7 And Vista section on page 36. If you are using Windows XP, please refer to the Vulkano Setup For Windows XP section on page 40. CONNECT VULKANO TO THE NETWORK You can use either a wired connection or Wi-Fi connection to connect your Vulkano to your home network. Wired connection If your router is close to your Vulkano: Connect your Vulkano to your router using the supplied Ethernet cable Note: You can connect your Vulkano to your router, your PC or an open Ethernet connection on your network. Wi-Fi connection If you are connecting your Vulkano to your home network through a Wi-Fi connection, then your PC setup wizard will connect wirelessly to your home network. CONNECT VULKANO TO THE POWER ADAPTOR Plug the power adapter into your Vulkano and a wall plug or power strip. 48 User Guide INSTALL AND RUN THE VULKANO SETUP FOR MAC To download the Vulkano setup for Mac: 1. Go to: www.myvulkano.com/players.html 2. Click for the Mac Player 3. Launch the downloaded Vulkano setup file Note: It takes a few minutes to download, and then a few more minutes to install. 4. Select Player > Run Vulkano Setup CHOOSE PASSWORD In the Choose password window: 1. Choose and enter a password for your Vulkano in the Password and Confirm password fields 2. Click Next SET UP WIRELESS SETTINGS In the Set Up Wireless Settings window: 1. Select your Home Network from the drop-down list 2. Enter your Network Key or Passphrase 3. Click Next 49 User Guide CONNECT TO WIRELESS NETWORK Once your Vulkano has been connected to your wireless network, it will no longer be necessary to have your Vulkano connected directly to your router. 1. Disconnect the Ethernet cable from your Vulkano 2. Click Next in the Connect to Set Top Box window Note: If necessary, unplug the power supply from your Vulkano and reconnect the audio and video cables from your STB to your Vulkano. Then, reconnect the power supply. When the Vulkano status light turns green, Click Next on the Connect to Set Top Box window. CONNECT VULKANO TO YOUR STB Your STB has output connectors on the back for Component setup, Composite setup or both. If you have both, use the Component setup for better video quality. You will need a STB to use Vulkano. Connect the cables from your STB output connectors to your Vulkano’s input connectors as shown below. For the Component setup option, you will use two sets of cables. For the Composite option, you will only use one set. Suggestion: Be sure to write down your STB brand and model number. You will need it later in the setup process. 50 User Guide CONNECT VULKANO TO YOUR TV This step assumes that your STB was previously connected to your TV. You will re-use your existing cables. For the setup process, it is not mandatory to connect your Vulkano output to a TV. Your TV has audio and video input connectors for Component setup, Composite setup or both. Make sure you use the same cable types, either Component or Composite, for this connection as used in the previous section. Connect the cables from your Vulkano output connectors to your TV’s input connectors, as shown below. For the Component setup option, you will use two sets of cables. For the Composite option, you will only use one set. If your TV has an HDMI input connector, use the HDMI setup option for better audio and video quality. 51 User Guide Select VIDEO INPUT In the Select Video Input window: 1. Select the appropriate video input configuration that corresponds to how you connected Vulkano to your STB: Composite – if you used Red/White/ Yellow cables Component – if you used Red/Green/ Blue and Red/White/Yellow cables 2. Click Next When you have selected the correct video input configuration, the video will be displayed in the Video Input Configuration window. Note: This step only appears if you have connected both Composite and Component cables. Otherwise the input is auto-detected. SET UP EPG (ELECTRONIC PROGRAM GUIDE) In the Set Up EPG window: 1. Select your Country from the drop-down list 2. Enter your Zip or Postal Code 3. Click Next Note: The EPG is supported in the United States. If you are located in another country, click Skip. In the Set Up EPG window: 1. Select your TV Service Provider from the drop-down list 2. Click Next 52 User Guide SELECT SET TOP BOX In the Select Set Top Box window: 1. Select your STB Manufacturer 2. Select your STB Model 3. Click Next If you do not know your STB manufacturer name or model number, you can perform one of the following options: Select the I couldn’t find the manufacturer check box option, or Select the I couldn’t find the model number check box option I couldn’t find the manufacturer If you selected the I couldn’t find the manufacturer check box option: 1. Click Next 2. Select the first code from the list 3. Click Channel Up or Channel Down and wait a few seconds to see if the channel changes If the channel does not change, select the next code from the list and click Next again. Repeat this process until you find the code that works. I couldn’t find my model number. If you selected the I couldn’t find the model number check box: 1. Click Next 2. Click Channel Up or Channel Down and wait a few seconds to see if the channel changes 53 User Guide Learn remote control commands If you have exhausted the list of manufacturer and model number test codes and still have no response from your Vulkano: 1. Select both the I couldn’t find the manufacturer and I couldn’t find my model number check box options 2. Click Next In the Learning Remote Control Commands window: 1. Select the Set Top Box type 2. Select a command from the Unlearned Commands list 3. Press Learn 4. Follow the onscreen instructions TEST VIDEO DEVICE CONTROL In the Test Video Device Control window: 1. Click Channel Up or Channel Down and wait a few seconds to see if the channel changes 2. Click Next SET UP REMOTE ACCESS In the Assign Vulkano Name window: 1. Enter a Vulkano Name 2. Enter a Password and Confirm Password 3. Click Next VULKANO CONFIGURED SUCCESSFULLY Congratulations! You have successfully set up your Vulkano! Click Finish ADDITIONAL HELP For information about players for PCs, Macs, iPhone/iPads, Androids and Blackberrys, please refer to Download And Install Players on page 57. For additional help, please refer to Frequently Asked Questions, Troubleshooting and Support on page 58. 54 User Guide SETUP THE STB CONTROL Vulkano uses the same technology found in a universal remote control to send control codes for a wide variety of STBs. The invisible light signal is sent from the small dark window at the front left of your Vulkano (when looking at it from the front). This signal is strong enough, in many cases, to bounce off the walls of your room and back into your STB’s remote control detector window (which is often behind a dark piece of plastic on the front panel). However, sometimes there may be a problem with the light getting from your Vulkano to your STB. If you have no luck at all in getting your STB to respond, you should use the IR Blaster cable which came with your Vulkano kit. Insert the plug into the hole label IR Blaster, located on your Vulkano's rear panel. The location of the IR Blaster jack depends on the model of your Vulkano device. 55 User Guide IR BLASTER CABLE Side View Front View IR BLASTER TIPS: Make sure the infrared (IR) emitter is plugged into the correct jack, located on the back of your Vulkano. If you have a digital camera, camcorder, or cell phone with a digital camera in it, you can put it into preview mode and point it at the emitter while sending out some test codes. It is best to do this in a dark room. If it is working, the digital camera will display the emitter LED flashing white. Make sure the IR emitter is placed in front of the video source so it can "see" the IR remote-control receiver built into the video device. Think of the IR emitter as a remote control you are holding: where do you point your remote control to operate the video device? Try adjusting the distance between the IR emitter and the video source. Sometimes placing it closer helps; sometimes placing it further away helps. Also, check the angle at which it is pointed. Make sure no light is reflecting off the front of the video device that would interfere with the reception of the invisible IR light beam. Finally, select a different code. Often, if the IR emitter is working, but the wrong code is selected, some of the functions will cause a reaction in the video source - just the wrong one. (For instance, testing the number "2" will result in turning the unit Power on/off). This is a sign you need to try a different code. 56 User Guide DOWNLOAD AND INSTALL PLAYERS PC Download Vulkano PC Player to your PC from www.myvulkano.com/players.html Install and run Vulkano Player Select Run Vulkano Player if you already set up Vulkano Go to Player > Add or Select Vulkano > Add and enter the name and password of your Vulkano Select Watch TV to get started Mac Download Vulkano Mac Player to your Mac from www.myvulkano.com/players.html Install and run Vulkano Player Go to Player > Add/Select Vulkano > Add to enter the name and password of Vulkano Go back to the Home screen and push Watch TV to get started iPhone/iPad Download Vulkano Player to your iPhone or iPad from the iTunes App Store Go to Settings>Select to enter the name and password of Vulkano Go back to the Home screen and push Live TV to get started Android Download Vulkano Player to your phone from Android Market Install and run Vulkano Player Go to Settings > Selected Vulkano > Add Vulkano Enter the name and password of Vulkano Go back to the Home screen and push Live TV to get started Blackberry Download Vulkano Player to your phone from Blackberry Apps World Install and run Vulkano Player Go to Settings > Selected Vulkano > Add Vulkano Enter the name and password of Vulkano Go back to the Home screen and push Live TV to get started 57 User Guide FREQUENTLY ASKED QUESTIONS For frequently asked questions, go to: http://www.myvulkano.com/support_faq.html. TROUBLESHOOTING For additional information or technical assistance for your Vulkano product, go to Monsoon’s Technical Support Website at: http://www.myvulkano.com/support.html. SUPPORT 9:00 AM to 9:00 PM PST (Monday – Saturday) phone: +1 (866) 937-4282 e-mail: [email protected] 58