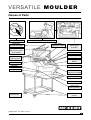
1
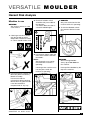
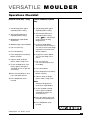
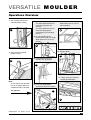
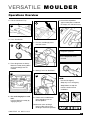
VERSATILE MOULDER
Safe Operating Procedures
TRAINING MANUAL
Current 22 May 2003
Contains 24 pages
V E R S AT I L E M O U L D E R
CONTENTS
•
•
•
•
•
•
•
•
•
•
•
•
•
•
•
•
About this Instruction Manual
User Liability
Safety Precautions
Before You Start
Name of Parts
Hazard Risk Analysis
Safe Operating Procedures
Standard Operations Checklist
Operations Checklist
Operations Overview
Product Guide
Daily Cleaning Procedure
Operations Competency
Cleaning Competency
Trouble Shooting
Risk Assessment
Moffat's policy is one of
continual improvement and
development. We therefore
reserve the right to amend the
information given in this booklet
without prior notice. All sales
will be subject to the company's
conditions of sale.
© M O F F A T
2 0 0 3
© M O F F AT 2 2 M AY 2 0 0 3
1
V E R S AT I L E M O U L D E R
About this Instruction Manual
This manual contains all the necessary information for the use, cleaning and maintenance of the
machine. The purpose of this booklet is to allow the user to take all measures and set up all the human
and material resources needed for safe and long-lasting use of the machine.
This manual should be available for all staff and maintenance personnel authorised to use the machine.
Do not attempt to use this machine in any other way that is not in compliance with the instructions
supplied.
Firstly
Please read the instruction book carefully and follow the directions given.
Secondly
If you are unsure of any aspect of the instructions or performance of this equipment, contact your dealer
immediately.
The electric power supply
The bakery must be fitted with an electrical system complying with current electrical regulations, in particular
the earth connection system and electrical control board must be protected against overload currents and short
circuiting. The rated power of the machine is shown on the machine plate. Electrical plant must be properly
installed throughout the workplace, maintained and regularly inspected by qualified electricians issuing
certificates of compliance for all jobs carried out, guaranteeing compliance with current Australian legislation
and Standards.
© M O F F AT 2 2 M AY 2 0 0 3
2
V E R S AT I L E M O U L D E R
User Liability
Working Safety
The machine must be used only by personnel suitably trained for the purpose and who have been trained
in the contents of this publication.
To ensure safe work, comply with the following instructions:
• Install the machine in compliance with workplace safe work requirements.
• Install the machine in an area away from personnel not authorised to operate it and especially
out of the reach of minors.
• Continually reinforce safe workplace practices as outlined in this manual.
• Eliminate all sources of distraction for the operator.
• Do not wear loose fitting clothing or clothing with wide and open sleeves.
• Designate a safe work area around the machine.
• Do not let bystanders enter the safe work area provided for the machine..
• Do not remove, cover or modify the identification plates placed on the machine body.
• Only use the machine for what it is designed to do.
• Do not use the machine as a working top and do not place any objects on it that are not required for
normal working operations.
• Do not use the machine with temporary electrical connections or non-insulated cables.
• Regularly check the state of the power cable and the cable clamp on the machine body. If defective
replace immediately by qualified personnel.
• Stop the machine immediately there is defective or abnormal operation, if a breakage is
suspected, or there are incorrect movements or unusual noises.
• Before cleaning or carrying out maintenance, disconnect the machine from the electricity mains.
• Use protective working gloves for cleaning and maintenance.
• For all extraordinary maintenance consult the manufacturer or qualified, authorised personnel.
• Do not aim high-pressure jets of water at the machine.
• When sharp accessories are manipulated, use cut-resistant gloves.
• Never insert hands or other objects into the product inlet or outlet.
Summary safety notes for owners/operators of this machine
Always operate within the capability limits of the machine.
Always carry out constant, regular and diligent maintenance.
Ensure the machine is used by a single trained person.
Eliminate all sources of distraction for the operator.
The manufacturer declines all direct and indirect liability deriving from:
•
•
•
•
•
Use by untrained personnel.
Non-observance of the instructions contained in this booklet.
Unauthorised modifications and/or repairs carried out on the machine.
The use of accessories and parts that are not genuine.
Exceptional events.
© M O F F AT 2 2 M AY 2 0 0 3
3
V E R S AT I L E M O U L D E R
Safety Precautions
To ensure maximum safety and optimum
performance from this machine it is essential
that you or any other operator of the machine
read and understand the contents of this
manual before the machine is started.
Pay particular attention to the SAFETY
INSTRUCTIONS highlighted by these symbols.
CAUTION
Serious injury possible
These safety alert symbols mean CAUTION,
WARNING or STOP/DANGER - a personal
safety instruction. Failure to comply with the
instruction may result in personal injury or
death.
WARNING: ELECTRICITY CAN KILL
Test and tag electrical cables to workplace
safety standards.
WARNING
Electric shock
STOP
DANGER
User instructions and precautions
The manufacturer declines all responsibility for any injury to persons or animals or damage to objects
resulting from the failure to observe any of the previous or following information and instructions on the
use or maintenance of the machine:
•
Do not use the equipment for any purposes and / or loads different to those stated by the
manufacturer;
•
Every day, check the safety devices and general state of the equipment;
•
Every day clean the equipment thoroughly;
•
Take all the necessary precautions and safety measures when loading, adjusting, changing parts or
carrying out repair or maintenance work on the machine. Ensure the machine or any parts of it are not
accidentally started up by other persons;
•
Do not tamper with the guards and safety devices on the machine;
•
Do not remove the guards and safety devices on the machine unless necessary for maintenance
purposes without adopting the measures designed to reduce the risk to the minimum possible, as
described fully and frequently in this manual;
•
Put back all the guards and safety devices as soon as the reason for their temporary removal no
longer exists;
•
All operators must comply with applicable workplace safety procedures.
Definitions
According to this manual, the following definitions are used:
1. "Danger area" any area inside or near a machine which might be dangerous for a bystander.
2. "Bystander"
any person entirely or partly situated in a danger area.
3. "Operator"
the person or persons installing, running, adjusting, cleaning, repairing, transporting or
performing maintenance work on a machine.
© M O F F AT 2 2 M AY 2 0 0 3
4
V E R S AT I L E M O U L D E R
Before you start the VERSATILE M O U L D E R
Before starting, undertake a General Safety check
• Area clean and free from obstructions, e.g. nothing placed on top of the machine such as a dough knife, etc.
• Operator not wearing loose fitting clothing.
WARNING: Make sure the machine is switched off during cleaning, maintenance and lubrication
When using the machine, never place hands near working areas.
Mechanical or electrical repairs must only be undertaken by qualified service technicians.
Only one person may operate the machine at any time. Any bystanders must keep well
away from the machine.
The key safety and hygiene features are:
1 A readily accessable emergency stop button in the form of a red mushroom safety switch.
2 The Versatile Moulder is fitted with a patented Safety Mouth Assembly which permits safe operation
of the machine. Under no circumstances should this safety system be modified or removed.
The Safety Mouth Assembly has been designed to prevent the operator from placing fingers
anywhere within the mouth of the machine or near the sheeting rollers.
3 There are Belt Guards covering the belts on either side of the machine.
4 The Curling Chain and Safety Mouth Assembly are easily removed for cleaning purposes.
5 There is an overload switch button located at the rear of the machine.
1
1 Emergency stop button.
A red mushroom safety switch.
Push in to stop the machine.
Twist and pull out to reset.
Use theEmergency Stop only
in an emergency.
2
2 The Safety Mouth Assembly.
3 Safety Belt Guards cover the
belts on either side of the
machine.
3
Use Stop Button to stop the
machine under normal
conditions.
© M O F F AT 2 2 M AY 2 0 0 3
5
V E R S AT I L E M O U L D E R
Names of Parts
Emergency Stop
Specialty Tube for shell or laminated rolls
Attachment
Raise/Lower Handle
Guide Width
Adjustment Handle
(Loaf Guides)
Attachment
Mounting Frame
Belt Guards
Start Button
Stop Button
Rear Belts
Adjustment Handle
Safety Mouth
Assembly
Counter Weight
Roll Chutes
Emergency Stop
Button
Stop Bar
Sheeting Roller
Adjustment Handle
Splitter Handle
Catchment Tray
Front Panel
Locking Knobs
Fixed Castors
Lockable Swivel
Castors
© M O F F AT 2 2 M AY 2 0 0 3
6
V E R S AT I L E M O U L D E R
Hazard Risk Analysis
Machine in use
WARNING:
Set up the machine on a flat
even surface.
3 Electrical isolation switch
should be fully accessible to
the operator.
1.5 metres above the floor is
a recommended height.
3
1 Cleaning of machine should
only be carried out with a
damp cloth. Buckets of water
or a hose should not be used.
1
✓
✗
2 Do not remove or tamper with
Micro Key Switch on Safety
Mouth Assembly.
Do not over–ride the
microswitch during cleaning.
Microswitch on guard should
never be removed or
tampered with in any way.
5 DANGER:
Stay clear of the back of the
machine while it is operating.
6 To shift the Moulder unlock
the two front Swivel Castors
first.
6
4 Do not push fingers under the
front of the machine towards
the blades.
NOTE:
Service panels must not be
removed while machine is
operating.
Cleaning of the machine must
not take place while the
machine is operating.
4
WARNING
When moving Moulder
always push low down on
the machine.
Never pull the Moulder by the
top of the machine.
7
2
© M O F F AT 2 2 M AY 2 0 0 3
7
V E R S AT I L E M O U L D E R
1 Check that the machine is
clear of all objects and that
all switches are off.
4 Test red Emergency Stop
Button operation by pushing
the mushroom button in.
(See below)
6 Mould dough according to
work-place procedures. Keep
fingers clear of the Mouth
Guard.
WARNING:
The operator should never
tamper with or make repairs
to this machine.
All maintenance other than
approved cleaning operations
to be carried out by trained
technicians only.
4
6
2 Check or place the electrical
cord in the appropriate
socket and turn power on.
2
The machine must stop
operating immediately.
If not, do not use the machine;
call supervisor and/or Moffat
Service Agent.
5 Test the stop bar at the
feeder mouth by restarting
the machine and depressing
the bar.
7 NEVER by-pass factory fitted
microswitchs in an attempt to
run the machine while front
guard is off.
Fully isolate machine
from electric power source
before cleaning.
7
5
3 Push green start button to
operate the Versatile Moulder.
3
The machine must stop
operating immediately.
If not, do not use the machine;
call supervisor and/or Moffat
Service Agent.
© M O F F AT 2 2 M AY 2 0 0 3
8
MOFFAT SUGGESTS— Use this form to train staff, copy and laminate for your workplace
Safe Operating Procedures
V E R S AT I L E M O U L D E R
MOFFAT SUGGESTS— Use this form to train staff, copy and laminate for your workplace
Standard Operations Checklist
✓
OPERATION
INSTRUCTIONS
Set sheeting, roller gap to
required product setting.
Option for sandwich breads
using splitter.
Set rear belt to required
product setting.
Lower the loaf Guide
Width Attachment
between the belts.
Pull out catch tray.
Engage the Splitter.
Press Start Button.
© M O F F AT 2 2 M AY 2 0 0 3
9
V E R S AT I L E M O U L D E R
Standard Operations Checklist
OPERATION
INSTRUCTIONS
MOFFAT SUGGESTS— Use this form to train staff, copy and laminate for your workplace
✓
Feed dough into the Safety
Mouth Assembly.
Follow recommended work–place
procedures for the desired
product.
Observe action of dough pieces
under curling chain.
Dough should curl upwards and not deviate to the sides.
Check finished product against
work–place standards for shape,
size and consistency.
Repeat process.
Press Stop Button.
NOTE:
Use Emergency Stop Button only
in an emergency.
Use Stop Button to stop the
machine under normal conditions.
Emergency only
Stop
© M O F F AT 2 2 M AY 2 0 0 3
10
V E R S AT I L E M O U L D E R
Operations Checklist
FRENCH STICK 300g — 450g
4 PIECE SANDWICH BREAD
680g
1 Set Sheeting Roller gap to
required product setting.
1 Set Sheeting Roller gap to
required product setting.
2 Set Rear Belt Adjuster to
required product setting.
2 Set Rear Belt Adjuster to
required product setting.
Arrow
indicates the
correct setting for 650g
dough pieces.
3 Do not lower Guide Width
Attachment.
4 Do not engage 4 piece Splitter.
5 Pull out Catch Tray.
6 Press Start Button.
7 Place dough piece into Safety
Mouth assembly.
8 Observe action of dough
pieces under Curling Chain
9 Check moulded french stick
loaves against work-place
standards for size, shape and
consistency.
10 Place onto fluted french stick
trays and repeat process.
11 Press Stop Button when
finished.
3 Lower the Guide Width
Attachment into the machine.
This will ensure that the dough
is placed in the centre of the
Sheeting Rollers.
4 Engage the 4 piece Splitter.
This cuts the dough into 4
pieces.
5 Pull out Catch Tray.
Pull out sufficiently for ease
of handling.
6 Press Start Button.
7 Place dough piece into Safety
Mouth assembly.
8 Observe action of dough
pieces under Curling Chain
NOTE:
Sequence dough pieces
correctly to avoid doubles.
9 Check moulded 4 pieced
loaves against workplace
standards for shape, size
and consistency.
10 Cross pan loaves, place into
bread tin and repeat process.
11 Press Stop Button when
finished.
© M O F F AT 2 2 M AY 2 0 0 3
11
V E R S AT I L E M O U L D E R
Operations Checklist
HI–TOP 450g — 680g
VIENNA 450g — 680g
TANK LOAF 450g — 680g
HOT DOG/KNOT ROLLS 85g — 120g
1 Set Sheeting Roller gap to
required product setting.
11 Press Stop Button when
finished.
2 Set Rear Belt Adjuster to
required product setting.
Arrow
indicates the
correct setting for
680g dough pieces.
450g dough pieces
120g dough pieces
3 Lower the Guide Width
Attachment into the machine.
Set on central placement.
4 Do not Engage the 4 piece
Splitter.
5 Pull out Catch Tray.
Pull out sufficiently for ease
of handling.
6 Press Start Button.
7 Place dough piece into Safety
Mouth assembly.
8 Observe action of dough
pieces under Curling Chain.
NOTE:
Sequence dough pieces
correctly to avoid doubles.
9 Check moulded dough pieces
against work-place standards
for shape, size and
consistency.
10 Place loaves into bread tins
and repeat the process.
© M O F F AT 2 2 M AY 2 0 0 3
12
V E R S AT I L E M O U L D E R
Operations Overview
1 Set sheeting, roller gap to
required product setting.
1
If splitter option is required:
The Guide Width Attachment
must be lowered into the
machine.
The Guide Width Attachment
keeps the dough pieces
centred during the moulding
process.
D Adjusting the width of the
Guide Attachment to suit the
type of product.
D
A Un–clip handle from the
bracket which holds the Guide
Width Attachment in the up
position.
A
E Engage splitter.
2 Set rear belt to required
product setting.
E
2
B Guide Width Attachment
locked in the up position.
B
F 4 piece cutter for sandwich
breads pictured below.
Note:
At this stage of the operation.
Use of the splitter option for
sandwich breads is possible.
See opposite
C Lower the Guide Width
Attachment between the Belts.
C
F
© M O F F AT 2 2 M AY 2 0 0 3
13
V E R S AT I L E M O U L D E R
Operations Overview
3 Pull out Catchment Tray.
6
3
11 Check finished product
against work–place standards
for shape, size and consistency.
11
4 Press Start Button.
4
7 For rolls, feed dough pieces
into Roll Chutes.
7
12 Repeat the process.
13 Press Stop Button when
finished.
5 Place dough onto the Safety
Mouth Assembly. Swing down
to feed the dough into the
moulder.
8 Making Paninni or Shell Rolls.
5
8
NOTE:
Use the Emergency
Stop only in an emergency.
Stop Button to stop the
machine under normal
conditions.
6 For small dough pieces and
rolls:
Lock the Mouth Assembly by
engaging the pin.
9 Follow recommended workplace procedures for the
desired product.
Stop
Emergency only
10 Observe action of dough
pieces under curling chain.
All dough should curl upwards.
© M O F F AT 2 2 M AY 2 0 0 3
14
V E R S AT I L E M O U L D E R
Product Guide
SHEETING
ROLLER
ADJUSTMENT
REAR
BELT
ADJUSTMENT
GUIDE
WIDTH
ADJUSTMENT
4-6
8
—
LONG ROLLS
4
4 or 5
—
SHORT ROLLS
6
6
—
60 GRAM SHELL ROLLS
4
4
—
SECOND ROLLING
4-5
26
—
450 G SLIPPER VIENNA
6-7
ON ARROW
—
450 G TRAYED VIENNA
6-7
13
—
680 GRAM SANDWICH
8
ON ARROW
4 PIECED SANDWICH
ENGAGE 4 PIECE SPLITTER
PRODUCT
450 GRAM.
FRENCH STICKS
900 GRAM SANDWICH
10-11
ON ARROW
© M O F F AT 2 2 M AY 2 0 0 3
15
V E R S AT I L E M O U L D E R
MOFFAT SUGGESTS— Use this form to train staff, copy and laminate for your workplace
Daily Cleaning Procedure
WARNING
Electrically isolate
Dough Moulder.
1 Brush off all external surfaces.
Use a bannister brush and
work from top to bottom.
Use bannister brush outside
of machine; clean mouth
assembly with damp cloth.
3 Open sheeting rollers to
maximum (15) and wipe
down with damp cloth.
3
1
4 To remove curling chain, undo
Locking Knob and lift out the
Chain Assembly.
WARNING
When moving Moulder
always push low down on
the machine.
Never pull the Moulder by the
top of the machine.
1
2 Take off cover by removing
front panel Locking Knobs.
2
4
5 Unhook curling chain, check
for build-up and wash if
needed in warm water.
5
© M O F F AT 2 2 M AY 2 0 0 3
16
V E R S AT I L E M O U L D E R
Daily Cleaning Procedure
9 Reassemble machine, turn
on power and check for
correct operation.
MOFFAT SUGGESTS— Use this form to train staff, copy and laminate for your workplace
6 Inspect the curling chain
before re-assembly.
6
7 Check rear belts for signs of
old dough. Clean with plastic
scraper if necessary and
brush lightly.
Note:
Never use a metal scraper.
7
8 Clean attachment arms and
rollers with a plastic scraper
and damp cloth.
8
© M O F F AT 2 2 M AY 2 0 0 3
17
V E R S AT I L E M O U L D E R
GUIDE SHEETS
for Staff Training
Pages in the following section of this manual should be copied and used
when training staff to operate the VERSATILE M O U L D E R
MOFFAT recommends that competency assessment check lists be
completed signed and a copy kept in the personnel files for future
reference.
SUPERVISORS TO ENSURE
• competency check lists are copied and completed as part of the training of staff
• correct training of staff to the required competency expectations
• sign off the verification section of the competency check list
• place a copy of the completed and signed competency check list in personnel
records as evidence of operator competence
© M O F F AT 2 2 M AY 2 0 0 3
18
V E R S AT I L E M O U L D E R
Operations Competency Checklist
MOFFAT SUGGESTS— Use this form to train staff, and place a copy in personnel file.
Element
✓
Implement safe work procedures.
Assessment Criteria
“Can the operator”
Identify the purpose and use of:
• Equipment guards
• Warning signs
• Safety features
Related to this machinery?
Identify:
• Machine related health and safety risks of this equipment?
• Emergency procedures to be used with this equipment?
Operate this equipment correctly in normal and emergency situations?
Identify:
• OH&S reporting procedures related to hazard reporting for this machine?
Comments
To gain competency in the use of the VERSATILE MOULDER, the assessor must be satisfied that
the operator has consistently applied the knowledge and skills in all of the above elements.
This form should be signed off only when the assessor is satisfied that the
employee/trainee is competent to carry out all of the tasks described above.
Applicant’s signature
Date
/
/
Assessor’s signature
Date
/
/
© M O F F AT 2 2 M AY 2 0 0 3
19
V E R S AT I L E M O U L D E R
Cleaning Competency Checklist
✓
Implement essential hygiene and sanitation procedures.
MOFFAT SUGGESTS— Use this form to train staff, and place a copy in personnel file.
Element
Assessment Criteria
“Can the operator”
Maintain sound personal hygiene at all times when working with the VERSATILE MOULDER?
Use appropriate protective and work clothing while working with the VERSATILE MOULDER?
Identify:
• Product handling requirements during production process?
• Critical points in the process where contamination can be introduced?
• Why it is important to monitor hygiene and sanitation performance?
• The effect of poorly maintained equipment on the control of contamination and spoilage?
• Company policies and procedures regarding hygiene and sanitation?
• Actual and potential contamination and spoilage hazards?
• Solutions to rectify contamination and spoilage problems?
Use work practices and methods that reduce the risk of product contamination?
Remove contamination where appropriate in accordance with:
• Workplace hygiene and sanitation procedures?
• Procedures specific to the VERSATILE MOULDER?
Comments
To gain competency in the use of the VERSATILE MOULDER, the assessor must be satisfied that
the operator has consistently applied the knowledge and skills in all of the above elements.
This form should be signed off only when the assessor is satisfied that the
employee/trainee is competent to carry out all of the tasks described above.
Applicant’s signature
Date
/
/
Assessor’s signature
Date
/
/
© M O F F AT 2 2 M AY 2 0 0 3
20
V E R S AT I L E M O U L D E R
Trouble Shooting
Problem
The VERSATILE MOULDER does not
operate/start.
Remedy
Possible cause
Not plugged in to socket at main
switch.
Plug in and switch on.
The main switch is “off”.
Turn on.
Fuse overload at the power board
Contact supervisor.
The moulder overload has been
activated.
Resets automatically (10 min).
Stop button still locked in down
position.
Release by rotating and pulling.
Start Button not pressed.
Press Start Button.
The moulder overload has been
activated.
Resets automatically (10 min).
If overload occurs repeatedly
contact supervisor/Moffat
Service Agent.
Fuse overload at the power board.
Contact supervisor advise Moffat
Service Agent.
Dough too stiff/tight.
Review and adjust rear belt settings
to a wider gap.
Mechanical malfunction.
Loose belts or drive belts.
Advise supervisor.
Contact Moffat Service Agent.
The VERSATILE MOULDER does not
stop.
Electrical/mechanical malfunction.
Switch off power at main switch
Isolate moulder by removing wall
plug. Attach danger tag to machine.
Contact supervisor advise Moffat
Service Agent.
The VERSATILE MOULDER belts
operate in wrong direction.
Inserting the VERSATILE MOULDER
electrical plug into non-compatible
socket after cleaning.
Consult authorised electrical service
to rewire or change polarity.
Relocating VERSATILE MOULDER in
another location after maintenance.
Return to correct location.
Machine started in wrong direction
causing chain to jump off sprockets.
Contact supervisor advise Moffat
Service Agent.
The VERSATILE MOULDER starts
and then stops.
The VERSATILE MOULDER labours
under load.
Electric motor functions but belts do
not turn.
© M O F F AT 2 2 M AY 2 0 0 3
21
V E R S AT I L E M O U L D E R
Trouble Shooting
Problem
Possible cause
Remedy
Skinning of dough pieces.
Dough pieces not covered during
resting.
Cover dough pieces.
A fine mist of water can be sprayed
on the product prior to moulding.
Dough sticking to belt.
Excess water in dough formulation.
Redo batch.
Add flour externally on
dough pieces.
Dough piece tearing.
Insufficient water in dough mix.
Redo batch.
Settings too tight.
Loosen settings.
Moulder not cleaned as per cleaning
instructions.
Thoroughly scrape and check
between rollers, scrapers and
splitter blades. Review cleaning
instructions.
Poor ingredient quality.
Contact ingredient supplier.
Poor personal/bakery hygiene.
Review and reinforce correct
procedures.
Holes in dough piece.
Sheeting roller gap too wide.
Close roller gap.
Air bubble in centre of bread sticks.
Stick being moulded from round
dough ball.
Premould and prove dough pieces
in 200mm long shape and place
sideways into the Safety Mouth
assembly.
4 piece not cutting.
Dirty or blunt cutting blades.
Clean or have sharpened.
Dough pieces doubling up as they
go under the Curling Chain.
Wrong dough sequencing.
Sequence dough correctly.
Dough too tight.
Add more water in mix cycle.
Dough too dry.
Cover Dough pieces during resting.
Foreign matter found/seen in dough.
© M O F F AT 2 2 M AY 2 0 0 3
22
V E R S AT I L E M O U L D E R
Risk Assessment
The following risk assessment covers the reasonably foreseeable hazards to health and safety arising from
the VERSATILE MOULDER and from systems of work associated with this machine.
Hazard identified
Existing controls
Consequences
Likelihood
Risk rating
Catastrophic
Major injuries
Moderate injuries
Minor injuries
Insignificant injuries
Almost certain
Likely
Possible
Unlikely
Rare
Extreme risk
High risk
Moderate risk
Low risk
Cleaning the machine with
buckets of water or hoses
is extremely dangerous and
may lead to electrocution.
The machine must be
cleaned with a damp cloth
only.
Clear warning guidelines
on machine. Safe work
practices included in
training manual.
Catastrophic
Rare
High risk
Micro Key Switch on Safety
Mouth Assembly should
never be removed or
tampered with otherwise
machine could continue
working and be unsafe.
Safe work guidelines are
detailed in this manual.
Alterations to micro
switches are service
items only.
Moderate injuries
Rare
Moderate risk
Electrical isolation switch
should be fully accessible
to the operator.
Recommend no more than
1.5 metres above the floor.
Dependent on store
electrical policy
Catastrophic
Rare
High risk
Service panels should not
be removed while the
machine is in operation.
The machine must not be
operated with any service
access panel removed.
Designed to be accessed
by authorised service
technicians only. Warning
signs clearly evident.
Major injuries
Rare
High risk
Moderate injuries
Unlikely
Moderate risk
Cleaning of machine
Safe, correct cleaning
should not take place while procedure detailed in
it is in operation
training manual.
© M O F F AT 2 2 M AY 2 0 0 3
23
V E R S AT I L E M O U L D E R
Risk Assessment
The following risk assessment covers the reasonably foreseeable hazards to health and safety arising from
the VERSATILE MOULDER and from systems of work associated with this machine.
Hazard identified
Friction burns from
inserting hand between the
Belts at top rear of
machine.
Existing controls
Area inaccessible from
the front operating
position. Warnings in
manual and warnings
about sole operator use.
Consequences
Likelihood
Risk rating
Catastrophic
Major injuries
Moderate injuries
Minor injuries
Insignificant injuries
Almost certain
Likely
Possible
Unlikely
Rare
Extreme risk
High risk
Moderate risk
Low risk
Minor injuries
Unlikely
Low risk
Moderate injuries
Unlikely
Moderate risk
Recommended
placement of machine is
back against a wall.
Machine is top heavy and
may unbalance if wheels
catch an obstruction on the
floor while the machine is
being moved.
Safe work guidelines
reinforce correct moving
procedure for the
Versatile Moulder.
© M O F F AT 2 2 M AY 2 0 0 3
24