1
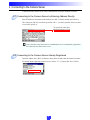
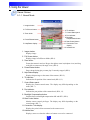
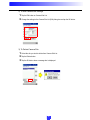
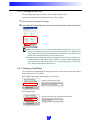
 Introduction
Thank you for purchasing the “Viewer for Pocket PC RV-P1.0” (referred to hereafter as the
viewer).
Read this manual carefully before you use this viewer to make the best use of it.
Make sure to read the Readme file provided on the supplied CD-ROM.
The latest product information is available at the following Web site:
http://www.canon.com/webview/
Notice
1. Unauthorized transfer or duplication of all or part of this manual is prohibited.
2. The content of this manual is subject to change without notice.
3. Every effort has been made to ensure that the information contained in this manual is
correct. If any error or omission is found, contact us directly or an authorized Canon
representative.
4. Canon is not responsible for any damages, direct or indirect, arising from or related to
the use of this viewer.
Copyrights
Please note that copyright laws prohibit you from using recorded videos and still pictures
for any purpose other than personal enjoyment without permission from the copyright
holder.
Trademarks
z Canon and Canon logo are registered trademarks of Canon Inc.
z Microsoft®, Windows®, ActiveSync and Microsoft Internet Explorer are trademarks or
registered trademarks of Microsoft Corporation in the United States and/or other
countries.
z Windows is formally referred to as Microsoft Windows Operating System.
z Java and all Java-based marks are trademarks or registered trademarks of Sun
Microsystems, Inc. in the United States and/or other countries.
z Other product and company names mentioned in this manual may be the trademarks or
registered trademarks of their respective owners.
Conventions Used in this Manual
To ensure your safe and most efficient use of this viewer, the points to be paid careful
attention are provided under headings as listed below. Make sure to understand what these
headings stand for when you read this manual and observe the provisions thoroughly when
you use the viewer.
Note
Tip
Indicates restrictions and other important issues on operation of this viewer that
you should comply with. To avoid damaging the equipment and causing break
down and malfunction, read these notes carefully and observe.
Indicates tips and hints that help you to operate the viewer more efficiently and
other supplemental information.
i
Terms and Definitions
Tap:
Operation to touch the liquid crystal screen once with the stylus, a writing tool
attached to the Pocket PC terminal.
Tap-and-hold:
Operation to tap the stylus on an item and hold it for a while. Use this to display a
menu.
Drag:
Operation to tap and move the stylus while the tip of the stylus still touches the screen.
Use this for operations such as shifting the scroll bar as you drag the item with a
mouse.
Navigation button:
A crosswise key on the Pocket PC terminal. It may be called the Cursor button in
some Pocket PC terminals.
ii
Contents
Introduction . . . . . . . . . . . . . . . . . . . . . . . . . . . . . . . . . . . . . . . . . . . i
1. Overview . . . . . . . . . . . . . . . . . . . . . . . . . . . . . . . . . . . . . . . . . . . 1
1-1. Operating Environment . . . . . . . . . . . . . . . . . . . . . . . . . . . . . . . . . . . . . 1
2. Installing and Uninstalling the Viewer . . . . . . . . . . . . . . . . . . . . . 2
2-1. Installing the Viewer . . . . . . . . . . . . . . . . . . . . . . . . . . . . . . . . . . . . . . . 2
2-2. Uninstalling the Viewer . . . . . . . . . . . . . . . . . . . . . . . . . . . . . . . . . . . . 2
3. Starting and Closing the Viewer . . . . . . . . . . . . . . . . . . . . . . . . . . 3
3-1. Starting the Viewer . . . . . . . . . . . . . . . . . . . . . . . . . . . . . . . . . . . . . . . . 3
3-2. Closing the Viewer . . . . . . . . . . . . . . . . . . . . . . . . . . . . . . . . . . . . . . . . 3
4. Connecting to the Camera Server . . . . . . . . . . . . . . . . . . . . . . . . 4
4-1. Connecting to the Camera Server by Entering Address Directly . . . . . 4
4-2. Connecting to the Camera Server Already Registered . . . . . . . . . . . . . 4
5. Using the Viewer . . . . . . . . . . . . . . . . . . . . . . . . . . . . . . . . . . . . . 5
5-1. Viewer Screen . . . . . . . . . . . . . . . . . . . . . . . . . . . . . . . . . . . . . . . . . . . . 5
5-2. Operating the Camera . . . . . . . . . . . . . . . . . . . . . . . . . . . . . . . . . . . . . . 7
5-3. Specifying Various Settings . . . . . . . . . . . . . . . . . . . . . . . . . . . . . . . . . 9
6. Troubleshooting . . . . . . . . . . . . . . . . . . . . . . . . . . . . . . . . . . . . . 15
7. Error Messages . . . . . . . . . . . . . . . . . . . . . . . . . . . . . . . . . . . . . 17
iii
1.Overview
This software is designed to view video distributed from the camera server on the Pocket
PC terminal through the Internet or LAN. If the VC-C4 or other cameras that can be
controlled from the viewer are connected to the camera server, you can control various
camera operations such as: panning, tilting, zooming and backlight compensation while
viewing the video on the screen.
Video Distributor
Distributing live video
Viewer
Internet
Intranet
Camera Server
Operating camera by
remote control
PDA
1-1. Operating Environment
Software
• Microsoft Pocket PC 2002 Software (Windows CE 3.0)
Supported Camera Servers
• Network Camera Server VB101*
• Network Camera Server VB150
• Network Camera VB-C10/VB-C10R
* When you are using the Network Camera Server VB101, upgrade the firmware to Ver. 3.0
(free) to use the viewer. For the latest information, visit the Web site below.
http://www.canon.com/webview/
1
2. Installing and Uninstalling the Viewer
The viewer requires that ActiveSync be installed on the PC. If it is not installed, be sure to
install it before installing the viewer.
Tip
z Use ActiveSync provided with your Pocket PC.
z If a trial version of the viewer is already installed, you need to uninstall it and reset your
Pocket PC before installing the viewer.
2-1. Installing the Viewer
1
2
Start ActiveSync and transfer the cabinet file, Livescope_Pocket2002_ARM_E.cab from
CD-ROM to your Pocket PC.
Tap the transferred cabinet file to install the viewer.
Installation is now complete.
Tip
The viewer can be installed by the following methods as well.
• Start File Explorer in the Pocket PC, directory copy the cabinet file on the PC to your
Pocket PC, and then tap the copied cabinet file.
• Copy the cabinet file to CompactFlash, and tap the file on the Pocket PC.
2-2. Uninstalling the Viewer
1
2
3
Select Settings from the Start menu and tap System.
Tap Remove Programs.
Select Canon Livescope from the list and tap the Remove button.
Reset your Pocket PC as there is a possibility that the application icon may remain on the
screen.
Uninstallation is now complete.
2
3. Starting and Closing the Viewer
3-1. Starting the Viewer
3-1-1. To start up from the viewer
Tap the icon of the viewer in the Programs folder to start up the viewer.
No connection to the camera
server is established when the
viewer is started up
independently (ÆP. 4).
3-1-2. To start up from the Web Browser
Access the Web site that distributes live video from Pocket Internet Explorer and tap the
Using Viewer for PC button or Using Helper button. The viewer starts up and the
connection to the camera server is established.
Once connection to the camera
server is established, the server
is automatically registered in
the camera site list (ÆP. 9) of
the viewer.
3-2. Closing the Viewer
Select Exit from the File menu to close the viewer.
3
4. Connecting to the Camera Server
Connection to the camera server can be established in two major methods as follows.
4-1. Connecting to the Camera Server by Entering Address Directly
Enter IP address or host name in the address box (ÆP. 5) directly and tap the Enter key.
The video port (ÆP. 10) can also be specified with “:” (a colon) separator; however, there
is no need to specify it.
To specify the video port:
Tip
Once connection to the camera server is established, the server is automatically registered in
the camera site list (ÆP. 9) of the viewer.
4-2. Connecting to the Camera Server Already Registered
Open the address box (ÆP. 5) to display a drop-down list and select the camera site name.
For details about registering camera servers, refer to “5-3-1. Camera Site List” (ÆP. 9).
4
5. Using the Viewer
5-1. Viewer Screen
5-1-1. Normal Mode
1. Image window
2. Full Screen button
6. Tilt Indicator
7. Control Status panel
3. Zoom slider
8. Pan Indicator
9. Backlight
Compensation button
10. Start Control button
4. Pause/Restart button
5. Help/Status display
11. Connection Time
display
12. Address box
1. Image window:
Displays image.
2. Full Screen button:
Displays image in Full Screen Mode (ÆP. 6).
3. Zoom slider:
Zooms the camera in and out. Drag to the right to zoom in (telephoto view) and drag
to the left to zoom out (wide-angle view) (ÆP. 8).
4. Pause/Restart button:
Pauses image during play or starts play if currently stopped (ÆP. 8).
5. Help/Status display:
Displays help message or the status of the camera (ÆP. 12).
6. Tilt Indicator:
Indicates the tilt position of the camera head (ÆP. 8, 13).
7. Control Status panel:
Displays the camera control status. The display may differ depending on the
status (ÆP. 7).
8. Pan Indicator:
Indicates the pan position of the camera head (ÆP. 8, 13).
9. Backlight Compensation button:
Switches between backlight compensation ON and OFF (ÆP. 8).
10.Start Control button:
Obtains camera control privileges. The display may differ depending on the
control status (ÆP. 7).
11.Connection Time display:
Displays the period of time connected to the camera server.
12.Address box:
Displays, enters or selects the address of camera server to be connected.
5
5-1-2. Full Screen Mode
Tap the Full Screen button (ÆP. 5) to switch to Full Screen Mode when the viewer is in
Normal Mode.
1. Image Window
2. Camera Control/
View Settings menu
3. Zoom Indicator
4. Pan Indicator
5. Tilt Indicator
1. Image window:
Displays image.
2. Camera Control/View Settings menu:
Tap-and-hold (ÆP. ii) the stylus on the image window to display the menu. From
this menu, you can return to Normal Mode (ÆP. 5), show or hide the camera
position (ÆP. 13), obtain camera control privileges (ÆP. 7), choose preset or camera
and turn backlight compensation ON and OFF (ÆP. 8).
3. Zoom Indicator:
Displays the zoom ratio of the camera. A colored bar is displayed long when the
camera zooms in and short when the camera zooms out (ÆP. 8, 13).
4. Pan Indicator:
Indicates the pan position of the camera head (ÆP. 8, 13).
5. Tilt Indicator:
Indicates the tilt position of the camera head (ÆP. 8, 13).
Tip
An error message (ÆP. 17) does not appear when the viewer is in Full Screen Mode. If an
error occurs while in this mode, an error message appears after you return the display to
Normal Mode.
6
5-2. Operating the Camera
5-2-1. Obtaining Camera Control Privileges
Although more than a client can connect to the same camera server, the client who can
control the camera is limited to only the client currently holding control privileges.
Camera control privileges can be obtained by the following methods.
Normal Mode
Full Screen Mode
Control Status panel
(See table below)
Start Control button
(See table below)
Tap the Start Control button.
Tap Start Control on the Camera
Control/View Settings menu.
The display changes depending on the camera control status.
Status that you can obtain control privileges.
Tap the Start Control button to obtain control privileges.
Status that you are in a queue for control privileges.
The number displayed next to the sign of person indicates control queue time that you should
wait to obtain control privileges. As there may be some client who may cancel control privileges
or quit from the queue for control privileges while you are waiting for control privileges, there is
a possibility that you can obtain control privileges before control queue time reaches ‘0’.
Status that you are currently holding control privileges.
The number displayed next to the clock sign indicates the permitted time to hold control
privileges.
Status that you can hold control privileges beyond the time limit.
When there is no camera control request from other clients, you can keep holding control
privileges beyond the permitted time.
Status that you are disconnected from the camera server.
Connection to the camera server is cut off for some reason.
Status that you are not connected to the camera server.
Connection to the camera server is failed or not permitted.
Note
It is not guaranteed that control privileges can be obtained immediately whenever you wish.
Check the camera control status before you try to control the camera.
7
5-2-2. Adjusting Pan/Tilt Angle of the Camera
First obtain camera control privileges and then tap the point that you want to focus the
camera on the image window (ÆP. 5, 6). The camera pans and tilts to make that point the
center of the image.
5-2-3. Changing Zoom Ratio of the Camera
First obtain camera control privileges and then perform the following operations.
Normal Mode
z Zoom slider (ÆP. 5)
Zoom ratio can be changed by dragging the sliding lever with the stylus. Drag it to the
right to zoom in (telephoto) and drag it to the left to zoom out (wide-angle).
z Navigation button (ÆP. ii)
Press the right or upper part to zoom in (telephoto) and press the left or lower part to
zoom out (wide-angle).
Full Screen Mode
z Navigation button (ÆP. ii)
Press the right or upper part to zoom in (telephoto) and press the left or lower part to
zoom out (wide-angle).
5-2-4. Turning Backlight Compensation ON and OFF
First obtain camera control privileges and then perform the following operations.
Normal Mode
Tap the Backlight Compensation button (ÆP. 5) to switch between ON and OFF.
When the image becomes dark due to backlight, turn this feature ON.
Full Screen Mode
Tap Backlight Compensation on the Camera Control/View Settings menu (ÆP. 6) to
switch between ON and OFF.
When the image becomes dark due to backlight, turn this feature ON.
5-2-5. Pausing and Restarting the Image
Tap the Pause/Restart button (ÆP. 5) to pause the image that is currently viewed.
Tap the Pause/Restart button again to restart the image that is currently paused.
8
5-2-6. Saving a Snapshot
A live image can be saved as a snapshot.
1. Under File, select Pause to pause the
live image.
2. Under File, tap Save to display the
Save As dialog box.
3. Enter Name, Folder and Location and
tap the OK button.
A snapshot is saved in JPEG format.
Note
Copyright laws prohibit you from using recorded videos and still pictures for any purpose
other than personal enjoyment without permission from the copyright holder.
5-3. Specifying Various Settings
5-3-1. Camera Site List
In the Camera Site List dialog box, you can add, edit and delete a camera site.
To display the Camera Site List dialog box, under the Tools menu, select Camera Site List.
9
1) To Add a Camera Site
1
Tap the Add button on Camera Site List.
2
Enter each item correctly in the Camera Site List (Add) dialog box and tap the OK button.
Site Name:
Enter the name of the site that is displayed in Camera Site or the Address box.
Address:
Enter the IP address or host name of the server to connect.
Video Port No.:
Enter the video transmission port number of the camera server. Enter a value between
1 and 65535. Normally, there is no need to change this setting.
Camera Port No.:
Enter the camera control port number of the camera server. Enter a value between
1 and 65535. Normally, there is no need to change this setting.
User Name:
Enter the name of the user when access restrictions have been set at the camera server.
Password:
Enter the password when access restrictions have been set at the camera server.
Tip
z A hundred camera sites can be registered.
z The video transmission port and the camera control port settings are made at the camera
server. See the “WebView Livescope Settings Page” (if the VB101 is being used, it is
“Application Settings Page”) section in Chapter 3 of the user’s manual provided with the
camera server for details.
z When access to the camera server is restricted, specify User Name and Password
beforehand for your convenience. Once User Name and Password are obtained, user
authentication (ÆP. 14) is executed automatically.
For details about setting access control of the camera server, refer to the “Access Control
Settings Page” section in Chapter 3 of the user’s manual provided with the camera server.
User Name and Password are the same as Account Name and Password in Authorized
User List registered in the camera server.
10
2) To Edit Camera Site Settings
1
Tap the Edit button on Camera Site List.
2
Change the settings in the Camera Site List (Edit) dialog box and tap the OK button.
3) To Delete Camera Site
1
Select the site you wish to delete from Camera Site List.
2
Tap the Delete button.
3
Tap the OK button when a message box is displayed.
11
5-3-2. Changing Screen Size
You can change the image size (Screen Size) displayed on the viewer.
Follow the procedure below to change the Screen Size settings.
1
In the View menu, tap Image Size Settings.
2
In the Image Size Settings dialog box, select the desired Screen Size and tap the OK button.
Tip
z When Screen Size is set to 320 x 240 (Virtual) and Received Image Size is set to 320 x
240, the viewer displays the image as it is. If Received Image Size is set to other than 320
x 240, the size of received image is modified to 320 x 240 and the viewer displays 240 x
180 part of the modified image that is cut out from the center.
z To change Received Image Size, change the setting in the camera server. For details, refer
to the descriptions of Video Capture Size in Chapter 3, “Camera and Video Settings Page”
(if the VB-C10/VB-C10R is being used, it is in “Camera Settings Page”) section of the
user’s manual provided with the camera server.
5-3-3. Displaying Help/Status
To switch between displaying help message and status of the camera, select and deselect
Status Display in the View menu.
z To display Help (When Status Display is not selected)
Displays various help messages.
z To display Status
Displays Frame Rate (fps) and Received Image Size.
12
5-3-4. Displaying Camera Position
Camera Position Indicators can be shown or hidden.
Normal Mode
Full Screen Mode
Tap Camera Position Display on the View menu.
Tap Camera Position Display on the Camera
Control/View Settings menu.
Tip
When you have control privileges, the indicators are displayed in yellow and when you do
not have control privileges, the indicators are displayed in light blue.
5-3-5. Connecting to Network
You can establish and cut off dial-up connection to the camera server from the viewer. To
establish the connection from the viewer, specify dial-up entry for dial-up connection in
the Dial-up Settings dialog box beforehand.
Tip
For instructions on specifying dial-up entry, refer to the user’s manual provided with your
Pocket PC.
13
5-3-6. User Authentication
When the camera server limits the clients to access to the server, the User Authentication
dialog is displayed. Enter User Name and Password in the text box (ÆP. 10).
Tip
When User Name and Password are registered in the camera site list, user authorization is
executed automatically and the User Authentication dialog box is not displayed (ÆP. 10).
14
6. Troubleshooting
z Cannot reinstall the viewer.
• When the viewer is running, the viewer cannot be reinstalled.
Close the viewer and uninstall it. Then reset your Pocket PC terminal and reinstall
the viewer (ÆP. 2).
z Cannot start up the viewer.
• When executing memory of Pocket PC is not enough, the viewer may not be started.
In that case, delete any file that is not needed, or close other applications currently
opened. If the above measures do not work, then you need to reset your Pocket PC
terminal.
• When a dial-up connection is established from the viewer, the viewer may not be
restarted immediately. Wait for ten seconds or so, then restart the viewer to establish
the connection again.
z Cannot connect to the camera server.
• Check the IP address or port number of the camera server to see if it is specified
correctly (ÆP. 10).
• When registered camera site is selected for connection, check the information of the
server to see if it is entered correctly (ÆP. 10).
• Check the network connection environment of your Pocket PC. For instance, if you
are using a dial-up connection, use a Web browser to verify if connection is correctly
established.
• When a LAN connection is established and “Always use dial-up connections” is
selected in the Dial-up Settings dialog box, the connection to the camera server fails
because a dial-up connection is established before connection to the camera server is
made. In that case, uncheck the “Always use dial-up connections” box and try again.
• Ask the administrator of the camera server if the camera server is operating
correctly.
z Cannot control the camera.
• Check to see if you have camera control privileges. Select Camera Position Display to
display Camera Position Indicators. The color of the indicator tells you if you have
control privileges or not (ÆP. 13).
• When the camera sever limits the camera control to preset angles, the operations
such as selecting the camera, preset and backlight compensation ON/OFF are only
available.
• Check the settings on the camera server to see if the server prohibits camera control.
• When extreme view restrictions are set at the camera server, camera control may be
restricted as well.
• Ask the administrator of the camera server if the camera server is operating correctly.
z Cannot obtain camera control privileges.
• When the maximum number of the clients set at the camera server reaches its limit,
or control privileges of other viewer software have priority over the viewer, control
privileges cannot be obtained.
15
z Images are refreshed at a slow rate.
• Depending on various conditions such as when the settings of video capture size or
quality are specified to a high level at the camera server, or when the network is
busy, refreshing of the images may take time.
z Cannot establish a dial-up connection.
• Check the dial-up entry in Pocket PC to see if it is registered correctly (ÆP. 13).
• When dial-up connection is established from other applications installed in your
Pocket PC terminal, connection cannot be established from the viewer.
• Depending on the radio wave conditions, connection may not be established using a
wireless LAN card.
16
7. Error Messages
Error messages are displayed only when the viewer is in Normal Mode (ÆP. 5).
Message
No response from the server.
Operation/Status
To connect to the server.
Condition
Connection to the video server has failed.
Message
No response from the camera control server. You can use video
only.
Operation/Status
To connect to the server.
Condition
Connection to the video server is established but not to the
camera control server.
Message
Network is busy. Please try again later.
Operation/Status
To connect to the server.
Condition
The number of clients that can be connected simultaneously
from the viewer has reached the maximum specified at the
camera server.
Message
The connection to the server is restricted.
Operation/Status
To connect to the server.
Condition
Access restrictions have been set at the server.
Message
The camera is switched off or faulty.
Operation/Status
Connected.
Condition
The camera is switched off or broken.
Message
Could not get camera control privileges.
Operation/Status
To tap the Start Control button.
Condition
The number of the clients waiting for control privileges has
reached the maximum specified at the camera control server. Or
another client with camera control privileges higher than
yourself is connected to the server.
Message
100 camera sites already registered. This camera site will not be
auto-registered.
Operation/Status
To connect to the server by wvh file or entering the address directly.
Condition
The server being connected is not registered and 100 camera
sites are already registered with the viewer.
17
CANON INC.
30-2, Shimomaruko 3-chome, Ohta-ku, Tokyo 146-8501, Japan
U.S.A.
CANON U.S.A.,INC. NEW JERSEY OFFICE
100 Jamesburg Road, Jamesburg, NJ 08831 USA
CANON U.S.A.,INC. CHICAGO OFFICE
100 Park Blvd., Itasca, IL 60143 USA
CANON U.S.A.,INC. LOS ANGELES OFFICE
15955 Alton Parkway, Irvine, CA 92618 USA
CANON U.S.A.,INC. HONOLULU OFFICE
210 Ward Avenue, Suite 200 Honolulu, HI 96814 USA
z If you have any questions, call the Canon U.S.A. Information Center toll-free at
1-800-OK-CANON (652-2666) (U.S.A.only)
CANADA
CANON CANADA INC.NATIONAL HEADQUARTERS
6390 Dixie Road, Mississauga, Ontario L5T 1P7
CANON CANADA INC. CALGARY
2828, 16th Street, N.E, Calgary, Alberta T2E 7K7
CANON CANADA INC. MONTRÉAL
5990 Côte-de-Liesse, Montréal, Québec H4T 1V7
z If you have any questions, call the CANON CANADA Customer Information Centre
toll-free at 1-800-OK-CANON (652-2666) (Canada only)
MEXICO
CANON MEXICANA, S. DE R.L.DE C.V.
Periferco Sur No. 4124, Col. Ex-Rancho de Anzaldo, C.P. 01900
México, D.F.,México
CENTRO y
SURAMERICA CANON LATIN AMERICA, INC.
6505 Blue Lagoon Drive, Suite 325, Miami, FL 33126, USA
ASIA
CANON SINGAPORE PTE. LTD.
79 Anson Road, #09-01/06, Singapore 079906 Republic of Singapore
CANON HONGKONG CO., LTD.
9/F., The Hong Kong Club Building, 3A, Chater Road, Central, Hong Kong
OCEANIA
CANON AUSTRALIA PTY.LTD.
1 Thomas Holt Drive, North Ryde, Sydney, N.S.W. 2113, Australia
EUROPE
CANON EUROPA N.V.
P.O.Box 2262, 1180 EG Amstelveen, The Netherlands
CANON EUROPE LTD.
6 Roundwood Avenue, Stockley Park, Uxbridge Middlesex,
UB11 1JA, United Kingdom
PUB. VB-030511
©CANON INC. 2003