1
OPERATION MANUAL
USAGE AND SAFETY PRECAUTIONS
Safety Precautions
Warning
This symbol indicates explanations about
extremely dangerous matters. If users
ignore this symbol and handle the device
the wrong way, serious injury or death
could result.
Caution
This symbol indicates explanations about
dangerous matters. If users ignore this
symbol and handle the device the wrong
way, bodily injury and damage to the
equipment could result.
Please observe the following safety tips and precautions
to ensure hazard-free use of the RT-323.
About power
Warning Since power consumption of this unit is fairly high,
we recommend the use of an AC adapter whenever
possible. When powering the unit from a battery, use
only an alkaline type.
AC adapter operation
• Be sure to use only an AC adapter which supplies
9 V DC, 300 mA and is equipped with a "center
minus" plug (Zoom AD-0006).
The use of an adapter other than the specified
type may damage the unit and pose a safety
hazard.
• Connect the AC adapter only to an AC outlet that
supplies the rated voltage required by the adapter.
• When disconnecting the AC adapter from the AC
outlet, always grasp the adapter itself and do not
pull at the cable.
• If the unit is not to be used for a long time,
disconnect the AC adapter from the outlet.
Battery operation
• Use six IEC R6 (size AA) batteries (alkaline or
manganese).
• The RT-323 cannot be used for recharging.
Pay close attention to the labelling of the battery
to make sure you choose the correct type.
• If the RT-323 is not to be used for an extended
period of time, remove the battery from the unit.
• If batteries leakage has occurred, wipe the battery
compartment and the battery terminals carefully
to remove all remnants of battery fluid.
• While using the unit, the battery compartment
cover should be closed.
Environment
Caution Avoid using your RT-323 in environments where it
2
will be exposed to:
• Extreme temperature
• High humidity or moisture
• Excessive dust or sand
• Excessive vibration or shock
Handling
Caution • Since the RT-323 is a precision electronic device,
avoid applying excessive force to the controls.
Do not operate the keys or controls with your
foot.
• Take care that no foreign objects (coins or pins
etc.) or liquids can enter the unit.
• Be sure to turn the power to all equipment off
before making connections.
• Before moving the unit, turn the power off, and
disconnect all cables and the AC adapter.
Alterations
Caution Never open the case of the RT-323 or attempt to
modify the product in any way since this can result
in damage to the unit.
In Case of Trouble
Caution If there seems to be a defect or a problem with the
unit, immediately disconnect the AC adapter or
remove the batteries to shut off the power. Then
disconnect any other cables connected to the unit.
Usage Precautions
• Electrical interference
For safety considerations, the RT-323 has been
designed to provide maximum protection against the
emission of electromagnetic radiation from inside the
device, and protection from external interference.
However, equipment that is very susceptible to
interference or that emits powerful electromagnetic
waves should not be placed near the RT-323, as the
possibility of interference cannot be ruled out entirely.
USAGE AND SAFETY PRECAUTIONS
Names of Parts
••••••••
2
Application Guide
[Drum Kits/Bass Programs] • • • • • • • • • • • • • • • 33
•••••••••••••••••••••••••••
4
Drum Kit Operation • • • • • • • • • • • • • • • • • • • • • • 33
Bass Program Operation • • • • • • • • • • • • • • • • • • 37
Top Panel • • • • • • • • • • • • • • • • • • • • • • • • • • • • • • 4
Rear Panel • • • • • • • • • • • • • • • • • • • • • • • • • • • • • 4
Side Panel • • • • • • • • • • • • • • • • • • • • • • • • • • • • • • 5
Getting Connected
Using the Unit on Batteries • • • • • • • • • • • • • • • • • 7
Preparations for Playback • • • • • • • • • • • • • • • • • • 7
Quick Guide 1 Listening to the Demo
•••••••
8
To Start the Demo Song • • • • • • • • • • • • • • • • • • •
To Stop the Demo Song • • • • • • • • • • • • • • • • • • •
To Leave the Demo Mode • • • • • • • • • • • • • • • • •
Drum Kits and Bass Programs • • • • • • • • • • • • • • •
8
8
8
9
Quick Guide 2 Playing the Pads
••••••••••••
10
Playing a Drum Kit • • • • • • • • • • • • • • • • • • • • • • • 10
Playing a Bass Program • • • • • • • • • • • • • • • • • • 11
Changing the Drum Kit/Bass Program • • • • • • • 11
Quick Guide 3 Listening to Patterns
••••••••
12
Playing a Pattern • • • • • • • • • • • • • • • • • • • • • • • •
Changing the Pattern • • • • • • • • • • • • • • • • • • • •
Changing the Tempo • • • • • • • • • • • • • • • • • • • • •
Stopping the Pattern • • • • • • • • • • • • • • • • • • • • •
Patterns and Tracks • • • • • • • • • • • • • • • • • • • • •
12
12
13
13
13
Quick Guide 4 Creating a Pattern
••••••••••
14
Selecting the Record Pattern/Track • • • • • • • • • 14
To Start Recording • • • • • • • • • • • • • • • • • • • • • • 15
To Stop Recording • • • • • • • • • • • • • • • • • • • • • • 15
Quick Guide 5 Using Groove Play
••••••••••
16
To Use Groove Play • • • • • • • • • • • • • • • • • • • • • •
To Play a Pattern with a Pad • • • • • • • • • • • • • • •
To Keep Playing the Pattern After
Releasing the Pad • • • • • • • • • • • • • • • • • • • • • •
To Terminate Groove Play • • • • • • • • • • • • • • • •
16
16
17
17
•••••••••••••••••••••••
18
What Is a Song? • • • • • • • • • • • • • • • • • • • • • • • • 18
Lesson 1 Creating a Song [Step Input] • • • • • • • 18
••••••••••••••••
18
● Enter pattern information • • • • • • • • • • • • • • • 19
Use a soft, dry cloth to clean the RT-323. If necessary,
slightly moisten the cloth. Do not use abrasive
cleanser, wax, or solvents (such as paint thinner or
cleaning alcohol), since these may dull the finish or
damage the surface.
40
40
42
43
46
49
49
49
50
Application Guide [Song]
•••••••••••••••••
55
Song Playback • • • • • • • • • • • • • • • • • • • • • • • • •
Real-time Song Input • • • • • • • • • • • • • • • • • • • • •
Song Step Input • • • • • • • • • • • • • • • • • • • • • • • •
Copying Specific Measures • • • • • • • • • • • • • • • •
Deleting a Song • • • • • • • • • • • • • • • • • • • • • • • • •
Copying a Song • • • • • • • • • • • • • • • • • • • • • • • • •
Song Track Operation • • • • • • • • • • • • • • • • • • • •
Editing Song Settings • • • • • • • • • • • • • • • • • • • •
55
56
60
68
68
69
69
72
•••••••••••
74
Formatting a SmartMedia Card • • • • • • • • • • • • •
Saving Data on the SmartMedia Card • • • • • • • •
Loading Data from the SmartMedia Card • • • • • •
Partial Import of Data from
a SmartMedia Card • • • • • • • • • • • • • • • • • • • •
Deleting Data From the SmartMedia Card • • • • •
Import/Export of PS-02 SmartMedia Data • • • • •
74
75
76
Application Guide [SmartMedia]
Application Guide [Remote Control]
76
78
79
82
••••••••
Controlling the RT-323 With
a Foot Pedal (FP01/FP02) • • • • • • • • • • • • • • • 82
Controlling the RT-323 With
a Foot Switch (FS01) • • • • • • • • • • • • • • • • • • • 83
••••••••••••••••••
85
Available MIDI Functions • • • • • • • • • • • • • • • • •
Changing the MIDI Setting • • • • • • • • • • • • • • • • •
Saving RT-323 Internal Data on
MIDI Equipment • • • • • • • • • • • • • • • • • • • • • •
MIDI Track Operation • • • • • • • • • • • • • • • • • • • •
85
85
90
91
● Transposing the bass track • • • • • • • • • • • • • 21
● Entering a fill-in pattern • • • • • • • • • • • • • • • • 23
Lesson 2 Editing a Song
••••••••••••••••••
24
● Copying part of a song • • • • • • • • • • • • • • • • 24
• Cleaning
•••••••••••••••
Playing a Pattern • • • • • • • • • • • • • • • • • • • • • • • •
Using the Groove Play Function • • • • • • • • • • • • •
Real-Time Pattern Input • • • • • • • • • • • • • • • • • • •
Pattern Step Input • • • • • • • • • • • • • • • • • • • • • • •
Deleting a User Pattern • • • • • • • • • • • • • • • • • • •
Deleting a Track • • • • • • • • • • • • • • • • • • • • • • • •
Copying a Pattern • • • • • • • • • • • • • • • • • • • • • • •
Changing Pattern Settings • • • • • • • • • • • • • • • • •
Application Guide [MIDI]
Hands-on Lessons
● Select an empty song
With any type of digital control device, the RT-323
included, electromagnetic interference can cause
malfunctioning and can corrupt or destroy data. Care
should be taken to minimize the risk of damage.
6
••••••••••••••••••••••••
Application Guide [Patterns]
● Changing the bass track
••••••••••••••
93
••••••••
Metronome Operation • • • • • • • • • • • • • • • • • • • • 93
Other Special Functions • • • • • • • • • • • • • • • • • • 94
26
•••••••••••••••••••••••••
95
•••••••••••••••••••••••••••••••
96
•••
28
Troubleshooting
•••••••
30
Reference
Lesson 3 Creating a Song [Real-time Input]
Application Guide [Pads/JAM Slider]
Application Guide [Other Functions]
Playing the Pads • • • • • • • • • • • • • • • • • • • • • • • • 30
Adjusting pad pitch/volume/panning/sound in
real time (jam function) • • • • • • • • • • • • • • • • • • 31
Adjusting the Pad Sensitivity • • • • • • • • • • • • • • • 32
RT-323 Specifications
Index
••••••••••••••••••••
•••••••••••••••••••••••••••••••••
96
114
Please keep this manual at hand for future
reference.
3
Contents
USAGE AND SAFETY PRECAUTIONS
In this manual, symbols are used to highlight warnings
and cautions for you to read so that accidents can be
prevented. The meanings of these symbols are as follows:
Contents
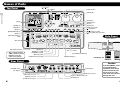
Names of Parts
Top Panel
[ ] / [ ]keys
[ ]/[
]keys
[OUTPUT] dial
[VALUE] dial
Names of Parts
Names of Parts
[SONG] key
[PATTERN] key
[KIT] key
[UTILITY] key
[TEMPO] key (LED)
[ ] (STOP) key
Display
[ENTER] key
[ERASE] key
[EDIT] key
[INSERT/DELETE] key
[EXIT] key
[
[
] (PLAY) key (LED)
REC] (STEP REC) key (LED)
[JAM FUNCTION] key
(LED)
Side Panel
[DATA CARD] slot
JAM slider
[PAD FUNCTION] key
* Keys and pads marked
(LED) contain an internal
LED that causes the
entire key to light up.
[MUTE] key
[DRUM A] key (LED)
[DRUM B] key (LED)
[BASS] key (LED)
[SONG TRACK] key (LED)
Pads 1 - 13 (LED)
[PAD BANK/OCTAVE] key
[REPEAT/STEP] key
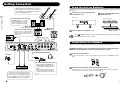
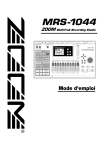
SmartMedia card
Correct
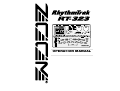
Rear Panel
Wrong
Caution
[LINE IN] jack
[POWER] switch
[DC IN] jack
[MIDI OUT] connector
[MIDI IN] connector
[CONTROL IN 1/2] jack
4
[SUB OUT 1/2] jacks
[R OUT / L/MONO OUT] jacks
If the SmartMedia card is
inserted with wrong
orientation, it will not go
all the way into the slot.
Do not try to force the
card in, because this will
damage the card.
[PHONES] jack
5
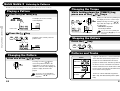
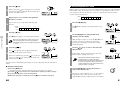
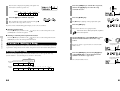
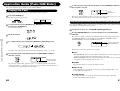
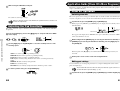
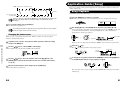
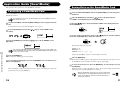
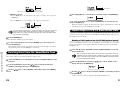
Getting Connected
Using the Unit on Batteries
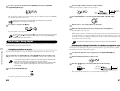
When a guitar or other instrument is connected to
the [LINE IN] jack, the sound from the instrument
is mixed with the sound of the RT-323 and output
from the [L/MONO/R OUT] jack.
The RT-323 can be powered from six IEC R6 (size AA) batteries. Follow the steps below to insert
the batteries.
1 Turn the unit over and open the battery
Guitar
Bass
compartment cover.
2 Insert six fresh IEC R6 (size AA)
alkaline batteries.
RT-323 rear
Mixer, audio system,
or other playback equipment
Multi-effect
(ZOOM 505II etc.)
To play an external MIDI component
from the RT-323, connect the [MIDI
OUT] connector of the RT-323 to the
MIDI IN connector of the external
component.
3 Close the battery compartment cover.
If the
LED lights up while the unit is powered from batteries, the batteries are exhausted.
Replace the batteries as soon as possible.
R
OUT
Drum sound
source module
Six IEC R6 (size AA)
Getting Connected
Getting Connected
For mono playback, connect only the
[L/MONO OUT] jack. To selectively
use the output signal for certain
instrument sounds only, connect a
cable to the [SUB OUT 1/2] jack.
L/MONO
OUT
SUB
OUT 2
SUB
OUT 1
LINE IN
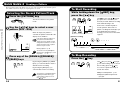
Preparations for Playback
After connections are established, check the sound by performing the following steps.
1 While the playback system is still turned off and the volume is fully turned down,
DC IN
MIDI
OUT
MIDI
IN
double-check whether all connections have been made correctly.
PHONES
CONTROL
IN 2
CONTROL
IN 1
2 Turn power to the RT-323 on.
AC adapter
Connect the supplied AC adapter to the [DC IN] connector and set the [POWER] switch to
ON.
FS01
Headphones
FP01/FP02
MIDI sequencer
(computer MIDI interface)
To synchronize the RT-323 with an external
sequencer or to control the sound sources of
the RT-323 from an external MIDI component,
link the MIDI OUT connector of the equipment
with the [MIDI IN] connector on the RT-323.
6
By connecting the optional foot pedal
FP01 or FP02 to the [CONTROL IN
1]/[CONTROL IN 2] jack, pitch, volume,
or sound can be controlled with the
pedal.
Connecting the optional foot switch
FS01 to the jack allows activating a
sound or switching the tone with your
foot.
3 Turn power to the playback system on and adjust the volume.
While tapping a pad to produce sound, adjust the [OUTPUT] dial of the RT-323 and the
volume control on the playback system to a suitable position.
7
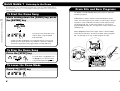
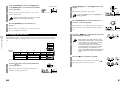
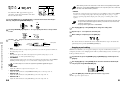
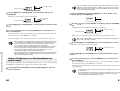
Quick Guide 1 Listening to the Demo
The Quick Guide section of this manual is intended to help you become familiar with the RT-323.
To hear what the unit can do, we recommend that you listen to the built-in demo song which uses a
variety of sounds.
To Start the Demo Song
While holding down the [SONG] key, press
the [ENTER] key
The backup sound provided by the RT-323 consists of "drum kits"
and "bass programs"
A drum kit is a collection of drum sounds including bass drums,
snares, and tom-tom percussion sounds, as well congas, as bongos,
and various other sound effect. The RT-323 offers 64 preset readonly drum kits (00 - 63), as well as the capacity to store 64 userprogrammable drum kits (64 - 127). Up to two of these can be used
simultaneously.
Quick Guide 1 Listening to the Demo
Quick Guide 1 Listening to the Demo
The unit goes into demo play mode,
and two demo songs are played
back alternately.
Drum Kits and Bass Programs
A bass program provides various types of bass sounds including
electric and acoustic bass. The RT-323 includes 55 bass programs
(00 - 54), allowing use of only one bass program at a time.
Sounds just like the backup of a live band, doesn't it? Note how
effectively various drum, percussion, and bass sounds are combined.
The RT-323 can produce such a great variety of sounds with ease.
To Stop the Demo Song
Drum kit
Bass
program
Press the [STOP] key
To restart demo song playback, use
the [▲]/[▼] keys to select the demo
song, and then press the [
] key.
Drum kit
To Leave the Demo Mode
Press the [EXIT] key
8
9
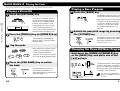
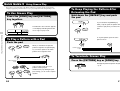
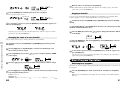
Quick Guide 2 Playing the Pads
The top panel of the RT-323 has 13 pads which serve to play drum kits and bass programs.
Playing a Bass Program
Playing a Drum Kit
1 Press the [BASS] key
1 Press the [PATTERN] key
2 Press the [DRUM A] key (or [DRUM B] key)
When a bass program is selected, the
same bass sound shifted in pitch by
a semitone is assigned to the pads.
Therefore you can use the 13 pads
like the white and black keys on a
keyboard.
2 Switch the pad pitch range by pressing
the [OCTAVE] key
When a bass program is selected, the
[OCTAVE] key can be used to shift the
pitch range of the pads over 4
octaves (octave 1 - 4).
The [DRUM A] key ([DRUM B] key)
lights up, and you can play the drum
kit with the pads.
3 Tap the pads
When a drum kit is selected, 13 drum
sounds out of the maximum of 39
sounds included in that kit are
assigned to the 13 pads. You can play
the sounds simply by hitting the pads.
Changing the Drum Kit/Bass Program
Hold down the [DRUM A]/[DRUM B] key
or the [BASS] key, and press one of the
[ ]/[ ] keys
4 Press the [PAD BANK] key to switch
The drum kit number or bass program
number is switched by one step up or
down, so that the sound assigned to
the pads changes. Tap the pads after
switching to verify the change.
the bank
The [PAD BANK] key allows you to
switch between pad banks 1 - 3,
which will change the sounds that are
assigned to pads 1 - 13.
You can also use the [VALUE] dial
instead of the [▲]/[▼] keys to switch
the sound.
Drum kit number
10
11
Quick Guide 2 Playing the Pads
Quick Guide 2 Playing the Pads
The indication "PATTERN" appears in
the top part of the display, showing
that the RT-323 is in pattern mode.
In pattern mode, "patterns" (short
backing phrases of a few measures)
can be recorded and played. The
normal mode for playing a drum kit by
hitting the pads is the pattern mode.
The [BASS] key lights up, and you can
play the bass program with the pads.
Quick Guide 3 Listening to Patterns
The RT-323 incorporates 400 preset read-only patterns which you can use as follows.
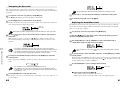
Changing the Tempo
Playing a Pattern
1
Press the [PATTERN] key
While holding down the [TEMPO] key,
press one of the [ ]/[ ] keys
While you hold down the [TEMPO] key,
the display shows the current tempo
(BPM). Pressing one of the [ ]/[ ]
keys shifts the tempo up or down in
0.1 BPM steps.
The display shows the currently
selected pattern.
2
Press the [
] key
Current tempo
Playback of the currently selected
pattern starts.
Stopping the Pattern
Press the [
Measure Beat
Changing the Pattern
]/[
] keys
Pressing one of the [ ]/[ ] keys
causes the pattern number to be
switched by one step up or down. If
"EMPTY" is shown on the display, the
pattern is empty and cannot be
played.
You can also use the [VALUE] dial
instead of the [ ]/[ ] keys to select
the pattern.
12
] key
Patterns and Tracks
Pattern
Press one of the [
You can also use the [VALUE] dial
instead of the [ ]/[ ] keys to select
the tempo.
Drum A track
Drum B track
Bass track
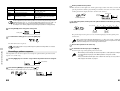
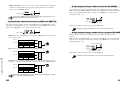
A pattern of the RT-323 is a stored combination
of two drum kits and one bass program. The
location for each individual drum kit or bass
program is called a track. Therefore a pattern of
the RT-323 consists of the drum A track, drum
B track, and the bass track. Drum tracks A and
B each contain a specific drum kit and the bass
track contains a bass program.
The RT-323 contains 400 read-only patterns
(000 - 399), and 100 read/write patterns (U00 U99).
13
Quick Guide 3 Listening to Patterns
Quick Guide 3 Listening to Patterns
* BPM: Number of quarter
note beats per minute
Pattern name
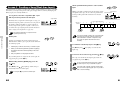
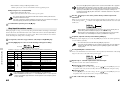
Quick Guide 4 Creating a Pattern
The user pattern feature of the RT-323 lets you create your own patterns. You can hit the pads in
time with the metronome and play an original pattern to be stored.
Selecting the Record Pattern/Track
1 Press the [PATTERN] key
To Start Recording
While holding down the [
press the [
] key
2
Quick Guide 4 Creating a Pattern
When an empty user pattern is
selected, the pattern name field of the
display shows "EMPTY".
Measure Beat
[Pattern recording]
Pad
In the factory default condition, all
user patterns of the RT-323 are
empty. If you have already created
many patterns and there is no more
empty user pattern erase a pattern
that is no longer needed.
Erasing a pattern ➝ p. 49
You can also use the [VALUE] dial
instead of the [ ]/[ ] keys to select
the pattern.
3
Press any of the [DRUM A]/[DRUM B]/
[BASS] keys
By pressing the [DRUM A] or [DRUM
B] key, you select the drum A track or
drum B track for recording.
By pressing the [BASS] key, you
select the bass track for recording.
To change the sound (drum kit/bass
program), hold down the key you
selected above, and press one of
the [ ]/[ ] keys.
14
Pad
Recording loops for two measures
Precount
To Stop Recording
Press the [
] key
The [ REC ] key and [
] key light
go out and recording stops. To check
the recording, press the [
] key.
You can also repeat these steps to
record other tracks.
Editing a recorded pattern ➝ p. 47
Changing the pattern length or beat
➝ p.51, p52
15
Quick Guide 4 Creating a Pattern
The [ REC] key and [
] key light
up, a precount of four beats (one
measure) is heard, and then recording
starts. While listening to the
metronome sound,hit the pads to
record a pattern. At the end of a
pattern, recording automatically loops
to the beginning and continues,
allowing you to record over the earlier
segment.
The RT-323 switches to the pattern
mode.
Use the [ ]/[ ] keys to select a user
pattern (U00 - U99)
REC] key,
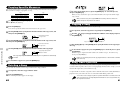
Quick Guide 5 Using Groove Play
Groove play is a special feature of the RT-323 which lets you switch among various patterns
simply by tapping the pads. This makes it easy to play with patterns like a DJ spinning records.
To Use Groove Play
Press the [SONG] key and [PATTERN]
key together.
To Keep Playing the Pattern After
Releasing the Pad
Hold down the [REPEAT] key and push
the pad
If you hold down the [REPEAT] key
while you push a pad, the pattern will
continue to play after you release the
pad.
The indication "GroovePLAY" appears
on the display, indicating that the RT323 is in groove play mode.
Push the pad
While you hold down the pad, the
pattern assigned to the pad will play.
Try out various pads to hear which
patterns are assigned to them.
To Terminate Groove Play
Hold down
Press the [PATTERN] key or [SONG] key
Pattern assigned
to pad
In groove play mode, up to four
patterns can be played
simultaneously. By shifting the pad
press timing, you can create complex
rhythms.
16
Pattern assigned
to pad
Changing the pattern assigned to the pad
→ p. 42
17
Quick Guide 5 Using Groove Play
Quick Guide 5 Using Groove Play
To stop the pattern, push the same
pad once more.
To Play a Pattern with a Pad
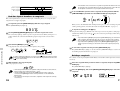
Hands-on Lessons
To erase an existing song to make it empty, see page 68.
The RT-323 allows you to line up patterns in a desired order to create an entire backing sequence
(song). This section contains several lessons that will show you how you can use the
preprogrammed patterns to create your original songs.
● Enter pattern information
What Is a Song?
A song in the RT-323 basically is a playing sequence of patterns (backing of several measures
comprising the three tracks drum A, drum B, and bass). To create a song, you sequentially enter
information about pattern switching from the beginning. The maximum number of measures in a
song is 999.
A song contains not only pattern information. You can also enter the following information.
•
•
•
•
For step input, you start from the beginning of an empty song. In this example, we will repeat a 2measure pattern four times.
Press the [● REC] key.
1
Number of drum kit/bass program used for each track
Tempo information
Bass track pitch shift (transpose)
Track volume
The [● REC] lights up, and step input starts. The display
shows the current measure and beat, indicating the current
position. Because there is yet no pattern information in the
empty song, the display also shows "End".
Measure
Beat
Use the [INSERT] key to bring up the indication
"INSERT?" on the display.
2
Lesson 1 Creating a Song [Step Input]
In this lesson, we will create a simple song by using step input. This mode allows you to enter
pattern information while the RT-323 is stopped.
● Select an empty song
With each push of the [INSERT] key, the display cycles
through "INSERT?" ➝ "DELETE?" ➝ "original
indication".
When "INSERT?" is shown, a new pattern can be inserted
at the current position.
Pattern Pattern
number duration
Use the [VALUE] dial to select the pattern.
3
To create a new song, select an empty song where no pattern is input.
Let's select the pattern number "116" here. The duration of
116 is 2 measures, and the bass track plays an E Major
chord.
Press the [SONG] key.
1
Press the [ENTER] key.
The indication "SONG" appears in the top part of the
display, and the unit switches to the song mode for creating
and playing songs.
Use the [▲]/[▼] keys or the [VALUE] dial to select
an empty song.
2
18
The number and name of the currently selected song appear
in the bottom part of the display. When an empty song is
selected, the song name field shows "EMPTY".
4
The pattern "116" is entered at the current location.
To check the entered pattern, you can play the pattern
with the [
]/[■] keys.
or
Song number
19
Hands-on Lessons
Hands-on Lessons
This information can also be altered during a song. This lets you for example transpose the bass
track pitch according to the chord progression, continuously alter the tempo, perform fade-out at
the end of a song, etc. There are no limits to your creative potential.
Press the [
5
] key.
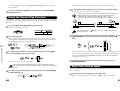
● Transposing the bass track
During step input, you can not only select a pattern number but also add various other information
such as volume, tempo, bass transpose value, etc. Such pieces of information are called "events".
As an example, we will add a bass transpose value here, to shift the pitch of the bass track in
accordance with chord progression.
When you press the [ ] key, the display moves to the point
where the next pattern can be input. (In this example, this is
the start of the third measure.)
Measure 1
number
Repeat steps 2 - 6, to enter the same pattern in
measures 3, 5, and 7.
6
Chord
2
3
4
116
Chord
E
5
6
116
E
7
8
116
E
116
3
4
E
5
6
116
A
7
8
116
B
116
9
END
E
Press the [● REC] key.
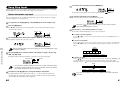
You now have created a song with the following eight
measures.
Measure 1
number
2
116
1
9
END
The [● REC] key lights up, and step input again becomes
possible.
E
Press the [ ■ ] key.
Use the [▲]/[▼] keys to bring the indication
"Transps" onto the display.
The [● REC] key light goes out, and step input terminates.
When you enter patterns in an empty song, the song
name "Songxxx" (where xxx is the song number) is
automatically assigned. You can change this name later
( ➝ p. 73).
Press the [
8
2
Song name
] key.
The [
] key lights up, and song playback starts. The
display shows the current measure and beat.
While "Transps" is shown, you can use the [▲]/[▼] keys to
select the event type to be added to the current song
position. You can add transpose information or change
existing information.
Use the [ ]/[ ] keys to move to the start of the
third measure.
Measure
Beat
To listen to a finished song, press the [
] key. At the end
of the song, playback stops automatically. To stop the song
midway, press the [■] key.
In this example, transpose information at the start of the
third measure has a setting value of zero.
3
If you have made a mistake during pattern input, you can select the pattern and correct the input as
follows.
■ Entering another pattern
(1) Press the [●REC] key.
Step input starts again, and pattern information at the current point can be changed.
(2) Use the [ ]/[ ] keys to move to the position whose pattern you want to change.
(3) Use the [VALUE] dial to select the new pattern.
(4) When the operation is completed, press the [■] key to terminate step input.
20
Hands-on Lessons
Hands-on Lessons
7
Setting value
• When pattern information is input, transpose
information with a zero value is also input.
• Event information including pattern information can
be entered not only at the start of a measure, but
anywhere within the measure (using sixteenth-note
steps). For details, see page 66.
Use the [VALUE] dial to change the transpose
value for the third measure.
4
The transpose value setting range is -12 - 0 - 12 (in semitone
steps). For measures 3 and 4, we want to transpose the
original E Major pattern to A Major. Therefore, the required
21
setting value is "5" (five semitones higher = perfect fourth
higher).
The transpose setting remains active until the point
where the next transpose value is entered (start of fifth
measure in this example).
Use the [ ]/[ ] keys to move to the start of the
fifth measure.
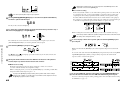
● Entering a fill-in pattern
With the previously described steps, we have created an 8-measure chord progression. But the
rhythm simply repeats the same pattern. To add a bit of flourish, proceed as follows.
Press the [● REC] key.
1
5
Press the [▲] key once.
Use the [VALUE] dial to change the transpose
value for the fifth measure.
6
2
For measures 5 and 6, we want to transpose the original E
Major pattern to B Major. Therefore, the required setting
value is "7" (seven semitones higher = perfect fifth higher).
Press the [■] key to terminate step input.
The indication "EV➝" appears on the display.
Other indications such as "PT" or "TS" to the right of
"EV➝" denote event information for the current position.
"PT" stands for pattern information and "TS" for transpose
information. For details, see page 66.
While this indication is shown, position information is
shown on the display to the right of the measure and beat in
"ticks" (1/96 beat).
Hands-on Lessons
Hands-on Lessons
For measures 7 and 8, we want to use E Major of the
original chord. Therefore there is no need to change
the transpose value of zero.
7
The [● REC] key lights up, and step input again becomes
possible.
Use the [ ]/[ ] keys to move to the start of the
eighth measure.
3
To listen to the song with the transpose information, press
the [
] key.
When "EV ➝ " is displayed, the [ ]/[ ] keys can be used to
move in measures. The [STEP] key allows movement in
steps of 24 ticks.
Press the [▼] key once.
If you have made a mistake during transpose information input, you can correct it as follows.
Pattern information can be input.
■ Modifying the transpose information setting value
After performing steps 1 - 2, use the [ ]/[ ] keys to move to the desired point, and use the
[VALUE] dial to enter the new transpose information.
4
■ Deleting accidentally entered transpose information
After performing steps 1 - 2, use the [ ]/[ ] keys to move to the desired point, and press the
[ERASE] key. The current transpose information is deleted.
Use the [VALUE] dial to enter new pattern
information.
5
22
When you move to a point where no pattern
information is input, the indication " " is shown to
the left of "Pattern". This means that the preceding
pattern will continue to play.
With the [VALUE] dial you can enter new pattern
information at the current position. In this example, let's
select pattern "117". This is a 1-measure fill-in pattern. The
bass track uses the same E Major chord as pattern 116.
23
Now measure 7 will play the beginning of the pattern 116,
and measure 8 switches to pattern 117.
Measure 1
number
2
3
4
116
Chord
5
6
116
E
A
7
116
B
8
1
9
116 117 END
first half
E
E
Press the [■] key to terminate step input.
6
Press the [SONG] key to activate the song mode,
and use the [▲]/[▼] keys to select the song
created in lesson 1.
Press the [● REC] key.
This concludes the actions for this lesson. Press the [
key to listen to the song you have created.
2
]
The [● REC] key lights up, and step input starts again.
Press the [EDIT] key.
If you have made a mistake during pattern input, you can correct it as follows.
■ Entering another pattern
Press the [● REC] key and then use the [ ]/[ ] keys to move to the desired point. Use the
[VALUE] dial to enter the new pattern.
3
This function can be called up at any time, regardless
of the current position.
Use the [▲]/[▼] keys or the [VALUE] dial to select
the first measure number to be used as copy
source.
4
Using the song created in lesson 1, this lesson demonstrates how you can extend the song with the
copy function, change the bass track contents, and perform various other useful editing functions.
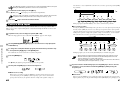
● Copying part of a song
In lesson 1, we have input a song of 8 measures. In this lesson, we will copy the entire song
(measure number 1 - 8) to the latter part, to extend it to 16 measures.
5
Because we want to copy 8 measures, we select measure
number 1 here.
Select measure number 8 here.
2
3
116
Measure 1
number
2
116
24
4
5
116
3
4
116
6
116
5
6
116
7
8
First measure number
of copy source
Press the [ENTER] key, and use the [▲]/[▼] keys
or the [VALUE] dial to select the last measure
number to be used as copy source.
Copy
Measure 1
number
or
Last measure number
of copy source
9
116 117
first half
7
8
116 117
first half
9
10
116
11
12
116
13
14
116
15
16
116 117
first half
25
Hands-on Lessons
Hands-on Lessons
■ Deleting accidentally entered pattern information
Press the [● REC] key and then use the [ ]/[ ] keys to move to the desired point. Press the
[ERASE] key to delete the current pattern information.
Lesson 2 Editing a Song
This activates the mode for copying measures.
Press the [ENTER] key, and use the [▲]/[▼] keys
or the [VALUE] dial to select the measure number
of the copy target.
Copy target start
measure number
2
Because we want to copy the measures 1 - 8 as is, select
measure number 9 here.
6
Use the [▲]/[▼] keys to call up " Bas PTN" on the
display.
The bass track replacement is now possible.
To replace the drum B track, use the [▲]/[▼] keys to
call up " DrB PTN".
If you have made a mistake entering a value, press the
[EXIT] key to return to the previous step.
Use the [VALUE] dial to select the pattern to be
used as a source for replacing.
Press the [ENTER] key to execute the copy
process.
3
7
The 8 measures of the original song are copied to the end of
the song, resulting in 16 measures.
● Changing the bass track
Use the [
]/[■] keys to verify that the bass track
contents only have changed.
119
4
DRUM A
DRUM B
Bass
Chord
12
13
14
15
16
116
116
116
DRUM A
DRUM A
DRUM A
DRUM A
DRUM B
DRUM B
DRUM B
DRUM B
Bass
Bass
Bass
Bass
A
B
E
first half
17
117
Hands-on Lessons
Hands-on Lessons
The drum B track or bass track of the pattern used in a song can be altered to that of a different
pattern. In this example, we will change the bass track of measure 16 to the bass track of pattern
119.
Measure 11
number
Here we will select "119". This will cause the bass track of
the last track to be replaced with the bass track of pattern
119.
• Replacing with a user pattern (U00 - U99) is also
possible. By recording a phrase on the bass track
of a user pattern, you can provide your own bass
track contents for use in other patterns.
• To replace the drum B track, select the drum A
track or drum B track of any pattern. The drum A
track is identified by an "A" appended to the
pattern number (001A, U99A), and the drum B track
by a "b" appended to the pattern number (001b,
U99b).
END
Press the [■] key to terminate step input.
E
5
This concludes the actions for this lesson. Press the[
key to listen to the song you have created.
]
Use the [ ]/[ ] keys to move to the pattern that
you want to replace.
1
26
Here we move to the start of measure 16. This position
should have an input for pattern 117.
27
Hit the pad with the first pattern to start real-time
input.
Lesson 3 Creating a Song [Real-time Input]
In the final lesson, we will use "real-time input", which is another method for creating a song. With
this method, you assign desired patterns to the pads and play them in real time by hitting the pads.
What you play is recorded by the RT-323.
Hitting a pad in this condition starts real-time input, and the
first pattern starts to play. To select the next pattern, hit the
desired pad. The pattern will switch at the next measure
boundary.
In song mode, select the song number (00 - 11) for
which you want to perform real-time input.
Current beat
Current measure
Song number
1
Normally, when you perform real-time input of a song, you
must first assign the patterns you wish to use to the pads. In
the default condition of the RT-323, various patterns are
already assigned to the pads for songs 00 - 11. In lesson 3,
we will use these preassigned patterns. (For information on
how to assign your own patterns, see page 56.)
Preceding pattern plays
4
The [● REC] and [
] keys lights up, and the unit goes
into standby mode for real-time input.
5
Pattern A
6
7
8
Pattern B
Pattern B
9
10
11
Pattern C
Pattern C
To terminate real-time input, press the [■] key.
5
The [● REC] and [
input stops.
] key light go out, and real-time
To listen to the recorded song, press the [
Try out which patterns are assigned to the various pads. To
stop pattern play, press the [■] key.
3
4
Hands-on Lessons
Hands-on Lessons
Tapping a pad will play the pattern assigned to that pad.
This function is similar to groove play mode, but it differs in
the following regards.
While holding down the [● REC] key, press the
[
] key.
3
In the factory default condition, the song numbers 00 11contain only short fill-in patterns assigned to the
pads marked FILL 1 and FILL 2. Only when using
these pads, the pattern will switch at the beat
boundary.
Hit the pads.
• Pattern play continues also when you release a pad.
• When you hit another pad while a pattern is playing,
the pattern will switch at the beginning of the next
measure.
• Only one pattern can be played at a time.
2
Pattern A
The pattern assignment for each pad is stored
separately for each song.
2
Measure 1
number
] key.
The song created with real-time input is played back. To
stop playback, press the [■] key.
6
A song created with real-time input can be edited in
the same way as a song created with step input.
If you have made a mistake, start the real-time input
process from the beginning again. (It is not possible to
make correction midway.)
Pressing the [■] key cancels real-time input.
28
29
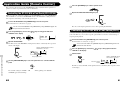
Application Guide [Pads/JAM Slider]
6 To switch the pitch range of the bass program, press the [OCTAVE] key while the
This section explains the use of the RT-323 pads and the JAM slider.
bass program is selected.
Playing the Pads
Currently
selected octave
When the RT-323 is in pattern mode, you can play drum kits and bass programs.
1 Press the [PATTERN] key.
The bass programs of the RT-323 allow you to play over a range of four octaves (octave 1 - 4).
The number of the currently selected octave is shown on the display.
The RT-323 goes into pattern mode.
Adjusting pad pitch/volume/panning/sound in real time (jam function)
2 To play a drum kit, press the [DRUM A] key or [DRUM B] key. To play a bass
program, press the [BASS] key.
By moving the JAM slider while you hit a pad, you can adjust the pitch, volume, panning (left/right
stereo balance), and sound parameters in real time.
The selected key lights up.
1 In pattern mode, press one of the [DRUM A]/[DRUM B]/[BASS] keys.
2 Use the [JAM FUNCTION] key to select the parameter to be controlled with the
JAM slider.
3 Hit the desired pad.
The parameter currently controlled by the JAM slider is shown on the display. Each push of
the [JAM FUNCTION] key cycles through the settings PITCH → VOLUME → PAN →
SOUND CHANGE → no indication (JAM slider inactive).
Parameter selected with
[JAM FUNCTION] key
Hold down
The tempo of the sound depends on the current tempo and quantize setting ( ➝ p. 41, 50).
5 To play another drum sound with the pad, press the [PAD BANK] key while the
drum kit is selected.
Number of currently
selected pad bank
The collection of drum sounds assigned to pads 1 - 13 is called a "pad bank". One drum kit
comprises pad banks 1 - 3, allowing you to play up to 39 types of drum sounds. The number of
the currently selected pad bank is shown on the display.
The functions of the various parameters are as follows.
■ PITCH
• For drum kits: The pitch of the pad is shifted continuously up or down according to the
slider movement. The width of the pitch shift depends on the sound.
• For bass programs: The pitch of the pad is shifted up or down in 13 discrete steps. The
actual pitch depends on the pitch setting for pads 1 - 13.
■ VOLUME
The pad volume changes according to the slider movement.
■ PAN (Panning)
As the JAM slider is moved from up to down, the pan setting (left/right position) of the
sound is shifted from right to left.
■ SOUND CHANGE
According to the slider movement, the sound of the pad changes. The actual change
depends on the drum kit and bass program.
30
31
Application Guide [Pads/JAM Slider]
Application Guide [Pads/JAM Slider]
4 To continuously play a pad, hold down the [REPEAT] key while hitting the pad.
Application Guide [Drum Kits/Bass Programs]
3 While moving the JAM slider, hit the pad.
The RT-323 comprises 128 drum kits and 55 bass programs. This section describes the operation
steps to control these functions.
Drum Kit Operation
● Switching drum kits
RT-323 incorporates 64 read-only preset drum kits (00 - 63) and 64 rewritable user drum kits (64 127). For each pattern, you can select the desired drum kit for the drum A track and drum B track.
The sound selected in step 2 changes.
When you change the function of the JAM slider, the parameter that was controlled so far
reverts to the original value.
Adjusting the Pad Sensitivity
1 In pattern mode, press the [DRUM A] key (or [DRUM B] key).
While you press the [DRUM A] (or [DRUM B]) key, the display shows the currently selected
drum kit number.
This setting controls the degree to which the value changes depending on the intensity with which
the pad is hit.
Drum kit
number
Drum kit name
1 Press the [UTILITY] key, and use the [ ]/[ ] keys to call up the indication "SENS"
on the display.
The top part of the display shows "PRESET" when a preset drum kit is selected and "USER"
when a user drum kit is selected.
2 While holding down the [DRUM A] key (for selecting the drum A track drum kit) or
following options.
or
• SOFT: Low volume regardless of pad hitting intensity
• MEDIUM: Medium volume regardless of pad hitting intensity
• LOUD: High volume regardless of pad hitting intensity
• LITE: Highest sensitivity setting. Results in loud volume even when pad is hit only
lightly.
• NORMAL: Medium sensitivity setting (default)
• HARD: Low sensitivity setting
• EX HARD: Lowest sensitivity setting. Pads must be hit hard to produce volume.
3 To return to pattern mode, press the [PATTERN] key.
With each push of the [▲]/[▼] keys, the drum kit number is switched up or down by one
increment.
3 Hit the pads to check out the sound of the changed drum kit.
● Editing pad settings
In a user drum kit, you can change the parameters for each pad, including drum sound, volume,
pitch, and output target.
The preset drum kits cannot be edited. To edit a preset drum kit, copy the contents to a
user drum kit and then perform editing ( → p. 37).
1 In pattern mode, press the [DRUM A] key (or [DRUM B] key) and then the [KIT] key.
32
33
Application Guide [Drum Kits/Bass Programs]
Application Guide [Pads/JAM Slider]
2 Use the [▲]/[▼] keys or the [VALUE] dial to select the sensitivity from one of the
[DRUM B] key (for selecting the drum B track drum kit), press the [▲]/[▼] keys or
the [VALUE] dial.
When wanting to retrieve the bass drum or snare drum sound separately from the [SUB
OUT 1] jack, set the OUTPUT MAIN parameter for the respective pad to zero, and increase
the value of the OUTPUT SUB 1 parameter.
The indication "KIT" appears in the top part of
the display, and the name and number of the drum
kit to be edited are shown.
• GROUP
Drum kit name
Drum kit number
Determines the sound pattern when a pad is hit in succession (POLY = sound overlaps, MONO =
sound does not overlap), and the group to which the pad belongs (0 = no group, 1 - 7 = pad
belongs to specified group). Pads belonging to the same group 1 - 7 will not produce sound
together.
2 Use the [▲]/[▼] keys or the [VALUE] dial to select the desired user drum kit (64 • For example, by assigning two pads for open hi-hat and close hi-hat to the same group,
the open hi-hat sound will be suppressed when you activate the close hi-hat sound,
resulting in a natural effect.
• The group number applies both to POLY/MONO.
127), and press the [PAD FUNCTION] key.
5 Use the [▲]/[▼] keys or the [VALUE] dial to change the setting value.
3 Use the [PAD BANK] key and pads 1 - 13 to specify the pad whose sound you want
to edit.
Pads 1 - 13
4 Use the [
]/[
6 Repeat steps 3 - 5 as required to edit other pads.
7 When editing is completed, press the [EXIT] key.
] keys to select the parameter to be edited.
Parameter
Setting value
The edited contents are automatically stored, and the unit returns to step 2. To return to the
pattern/song mode, press the [PATTERN]/[SONG] key.
● Copying a pad setting
• INST
Selects the drum sound to be assigned to the pad from the 377 sounds incorporated in the RT-323.
The setting range is 0 - 376.
• PITCH
Fine-adjusts the pitch of the drum sound assigned to the pad. The setting range is -7.9 - 0
(reference pitch) - 7.9, in 0.1 (1/10 semitone) steps.
• PAN MODIFY
Adjusts the left/right position of the pad sound, as determined by the signal balance at the [L/MONO
/ R OUT] jack. The setting range is -7 - 0 - 7. The amount of change depends on the sound.
The PAN setting does not affect the signal at the [SUB OUT 1]/[SUB OUT 2] jack.
Within the user drum kits, you can copy the settings for one pad to another. This is useful for
example if you wish to create multiple patterns with very similar settings such as close hi-hat, pedal
hi-hat, open hi-hat, and so on.
1 In pattern mode, press the [DRUM A] key (or [DRUM B] key), and then press the
[KIT] key.
2 Use the [▲]/[▼] keys or the [VALUE] dial to select the desired user drum kit (64 127), and press the [PAD FUNCTION] key.
• INST LEVEL
Adjusts the volume for each pad over the range of 1 - 15.
• OUTPUT MAIN
Adjusts the drum sound level at the [L/MONO / R OUT] jacks over the range of 0 - 15.
• OUTPUT SUB 1
Adjusts the drum sound level at the [SUB OUT 1] jack over the range of 0 - 15.
• OUTPUT SUB 2
3 Press the [EDIT] key, and hit the pad to be used as copy source.
The copy source pad is selected.
Adjusts the drum sound level at the [SUB OUT 2] jack over the range of 0 - 15.
34
35
Application Guide [Drum Kits/Bass Programs]
Application Guide [Drum Kits/Bass Programs]
Drum sound
name
Copy source pad
Copy
source pad
4 Press the [ENTER] key, and hit the pad to be used as copy target.
The drum kit name is updated, and the unit returns to the condition of step 2. To return to
pattern mode, press the [PATTERN] key.
● Copying a drum kit
The copy target pad is selected.
Copy target pad
6 When the name is as desired, press the [EXIT] key.
Copy
target pad
You can copy an existing drum kit (preset drum kit or user drum kit) to a user drum kit. This is
useful for example to create a variation drum kit where only a part is changed.
1 In pattern mode, press the [DRUM A] key (or [DRUM B] key), then press the [KIT]
5 To execute the copy process, press the [ENTER] key. To cancel the copy process,
key.
press the [EXIT] key.
2 Use the [▲]/[▼] keys or the [VALUE] dial to select the source drum kit (preset drum
kit 00 - 63/user drum kit 64 - 127).
Execute
Cancel
After the copy process was executed, the unit returns to the condition of step 2. To return to
pattern mode, press the [PATTERN] key.
3 Press the [EDIT] key, and use the [
]/[
] keys to bring up the indication "COPY?"
on the display.
● Changing the name of a user drum kit
You can assign a name of up to 8 characters (kit name) to a user drum kit.
1 In pattern mode, press the [DRUM A] key (or [DRUM B] key), and then press the
4 Press the [ENTER] key, and use the [▲]/[▼] keys or the [VALUE] dial to select the
target user drum kit.
2 Use the [▲]/[▼] keys or the [VALUE] dial to select the user drum kit (64 - 127)
whose name you want to change.
Copy target user drum kit
5 To execute the copy process, press the [ENTER] key. To cancel the copy process,
press the [EXIT] key.
3 Press the [EDIT] key, and use the [
]/[
] keys to call up the indication "NAME"
on the display.
After the copy process was executed, the unit returns to the condition of step 2. To return to
pattern mode, press the [PATTERN] key.
Bass Program Operation
4 Use the [
]/[
] keys to move the underline to the position you want to change.
● Switching bass programs
The RT-323 incorporates 55 types of bass programs (00 - 54). For each pattern, you can select one
bass program.
Underline
5 Use the [▲]/[▼] keys or the [VALUE] dial to select the character you want to change
1 Press the [PATTERN] key to switch to pattern mode, and then press the [BASS]
from among the following choices.
key.
Letters: A - Z, a - z
Numerals: 0 - 9
Symbols: <Space> ! " # $ % & ' ( ) + , - . / : ; < = > ? @ [ ¥ ] ^ _ < ` { ı }
While you press the [BASS] key, the display shows the currently selected drum kit number
(00 - 54).
36
37
Application Guide [Drum Kits/Bass Programs]
Application Guide [Drum Kits/Bass Programs]
[KIT] key.
Bass
program number
Bass program
name
2 Press the [UTILITY] key, and use the [
3 Hit the pad to check out the sound of the selected bass program.
3 Use the [▲]/[▼] keys or the [VALUE] dial to set the tuning value.
You can make the setting over the range of 435 Hz - 445 Hz, in 1-Hz steps. The factory
default setting is 440 Hz.
4 To terminate the setting and return to the pattern mode, press the [PATTERN] key.
● Transposing a bass program
This setting affects all bass programs.
Using the pitch assigned to pad 1 as a reference, the pitch of the entire bass program can be shifted
up or down in semitone steps·.
● Changing the bass program output level
1 In pattern mode, press the [BASS] key.
2 Press the [UTILITY] key, and use the [
] keys to call up "TUNING" on the
Current setting
2 While holding down the [BASS] key, use the [▲]/[▼] keys.
With each push of the [▲]/[▼] keys, the bass program number is switched up or down by one
increment.
]/[
display.
]/[
] keys to bring up the indication
"BASKEY" on the display.
The pitch of pad 1 appears on the display.
The bass program output level can be set individually for the [L/MONO / R OUT] jack, [SUB OUT
1] jack, and [SUB OUT 2] jack. This is handy for separately using the bass track and drum track
output.
1 Press the [UTILITY] key, and use the [
]/[
] keys to call up "BASOUT" on the
display.
3 Use the [▲]/[▼] keys or the [VALUE] dial to set the transpose step width.
Currently selected
output jack
The available settings are F# (-6 semitones) - C (transpose off) - F# (+6 semitones). When the
pitch of pad 1 is switched, the other pads are transposed accordingly.
Volume setting
2 Use the [
]/[ ] keys to set the output for the bass track to "MAIN" ([L/MONO
R/OUT] jack), "SUB1" ([SUB OUT 1] jack), or "SUB2" ([SUB OUT 2] jack).
In the default condition, "MAIN" ([OUTPUT L/R] jack) is selected.
4 To return to pattern mode when the setting is complete, press the [PATTERN] key.
This setting applies to all bass programs.
3 Use the [VALUE] dial to set the bass program output level (0 - 15).
The factory default setting is MAIN = 15, SUB1 = 0, SUB2 = 0.
4 When the setting is completed and you want to return to the pattern mode, press
● Adjusting bass program tuning
The tuning of the entire bass program can be adjusted in 1-Hz steps. This makes it possible for
example to match a bass program of the RT-323 to an instrument such as an acoustic piano.
the [PATTERN] key.
This setting affects all bass programs.
1 In pattern mode, press the [BASS] key.
38
39
Application Guide [Drum Kits/Bass Programs]
Application Guide [Drum Kits/Bass Programs]
Pitch of pad 1
Application Guide [Patterns]
This section explains various operation steps related to patterns. It also outlines the groove play
function which lets you assign various patterns to the pads and play them in real time.
Playing a Pattern
The RT-323 comprises 400 read-only preset patterns (000 - 399) and 100 read/write user patterns
(U00 - U99), resulting in a total of 500 available patterns. To select and play a pattern, proceed as
follows.
1 Press the [PATTERN] key.
4 To stop pattern playback, press the [■] key.
Instead of the [■] key, you can also press the [
]key to set the unit to pause mode
(the [
] key flashes). Pressing the key once more causes playback to resume from the
current point.
● Changing the pattern tempo
In pattern mode, you can use the [TEMPO] key to change the tempo of the pattern.
Pattern
mode
1 Hold down the [TEMPO] key and use the [▲]/[▼] keys or the [VALUE] dial to change
the tempo value.
The RT-323 switches to pattern
mode. In the lower part of the
display, the currently selected pattern
name and pattern number are shown.
While holding down the [TEMPO] key, the current tempo value is shown on the display.
Pattern
number
Pattern
name
Tempo value
2 Use the [▲]/[▼] keys or the [VALUE] dial to select the pattern to play.
The tempo value range is 40 - 250 (BPM), in steps of 0.1 BPM. When the desired tempo is set,
release the [TEMPO] key.
or
2 To enter the tempo value manually, tap the [TEMPO] key twice in the desired
interval (tempo tap input).
With the [ ]/[ ] keys, you can switch among different categories of preset patterns. For
more information on preset pattern categories, please refer to the list at the end of this
manual.
3 Press the [
Tap twice
If you tap the [TEMPO] key twice while a pattern is playing or stopped, the tapping interval is
taken as the quarter note tempo. This allows you to simply set the tempo in sync with a song.
] key.
The selected pattern starts to play.
Current beat
Current
measure
● Muting a track
With the [MUTE] key, you can selectively mute the tracks of a pattern (drum A/drum B/bass).
1 While holding down the [MUTE] key, press the key corresponding to the track you
You can also switch patterns while playback is in progress. If you use the [▲]/[▼] keys, the
pattern switches immediately. If you use the [VALUE] dial, the pattern switches only after
the current pattern has ended.
want to mute ([DRUM A]/[DRUM B]/[BASS]).
The key lights up, and the corresponding track is muted. While you hold the [MUTE] key, you
40
41
Application Guide [Patterns]
Application Guide [Patterns]
When a preset pattern was selected, the display shows "PRESET". When a user pattern was
selected, the display shows "USER". When the RT-323 is in the default condition, all user
patterns are empty, and the indication "EMPTY" is shown in the pattern name field.
can check the light on/off status of the [DRUM A]/[DRUM B]/[BASS] keys to see which
tracks are muted.
The pattern is played back in a loop. Pressing the same pad again cancels the loop.
5 To play multiple patterns simultaneously, you can press several pads together.
2 To cancel muting, hold the [MUTE] key down and press the [DRUM A]/[DRUM
B]/[BASS] key again.
In groove play mode, you can play up to four patterns.
• If you press five or more pads, the most recently pressed four pads will be active.
• When you have pressed several pads, the start and stop timing is adjusted
automatically, according to the selected quantize method (→ p. 50).
• The various patterns are played in the same tempo as the currently selected song.
Using the Groove Play Function
When the RT-323 is in groove play mode, patterns assigned to the pads can be played in real time.
Up to 4 patterns can be played simultaneously, letting you create complex rhythms or loop patterns
like a DJ.
Pad
Press
Pad
Play
Play
Release Stop
1 Press the [SONG] key and [PATTERN] key simultaneously.
Smallest quantize unit
The RT-323 switches to groove mode.
In groove play mode, the [
currently selected song.
Smallest quantize unit
]/[■] keys can be used to start/stop playback of the
6 To continuously vary the pitch, volume, panning, and sound of the pattern, use the
2 Press any pad you like.
While you hold down the pad, the pattern assigned to the pad is played. The overall pattern
volume depends on the hitting intensity of the pad. The pattern name and pattern number of
the currently played pattern are shown on the display.
[JAM FUNCTION] key to select the parameter and then adjust it with the JAM
slider.
Number of
pattern assigned
to pad
Currently
pressed
pad
3 To change a pattern assigned to a pad, hold down the pad and use the [▲]/[▼]
keys or the [VALUE] dial to select the pattern.
In groove play mode, you can use the JAM slider to adjust parameters such as pitch, volume,
tone, etc. of the currently playing pattern. The JAM slider affects only the currently selected
track (selected with [DRUM A]/[DRUM B]/[BASS] key). (For details on the JAM slider
operation, please refer to p. 31.)
7 To return from the groove play mode to the pattern/song mode, press the
You can select either a preset or a user pattern.
When a pattern for which "PAD" is displayed is assigned to a pad, hitting the pad in
pattern mode will play the original sound (drum sound for drum kit or bass sound for bass
program).
4 To continuously play the pattern after releasing the pad, hold down the [REPEAT]
[PATTERN]/[SONG] key.
Real-Time Pattern Input
This section explains how you can perform real-time input, using the metronome to hit pads and
create a user pattern.
key while hitting the pad.
1 In pattern mode, select an empty user pattern (U00 - U99).
When you select an empty pattern, the indication "EMPTY" appears on the display.
42
43
Application Guide [Patterns]
Application Guide [Patterns]
Name of pattern assigned to pad
During pattern real-time input, you can also input notes via a MIDI keyboard or other
component connected to the [MIDI IN] jack.
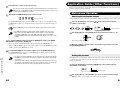
■ Bass track recording
In the factory default condition, a scale with semitone pitch steps such as C, C#, D, D#,...B,
C is assigned to the pads, except for pad 6. Hitting a pad produces the bass sound of the
assigned pitch, and recording is performed with the currently selected quantize setting.
Note that, unlike the drum track, the bass track also records the duration of the pad press.
For example, to record the following example, the pad to which A2 is assigned and the pad
to which E2 is assigned must be pressed for the duration of a quarter note each.
You cannot perform pattern input on a preset pattern.
2 Use the [DRUM A]/[DRUM B]/[BASS] key to select the track (drum A/drum B/bass)
for which to perform real-time input.
The key for the selected track lights up.
3 To change the sound (drum kit/bass program), hold down the key selected in step 2
A2 pad
E2 pad
Hold down
Hold down
and use the [▲]/[▼] keys or the [VALUE] dial.
While recording the bass track, the [OCTAVE] key can be used to switch the bass range.
In the factory default condition, the quantize setting of the RT-323 is a sixteenth note, but
this setting can be changed if desired ( → p. 50 ).
The sound last selected for each track is stored for the pattern. If required, you can use the
[PAD BANK]/[OCTAVE] key to select the pad bank or the bass pitch.
4 Hold down the [● REC] key and press the [
6 To erase the play contents from a specific pad, hold down the [ERASE] key and
press the pad.
Pads 1 - 13
] key.
To erase the entire track, hold down the [ERASE] key and press the key for the track ([DRUM
A]/[DRUM B]/[BASS]) key. While you keep both keys depressed, all sound from the
respective track is erased from the pattern.
The [● REC] and [
] keys light up, a precount of four beats (one measure) is heard, and
then real-time input starts.
[PAD1](KICK)
[PAD13](EXTRA 3)
5 Hit the pads in time with the metronome. When the last measure of the pattern is
reached, input loops back to the first measure and continues.
Drum track A
Snare
drum
■ Drum track recording
The drum sound assigned to the pad is heard, and the play contents are recorded in
accordance with the currently selected quantize settings.
While recording the pattern, you can use the [PAD BANK] key to switch the pad bank. This
changes the drum sounds assigned to pads 1 - 13.
If you press the [● REC] key during recording, the key starts to flash, and recording is
paused. In this condition, you can hit a pad to check which sound is assigned to it. Press
the [● REC] key again to resume recording.
44
Bass
drum
Snare
drum
Bass
drum
7 To record a JAM slider operation in the pattern, use the [JAM FUNCTION] key to
select the function and then move the JAM slider while holding down the pad.
You can record changes in pitch, volume, panning position, and sound. (For details on using
the JAM slider, see page 31.)
45
Application Guide [Patterns]
Application Guide [Patterns]
While you hold down the [ERASE] key, the sound assigned to that pad is erased from the
pattern.
The JAM slider operation is only effective for a sound currently played with a current pad.
Moving the JAM slider by itself has no effect on the recorded sound.
sixteenth note, to enter a rhythm kick as shown in the score below, operate the pads and [STEP]
key as follows.
8 To terminate real-time input, press the [■] key.
The [● REC] and [
] keys light go out, and real-time input finishes.
When you create a new pattern, it is assigned a name such as "Pat xxx" (where xxx is the
user pattern number). This pattern name can be changed as desired (→ p. 54).
9 Press the [
] key to check the recorded contents.
Pattern Step Input
For step input, you enter each note separately, while the RT-323 is in the stop condition. This
makes it easy to enter complex drum patterns or bass lines that might be difficult to achieve with
real-time input.
1 In pattern mode, select an empty user pattern (U00 - U99).
When an empty pattern is selected, the indication "EMPTY" appears on the display.
2 Use the [DRUM A]/[DRUM B]/[BASS] key to select the track for step input (drum
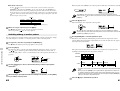
[KICK] [STEP] [STEP] [STEP] [KICK] [STEP] [STEP] [STEP] [KICK] [STEP] [STEP]
During step input, the [PAD BANK] key can be used to switch between pad banks.
■ Bass track recording
Pressing the [STEP] key while holding down a pad enters a note of the pitch assigned to that pad.
Pressing only the [STEP] key enters no note, and the present position advances by the quantize
value. The duration of the note depends on the number of times the [STEP] key is pressed while
holding down a pad. For example, with a quantize setting of a sixteenth note, to enter a rhythm
kick as shown in the score below, operate the pads and [STEP] key as follows.
[PAD 5]
Hold down
[STEP]
[STEP]
Hold down
[STEP]
[STEP]
[STEP]
[STEP]
[STEP]
[STEP]
2, and operate the [▲]/[▼] keys or the [VALUE] dial.
The sound last selected for each track is recorded as the pattern.
4 Press the [● REC] key.
During step input, you can also use the [OCTAVE] key to switch the bass pitch.
• When entering notes with step input, the hitting intensity of the pad is also stored.
• When the end of the pattern is reached, the unit automatically returns to the first
measure, allowing you to continue with step input.
• In the factory default condition, the quantize setting of the RT-323 is a sixteenth note,
but this setting can be changed if desired ( → p. 50 ).
The [● REC] key lights up, and pattern step input becomes possible.
5 Use the pads and [STEP] key to enter notes and pauses.
6 If you have made a mistake during input, use the [STEP] key to move to the note
you want to correct, and then hold down the [ERASE] key while pressing the
respective pad.
Pads 1 - 13
■ Drum track recording
When you press a pad after pressing the [STEP] key, the drum sound assigned to the pad is
entered. If you just press the [STEP] key without pressing a pad, no note is entered and the
present position advances by the quantize value. For example, with a quantize setting of a
46
■ Drum track
When you use the [STEP] key to move within the pattern, the pad input for the current position
lights up. When you press a lit pad while holding down the [ERASE] key, the pad light goes out,
47
Application Guide [Patterns]
Application Guide [Patterns]
3 To change the sound (drum kit/bass program), hold down the key selected in step
[PAD 13]
[PAD 5]
A/drum B/bass).
and the note at that position is cleared.
Deleting a User Pattern
[PAD1](KICK)
This clears all playing information from the currently selected user pattern, returning it to the empty
condition.
Drum A track
Snare drum
1 In pattern mode, use the [▲]/[▼] keys or the [VALUE] dial to select the user pattern
Bass drum
you want to delete.
Drum A track
2 While the pattern is stopped, press the [DELETE] key.
Snare drum
The indication "SURE?" appears on the display.
Bass drum
■ Bass track
To clear a specific note from the bass track, use the [STEP] key as for the drum track to move to
the start of the note (the pad for the pitch lights up). Then hold down the [ERASE] key and press
the lit pad.
By holding down the [ERASE] key and pressing the pad at a point within the note, you can make
the note shorter.
3 To execute the delete process, press the [ENTER] key. To cancel the delete
process, press the [EXIT] key.
When the [ENTER] key is pressed, the pattern is deleted and the indication "EMPTY" is
shown on the display.
[PAD]
Deleting a Track
Bass track
You can delete any track from the currently selected user pattern.
1 In pattern mode, use the [▲]/[▼] keys or the [VALUE] dial to select the user pattern
from which you want to delete a track.
B]/[BASS] key) you want to delete.
[PAD]
Bass track
Note duration
3 To execute the delete process, press the [ENTER] key. To cancel the delete
process, press the [EXIT] key.
When the [ENTER] key is pressed, the specified track is deleted.
Copying a Pattern
You can copy an existing pattern (preset/user pattern) to any user pattern.
To terminate step input, press the [■] key.
7
The [● REC] key light goes out, and the step input condition is terminated.
1 In pattern mode, select the pattern to be used as copy source, and press the [EDIT] key.
2 Use the [ ]/[ ] keys to bring up the indication "COPY?" on the display.
48
49
Application Guide [Patterns]
Application Guide [Patterns]
2 While holding down the [ERASE] key, press the key for the track ([DRUM A]/[DRUM
If you press the [● REC] key instead of the [EXIT] key in step 4, the notes recorded in the
current pattern are aligned to the quantize setting.
3 Press the [ENTER] key, and use the [▲]/[▼] keys or the [VALUE] dial to select the
copy target user pattern (U00 - U99).
● Adjusting the rhythm flourish (swing)
This lets you control the amount of rhythm flourish (swing) used by the pattern. Higher values
result in more pronounced swing.
Copy target pattern number
4 To execute the copy process, press the [ENTER] key. To cancel the copy process,
press the [EXIT] key.
When the [ENTER] key is pressed, the copy is carried out and the unit returns to step 1.
This setting affects all patterns.
1 In pattern mode, press the [EDIT] key.
2 Use the [ ]/[ ] keys to call up the indication "SWING" on the display.
You can now set the swing value.
Changing Pattern Settings
This section describes how to change settings that are common to all patterns, and settings that are
user pattern specific (such as beat and tempo).
Current setting
3 Use the [▲]/[▼] keys or the [VALUE] dial to set the swing value (50 - 75).
The default setting is 50 (no swing).
● Setting the quantize value
The quantize value is the smallest unit for real-time input/step input of a pattern.
4 When the setting is complete, press the [EXIT] key.
The setting is updated, and the unit returns to pattern mode.
1 In pattern mode, press the [EDIT] key.
2 Use the [ ]/[ ] keys to call up the indication "QUNTIZ" on the display.
Current setting
3 Use the [▲]/[▼] keys or the [VALUE] dial to select the smallest unit note from the
following available settings.
4: Quarter note
8: Eighth note
12: Eighth triplet note
16: Sixteenth note
24: Sixteenth triplet note
32: Thirty-second note
48: Thirty-second triplet note
Hi: 1 tick (quantize function off)
* 1 tick is (1/96 of quarter note)
This setting affects the following four functions.
•
•
•
•
Smallest unit for real-time input
Smallest unit for step input
Smallest unit for continuous sound interval when pad is hit while holding down [REPEAT] key
Smallest unit for pattern play start/stop timing adjustment during groove play
The length of a user pattern (number of measures) can be adjusted. This setting is stored for each
user pattern individually.
1 In pattern mode, select the user pattern for which you want to make the setting,
and press the [EDIT] key.
2 Use the [ ]/[ ] keys to call up the indication "BARLEN" on the display.
Current setting
3 Use the [▲]/[▼] keys or the [VALUE] dial to set the number of measures.
The setting range is 1 - 99. The default length for empty patterns is 2 measures.
When changing the length of a pattern that has already been input, the playback content
changes as follows.
■ More measures than current setting
4 When the setting is complete, press the [EXIT] key.
Blank measures are added to the end of the current pattern.
The new setting becomes active and the unit returns to the pattern mode.
50
51
Application Guide [Patterns]
Application Guide [Patterns]
You can now select the smallest unit for the note.
● Changing the pattern length
■ Fewer measures than current setting
The excessive measures are cut off. After returning to pattern mode, the deleted measures cannot
be restored.
When you change the setting with the [▲]/[▼] keys or the [VALUE] dial, the indication "E"
appears on the display. When you return the setting to the original value, the "E"
disappears.
● Setting the volume balance for each track
You can adjust the volume of the drum A, drum B, and bass track in a user pattern. This setting is
stored for each user pattern individually.
1 In pattern mode, select the user pattern for which you want to make the setting,
and press the [EDIT] key.
4 When the setting is complete, press the [EXIT] key.
The new setting becomes active and the unit returns to the pattern mode.
2 Use the [ ]/[ ] keys to call up "MIXLVL" on the display.
● Changing the pattern beat
The beat (timing signal) of a user pattern can be adjusted. This setting is stored for each user pattern
individually.
1 In pattern mode, select the user pattern for which you want to make the setting,
and press the [EDIT] key.
2 Use the [ ]/[ ] keys to call up "TIMSIG" on the display.
Current setting
Current track Current setting
3 Use the [ ]/[ ] keys to select the track for which you want to change the volume.
4 Use the [▲]/[▼] keys or the [VALUE] dial to set the volume for the track (0 - 15).
When a new pattern is created, the volume for all tracks is set to 15. When wishing to adjust
the volume for other tracks, repeat steps 3 and 4.
5 When the setting is complete, press the [EXIT] key.
The unit returns to pattern mode.
3 Use the [▲]/[▼] keys or the [VALUE] dial to set the beat.
● Changing the play timing (shift)
You can change the play timing of the currently selected user pattern.
It is possible to change the beat for a pattern that is already input. In this case, the playback
content changes as follows.
1 In pattern mode, select the user pattern for which you want to make the setting,
■ Longer beat than current setting
2 Use the [ ]/[ ] keys to call up "SHIFT" on the display.
Blank space is added to each measure.
■ Shorter beat than current setting
and press the [EDIT] key.
Current setting
Excessive section of each measure is cut off. After returning to pattern mode, the deleted part
cannot be restored.
When you change the setting with the [▲]/[▼] keys or the [VALUE] dial, the indication "E"
appears on the display. When you return the setting to the original value, the "E"
disappears.
3 Use the [▲]/[▼] keys or the [VALUE] dial to shift the timing.
The setting range is -192 to 192 ticks (+-2 beats) in units of 1 tick (1/96 of a quarter note).
For example, when the setting value is 24, the pattern changes as follows.
4 To update the setting, press the [ENTER] key. To cancel the process, press the
[EXIT] key.
When you press the [ENTER] key the unit returns to pattern mode.
52
53
Application Guide [Patterns]
Application Guide [Patterns]
The setting range is 1 (1/4 beat) - 16 (16/4 beat). The initial setting for empty patterns is 4 (4/4
beat).
Application Guide [Song]
Shift Setting value = 24 (sixteenth note)
This section explains various operation steps related to song playback, creating new songs, and
editing existing songs.
Deleted
Song Playback
The RT-323 can store up to 100 songs.
Pause of same length
as setting value
When you change the setting with the [▲]/[▼] keys or the [VALUE] dial, the indication "E"
appears on the display. When you return the setting to the original value, the "E"
disappears.
1 Press the [SONG] key to switch to song mode.
The RT-323 switches to the song mode which lets you create and play your own songs.
4 To accept the setting, press the [EXIT] key.
The unit returns to pattern mode.
2 Use the [▲]/[▼] keys or the [VALUE] dial to select the song number (00 - 99).
This setting directly alters the play data stored for the pattern. After you return to pattern
mode, the original contents cannot be restored.
● Changing the pattern name
You can also switch songs while a song is playing. When you use the [▲]/[▼] keys, the song
is switched immediately. When you use the [VALUE] dial, the song is switched when
playback of the current song completed.
When you create a new pattern, the pattern name "PTN xxx" (where xxx is the user pattern
number) is automatically assigned.
1 In pattern mode, select the user pattern for which you want to make the setting,
and press the [EDIT] key.
Song name
When you select an empty song, the indication "EMPTY" is shown in the song name field.
3 Press the [
The [
] key.
] key lights up, and the selected song is played.
The pattern name is shown under "NAME" with an underline.
Current beat
Current
measure
Underline
3 Use the [ ]/[ ] keys to move the underline, and use the [▲]/[▼] keys or the
4 To change the song tempo, hold down the [TEMPO] key and use the [▲]/[▼] keys
or the [VALUE] dial while the song is playing (or stopped).
[VALUE] dial to select the desired character. (For a list of usable characteristics,
see p. 36.)
4 When the pattern name has been changed, press the [EXIT] key.
The unit returns to pattern mode.
The song tempo can be set in the range from 40 - 250 (BPM). The setting is stored together
with the song.
54
55
Application Guide [Song]
Application Guide [Patterns]
2 Use the [ ]/[ ] keys to call up "NAME" on the display.
Song number
or
5 To mute a specific track, hold down the [MUTE] key and press the [DRUM
A]/[DRUM B]/[BASS] key.
3 Press the pad to which you want to assign a pattern.
You can now assign a pattern to the selected pad.
Pattern
name
The key lights up, and the selected track is muted. To cancel muting, hold down the [MUTE]
key and press the same key once more.
Pattern
number
4 Use the [VALUE] dial to select the pattern number (000 - 399, U00 - U99).
When you mute a track, the song track will also be muted at the same time. (For
information on the song track, see page 69.)
6 To stop the song, press the [■] key.
5 Repeat steps 3 - 4 to assign patterns to other pads.
6 When the required patterns have been assigned, press the [EXIT] key.
The unit returns to the song mode.
The song returns to the start position.
If you press the [
] key instead of the [■] key, the unit goes into pause mode. Pressing
the [
] key again resumes playback. During pause, you can use the [VALUE] dial to
adjust the position in measure units.
Real-time Song Input
This section explains how to record songs in real time by assigning patterns to pads and playing
them by hitting the pads in the desired sequence.
● Assigning a pattern to a pad
1 In song mode, use the [▲]/[▼] keys or the [VALUE] dial to select an empty song.
When you select an empty song, the indication "EMPTY" is shown in the song name field.
• In the factory default condition, songs 00 - 11 have various patterns assigned to the
pads. (For more information, see the list at the end of this manual.)
• When you select a song for which "EMPTY" is shown (in the factory default condition
songs 12 - 99), the pattern-to-pad assignment of the most recent song is used
automatically.
The pattern information assigned to the pads is stored for each song individually.
● Changing the playing information of a pattern assigned to a pad
In song mode, you can transpose the pitch of a pattern assigned to a pad, and select the operation
that will be performed after the pattern is played.
Application Guide [Song]
Application Guide [Song]
To perform real-time input of a song, you must first assign the patterns to be used in the song.
When you hit a pad in this condition, the pattern assigned to the pad is played. This allows you
to play the backing for a song by switching patterns in real time. This is similar to groove play
mode, but you cannot play multiple patterns at the same time, and the pattern switching occurs
only at the measure (or beat) change.
1 In song mode, while the song is stopped, press the [PAD FUNCTION] key.
2 Hit the pad with the pattern you want to edit.
3 Use the [ ]/[ ] keys to select the parameter from the following.
Parameter
2 Press the [PAD FUNCTION] key.
Setting value
The parameters and setting ranges are as shown in the following table.
The various pad settings can now be edited.
56
57
Parameter
Content
Ptn
Pattern number assigned to pad
Dr B
Drum B track playing information
Bass
Transp
Bass track playing information
Bass track transpose setting
Next
Operation when number of measures set
with BARLEN is exceeded
Setting Range
000 – 399,U00 –U99
000A –399A, U00A –U99A,
000b –399b, U00b –U99b
000 –399, U00 –U99
-12 – 0 –12 (Semitone units)
1 - 13: Play pattern of specified pad
1 Fill - 13 Fill: Switch pattern at beat boundary
STOP: Stop play
The Next parameter specifies which operation occurs when the pattern assigned to the
pad was played. If set to "1" - "13", the specified pattern is played. If set to "1 Fill" - "13
Fill", the specified pattern is also played, but pattern switching occurs at the bar
boundary. If set to "STOP", playback stops at that point (suitable for ending patterns).
3 Hit the pad with the first pattern.
This starts the real-time input mode, and the pattern is played back. Also when you release the
pad, the pattern will continue to play until the preset number of measures is reached, or until
another pad is hit. The display shows the current measure and beat.
Current
measure
Current beat
Pad with first pattern
4 To switch the pattern, hit the pad for the pattern within the immediately preceding
measure.
Measure number
for recording
1
2
3
4
5
6
7
8
Pattern A PatternA PatternB PatternB
4 Use the [VALUE] dial to change the setting value.
Pad with next pattern
Pad with
pattern A
Setting value
Pad with
pattern B
The pattern assigned to the pad is reserved, and will start playing from the beginning of the
next measure.
5 To terminate the editing process, press the [EXIT] key.
When you hit a pad for which the Next parameter ( ➝ p. 58) is set to "1 Fill" - "13 Fill", the
unit switches to the new pattern at the bar boundary. Because the new pattern also starts
at the bar boundary, there is no bar change for this measure.
The unit returns to the song mode.
5 Record other patterns in the same way.
When hitting pads for song real-time input, the parameter settings will be recorded as
song events.
6 To terminate real-time input, press the [■] key.
Real-time input stops at the beginning of the next measure.
After all patterns to be used in a song have been assigned to patterns, hit the pads in the desired
sequence to record the song.
1 Use the [▲]/[▼] keys to select the song for which the pattern have been assigned.
• When wanting to automatically end real-time input after a certain pattern (for example
an ending pattern), has played, set the NEXT parameter of the pad to "STOP"
( → p. 58).
• A song created with real-time input can be edited in the same way as a song created
with step input. For details, see page 61.
Song number
2 Hold down the [● REC] key and press the [
] key.
The unit goes into standby mode for real-time song input.
58
59
Application Guide [Song]
Application Guide [Song]
● Recording a pattern sequence
6 To enter the selected pattern, press the [ENTER] key.
Song Step Input
For song step input, you enter various information (pattern, tempo, bass transpose, etc.) separately,
while the RT-323 is in the stop condition. To do this, proceed as follows.
To check the entered pattern, you can play the pattern with the [
● Pattern information step input
You can enter patterns one by one in the desired playing sequence. This is suitable for example to
create the backing for a song arrangement.
]/[■] keys.
7 To enter the next pattern, press the [ ] key.
The current position advances for the duration of the pattern.
1 In song mode, use the [▲]/[▼] keys or the [VALUE] dial to select an empty song.
By using the [ ]/[ ] keys during pattern input, you can move directly to pattern
information that has already been entered.
2 Press the [● REC] key.
The [● REC] key lights up, and song step input becomes possible. The display shows the
current measure and beat.
Measure
Beat
8 Repeat steps 3 - 7 to select the patterns for a song.
If you make a mistake during input, you can correct it as follows.
■ To change an entered pattern
3 Use the [INSERT] key to bring up the indication "INSERT?" on the display.
The pattern for input to the song can be selected.
Use the [ ]/[
new pattern.
] keys to move to the respective pattern, and use the [VALUE] dial to select a
■ To insert a new pattern
Use the [ ]/[ ] keys to move to the respective pattern, and carry out steps 3 - 6. This inserts a
pattern at the current position, and shifts all later patterns back by the duration of the inserted
pattern.
INSERT
When the indication "End" is shown on the display, you can use the [VALUE] dial to call up
the indication "INSERT?".
Pattern D
Pattern B
Pattern C
(000 - 399, U00 - U99).
The pattern number and duration (number of measures) are shown on the display.
Pattern A
Pattern B
Pattern D
Pattern number
Duration
Pattern C
■ To delete a pattern
Use the [ ]/[ ] keys to move to the pattern you want to delete, and press the [ERASE] key. The
song length remains the same, but the current pattern information is deleted. The display
indication changes to " Pattern". This means that the preceding pattern will continue to play.
ERASE
• If a user pattern is empty, the indication "E" is shown to the right of the pattern number.
• If you input an empty user pattern into a song, the sound will be muted for the duration
of the pattern. (The duration is shown on the display.)
5 If required, use the [▲]/[▼] keys to change the duration of the pattern.
The pattern duration can be adjusted in the range of 1 - 99. If you make it longer than the
original setting, the same pattern will be repeated. If you make it shorter, the pattern will be
cut off midway when switching to the next pattern.
60
Pattern A
Pattern B
Pattern A
Pattern B
Pattern C
Pattern D
Pattern D
(Preceding pattern plays)
If you delete the first pattern in a song, the sound will be muted until the next pattern
information.
61
Application Guide [Song]
Application Guide [Song]
Pattern A
4 Use the [VALUE] dial to select the number of the pattern to assign to the first step
■ To delete a measure
With each push of the [STEP] key, the current position is shifted by a sixteenth note (24 ticks).
Use the [ ]/[ ] keys to move to the start of the measure you want to delete, and press the
[DELETE] key. The indication "DELETE?" appears on the display. Press the [ENTER] key to
delete the measure from the current song. Subsequent patterns are shifted forward. If you delete
the first measure of a 2-measure pattern, the first measure remains in the song, with the indication
" Pattern". This means that the immediately preceding pattern is played. If required, delete this
measure using the same procedure.
DELETE
Pattern A
Pattern B
Pattern A
Pattern B
Pattern C
Pattern D
The [STEP] key cannot be used to move back. If you have moved past the desired
position, use the [ ] key to return to the start of the measure, and then start over with the
[STEP] key.
5 Press the [▼] key once.
Pattern information can be input at the current position.
Pattern D
(Preceding pattern plays)
9 When one song is completed, press the [■] key.
The [● REC] key light goes out, and song step input is terminated.
When you press the [
] key, the song is played.
Also while the "EV➝" indication is not shown, you can use the [STEP] key to shift the
current position by a sixteenth note (24 ticks). In this case, the current tick count is shown
only while the [STEP] key is pressed.
● Switching midway to another pattern
It is also possible to have the unit switch to another pattern while a pattern is playing. For example,
you could change the second half of a 2-measure pattern to a fill-in 1-measure pattern.
1 In song mode, select the song and press the [● REC] key.
6 Use the [VALUE] dial to select the pattern for input.
Immediately after turning the [VALUE] dial, pattern information is input for the current
position. When pattern information is input midway in a measure, the indication "F" appears
to the right of the pattern number.
The [● REC] key lights up, and song step input becomes possible.
2 Press the [▲] key.
Measure
Beat
If the pattern was switched midway in a measure, the new pattern does not play from the
beginning, but from the point where the pattern is switched.
Application Guide [Song]
Application Guide [Song]
The indication "EV➝" is shown on the display. While this indication is shown, you can use
the [ ]/[ ] keys to adjust the position in measure units. Other indications such as "PT" or
"TS" to the right of "EV➝" denote event information for the current position. (For details, see
page 66.)
Pattern A
Pattern B
Tick
1
2
Pattern A
Pattern A
3
Pattern B
4
Pattern B
SONG
3 Use the [ ]/[ ] keys to move to the measure where you want to input pattern
information.
4 When wishing to input pattern information midway in the measure, use the [STEP]
• The pattern entered here is repeated until the point where the next pattern information
exists.
• When you press the [ENTER] key for a pattern with "F" appended to the number, the
"F" indication disappears and the pattern starts from the beginning. (In this case, the
current position becomes the new start of the measure.) By pressing the [ENTER] key
again, you can return to the pattern with "F".
key to shift the current position.
7 Press the [■] key to terminate the operation.
62
63
● Transposing the bass track
This section explains how to shift (transpose) the pitch of the bass track of a pattern input for a
song. Using the transpose function, you can create various chord progressions from a small number
of patterns.
1 In song mode, select the song, and press the [● REC] key.
The [● REC] key lights up, and song step input becomes possible.
2 Use the [▲]/[▼] keys to call up "Transps" on the display.
Transpose information can now be entered or edited. If there is already transpose information
at the current position, the setting value is shown.
Transpose
setting value
When pattern information is input, transpose information with a zero value is also input.
3 Use the [ ]/[ ] keys to move to the measure where you want to enter transpose
information.
While "Transps" is shown, you can use the [ ]/[ ] keys to shift the current position in
measure units. (If transpose information is entered within a measure, you can move to that
position.)
6 Repeat steps 3 - 5 to enter any desired transpose information at other points.
7 To terminate the operation, press the [■] key.
● Replacing the drum B/bass track
The drum B track or bass track of the pattern used in a song can be altered to that of a different
pattern. This is useful for example to utilize the fill-in phrase from another pattern after pattern
input for a song has been completed.
1 In song mode, select the song, and press the [● REC] key.
2 Use the [ ]/[ ] keys to move to the position of the pattern where you want to
replace the drum B track/bass track.
3 Use the [▲]/[▼] keys to call up " DrBPTN" (to replace the drum B track) or
" BasPTN" (to replace the bass track) on the display.
In this condition, you can use the [ ]/[ ] keys to move the current position in measure
units.
4 To change the play contents from within a measure, use the [STEP] key to shift the
4 To transpose from midway through a measure, use the [STEP] key to adjust the
current position.
With each push of the [STEP] key, the current position is advanced by one sixteenth note (24
ticks).
current position.
With each push of the [STEP] key, the current position is advanced by one sixteenth note (24
ticks). If you have moved past the desired position, use the [ ] key to return to the start of the
measure, and then start over with the [STEP] key.
5 Use the [VALUE] dial to select a setting from the following.
• The current tick count is shown while the [STEP] key is pressed.
• The [STEP] key cannot be used to move back. If you have moved past the desired
position, use the [ ] key to return to the start of the measure, and then start over with
the [STEP] key.
5 Use the [VALUE] dial to set the transpose value.
The transpose value can be set in semitone steps over the range of -12 (1 octave lower) - 0 - 12
(1 octave higher).
64
Setting value
■ Replacing the drum B track (DrBPTN)
• Pattern numbers ending in A (Example: 001A, U99A)
Will be replaced by the contents of the drum A track of the applicable pattern.
65
Application Guide [Song]
Application Guide [Song]
• The transpose information need not be input at the same position as the pattern
information. It can be input at the start of any measure in a pattern, or within a measure.
• If no transpose information is input for the current point, the indication " " is shown.
This means that the preceding transpose information continues to apply.
The entered transpose information remains valid until the next transpose input.
• Pattern numbers ending in b (Example: 001b, U99b)
Will be replaced by the contents of the drum B track of the applicable pattern.
■ Replacing the bass track (BasPTN)
• Pattern number (Example: 001, U99)
If you press the [▲] key while a pattern event is selected, the indication "EV➝" appears on
the display. While this indication is shown, the number of ticks (1/96 of a beat) for the
current position is shown to the right of the measure and beat, and movement in steps of
24 ticks is possible. (While "EV➝" is displayed, pattern event input or editing is not
possible.) Pressing the [▼] key turns off the "EV➝" indication and returns to the pattern
event selection mode.
Will be replaced by the bass track contents of the respective pattern.
The contents replaced as described here will remain effective until the point where the
next pattern information is input.
If the track contents were switched midway in a measure, the new contents are not played
from the beginning, but from the point where the switch was made.
3 Use the [ ]/[ ] keys to move to the position where you want to input event
information.
If there is an event for the current position, the display will show its value. If there is no event
for the current position, " " is shown on the display. This indicates that the last event setting
is still active.
6 To terminate the operation, press the [■ ] key.
● Step input for various events
During step input of a song, you can not only enter pattern information and transpose information,
but also add various other information such as the volume and sound of each track (drum kit/bass
program). Such pieces of information are called "events". This section describes how to add new
events and change the setting value of existing events.
1 In song mode, select the song you want to edit, and press the [● REC] key.
2 Use the [▲]/[▼] keys to select one of the following event types for editing.
Event type
Editable event types along with setting range and setting resolution are listed below.
Symbol
Content
Setting range
Pattern
Pattern number
000 399, U00 – U99
Transps
Bass track transpose information
-12 – 0 – 12 (semitone units)
Tempo
Tempo information
DrBPTN
Drum B track play information
BasPTN
Bass track play information
---, 000 – 399, U00 – U99
DrAKIT
Drum A track drum kit
00 – 127
DrBKIT
Drum B track drum kit
00 – 127
BasPRG
Bass track bass program
00 – 54
DrAVOL
Drum A track volume
0 – 15
DrBVOL
Drum B track volume
0 – 15
BasVOL
Bass track volume
0 – 15
While any event is displayed, you can use the [STEP] key to advance the current position by
one sixteenth note (24 ticks).
• The current tick count is shown while the [STEP] key is pressed.
• If you have used the [STEP] key to move past the target position, press the [ ] key to
return to the start of the step, and then press the [STEP] key again to move to the
target position.
5 Use the [VALUE] dial to enter the value.
A new event information is now entered at the current position (for information on the setting
range for each event, see the table on the previous page).
Setting value
40 – 250 (BPM)
----, 000A – 399A, U00A – U99A,
000b – 399b, U00b – U00b
• The smallest unit for entering each event information is one sixteenth note.
• When the DrBPTN event was set to "----" or the BasPTN event to "---", the respective
track is muted until the play information of another pattern is selected (or the pattern
itself is switched).
66
4 If required, adjust the current position with the [STEP] key.
6 Repeat steps 2 - 5 until all required events have been input.
Any entered events can be edited as shown below.
■ Changing the event setting value
Use the [▲]/[▼] keys to select the event type. Use the [ ]/[ ] keys and [STEP] key to move to
the position of the event you want to modify, and use the [VALUE] dial to change the setting.
■ Deleting an event
Use the [▲]/[▼] keys to select the event type. Use the [ ]/[ ] keys and [STEP] key to move to
the position of the event you want to delete, and press the [ERASE] key.
7 To add or edit events, press the [■] key.
67
Application Guide [Song]
Application Guide [Song]
Event type
• While a pattern event is displayed, you can use the [ ]/[ ] keys to directly move to
points where pattern information is input (or to the end of the song).
• When another event is displayed, you can use the [ ]/[ ] keys to move in measure
units. If there is an event midway in a measure, you can move to that point.
Copying Specific Measures
You can use measure units to copy a part of a song for which pattern information has been input.
This is useful for example to repeat parts of a song.
Copy
Copy
1
2
3
4
5
6
7
8
Pattern A Pattern A Pattern A Pattern B
1
2
3
4
Pattern A Pattern B
1
2
3
4
5
6
7
8
9
10
Pattern A Pattern B Pattern A Pattern A Pattern B
1
2
3
4
5
6
7
8
Pattern A Pattern B Pattern A Pattern B
3 To carry out the delete process, press the [ENTER] key. To cancel the process,
press the [EXIT] key.
When you carry out the delete process, the unit will return to the song mode with the empty
song selected.
When you delete a song, the song and MIDI track recording contents as well as the
patterns assigned to the pads are also deleted.
1 In song mode, press the [● REC] key.
The [● REC] key lights up.
Copying a Song
2 Press the [EDIT] key.
The currently selected song can be copied to any other song.
You can now specify the number of the first measure of the copy source.
3 Use the [VALUE] dial to specify the first measure number of the copy source, and
then press the [ENTER] key.
1 In song mode, select the copy source song and press the [EDIT] key.
2 Use the [ ]/[ ] keys to bring up the indication "COPY?" on the display, and press
First measure number
of copy source
the [ENTER] key.
4 Use the [VALUE] dial to specify the last measure number of the copy source, and
then press the [ENTER] key.
Copy source song
Last measure number
of copy source
5 Use the [VALUE] dial to specify the first measure number of the copy target.
If the copy target range exceeds the end of the song, the song duration is automatically
extended.
3 Use the [▲]/[▼] keys or the [VALUE] dial to specify the number of the copy target
song.
4 To execute the copy process, press the [ENTER] key. To cancel the process, press
the [EXIT] key.
When the copy is completed, the unit returns to the condition of step 1. To return to song
mode, press the [EXIT] key.
If there is a song already stored in the copy target number, its contents will be overwritten
by the new song.
6 To execute the copy process, press the [ENTER] key.
Song Track Operation
Deleting a Song
You can delete the currently selected song, to return it to the empty condition.
1 In song mode, select the song you want to delete.
2 Press the [DELETE] key.
The following indication appears on the display.
68
The song tracks are special auxiliary tracks which are separate from the pattern information
recorded for that song. These allow you to record pad playing information. For example, you could
add some fill-in parts after you have finished a song.
A song in the RT-323 has three song tracks: drum A, drum B, and bass. The sound (drum kit/bass
program) used by each track is the same as for the drum A/drum B/bass pattern track.
You can also select an empty song where no pattern information is recorded, and record
on the song track. Later, you may add pattern information to such a song for which only
the song track is recorded.
69
Application Guide [Song]
Application Guide [Song]
Copy target start position
measure number
Copy target song
•
Song
Drum A song track
Drum B song track
Bass song track
If the duration of the contents of the song track is longer than the duration of the song,
the end point of the song track will become the new end point of the song. In this case,
the last pattern entered for the song is repeated until the new end point.
5 To record JAM slider operation on the song track, select the parameter with the
Pattern A
Pattern B
Pattern C
[JAM FUNCTION] key and then move the JAM slider while pressing the pad.
● Real-time input of drum/bass to song track
This section explains how to perform real-time input of drum/bass phrases on a song track. (The
song tracks do not support step input.)
1 In song mode, press the [SONG TRACK] key while the song is stopped.
The [SONG TRACK] key lights up.
When you move the JAM slider while holding down the pad, you can record changes in pitch,
volume, panning position, and sound. (For details on using the JAM slider, see page 31.)
6 To stop the recording, press the [■] key.
2 Use the [DRUM A]/[DRUM B]/[BASS] key to select the song track to record.
The selected key lights up, and the respective song track is selected. When you hit pads 1 - 13
in this condition, the sound of the drum kit/bass program assigned to the selected track is
heard.
3 Hold down the [● REC] key and [
] key.
Song track recording stops. (When the end of the song is reached, song track recording stops
automatically.) When you press the [
] key, the recorded song track is played back along
with the song.
• If you hold down the [MUTE] key and press the [SONG TRACK] key, you can mute the
entire song track. Performing the same step once more cancels the mute condition.
• The song track can be rerecorded without affecting the contents of a recorded song.
• If you hold down the [ERASE] key and press the [DRUM A]/[DRUM B]/[BASS] key
during song track recording, you can mute the sound of the respective pad (or song
track).
Song playback starts, and song track real-time input becomes possible.
Beat
Measure
4 While listening to the song, hit the pads.
Your pad play is recorded.
The [SONG TRACK] key light goes out. Also when the [SONG TRACK] key is out, the song
track will be played back when the song is played.
● Deleting a song track
The contents of each song track (drum A/drum B/bass) entered with real-time input can be deleted
selectively.
1 Select the song from which you want to delete a song track, and press the [SONG
TRACK] key.
The [SONG TRACK] key lights up.
• In the factory default condition, the quantize setting of the RT-323 is a sixteenth note,
but this setting can be changed if desired ( → p. 72 ).
• Instead of hitting pads, you can also play a MIDI keyboard or other component
connected to the [MIDI IN] jack and record the performance on the drum A/drum
B/bass tracks.
• The song track can hold up to 999 measures, regardless of the length of the currently
selected song.
70
2 Press the [ERASE] key, and use the [DRUM A]/[DRUM B]/[BASS] key to select the
song track.
71
Application Guide [Song]
Application Guide [Song]
To start recording from halfway into a song, press the [
] (pause) key during recording,
and then use the [VALUE] dial to move to the measure where you want to start. Press the
[
] key to start recording.
7 To cancel the song track selection, press the [SONG TRACK] key.
3 To delete, press the [ENTER] key. To cancel the process, press the [EXIT] key.
Current repeat setting
Editing Song Settings
This section describes how to alter settings that affect the entire song, such as tempo, song name, etc.
3 Use the [▲]/[▼] keys to specify the number of the measure where repeat playback
is to be triggered.
● Transposing an entire song
The bass track of an entire song can be transposed in semitone steps. This setting also affects the
bass song track.
1 In song mode, select the song whose settings you want to change, and press the
Possible settings are OFF (repeat playback disabled) and 1 - last measure of song. When a
setting of 1 or higher is selected, the song plays up to the specified measure number and then
is automatically repeated.
4 When the setting is complete, press the [EXIT] key.
The setting is updated, and the unit returns to the song mode.
[EDIT] key.
2 Use the [ ]/[ ] keys to bring up the indication "KEY" on the display.
● Changing the song name
When a song is newly created, the name "SONG xxx" (where xxx is the song number) is
automatically assigned.
Transpose value
1 In song mode, select the song whose name you want to change, and press the
[EDIT] key.
3 Use the [▲]/[▼] keys to set the transpose value.
The setting range is -6 - 0 - 6 (semitones).
2 Use the [ ]/[ ] keys to call up "NAME" on the display.
The song name is shown under "NAME" with an underline.
4 When the setting is complete, press the [EXIT] key.
The setting is updated, and the unit returns to the song mode.
● Setting the quantize value
For recording the song track, the quantize value must be set. In song mode, the [EDIT] key needs to
be pressed first, but otherwise the procedure is the same as when setting the quantize value in
pattern mode. For details, see page 50.
Underline
3 Use the [ ]/[ ] keys to move the underline, and use the [▲]/[▼] keys or the
[VALUE] dial to select the desired character. (For a list of usable characters, see
page 36.)
4 When the song name has been changed, press the [EXIT] key.
The unit returns to the song mode.
● Song repeat playback setting
You can set song repeat to on or off, and you can control the repeat range.
1 In song mode, select the song whose settings you want to change, and press the
[EDIT] key.
2 Use the [ ]/[ ] keys to bring up the indication "REPEAT" on the display.
72
73
Application Guide [Song]
Application Guide [Song]
This setting does not affect the MIDI track data.
For information about the MIDI track, see page 91.
Application Guide [SmartMedia]
This section describes various uses of the SmartMedia card facility.
Saving Data on the SmartMedia Card
The entire data of the RT-323 can be saved (stored) on a formatted SmartMedia card as a file.
Formatting a SmartMedia Card
Before a SmartMedia card can be used for saving and loading data, it must be formatted
(initialized) as follows.
The formatting process erases any data already present on the SmartMedia card. These
data cannot be restored.
1 Insert the SmartMedia card into the [DATA CARD] slot on the side panel of the RT323.
1 Insert a formatted SmartMedia card into the [DATA CARD] slot on the side panel of
the RT-323.
2 Press the [UTILITY] key, and use the [ ]/[ ] keys to call up the indication
"CARD?" on the display. Then press the [ENTER] key.
3 Use the [ ]/[ ] keys to call up the indication "SAVE" on the display. Then press
the [ENTER] key.
For information on how to insert the SmartMedia card, see page 5.
2 Press the [UTILITY] key, and use the [ ]/[ ] keys to call up "CARD?" on the
display.
Underline
4 To give a name to the file to be saved, use the [ ]/[ ] keys to move the underline,
and use the [VALUE] dial to change the character.
3 Press the [ENTER] key, and use the [ ]/[ ] keys to call up "FORMAT" on the
display.
The following characters can be used.
If the indication "NOCARD" appears, the SmartMedia card is not recognized. Make sure
that the SmartMedia card is inserted properly in the [DATA CARD] slot and that the metal
section of the card is not dirty.
Letters: A - Z
Numerals: 0 - 9
Symbols: ! # $ % ' _ [ ] ^ - { }
The indication "SURE?" appears on the display.
5 Press the [ENTER] key.
5 To execute the formatting process, press the [ENTER] key. To cancel the process,
press the [EXIT] key.
The indication "SURE?" appears on the display. If a file with the same name already exists on
the SmartMedia card, the indication "Over Wr?" appears on the display.
6 To carry out the save process, press the [ENTER] key. To cancel the process, press
Execute
Cancel
When formatting is completed, the indication "Done" appears on the display. To return to the
pattern/song mode, press the [EXIT] key.
the [EXIT] key.
When data saving is complete, the indication "Done" appears on the display. To return to the
pattern/song mode, press the [EXIT] key several times.
• While the SmartMedia card is being accessed, the symbol shown
at right appears on the display. While this symbol is shown, never
remove the SmartMedia card or turn off the unit. Otherwise the
data may be destroyed.
74
75
Application Guide [SmartMedia]
Application Guide [SmartMedia]
On the same SmartMedia card, there cannot be duplicate file names.
4 Press the [ENTER] key.
• If the indication "CARDFULL" appears while saving data, there is
not enough free space on the SmartMedia card. Delete
unnecessary data first ( → p. 78).
Loading Data from the SmartMedia Card
2 Press the [UTILITY] key, and use the [ ]/[ ] keys to bring up the indication
"CARD?" on the display. Then press the [ENTER] key.
3 Use the [ ]/[ ] keys to call up the indication "IMPORT" on the display, and press
the [ENTER] key.
To load saved data from the SmartMedia card into the RT-323, proceed as follows.
Import source file
1 Insert the SmartMedia card with the saved data into the [DATA CARD] slot on the
side panel of the RT-323.
4 Use the [▲]/[▼] keys to select the file from which you want to import data, and
2 Press the [UTILITY] key, and use the [ ]/[ ] keys to bring up the indication
press the [ENTER] key.
"CARD?" on the display. Then press the [ENTER] key.
5 Use the [ ]/[ ] keys to select the type of data you want to import, and press the
3 Use the [ ]/[ ] keys to call up the indication "LOAD", and press the [ENTER] key.
[ENTER] key.
Data type to import
File name
4 Use the [▲]/[▼] keys to select the file with the data you want to load, and press the
[ENTER] key.
•
•
•
•
KIT: Specified user drum kit
PTN: Specified user pattern
SONG: Specified song
GLOBAL: General RT-323 settings
6 If you have selected KIT/PTN/SONG as data to import, proceed to the next step.
The indication "SURE?" appears on the display.
(1) Use the [▲]/[▼] keys to select the number of the user drum kit to use as import source, and
press the [ENTER] key.
(2) Use the [▲]/[▼] keys to select the number of the user drum kit to use as import target.
5 To carry out the loading process, press the [ENTER] key. To cancel the process,
press the [EXIT] key.
When data loading is complete, the indication "Done" appears on the display. To return to the
pattern/song mode, press the [EXIT] key several times.
Partial Import of Data from a SmartMedia Card
From any file stored on a SmartMedia card, you can load partial data such as song information, user
pattern information, user drum kit information, etc.
1 Insert a SmartMedia card containing RT-323 data into the [DATA CARD] slot on the
Import source user drum kit
Import target user drum kit
• PTN was selected
(1) Use the [▲]/[▼] keys to select the number of the user pattern to use as import source, and
press the [ENTER] key.
(2) Use the [▲]/[▼] keys to select the number of the user pattern to use as import target.
side panel.
76
77
Application Guide [SmartMedia]
Application Guide [SmartMedia]
If the indication "ERROR" appears, the SmartMedia card is defective or the data are
damaged. Try formatting the card again.
• KIT was selected
File to delete
Import source user pattern
Import target user pattern
• SONG was selected
4 Use the [▲]/[▼] keys to select the file to be deleted, and press the [ENTER] key.
(1) Use the [▲]/[▼] keys to select the number of the song to use as import source, and press the
[ENTER] key.
(2) Use the [▲]/[▼] keys to select the number of the song to use as import target.
5 To carry out the delete process, press the [ENTER] key. To cancel the process,
press the [EXIT] key.
When data deleting is complete, the indication "Done" appears on the display. To return to the
pattern/song mode, press the [EXIT] key several times.
Import source song
Import target song
If the song selected as import source contains user patterns, the respective user patterns
will also be imported automatically, and empty user patterns are assigned as import
target. (If there are no empty user patterns, allocation will be made sequentially, starting
from user pattern number U00.)
Import/Export of PS-02 SmartMedia Data
The RT-323 is compatible with pattern data of the ZOOM Palmtop Studio PS-02. This section
explains how you can import data saved on a SmartMedia card with the PS-02, and how you can
export RT-323 data to the PS-02.
7 Press the [ENTER] key.
The indication "SURE?" appears on the display.
8 To carry out the import process, press the [ENTER] key. To cancel the process,
press the [EXIT] key.
When data importing is complete, the indication "Done" appears on the display. To return to
the pattern/song mode, press the [EXIT] key several times.
● Reading a PS-02 pattern into the RT-323 (pattern import)
You can read in PS-02 pattern data stored on a SmartMedia card into the RT-323 as user pattern
data. It is also possible to edit the pattern with the RT-323 and then write it back to the PS-02
SmartMedia card.
1 Insert a PS-02 start-up SmartMedia card into the [DATA CARD] slot on the side
Deleting Data From the SmartMedia Card
When you edit pattern data on the RT-323 and then write the data back to the PS-02
SmartMedia card, the original data will be overwritten. If you want to keep the original
pattern of the PS-02, create a backup of the PS-02 SmartMedia card first. (For details,
refer to the PS-02 Operation Manual.)
1 Insert a SmartMedia card containing RT-323 data into the [DATA CARD] slot on the
side panel.
2 Press the [UTILITY] key, and use the [ ]/[ ] keys to call up "PS-02?" on the
display. Then press the [ENTER] key.
2 Press the [UTILITY] key, and use the [ ]/[ ] keys to bring up the indication
"CARD?" on the display. Then press the [ENTER] key.
3 Use the [ ]/[ ] keys to call up "DELETE" on the display, and press the [ENTER]
key.
3 Use the [ ]/[ ] keys to call up the indication "IMPORT" on the display, and press
the [ENTER] key.
You now can select a pattern to import from the PS-02 SmartMedia card.
78
79
Application Guide [SmartMedia]
Application Guide [SmartMedia]
Files saved on the SmartMedia card can be selectively deleted. If there is not enough space on the
card to save new data, you can delete data that is no longer needed.
panel of the RT-323.
When you edit pattern data on the RT-323 and then write the data back to the PS-02
SmartMedia card, the original data will be overwritten. If you want to keep the original
pattern of the PS-02, create a backup of the PS-02 SmartMedia card first. (For details,
refer to the PS-02 Operation Manual.)
PS-02 pattern number
PS-02 pattern name
4 Use the [▲]/[▼] keys or the [VALUE] dial to select the pattern, and press the
[ENTER] key.
2 Press the [UTILITY] key, and use the [ ]/[ ] keys to call up "PS-02?" on the
display. Then press the [ENTER] key.
The target user pattern number is shown on the display.
RT-323 pattern
number
RT-323 pattern name
5 Use the [▲]/[▼] keys or the [VALUE] dial to select the target user pattern in the RT323.
3 Use the [ ]/[ ] keys to call up "EXPORT" on the display, and press the [ENTER]
key.
A PS-02 pattern on the SmartMedia card is shown as export target.
PS-02 pattern number
6 To carry out the import process, press the [ENTER] key. To cancel the process,
press the [EXIT] key.
When data read-in is complete, the indication "Done" appears on the display. To return to the
pattern/song mode, press the [EXIT] key several times.
PS-02 pattern name
When there is an export-enabled pattern in the RT-323, the pattern number is shown.
When writing an edited pattern to the SmartMedia card, the data of the original pattern
number on the card will be overwritten.
The imported pattern can be edited in the same way as a normal pattern, using edit mode.
● Writing a RT-323 pattern to a PS-02 SmartMedia card
(pattern export)
After editing pattern data imported from the PS-02 to the RT-323, you can write the data to the PS02 SmartMedia card again. This lets you then use the pattern data in the PS-02.
1 Insert a PS-02 start-up SmartMedia card into the [DATA CARD] slot on the side
panel of the RT-323.
80
4 Use the [▲]/[▼] keys or the [VALUE] dial to select the PS-02 pattern to export to.
The RT-323 user pattern to export from is shown.
RT-323 pattern number
5 Use the [▲]/[▼] keys or the [VALUE] dial to select the RT-323 pattern to export
from.
6 To carry out the export process, press the [ENTER] key. To cancel the process,
press the [EXIT] key.
When data exporting is complete, the indication "Done" appears on the display. To return to
the pattern/song mode, press the [EXIT] key several times.
If you start up the PS-02 with that card, the exported pattern will be usable in the same way as
an internal pattern.
• The selected user pattern is exported with the contents of drum B track merged onto
the drum A track.
• The maximum number of simultaneous sounds that the PS-02 can produce is four drum
voices and one bass voice. If a pattern that exceeds these numbers is exported,
correct playback with the PS-02 will not be possible.
81
Application Guide [SmartMedia]
Application Guide [SmartMedia]
• When changing the sound (drum kit/bass program) of pattern data imported to the RT323, select only PS-02 compatible sounds. (For details, see the list at the end of this
documentation.) If you select RT-323 specific drum kit/bass program sounds and
export the data to the PS-02, normal playback may not be possible.
• Do not change the names of patterns imported to the RT-323. Otherwise the pattern
name may not display correctly after the pattern is exported again to the PS-02.
• The bass line included in PS-02 pattern data is imported with the "C" root (no
transposition) and "NON" chord (no transformation) setting.
• When editing the bass track of an imported pattern on the RT-323, note that entering a
phrase with a different root or chord type may result in improper playback when the
data are exported again to the PS-02.
Application Guide [Remote Control]
This section describes how to use the [CONTROL IN] jack in conjunction with an optional foot
pedal or foot switch, to perform remote control of the RT-323.
Controlling the RT-323 With a Foot Pedal (FP01/FP02)
5 Press the [PATTERN] key to return to pattern mode.
6 Operate the FP01/FP02 while hitting the pad.
When you connect the separately available foot pedal (FP01/FP02) to one of the [CONTROL IN]
jacks on the RT-323, you can use the FP01/FP02 instead of the JAM slider to adjust parameters
such as pitch or sound change of the currently operated pad.
1 Connect the FP01/FP02 to the [CONTROL IN] jack on the rear panel.
FP01
For information on connections, see page 6.
You can connect the FP01/FP02 to the [CONTROL IN 1] or the [CONTROL IN 2] jack. The
two jacks have the same function.
2 Press the [UTILITY] key, and use the [ ]/[ ] keys to bring up the indication
"CTRLIN" on the display.
The effect of moving the pedal is the same as when operating the JAM slider.
Controlling the RT-323 With a Foot Switch (FS01)
When you connect the separately available foot switch (FS01) to one of the the [CONTROL IN]
jacks on the RT-323, you can control a specific pad with the foot switch or control start/stop of
song and pattern playback.
1 Connect the FS01 to the [CONTROL IN] jack on the rear panel.
For information on connections, see page 6.
3 Operate the FP01/FP02.
The RT-323 detects the FP01/FP02, and the parameter that is controlled by the foot pedal is
shown on the display.
Number of [CONTROL IN] jack where
FP01/FP02 is connected
You can connect the FS01 to the [CONTROL IN 1] or the [CONTROL IN 2] jack. The two
jacks have the same function.
2 Press the [UTILITY] key, and use the [ ]/[ ] keys to bring up the indication
"CTRLIN" on the display.
3 Push the FS01.
FP01
Assigned parameter
pedal.
FS01
Function assigned
to FS01
The RT-323 detects the FS01, and the parameter that is controlled by the foot pedal is shown
on the display.
The available settings are "PITCH", "VOLUME", "PAN" (panning), and "SOUND
CHANGE" (pad sound switching).
82
83
Application Guide [Remote Control]
Application Guide [Remote Control]
4 Use the [JAM FUNCTION] key to select the parameter to be controlled with the
Number of [CONTROL IN] jack
where FS01 is connected
FS01
Application Guide [MIDI]
4 While holding down the FS01, press the key or pad that you want to control.
FS01
This section describes the various MIDI related settings of the RT-323 and gives information on
MIDI track operation.
Available MIDI Functions
The RT-323 incorporates the following MIDI functions.
The function controlled by the FS01 will be assigned depending on which key or pad was
operated when holding down the FS01. The available choices and the required operations are
listed below.
Push FS01
+
RT-323 operation
Function
Display
In pattern mode, pushing FS01 produces
sound from that pad.
(xx = pad number)
Push two different pads twice
The sound of the first pad can be switched
with the FS01.
When the FS01 is pressed, the sound of
the first pad is heard. When you release the
foot switch, the sound of the second pad is
heard. (For example, you could use the
FS01 to toggle between the sound of an
open and closed hi-hat.)
PADxx➝yy (xx,yy = pad number)
Push [■] key
In pattern mode/song mode, pushing FS01
switches through [Start play] → [Stop] →
[Start play from beginning]
START
Push [
In pattern mode/song mode, pushing FS01
switches through [Start play] →[Pause] →
[Start play from pause position]
CONTINUE
Push [DRUM A]/[DRUM B]/
[BASS] key
In pattern mode/song mode, pushing FS01
switches specified track muting on/off
MUTE xxx (xxx = DrA, DrB, Bas)
Push [TEMPO] key
In pattern mode/song mode, two
subsequent pushed of FS01 specify the
tempo (tap tempo input)
TAP
Push [REPEAT] key
In pattern mode, pushing a pad while
depressing FS01 produces sound from
that pad continuously
REPEAT
] key
Changing the MIDI Setting
● Basic steps
5 Press the [PATTERN] key/[SONG] key, to return to pattern mode/song mode.
6 Operate the FS01.
The FS01 performs the function set in step 4 (activating the sound of a pad or performing
start/stop remote control.
84
The basic steps for changing MIDI settings are similar for all MIDI items. Proceed as follows.
1 Press the [UTILITY] key, and use the [ ]/[ ] keys to call up the indication "MIDI?"
on the display.
85
Application Guide [MIDI]
Application Guide [Remote Control]
Push one of pads 1 - 13
● Send/receive note information
MIDI note information can be sent out when hitting the pads, and note information can be
received to operate the drum kit and bass program of the RT-323 from an external
component.
● Send/receive control change information
Control change information triggered by JAM slider operation can be sent out. Control
change information can be received to obtain the same effect as when operating the JAM
slider, for adjusting the track volume or pitch.
● Send/receive program change information
Program change information triggered by switching the drum kit/bass program can be sent
out. Program change information can be received to switch the drum kit/bass program from
an external component.
● Send/receive MIDI sync messages
MIDI sync messages such as MIDI clock, start, stop, etc. can be sent and received, to
synchronize operation of the RT-323 to an external component such as a MIDI sequencer or
rhythm machine.
● Save internal data as bulk dump
Internal RT-323 data and setting information can be sent out as MIDI messages and stored
on an external component such as a MIDI sequencer. By sending these data back to the RT323, a previous condition can be restored at any time.
● Recording playing information on a MIDI track
The RT-323 incorporates a MIDI track which allows recording of MIDI messages in real
time. This is useful for example to record a MIDI sequencer in conjunction with song
accompaniment.
2 Press the [ENTER] key, and use the [ ]/[ ] keys to select the setting item.
Currently selected
item
MIDIch: Set MIDI send/receive channel for drum A/drum B/bass separately.
CTRL: Enable/disable control change information send.
PRG: Enable/disable program change information send.
SYNC: Enable/disable MIDI send/receive of sync messages (MIDI clock etc.).
MIDI TR: Enable/disable output of data stored on MIDI track.
MIDI PC DRUM: Assign program change number to drum kit (00 - 127).
MIDI PC BAS: Assign program change number to bass program (00 - 54).
3 When the desired item is shown, use the [▲]/[▼] keys or the [VALUE] dial and other
controls to make the setting.
For detailed information on operation, see the sections on the various items.
4 When the setting is complete, press the [EXIT] key.
The unit returns to the condition of step 1. To return to pattern/song mode, press the
[PATTERN]/[SONG] key.
● Set MIDI send/receive channel for each track (MIDIch)
This allows you to set the MIDI send/receive channel for the drum A, drum B, and bass tracks.
While the indication "MIDIch" is shown on the display, use the [▲]/[▼] keys to select the track for
which to set the MIDI channel. Then use the [VALUE] dial to select one of the following settings.
• 1 - 16: MIDI channel 1 - 16 (Default setting: DRUM A = 10, DRUM B = 11,
BASS = 9)
• OFF: Send/receive off
Setting
MIDI messages such as note information, control change information, and program
change information will be sent and received in this channel.
Determines whether the RT-323 sends control change information. While the indication "CTRL" is
shown on the display, use the [▲]/[▼] keys or the [VALUE] dial to select "ON" (send enabled;
default setting) or "OFF" (send disabled).
Current setting
When control change send is enabled, operating the JAM slider causes control change information
to be output from the [MIDI OUT] jack.
Control change receive is always On. Even if this setting is Off, control change messages
sent to the [MIDI IN] jack from external equipment can be used to achieve the same effect
as moving the JAM slider, or to adjust volume and pitch for a specific track. (For details on
control change messages recognized by the RT-323, see the list at the end of this
manual.)
● Enable/disable program change information send (PRG)
Determines whether the RT-323 sends program change information. While the indication "PRG" is
shown on the display, use the [▲]/[▼] keys or the [VALUE] dial to select "ON" (send enabled;
default setting) or "OFF" (send disabled).
Current setting
When program change send is enabled, switching the drum kit/bass program at the RT-323 causes
program change information to be output from the [MIDI OUT] jack.
• Program change receive is always On. Even if this setting is Off, program change
messages sent to the [MIDI IN] jack from external equipment can be used to switch the
sound (drum kit/bass program) for a specific track.
• In the factory default condition, a separate program change number is assigned to each
drum kit/bass program. The program change number assignment can be changed if
desired ( → p. 89).
● Enable/disable MIDI send/receive of sync messages (SYNC)
Determines whether the RT-323 sends and receives MIDI sync messages. While the indication
"SYNC" is shown on the display, use the [▲]/[▼] keys or the [VALUE] dial to select one of the
following settings.
• INT: When the RT-323 carries out playback, MIDI sync messages are sent (default setting).
This allows for example playing a MIDI sequencer in sync with the tempo of the RT-323.
86
87
Application Guide [MIDI]
Application Guide [MIDI]
Track
● Enable/disable control change information send (CTRL)
• MIDI: When MIDI sync messages are received from an external component, the RT-323
functions accordingly. This allows for example operating the RT-323 in sync with the
tempo of an external MIDI sequencer.
Current setting
Note that if the "MIDI" setting is selected, the RT-323 will not perform pattern or song
playback unless MIDI sync messages are received.
● Enable/disable output of data stored on MIDI track (MIDI TR)
This setting controls the output of data stored on the MIDI track via the [MIDI OUT] jack. (For
information about the MIDI track, see page 91). While the indication "MIDI TR" is shown on the
display, use the [▲]/[▼] keys to select one of the following settings.
This item allows you to change the default program change numbers allocated to the drum kits.
While the indication "MIDI PC DRUM" is shown, press the [ENTER] key, and use the [VALUE]
dial to specify the drum kit number (00 - 127). Then use the [▲]/[▼] keys to set the program
change number (001 - 128).
Drum kit number
Program change number
When you have made the required settings, press the [EXIT] key.
For details on factory default settings, see the list at the end of this manual.
● Assign program change number to bass program (PC BASS)
Current setting
NO OUT: Data stored on MIDI track are not output via [MIDI OUT] jack or internal sound
source (default setting).
MIDI track
Ch 1 – 16
Song track
Ch 9
Pattern
Pattern
Ch 11
This item allows you to change the default program change numbers allocated to the bass
programs.
While the indication "MIDI PC BASS" is shown, press the [ENTER] key, and use the [VALUE]
dial to specify the bass program number (00 - 54). Then use the [▲]/[▼] keys to set the program
change number (001 - 128).
Bass program number
Ch 10
Pattern
● Assign program change number to drum kit (PC DRUM)
MIDI OUT
Sound source
OUT: Data stored on MIDI track are sent only to [MIDI OUT] jack.
Program change number
MIDI track
Ch 1 – 16
Ch 9
Song track
MIDI OUT
Ch 10
Ch 11
Pattern
Pattern
When you have made the required settings, press the [EXIT] key.
For details on factory default settings, see the list at the end of this manual.
Pattern
Sound source
Application Guide [MIDI]
Application Guide [MIDI]
EX OUT: Among data stored on MIDI track, those matching the MIDI channel of internal
sound source are sent to internal sound source, and other data are sent to [MIDI OUT] jack.
Ch 1 – 8, 12 – 16
Ch 9 – 11
MIDI track
Ch 9
Song track
MIDI OUT
Ch 10
Ch 11
Pattern
Pattern
Pattern
Sound source
When "THRU" or "EX THRU" is selected, no MIDI messages for hitting pads or playing
patterns are output via the [MIDI OUT] jack.
88
89
Saving RT-323 Internal Data on MIDI Equipment
The internal data of the RT-323 including all setting information can be converted to MIDI
messages and output via the [MIDI OUT] jack (bulk dump). This function allows you to store all
RT-323 settings or only selected data on an external component such as a MIDI sequencer.
Before starting the bulk dump operation, make sure that the [MIDI OUT] jack of the RT-323
is connected to the MIDI IN jack of the other component.
1 Press the [UTILITY] key, and use the [ ]/[ ] keys to bring up the indication
"MIDI?". Then press the [ENTER] key.
MIDI Track Operation
The RT-323 incorporates a MIDI track that can record MIDI messages such as output for example
by an external MIDI keyboard in real time. You can record and play such data in conjunction with
an existing song. The following types of MIDI messages can be recorded.
• Note data (note on/off, velocity)
• Pitch bend
• Program change
• Control change
• Polyphonic key player
• Channel pressure
2 Use the [ ]/[ ] keys to bring up the indication "DUMP" on the display, and press
the [ENTER] key.
When messages are recorded and played, their original MIDI channel (1 - 16) assignment does not
change.
3 Use the [ ]/[ ] keys to select the bulk dump type from the following, then press
the [ENTER] key.
• SEQUENCE: User pattern and song data
• SYSTEM: Global RT-323 settings
• ALL KITS: All user drum kits
Note that you cannot record on a send/receive channel set to the drum A/drum B/bass track.
To record on such a MIDI channel, set the send/receive channel for the respective track to OFF (➝
p. 86).
● MIDI track recording
Bulk dump data type
4 Press the [ENTER] key.
The confirmation message "SURE?" appears on the display. Make sure that the external MIDI
component is ready to record MIDI messages.
5 To carry out the bulk dump process, press the [ENTER] key. To cancel the process,
This section explains the steps for MIDI track recording, using the example of recording a MIDI
synthesizer performance on the MIDI track.
1 Connect the RT-323 and MIDI synthesizer as shown in the illustration.
RT-323
[MIDI OUT] jack
[MIDI IN] jack
press the [EXIT] key.
While bulk dump is being carried out, the indication "TX" is shown.
MIDI IN
MIDI OUT
The unit returns to the condition of step 1.
MIDI synthesizer
To restore the condition of the RT-323 using set data stored on an external MIDI component,
connect the MIDI OUT jack of the external component to the [MIDI IN] jack of the RT-323,
and send the data while the RT-323 is in the stop condition. (No special steps are required at
the RT- 323.)
When setting data are sent from an external MIDI component to the RT-323, all data in the
RT-323 are overwritten. Take care not to accidentally patterns or songs that you wish to
keep.
90
The MIDI messages input to the [MIDI IN] jack of the RT-323 are not sent through to the
[MIDI OUT] jack. Therefore you must set the MIDI synthesizer to "Local = On".
2 Press the [UTILITY] key, and use the "MIDI TR" item to enable the MIDI track
output. (For setting information, see page 88.)
91
Application Guide [MIDI]
Application Guide [MIDI]
6 When bulk dump is completed, press the [EXIT] key.
Application Guide [Other Functions]
3 Set the RT-323 to song mode and select a song.
You can also select an empty song where no pattern information is recorded, and record
MIDI messages on the MIDI track. Later, you may add pattern information to such a song
for which only the MIDI track is recorded.
4 Hold down the [SONG TRACK] key for at least 1 second.
Press for 1 second
The [SONG TRACK] key lights up and the MIDI track is ready for recording. The procedure
for MIDI track recording, stop, and playback is the same as for the song track. For details, see
page 69.
This section describes how to use the metronome, how to return the RT-323 to the factory default
condition, and other auxiliary functions.
Metronome Operation
● Adjusting the metronome volume
You can adjust the volume of the metronome sound heard when performing pattern real-time input.
1 Press the [UTILITY] key, and use the [ ]/[ ] keys to bring up the indication
"CLICK" on the display.
When the MIDI track is in the recording mode, hitting the pads will not produce sound.
Metronome volume
• The MIDI track is always recorded without quantize (minimum note unit = 1 tick).
• When you record on the MIDI track again, previous data are not erased. Instead,
overdubbing of MIDI data occurs. If the MIDI synthesizer supports multi-timbre,
changing the MIDI channel and sending a different timbre allows you to create sound
overlays.
5 To delete the MIDI track data, hold down the [ERASE] key and press the [SONG
2 Use the [▲]/[▼] keys or the [VALUE] dial to set the metronome volume (1 - 15).
or
The factory default setting is 10.
TRACK] key and then the [ENTER] key.
When you press the [SONG TRACK] key while holding down the [ERASE] key, the
indication "ERASE MIDI?" appears on the display. When you press the [ENTER] key in this
condition, all data on the MIDI track are erased.
3 When the setting is complete, return to the pattern/song mode by pressing the
[PATTERN]/[SONG] key.
6 To terminate the MIDI track recording condition, press the [SONG TRACK] key.
The [SONG TRACK] key light goes out. The MIDI track will still be played together with
song playback also in this condition.
● Setting the precount
When the RT-323 is in the default condition, the metronome counts down the time before the start
of real-time input (precount) for 1 measure. The number of measures can be changed, and precount
can also be turned off.
1 Press the [UTILITY] key, and use the [ ]/[ ] keys to bring up the indication
"COUNT" on the display.
Precount setting
2 Use the [▲]/[▼] keys or the [VALUE] key to select one of the following settings.
OFF: Precount is off. Recording starts immediately when activated.
92
93
Application Guide [Other Functions]
Application Guide [MIDI]
• The data recorded on the MIDI track are stored as part of the song data in the RT-323.
• The MIDI track can hold up to 999 measures, regardless of the length of the currently
selected song.
• If the duration of the contents of the MIDI track is longer than the duration of the song,
the end point of the MIDI track will become the new end point of the song. In this case,
the last pattern entered for the song is repeated until the new end point.
Troubleshooting
1: A precount of 1 measure is carried out before recording starts (default setting).
2: A precount of 2 measures is carried out before recording starts.
PAD: Precount is off. Recording starts immediately when a pad is hit.
3 To terminate the setting and return to pattern mode, press the [PATTERN] key.
Check the following items first if there seems to be a problem with the RT-323.
■ Power does not come on
• Check that the correct AC adapter or batteries are used.
■ No sound or very low volume
Other Special Functions
• Is RT-323 connected correctly to playback system?
• Is volume of RT-323 set to a suitable position?
● Checking the memory free amount
You can check the remaining memory capacity of the RT-323.
1 Press the [UTILITY] key, and use the [ ]/[ ] keys to bring up the indication
"MEMORY" on the display.
■ No sound or very low volume when hitting pad
• Press the [UTILITY] key to call up the "SENS" item and try changing the setting to an option other
than "SOFT" or "EX HARD".
■ The indication "FULL" appears and no user pattern/song can be recorded
• There is not enough free memory in the RT-323. Delete unneeded user patterns or songs.
Remaining memory
The current amount of free memory in the RT-323 is shown. This display is for information
only, it cannot be changed.
2 To return to the pattern/song mode, press the [PATTERN]/[SONG] key.
● Returning the unit to the factory default settings
This section shows how to initialize the RT-323. This will return all data and settings to the factory
default condition.
1 Hold down the [● REC] key while turning power to the RT-323 on.
The following indication appears on the display, and initialization is carried out automatically.
■ Song/pattern playback does not start when [
] key is pressed
• Press the [UTILITY] key to call up the "SYNC" item, and verify that the setting is "INT".
■ JAM slider has no effect
• In song mode, operating the JAM slider has no effect. Switch to pattern mode or groove play mode.
■ No MIDI data supplied from [MIDI OUT] jack
• Press the [UTILITY] key to call up the "MIDI TR" item, and verify that the setting is "NO OUT".
• Press the [UTILITY] key to call up the items "CTRL" and "PRG", and verify that the setting is
"ON".
■ FP01/FS01 has no effect
• The FP01/FS01 function may not be correctly assigned. To assign a function, be sure to push down
the FS01 (or operate the FP01).
■ Data cannot be stored on SmartMedia card
When initialization is performed, the RT-323 will restart.
94
95
Troubleshooting
Application Guide [Other Functions]
Use this function with care. Initialization will clear all user pattern and song information
that you have created.
• SmartMedia card is not formatted. Before a new card can be used, it must be formatted in the RT323 ( → p. 74).
• If the indication "NOCARD" is shown, the SmartMedia card is not recognized. Verify that the card
is correctly inserted in the [DATA CARD] slot.
• If the indication "WRITE PROTECT" is shown, the SmartMedia card is write-protected. Remove
the write-protect tab or use another card.
• If the indication "CARD FULL" is shown, the SmartMedia card does not have enough free space.
Delete unneeded files ( → p. 78) or use another card.
Drum Kit List
Reference
* The PC# can be changed as required.
RT-323 Specifications
Sampling Frequency:
D/A Conversion:
Maximum Polyphony:
Resolution:
Tempo:
Maximum Notes:
Drum Sounds:
Bass Programs:
Drum Kits:
Rhythm Patterns:
Songs:
48 kHz
24-bit, 8-times oversamoling
30 voices
96 PPQN
40.0 to 250.0 BPM
40,000
377
55
128 (Preset: 64 User: 64)
500 (Preset: 400 User: 100)
100
Pads:
13 pad (with velocity sensor)
Display:
640-segment custom LCD
No. PC# Display
BASIC KITS
0
1
2
3
4
5
6
7
8
9
10
11
12
13
14
15
16
17
18
19
20
21
22
23
24
25
26
27
28
29
30
31
32
33
34
35
36
37
38
39
40
41
42
43
44
45
46
47
48
49
50
51
52
53
54
55
56
57
58
59
60
61
62
63
LIVE ROCK
STUDIO
DRUMS
STANDARD
KIT
FUNK TRAP
Connectors for external equipment
Control:
FP-01, FP-02/FS-01 input x 2
MIDI:
IN, OUT
Inputs/Outputs
LINE IN:
OUTPUT:
Data card
SmartMedia:
Reference
Dimensions:
Weight:
Power Requirements:
Supplied accessories:
96
EPIC ROCK
BALLAD SET
DANCE KIT
Mono,
Input impedance
Rated input level
Line Out (L/MONO)
Line Out (R)
SUB Out 1
SUB Out 2
Output impedance
Rated output level
Phones:
Standard phone jack, analog mix
10 kilohms
-10dBm
Standard phone jack
Standard phone jack
Standard phone jack
Standard phone jack
1 kilohm max.
-10dBm
Mini phone jack
50mW ( 32 ohms load)
SSFDC 4 MB - 128 MB, 3.3 V
265 (W) x 175 (D) x 55 (H)
870 g
9 V DC, 300mA (from AC adapter AD- 0006)
Batteries :IEC R6 (size AA) x 6;
continuous operation 7 hours minimum
Instruction Manual
AC adapter
RAP/HIPHOP
TECHNO BEAT
GENERAL
DRUMS
PERCUSSION/
SFX
2
3
4
5
6
7
9
10
11
0
12
13
14
15
17
18
19
20
21
22
23
26
27
28
29
30
31
33
34
35
36
37
38
39
41
42
43
44
45
46
8
32
1
47
16
40
49
25
24
50
51
52
53
54
48
55
63
57
58
59
60
61
62
56
LiveRock
StudioDr
Standard
FunkTrap
EpicRock
Ballad
Dance
Hiphop
Techno
Drum#9
GenePerc
EnhPower
Dist
Live 1
Live 2
Live 3
Studio1
Studio2
Studio3
Standrd1
Standrd2
Standrd3
Funk 1
Funk 2
Funk 3
Epic 1
Epic 2
Epic 3
Ballad 1
Ballad 2
Ballad 3
Dance 1
Dance 2
Dance 3
HipHop 1
HipHop 2
HipHop 3
Techno 1
Techno 2
Techno 3
General1
General2
General3
General4
General5
General6
General7
General8
General9
DrumSkin
Indian
Gamelan
Clk&Stk
SnglPerc
Orchestr
Cymbals
LoPercus
HiPercus
VariPer1
VariPer2
VariPer3
VariPer4
VariPer5
SFX Kit
Kit name
Live Rock
Studio Drums
Standard Kit
Funk Trap
Epic Rock
Ballad Set
Dance Kit
Rap/Hiphop
Techno Beat
Drum#9
General Percussion
Enhanced Power
DISTORTION
Live Rock 1
Live Rock 2
Live Rock 3
Studio Drums 1
Studio Drums 2
Studio Drums 3
Standard Kit 1
Standard Kit 2
Standard Kit 3
Funk Trap 1
Funk Trap 2
Funk Trap 3
Epic Rock 1
Epic Rock 2
Epic Rock 3
Ballad Set 1
Ballad Set 2
Ballad Set 3
Dance Kit 1
Dance Kit 2
Dance Kit 3
Rap/Hiphop 1
Rap/Hiphop 2
Rap/Hiphop 3
TechnoBeat 1
TechnoBeat 2
TechnoBeat 3
General Kit 1
General Kit 2
General Kit 3
General Kit 4
General Kit 5
General Kit 6
General Kit 7
General Kit 8
General Kit 9
DRUM SKINS
Indian Percussion
Agogo Gamelan
Clicks and Sticks
Single Percussion
Orchestral Set
CymbalSet
Lo Percussion
Hi Percussion
Various Percussion 1
Various Percussion 2
Various Percussion 3
Various Percussion 4
Various Percussion 5
SFX Kit
USER KIT
PS-02
COMPATIBLE
No. PC# Display
64
64
115
116
117
118
119
120
121
122
123
124
125
126
127
115
116
117
118
119
120
121
122
123
124
125
126
127
Kit name
Default
Default
PsStndrd
PsRock
PsJazz
PsAnalg1
PsPower
PsFunk1
PsScrtch
PsAnalg2
PsDist
PsElectr
PsBrush
PsFunk2
PS-02 STANDARD
PS-02 ROCK
PS-02 JAZZ
PS-02 ANALOG 1
PS-02 POWER
PS-02 FUNK 1
PS-02 SCRATCH
PS-02 ANALOG 2
PS-02 DISTORTION
PS-02 ELECTRONIC
PS-02 BRUSH
PS-02 FUNK 2
Reference
PRESET KIT
* In the factory default condition, user kits 64 - 115 contain LiveRock.
* User kits 116 - 127 are PS-02 compatible kits.
97
Bass Program List
No.
PC#
98
LiveBass
StudioBS
EpicBass
FunkBass
BalladBS
AcostcBS
ModernBS
Synth BS
TechnoBS
BigBtmBS
SubSlpBS
DigiAcBS
BSHrmnic
No Frets
Aco Jazz
DigiPick
TechAnlg
Tabla BS
TightAna
Analog5#
TempleTN
QuadraBS
AnaTouch
Pick Aco
BassDive
AnaOctav
SynTomBS
Lo Sine
DigiSlap
TmbaTone
CongKeys
PowTom BS
BecmngBS
HrmnicBS
BassHarm
PickFunk
PickJazz
PickTech
Aco Tech
PowerFnk
PopsPull
EpicJam1
TrblJam2
WoodBass
JazzBass
FunkPops
FunkPull
PickBass
AnalogBS
DigiBass
Saw Wave
Square
Hi Sine
Drive BS
FuzzBass
Drum PAD NOTE# List
Program name
Live Bass
Studio Bass
Epic Bass
Funk Bass
Ballad Bass
Acoustic Bass
Modern Bass
Synth Bass
Techno Bass
Big Bottom Bass
SubSlap Bass
Digital Acoustic
Bass Harmonics
No Frets
Acoustic Jazz
Digital Pick
TechnoAnalog
Tabla Bass Tones
Tight Analog
Analog Fifths
Temple Tones
Quadra Bass
Analog Touch
Picked Acoustic
Bass Dive
AnalogOctaves
SynthTom Bass
Lo Sine
Digi Slap Bass
Tumba Tones
Conga Keys
Power Tom Bass
Becoming Bass
Harmonics Bass
Bass with Harmonics
Picked Funk Bass
Picked Jazz
Picked Techno
Acoustic Techno
Power Funk
Pops/Pull Split
Epic Bass Jam/1
Tribal Bass Jam/2
Wooden Bass
Jazz Bass
Funk Pops
FunkPulls
Picked Bass
Analog Bass
Digi Bass
Saw Wave
Square Wave
Hi Sine
Drive Bass
Fuzz Bass
PAD No
PAD NAME
PAD1
PAD2
PAD3
PAD4
PAD5
PAD6
PAD7
PAD8
PAD9
PAD10
PAD11
PAD12
PAD13
KICK
TOM1
SNARE
TOM2
CLOSED HAT
TOM3
OPEN HAT
CRASH
EXTRA 1
RIDE
EXTRA 2
EXTRA CYMBAL
EXTRA 3
Instrument List
BANK1 BANK2 BANK3
36
50
38
47
42
43
46
49
37
51
39
53
56
35
48
40
45
44
41
54
57
70
59
52
55
58
No.
61
64
60
62
68
63
67
66
71
65
72
69
73
MIDI NOTE # List
DRUM KIT
Note No
24
25
26
27
28
29
30
31
32
33
34
35
36
37
38
INST No INST NAME
From note 0
349
290
358
359
275
318
321
329
HighQ
Slap
Scratch1
Scratch2
ShortStk
SquarClk
MetroClk
MtrBell
39
PAD BANK 1
66
PAD BANK 3
67
68
69
70
71
72
73
74
75
76
77
78
79
80
81
82
83
84
85
86
87
88
BASS
Programs
74
75
76
77
78
79
80
81
82
83
84
85
86
87
BASS range
GuiroL1
Claves1
WoodBlkH
WoodBlkL
CuicaHi
CuicaLo
MtTrangl
OpTrangl
Shaker1
JBell1
Belltre1
Castnet1
MtSurdo
OpSurdo
The highest note number that can be produced depends on the bass program.
The PAD BANK 1 - 3 INST No, INST NAME depend on the kit.
The range of note numbers that can be produced by the pads of the RT-323 is 12 - 63.
0
1
2
3
4
5
6
7
8
9
10
11
12
13
14
15
16
17
18
19
20
21
22
23
24
25
26
27
28
29
30
31
32
33
34
35
36
37
38
39
40
41
42
43
44
45
46
47
48
49
50
51
52
53
54
55
56
57
58
59
60
61
62
Display
HvyKick
TightKic
DistKick
ScrchKic
Live K11
Live K12
Live K13
Live K14
StdioK11
StdioK12
StdioK13
StdioK14
StnddK11
StnddK12
StnddK13
StnddK14
StnddK21
Funk K11
Funk K12
Funk K13
Funk K14
Epic K11
Epic K12
Epic K13
Epic K14
Epic K21
Blld K11
Blld K12
Blld K13
Blld K14
Blld K21
Blld K22
DanceK11
DanceK12
DanceK13
DanceK14
Hip K11
Hip K12
Hip K13
Hip K14
Hip K21
Tec K11
Tec K12
Tec K13
Tec K21
Gene K11
Gene K12
Gene K13
Gene K14
Gene K15
Gene K16
Gene K17
Gene K18
Gene K21
Gene k22
Gene K23
OrchKick
RoomSnar
TightSnr
HvySnare
DistSnar
ScrchSnr
Live S11
Instrument name
Heavy Kick
Tight Kick
Dist Kick
Scratch Kick
Live Kick 11
Live Kick 12
Live Kick 13
Live Kick 14
Studio Kick 11
Studio Kick 12
Studio Kick 13
Studio Kick 14
Standard Kick 11
Standard Kick 12
Standard Kick 13
Standard Kick 14
Standard Kick 21
Funk Kick 11
Funk Kick 12
Funk Kick 13
Funk Kick 14
Epic Kick 11
Epic Kick 12
Epic Kick 13
Epic Kick 14
Epic Kick 21
Ballad Kick 11
Ballad Kick 12
Ballad Kick 13
Ballad Kick 14
Ballad Kick 21
Ballad Kick 22
Dance Kick 11
Dance Kick 12
Dance Kick 13
Dance Kick 14
HipHop Kick 11
HipHop Kick 12
HipHop Kick 13
HipHop Kick 14
HipHop Kick 21
Techno Kick 11
Techno Kick 12
Techno Kick 13
Techno Kick 21
General Kick 11
General Kick 12
General Kick 13
General Kick 14
General Kick 15
General Kick 16
General Kick 17
General Kick 18
General Kick 21
General Kick 22
General Kick 23
Orchestra Kick
Room Snare
Tight Snare
Heavy Snare
Dist Snare
Scratch Snare
Live Snare 11
No.
63
64
65
66
67
68
69
70
71
72
73
74
75
76
77
78
79
80
81
82
83
84
85
86
87
88
89
90
91
92
93
94
95
96
97
98
99
100
101
102
103
104
105
106
107
108
109
110
111
112
113
114
115
116
117
118
119
120
121
122
123
124
125
Display
Live S12
Live S13
Live S14
Live S21
StdioS11
StdioS12
StdioS13
StdioS14
StdioS21
StdioS22
StnddS11
StnddS12
StnddS13
StnddS14
StnddS21
StnddS22
Funk S11
Funk S12
Funk S13
Funk S14
Epic S11
Epic S12
Epic S13
Epic S14
Epic S21
Blld S11
Blld S12
Blld S13
Blld S14
Blld S21
Blld S22
DanceS11
DanceS12
DanceS13
DanceS14
DanceS21
Hip S11
Hip S12
Hip S13
Hip S14
Tec S11
Tec S12
Tec S13
Tec S14
Gene S11
Gene S12
Gene S13
Gene S14
Gene S15
Gene S16
Gene S17
Gene S18
Gene S19
Gene S21
Gene S22
Gene S23
Gene S24
Gene S25
OrchSnar
Live Tm1
Live Tm2
Live Tm3
StdioTm1
Instrument name
Live Snare 12
Live Snare 13
Live Snare 14
Live Snare 21
Studio Snare 11
Studio Snare 12
Studio Snare 13
Studio Snare 14
Studio Snare 21
Studio Snare 22
Standard Snare 11
Standard Snare 12
Standard Snare 13
Standard Snare 14
Standard Snare 21
Standard Snare 22
Funk Snare 11
Funk Snare 12
Funk Snare 13
Funk Snare 14
Epic Snare 11
Epic Snare 12
Epic Snare 13
Epic Snare 14
Epic Snare 21
Ballad Snare 11
Ballad Snare 12
Ballad Snare 13
Ballad Snare 14
Ballad Snare 21
Ballad Snare 22
Dance Snare 11
Dance Snare 12
Dance Snare 13
Dance Snare 14
Dance Snare 21
HipHop Snare 11
HipHop Snare 12
HipHop Snare 13
HipHop Snare 14
TechnoBeat Snare 11
TechnoBeat Snare 12
TechnoBeat Snare 13
TechnoBeat Snare 14
General Snare 11
General Snare 12
General Snare 13
General Snare 14
General Snare 15
General Snare 16
General Snare 17
General Snare 18
General Snare 19
General Snare 21
General Snare 22
General Snare 23
General Snare 24
General Snare 25
Orchestra Snare
Live TOM 1
Live TOM 2
Live TOM 3
Studio TOM 1
Reference
Reference
0
0, 63, 118
1 1, 34, 64, 119
2
2, 65, 120
3
3, 66, 121
4
4, 67,122
5
5, 32, 123
6
6, 69, 124
7
7, 38, 70
8 8, 39, 71 126
9
9, 72, 127
10 10, 37, 73
11
11, 74
12
12, 75
13 13, 35, 76
14
14, 77
15
15, 78
16
16, 79
17
17, 80
18
18, 81
19
19, 82
20
20, 83
21
21, 84
22
22, 85
23
23, 86
24
24, 87
25
25, 88
26
26, 89
27
27, 90
28
28, 91
29
29, 92
30
30, 93
31
31, 94
32
40, 95
33
41, 96
34
42, 97
35
43, 98
36
44, 99
37
45, 100
38
46, 101
39
47, 102
40
48, 103
41
49, 104
42
50, 105
43
51, 106
44 33, 52, 107
45 36, 53, 108
46
54, 109
47
55, 110
48
56, 111
49
57, 112
50
58, 113
51
59, 114
52
60, 115
53
61, 116
54
62, 117
Display
99
Display
Instrument name
126
127
128
129
130
131
132
133
134
135
136
137
138
139
140
141
142
143
144
145
146
147
148
149
150
151
152
153
154
155
156
157
158
159
160
161
162
163
164
165
166
167
168
169
170
171
172
173
174
175
176
177
178
179
180
181
182
183
184
185
186
187
188
StdioTm2
StdioTm3
StnddTm1
StnddTm2
StnddTm3
Funk Tm1
Funk Tm2
Funk Tm3
Epic Tm1
Epic Tm2
Epic Tm3
Blld Tm1
Blld Tm2
Blld Tm3
DanceTm1
DanceTm2
DanceTm3
Hip Tm1
Hip Tm2
Hip Tm3
Tec Tm1
Tec Tm2
Tec Tm3
GeneTm11
GeneTm12
GeneTm13
GeneTm21
GeneTm22
GeneTm23
GeneTm31
GeneTm32
GeneTm33
GeneTm41
GeneTm42
GeneTm43
GeneTm51
GeneTm52
GeneTm53
GeneTm61
GeneTm62
GeneTm63
GeneTm71
BrushTom
Orch Tom
DlyLivT1
DlyLivT2
DlyLivT3
DlyStuT1
DlyStuT2
DlyStuT3
DlyStdT1
DlyStdT2
DlyStdT3
DlyFnkT1
DlyFnkT2
DlyFnkT3
DlyEpcT1
DlyEpcT2
DlyEpcT3
DlyBldT1
DlyBldT2
DlyBldT3
DlyDncT1
Studio TOM 2
Studio TOM 3
Standard TOM 1
Standard TOM 2
Standard TOM 3
Funk TOM 1
Funk TOM 2
Funk TOM 3
Epic TOM 1
Epic TOM 2
Epic TOM 3
Ballad TOM 1
Ballad TOM 2
Ballad TOM 3
Dance TOM 1
Dance TOM 2
Dance TOM 3
HipHop TOM 1
HipHop TOM 2
HipHop TOM 3
TechnoBeat TOM 1
TechnoBeat TOM 2
TechnoBeat TOM 3
Genaral TOM 11
Genaral TOM 12
Genaral TOM 13
Genaral TOM 21
Genaral TOM 22
Genaral TOM 23
Genaral TOM 31
Genaral TOM 32
Genaral TOM 33
Genaral TOM 41
Genaral TOM 42
Genaral TOM 43
Genaral TOM 51
Genaral TOM 52
Genaral TOM 53
Genaral TOM 61
Genaral TOM 62
Genaral TOM 63
Genaral TOM 71
Brush TOM
Orchestra Tom
Delayed Live TOM 1
Delayed Live TOM 2
Delayed Live TOM 3
Delayed Studio TOM 1
Delayed Studio TOM 2
Delayed Studio TOM 3
Delayed Standard TOM 1
Delayed Standard TOM 2
Delayed Standard TOM 3
Delayed Funk TOM 1
Delayed Funk TOM 2
Delayed Funk TOM 3
Delayed Epic TOM 1
Delayed Epic TOM 2
Delayed Epic TOM 3
Delayed Ballad TOM 1
Delayed Ballad TOM 2
Delayed Ballad TOM 3
Delayed Dance TOM 1
100
No.
Display
Instrument name
No.
Display
189
190
191
192
193
194
195
196
197
198
199
200
201
202
203
204
205
206
207
208
209
210
211
212
213
214
215
216
217
218
219
220
221
222
223
224
225
226
227
228
229
230
231
232
233
234
235
236
237
238
239
240
241
242
243
244
245
246
247
248
249
250
251
DlyDncT2
DlyDncT3
DlyHipT1
DlyHipT2
DlyHipT3
DlyTecT1
DlyTecT2
DlyTecT3
Lrg CHH
LrgHfOHH
EpicC-HH
LiveC-HH
Live PHH
Live OHH
StnddCHH
StnddOHH
SmallCHH
SmallOHH
Hip CHH
Hip OHH
Tec CHH
Tec OHH
Gane CHH
Gane OHH
DanceCHH
DanceOHH
RmHedCHH
RmRimCHH
RoomOHH
GenHfOHH
Gene PHH
DancePHH
LargCrsh
SmlCrsh1
SmlCrsh2
SmlCrsh3
HipCrash
EleCrsh1
EleCrsh2
GaneCrsh
ChinsCym
RideCym1
RideCym2
RidBell1
RidBell2
LiveSpls
GenSpls1
GenSpls2
TecSplsh
HiBongo
LowBongo
BongoVb1
BongoVb2
MtHiCong
OpHiCong
LowConga
LivCong1
loosCng1
loosCng2
LivCong2
Doumbek 1
Doumbek 2
Doumbek 3
Delayed Dance TOM 2
Delayed Dance TOM 3
Delayed HipHop TOM 1
Delayed HipHop TOM 2
Delayed HipHop TOM 3
Delayed TechnoBeat TOM 1
Delayed TechnoBeat TOM 2
Delayed TechnoBeat TOM 3
Large Close HiHat
Large Half Open HiHat
Epric Close HiHat
Live Close HiHat
Live Pedal HiHat
Live Open HiHat
Standard Close HiHat
Standard Open HiHat
Small Close HiHat
Small Open HiHat
HipHop Close HiHat
HipHop Open HiHat
Techno Close HiHat
Techno Open HiHat
General Close HiHat
General Open HiHat
Dance Close HiHat
Dance Open HiHat
Room Head Close HiHat
Room Rim Close HiHat
Room Open HiHat
General Half Open HiHat
Genaral Pedal HiHat
Dance Pedal HiHat
Large Crash Cymbal
Small Crash Cymbal 1
Small Crash Cymbal 2
Small Crash Cymbal 3
HipHop Crash Cymbal
Electric Crash Cymbal 1
Electric Crash Cymbal 2
General Crash Cymbal
Chinese Cymbal
Ride Cymbal 1
Ride Cymbal 2
Ride Bell Cymbal 1
Ride Bell Cymbal 2
Live Splash Cymbal
General Splash Cymbal 1
General Splash Cymbal 2
Techno Splash Cymbal
High Bongo
Low Bongo
Bongo Reverb 1
Bongo Reverb 2
Mute High Conga
Open High Conga
Low Conga
Live Conga 1
Loose Conga 1
Loose Conga 2
Live Conga 1
Doumbek 1
Doumbek 2
Doumbek 3
252
253
254
255
256
257
258
259
260
261
262
263
264
265
266
267
268
269
270
271
272
273
274
275
276
277
278
279
280
281
282
283
284
285
286
287
288
289
290
291
292
293
294
295
296
297
298
299
300
301
302
303
304
305
306
307
308
309
310
311
312
313
314
Doumbek 4
Doumbek 5
Tabla 1
Tabla 2
Tabla 3
Tabla 4
Tabla 5
Timbale1
Timbale2
Timbale3
Timbale4
Tumba 1
Tumba 2
Tumba 3
HandTom
MtSurdo
OpSurdo
Claps1
Claps2
EleClpMn
EleClpSt
Castnet1
Castnet2
ShortStk
GeneStk
LiveStk
X-Stick
StkVerb1
StkVerb2
StkVerb3
Claves 1
Claves 2
Claves 3
EleClvs
LatnSel1
LatnSel2
WoodBlkH
WoodBlkL
Slap
BrushSlp
GuiroS1
GuiroS2
GuiroS3
GuiroL1
GuiroL2
GuiroL3
Vibslap1
Vibslap2
Vibslap3
Shaker 1
Shaker 2
Shaker 3
Cabasa
Marcas
RimBrush
Cuica Hi
Cuica Lo
Whistle1
Whistle2
Whistle3
CowBelLo
CowBelHi
GeneCwBl
Instrument name
Doumbek 4
Doumbek 5
Tabla 1
Tabla 2
Tabla 3
Tabla 4
Tabla 5
Timbale1
Timbale2
Timbale3
Timbale4
Tumba 1
Tumba 2
Tumba 3
Hand Tom
Mute Surdo
Open Surdo
Hand Claps 1
Hand Claps 2
Electric Claps Mono
Electric Claps Stereo
Castanet 1
Castanet 2
Short Stick
General Stick
Live Stick
Cross Stick
Stick Reverb 1
Stick Reverb 2
Stick Reverb 3
Claves 1
Claves 2
Claves 3
Electric Claves
Latin Sell 1
Latin Sell 2
Wood Block High
Wood Block Low
Slap
Brush Slap
Short Guiro 1
Short Guiro 2
Short Guiro 3
Long Guiro 1
Long Guiro 2
Long Guiro 3
Vibra Slap 1
Vibra Slap 2
Vibra Slap 3
Shaker 1
Shaker 2
Shaker 3
Cabasa
Maracas
Rim Brush
Cuica High
Cuica Low
Whistle1
Whistle2
Whistle3
CowBell Lo
CowBell Hi
General CowBell
No.
Display
315
316
317
318
319
320
321
322
323
324
325
326
327
328
329
330
331
332
333
334
335
336
337
338
339
340
341
342
343
344
345
346
347
348
349
350
351
352
353
354
355
356
357
358
359
360
361
362
363
364
365
366
367
368
369
370
371
372
373
374
375
376
EleCwBel
DancCwBl
EleSnap
SquarClk
StdioClk
WoodClk
MetroClk
Agogo 1
Agogo 2
Agogo 3
Agogo 4
MtTrangl
OpTrangl
Gamelan
MtrBell
SteelPip
Belltre1
Belltre2
Belltre3
JBell1
JBell2
JBell3
Tambrin1
Tambrin2
Tambrin3
Tambrin4
Tambrin5
Tambrin6
Ratchet1
Ratchet2
FngCym1
FngCym2
FngCym3
FngCym4
HighQ
Bass 1
Bass 2
Bass 3
Bass 4
Noise 1
Noise 2
Noise 3
NoiseSlp
Scratch1
Scratch2
Scratch3
RevCym1
RevCym2
RevCym3
RevSnr
RvrsKick
BreathDr
IndstriK
EleBomb
SineWave
Whirl
Sfx Clap
Sfx Slap
SfxTambr
SfxVerb1
SfxVerb2
SfxWhisl
Instrument name
Electric CowBell
Dance CowBell
Electric Snap
Square Click
Studio Click
Wood Click
Metronome Click
Agogo 1
Agogo 2
Agogo 3
Agogo 4
Muted Triangle
Open Triangle
Gamelan
Metronome Bell
Steel Pipe
Bell tree 1
Bell tree 2
Bell tree 3
Jingle Bell 1
Jingle Bell 2
Jingle Bell 3
Tambourine 1
Tambourine 2
Tambourine 3
Tambourine 4
Tambourine 5
Tambourine 6
Ratchet 1
Ratchet 2
Finger Cymbal 1
Finger Cymbal 2
Finger Cymbal 3
Finger Cymbal 4
HighQ
Bass 1
Bass 2
Bass 3
Bass 4
Noise 1
Noise 2
Noise 3
Noise Slap
Scratch 1
Scratch 2
Scratch 3
Reverse Cymbal 1
Reverse Cymbal 2
Reverse Cymbal 3
Reverse Snare
Reverse Kick
Breath Drum
Industrial Kick
Electric Bomb
SineWave
Whirl
Sfx Clap
Sfx Slap
Sfx Tambourine
Sfx Reverb 1
Sfx Reverb 2
Sfx Whistle
Reference
Reference
No.
101
Preset Patterns
* 0 - 99 is the user area.
Pattern
number
Song
Song
Song
Song
Song
102
*
*
*
*
*
*
*
*
*
*
*
*
*
Pattern
name
ROCK01
ROCK02
ROCK03
ROCK04
ROCK05
ROCK06
ROCK07
ROCK08
ROCK09
ROCK10
ROCK11
ROCK12
ROCK13
ROCK14
ROCK15
ROCK16
ROCK17
ROCK18
ROCK19
ROCK20
ROCK21
ROCK22
ROCK23
ROCK24
ROCK25
ROCK26
ROCK27
ROCK28T
ROCKs1VA
ROCKs1FA
ROCKs1VB
ROCKs1FB
ROCKs2VA
ROCKs2FA
ROCKs2VB
ROCKs2FB
ROCKs3VA
ROCKs3FA
ROCKs3VB
ROCKs3FB
ROCKs4VA
ROCKs4FA
ROCKs4VB
ROCKs4FB
ROCKs4BR
HRK 01
HRK 02
HRK 03
HRK 04
HRK 05
HRK 06
HRK 07
HRK s1VA
HRK s1FA
HRK s1VB
HRK s1FB
HRK s2VA
HRK s2FA
HRK s2VB
HRK s2FB
Recommended
tempo
120
140
107
136
120
115
117
117
120
136
112
140
120
120
120
116
92
96
96
112
137
103
120
99
132
96
120
120
120
120
120
120
110
110
110
110
124
124
124
124
130
130
130
130
130
130
113
96
120
121
136
120
120
120
120
120
115
115
115
115
DRUM A
4
4
4
11
1
22
13
0
11
22
22
1
0
20
19
20
0
21
0
21
16
0
6
3
1
33
21
1
3
3
3
3
3
3
3
3
16
16
16
16
5
5
5
5
5
0
4
0
16
0
0
0
1
1
1
1
11
11
11
11
Kit number
DRUM B
21
9
0
11
18
4
0
0
11
0
22
0
0
22
57
20
22
0
0
0
16
0
2
57
8
40
22
0
6
6
6
6
6
6
6
6
21
21
21
21
22
22
22
22
22
0
0
63
18
0
57
0
4
4
4
4
0
0
0
0
Pattern
number
BASS
1
3
1
53
23
1
23
0
9
1
4
4
15
3
4
0
0
4
4
4
9
0
5
5
53
4
1
2
14
14
14
24
1
1
1
1
9
9
9
9
1
1
1
1
1
0
2
2
1
0
0
0
1
1
1
1
14
14
14
14
Song
Song
Song
Song
Song
Song
Song
Song
Song
060
061
062
063
064
065
066
067
068
069
070
071
072
073
074
075
076
077
078
079
080
081
082
083
084
085
086
087
088
089
090
091
092
093
094
095
096
097
098
099
100
101
102
103
104
105
106
107
108
109
110
111
112
113
114
115
116
117
118
119
120
121
122
123
Fill
*
*
*
*
*
*
*
*
*
*
*
*
*
*
*
*
*
Pattern
name
MTL 01
MTL 02
MTL 03
MTL 04
MTL s1VA
MTL s1FA
MTL s1VB
MTL s1FB
THRS01
THRS02
PUNK01
PUNK02
TP s1VA
TP s1FA
TP s1VB
TP s1FB
FUS 01
FUS 02
FUS 03
FUS 04
FUS 05
FUS 06
FUS 07
FUS 08
FUS s1VA
FUS s1FA
FUS s1VB
FUS s1FB
FUS s2VA
FUS s2FA
FUS s2VB
FUS s2FB
FUS s3VA
FUS s3FA
FUS s3VB
FUS s3FB
INDTs1VA
INDTs1FA
INDTs1VB
INDTs1VC
POP 01
POP 02
POP 03
POP 04
POP 05
POP 06
POP 07
POP 08
POP 09
POP 10
POP 11
POP 12T
POP s1VA
POP s1FA
POP s1VB
POP s1FB
POP s2VA
POP s2FA
POP s2VB
POP s2FB
POP s3VA
POP s3FA
POP s3VB
POP s3FB
Recommended
tempo
98
103
112
150
128
128
128
128
135
186
160
158
129
129
129
129
124
120
113
105
120
120
120
94
110
110
110
110
124
124
124
124
118
118
118
118
134
134
134
134
120
142
108
120
112
80
100
117
120
120
120
140
126
126
126
126
134
134
134
134
120
120
120
120
DRUM A
0
25
1
0
3
3
3
3
4
0
15
22
3
3
3
3
26
3
1
6
3
22
40
18
24
24
24
3
9
9
9
9
4
4
4
4
8
8
8
0
22
16
5
22
2
57
2
34
22
22
22
5
20
20
20
20
3
3
3
3
22
22
22
22
Kit number
DRUM B
25
25
5
0
6
6
6
6
4
0
0
4
13
13
13
13
13
2
10
2
2
24
10
0
2
2
2
2
0
0
0
0
0
0
0
0
63
63
63
63
21
9
9
21
57
2
43
57
0
21
21
18
0
0
0
0
0
0
0
0
21
21
21
21
BASS
0
53
0
0
2
2
2
2
2
54
0
54
0
0
0
0
14
2
5
15
2
14
15
1
1
1
1
1
39
39
39
39
0
0
0
0
7
7
34
11
1
4
4
1
0
5
4
4
0
0
1
4
1
1
1
1
0
0
0
0
1
1
1
1
103
Reference
Reference
Song
000
001
002
003
004
005
006
007
008
009
010
011
012
013
014
015
016
017
018
019
020
021
022
023
024
025
026
027
028
029
030
031
032
033
034
035
036
037
038
039
040
041
042
043
044
045
046
047
048
049
050
051
052
053
054
055
056
057
058
059
Fill
* When you press the [ ]/[ ] keys in pattern mode, the unit jumps to the first
pattern in the section divided by bold lines.
* Songs in the same frame contain similar patterns, making it easy to create songs.
* Fill-in patterns are indicated by a * in the "Fill" column.
Pattern
number
Song
Song
Song
104
*
*
*
*
*
*
*
*
Pattern
name
RnB 01
RnB 02
RnB 03
RnB 04
RnB 05
RnB 06
RnB 07
RnB 08
RnB 09
RnB 10
RnB s1VA
RnB s1FA
RnB s1VB
RnB s1FB
FUNK01
FUNK02
FUNK03
FUNK04
FUNK05
FUNK06
FUNK07
FUNK08
FUNK09
FUNK10
FUNK11
FUNK12
FUNKs1VA
FUNKs1FA
FUNKs1VB
FUNKs1FB
FUNKs2VA
FUNKs2FA
FUNKs2VB
FUNKs2FB
HIP 01
HIP 02
HIP 03
HIP 04
HIP 05
HIP 06
HIP 07
HIP 08
HIP 09
HIP 10
HIP 11
HIP 12
HIP 13
HIP 14
HIP 15
HIP 16
HIP 17
HIP 18
HIP 19
HIP 20
HIP 21
HIP 22
HIP 23
HIP s1VA
HIP s1FA
HIP s1VB
HIP s1FB
HIP s1VC
HIP s1VD
Recommended
tempo
DRUM A
138
100
120
168
100
120
146
92
116
104
130
130
130
130
112
120
112
121
98
94
92
99
112
125
92
110
120
120
120
120
118
118
118
118
98
91
86
96
112
112
103
92
99
85
96
116
148
107
104
120
98
102
99
91
88
88
136
96
96
96
96
96
96
3
19
34
3
22
3
2
2
3
3
22
22
22
22
2
22
3
3
24
24
3
19
2
36
22
15
31
31
31
31
6
6
6
6
16
7
36
2
3
2
0
7
34
8
0
48
8
3
7
34
16
7
37
8
12
35
7
7
7
7
7
7
7
Kit number
DRUM B
9
57
0
22
57
0
7
55
4
22
0
0
49
0
3
0
5
34
13
57
49
52
3
58
5
55
22
22
22
22
2
2
2
2
36
50
34
57
7
7
53
51
57
10
58
0
2
57
35
22
36
6
21
35
11
37
53
2
2
2
2
2
2
Pattern
number
BASS
27
0
3
0
3
2
0
4
0
0
0
0
0
0
3
3
3
3
8
3
9
5
10
27
10
3
10
10
10
10
3
3
3
3
22
32
8
10
5
4
16
5
4
27
27
22
22
5
38
8
22
22
4
5
5
4
22
0
4
4
4
4
4
Song
Song
Song
Song
Song
Song
Song
187
188
189
190
191
192
193
194
195
196
197
198
199
200
201
202
203
204
205
206
207
208
209
210
211
212
213
214
215
216
217
218
219
220
221
222
223
224
225
226
227
228
229
230
231
232
233
234
235
236
237
238
239
240
241
242
243
Fill
*
*
*
*
*
*
*
*
*
*
*
Pattern
name
HIP s2VA
HIP s2VB
HIP s2FB
HIP s2VC
HIP s2VD
HIP s3VA
HIP s3VB
DANC01
DANC02
DANC03
DANC04
DANC05
DANC06
DANCs1VA
DANCs1FA
DANCs1VB
DANCs1FB
DANCs2VA
DANCs2FA
DANCs2VB
DANCs2FB
HOUS01
HOUS02
HOUS03
HOUS04
HOUSs1VA
HOUSs1FA
HOUSs1VB
HOUSs1FB
TECH01
TECH02
TECH03
TECH04
TECH05
TECH06
TECH07
TECH08
TECH09
TECH10
TECHs1VA
TECHs1FA
TECHs1VB
TECHs1FB
DnB 01
DnB 02
DnB 03
DnB 04
DnB 05
DnB 06
DnB s1VA
DnB s1FA
DnB s1VB
DnB s1FB
TRIP01
TRIP02
TRIP03
TRIP04
Recommended
tempo
110
110
110
110
110
112
112
111
102
120
180
103
120
110
110
110
110
120
120
120
120
120
126
120
120
120
120
120
120
148
125
125
160
164
118
140
136
119
127
135
135
135
135
163
150
150
144
154
154
150
150
150
150
120
75
101
97
DRUM A
12
12
12
12
12
2
2
8
3
8
34
33
6
37
37
37
37
7
7
7
7
34
34
37
31
34
34
8
8
7
8
8
36
7
6
34
34
25
48
8
8
8
8
42
3
34
7
12
24
7
7
47
47
34
45
47
63
Kit number
DRUM B
63
0
11
11
11
1
1
2
34
52
61
57
57
36
36
34
36
31
31
31
31
60
52
8
52
19
19
58
58
37
39
37
8
52
8
52
52
37
57
36
36
37
37
0
7
7
8
37
49
34
34
46
46
7
57
50
56
BASS
0
4
0
4
4
0
5
8
4
3
27
27
10
22
22
22
22
4
4
4
4
27
4
8
7
22
22
22
22
50
22
22
8
27
22
27
27
22
52
8
8
8
8
2
27
27
27
5
27
5
5
27
5
5
14
13
4
105
Reference
Reference
Song
124
125
126
127
128
129
130
131
132
133
134
135
136
137
138
139
140
141
142
143
144
145
146
147
148
149
150
151
152
153
154
155
156
157
158
159
160
161
162
163
164
165
166
167
168
169
170
171
172
173
174
175
176
177
178
179
180
181
182
183
184
185
186
Fill
Pattern
number
Song
Song
Song
Song
Song
106
*
*
*
*
*
*
*
*
*
*
*
*
Pattern
name
AMB 01
AMB 02
AMB 03
AMB 04
AMB s1VA
AMB s1FA
AMB s1VB
AMB s1FB
BALD01
BALD02
BALD03
BALD04
BALD05
BALD06
BALD07
BALD08
BALD09
BALD10
BALD11T
BALDs1VA
BALDs1FA
BALDs1VB
BALDs1FB
BLUS01
BLUS02
BLUS03
BLUS04
BLUS05
BLUS06
BLUSs1VA
BLUSs1FA
BLUSs1VB
BLUSs1FB
CNTR01
CNTR02
CNTR03
CNTR04
CNTRs1VA
CNTRs1FA
CNTRs1VB
CNTRs1FB
JAZZ01
JAZZ02
JAZZ03
JAZZ04
JAZZ05
JAZZ06
JAZZ07P
JAZZs1VA
JAZZs1FA
JAZZs1VB
JAZZs1FB
SHFL01
SHFL02
SHFL03
SHFL04
SHFL05
SHFLs1VA
SHFLs1Va
SHFLs1FA
SHFLs1VB
SHFLs1FB
Recommended
tempo
DRUM A
106
98
157
89
114
114
114
114
76
75
65
65
108
99
80
75
110
105
112
96
96
96
96
120
72
120
111
91
105
136
136
136
136
120
120
95
115
118
118
118
118
102
100
110
125
110
123
180
150
150
150
150
125
120
122
120
120
115
115
115
115
115
8
47
46
7
7
7
3
3
5
2
5
5
2
2
1
25
2
22
15
2
2
2
2
3
21
3
21
5
31
16
16
16
16
2
0
2
45
16
16
16
16
9
2
40
3
40
19
21
9
9
9
9
3
0
3
22
3
3
3
3
3
3
Kit number
DRUM B
50
52
7
0
57
57
7
36
22
55
55
19
1
3
3
0
3
21
0
3
3
3
3
0
2
0
28
6
21
0
0
0
0
0
2
0
0
0
0
0
0
21
58
7
61
27
59
9
21
21
21
21
0
22
19
21
21
6
6
6
6
6
Pattern
number
BASS
21
4
27
27
8
8
27
0
4
4
4
4
0
4
13
4
5
4
4
4
4
4
4
4
4
4
4
0
5
1
1
1
1
4
5
4
0
5
5
5
5
5
4
5
5
5
5
5
5
5
5
5
4
11
22
6
3
2
2
2
2
2
Song
Song
Song
Song
Song
306
307
308
309
310
311
312
313
314
315
316
317
318
319
320
321
322
323
324
325
326
327
328
329
330
331
332
333
334
335
336
337
338
339
340
341
342
343
344
345
346
347
348
349
350
351
352
353
354
355
356
357
Fill
*
*
*
*
*
*
*
*
*
*
Pattern
name
SKA 01
SKA 02
SKA 03
SKA 04
REGG01
REGG02
REGG03
REGG04
REGGs1VA
REGGs1FA
REGGs1VB
REGGs1FB
AFRO01
AFRO02
AFRO03
AFRO04
AFRO05
AFRO06
AFRO07
AFRO08
AFROs1VA
AFROs1FA
AFROs1VB
AFROs1FB
LATN01
LATN02
LATN03
LATN04
LATN05
LATN06
LATN07
LATN08
LATN09
LATN10
LATN11
LATN12
LATNs1VA
LATNs1FA
LATNs1VB
LATNs1FB
LATNs2VA
LATNs2FA
LATNs2VB
LATNs2FB
MidE01
MidE02
MidE03
MidE04T
MidEs1VA
MidEs1FA
MidEs1VB
MidEs1FB
Recommended
tempo
160
141
160
144
132
161
129
150
132
132
132
132
123
98
115
111
106
92
116
106
117
117
117
117
116
130
118
88
109
150
141
112
104
100
78
109
126
126
126
126
112
112
112
112
112
122
122
112
118
118
118
118
DRUM A
22
2
2
2
21
3
3
3
2
2
2
2
5
50
22
22
19
57
36
57
24
24
24
24
9
9
2
10
1
3
19
9
22
49
10
22
9
9
9
9
3
3
3
3
2
2
16
57
19
19
19
19
Kit number
DRUM B
60
3
57
0
57
0
50
0
1
1
4
1
49
56
56
49
10
56
56
56
10
10
10
10
21
21
10
10
57
2
10
3
10
57
56
56
0
0
0
21
0
0
0
0
56
56
49
2
57
57
50
50
BASS
4
0
14
4
4
4
5
4
4
4
0
4
4
13
3
5
3
4
27
5
6
6
6
6
4
4
4
4
4
5
4
4
4
5
4
0
4
4
4
4
5
5
5
5
4
5
4
5
4
4
4
4
Reference
Reference
Song
244
245
246
247
248
249
250
251
252
253
254
255
256
257
258
259
260
261
262
263
264
265
266
267
268
269
270
271
272
273
274
275
276
277
278
279
280
281
282
283
284
285
286
287
288
289
290
291
292
293
294
295
296
297
298
299
300
301
302
303
304
305
Fill
107
Pattern
number
358
359
360
361
362
363
364
365
366
367
368
369
370
371
372
373
374
375
376
377
378
379
380
381
382
383
384
385
386
387
388
389
390
391
392
393
394
395
396
397
398
399
Fill
Pattern
name
INTRO01
INTRO02
INTRO03
INTRO04
INTRO05
INTRO06
INTRO07
INTRO08
INTRO09
INTRO10
INTRO11
INTRO12
COUNT
INTRO14
INTRO15
INTRO16
INTRO17
INTRO18
INTRO19
ENDING01
ENDING02
ENDING03
ENDING04
ENDING05
ENDING06
ENDING07
Grv Arp1
Grv Arp2
Grv Drm1
Grv Drm2
Grv Drm3
Grv Drm4
Grv Perc
Grv Bas1
Grv Bas2
Grv Bas3
Grv Bas4
Grv Pad
GrvSnrFl
METRO4/4
METRO3/4
All Mute
Recommended
tempo
DRUM A
----------------------------------------------------PAD 2
PAD 4
PAD 1
PAD 5
PAD 7
PAD 8
PAD 6
PAD13
PAD 9
PAD12
PAD11
PAD10
PAD 3
-------
3
22
11
16
3
3
22
6
3
3
3
9
3
2
9
3
40
3
3
3
3
3
3
9
3
9
0
0
42
6
7
7
14
0
0
0
0
0
4
2
2
0
Kit number
DRUM B
6
21
21
21
21
21
21
0
21
21
21
21
21
1
21
0
21
21
0
0
21
21
0
21
21
21
0
0
40
0
0
8
0
0
0
0
0
0
0
55
55
0
Preset Song Pad Parameter Defaults
BASS
14
0
14
1
0
0
0
2
0
0
0
39
0
4
5
0
1
0
0
0
0
1
0
5
1
4
12
12
0
0
0
0
0
5
4
34
2
51
0
0
0
0
SONG00 ROCK tmpl
120BPM
KEY=E
SONG03 TRSHtmpl
129BPM
KEY=D
PAD No
PtnA
DrumB
Bass
Transp
Next
PAD No
PtnA
DrumB
Bass
Transp
Next
PAD 1
PAD 2
PAD 3
PAD 4
PAD 5
PAD 6
PAD 7
PAD 8
PAD 9
PAD10
PAD11
PAD12
PAD13
358
28
28
28
29
30
30
30
31
28
379
30
377
358
28
28
28
29
30
30
30
31
28
379
30
377
358
28
28
28
29
30
30
30
31
28
379
30
377
0
5
0
7
0
5
0
7
0
-2
0
-2
0
3
2
3
4
7 FILL
6
7
8
3 FILL
10
3 FILL
12
0
PAD 1
PAD 2
PAD 3
PAD 4
PAD 5
PAD 6
PAD 7
PAD 8
PAD 9
PAD10
PAD11
PAD12
PAD13
363
72
72
72
73
74
74
74
75
72
377
74
377
363
72
72
72
73
74
74
74
75
72
67
74
377
363
72
72
72
73
74
74
74
75
72
377
74
377
-2
3
-2
5
-2
1
-2
5
-2
-2
-2
-2
-2
3
2
3
4
7 FILL
6
7
8
3 FILL
12 FILL
11
12
0
SONG04
FUS tmpl
PAD No
PtnA
DrumB
Bass
Transp
Next
PAD No
PtnA
DrumB
Bass
Transp
Next
PAD 1
PAD 2
PAD 3
PAD 4
PAD 5
PAD 6
PAD 7
PAD 8
PAD 9
PAD10
PAD11
PAD12
PAD13
360
56
56
56
57
58
58
58
59
49
58
50
378
360
56
56
56
57
58
58
58
59
49
58
50
378
360
56
56
56
57
58
58
58
59
49
None
50
378
3
6
3
8
3
6
3
8
3
1
3
3
3
3
2
3
4
7 FILL
6
7
8
3 FILL
12
11 FILL
12
0
PAD 1
PAD 2
PAD 3
PAD 4
PAD 5
PAD 6
PAD 7
PAD 8
PAD 9
PAD10
PAD11
PAD12
PAD13
369
88
88
88
89
90
90
90
91
386
386
386
378
369
88
88
88
89
90
90
90
91
386
None
386
378
369
88
88
88
89
90
90
90
91
None
None
88
378
-4
-2
-4
-1
-4
11
8
1
-2
-4
-4
-4
-4
3
2
3
4
7 FILL
6
7
8
3 FILL
10
11
12
0
SONG01 HROKtmpl
115BPM
KEY=G
124BPM
SONG05
R&B tmpl
PAD No
PtnA
DrumB
Bass
Transp
Next
PAD No
PtnA
DrumB
Bass
Transp
Next
PAD 1
PAD 2
PAD 3
PAD 4
PAD 5
PAD 6
PAD 7
PAD 8
PAD 9
PAD10
PAD11
PAD12
PAD13
365
64
64
64
65
66
66
66
67
65
64
63
380
365
64
64
64
65
66
66
66
67
65
64
63
380
365
64
64
64
65
66
66
66
67
66
None
66
380
-2
3
-2
5
-2
1
-2
5
-2
-2
-2
-2
-2
3
2
3
4
7 FILL
6
7
8
3 FILL
12 FILL
11
12
0
PAD 1
PAD 2
PAD 3
PAD 4
PAD 5
PAD 6
PAD 7
PAD 8
PAD 9
PAD10
PAD11
PAD12
PAD13
364
134
134
134
135
136
136
136
137
131
137
131
380
364
134
134
134
135
136
136
136
137
131
67
131
380
364
134
134
134
135
136
136
136
137
131
None
131
380
-2
0
-2
1
-2
0
-2
3
-2
1
0
4
-2
3
2
3
4
7 FILL
6
7
8
3 FILL
10
3 FILL
12
0
SONG02 METLtmpl
128BPM
KEY=D
130BPM
KEY=C
KEY=D
Reference
Reference
108
109
MIDI Implementation
KEY=Bb
PAD No
PtnA
DrumB
Bass
Transp
Next
PAD No
PtnA
DrumB
Bass
Transp
Next
PAD 1
PAD 2
PAD 3
PAD 4
PAD 5
PAD 6
PAD 7
PAD 8
PAD 9
PAD10
PAD11
PAD12
PAD13
181
182
183
183
184
185
185
399
186
158
158
158
399
181
182
183
190
184
176
185
186
186
158
158
158
399
181
182
183
183
184
185
185
185
186
183
None
185
186
0
0
0
0
0
0
0
0
0
0
0
0
0
1
3 FILL
3
4
7 FILL
6
7
8
3 FILL
10
11
12
0
PAD 1
PAD 2
PAD 3
PAD 4
PAD 5
PAD 6
PAD 7
PAD 8
PAD 9
PAD10
PAD11
PAD12
PAD13
372
292
292
292
293
294
294
294
295
285
285
285
381
372
292
292
292
293
294
294
294
295
285
285
285
381
372
292
292
292
293
294
294
294
295
285
285
285
381
-6
-1
6
1
-6
-1
-6
1
-6
-1
6
1
6
3
2
3
4
7 FILL
6
7
8
3 FILL
10
11
12
0
135BPM
KEY=E
150BPM
HIP tmpl
SONG07 TECHtmpl
96BPM
SONG09 JAZZtmpl
SONG06
KEY=F#
SONG10 LATNtmpl
126BPM
KEY=E
PAD No
PtnA
DrumB
Bass
Transp
Next
PAD No
PtnA
DrumB
Bass
Transp
Next
PAD 1
PAD 2
PAD 3
PAD 4
PAD 5
PAD 6
PAD 7
PAD 8
PAD 9
PAD10
PAD11
PAD12
PAD13
221
219
226
226
227
221
228
228
229
224
224
224
223
221
221
226
228
227
226
228
234
229
222
224
219
223
221
221
226
226
227
226
228
228
229
224
224
217
223
2
2
2
2
2
2
2
2
2
2
2
-1
2
1
3
3
4
7 FILL
6
7
8
3 FILL
10
11
12
0
PAD 1
PAD 2
PAD 3
PAD 4
PAD 5
PAD 6
PAD 7
PAD 8
PAD 9
PAD10
PAD11
PAD12
PAD13
343
342
342
342
343
344
344
344
345
342
345
344
383
343
342
342
342
343
344
344
344
345
342
None
344
383
None
342
342
342
343
344
344
344
None
342
None
344
383
0
1
0
3
0
1
0
3
0
5
0
5
0
3
2
3
4
7 FILL
6
7
8
3 FILL
10
3 FILL
12
0
SONG08 METLtmpl
136BPM
KEY=A
SONG11 RAGGtmpl
135BPM
KEY=F#
PAD No
PtnA
DrumB
Bass
Transp
Next
PAD No
PtnA
DrumB
Bass
Transp
Next
PAD 1
PAD 2
PAD 3
PAD 4
PAD 5
PAD 6
PAD 7
PAD 8
PAD 9
PAD10
PAD11
PAD12
PAD13
361
273
273
273
274
275
275
275
276
44
44
44
377
361
273
273
273
274
275
275
275
276
44
44
44
377
361
273
273
273
274
275
275
275
276
44
44
44
377
5
10
5
0
5
10
5
0
5
10
5
0
5
3
2
3
4
7 FILL
6
7
8
3 FILL
10
11
12
0
PAD 1
PAD 2
PAD 3
PAD 4
PAD 5
PAD 6
PAD 7
PAD 8
PAD 9
PAD10
PAD11
PAD12
PAD13
371
314
314
314
315
316
316
316
317
314
312
316
378
371
314
314
314
315
316
316
316
317
314
312
316
378
371
314
314
314
315
316
316
316
317
314
None
316
378
0
3
0
5
0
3
0
5
0
-2
0
-2
0
3
2
3
4
7 FILL
6
7
8
3 FILL
10
3 FILL
12
0
1. Recognized Messages
Status
1st
2nd
Description
----------------------------------------------------------------------------------8nH
kk
vv
Note Off kk: note number
vv: velocity will be ignored
9nH
kk
00H
Note Off kk: note number
9nH
kk
vv
Note On
kk: note number
vv: velocity
BnH
07H
vv
Channel Volume
vv: volume value
BnH
10H
vv
Channel Panpot
vv: panpot value
BnH
11H
vv
Channel Expression vv: expression value
BnH
51H
vv
Channel JamPitch
vv: JamPitch value
BnH
52H
vv
Channel JamPan
vv: JamPan value
BnH
53H
vv
Channel JamSound
vv: JamSound value
BnH
78H
xx
All Sounds Off
BnH
79H
xx
Reset All Controllers
BnH
7BH
xx
All Notes Off
CnH
pp
Program Change
pp: program number
EnH
bl
bh
Pitch Bender
bh: bender value high
bl: bender value low will be ignored
F2H
sl
sh
Song Position Pointer shsl: song position
F3H
ss
Song Select ss: song number
F8H
Timing Clock
FAH
Start
FBH
Continue
FCH
Stop
2. Transmitted Messages
Status
1st
2nd
Description
----------------------------------------------------------------------------------8nH
kk
40H
Note Off kk: note number
9nH
kk
vv
Note On
kk: note number
vv: velocity
BnH
07H
vv
Channel Volume
vv: volume value
BnH
51H
vv
Channel JamPitch
vv: JamPitch value
BnH
52H
vv
Channel JamPan
vv: JamPan value
BnH
53H
vv
Channel JamSound
vv: JamSound value
BnH
78H
00H
All Sounds Off
BnH
79H
00H
Reset All Controllers
BnH
7BH
00H
All Notes Off
CnH
pp
Program Change
pp: program number
F2H
sl
sh
Song Position Pointer shsl: song position
F3H
ss
Song Select ss: song number
F8H
Timing Clock
FAH
Start
FBH
Continue
FCH
Stop
3. System Exclusive Messages
1) Identity Request : Recognized Only
Byte
Description
-------------------------------------------------------------------------F0H
System Exclusive Message Status
7EH
Universal System Exclusive non real time header
cc
MIDI Channel 00H - 0FH
06H
Sub ID #1 : General Information
01H
Sub ID #2 : Identity Request
F7H
End Of Exclusive
Reference
Reference
2) Identity Reply : Transmitted Only
Byte
Description
-------------------------------------------------------------------------F0H
System Exclusive Message Status
7EH
Universal System Exclusive non real time header
cc
MIDI Channel 00H - 0FH
06H
Sub ID #1 : General Information
110
111
02H
52H
26H
00H
00H
00H
rr
rr
rr
rr
F7H
Sub ID #2 : Identity Reply
Manufacturer : ZOOM Corporation
Machine ID low : RT-323
high :
Family ID low
Family ID high
Revision
1st digit in ASCII
Revision
10th digit in ASCII
Revision
100th digit in ASCII
Revision 1000th digit in ASCII
End Of Exclusive
MIDI Implementation Chart
[ MultiTrack Rhythm Machine
Model RhythmTrack RT-323
code
code
code
code
4) Sequence Dump
Byte
Description
-------------------------------------------------------------------------F0H
System Exclusive Message Status
52H
ZOOM Corporation
cc
MIDI Channel of DrumA , 00H-0FH
26H
RT-323
27H
Sequence Dump
data
Sequence data
F7H
EOX
Note: All sequence in user area will be cleared and replaced
when this message is received.
Empty patterns/songs should not be sent.
Transmitted
Recognized
Basic
Channel
Default
Changed
1-16,OFF
1-16,OFF
1-16,OFF
1-16,OFF
Mode
Default
Messages
Altered
3
x
******************
3
x
0-127
******************
0-127
True voice
Velocity Note ON
Note OFF
o
x
o
x
After
Touch
x
x
x
x
x
o
MS7bits
80
81
82
83
7
10
80
81
82
83
Volume
Panpot
JAM VOLUME
JAM PITCH
JAM PAN
SOUND CHANGE
Note
Number
Key's
Ch's
Pitch Bend
Control
Change
120
121
5) System Dump
Byte
Description
-------------------------------------------------------------------------F0H
System Exclusive Message Status
52H
ZOOM Corporation
cc
MIDI Channel of DrumA , 00H-0FH
26H
RT-323
28H
System Dump
data
System data
F7H
EOX
Prog
Change
o 0-127
******************
o 0-127
System Exclusive
o
o
System
o
o
x
o
o
x
o
o
o
o
x
x
x
x
x
o
o
x
True #
Song Pos
Song Sel
Tune
Common
4. Recordable Messages
112
System
Real Time
Aux
Messages
Notes
Clock
Commands
Local ON/OFF
All Notes OFF
Active Sense
Reset
Memorized
See Note1
All Sounds Off
Reset All Ctrls
No transmitted messages.
Mode 1 : OMNI ON, POLY
Mode 3 : OMNI OFF, POLY
Mode 2 : OMNI ON, MONO
Mode 4 : OMNI OFF, MONO
Reference
Reference
Status
1st
2nd
Description
----------------------------------------------------------------------------------8nH
kk
vv
Note Off kk: note number
vv: velocity will be ignored
9nH
kk
00H
Note Off kk: note number
9nH
kk
vv
Note On
kk: note number
vv: velocity
AnH
kk
vv
Polyphonic Key Pressure kk: note number
vv: pressure value
BnH
cc
vv
Control Change cc: control number 0-119
vv: control value
BnH
78H
xx
All Sounds Off
BnH
79H
xx
Reset All Controllers
BnH
7BH
xx
All Notes Off
CnH
pp
Program Change
pp: program number
DnH
vv
Channel Pressure
vv: pressure value
EnH
bh
bl
Pitch Bender
bh: bender value high
bl: bender value low will be ignored
Remarks
Function ...
3) All Kits Dump
Byte
Description
-------------------------------------------------------------------------F0H
System Exclusive Message Status
52H
ZOOM Corporation
cc
MIDI Channel of DrumA , 00H-0FH
26H
RT-323
26H
All Kit Dump
data
All kit data
F7H
EOX
]
Date :15.DEC.2000
MIDI Implementation Chart
Version :1.00
o : Yes
x : No
113
Index
■B■
"EXPORT"
"BARLEN" • • • • • • • • • • • • • • • • • • • • • • • • • • • • • • • • • 51
"BASKEY" • • • • • • • • • • • • • • • • • • • • • • • • • • • • • • • • • 38
"BASOUT" • • • • • • • • • • • • • • • • • • • • • • • • • • • • • • • • • 39
"BasPRG" • • • • • • • • • • • • • • • • • • • • • • • • • • • • • • • • • • 66
"BasPTN" • • • • • • • • • • • • • • • • • • • • • • • • • • • • • • • • • • 66
"Bass" • • • • • • • • • • • • • • • • • • • • • • • • • • • • • • • • • • • • • 58
Bass program • • • • • • • • • • • • • • • • • • • • • • • • • • • • • • 9, 37
Adjusting the bass output level • • • • • • • • • • • • • 39
Selecting the bass output • • • • • • • • • • • • • • • • • • • 39
Bass program tuning • • • • • • • • • • • • • • • • • • • • • • • 38
Bass program transposing • • • • • • • • • • • • • • • • • • 38
Switching • • • • • • • • • • • • • • • • • • • • • • • • • • • • • • • • • 37
"BasVOL" • • • • • • • • • • • • • • • • • • • • • • • • • • • • • • • • • • 66
Batteries • • • • • • • • • • • • • • • • • • • • • • • • • • • • • • • • • • • • • • 7
BPM • • • • • • • • • • • • • • • • • • • • • • • • • • • • • • • • • • • • • • • • 13
Bulk dump • • • • • • • • • • • • • • • • • • • • • • • • • • • • • • • • • • 90
■F■
■C■
"CARD?" • • • • • • • • • • • • • • • • • • • • • • • • • • • • • • • • • • • 74
"CLICK" • • • • • • • • • • • • • • • • • • • • • • • • • • • • • • • • • • • • 93
[CONTROL IN 1/2] jack • • • • • • • • • • • • • • • • • • 82, 83
"COPY?" • • • • • • • • • • • • • • • • • • • • • • • • • • • • 37, 49, 69
"COUNT" • • • • • • • • • • • • • • • • • • • • • • • • • • • • • • • • • • • 93
"CTRL" • • • • • • • • • • • • • • • • • • • • • • • • • • • • • • • • • • • • • 87
"CTRLIN" • • • • • • • • • • • • • • • • • • • • • • • • • • • • • • • • • • 82
■D■
"DELETE" • • • • • • • • • • • • • • • • • • • • • • • • • • • • • • • • • • 78
Demo mode • • • • • • • • • • • • • • • • • • • • • • • • • • • • • • • • • • • 8
Demo song • • • • • • • • • • • • • • • • • • • • • • • • • • • • • • • • • • • 8
"Dr B" • • • • • • • • • • • • • • • • • • • • • • • • • • • • • • • • • • • • • • 58
"DrAKIT" • • • • • • • • • • • • • • • • • • • • • • • • • • • • • • • • • • • 66
"DrAVOL" • • • • • • • • • • • • • • • • • • • • • • • • • • • • • • • • • • 66
"DrBKIT" • • • • • • • • • • • • • • • • • • • • • • • • • • • • • • • • • • • 66
"DrBPTN" • • • • • • • • • • • • • • • • • • • • • • • • • • • • • • • • • • 66
"DrBVOL" • • • • • • • • • • • • • • • • • • • • • • • • • • • • • • • • • • 66
Drum kit • • • • • • • • • • • • • • • • • • • • • • • • • • • • • • • • • • 9, 33
Changing the name of a user drum kit • • • • • • • 36
Copying • • • • • • • • • • • • • • • • • • • • • • • • • • • • • • • • • • 37
Copying pad settings • • • • • • • • • • • • • • • • • • • • • • 35
Editing pad settings • • • • • • • • • • • • • • • • • • • • • • • • 33
Preset drum kits • • • • • • • • • • • • • • • • • • • • • • • • • • • 33
Switching • • • • • • • • • • • • • • • • • • • • • • • • • • • • • • • • • 33
User drum kits • • • • • • • • • • • • • • • • • • • • • • • • • • • • 33
"DUMP" • • • • • • • • • • • • • • • • • • • • • • • • • • • • • • • • • • • • 90
■E■
114
80
Factory default settings, returning to • • • • • • • • • • •
Foot pedal • • • • • • • • • • • • • • • • • • • • • • • • • • • • • • • • • • •
Foot switch • • • • • • • • • • • • • • • • • • • • • • • • • • • • • • • • • •
"FORMAT" • • • • • • • • • • • • • • • • • • • • • • • • • • • • • • • • •
Formatting • • • • • • • • • • • • • • • • • • • • • • • • • • • • • • • • • • •
FP01 • • • • • • • • • • • • • • • • • • • • • • • • • • • • • • • • • • • • • • • •
FP02 • • • • • • • • • • • • • • • • • • • • • • • • • • • • • • • • • • • • • • • •
FS01 • • • • • • • • • • • • • • • • • • • • • • • • • • • • • • • • • • • • • • • •
94
82
83
74
74
82
82
83
"MIXLVL" • • • • • • • • • • • • • • • • • • • • • • • • • • • • • • • • • • 53
[MUTE] key • • • • • • • • • • • • • • • • • • • • • • • • • • 41, 56, 71
■N■
■G■
Groove play • • • • • • • • • • • • • • • • • • • • • • • • • • • • • • 16, 42
Groove play mode • • • • • • • • • • • • • • • • • • • • • 16, 42
"GROUP" • • • • • • • • • • • • • • • • • • • • • • • • • • • • • • • • • • 35
■I■
Import • • • • • • • • • • • • • • • • • • • • • • • • • • • • • • • • • • • 76, 79
"IMPORT" • • • • • • • • • • • • • • • • • • • • • • • • • • • • • • 76, 79
Initialization • • • • • • • • • • • • • • • • • • • • • • • • • • • • • • • • • 94
"INST LVL" • • • • • • • • • • • • • • • • • • • • • • • • • • • • • • • • • 34
"INST" • • • • • • • • • • • • • • • • • • • • • • • • • • • • • • • • • • • • • • 34
■J■
Jam function • • • • • • • • • • • • • • • • • • • • • • • • • • • • • • • • • 31
[JAM FUNCTION] key • • • • • • • • • • • • • • • • • • • • • • 31
JAM slider • • • • • • • • • • • • • • • • • • • • • • • • • • • • • • • • • • 31
■K■
"KEY" • • • • • • • • • • • • • • • • • • • • • • • • • • • • • • • • • • • • • • 72
[KIT] key • • • • • • • • • • • • • • • • • • • • • • • • • • • • • • • • • • • • 33
■L■
[LINE IN] jack • • • • • • • • • • • • • • • • • • • • • • • • • • • • • • • • 6
"LOAD" • • • • • • • • • • • • • • • • • • • • • • • • • • • • • • • • • • • • 76
Loading data • • • • • • • • • • • • • • • • • • • • • • • • • • • • • • • • • 76
■M■
"MEMORY" • • • • • • • • • • • • • • • • • • • • • • • • • • • • • • • • 94
Memory free, checking • • • • • • • • • • • • • • • • • • • • • • • 94
Metronome • • • • • • • • • • • • • • • • • • • • • • • • • • • • • • • • • • 93
MIDI • • • • • • • • • • • • • • • • • • • • • • • • • • • • • • • • • • • • • • • • 85
Changing drum kit program change • • • • • • • • • 89
Control change send setting • • • • • • • • • • • • • • • • 87
Enabling MIDI output of MIDI track • • • • • • • • 88
MIDI clock • • • • • • • • • • • • • • • • • • • • • • • • • • • • • • • 87
Program change for bass program • • • • • • • • • • 89
Program change send setting • • • • • • • • • • • • • • • • 87
Saving internal data on MIDI component • • • • 90
Setting MIDI channel for each track • • • • • • • • 86
Sync MIDI message send/receive setting • • • • • 87
MIDI track • • • • • • • • • • • • • • • • • • • • • • • • • • • • • • • 88, 91
"MIDI?" • • • • • • • • • • • • • • • • • • • • • • • • • • • • • • • • • • • • 85
"MIDICH" • • • • • • • • • • • • • • • • • • • • • • • • • • • • • • • • • • 86
"MIDITR" • • • • • • • • • • • • • • • • • • • • • • • • • • • • • • • • • • • 88
"NAME" • • • • • • • • • • • • • • • • • • • • • • • • • • • • 36, 54, 73
"Next" • • • • • • • • • • • • • • • • • • • • • • • • • • • • • • • • • • • • • • 58
■O■
Octave • • • • • • • • • • • • • • • • • • • • • • • • • • • • • • • • • • • • • • 31
"OUTPUT" • • • • • • • • • • • • • • • • • • • • • • • • • • • • • • • • • 34
[OUTPUT] dial • • • • • • • • • • • • • • • • • • • • • • • • • • • • • • • 7
■P■
Pad • • • • • • • • • • • • • • • • • • • • • • • • • • • • • • • • • • • • • • 10, 30
Adjusting the pad sensitivity • • • • • • • • • • • • • • • 32
Playing • • • • • • • • • • • • • • • • • • • • • • • • • • • • • • • • • • • 30
Pad bank • • • • • • • • • • • • • • • • • • • • • • • • • • • • • • • • • • • • 30
[PAD FUNCTION] key • • • • • • • • • • • • • • • • • • • 34, 57
"PAN" • • • • • • • • • • • • • • • • • • • • • • • • • • • • • • • • • • • • • • 34
Pattern • • • • • • • • • • • • • • • • • • • • • • • • • • • • • • • 10, 13, 40
Adjusting the swing • • • • • • • • • • • • • • • • • • • • • • • 51
Changing the length of a pattern • • • • • • • • • • • • 51
Changing the pattern beat • • • • • • • • • • • • • • • • • • 52
Changing the pattern name • • • • • • • • • • • • • • • • • 54
Changing the play timing • • • • • • • • • • • • • • • • • • 53
Changing the tempo of a pattern • • • • • • • • • • • • 41
Copying • • • • • • • • • • • • • • • • • • • • • • • • • • • • • • • • • • 49
Copying a specific measure • • • • • • • • • • • • • • • • 49
Deleting a track • • • • • • • • • • • • • • • • • • • • • • • • • • • 49
Deleting a user pattern • • • • • • • • • • • • • • • • • • • • • 49
Empty user pattern • • • • • • • • • • • • • • • • • • • • • • • • 14
Muting a track • • • • • • • • • • • • • • • • • • • • • • • • • • • • 41
Pattern mode • • • • • • • • • • • • • • • • • • • • • • • • • • • • • • 10
Playback • • • • • • • • • • • • • • • • • • • • • • • • • • • • • • • • • • 40
Preset patterns • • • • • • • • • • • • • • • • • • • • • • • • • 13, 40
Real-time input • • • • • • • • • • • • • • • • • • • • • • • • • • • 43
Setting the quantize value • • • • • • • • • • • • • • • • • • 51
Setting the volume balance for each track • • • 53
Step input • • • • • • • • • • • • • • • • • • • • • • • • • • • • • • • • • 46
User pattern • • • • • • • • • • • • • • • • • • • • • • • • • • • 13, 40
"Pattern" • • • • • • • • • • • • • • • • • • • • • • • • • • • • • • • • • • • 66
"PCBASS" • • • • • • • • • • • • • • • • • • • • • • • • • • • • • • • • • 89
"PCDRUM" • • • • • • • • • • • • • • • • • • • • • • • • • • • • • • • • 89
"PITCH" • • • • • • • • • • • • • • • • • • • • • • • • • • • • • • • • • • • • 34
Precount • • • • • • • • • • • • • • • • • • • • • • • • • • • • • • • • • • • • • 93
"PRG" • • • • • • • • • • • • • • • • • • • • • • • • • • • • • • • • • • • • • • 87
PS-02 • • • • • • • • • • • • • • • • • • • • • • • • • • • • • • • • • • • • • • • 79
"PS-02?" • • • • • • • • • • • • • • • • • • • • • • • • • • • • • • • • • • • 79
"Ptn" • • • • • • • • • • • • • • • • • • • • • • • • • • • • • • • • • • • • • • • 58
■Q■
Quantize • • • • • • • • • • • • • • • • • • • • • • • • • • • • • • • • • • • • 50
"QUNTIZ" • • • • • • • • • • • • • • • • • • • • • • • • • • • • • • • • • • 50
■R■
"REPEAT"
••••••••••••••••••••••••••••••••••
■S■
Save • • • • • • • • • • • • • • • • • • • • • • • • • • • • • • • • • • • • • • • • 73
"SAVE" • • • • • • • • • • • • • • • • • • • • • • • • • • • • • • • • • • • • • 75
"SENS" • • • • • • • • • • • • • • • • • • • • • • • • • • • • • • • • • • • • • 32
Shift • • • • • • • • • • • • • • • • • • • • • • • • • • • • • • • • • • • • • • • • 53
"SHIFT" • • • • • • • • • • • • • • • • • • • • • • • • • • • • • • • • • • • • 53
SmartMedia • • • • • • • • • • • • • • • • • • • • • • • • • • • • • • • 5, 74
Deleting data from SmartMedia • • • • • • • • • • • • 78
Formatting a SmartMedia card • • • • • • • • • • • • • 74
Import/export of PS-02 data on
SmartMedia card • • • • • • • • • • • • • • • • • • • • • • • • 79
Loading data from SmartMedia • • • • • • • • • • • • • 76
Partial import of SmartMedia data • • • • • • • • • • 76
Saving data to SmartMedia • • • • • • • • • • • • • • • • • 75
Song • • • • • • • • • • • • • • • • • • • • • • • • • • • • • • • • • • • • • 18, 55
Blank song • • • • • • • • • • • • • • • • • • • • • • • • • • • • • • • 18
Changing the song name • • • • • • • • • • • • • • • • • • • 73
Copying • • • • • • • • • • • • • • • • • • • • • • • • • • • • • • • • • • 69
Copying specific measures • • • • • • • • • • • • • • • • • 68
Deleting • • • • • • • • • • • • • • • • • • • • • • • • • • • • • • • • • • 68
Event • • • • • • • • • • • • • • • • • • • • • • • • • • • • • • • • • 21, 66
Playing • • • • • • • • • • • • • • • • • • • • • • • • • • • • • • • • • • • 55
Real-time input • • • • • • • • • • • • • • • • • • • • • • • • 28, 56
Setting the quantize value • • • • • • • • • • • • • • • • • • 72
Setting the song tempo • • • • • • • • • • • • • • • • • • • • • 55
Song mode • • • • • • • • • • • • • • • • • • • • • • • • • • • • 18, 55
Song repeat setting • • • • • • • • • • • • • • • • • • • • • • • • 72
Step input • • • • • • • • • • • • • • • • • • • • • • • • • • • • • 18, 60
Transposing • • • • • • • • • • • • • • • • • • • • • • • • • • • • • • • 72
Song track • • • • • • • • • • • • • • • • • • • • • • • • • • • • • • • • • • • 69
Deleting • • • • • • • • • • • • • • • • • • • • • • • • • • • • • • • • • • 71
Drum/bass real-time input • • • • • • • • • • • • • • • • • • 70
[SONG TRACK] key • • • • • • • • • • • • • • • • • • • • • 70, 92
[SUB OUT 1/2] jack • • • • • • • • • • • • • • • • • • • • • • 34, 39
Swing • • • • • • • • • • • • • • • • • • • • • • • • • • • • • • • • • • • • • • • 51
"SWING" • • • • • • • • • • • • • • • • • • • • • • • • • • • • • • • • • • • 51
"SYNC" • • • • • • • • • • • • • • • • • • • • • • • • • • • • • • • • • • • • 87
Sync playback • • • • • • • • • • • • • • • • • • • • • • • • • • • • • • • 87
■T■
Tap tempo • • • • • • • • • • • • • • • • • • • • • • • • • • • • • • • • • • • 41
"Tempo" • • • • • • • • • • • • • • • • • • • • • • • • • • • • • • • • • • • 66
[TEMPO] key • • • • • • • • • • • • • • • • • • • • • • • • 13, 41, 55
Tick • • • • • • • • • • • • • • • • • • • • • • • • • • • • • • • • • • • • • 23, 50
"TIMSIG" • • • • • • • • • • • • • • • • • • • • • • • • • • • • • • • • • • • 52
Track • • • • • • • • • • • • • • • • • • • • • • • • • • • • • • • • • • • • • • • 13
Bass track • • • • • • • • • • • • • • • • • • • • • • • • • • • • • • • • 13
Drum A track • • • • • • • • • • • • • • • • • • • • • • • • • • • • • 13
Drum B track • • • • • • • • • • • • • • • • • • • • • • • • • • • • • 13
"Transp" • • • • • • • • • • • • • • • • • • • • • • • • • • • • • • • • • • • 58
Transpose • • • • • • • • • • • • • • • • • • • • • • • • • • • • • • • • 21, 64
"Transps" • • • • • • • • • • • • • • • • • • • • • • • • • • • • • • • • • • 66
Tuning • • • • • • • • • • • • • • • • • • • • • • • • • • • • • • • • • • • • • • 38
"TUNING" • • • • • • • • • • • • • • • • • • • • • • • • • • • • • • • • • • 38
72
115
Index
Index
Error messages
"CARD FULL" • • • • • • • • • • • • • • • • • • • • • • • • • • • 95
"ERROR" • • • • • • • • • • • • • • • • • • • • • • • • • • • • • • • • 76
"FULL" • • • • • • • • • • • • • • • • • • • • • • • • • • • • • • • • • • 95
"NOCARD" • • • • • • • • • • • • • • • • • • • • • • • • • • • • • • 95
"WRITE PROTECT" • • • • • • • • • • • • • • • • • • • • • 95
Event • • • • • • • • • • • • • • • • • • • • • • • • • • • • • • • • • • • • 21, 66
Export • • • • • • • • • • • • • • • • • • • • • • • • • • • • • • • • • • • • • • • 79
•••••••••••••••••••••••••••••••••
ZOOM CORPORATION
NOAH Bldg., 2-10-2, Miyanishi-cho, Fuchu-shi, Tokyo 183-0022, Japan
PHONE: +81-42-369-7116 FAX: +81-42-369-7115
Web Site: http://www.zoom.co.jp
Printed in Japan RT-323 - 5000-2