1
iii
100%
Recycled Paper
the possibilities
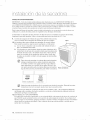
Thank yob for ourchasing this Samsung product.
To receive more comu_e_e serwce or accessor
www.samsung.com/register
paris, p_ease register your product at or comac_
1-800-SAMSUNG
(726-78641
DV400-03170A
EN HUDSON-PJT
vl.indd
1
2012-01-20
N 1:58:08
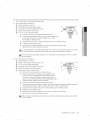
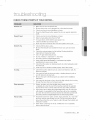
featLAres
.
Extra Large Capacity
Ultra drying capabilities are at your fingertips! Now you can dry extra-large loads. Our
ultralarge 7.3cu.ft(DV456*),
7.2cu.ft(DV422*,DV400*)
capacity dryer circulates more air
through your clothes, drying them faster, for a wrinkle-free result.
.
Sanitize Cycle
This cycle sanitizes garments by infusing high temperature heat deep into the fabric during
the drying cycle and eliminating 99.9% of certain bacteria.Use this cycle for clothing,
bedding, towels, or other items needing sanitization. The Sanitize cycle is certified by NSF
International, an independent third-party testing and certification organization.
N
_S_
.
[
Sat sl_Zlit,°n
Piertfhler_l
D'r_e rl f
NSF Protocol
P154
Various Drying Cycles & Fuzzy Logic Algorithm
Simply turn the Jog Dial to select one of the 11 (DV456"), 9(DV422*,DV40@)
automatic drying
cycles, including normal, heavy duty and bedding, or let the Fuzzy Logic Control measure the
degree of dampness and automaticall\
set the drying time. Precision drying has never been
easier than with Samsung.
.
Time Saving
Our cycles are designed with you in mind. All our dryers are designed to dry your clothes in
less time.., just 42 minutes! Giving you time for more important things in life.
.
Energy Saving
Samsung
dryers are super energy efficient. You can dry up to 3.09 pounds
of laundry with
1 kWh. Also, both the large capacity and Fuzzy Logic Control save energy by automatically
drying your clothes the most efficient way.
2
DV400-03170A
Features
EN HUDSON-PJT
vl.indd
Sec9:2
2012-01-20
[1_1:58:26
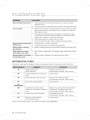
7. Easy Reversible Door
The direction
of our reversible door can be changed
easily.
8. 4-way Vent (electric model only)
You can install the exhaust vent in the following
four (4) positions:
back, either side, bottom.
9. Smart Care [DV456 ONLY]
This function diagnoses problems by itself.
You don't need to call a service engineer or try to find the user manual whenever the product
has a problem, as Smart appliances let you know how to deal via the problem through your
smart phone.
Feat ur'es 3
DV400-03170A
EN HUDSON-PJT
vl.indd
Sec9:3
2012-01-20
[1_1:58:26
n trLA tion
J
Congratulations on your new Samsung Dryer. This manual contains valuable
information on the installation, use, and care of your appliance. Please take the
time to read this manual to take full advantage of your dryer's many benefits and
features.
WHAT YOU NEED TO KNOW ABOUT
SAFETY INSTRUCTIONS
Warnings and Important Safety Instructions in this manual do not cover all possible conditions and
situations that may occur. It is your responsibility to use common sense, caution, and care when installing,
maintaining, or operating your dryer.
Always contact
your manufacturer
IMPORTANT
about problems
SAFETY SYMBOLS
or conditions
you do not understand.
AND PRECAUTIONS
What the icons and signs in this user manual mean:
Hazards or unsafe practices
or death.
z£
Follow the information
WARNING
explosion
that may result in severe
injury
in this manual to minimize the risk of fire or
or to prevent property
damage,
personal injury, or death.
Do not store or use gasoline or other flammable
this or any other appliance.
Z_
CAUTION
personal
Hazards or unsafe practices
property damage.
vapors and liquids near
that may result in minor
personal
injury
or
Do NOT attempt.
_}
Do NOT disassemble.
[_
Do NOT touch.
[_
Follow directions
explicitly.
Unplug the power plug from the wall socket.
Make sure the machine
is grounded
to prevent electric shock.
Call the service center for help.
Note
These
warning
Please
After
follow
reading
signs
them
are here to prevent
injury to you and others.
explicitly.
this section,
Read all instructions
keep it in a safe place for future
reference.
before using the appliance.
SAVE THESE INSTRUCTIONS
4
DV400-03170A
safety
ir_structior_s
EN HUDSON-PJT
vl.indd
Secll:4
2012-01-20
M 1:58:26
.......
WARNING:
To reduce the risk of fire, electric shock, or injury to persons when using your
appliance, follow basic precautions,
including the following:
1. Read all instructions
before using this appliance.
2. Do not dry articles that have been previously cleaned in, washed in, soaked in,
or spotted with gasoline, dry-cleaning solvents, or other flammable or explosive
substances,
as they give off vapors that could ignite or explode.
3. Do not use the dryer to dry clothes which have traces of any flammable substance, such
as vegetable oil, cooking oil, machine oil, flammable chemicals, thinner, etc., or anything
containing wax or chemicals, such as mops and cleaning cloths. Flammable substances
may cause the fabric to catch fire by itself.
4. Do not store or use gasoline or other flammable
appliance.
vapors and liquids near this or any other
5. Do not allow children to play on or in the appliance. Close supervision
necessary when the appliance is used near children.
6. Before the appliance
drying compartment.
is removed
7. Do not reach into the appliance
from service or discarded,
remove the door to the
if the drum is moving.
8. Do not install or store this appliance
9. Do not tamper
of children is
where it will be exposed
to the weather.
with controls.
10.Do not repair or replace any part of the appliance or attempt any servicing unless
specifically recommended
in the user-maintenance
instructions or in published userrepair instructions that you understand and have the skills to carry out.
11 .Do not use fabric softeners or products to eliminate static unless recommended
manufacturer of the fabric softener or product.
by the
12.Clean the lint screen before or after each load.
13.Do not use heat to dry articles containing
materials.
foam rubber or similarly textured
14.Keep area around the exhaust opening and adjacent
accumulation
of lint, dust, and dirt.
15.The interior of the appliance
qualified service personnel.
and exhaust duct should
surrounding
rubber-like
areas free from the
be cleaned
periodically
by
16.Do not place items exposed to cooking oils in your dryer. Items contaminated
with
cooking oils may contribute to a chemical reaction that could cause a load to catch fire.
SAVE THESE INSTRUCTIONS
safety
DV400-03170A
EN HUDSON-PJT
vl.indd
Secll:5
instructior_s
2012-01-20
N 1:58:26
J
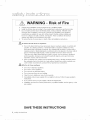
WARNING - Risk of Fire
•
Clothes dryer installation must be performed by a qualified installer.
Install the clothes dryer according to the manufacturer's
instructions and local codes.
Do not install a clothes dryer with flexible plastic venting materials. If flexible metal
(foil type) duct is installed, it must be of a specific type identified by the appliance
manufacturer as suitable for use with clothes dryers. Flexible venting materials are
known to collapse, be easily crushed, and trap lint. These conditions will obstruct
clothes dryer airflow and increase the risk of fire.
To reduce the risk of severe injury or death, follow all installation instructions.
reduce
®
the risk of fire or explosion:
Do not dry items that have been previously cleaned, washed, soaked, or spotted with
gasoline, dry cleaning solvents, or other flammable or explosive substances. They
emit vapors that could ignite or explode. Any material that has been in contact with a
cleaning solvent or flammable liquids or solids should not be placed in the dryer until all
traces of these flammable liquids or solids and their fumes have been removed.
There are many highly flammable items used in homes, such as acetone, denatured
alcohol, gasoline, kerosene, some liquid household cleaners, some spot removers,
turpentine, waxes, and wax removers
Items containing foam rubber (may be labeled latex foam) or similarly textured rubberlike materials must not be dried on a heat setting. Heated foam rubber materials can,
under certain circumstances,
produce fire by spontaneous
combustion.
w_.,._ What
to do if you smell
gas:
•
Do not try to light any appliance.
•
Do not turn on the appliance.
Do not touch
any electrical
switch.
Do not use any phone in your building.
•
Clear the room, building or area of all occupants.
Immediately
instructions.
call your gas supplier from a neighbor's
•
If you cannot reach your gas supplier,
•
Installation and service must be performed
gas supplier.
phone. Follow the gas supplier's
call the fire department.
by a qualified installer, service agency, or the
SAVE THESE INSTRUCTIONS
safety
DV400-03170A
instructior_s
EN HUDSON-PJT
vl.indd
Secll:6
2012-01-20
N 1:58:26
Do not allow children or pets to play on, in, or in front of the appliance.
necessary when the appliance is used near children and pets.
Close supervision
is
Before discarding or removing your dryer from service, remove the door to the drying
compartment
to prevent children or animals from becoming trapped inside.
Do not reach into the appliance
when the drum is moving.
Do not install or store this appliance
Do not tamper
where it will be exposed
to the weather.
with controls.
Do not repair, replace, or attempt to service any part of the appliance unless specifically
instructed to in the user-repair instructions and you have the understanding
and skills to
carry out the procedure.
Do not use fabric softeners or products to eliminate static unless the softener or product
recommended
for dryer use by the manufacturer of the fabric softener or product.
is
Clean the lint screen before or after each load.
Keep the area around the exhaust opening and surrounding
areas free from lint, dust, and dirt.
The interior of the dryer and exhaust duct should be cleaned
personnel.
periodically
by qualified
service
This appliance must be properly grounded. Never plug the power cord into a receptacle
that is not grounded adequately and in accordance with local and national codes. See
installation instructions for information about grounding this appliance.
Do not sit on top of the dryer.
Z_
.......
Z_
Ensure pockets are free from small, irregularly shaped hard objects,
coins, knives, pins, etc. These objects could damage your dryer.
Do not wash clothing
with large buckles,
Gas leaks may occur
in your system,
buttons,
foreign material, etc. ie.
or other heavy metal or solid objects.
resulting in a dangerous
situation.
WARNIN_
Gas leaks may not be detected
Gas suppliers
recommend
by smell alone.
you purchase
Install and use in accordance
and install a UL-approved
with the manufacturer's
gas detector.
instructions.
Do not place items in your dryer that have been spotted or soaked with vegetable oil or cooking
oil. Even after being washed, these items may contain significant amounts of these oils.
Residual oil on clothing can ignite spontaneoulsy.
The potential for spontaneous
combustion
increases when items containing vegetable oil or cooking oil are exposed to
heat. Heat sources such as your dryer can warm these items, allowing an oxidation reaction
in the oil to occur. Oxidation creates heat. If this heat cannot escape, the items can become
hot enough to catch fire. Piling, stacking, or storing these kinds of items may prevent heat
from escaping and can create a fire hazard.
All washed and unwashed fabrics that contain vegetable oil or cooking oil can be
dangerous. Washing these items in hot water with extra detergent will reduce, but not
eliminate, the hazard. Always use the Cool Down cycle for these items to reduce their
temperature.
Never remove these items from the dryer hot or interrupt the drying cycle until
the items have run through the Cool Down cycle. Never pile or stack these items when they
are hot.
SAVE THESE INSTRUCTIONS
safety instructions
DV400-03170A
EN HUDSON-PJT
vl.indd
Secll:7
2012-01-20
7
N 1:58:26
cont nt,s
iNSTALLiNG
OPERATING
YOUR DRYER
iNSTRUCTiONS,
TIPS
OPERATING INSTRUCTIONS, TiPS
OPERATING
INSTRUCTIONS,
TIPS
CARE AND CLEANING
SPECIAL LAUNDRY TiPS
TROUBLESHOOTING
APPENDIX
8
DV400-03170A
9
Unpacking
9
Basic
your dryer
10
Ducting
11
11
Important to installer
Location considerations
11
Alcove
or closet
12
Mobile
home installation
12
Exhausting
13
13
Gas requirements
Commonwealth
of Massachusetts
installation
instructions
14
Electrical
14
Grounding
15
Electrical
16
19
Installation
- General procedure
Final installation
checklist
20
21
Dryer Exhaust
Door Reversal
23
Overview
26
Child
26
Drum Light (Only DV456")
26
Signal
27
My Cycle
28
Clean the lint filter
28
Load the dryer properly
28
Getting
started
29
Control
Panel
29
Tumbler
29
Powder
29
Dryer Exterior
29
Dryer Exhaust
30
Special
31
32
Check these points
Information
codes
33
Fabric
34
Protecting
the environment
34
Declaration
of conformity
34
Specifications
35
Cycle
requirments
requirements
installation
requirements
connections
Tips
of the control
panel
lock
Coated
Tumbler
System
laundry
tips
if your dryer...
care chart
chart
Contents
EN HUDSON-PJT
vl.indd
Sec2:8
2012-01-20
DO1:58:26
UNPACKING
YOUR DRYER
Unpack your Dryer and inspect it for shipping damage. Make sure you have received all of the items
shown below. If your Dryer was damaged during shipping, or you do not have all of the items, contact
1-800-SAMSUNG
(726-7864).
To prevent personal
injury or strain, wear protective
Packing materials can be dangerous
etc.) well out of childrens' reach
.......
gloves whenever
to children.
lifting or carrying the dryer.
Keep all packing
material (plastic bags,
polystyrene,
panel
[BACK]
Cover
i
Filter
IFrame
Duct Exhaust
Front
Tools needed
Pliers
Cutting knife
Pipe wrench (gas only)
Level
Phillips Screwdriver
Duct tape
Wrench
BASIC REQUIRMENTS
Make sure you have everything
*
A GROUNDED
ELECTRICAL
necessary
OUTLET
for proper installation
is required.
A POWER CORD for electric dryers (except
See Electrical Requirements.
in Canada).
GAS LINES (if installing a gas dryer). The gas lines must meet national and local codes.
EXHAUST
SYSTEM
- must be rigid metal or flexible stiff-walled
metal exhaust
ducting.
installing your dryer
DV400-03170A
EN
HUDSON-PJT
vl.illdd
Sec3:9
2012-01-20
9
HI 1:58:26
DUCTING
REQUIREMENTS
Use a 4-inch (10.2 cm) diameter
Do not use a smaller duct.
rigid aluminum
Ducts larger than 4 inches (10.2 cm) in diameter
Lint accumulation
should be cleaned regularly.
or rigid galvanized
steel duct.
can cause increased
lint accumulation.
If a flexible metal duct must be used, use the type with a stiff sheet metal wall. Do not use a flexible duct
with a thin foil wall. Serious blockage can result if the flexible metal duct is bent too sharply.
Never install any type of flexible duct in walls, ceilings,
Keep the exhaust duct as straight
or other concealed
spaces.
and short as possible.
Secure joints with duct tape. Do not use screws.
Plastic flexible duct can kink, sag, be punctured,
operation.
Exhaust systems
may collect lint.
longer than recommended
reduce airflow, extend drying times, and affect dryer
can extend drying times, affect machine
operation,
The exhaust duct should end with an exhaust hood with a swing-out damper to prevent
the entry of wildlife. Never use an exhaust hood with a magnetic damper.
The hood should have at least 12 inches (30.5 cm) of clearance between
the ground or other obstruction. The hood opening should point down.
Never install a screen over the exhaust outlet.
To avoid lint buildup,
or porch.
do not exhaust the dryer directly into a window
the bottom
Check frequently
back drafts and
of the hood and
well. Do not exhaust
If exhaust ductwork must run through an unheated area, the duct should be insulated
down towards the exhaust hood to reduce condensation
and lint buildup.
Inspect and clean the interior of the exhaust system
cleaning.
and
under a house
and slope slightly
at least once a year. Unplug the power cord before
to be sure the exhaust hood damper
opens and closes freely.
Check once per month, and clean at least one time per year. Note: If clothes are not getting dry, then
check ducting for obstructions.
Do not exhaust dryer into any wall, ceiling, crawl space, or concealed space of a building, gas vent, or
any other common duct or chimney. This could create a fire hazard from lint expelled by the dryer.
Weather
Recommended
Hood Type
Use only for Sh0rt-run
4" (10.2 cm)
No.
*
10
DV400-03170A
of 90 ° elbows
_
Rigid
Metallic
inStallation
2.5" (6.4 cm)
Flexible"
Rigid
41 ft. (12.4 m)
74ft.
i
68 ft. (20.7 m)
37 ft. (11.2 m)
62 ft. (18.9 m)
29 ft. (8.8 m)
2
57ft.
(17.4 m)
33 ft. (10.1 m)
51 ft. (15.5 m)
25 ft. (7.6 m)
47ft.
(14.3 m)
41 ft. (12.5 m)
21 ft. (6.5 m)
Do not use non-metallic
flexible
(8.8 m)
33ft.
Flexible*
80 ft. (24.4 m)
29ft.
(22.6 m)
' Metallic
0
(10.1 m)
duct.
installing your dryer
EN HUDSON-PJT
vl.indd
Sec3:10
2012-01-20
N 1:58:28
If the new dryer is being installed into an existing exhaust system, you must
make sure:
The exhaust
system meets all local, state, and national codes.
That a flexible
plastic duct is not used.
To Inspect and clean all lint buildup from inside the existing duct.
The duct is not kinked or crushed.
The exhaust
hood damper opens and closes freely.
The static pressure
less than 0.
in any exhaust system must not exceed 0.83 inches of water column,
or be
This can be measured with the dryer running with a manometer at the point where the exhaust
duct connects to the dryer. A no-heat setting should be used. The dryer tumbler should be
empty and the lint filter clean.
IM PORTANT TO INSTALLER
Please read the following
for future reference.
Z_
WARNINe
instructions
carefully
Remove the door from all discarded
LOCATION
before installing the dryer. These instructions
appliances
to avoid the danger
should be kept
of a child suffocating,
CONSIDERATIONS
Locate the dryer where there is enough space at the front for loading the dryer, and enough space behind
for the exhaust system. This dryer is factory-ready for rear exhaust. To exhaust out the bottom or the right
or the left (electric model only), use the accessory exhaust kit (sold separately). Instructions are included
with the kit. It's important to make sure the room has enough fresh air. The dryer must be located where
there is no air-flow obstruction.
On gas dryers, adequate clearance as noted on the data plate must be maintained
for combustion
and proper dryer operation.
to ensure adequate
air
Do not install or store the dryer in an area where it will be exposed to water and/or weather. Keep the dryer
area clear of combustible materials, casoline, and other flammable
vapors and liquids. A dryer produces
combustible
lint. The area around the dryer should be kept Lint-Free.
ALCOVE
OR CLOSET
INSTALLATION
You must exhaust the dryer to the outside
wA_.,._closet.
No other fuel-burning
appliance
should
to reduce the risk of fi re when installed in an alcove or
be installed in the same closet as the dryer.
WARNING: To reduce the risk of fi re, you must exhaust the dryer to the outdoors.
See Exhaust information section.
Minimum clearances between the dryer and adjacent walls or other surfaces
2" in front, 17" on top, 1" on either side, and 5" in the back.
are:
The closet front must have two unobstructed
air openings for a combined minimum total area of 72 in2
with 3" minimum clearance on the top and bottom. A Iouvered door with equivalent space clearance is
acceptable.
installing
DV400-03170A
EN HUDSON-PJT
vl.indd
Sec3:ll
your dryer
11
2012-01-20
N 1:58:28
MOBILE
HOME INSTALLATION
The installation of the dryer in mobile homes must conform to the Manufactured
Home Construction
and
Safety Standard Title 24 CFR, Part 3280 {formerly the Federal Standard for Mobile Home Construction
and
Safety, Title 24, HUD (Part 280), 1975} for the United States) or CSA Standards Z240 (for Canada).
When installing a dryer in a mobile
home, you must make provisions
Locate the dryer in an area that has adequate
A minimum
of 72 in2 (465 cm 2) of unobstructed
Call 1-800-SAMSUNG(726-7864)
for anchoring
the dryer to the floor.
fresh air.
space is required.
for information
on purchasing
the Floor Anchoring
Kit as an accessory.
All mobile home installations must be exhausted to the outside with the exhaust duct termination
fastened to the mobile home structure, using materials that will not support combustion.
The exhaust
duct may not terminate
See Exhausting
underneath
the mobile
securely
home.
section for more information.
EXHAUSTING
Exhausting
room.
the dryer to the outside will prevent large amounts
In
of lint and moisture from being blown into the
the United States:
®
All dryers must be exhausted
®
The required exhaust duct is 4 inches (10.2 cm) in diameter.
®
Use only those foil-type flexible ducts, if any, specifically identified for use with the appliance
by the manufacturer
and that comply with the Outline for Clothes Dryer Transition Duct,
Subject 2158A.
Do not assemble
and catch lint.
to the outside.
the duct with screws
or other fastening
means that extend into the duct
In Canada:
Use only those foil-type flexible
by the manufacturer.
All dryers must be exhausted
The exhaust duct should
ducts,
if any, specifically
identified
for use with the appliance
to the outside.
be 4 inches (10.2 cm) in diameter.
Outside the U.S. and Canada:
Refer to the local codes.
.......
You must exhaust the dryer to the outside to reduce the risk of fi re when you install the
dryer in an alcove or closet.
NEVER USE A PLASTIC OR NON-METAL FLEXIBLE DUCT.
If your existing ductwork is plastic, non-metal, or combustible,
replace it with metal.
Use only a metal exhaust duct that is non-flammable
to ensure containment
of exhaust air,
heat, and lint.
12
DV400-03170A
installing your dryer
EN HUDSON-PJT
vl.indd
Sec3:12
2012-01-20
N 1:58:28
GAS REQUIREMENTS
Use only natural or LP (liquid propane)
gases.
THE INSTALLATION
MUST CONFORM
WITH LOCAL CODES, OR IN THE ABSENCE
OF LOCAL
CODES, WITH THE NATIONAL FUEL GAS CODE ANSVZ223.1,
LATEST REVISION (FOR THE UNITED
STATES), OR WITH THE CAN/CGA-B149
INSTALLATION
CODES (FOR CANADA).
Gas dryers are equipped with a burner vent for use with natural gas. If you plan to use your dryer with LP
(liquid propane) gas, it must be converted for safe and proper performance
by a qualified service technician.
A 1/2" (1.27 cm) gas supply line is recommended
and must be reduced to connect to the 3/8" (1 cm) gas
line on your dryer. The National Fuel Gas Code requires that an accessible, approved manual gas shut-off
valve be installed within G" of your dryer.
Gas dryers
installed
Additionally,
connection,
a 1/8" (0.3 cm) N.RT. (National Pipe Thread) plugged tapping, accessible for test gauge
must be installed immediately upstream of your dryer's gas supply connection.
in residential
Your dryer must be disconnected
system.
garages
must be raised
from the gas supply
18 inches
(46 cm) above
the floor.
pipe system during any pressure testing
of the
DO NOT reuse old flexible metal gas lines. Flexible gas lines must be design certified by the American
Association (CGA in Canada).
[_
ny pipe joint compound used must be resistant to the action of any liquefied
As a courtesy, most local gas utilities will inspect a gas appliance installation.
GAS IGNITION
petroleum
Gas
gas.
- Your dryer uses an automatic ignition system to ignite the burner.
There is no constant burning pilot.
COMMONWEALTH
INSTRUCTIONS
OF MASSACHUSETTS
INSTALLATION
Your dryer must be installed by a licensed plumber or gas fitter. A "T" handle manual gas valve must be
installed in the gas supply line to your dryer. If a flexible gas connector is used to install your dryer, the
connector can be no longer than 3' (36").
.......
*
_
Gas leaks may occur in your system, creating a dangerous
Gas leaks may not be detected by smell alone.
situation.
Gas suppliers recommend you purchase and install a UL-approved
Install and use in accordance with manufacturer's
instructions.
gas detector.
installing
DV400-03170A
EN HUDSON-PJT
vl.indd
Sec3:13
your dryer
13
2012-01-20
N 1:58:28
ELECTRICAL
(_
Z_
.......
Wiring
diagram
REQUIREMENTS
is located
on
the plate below the control panel
or
frame back.
Improper connection of the equipment grounding conductor can result in a risk of electric shock.
Check with a qualified electrician or serviceman if you are in doubt as to whether your dryer is
properly grounded. Do not modify the plug provided with your dryer - if it doesn't fit the outlet,
have a proper outlet installed by a qualified electrician.
To prevent unnecessary risk of fire, electrical shock,
must be done in accordance with local codes, or in
Electrical Code, ANSI/NFPA No. 70-Latest Revision
CSA C22.1 - Latest Revisions and local codes and
adequate electrical services for your dryer.
or personal injury, all wiring and grounding
the absence of local codes, with the National
(for the U.S.) or the Canadian Electrical Code
ordinances. It is your responsibility to provide
All gas installations must be done in accordance with the national Fuel Code ANSI/Z2231
- Latest
Revision (for the U.S.) or CAN/CGA - B149 Installation Codes - Latest Revision (for Canada) and
local codes and ordinances.
GROUNDING
This dryer must be grounded. In the event of malfunction or breakdown, the ground
electrical shock by providing a path of least resistance for the electrical current.
will reduce the risk of
Z_ Gas models
WARNIN_
Your dryer has a cord with an equipment-grounding
conductor
and a grounding
The plug must be plugged into an appropriate outlet that is properly
accordance with all local codes and ordinances.
plug.
installed and grounded
in
Do not modify the plug provided with your dryer - if it doesn't fit the outlet, have a proper outlet
installed by a qualified electrician.
Never connect
the ground
wire to plastic plumbing
lines, gas lines, or hot water pipes.
Electric models
WARNIN_
Your dryer has a cord with an equipment-grounding
separately.
conductor
and a grounding
The plug must be plugged into an appropriate outlet that is properly
accordance with all local codes and ordinances.
plug, sold
installed and grounded
in
Do not modify the plug provided with your dryer - if it doesn't fit the outlet, have a proper outlet
installed by a qualified electrician.
If a power cord is not used and the electric dryer is to be permanently wired, the dryer must
be connected to a permanently grounded metal wiring system, or an equipment grounding
conductor must be run with the circuit conductors and connected to the equipment grounding
terminal.
14
DV400-03170A
installing your dryer
EN HUDSON-PJT
vl.indd
Sec3:14
2012-01-20
N 1:58:28
ELECTRICAL
Before operating
CONNECTIONS
or testing,
follow all grounding
instructions
in the Grounding
section.
An individual branch (or separate) circuit serving only your dryer is recommended.
EXTENSION CORD.
DO NOT USE AN
Gas models - U.S. and Canada
A 120 volt, 60 Hz AC approved
required.
electrical
service,
with a 15-ampere
fuse or circuit
breaker is
Electric models - U.S. only
Most U.S. dryers require a 120 / 240 volt, 60 Hz AC approved electrical service. Some require
120 / 208 volt, 60 Hz approved electrical service. The electric service requirements can be found
on the data label located behind the door. A 30-ampere fuse or circuit breaker on both sides of
the line is required.
If a power cord is used, the cord should be plugged
into a 30-ampere
receptacle.
The power cord is NOT provided with U.S. electric model dryers.
IMPORTANT:
When local codes allow, the dryer electrical supply may be connected by means of a new power
supply cord kit, marked for use with a dryer, that is U.L listed and rated at a minimum of120/240
volts, 30-ampere with three No. 10 copper wire conductors terminated with closed loop
terminals, open-end spade lugs with turned up ends, or with tinned leads.
•
Do not reuse a power supply cord from an old dryer. The power cord electric supply wiring
must be retained at the dryer cabinet with a suitable UL-listed strain relief.
Grounding through the neutral conductor is prohibited for (1) new branch-circuit
installations,
(2) mobile homes, (3) recreational vehicles, and (4) areas where local codes prohibit
grounding through the neutral conductor. (Use 4-prong plug for 4 wire receptacle, NEMA
type 14-30R.)
Electric models - Canada Only
A 120 / 240 volt, 60 Hz AC approved electrical service fused through
circuit breaker on both sides of the line is required.
All Canadian models are shipped with the power cord attached.
plugged into a 30-ampere receptacle.
I_lt
is not permissible
to convert
a 30-ampere
The power cord should be
a dryer in Canada to 208 volts.
installing
DV400-03170A
EN HUDSON-PJT
vl.indd
Sec3:15
fuse or
your dryer
15
2012-01-20
N 1:58:28
INSTALLATION
For proper
- GENERAL
installation,
Read these instructions
To install the dryer,
t.
PROCEDURE
we recommend
completely
follow
these
that you hire a qualified
installer.
before you begin the installation.
steps:
Move your dryer to an appropriate location for installation.
by-side so you have easy access to both appliances.
Consider
installing the dryer and washer side-
To move the dryer easily, lay two of the carton cushion-tops
on the floor. Tip your dryer on its side so it
lies across both cushion-tops.
Push the dryer so that it is near its final location. Set your dryer upright.
Leave enough room around the dryer so you can attach the duct work, power cord, etc.
2.
If you need to change
the direction
of the door, go to Door Reversal on page.
When done, return to
Step 3 below.
3.
Review the Exhausting section before installing the exhaust system. Install the duct work from your
dryer to the exhaust hood. The crimped end of the duct sections must point away from your dryer. DO
NOT use sheet metal screws when assembling ducting. These joints should be taped. Never use plastic
flexible exhaust material.
A tip for tight installations: Attach a section of the exhaust system to your dryer before putting it in
place. Use duct tape to secure this section to your dryer, but do not cover the ventilation slots at the
back of the dryer cabinet.
4.
If you have an electric model, skip to Step 6. If you have a gas model, go to the next step.
5.
Review the Gas Requirements
ao
Remove
b.
Apply pipe joint compound
section,
the pipe thread protective
DV400-03170A
cap.
or about 1 1/2 wraps of Teflon tape over all threaded
The pipe joint compound
16
then follow the lettered steps below.
must be resistant
to the action of any liquefied
connections.
petroleum
gas.
c.
Connect the gas supply to your dryer. An additional fitting is required to connect the 3/4" (1.9 cm)
female thread end of a flexible connector to the 3/8" (1 cm) male threaded end on the dryer.
d.
Securely tighten the gas line fitting over the threads.
e.
Turn on the gas supply. Check all gas connections for leaks using a soap solution. If bubbles
appear, tighten the connections and recheck. DO NOT use an open flame to check for gas leaks.
f.
Go to Step 6 on the next page
installing your' dryer
EN HUDSON-PJT
vl.indd
Sec3:16
2012-01-20
[1_1:58:28
6.
Review the Electrical Requirements
section, then follow the 3 Wire system connection
7) or 4 Wire system instructions (Step 8) below.
7.
Three Wire system instructions:
Ao External ground
instructions
(Step
connector
IBo Neutral grounding wire (green/yellow)
Co Center silver-colored terminal block screw
IDo Neutral wire (white or center wire)
I_o %" (1.9 cm) UL-listed
1.
strain relief
Loosen or remove the center terminal
block screw.
2. Connect the neutral wire (white or center
cord to the center, silver-colored terminal
terminal
3. Connect
wire) of the power
screw of the
block. Tighten screw.
the other wires to outer terminal
block screws.
Tighten screws.
4. Tighten the strain relief screws.
5.
Insert the tab of the terminal block cover into your Dryer's rear panel slot.
Secure the cover with a hold-down
screw.
If converting from a 4-wire electrical system to a 3-wire, you must connect the ground
wA..,._ to the terminal block support to ground the dryer frame to the neutral conductor.
We recommend
them perfectly.
using Ring terminals.
If you use Strap terminals,
strap
please ensure you install
8. Four Wire System instructions:
A. External ground connector
B.
C.
D.
E.
E
Green or bare copper wire of power cord
A
%" (1.9 cm) UL-listed strain relief
Center silver-colored terminal block screw
Neutral Grounding
wire (green/yellow)
Neutral wire (white or center wire)
1.
Remove the External ground
connector
screw.
2. Connect the ground wire (green or unwrapped) of the
power cord to the external ground connector screw. If
you want to connect B (Green or bare copper wire of
power cord) to the Neutral Post without assembling with A
(cabinet ground), call the service technician.
3.
Loosen or remove the center terminal
block screw.
4. Connect the neutral wire (white or center wire) of the power cord and the appliance
wire (green with yellow stripes) under the central screw of the terminal block.
5. Connect
the other wires to the outer terminal
block screws.
ground
Tighten screws.
6. Tighten the strain relief screws.
7.
[_
Insert the tab of the terminal block cover into your Dryer's rear panel slot.
Secure the cover with a hold-down
screw.
e recommend
them perfectly.
using Ring terminals.
If you use Strap terminals,
please ensure you install
installing
DV400-03170A
EN HUDSON-PJT
vl.indd
Sec3:17
your dryer
17
2012-01-20
N 1:58:28
U.S. MODELS:
IMPORTANT - All U.S. models are designed for a 3-WIRE SYSTEM
grounded to the neutral conductor at the terminal block. A 4-WIRE
new or remodeled construction,
mobile homes, or if local codes do
If you use the 4-wire system, you cannot ground the dryer frame to
block.
CONNECTION.
The dryer frame is
SYSTEM CONNECTION is required for
not permit grounding through neutral.
the neutral conductor at the terminal
Remove the terminal block cover plate. Insert the power cord with a UL-listed
provided in the cabinet near the terminal block.
strain relief through
A strain relief must be used. Do not loosen the nuts already installed on the terminal
tight. Use a 3/8" (lcm) deep well socket.
9.
Connect the Water Inlet Hose. For instructions,
Inlet Hose on page
go to Connecting
10.To ensure that the dryer provides optimal drying performance,
be level. To level the dryer, follow the lettered steps below:
Level
it must
Using a level, check if the dryer is level side to side and then front
to back.
b.
If the dryer is not level, adjust the leveling feet on the bottom of
the dryer until the washer is level side to side and back to front.
Turning the feet clockwise retracts the feet. Turning the feet
clockwise loosens and extends them.
To set the dryer to the same height as the washer, fully
retract the leveling feet by turning them counterclockwise,
then loosen the feet by turning them clockwise. Once
the dryer is the same height as the washer, follow the
directions above to level the dryer.
Leveling
Retract fully
[_
block. Be sure they are
the
a.
[_
the hole
feet
Then loosen
djust the leveling feet only as much as necessary to level the dryer. Extending
feet more than necessary can cause the dryer to vibrate.
t 1. Make sure all gas connections (on gas models), exhaust, and electrical connections
in your dryer, and then check its operation by using the checklist below.
t2. For GAS MODELS ONLY
the leveling
are complete.
Plug
The burner may not ignite initially due to air in the gas line. Allowing your dryer to operate on a heat
setting will purge the line. If the gas does not ignite within 5 minutes, turn your dryer off and wait 5
minutes. Be sure the gas supply to your dryer has been turned on. To confirm gas ignition, check the
exhaust for heat.
18
DV400-03170A
installing your dryer
EN HUDSON-PJT
vl.indd
Sec3:18
2012-01-20
[1_1:58:28
FINAL INSTALLATION
CHECKLIST
[]
The dryer is plugged
[]
The exhaust
[]
You have used rigid or stiff-walled
[]
The dryer is level and is sitting firmly on the floor.
[]
For gas models:
[]
Start your dryer to confirm that it runs, heats, and shuts off.
ductwork
into an electrical
is hooked
outlet and grounded
properly.
up and the joints are taped.
flexible
metal duct material, not plastic flexible duct.
The gas is turned on and there are no gas leaks.
installing
DV400-03170A
EN HUDSON-PJT
vl.indd
Sec3:19
your dryer
19
2012-01-20
N 1:58:29
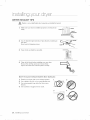
DRYER EXHAUST
Z_
TiPS
Plastic or non-metal
flexible duct presents a potential
fire hazard.
WARNING
t.
Make sure your dryer is installed properly
easily.
so it exhausts
2.
Use 4" diameter rigid metal duct. Tape all joints, including
the dryer.
Never use lint-trapping screws.
3.
Keep ducts as straight
air
at
as possible.
[
J
Clean all old ducts before installing your new dryer.
Be sure the vent flap opens and closes freely.
Inspect and clean the exhaust system annually.
Don't let a poor exhaust system slow drying by:
20
DV400-03170A
t.
Restrict your dryer with a poor exhaust
2.
Use a plastic, thin foil, or non-metal
3.
Use unnecessarily
elbows.
4.
Use crushed
system.
1
2
3
4
flexible duct.
long ducts that have many
or clogged vent or ducts.
O
installing your dryer
EN HUDSON-PJT
vl.indd
Sec3:20
2012-01-20
N 1:58:29
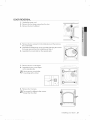
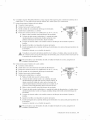
DOOR REVERSAL
1.
Unplug the power cord.
2.
Remove the four hinge screws
3.
Remove the door by lifting it
4.
Remove the two screws
the cover-holder.
from the door
from the holder-lever
5. Assemble the holder-lever on the opposite
that were removed from the holder-lever-in
6. Assemble
7.
the cover-holder
on the opposite
and then remove
side using the screws
Step 4.
side.
Remove the two cover-hinges.
iF ........................................
z,
8. Assemble the two cover-hinges
on the opposite side.
Use to remove cover-holder,
cover-hinge with (-) driver
J
J
9.
Remove the 14 screws.
Two screw(L) is different
(longer than the other.)
other screws.
ItJiiiii_
' ,'!i
installing
DV400-03170A
EN HUDSON-PJT
vl.indd
Sec3:21
jt
i:
"7,
your dryer
21
2012-01-20
[1_1:58:29
t 0. Remove the holder-glass.
t 1. Change
position
: Cover-hinge
: holder-hinge
glass
with each other.
to handle-door
to guider-holder
t2, Remove the hinge-door and then
assemble on the opposite side,
[_
icture for you reference the
process of assemble.
t 3. Remove the cover-hole(P1).
t 4. Assemble the holder glass and then fasten the 14 screws
that removed in step 9.
t 5. Attach the cover-hole.
[_
Spare cover-hole
into assy manual.
t6. Install the door on the frame-front
screws
[_
22
DV400-03170A
that removed
Check position
and then fasten the 4
in step 2.
of screw that installed to hinge door.
installing your _dryer
EN HUDSON-PJT
vl.indd
Sec3:22
2012-01-20
N 1:58:30
.......
To reduce the risk of fire, electric shock, or injury to persons,
INSTRUCTIONS
before operating this appliance.
OVERVIEW
OF THE CONTROL
read the IMPORTANT
SAFETY
PANEL
Power
HeavyDuty
Normal
_X
',
k\
De" ates-V'k2"// ....
[]
Sensor
___,___
@
......................................
Sanitize
._
!!
--i
a Very Dry
n High
II
m
More
m Medium
m 40 rain.
II Wrinkle
i
"
DampDry
. E×traLow
" 20 mln.
l Mixe_Lro%c_Belli
Dry
I
PreveM
• No_,Dry-_ow
.,0mi..
i'(" 1::
Manual []
@@
@
@
@
@
@@@
Power
Heavy Duty ..................
__#____.
PermP..............
/,%_-
@
....................................
Sanitize
-_
TimeDry
' . vo_Dry
More
Dry
_
i_
High
_
40 rain.
_!--i
111W_nt-N
al
Delkat ................'*_
[] Sensor
k
/
"_ / l..................
RW_inak)
ee
.......
f /
R'
_ Medium
_ 30rain.
!
DampDry
_ Low
_ 20 min.
'......
Me000,•
J
\\_T
NormaIDry
_......
I ....... I ............
l
_
®@
@
@ @ ®
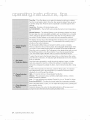
To select a cycle, rotate the Cycle Selector
dial to the desired cycle.
The indicator light by the cycle name will illuminate. The Nomal, Heavy Duty,
Perm Press, Bedding, Delicates, Towels cycles are Sensor Dry cycles.
Sensor Dry automatically senses the moisture in the load and shuts the dryer
off when the load reaches the dryness level you have selected with the Dry
Level Selection Button (see below).
Normal
Heavy
- Use this cycle to dry loads of cotton,
underwear,
and linen.
Duty - Use this cycle to dry heavy fabrics such as jeans, corduroys,
or
workperm
clotheSpress
-withDry
highwrinkle_freetemperatUrecottons,heat.synthetic
fabrics, knits, and permanent
press fabrics
Beading aelicates
automatically.
For bulky items such as blankets, sheets and comforters.
- The Delicates cycle is designed to dry heat-sensitive items at a
low drying temperature.
Towels (DV456") - To dry bath towels and similar items.
Sanitize - Sanitizes garments by infusing high temperature heat deep into
the fabric during the drying cycle. Use this course to keep your bedding and
curtains clean through sanitization.
operating
DV40D-03170A
EN HUDSON-PJT
Vllindd
Sec6:23
instructions,
tips 23
2012-01-20
M 1:58:31
op r t
n tnA tion
Time
t
Dry - Time Dry allows you to select the desired
cycle time in minutes.
Turn the Cycle Selector dial to Time Dry, then press the Adjust Time up arrow
to set the drying time. Press the arrow repeatedly to scroll through the time
settings.
Quick
Dry - Provides a 30 minute drying cycle.
Air Fluff (DV456")
air.
- The Air Fluff cycle tumbles the load at room temperature
Wrinkle
Release - The Wrinkle Release cycle will release wrinkles from items
that are clean, dry, and only slightly wrinkled, such as clothes from a crowded
closet, suitcase or items that have been in the dryer too long after the cycle
has ended. Wrinkle Release can be used with any temperature selection.
The display window shows the estimated time remaining in the cycle after you
have pressed the Start/Pause button. The estimated time remaining may fl
uctuate as the cycle progresses.
The Drying light will illuminate
and remain lit until the cycle is complete.
When your dryer is in the cool-down phase, the Cooling light will illuminate. When
your dryer is in the wrinkle prevent phase, the Wrinkle Prevent light will illuminate.
When the cycle is complete, "End" will appear in the display panel until you push
the Start/Pause button or the Power button. If your dryer is paused during a
cycle, the indicator lights will blink until you press the Start/Pause button.
To select the dry level in the Normal, Heavy Duty, or other Sensor Dry cycles,
press the Dry Level button. An indicator light will illuminate next to the dryness
level you selected.
Press the button repeatedly to scroll through the settings. Larger or bulkier
loads may require the Very Dry or More Dry setting for complete dryness.
Damp Dry is designed
to dry.
to partially
dry items. Use for items that lay flat or hang
To select the temperature for the load, press the Temp button. An indicator
light will illuminate next to the temperature you selected. Press the button
repeatedly to scroll through the settings.
High - For sturdy cottons
or those
labeled Tumble Dry.
Medium - For permanent press, synthetics,
labeled Tumble Dry Medium.
lightweight
cottons,
or items
Low - For heat sensitive items labeled Tumble Dry Low or Tumble Dry Warm.
Extra Low (DV456") - Provides the lowest heated dry temperature
possible.
When using Manual Dry cycles, you can adjust the drying time by pressing
time selection button.
During the Sensory Dry cycle, the time light indicator is off because
drying times are determined by fluctuating humidity levels.
24
DV400-03170A
operating
instructions,
EN HUDSON-PJT
vl.indd
the
exact
tips
Sec6:24
2012-01-20
N 1:58:31
Adjust Time - You can add or subtract time from the automatically set times
in the Wrinkle Release cycle and the Manual Dry cycles (Time Dry, Quick Dry,
or Air Fluff cycles.)
To add or subtract time from the cycle, press the Adjust Time arrow pad up or
until the desired time is displayed.
iiiiiiiiiiiiiiiiiiiiiiiiiiiiiiiiiiiiiiiiiii!i:i:i:idown
iiiiiiiiiiiiiiiiiiiiiiiiii
Wrinkle
Prevent -Wrinkle Prevent provides approximately
180 minutes
of intermittent tumbling in unheated air at the end of the cycle to reduce
wrinkling. Press the Wrinkle Prevent button to activate this feature.
The indicator
light above the pad will illuminate when you select Wrinkle Prevent.
The load is dry and you can remove it at any time during the Wrinkle Prevent cycle.
Mixed Load Bell (DV456") - This is an alarm that notifies you when the
average dry level of a mixed load with various types of cloth is damp dry
(80 % dried). When this level is reached, an alarm sounds for five (5) seconds.
After the alarm sounds, the dryer will continue to run until you turn it off or the
clothes reach the level of dryness you selected at the start of the cycle.
This function can only be selected in the Sensor Dry course, and the dry level
can only be selected from among Normal Dry, More Dry, and Very Dry.
Smart Care (DV456")- Use this function to check if the Dryer is out of order
using your smart phone when the Dryer malfunctions. This function is set if
you press and hold the Mixed Load Bell key for 3 seconds within 10 seconds
of turning the power on or when an error occurs.
Press to pause and restart programs.
:::::::::::::::::::::::::::::::::::::::::::::::::::::::::::::::::::::::::::::::::::::::::::::::::::::::::::::::::::::
Choose your favorite
page 27 for detail.)
cycle including
cycle, temp, dry level option, etc. (See
Press once to turn your dryer on, press again to turn it off. If you turn
your dryer on and do not touch any buttons for 10 minutes, the power
automatically turns off.
operating
DV400-03170A
EN HUDSON-PJT
vl.indd
Sec6:25
instructions,
tips 25
2012-01-20
N 1:58:32
op r t
n tnA tion
t
CHILD LOCK
A function to prevent children from playing with your d_er.
Setting/Releasing
If you want to set or release the Child Lock, press the Temp. and Time buttons
for 3 seconds.
simultaneously
Child Lock Details
You can set Child Lock while your dryer is running.
Once you turn Child Lock on, no button,
release the Child Lock function.
The Child Lock indicator
except
for the Power button,
will respond
until you
will be lit.
lf you have not released Child Lock, and then turned the dryer off and on, the Child Lock
function will still be on. To release Child Lock, follow the instructions above.
[_
DRUM
hen other buttons, except for the Power button,
indicator. If Child Lock is on, follow the instructions
do not respond, check the Child Lock
above to turn Child Lock off.
LIGHT (ONLY DV456")
Lights the dryer drum while the dryer is running.
Turning On and Off
Press and hold the Wrinkle
Prevent button for 3 seconds
or more.
You can turn the Drum Light on and off while your dryer is running and when it is
stopped. If you do not turn the Drum Light off 5 minutes after turning it on, the Drum Light
automatically turns off.
SIGNAL
When the cycle is complete,
a chime will sound.
When you press and hold both the Dry Level and Temp buttons
chime will sound intermittently.
Adjust the volume
Press the button
26
DV400-03170A
operating
simultaneously
for 3 seconds
or more, the
of the chime or turn it off by pressing the Signal button.
repeatedly
to scroll through
instructions,
EN HUDSON-PJT
vl.indd
the choices.
tips
Sec6:26
2012-01-20
M 1:58:32
MY CYCLE
1. Users can only use this function
2.
The My Cycle setting consists
held down.
when the product
of a Save function
Holding the key down for 3 seconds
is played)
is turned on and in standby
and a Load function
or more: The My Cycle Save function
Holding the key down for less than 3 seconds:
sound is played.)
the My Cycle
mode.
depending
on how long the key is
(the option setting
The My Cycle Load function
sound
(the level changing
3.
When configuring
4.
If the My Cycle key is held down, the My Cycle LED is turned on. (Only when the My Cycle LED exists.)
5.
The items saved by the My Cycle function
6.
If the My Cycle Save is configured, the currently configured course and option LEDs blink at 0.5 second
intervals for 3 seconds, and if the course and option settings are changed within those 3 seconds, the
LEDs remain on.
7.
In the paused state, the My Cycle Save function cannot be configured
the My Cycle Save function, an error sound is played.
8.
If the My Cycle Load function is configured while the course and option LEDs blink due to the
configuration
of My Cycle Save function, the LEDs stop blinking and remain on.
9.
If a saved option key is pressed
Cycle LED is turned off.
10. The My Cycle function
Load, and there is no saved course, the default course is set.
are the course,
or the course is changed
is released when the product
temperature
and drying level.
and if the user tries to configure
when configuring
the My Cycle Save, the My
enters the exit cycle or is turned off.
SMART CARE (DV456")
This function
enables you to check
the status of the washing
machine
using a smartphone.
1. To activate the Smart Care function, press the power button to turn the dryer on and then press and
hold the Mixed Load Bell button for 3 seconds. If you press a button other than the Mixed Load Bell
button after turning the dryer on, you will not be able to activate the Smart Care function.
2.
If the Smart Care function is activated, the lamp over the Mixed Load Bell button
3 seconds and then the Smart Care indicator is lit on the display.
3.
Run the Smart Care app on your smart phone.
4.
You can only use the Smart Care function
5.
Focus the smart
6.
If the smart phone's camera is focused on the display panel of the washing machine, the result is
automatically recognized and the error type and countermeasures
are displayed on the smart phone.
7.
If an error occurs more than once, please manually enter the error code displayed
of the washing machine into the Smart Care app.
Downloading
phone's
using a Samsung
camera on the display
blinks for 2 or
Galaxy mobile.
panel of the washing
machine.
on the display panel
the Smart Care app
Galaxy S Users: To download the application, select the Samsung AppStore menu in the
Android Market (by pressing the Menu button in the Android Market) or connect to http://mobile.
kr.samsungmobile.com/apps
and install Samsung AppStore.
Galaxy $2 Users: To download the application,
smartphone
and enter the Samsung AppStore.
run SamsungApps
on the home screen of the
Using the application on the Galaxy S or $2 running android version 2.2 is recommended.
Precautions when using Smart Care
If a lighting device (e.g. fluorescent or lamp) is reflected on the display panel of the washing
machine, the result on the display panel may not be recognized easily.
If an error occurs more than once, please manually enter the error code displayed
panel of the washing machine into the Smart Care app.
on the display
If the angle of the smartphone
camera and the display panel of the washing machine is incorrect,
the error may not be recognized properly.Please try to hold the smart phone at an angle to the
display panel as shown by the figure.
operating
DV400-03170A
EN HUDSON-PJT
vl.indd
Sec6:27
instructions,
tips 27
2012-01-20
[1_1:58:32
CLEAN THE LINT FILTER
•
After each load.
To shorten
drying time.
To operate
more energy efficiently.
not operate your dryer without the lint filter in place.
[_Do
Filter
Door
LOAD THE DRYER PROPERLY
•
Place only one washload
•
In mixed loads, heavy and lightweight fabrics will dry differently. This may result in lightweight
being dry while heavy fabrics remain damp at the end of a drying cycle.
in your dryer at a time.
fabrics
Add one or more additional similar items to your dryer when you are drying only one or two items. This
improves the tumbling action and drying efficiency.
Overloading
fabrics.
restricts
tumbling
action,
resulting
in uneven drying as well as excessive
wrinkling
of some
GETTING STARTED
t.
2.
Load your dryer loosely - DO NOT overload.
Close the door.
3.
Select the appropriate
cycle and options for the load (see pages 23, 24, 25).
4.
Press the Start/Pause
button.
5.
The dryer indicator
6.
The estimated cycle time will appear in the display.
The time may fluctuate as humidity levels fluctuate in the dryer.
,
light will illuminate.
hen the cycle is complete, "End" will appear in the display.
Pressing Power cancels the cycle and stops your dryer.
The Drying, Cooling,
cycle.
and Wrinkle
Prevent indicator
lights will illuminate
during those portions
of the
Do not place anything on top of your dryer while it is running.
WARNIN_
28
DV400-03170A
operating
instructions,
EN HUDSON-PJT
vl.indd
tips
Sec6:28
2012-01-20
[1_1:58:32
CONTROL
PANEL
Clean with a soft, damp cloth. Do not use abrasive
Do not spray cleaners
The control
panel finish may be damaged
Apply such products
substances.
directly on the panel.
by some laundry pre-treatment
soil and stain remover products.
away from your dryer and wipe up any spills or overspray
immediately.
TUMBLER
Remove any stains such as crayon,
purpose cleaner.
Tumble old towels
or rags to remove any excess stain or cleaning substance.
Once these steps are followed,
POWDER
ink, or fabric dye (from new items such as towels or jeans) with an all-
stains may still be visible, but should not transfer
to subsequent
loads.
COATED TUMBLER
To clean the powder
surfaces.
coated tumbler,
use a damp cloth with a mild, non-abrasive
Remove the cleaner
residue and dry with a clean cloth.
cleaner suitable
for
DRYER EXTERIOR
Clean with a soft, damp cloth. Do not use abrasive
substances.
Protect the surface from sharp objects.
Do not place any heavy or sharp objects or a detergent box on the dryer. They can scratch or damage the
top cover of the dryer. Keep these items in the separately purchased pedestal or in a separate storage box.
The entire dryer has a high-gloss finish. Avoid scratching or damaging the surface when using the dryer.
DRYER EXHAUST
SYSTEM
Inspect and clean the dryer exhaust system yearly to maintain
optimum
The outside
to ensure proper operation.
exhaust hood should
be cleaned more frequently
performance.
care and cleaning
DV400-03170A
EN HUDSON-PJT
vl.indd
Sec10:29
29
2012-01-20
[1{]1:58:32
Special
laundry
tips
Please follow the care label or manufacturer's instructions for drying special
items, if care label instructions are not available, use the following information as
a guide.
Bedspreads
& Comforters
Follow the care label instructions
or dry using the Bedding
Make sure the item is thoroughly
dry before using or storing.
May require repositioning
Blankets
to ensure even drying.
Use the Normal cycle and dry only one blanket at a time for best
tumbling action.
®
Curtains
cycle.
& Draperies
Make sure the item is thoroughly
dry before using or storing.
Use the Perm Press cycle and medium
wrinkling.
®
Cloth Diapers
Down-filled
Items (jackets,
sleeping
bags, comforters,
etc.)
to help minimize
Dry these in small loads for best results and remove as soon as
possible.
Use the Normal cycle and the High temperature
fluffy diapers.
settings
Use the Normal cycle and medium
setting.
Adding a couple
moisture.
Foam Rubber (rug backs,
stuffed toys, shoulder
pads,
etc.)
temperature
temperature
of dry towels shortens
DO NOT dry on a heat setting.
DV456").
drying time and absorbs
Use the Air Fluff cycle (no heat. Only
WARNING - Drying a rubber item with heat may damage
a fire hazard.
Pillows
for soft,
it or create
Use the Normal cycle.
Add a couple of dry towels and a pair of clean sneakers
tumbling action and to fluff the item.
to help the
DO NOT dry kapok or foam pillows in the dryer. You can dry these
items in the dryer as long as you use the air fluff cycle.
Plastics
outdoor
etc.)
THINGS
®
(shower
furniture
TO AVOID
Fiberglass
Woolens,
DV400-03170A
Use the Air Fluff cycle or the Time Dry cycle and the Low or Extra
Low temperature settings depending on the care label instructions.
:
items (curtains,
draperies,
unless recommended
Items spotted
30
curtains,
covers,
etc.).
on the label.
or soaked with vegetable
speciN laundry
EN HUDSON-PJT
or cooking
oils.
tips
vl.indd
Sec5:30
2012-01-20
N 1:58:32
troLAbe hootna
CHECK THESE POINTS
Doesn't run.
IF YOUR DRYER...
Make sure the door is latched shut.
Be sure the power cord is plugged
into a live electrical
Check your home's circuit breakers
Press the Start/Pause
cycle.
Doesn't
heat.
button
again if the door is opened
Check your home's circuit breakers
Select a heat setting
outlet.
or fuses.
during the
or fuses.
ether than Air Fluff.
On a gas dryer, check that the gas supply is on.
Clean the lint filter and exhaust duct.
Dryer may have moved into the cool-down
Doesn't
dry.
phase of the cycle.
Check all of the above, plus...
Be sure the exhaust hood outside the home can open and close
freely.
Check the exhaust system for lint buildup.
inspected and cleaned annually.
Ducting should
be
Use a 4" rigid metal exhaust duct.
Do net overload.
1 wash load = 1 dryer load.
Sort heavy items from lightweight
o
Check that the washer
from the load.
is draining
Load may be toe small to tumble
Is noisy.
items.
Large, bulky items like blankets or comforters
repositiening to ensure even drying.
Check the load for objects
Remove promptly.
may require
properly to extract adequate
water
properly. Add a few towels.
such as coins, loose buttons,
It is normal to hear the dryer gas valve or heating element
and off during the drying cycle.
Be sure the dryer is leveled properly as outlined
instruction.
nails, etc.
cycle on
in the installation
It is normal for the dryer to hum due to the high velocity of air moving
through the dryer drum and exhaust system.
Dries
unevenly.
Seams, pockets, and other similarly heavy areas may not be
completely dry when the rest of the load has reached the selected
dryness level. This is normal. Select the Very Dry setting if desired.
If one heavy item is dried with a lightweight load, such as one towel
with sheets, it is possible that the heavy item will not be completely
dry when the rest of the load has reached the selected dryness level.
Sort heavy items from lightweight items for best drying results.
Has an odor.
Household odors from paint, varnish, strong cleaners, etc. may enter
the dryer with the surrounding room air. This is normal as the dryer
draws the air from the room, heats it, pulls it through the tumbler, and
exhausts it outside.
When these odors linger in the air, ventilate the room completely
before using the dryer.
troubleshooting
DV400-03170A
EN HUDSON-PJT
vl.indd
Sec4:31
31
2012-01-20
N 1:58:32
troL]beshootinG
Shuts
off before
load is dry
•
The dryer load is too small. Add more items or a few towels and
restart the cycle.
®
The dryer load is too large. Remove some items and restart the dryer.
Lint on clothes
Make sure the lint filter is cleaned before every load. With some loads
that produce high amounts of lint, it may be necessary to clean the
filter during the cycle.
Some fabrics are lint producers (for example, a fuzzy white cotton
towel) and they should be dried separately from clothes that are lint
trappers (for example, a pair of lack linen pants).
Divide larger loads into smaller loads for drying
Check pockets
Garments still wrinkled
Wrinkle-Care
thoroughly
before washing and drying clothes.
®
Small loads of 1 to 4 items work best.
®
Load fewer garments.
®
Fabrics containing
Water drips from nozzle
when Steam-Care
starts
®
This is steam condensation.
time.
Sprayed water is not visible
during Steam-Care
®
Sprayed
Odors remain
after Refresh.
in clothing
INFORMATION
Information
after
Load similar-type
strong
garments.
odors should
be washed
The dripping
in a normal cycle.
water will stop after a short
water is difficult to see when the door is closed
CODES
codes may be displayed
to help you understand
what is occurring
with your Dryer better.
tE
Clogged Lint Screen
Vent is restricted
Clean the screen or vent.
HE
Invalid heating Temp in running the
Call for service.
If the problem
continues,
call for service.
dryer
dE
Running the dryer with door open
Close the door and then restart.
If the problem
dF
Door is not closing
properly
continues,
call for service.
Call for service.
(DV422,DV400}
bE2
FE
Unit detects a button is being
_ressed for over 30secs or button
stuck
Try restarting the cycle.
If the problem continues,
Electronic
Call for service.
Control
(Communication
DV400-03170A
Make sure a button is NOT being pressed
continuously. Try restarting the cycle.
If the problem continues, call for service.
Invalid power source Frequency
Problem
call for service.
Error)
For any codes not listed above, call 1-800-726-7864
32
is
(1-800-SAMSUNG)
troubleshooting
EN HUDSON-PJT
vl.indd
Sec4:32
2012-01-20
N 1:58:32
appendx
FABRIC CARE CHART
The following symbols provide garment care directions. The Clothing care labels include symbols for
washing, bleaching, drying and ironing, or dry cleaning when necessary. The use of symbols ensures
consistency among garment manufacturers
of domestic and imported items. Follow care label directions
maximize garment life and reduce laundering problems.
Normal
Line Dry/Hang
to Dry
Permanent Press /
Wrinkle Resistant /
Wrinkle Control
Drip Dry
Do Not Wring
Gentle/Delicates
Dry Flat
Do Not Bleach
Do Not Wash
Hand Wash
Do Not Tumble Dry
iii@i!_!i_!i_!i;i;i_i_i_ii,!i_;_i(;!_
_i_ii_ii_i!i_;_)!_}}}}}ii!i!iiiiiiii!ii_i!,i!iiiii{iill
,ii,ii_ii_i_!i_i!ii_{{{{{{{{i!i!ili_i_iiii!ll
_i!iii_i!_i_iiiiiiiiiii_i_!i!i!_ii,li_iiiii_iiiii_ii_ii_i!_!i_ii
.....
High
_®_
• _
to
Hot
@
Warm
No Steam (added to
iron)
Do Not Iron
Medium
Low
Cold
O
Any Heat
O
Dry Clean
No Heat/Air
:_
Do Not Dry Clean
Any Bleach (when
needed)
Line Dry/Hang
Only Non-Chlorine
(color-safe)
Bleach (when needed)
High
[]
Drip Dry
Tumble Dry Cycle
Medium
[]
Dry Flat
to Dry
Low
iibqiPe manen,
P oss,
Wrinkle
Wrinkle
Resistant/
Control
Gentle/Delicates
** The dot symbols represent appropriate wash water temperatures for various items. The temperature range
for Hot is 105 ° - 125 °F / 41 ° - 52 °C, for Warm 85 ° - 105 °F / 29 ° - 41 °C and for Cold 600 - 85 °F /
I6 o _ 29 °C. _/ash water temperature must be a minimum of 600 F/16 ° C for detergent activation and
effective cleaning.)
appendix
DV400-03170A
EN HUDSON-PJT
vl.indd
Sec8:33
33
2012-01-20
N 1:58:32
a.ppondx
PROTECTING
THE ENVIRONMENT
This appliance is manufactured
from recyclable materials. If you decide to dispose of this appliance, please
observe local waste disposal regulations. Cut off the power cord so that the appliance cannot be connected
to a power source. Remove the door so that animals and small children cannot get trapped inside the
appliance.
DECLARATION
OF CONFORMITY
This appliance
with UL2158.
complies
SPECIFICATIONS
-c.
DIMENSIONS
Div
A. Height
B. Width
WEIGHT
HEATER
Inches
43.0"
(cm)
(109.1)
27"(68.6)
DV400-03170A
C. Depth
door
with
open 90 °
D. Depth
49.9"
(126.8)
29.4"(74.6)
123.9 Ib (56.2 kg)
RATING
5300 W (Elec.)
22000
34
_nCheS
(cm)
Div
BTU/hr (Gas)
appendix
EN HUDSON-PJT
vl.indd
Sec8:34
2012-01-20
N 1:58:32
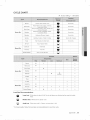
CYCLE CHART
(e : factory setting,
Normal
Perm Press
Sensor
Dry
Cottons, Work clothes, Linen
Normal dry
Heavy Fabrics such as jean, corduroys,
heavy work clothes
Normal dry
Shirts, Synthetic Fabrics, Knits, Wrinkb-free
cottons, Permanent
Normal dry
Bulky items such as blankets, Sheets,
Comforters, Pillows
Bedding
Underwear,
Towel
Normal dry
Blouses, Lingerie
Normal dry
Bedding, Curtains, Children' clothing
Very dry (No change)
Bath towels and similar items
Normal dry
©
©
Foam, Rubber, Plastic
Manual
_ : selectabl¢
Quick Dry
Small loads
Time Dry
Any load
Wrinkle Release
Shirts, Trouser, Blouses
Dry
©
®
®
®
®
Perm Press
Sensor
Dry
®
®
Bedding
I
o
Delicates
I
'
Manua!
®
(DV456')
Sanitize
®
®
Towel
®
®
Quick Dry
®
Time Dry
®
®
®
Wrinkle Release
®
®
®
®
®
®
®
®
®
®
®
®
®
Dry
Load Size Recommendations
Large load : Fillthe drum to about s4 full. Do not add items over this level as they need to tumble
freely.
Medium
©
Small
load
load
: Fill the drum
to about
: Fill the drum with
3-5
_/2full.
items,
* For best results, follow the load size recommendations
not more
than 1¼ full.
for each dry cycle.
appendix
DV400-03170A
EN HUDSON-PJT
vl.indd
Sec8:35
35
2012-01-20
[1_1:58:32
wc rrc lqty
SAMSUNG
LiMiTED
DRYER
WARRANTY
TO ORiGiNAL
PURCHASER
This SAMSUNG brand product, as supplied and distributed by SAMSUNG ELECTRONICS AMERICA, INC.
(SAMSUNG) and delivered new, in the original carton to the original consumer purchaser, is warranted by
SAMSUNG against manufacturing
defects in materials and workmanship
for a limited warranty period of:
One (1) Year All Parts and Labor
Two (2) Years Control Board Parts
This limited warranty begins
used in the United States.
on the original date of purchase,
and is valid only on products
purchased
and
To receive warranty service, the purchaser must contact SAMSUNG for problem determination
and service
procedures.
Warranty service can only be performed by a SAMSUNG authorized service center.
The original dated bill of sale must be presented upon request as proof of purchase to SAMSUNG or
SAMSUNG's authorized service center.
SAMSUNG will provide in-home service during the warranty
within the contiguous United States.
In-home service is not available in all areas.
To receive in-home service, product must be unobstructed
If service is not available, SAMSUNG may elect to provide
authorized service center.
period at no charge, subject to availability
and accessible to the service agent.
transportation
of the product to and from an
SAMSUNG will repair, replace, or refund this product at our option and at no charge as stipulated herein,
with new or reconditioned
parts or products if found to be defective during the limited warranty period
specified above.
All replaced parts and products become the property of SAMSUNG and must be returned to SAMSUNG.
Replacement parts and products assume the remaining original warranty, or ninety (90) days, whichever is
longer.
This limited warranty covers manufacturing
defects in materials and workmanship
encountered
in normal,
noncommercial
use of this product and shall not apply to the following: damage that occurs in shipment;
delivery and installation; applications
and uses for which this product was not intended; altered product or
serial numbers; cosmetic damage or exterior finish; accidents, abuse, neglect, fire, water, lightning, or other
acts of nature or God; use of products, equipment, systems, utilities, services, parts, supplies, accessories,
applications,
installations, repairs, external wiring or connectors not supplied or authorized by SAMSUNG
that damage this product or result in service problems; incorrect electrical line voltage, fluctuations and
surges; customer adjustments
and failure to follow operating instructions, maintenance and environmental
instructions that are covered and prescribed in the instruction book; product removal and reinstallation;
problems caused by pest infestations.
This limited warranty does not cover problems resulting from incorrect electric current, voltage or supply,
light bulbs, house fuses, house wiring, cost of a service call for instructions, or fixing installation errors.
SAMSUNG
36
DV400-03170A
does not warrant
uninterrupted
or error-free operation
of the product.
warranty
EN HUDSON-PJT
vl.indd
Sec7:36
2012-01-20
00 1:58:34
Except as set forth herein, there are no warranties on this product either express or implied, and samsung
disclaims all warranties including, but not limited to, any implied warranties of merchantability,
infringement
or fitness for a particular purpose.
No warranty or guarantee given by any person, firm, or corporation with respect to this product shall be
binding on samsung.
Samsung shall not be liable for loss of revenue or profits, failure to realize savings or thter benefits, or
any other special, incidental or consequential damages caused by the use, misuse, or inability to use this
product, regardless of the legal theory on which the claim is based, and even if samsung has been advised
of the possibility of such damages.
Nor shall recovery of any kind against samsung be greater in amount than the purchase price of the product
sold by samsung and causing the alleged damage.
Without limiting the foregoing, purchaser assumes all risk and liability for loss, damage, or injury to
purchaser and purchaser's property and to others and their property arising out of the use, misuse,
or inability to use this product. This limited warranty shall not extend to anyone other than the original
purchaser of this product, is nontransferable
and states your exclusive remedy.
Some states do not allow limitations on how long an implied warranty lasts, or the exclusion or limitation
of incidental or consequential
damages, so the above limitations or exclusions may not apply to you. This
warranty gives you specific rights, and you may also have other rights, which vary from state to state.
To obtain warranty
service, please contact
SAMSUNG
at:
Samsung
Electronics
America,
inc. 85 Challenger
Road Ridgefield
1-800-SAMSUNG(726-7864)
www.samsung.com
Park, NJ 07660
warranty 37
DV400-03170A
EN HUDSON-PJT
vl.indd
Sec7:37
2012-01-20
N 1:58:34
Scan the QR code* or visit
www.samsung.com/spsn
to view our he[pfu[
How-to Videos and Live Shows
*Requires
Scan this with your
reader
to be
_nstaLLed
on your
smartphone
smartphone
QUESTIONS OR COMMENTS?
U.S.A
1 800 SAMSUNG(726 7864)
www.samsung.com
MEXICO
01 800 SAMSUNG(726 7864)
www.samsung.com
Code No. DC68-03170AEN
DV400-03170A
EN HUDSON-PJT
vl.indd
Sec7:38
2012-01-20
N 1:58:34
_i_ as posibilidades
Graclas Dor adqulrlr este Droducto Samsung.
Para recibir un sew_c_omils comuleto o los
accesorlos, reglstre su D_oducto en o corltacte con
www.samsung.comiregister
1-800-SAMSU
HUDSON
DV400-03170A
MES.mdd
1
NG(726-7864)
2012-02-02
_C 11:36:21
I
Capacidad extra grande
lm
iLas capacidades
de secado ultra al alcance de la mano! Ahora puede secar cargas extra
grandes. Nuestras secadoras ultra grandes DV456", con 7,3 pies cQbicos de capacidad,
DV422" y DV400*, con 7,4 pies cQbicos de capacidad, hacen circular mils aire entre su ropa,
secfindola mAs rApido, para obtener un resultado sin arrugas.
1
Ciclo Sanitize (desinfecci6n)
Este ciclo desinfecta las prendas impregnando la tela con calor a alta temperatura durante el
ciclo de secado y eliminando el 99,9 % de ciertas bacterias. Utilice este ciclo para ropa, ropa
de cama, toallas u otras prendas que necesiten desinfecci6n.
El ciclo Sanitize (desinfecci6n)
estb. certificado por NSF International, una organizaci6n privada de evaluaci6n y certificaci6n.
__S_
Funci6n de desinfecci6n en secadoras
Protocob NSF
de ropa clasificadas
comoP154
residenciales
j_j
3. Diversos ciclos de secado y programa Fuzzy Logic
Simplemente gire el selector tb.ctil para seleccionar uno de los 11 ciclos de seeado
automAtico de la secadora DV456", o uno de los 9 ciclos de secado automa'tieo de las
secadoras DV422" o DV400*, incluidos normal, servicio pesado y ropa de cama, o deje que
el control Fuzzy Logic mida el grado de humedad y determine autom_ticamente
el tiempo de
seeado. La precisi6n en el secado nunca fue mils sencilla que con Samsung.
4. Ahorro de tiempo
Los ciclos estfin diseflados pensando en usted. Todas nuestras secadoras estfin disefladas
para secar su ropa en menos tiempo.., is61o en 42 minutos! Asf le queda tiempo para las
cosas mils importantes de la vida.
5. Ahorro de energia
Las secadoras Samsung son sQper eficientes en el consumo de energfa. Puede secar hasta
3,09 Ib (1,40 kg) de ropa con 1 kWh. Ademfis, tanto la gran capacidad como el control Fuzzy
Logic ahorran energfa secando automfiticamente
sus prendas de la manera m_s eficiente.
2
HUDSON
caracteristicas
DV400-03170A
MES.mdd
Sec9:2
2012-02-02
CC 11:37:47
I
7. Puerta fficilmente
La direcci6n
reversible
de la puerta reversible puede
8. Ventilaci6n
de 4 direcciones
modificarse
f_cilmente.
(modelo electrico
Puede instalar la ventilaci6n del drenaje en las siguientes
cualquiera de los laterales, en la parte inferior.
cuatro
solamente)
(4) posiciones:
atrfis, en
9. Smart Care [DV456 SOLAMENTE]
Esta funci6n diagnostica problemas por sf sola.
No serfi necesario que se comunique con un ingeniero del servicio t6cnico, ni que
busque el manual del usuario cuando surja algOn problema con el producto, ya que los
electrodom6sticos
inteligentes le permiten saber c6mo tratar el problema a trav_s de su
tel_fono inteligente.
caractedsticas
HUDSON
DV400-03170A
MES.mdd
Sec9:3
2012-02-02
3
_C 11:37:47
I
Felicitaciones por la compra de la nueva secadora Samsung. Este manual
contiene informaciOn importante acerca de la instalaciOn, el uso y el cuidado del
electrodomestico. Lea detenidamente estas instrucciones a fin de aprovechar al
maximo los m01tiples beneficios y funciones de la secadora.
LO QUE NECESITA SABER SOBRE LAS INSTRUCCIONES
DE SEGURIDAD
Las advertencias y las instrucciones de seguridad importantes de este manual no cubren todas las posibles
condiciones
y situaciones que pueden ocurrir. Es su responsabilidad
actuar con sentido comQn, precaucidn
y cuidado cuando instale, realice el mantenimiento
o ponga en funcionamiento
la secadora.
Comunfquese
siempre
SiMBOLOS
con el fabricante
si surgen problemas
Y PRECAUCIONES
o situaciones
DE SEGURIDAD
que usted no comprende.
IMPORTANTES
Los fconos y las seSales incluidas en este manual del usuado
significan Io siguiente:
Peligros o prficticas inseguras que pueden causar lesiones fisicas graves o la
muerte.
ADVERTENCIA
Siga la informaci6n contenida en este manual para minimizar el riesgo de
incendio o explosidn o para evitar da_os materiales, lesiones fisicas o la muerte.
No almacene ni utilice gasolina u otros vapores o Iiquidos inflamables cerca de
este o cualquier otto aparato el_ctrico.
Peligros o prficticas inseguras
leves o daSos materiales.
que pueden
causar lesiones
fisicas
NO intente hacer nada.
NO desarme.
[_
NO toque.
Siga las instrucciones
Desenchufe
oared.
Aseg_rese
descargas
el cable de alimentacidn
de que la m_quina
el6ctricas.
Llame al centro
[_
Estas seSales de advertencia
_Lea
el6ctrica
del tomacorriente
tenga buena conexidn
de servicio t6cnico
para obtener
de
a tierra para evitar
asistencia.
Nota
Siga las instrucciones
Despu_s
completamente.
de leer esta seccidn,
todas
estfin aqui para evitar que usted
u otras personas
sufran daSos.
completamente.
las instrucciones
gufirdela
en un lugar seguro
para consultas
futuras.
antes de usar el electrodom_stico.
GUARDE ESTAS INSTRUCCIONES
4
HUDSON
instrucciones
DV400-03170A
de seguddad
MES.mdd
Sec11:4
2012-02-02
CC 11:37:47
I
Z_
........
ADVERTENC[A:
Para reducir el riesgo de incendio, descargas el6ctricas o lesiones fisicas
cuando usa este electrodom_stico,
siga las instrucciones de seguridad bfisicas que figuran
a continuacidn:
1. Lea todas
2.
las instrucciones
antes de usar este electrodom6stico.
No seque prendas que han sido previamente limpiadas, lavadas, remojadas o
salpicadas con gasolina, solventes de limpieza en seco u otras sustancias inflamables
explosivas, ya que emiten vapores que pueden prenderse fuego o explotar.
3.
No utilice la secadora para secar ropa que tenga restos de sustancias inflamables,
como aceites vegetales, de coccidn o de mfiquina, productos qufmicos inflamables,
disolventes, etc., o que contengan cera o productos qufmicos, como trapeadores y
paBos de limpieza. Las sustancias inflamables pueden ocasionar que la tela se prenda
fuego.
4.
No almacene ni utilice gasolina u otros vapores
cualquier otro aparato el6ctrico.
5.
No permita
supervisidn
6.
Antes de descartar el electrodom@stico
compartimiento
de secado.
7.
No introduzca
8.
No instale o guarde
9.
No modifique
o Ifquidos inflamables
o
cerca de este o
que los niBos jueguen sobre la lavadora o dentro de ella. Se requiere de
cuando el electrodom6stico
es utilizado cerca de los niBos.
o de retirarlo de servicio, extraiga
la mano en el electrodom6stico
este electrodom6stico
si el tambor
donde quede
la puerta del
estb. en movimiento.
expuesto
a factores
clim_ticos.
los controles.
10. No repare, reemplace ni intente realizar el mantenimiento
de cualquier pieza del
electrodom@stico salvo que est_ recomendado
especfficamente
en las instrucciones
de mantenimiento
del usuario o en las instrucciones de reparacidn para el usuario
publicadas y que, a su juicio, usted tenga la habilidad para Ilevarlas a cabo.
11. No use suavizante para ropa o productos para evitar la est_tica
del suavizante para ropa o del producto Io recomiende.
12. Limpie el filtro atrapapelusa
13. No aplique
semejantes
salvo que el fabricante
antes o despu@s de cada carga.
calor para secar prendas que contengan
a la goma con textura similar.
goma espuma
o materiales
14. Mantenga el firea alrededor de la salida del drenaje y las fireas adyacentes
acumulacidn
de pelusa, polvo y suciedad.
15. El personal t@cnico calificado debe efectuar una limpieza periddica
electrodom@stico y del conducto de drenaje.
libres de la
del interior del
16. No coloque elementos expuestos a aceites de cocina en la secadora. Los elementos
contaminados
con aceites de cocina pueden contribuir a que se produzca una reaccidn
qufmica que ocasione queen la carga de ropa se prenda fuego.
GUARDE ESTAS INSTRUCCIONES
instrucciones
HUDSON
DV400-03170A
MES.indd
Secll:5
de seguddad
2012-02-02
5
ZC 11:37:47
[
ADVERTENCIA
- Riesgode incendio
,,
,,
,,
,,
La insta[ad6n de [a secadora de ropa debe estar a cargo de un insta[ador ca[ificado.
Instab [a secadora de ropa segOn [as instrucdones del fabrbante y los c6digos locales.
No instale una secadora de ropa con materiabs para ventilaci6n de p[_stico flexible. Si se insta[a
un conducto de metal flexible (tipo I_mina mete[ha), debe ser de un tipo especifico identificado
por e[ fabricante del ebctrodom_stbo come adecuado para uti[izar con secadoras de ropa. Los
materia[es para venti[ad6n f[exb[es suebn hundirse, ap[astarse f&cilmente y atrapar pe[usa. Estas
condiciones obstruir&n el f[ujo de aire de la secadora de ropa y aumentar&n el rbsgo de incendio.
Para reducir el riesgo de [esiones graves o muerte, siga todas [as instrucciones de instalaci6n.
/X
',Z=L=_
Para reducir
el riesgo
ADVE_ENC_
de incendio
o explosi6n:
'_
No seque prendas que hayan sido previamente limpiadas, lavadas, remojadas o
salpicadas con gasolina, solventes de limpieza en seco u otras sustancias inflamables
o explosivas. Emiten vapores que se pueden prender fuego o explotar. No debe
colocarse en la secadora ningOn material que haya estado en contacto con un solvente
de limpieza o liquidos o s61idos inflamables hasta que se haya eliminado todo vestigio
de tales liquidos o s61idos inflamables y sus vapores.
Existen muchos articulos altamente inflamables en los hogares, tales como acetona,
alcohol desnaturalizado,
gasolina, kerosene, algunos limpiadores liquidos de uso
dom6stico, algunos quitamanchas,
aguarrfis, ceras y removedores de cera.
,_
No se deben secar articulos que contengan goma espuma (puede estar catalogada
como espuma de latex) o materiales semejantes a la goma y con textura similar en
la opcidn de secado con calor. Los materiales de goma espuma que reciben calor
pueden, en ciertas circunstancias,
provocar incendios por combustidn
espontfinea.
Qu6 hacer
ADVE_ENC_
si percibe
olor a gas:
•
•
No intente encender ningOn electrodom6stico.
No encienda el electrodom6stico.
,,
Notoque
,,
No utilice ningOn tel6fono de su edificio.
,,
Haga que todos
•
Comuniquese inmediatamente
con el proveedor
Siga las instrucciones del proveedor de gas.
•
Si no se puede comunicar
bomberos.
•
La instalacidn y el servicio t6cnico deberfin estar a cargo de un instalador
una agencia de reparaciones o el proveedor de gas.
ningOn interruptor
el6ctrico.
los ocupantes
se retiren del cuarto, edificio
con el proveedor
o Area.
de gas desde el teldono
de gas, Ilame al departamento
de un vecino.
de
calificado,
GUARDE ESTAS INSTRUCCIONES
instrucciones
HUDSON
DV400-03170A
de seguridad
MES.indd
Sec11:6
2012-02-02
ZC 11:37:47
I
No permita que los ni_os o las mascotas jueguen sobre el ebctrodom6stico, dentro de 61o frente a
6J. Se requiere de supervisi6n cuando eJe[ectrodom@tbo es utiJizado cerca de ni_os y mascotas.
Antes de desechar [a secadora o de refirarJa de servicio, quite [a puerta deJcompartimiento de
secado para evitar que los ni_os y [as mascotas queden atrapados dentro de [a secadora.
introduzca Jamano en e[ eJectrodom6stico cuando eJ tambor est6 en movimiento.
_No
No instaJe o guarde este e[ectrodom6stbo
donde quede expuesto a factores cJim&tbos.
No modifique los controles.
No
repare
ni reempJace
intente reaJizareJ
de de
ninguna
pbza para
deJ e[ectrodom6stbo
salvo
que est6
indicado ni
especfficamente
en mantenimiento
Jas instrucciones
reparaci6n
eJusuario y que
comprenda y tenga [a habiJidad para [Jevar a cabo eJprocedimiento.
No utiJicesuavizante de ropa o productos para e[iminar [a est&tica a menos que el suavizante o
producto est6 recomendado para uso con [a secadora por eJfabricante deJ mismo.
Limpie el fi[tro para pe[usas antes o despu6s de cada carga.
Mantenga eJfirea a[rededor de Ja sa[ida deJ drenaje y Jas fireas circundantes [ibres de peJusa, po[vo y
sucbdad.
EJpersonal t6cnico caJificado debe efectuar una Jimpieza peri6dica deJ interior de Jasecadora y deJ
conducto de drenaje.
@
Este electrodom6stico debe conectarse a tierra correctamente. Nunca enchufe el cable de
aJimentaci6n a un recept_cuJo que no est6 conectado a tierra correctamente ni guarde conformidad
con Jos c6digos JocaJesy nacionaJes. Oonsu[te Jas instrucciones de insta[aci6n para obtener
informaci6n sobre c6mo conectar este ebctrodom6stico a tierra.
No se siente encima de la secadora.
/_
Aseg0rese de que los bolsillos no contengan objetos pequeBos, s61idos y de forma irregular, material
....
"_'_T_ extraBo, etc., por ejemplo: monedas, cuchi[Ios, alfileres, etc.. Tabs objetos podrian daBar [a secadora.
No lave ropa que contenga hebillas grandes, botones u otros objetos de metal pesado o s61ido.
Z_
Se pueden producir p6rdidas de gas en su sistema que generen una situaci6n peligrosa.
A_ERT_
Las p6rdidas de gas pueden no ser detectadas 0nicamente por el olor.
Los proveedores de gas recomiendan que compre e instale un detector de gas aprobado por UL.
Instale y use de acuerdo con las instrucciones del fabricante.
No coloque prendas en la secadora que hayan sido salpicadas o remojadas con aceite vegetal
o aceite de cocina. [ncluso despuBs del [avado, estas prendas pueden contener una cantidad
importante de dichos aceites.
El aceite residual en [as prendas puede prenderse fuego en forma espont&nea. La posibi[idad de
combusti6n espontfinea aumenta cuando [as prendas que contienen aceite vegetal o aceite de
codna son expuestas al calor. Las fuentes de calor, tales como la secadora, pueden ca[entar estas
prendas y permitir que se produzca [a oxidaci6n del aceite a modo de reacci6n. La oxidaci6n genera
calor. Si dicho calor no tiene forma sa[ir, las prendas pueden calentarse [o suficiente como para
prenderse fuego. Amontonar, api[ar o guardar este tipo de prendas puede impedir que el calor sa[ga y
puede generar un peligro de incendio.
Todas [as prendas [impias y sucias que contengan aceite vegetal o aceite de cocina pueden resu[tar
peligrosas. Lavar dichas prendas en agua ca[iente con una dosis adicional de detergente reducir_ e[
peligro, aunque no Io eliminar&. Siempre use el ciclo Ooo[ Down (Enfriamiento) para estas prendas
con el fin de reducir la temperatura. Nunca retire estas prendas cuando la secadora se encuentre
ca[iente ni interrumpa el cic[o de secado hasta que las prendas hayan pasado por el ciclo Ooo[ Down
(Enfriamiento). Nunca amontone o api[e estas prendas cuando est6n calientes.
GUARDE ESTAS INSTRUCCIONES
instrucciones
HUDSON
DV400-03170A
MES.indd
Sec11:7
de seguridad
2012-02-02
7
ZC 11:37:47
I
c©nt nido
INSTALACION
MANUAL
DE LA SECADORA
DE INSTRUCCIONES,
SUGERENCIAS
CUIDADO Y LIMPIEZA
SUGERENCIAS
PARA PRENDAS
ESPECIALES
GUiA DE SOLUCION
DE PROBLEMAS
APENDICE
t
8
HUDSON
9
Desembalaje
9
10
11
11
11
12
Requisitos bfisicos
Requisitos para el tendido de conductos
Importante
para el instalador
Consideraciones
acerca de la ubicaci6n
Instalaci6n
del electrodom6stico
en un
gabinete o en un hueco
Instalaci6n
en casas rodantes
de la secadora
12
Drenaje
13
13
Requisitos en cuanto al gas
Instrucciones
de instalaci6n
de la
comunidad
de Massachusetts
14
14
Requisitos el6ctricos
Conexi6n atierra
15
Conexiones
16
19
Instalaci6n
- procedimiento
general
Lista de verificaci6n
final de la instalaci6n
20
Sugerencias
secadora
21
Inversi6n
23
26
26
26
27
Descripci6n
general del panel de control
Seguro para niSos
Luz del tambor (DV456" solamente)
SeSal
Mi ciclo
27
28
Smart Care (DV456')
Limpie el filtro para pelusas
28
28
Cargue la secadora
C6mo comenzar
29
Panel de control
29
Tambor
29
29
Tambor
Exterior
29
Sistema
30
Sugerencias
31
Controle
estos puntos
32
C6digos
de informaci6n
33
Tabla de indicaciones
34
34
Protecci6n
Declaraci6n
34
35
Especificaciones
Tabla de ciclos
el&ctricas
acerca
del drenaje
de la
de la puerta
de manera
acabado con pintura
de la secadora
de drenaje
adecuada
en polvo
de la secadora
para prendas
especiales
si su secadora...
sobre la tela
del medio ambiente
de conformidad
contenido
DV400-03170A
MES.mdd
Sec2:8
2012-02-02
q7
11:37:48
I
DESEMBALAJE
DE LA SECADORA
Desembab la secadora e inspeccidnela para controlar que no se hayan producido da_os durante el transporte.
Compruebe que haya recibido todos los elementos que se muestran a confinuacidn. Si la secadora sufrid da[_os
durante el transporte, o si faka algOn elemento, comuniquese con el 1-800-SAMSUNG(726-7864).
Para evitar lesiones fisicas o firones, use guantes protectores cada vez que bvante o transporte la secadora.
Z_
........
Los materiales de embalaje pueden ser peligrosos para los ni_os. Mantenga todos
embalaje (bolsas de plfistico, poliestireno, etc.) lejos del alcance de los ni_os.
[ PARTE
los materiales
POSTERIOR
de
]
perior
Filtro
Conducto
IMarco
Herramientas
delantero
de
drenaje
necesarias
Pinzas
Cater
Nivel
Destomillador Phillips
REQUISITOS
Llave inglesa para
tuberias (s61o de gas)
Cinta para conductos
Llave de tuercas
Llave inglesa
BP,SICOS
AsegOrese de tener todo Io necesario para realizar una instalacidn adecuada
• Se requbre un TOMACORRIENTE OON OONEXION A TIERRA. Consulte la secci6n Requisitos el@trbos.
Un CABLE DE ALIMENTAQON para las secadoras el@tricas (excepto en Oanad_).
TUBER[AS DE GAS (si se instala una secadora a gas). Las tuberfas de gas deben cumplir con los c6digos locales y
nadonabs.
El SISTEMA DE DRENAJE - debe consbtir en un conducto de drenaje de metal rigido o flexible con un
recubrimbnto de metal resistente.
instalacidn
HUDSON
DV400-03170A
MES.indd
Sec3:9
de la secadora
2012-02-02
9
CC 11:37:48
I
REQUISITES
PARA EL TENDIDO
DE CONDUCTOS
•
•
Utilice un cenducto de acere galvanizade @de e de aluminie @do, de 4 pulgadas (10,2 cm) de di_metre.
No ufilice un cenducto de mener tamale.
•
•
Los conductes de m_s de 4 pulgadas (10,2 cm) de di_metro pueden causar una mayor acumuladdn de pelusa.
Pedddicamente, debe retirar la pelusa acumulada.
Si es precise utilizar un cenducte de metal flexible, ufilice ei tipe que viene con un recubdmiente de metal resistente. No
utilice un cenducto flexible con un recubrimiente delgade. Se puede predudr una ebstruccidn impertante si se deUa el
conducte flexible en ferma demasiade marcada.
•
•
Nunca instale ningOn ripe de cenducte flexible en paredes, techos u etres espacies que queden ecultes.
Haga que el cenducte de drenaje se mantenga le m_s recto y certe pesibie.
•
•
Asegure las unienes con cinta para cenductes. No utilice terniiles.
Los cenductes fiexibles de pi_stice se pueden enrescar, combat, pinchar, pueden reducir el fluje de aire, prelengar el
tiempe de secade y afectar el funcbnamiente de la secadera.
Los sistemas de drenaje de mayer Iongitud que la recemendada pueden prelengar el tiempe de secade, afectar el
funcienamiente dei equipe y acumuiar pelusa.
El conducte de drenaje debe finalizar en una tapa del drenaje con un reguiador de tire que gire hacia afuera para evitar el
refiuje de aire y el ingrese de insectos e piantas. Nunca utilice una tapa de drenaje con un reguiader de tire magnetice.
La tapa debe tenet 12 pulgadas (30,5 cm) de espacie libre come minime entre la parte inferior de la tapa y el sueb u etra
obstruccidn. La abertura de la tapa debe apuntar hacia abaje.
Nunca instale un fiitre sebre la saiida del drenaje.
Para evitar la acumulacidn de pelusa, no permita que la secadera drene directamente en el huece de una ventana. No
permita que drene debaje de la casa e de una galeria.
Si la red de cenductes del drenaje debe pasar per un _rea que no recibe caier, se debe aislar el cenducto y se le debe
colecar levemente en dedive hacia la tapa de drenaje para reducir la condensaddn y la acumuiacidn de pelusa.
Inspecdene y limpie el interior del sistema de drenaje per le menes una vez per a_e. Desenchufe el cable de aiimentacidn
antes de limpiar.
Oontrele con frecuencia para asegurarse de que el regulader de tire de la tapa de drenaje se abra y se cierre sin
incenvenientes.
Oontrele una vez per rues y limpie aI menes una vez al a_e. Neta: Si las prendas no se secan, verifique que los cenductes
no esten ebstruides.
•
•
•
•
•
•
•
•
•
•
No haga que la secadora drene hacia ninguna pared, teche, sdtane de peque_a aitura e espacie eculte de un edificie,
linea de descarga de gases e cuaiquier otto cenducte cemOn e chimenea. Este pedria generar un peligre de incendie
come censecuenda de la pelusa expuisada per la secadera.
Tipo de tapa
Recomendado
impermeable
Utilice S61opara una instalaciSn de corto alcance
4" (10,2 cm)
Ne Codes de 90°
Rigido
2,438,40
0
2,5" (8,4 cm)
Metfilico fleXible*
cm.
1,249,68
cm.
Rigido
2,255,52
Mete.lice flexible*
cm.
1,005,84
cm.
(24,4 m)
(12,4 m)
(22,6 m)
(10,1 m)
2,072,64 cm.
(20,7 m)
1,127,76 cm.
(11,2 m)
1,889,76 cm.
(18,9 m)
883,92 cm.
(8,8 m)
2
1,737,36 cm.
(17,4 m)
1,005,84 cm.
(10,1 m)
1,554,48 cm.
(15,5 m)
762,00 cm.
(7,6 m)
3
1,432,86 cm.
(14,3 m)
883,92 cm.
(8,8 m)
1,249,68 cm.
(12,5 m)
640,08 cm.
(8,5 m)
1
No utilice un conducte flexible de un material que no sea el metal.
10
HUDSON
instalacidn
DV400-03170A
de la secadora
MES.indd
Sec3:10
2012-02-02
_C 11:37:49
I
Si la nueva secadora se estfi instalando dentro de un sistema de drenaje
existente, debe asegurarse de que:
*
*
el sistema de drenaje cumpla con todos los cddigos
no se utilice un conducto flexible de pDstico;
*
*
se controle
Compruebe
locales, estaduales
y limpie toda la pelusa acumulada del interior del conducto
que el conducto no est6 enroscado o aplastado;
y nacionales;
existente;
* el regulador de tiro de la tapa de drenaje se abra y se cierre sin inconvenientes.
La presidn estAtica de cualquier sistema de drenaje no debe superar las 0,83 pulgadas de la
columna de agua ni ser inferior a O.
Esto se puede medir cuando la secadora estA en funcionamiento
con un mandmetro en el punto
donde el conducto de drenaje se conecta a la secadora. Se debe utilizar la opcidn sin calor. El
tambor de la secadora debe estar vacfo y el filtro para pelusas limpio.
IM PORTANTE
PARA EL INSTALADOR
Lea las siguientes instrucciones con detenimiento
deben conservar para consultas futuras.
Retire [a puerta de tedes los e[ectredem6stices
antes de instalar la secadora.
Estas instrucciones
se
desechades para evitar e[ peligre de que un ni_e se asfixie.
ADVERTE_
CONSIDERACIONES
ACERCA
DE LA UBICACION
Ubique la secadora donde haya suficiente espacio adelante para cargarla y suficiente espacio atrAs para
el sistema de drenaje. Esta secadora viene preparada de fAbrica para el drenaje posterior. Para que drene
por la parte inferior o hacia la derecha o la izquierda (modelo el_ctrico solamente), utilice el kit de drenaje
accesorio (de venta por separado). El kit viene acompa_ado
de instrucciones.
Es importante asegurarse de
que en la habitacidn circule suficiente aire fresco. La secadora debe estar ubicada donde el aire pueda fluir
sin inconvenientes.
Para las secadoras a gas, se debe mantener el espacio libre suficiente
informacidn para garantizar que haya aire suficiente para la combustidn
secadora.
tal como figura en la placa de
y el funcionamiento
adecuado
de la
No instale ni guarde la secadora en un Area donde quede expuesta al agua y/o a los factores climAticos.
Mantenga el Area de la secadora libre de materiales combustibles,
gasolina y otros vapores y Ifquidos
inflamables. Una secadora produce pelusa combustible.
No debe haber pelusas en el Area circundante de
la secadora.
INSTALACION
UN HUECO
DEL ELECTRODOME_STICO
EN UN GABINETE
O EN
A
Debe colocarse en la secadora un drenaje con salida hacia el exterior para reducir el riesgo de
AD_incendio
cuando se instala en un gabinete o en un hueco.
,,
No se debe instalar ningOn otro electrodom_stico
•
ADVERTENO[A: Para reducir e[ riesgo de incendio, debe co[ecarse en [a secadora un drenaje con salida hacia el
exterior.
Censu[te la secddn Drenaje a fin de ebtener m_s infermacidn.
que queme combustible en el mismo gabinete de [a secadora.
•
Los espacies libres minimos entre [a secadora y las paredes adyacentes u etras superficies deben tener [as
siguientes dimensiones:
2" (5,08 cm) en el frente, 17" (43,18 cm) en la parte superior, 1" (2,54 cm) a ambes lados y 5" (12,7 cm) en la parte
posterior.
•
El frente del gabinete debe contar con dos aberturas sin obstruccienes para que ingrese el aire, para ocupar un
&tea total cembinada minima de 72 pu[g 2 (183 cm2), con 3" (7, 62 cm) de abertura minima en la parte superior yen
[a parte inferior. Se acepta una puerta tipo persiana con un espacie libre equiva[ente.
instNacidn
HUDSON
DV400-03170A
MES.indd
Sec3:ll
de la secadora
11
2012-02-02
ZC 11:37:49
I
INSTALACION
EN CASAS
RODANTES
La instalaci6n de la secadora en casas rodantes debe cumplir con la Norma de Construccidn
y Seguridad
de Casas Fabricadas, Tftulo 24 CFR, Parte 3280 [denominada anteriormente
Norma Federal para la
Construccidn
y la Seguridad de Casas Rodantes, Tftulo 24, HUD (Parte 280), 1978] (para los Estados
Unidos) o las Normas CSA Z240 (para Canadfi).
Cuando
piso.
se instala una secadora
Ubique la secadora
en una casa rodante,
debe tener la precaucidn
en un _rea en la que circule suficiente
Se requiere un espacio
mfnimo
de asegurar
la secadora
al
aire fresco.
de 72 pulg 2 (465 cm 2) sin obstrucciones.
Llame al 1-800-SAMSUNG
(728-7864)
anclaje al piso como accesorio.
para obtener
mils informacidn
acerca de la compra del kit de
Todas las instalaciones en casas rodantes deben tener un drenaje con salida hacia el exterior y la
terminaci6n del conducto de drenaje debe estar firmemente asegurada a la estructura de la casa rodante
mediante materiales que no resulten inflamables.
El conducto
Consulte
de drenaje no puede terminar
la seccidn
debajo de la casa rodante.
Drenaje a fin de obtener
m_s informaci6n.
DRENAJE
Si la secadora tiene un drenaje con salida hacia el exterior se evitarfi que ingrese
pelusa y humedad a la habitaci6n.
una gran cantidad
de
En los Estados Unidos:
*
Todas las secadoras
*
El conducto
deben tener un drenaje con salida hacia el exterior.
*
Utilice sdlo los conductos flexibles tipo Ifimina metfilica, si los hubiera, identificados
especfficamente
para su utilizacidn con el electrodom6stico
por el fabricante y que cumplan
con el Esquema para conductos
de transici6n de secadora de ropa, Tema 2158A.
*
No fije el conducto con tornillos
conducto y atrapen pelusa.
de drenaje requerido
tiene 4 pulgadas
(10,2 cm) de difimetro.
u otros medios de sujeci6n
que se extiendan
dentro del
En Canadfi:
*
Utilice sdlo aquellos conductos flexibles tipo Ifimina met_lica, si los hubiera,
identificados por el fabricante para su uso con el electrodom_stico.
*
Todas las secadoras
*
El conducto
especfficamente
deben tener un drenaje con salida hacia el exterior.
de drenaje debe tener 4 pulgadas
(10,2 cm) de di_metro.
Fuera de los EE.UU. y Canadfi:
*
Remftase a los cddigos
locales.
Z_
Debe colocar en la secadora un drenaje con salida hacia el exterior para reducir el riesgo de
......... incendio cuando instala la secadora en un gabinete o en un hueco.
NUNCA UTILICE UN CONDUCTO
FLEXIBLE DE PLASTICO O DE UN MATERIAL QUE NO
SEA EL METAL.
Si su red de conductos existente es de plfistico, de un material que no sea el metal o es
inflamable, reempl_cela por una que sea de metal.
Utilice 0nicamente un conducto de drenaje de metal que no sea inflamable para asegurar
contenci6n del aire expulsado, el calor y la pelusa.
12
HUDSON
instalacidn
DV400-03170A
la
de la secadora
MES.indd
Sec3:12
2012-02-02
_C 11:37:49
I
REQUISITOS
Utilice Onicamente
EN CUANTO
AL GAS
gas natural o gas LP (gas licuado de propano).
LA INSTALACION
DEBE REAUZARSE
EN CONFORMIDAD
CON LOS CODIGOS LOCALES, O EN
AUSENClA
DE ELLOS, CON EL CODIGO NACIONAL
PARA GAS Y COMBUSTIBLES
ANSI/Z223.1,
REVISION M_,S REClENTE (PARA LOS ESTADOS
CAN/CGA-B149
(PARA CANADA).
UNIDOS),
O CON LOS CODIGOS
LA
DE INSTALACION
Las secadoras a gas esta,n equipadas con un orificio para el quemador de modo que puedan set utilizadas
con gas natural. Si tiene pensado utilizar su secadora con gas LP (gas licuado de propano), debera,
efectuarse la conversidn para Iograr un funcionamiento
adecuado y seguro, tarea que debera, estar a cargo
de un t6cnico calificado.
Se recomienda usar un conducto de suministro de gas de 1/2"(1,27 cm) y debe reducirse para la conexidn
con el conducto de gas de 3/8" (1 cm) de su secadora. El Cddigo National para Gas y Combustibles
exige que se instale una va,lvula manual de cierre del gas, aprobada y de fa,cil acceso, dentro de las 6" de
distancia de la secadora.
Las secadoras
a gas instaladas
(46 cm) del piso.
Ademflfls, inmediatamente
contra
en garajes
la corriente
residenciales
deben
de la conexidn
estar
del suministro
instalar una conexidn roscada macho N.P.T. (Rosca nacional para tubos)
conexidn del medidor de prueba.
Su secadora
sistema.
debe estar desconectada
del sistema
elevadas
de suministro
a 18 pulgadas
de gas de la secadora,
de gas durante las pruebas
NO vuelva a utilizar el viejo conducto de gas en metal flexible. El diseflo del conducto
estar certificado por la Asociacidn Americana del Gas (CGA en Canada,).
®
Todo compuesto
petr61eo.
o
A modo de corteda,
artefacto a gas.
ENCENDIDO
de unidn de tuberfas
la mayorfa
utilizado debe ser resistente
de las empresas
se debe
de 1/8" (0,3 cm), accesible
de presidn del
de gas flexible debe
a la accidn
del gas licuado de
locales de gas inspeccionara,n
la instalaci6n
DEL GAS: la secadora utiliza un sistema de encendido automa,tico para encender
quemador.
No existe un piloto que permanezca constantemente
encendido.
INSTRUCCIONES
MASSACHUSETTS
DE INSTALACION
para la
DE LA COMUNIDAD
del
el
DE
La instalacidn de la secadora debera, estar a cargo de un plomero o un gasista matriculado.
Se debera,
instalar una va,lvula de gas manual con una manija en forma de "T" en el conducto de suministro de gas de
la secadora. Si se utiliza un conector de gas flexible para instalar la secadora, el conector debe tener una
Iongitud ma,xima de 3' (36").
/_
®
......... ®
Se pueden producir p6rdidas de gas en su sistema que ocasionen una situacidn
Las p6rdidas de gas pueden no ser detectadas Onicamente por el olor.
o
Los proveedores
o
Instale y use de acuerdo
de gas recomiendan
que compre e instale un detector
con las instrucciones
de gas aprobado
DV400-03170A
MIZS.indd
Sec3:13
por UL.
del fabricante.
instNacidn
HUDSON
peligrosa.
de la secadora
13
2012-02-02
CC 11:37:49
I
REQUISITOS
ELE_CTRICOS
EI diagrama del cableado
del armaz6n.
AD_RT_O_
se encuentra
en la placa debajo del panel de control
o en la parte posterior
La conexi6n inadecuada del conductor de conexi6n a tierra del equipo puede generar una
descarga el_ctrica.
Consulte a un electricista o t6cnico calificado si le surgen dudas acerca de si la conexi6n a tierra
de su secadora es correct& No modifique el enchufe provisto con la secadora; si no entra en el
tomacorriente,
solicite a un electricista calificado que instale el tomacorriente
adecuado.
Para evitar el riesgo innecesario de incendio, descarga eldctrica o lesiones f[sicas, todo el cableado
y la conexi6n a tierra deben realizarse en conformidad con los c6digos locales, o en ausencia de
ellos, con el 06digo EI6ctrico Nacional, ANSI/NFPA Nro. 70, su Qltima revisi6n (para los EE.UU.)
o el 06digo El_ctrico Oanadiense OSA O22.1, sus Qltimas revisiones y los c6digos y ordenanzas
locales. Es su responsabilidad
proveer los servicios el_ctricos adecuados para su secadora.
Todas las instalaciones de gas deberAn realizarse en conformidad con el 06digo Nacional para
Combustibles ANSI/Z2231,
su Qltima revisi6n (para los EE.UU.) o con los 06digos de Instalaci6n
CAN/CGA - B149, su Qltima revisi6n (para CanadA) y los c6digos y ordenanzas locales.
CONEX[0N
A TIERRA
Esta secadora debe conectarse a tierra. En caso de que el electrodom_stico
funcione mal o se
descomponga,
la conexi6n a tierra reducirA el riesgo de descarga el_ctrica al ofrecer una via de menos
resistencia a la corriente el_ctrica.
Modelos a gas
ADV_tNC_
Su secadora tiene un cable con un conductor
conexi6n a tierra.
a tierra del equipo y un enchufe de
El enchufe debe conectarse a un tomacorriente
adecuado que est6 correctamente
conectado a tierra en conformidad con todos los c6digos y ordenanzas locales.
instalado y
No modifique el enchufe provisto con la secadora; si no entra en el tomacorriente,
electricista calificado que instale el tomacorriente
adecuado.
solicite a un
Nunca conecte el cable a tierra alas tuber[as
agua caliente.
A
de conexi6n
de plfistico,
las tuber[as
de gas o alas caner[as de
Modelos el_ctricos
ADV_tNC_
La secadora tiene un cable con un conductor
conexi6n a tierra, de venta por separado.
de conexi6n a tierra del equipo y un enchufe
de
El enchufe debe conectarse a un tomacorriente
adecuado que est6 correctamente
conectado a tierra en conformidad con todos los c6digos y ordenanzas locales.
instalado y
No modifique el enchufe provisto con la secadora; si no entra en el tomacorriente,
electricista calificado que instale el tomacorriente
adecuado.
solicite a un
Si no se utiliza un cable de alimentaci6n y la secadora el6ctrica debe estar permanentemente
conectada, se la debe conectar a un sistema de cableado de metal con conexi6n a tierra
permanente, o se debe conectar un conductor con conexi6n a tierra del equipo a los
conductores
del circuito y a la terminal con conexi6n a tierra del equipo.
14
HUDSON
instalac[6n
DV400-03170A
de la secadora
MES.mdd
Sec3:14
2012-02-02
CC 11:37:49
I
CONEXIONES
ELE_CTRICAS
Antes de poner al electrodom_stico
en funcionamiento
conexi6n a tierra de la secci6n Conexi6n a tierra.
Se recomienda que se destine un circuito derivado
UTILICE UN CABLE PROLONGADOR.
o realizar pruebas,
individual
siga las instrucciones
(o separado)
s61o para la secadora.
de
NO
Modelos a gas - EE.UU. y Canada
Se requiere un servicio
disyuntor de 18 A.
el_ctrico aprobado
de CA de 120 voltios,
80 Hz, con un fusible o
Modelos el_ctricos - $61o EE.UU.
La mayor parte de las secadoras estadounidenses
requieren un servicio el6ctrico aprobado de
CA de 120/240 voltios, 80 Hz. Algunas requieren un servicio el6ctrico aprobado de 120/208
voltios, 60 Hz. Los requisitos del servicio el_ctrico pueden encontrarse en la etiqueta con
informaci6n ubicada detrAs de la puerta. Se requiere un fusible o disyuntor de 30 A a ambos
lados del conducto.
o
Si se utiliza un cable de alimentaci6n,
o
NO se provee el cable de alimentaci6n
estadounidenses.
el cable debe enchufarse
con los modelos
a un tomacorriente
el6ctricos
de 30 A.
de secadoras
IMPORTANTE:
Si Io permiten
los c6digos
locales, el suministro
el_ctrico
de la secadora
puede conectarse
por
medic de un nuevo kit de cables de alimentaci6n
el6ctrica, rotulado para que se Io utilice con la
secadora, es decir que cuente con certificaci6n
U.L y categorizado
en un m[nimo de 120/240
voltios, 30 A con tres conductores
de cobre N. ° 10 que finalicen en terminales de bucle cerrado,
pernos de pala de tipo abierto con extremos rebatidos o con conductores
de esta_o.
o
o
No vuelva a utilizar un cable de alimentaci6n el_ctrica de una secadora vieja. El cable de
alimentaci6n
el6ctrica debe conservarse en el gabinete de la secadora con un dispositivo
alivio de tensi6n con certificaci6n UL adecuado.
de
La conexi6n a tierra a trav6s del conductor neutro estA prohibida para (1) instalaciones
nuevas con circuito derivado, (2) casas rodantes, (3) veh[culos de recreo y (4) Areas en las
que los c6digos locales proh#an la conexi6n a tierra a trav_s de un conductor neutro. (Utilice
un enchufe de 4 pines para el tomacorriente
de 4 ranuras, tipo NEMA 14-30R).
Modelos el_ctricos - $61o Canada
o
Se requiere un servicio el6ctrico aprobado de CA de 120/240
un fusible o disyuntor de 30 A a ambos lados del conducto.
o
Todos los modelos canadienses se env[an con el cable de alimentaci6n
alimentaci6n
debe conectarse a un tomacorriente
de 30 A.
En Canada
no
estfi permitido
convertir
una secadora
a
voltios,
DV400-03170A
MES.mdd
Sec3:15
adjunto.
con
El cable de
208 voltios.
instalac[6n
HUDSON
60 Hz, equipado
de la secadora
15
2012-02-02
CC 11:37:49
I
INSTALACION
Para realizar
- PROCEDIMIENTO
una instalaci6n
Lea estas instrucciones
Para instalar
t.
adecuada,
en su totalidad
la secadora,
siga
estos
GENERAL
recomendamos
contratar
a un instalador
pasos:
Mueva la secadora al lugar adecuado para la instalaci6n. Considere instalar la secadora
una al lado de la otra para tener fficil acceso a ambos electrodom_sticos.
[_
calificado.
antes de iniciar la instalacidn.
y la lavadora
ara mover la secadora con facilidad, coloque dos de las protecciones
superiores de cartdn en
el piso. Incline la secadora hacia uno de los laterales, de modo tal que quede atravesando ambas
protecciones.
Empuje la secadora de modo que quede cerca de su ubicacidn definitiva. Coloque la
secadora en posici6n vertical. Deje suficiente espacio alrededor de la secadora para poder conectar
los conductos, cable de alimentacidn, etc.
2.
Si necesita cambiar la direccidn de la puerta,
termine, vuelva al Paso 3 a continuacidn.
consulte
Inversi6n
de la puerta en la p_gina.
Cuando
3.
Consulte la seccidn Drenaje antes de instalar el sistema de drenaje. Instale la red de conductos desde
la secadora hasta la tapa de drenaje. El extremo con reborde de las secciones del conducto deben
apuntar hacia afuera de la secadora. NO utilice tornillos con recubrimiento
de metal cuando realice el
montaje de los conductos. Se les debe colocar cinta alas uniones. Nunca utilice material de pl_stico
flexible para el drenaje.
Una sugerencia para que las instalaciones
queden bien ajustadas: conecte una seccidn del sistema de
drenaje a la secadora antes de colocarla en su lugar. Utilice cinta para conductos
para asegurar esta
seccidn a la secadora, pero no cubra las aberturas
gabinete de la secadora.
4.
Si tiene un modelo
5.
Consulte la seccidn
continuacidn.
HUDSON
vaya al Paso 6. Si tiene un modelo
Requisitos
protectora
Retire la cubierta
b.
Aplique compuesto
de unidn de tubeffas
todas las conexiones roscadas.
l compuesto
de petr61eo.
ubicadas
en la parte posterior
del
a gas, vaya al paso siguiente.
en cuanto al gas, luego siga los pasos indicados
a.
[_
16
el6ctrico,
de ventilacidn
que figuran a
de la rosca para tubos.
de unidn de tuberfas
o 1 1/2 vueltas aproximadamente
utilizado debe ser resistente
de cinta de Teflon en
a la acci6n
del gas licuado
c.
Conecte el suministro de gas a la secadora. Se requiere un accesorio adicional para conectar el
extremo de la rosca hembra de 3/4" (1,9 cm) de un conector flexible al extremo de la rosca macho
de 3/8" (1 cm) de la secadora.
d.
Ajuste firmemente
e.
Abra el suministro de gas. Controle todas las conexiones de gas para detectar si presentan
p6rdidas usando una solucidn jabonosa. Si aparecen burbujas, ajuste las conexiones y vuelva a
controlar. NO use la llama abierta para verificar si hay p_rdidas de gas.
f.
Vaya al Paso 6 en la pfigina siguiente
instalacidn
DV400-03170A
el accesorio
de la tuberfa de gas sobre las roscas.
de la secadora
MES.indd
Sec3:16
2012-02-02
_C 11:37:49
I
6.
Consulte la seccidn Requisitos EI6ctricos, luego siga las instrucciones
para conexidn de sistemas
cables (Paso 7) o las instrucciones
para el sistema de 4 cables (Paso 8) a continuacidn.
7.
Instrucciones
A° Conector
de 3
para el sistema de tres cables:
a tierra externo
IB° Cable a tierra neutro (verde/amarillo)
C°
Tornillo central de color plateado del bloque de terminales
O° Cable neutro (cable blanco o central)
E°
Proteccidn
contra los tirones con certificacidn
UL de 3A" (1,9 cm)
1. Afloje o retire el tornillo central del bloque de terminales.
2. Conecte el cable neutro (cable blanco o central) del cable
de alimentacidn a la terminal de tornillo central de color
plateado del bloque de terminales.
3. Conecte
tornillos.
4. Ajuste los tornillos
5.
/_
........
con dispositivo
Inserte la lengL_eta de la cubierta
la secadora.
Asegure
la cubierta
externos del bloque de terminales.
Ajuste
los
de alivio de tensi6n.
del bloque de terminales
en la ranura del panel posterior
de
con un tornillo de sujecidn.
Si realiza la conversidn del sistema el@ctrico de 4 cables a 3 cables, debe conectar la cinta
de conexi6n a tierra al soporte del bloque de terminales para conectar a tierra el armazdn de
la secadora al conductor neutro.
Recomendamos
usar terminales
instalarlos perfectamente.
8.
Ajuste el tornillo.
los demos cables a los tornillos
Instrucciones
A° Conector
para el sistema de cuatro
a tierra externo
IB° Cable verde o de cobre desnudo
de anillo. Si utiliza terminales
de correa,
aseg0rese
de
cables:
del cable de alimentacidn
C°
Protecci6n
contra los tirones con certificacidn
D°
Tornillo central de color plateado del bloque de terminales
UL de 3A,,(1,9 cm)
I_° Cable a tierra neutro (verde/amarillo)
F.
Cable neutro (cable blanco o central)
1.
Retire el tornillo del conector
a tierra externo.
2. Conecte el cable a tierra (verde o sin cubierta) del cable
de alimentacidn al tornillo del conector a tierra externo. Si
desea conectar B (cable de cobre verde o desnudo del
cable de alimentaci6n) al terminal neutro sin montarlo en A
(conexidn a tierra del gabinete), Ilame al servicio t6cnico.
3. Afloje o retire el tornillo central del bloque de terminales.
4. Conecte el cable neutro (cable blanco o central) del cable de alimentacidn
y el cable a tierra
del electrodom@stico
(verde con franjas amarillas) debajo del tornillo central del bloque de
terminales.
5. Conecte
tornillos.
los demos cables a los tornillos
6. Ajuste los tornillos
7.
con dispositivo
Inserte la lengL_eta de la cubierta
la secadora.
Asegure
la cubierta
externos del bloque de terminales.
de alivio de tensi6n.
del bloque de terminales
en la ranura del panel posterior
de anillo. Si utiliza terminales
de correa,
insta(acidn
DV400-03170A
MES.mdd
Sec3:17
los
de
con un tornillo de sujecidn.
Recomendamos
usar terminales
instalarlos perfectamente.
HUDSON
Ajuste
aseg0rese
de
de la secadora
17
2012-02-02
_7
11:37:49
I
MODELOS
ESTADOUNIDENSES:
IMPORTANTE - Tedos los modelos estadounidenses est_n diseflados para una CONEXION DE SISTEMAS DE 3
CABLES. El armazdn de la secadora est_ conectade a tierra al conductor neutre del bloque de terminabs. Se requiere
una OONEXION DE SISTEMAS DE 4 CABLES para las construcciones nuevas e remedeladas, las casas redantes e
si los c6digos locales no permiten la conexi6n a tierra a travBs del neutre. Si utiliza un sistema de 4 cables, no puede
cenectar a tierra el armaz6n de la secadera al conductor neutre del bloque de terminabs.
Retire la tapa del bbque de terminales. Inserte el cable de alimentaci6n con una preteccidn centra los tirones con
certificaci6n UL a trav@ del orificie previste en el gabinete cerca del bbque de terminabs.
Se debe utilizar un dispositivo de alivio de tensidn. No afloje las tuercas ya instaladas en el bloque de terminabs.
AsegOrese de que est6n ajustadas. Utilice un tomacorriente para huecos profundos de 3/8" (1 cm).
9.
Coneete la manguera de entrada de agua. Para obtener instrueciones,
vaya a Conexidn de la manguera de entrada de agua en la p_gina
Nivel
t O. La secadora debe estar nivelada para garantizar un secado dptimo.
Para nivelar la secadora, siga los pasos que figuran a continuacidn:
a.
Con un nivel, compruebe si la seeadora
lade y de adelante hacia atr_s.
est_ nivelada de lade a
b.
Si la seeadora no est_ nivelada, ajuste las patas niveladoras de la
parte inferior de la base de la secadora hasta que la lavadora est6
nivelada de lade a lade y de adelante haeia atr_s. Hacer girar lab
paras en el sentido de las agujas del reloj ias retrae. Haeer girar
ias patas en el sentido eontrario al de las agujas de reloj las afioja
y extiende.
Para colocar la secadora a la misma altura que la lavadora,
retraiga completamente
las patas niveladoras girfindolas
en sentido contrario alas agujas del reloj, luego afloje las
patas girfindolas en el sentido de las agujas del reloj. Una
vez que la secadora esta" a la misma altura que la lavadora,
siga las instrucciones precedentes para nivelar la secadora.
i Retraer compbtamente
i
Luego
Patas
niveladoras
afiojar
Ajuste las patas niveladoras stile Io necesario para nivelar la secadora.
niveladoras m_s de Io necesario puede hacer que la secadora vibre.
Extender las patas
t 1. AsegLirese de que todas las conexiones de gas (en los modelos a gas), y las conexiones el6ctricas y
del drenaje est6n completas. Enchufe la secadora y controle su funcionamiento
utilizando la lista de
verificacidn que figura a continuacidn.
t2. Para MODELOS A GAS 0NICAMENTE
Es posible que al principle el quemador
gas. Permitir que la secadora funcione
minutes el gas no se enciende, apague
de gas hacia su secadora est6 abierto.
sienta calor en el drenaje.
18
HUDSON
instalacidn
DV400-03170A
no se encienda debido a la presencia de aire en el cenducto de
con la opcidn de calor purgar_ el conducto. Si en el lapse de 5
la secadora y espere 5 minutes. AsegQrese de que el suministro
Para confirmar que el gas estfi encendido, controle que se
de la secadora
MIZS.mdd
Sec3:18
2012-02-02
_C 11:37:50
I
LISTA DE VERIFICACION
[]
La secadora
[]
Los cenductos
est_ enchufada
[]
Usted usd conducto
plfistico.
[]
La secadora
[]
Para modelos
[]
Encienda
FINAL DE LA INSTALACION
a un temacorriente
de drenaje est_n conectados
y est_ conectada
y se ha celocado
rfgido o flexible con un recubrimiento
est_ nivelada y apoyada
firmemente
para confirmar
que funciona,
de metal resistente,
no conducto
calienta
de gas.
y se apaga.
instNacidn
HUDSON
DV400-03170A
M£S.mdd
Sec3:19
flexible de
sobre el piso.
a gas: El gas est_ abierto y no hay p6rdidas
la secadora
a tierra correctamente.
cinta alas uniones.
de la secadora
19
2012-02-02
_C 11:37:50
I
SUGERENCIAS
ACERCA
Z_
Un eonducto flexible
......... riesgo de incendio.
DEL DRENAJE
de plAstico o de un material que no sea el metal presenta
AsegOrese de que su secadora
correctamente
DE LA SECADORA
un poteneial
est6 instalada
para que extraiga el aire fAcilmente.
Secadora_
_
I _i
Pared
:1 I I CONDUOTO
DE DRENAJE
Utilice un conducto de metal rfgido, de 4" de diAmetro.
Coloque cinta en todas las uniones, incluso en la
secadora.
Nunca use tornillos que atrapen pelusa.
3.
Mantenga
los conductos
Limpie tedos
secadora.
Io mAs recto posible.
los viejos conductos
AsegOrese de que la ventilacidn
inconvenientes.
Inspeccione
antes de instalar la nueva
se abra y se cierre sin
y limpie el sistema de drenaje todos
los aSos.
No permita que un sistema de drenaje
defectuoso demore el secado:
20
HUDSON
t.
No limite la secadora
defectuoso.
2.
No use un conducto flexible de plAstico, de laminas
metAlicas delgadas o de un material distinto del
metal.
3.
No use conductos
innecesariamente
tienen muchos codes.
4.
No use conductos
u obstruidos.
instalacidn
DV400-03170A
con un sistema
o tubes
2
@
de drenaje
3
4
largos que
de ventilacidn
aplastados
de la secadora
MES.indd
Sec3:20
2012-02-02
CC 11:37:50
I
INVERSION
DE LA PUERTA
1.
Desconecte
2.
Retire los cuatro tornillos
el cable de alimentaci6n.
3.
Retire la puerta levantfindola.
4.
Retire los dos tornillos de la placa de apoyo y luego retire la placa
de apoyo de la cubierta
5.
Monte la placa de apoyo del lado opuesto utilizando
retirados de la placa de apoyo en el paso 4.
6.
Monte la placa de apoyo de la cubierta
7.
Retire las dos bisagras
cubierta.
8.
Monte las dos bisagras de la
cubierta del lado opuesto.
de la bisagra de la puerta.
C:-[
22:22
122 _2:C>
los tornillos
del lado opuesto.
de la
Para retirar la placa de apoyo de
la cubierta y las bisagras de la
cubierta, utilice una herramienta
de ajuste (-).
9.
Retire los 14 tornillos,
Hay dos tornillos (L) distintos
(de mayor Iongitud).
de los demfis
instalaci6n
HUDSON
DV400-03170A
MES.mdd
Sec3:21
de la secadora
21
2012-02-02
CC 11:37:50
I
t0o Retire el vidrio de la puerta.
t 1, Intercambie
las posiciones.
: Bisagra de la cubierta a manija
de la puerta
: Bisagra de apoyo a gufa del
vidrio de la puerta
t2. Retire la puerta de la bisagra
y vuelva a montarla del lado
opuesto.
[_
magen ilustrativa
montaje.
t3, Retire la cubierta
del proceso
e
de
del orificio (P1).
t4, Monte el vidrio de la puerta y luego ajuste los 14
tornillos que retird en el paso 9.
t5. Coloque
la cubierta
del orificio.
L (Poco sucla)
Se incluye una cubierta de repuesto
orificio en el manual de montaje.
P
para el
t6, Instale la puerta en el marco frontal y luego apriete los
4 tornillos que retird en el paso 2.
[_
22
HUDSON
erifique la posicidn
de la puerta,
instalacidn
DV400-03170A
de los tornillos
que instal6 en la bisagra
de la secadora
MES.indd
Sec3:22
2012-02-02
_C 11:37:51
I
/_
........
Pare reducir el riesgo de incendio, descarga el6ctrica o lesiones personales, lea las INSTRUCCIONES
DE SEGURIDAD IMPORTANTES antes de poner en funcionamiento
el aparato.
DESCRIPCION
GENERAL
DEL PANEL DE CONTROL
Power
Heavy Duty
Normal
....................................
Sanitize
f
[]__!!
a
Bedding
W/_
_
_
Delicates_k
'_"_
!y
2"/._Air
Quick Dry
II
m
Very Dry
More
Dry
II
High
I
m Medium
m 40 rain.
Fluffll ,NormaIDry,Low
Wrinkle
@
@
_/
@@
i'Wrhlkle
_
Prevenl
,
-30,,_i.n.
i(U}
@
i
i
1:7o @@@
@
Power
Heavy Duty
....................................
Sanitize
djust TI
PermPress
_./_
_-_Time
hqin 9
Dry
Coding
_!_t_
Est.T<,ieRe,,,alr,17
I Very Dry
Bedding
_{
,,_,,.
/
Delicates
_\-Sensor
_.!W.uick
k
Dry
/J"'--//_Wrinkle
Rel....
i
I
More
Dry
I
High
I
a
NormaIDry
u
Medium
R 30 rain.
!
m 20 rnin.
'......
lid DampDry
@
m Low
40 rain,
'!W_}t--
" ......
_,'
/
@
i ........ i ...........i
®cD cb cD ®
i
0®®
Pare seleccionar un ciclo, gire el disco Selector de ciclos haste Ilegar al ciclo deseado.
La luz del indicador junto al nombre del ciclo se iluminar& Los ciclos Normal (Normal),
Heavy Duty (Servicio pesado), Perm Press (PJancha permanente), Bedding (Rope de
came), Delicates (Prendas delicadas) y Towels (ToaNas)son ciclos Sensor Dry (Secado
con sensor).
La opci6n Sensor Dry (Secado con sensor) detecta autom&ticamente la humedad en
la carga y apaga la secadora cuando la carga alcanza el nivel de secado qua usted
seleccion6 con el bot6n Dry Level Sebction (Sebcci6n de nivel de secado) (ver a
continuaci6n).
Normal (Normal): utiNce este ciclo pare secar cargas de algod6n, rope interior y linD.
Heaw Duty (Potencia extra): utilice este ciclo pare secar las tales resistentes, tabs
cored los jeans, el corderoy y la rope de trabajo con calor a alta temperature.
iiiiiiiiiiiiiiiiiiiiiiiiiiiiiiiiiiiiiiiiiiiiiiiiiiiiiiiiiiiiiiiiiiiiiiiiiiiiiiiiiiiiiiiiiiiiiiiiiiiiiiiiiiiiiiiiiiiiiiiii
Perm Press (Plancha permanente): seca automfiticamente prendas de algod6n sin
arrugas, tambi6n tales sint6ticas, tejidos y tales qua requieren planchado permanente.
Bedding (Rope de came) - pare prendas voluminosas, coreD frazadas, sfibanas y
edredones.
Delicates (Delicada): este cido rue disehado pare secar prendas sensibbs al calor a
baja temperature de secado.
mmmmmmmmmmmmmmmmmmmmmmmmmmmmmmmmmmmmmmmm_
,
Towels (ToaNas) (DV456)- Pare secar toallas de ba_o y prendas similares.
Sanitize (Desinfecci6n) - Desinfecta las prendas irnpregnando la tela con calor a alta
temperature durante el ciclo de secado. Utilice este ciclo pare mantener su rope de
mmmmmmmmmmmmmmmmmmmmmmmmmmmmmmmmmmmmmmmm_
came y cortinas limpias pot medic de la desinfecci6n.
manual
HUDSON
DV400-03170A
MES.indd
Sec6:23
de instrucciones,
sugerencias
28
2012-02-02
CC 11:37:51
I
Time Dry (Secado con temporizador)
cblo deseado en minutes.
: este cblo le permite sebcdonar
el tiempo de1
Gire el disco Sebctor de ciclos a Time Dry (Secado con tempodzador), a continuad6n,
presione la flecha hacia ardba de Adjust Time (Ajustar tbmpo) para determinar el
tiempo de secado. Presione la flecha repetidamente para despbzarse per las opciones
de tbmpo.
Quick Dry (Secado r_pido) - ofrece un cblo de secado en 30 minutes.
Air Fluff (Secado a temperatura ambiente) (DV456") - este ciclo seca la carga con
awe a temperatura ambbnte.
Wrinkle Release (Desarrugar): este cblo eliminar& las arrugas de prendas que
estan Ih_npias,secas y s61o bvemente arrugadas, tales come prendas que extrajo de
un armado Ibno, una mabta o prendas que ban estado en la secadora demasiado
tiempo despu6s de la finNizaci6n del dale. El cido Wrinkle Release se puede usar con
cualquier temperatura.
La pantNla digital muestra el tiempo restante de1 ciclo calculado despu6s de presionar
el bot6n Start/Pause (Inido/Pausa). El tiempo restante calculado puede fluctuar a
medida que avance el ciclo.
Se iluminar& la luz de Drying (Secar) y se mantendrfi iluminada hasta que se haya
eumplido el ciclo.
Ouando la secadora est6 en la fase de enfriamiento, se iluminar& la luz de Oooling
(Refrescar). Ouando la secadora est6 en la fase de prevenci6n de arrugas, se iluminar&
la luz Is Wrinkle Prevent (Prevenci6n de arrugas).
Cuando
eloidohaya
finalizado,
aparecer_
Ea
naLabra
"End"
(Fin)
enlapantalEa
hasta
que presione el bot6n Start/Pause (Inicio/Pausa) o el bot6n Power (Eneendido). Si su
seoadora
sedetiene
durante
uncido,lasluees
delindioador
parpadear_n
hasta
que
presione el bot6n Start/Pause (Inicio/Pausa).
Para seleccionar el nivel de secado en los ciclos Normal (Norm@, Heavy Duty (Servicio
pesado), u otros ciclos Sensor Dry (Secado con sensor), presione el bot6n Dry Level
(Nivel de secado). Se iluminarfi una luz en el indicador junto al nivel de secado que
sebccion6.
Presione el bot6n repetidamente para desplazarse per las opciones. Las cargas mils
grandes o m@ voluminosas posibbmente requieran la opci6n Very Dry (Muy seco) o
More Dry (M_s seco) para que el secado sea complete.
La opci6n Damp Dry (Oentrifugado parcial) fue concebida para secar las prendas
parcialmente. Utilicela para las prendas que deban secarse en posici6n horizontal o
colgarse.
Se iluminar_ una luz en el indicador junto a la temperatura que seleccion6. Presione el
bot6n repetidamente para desplazarse per las opdones.
Para seleccionar
High
(Alta): para la
lostemperatura
algodones resistentes
para la carga,
o aquellos
presionecon
el bot6n
el r6tulo
Temp
Tumble
_emperatura).
Dry (Secar
en secadora).
a,godonesMedium
,Mediaoo,:,ivianos
uotras
te,aSprendasqUeconre
arar to,o 'anehad°Tumble
Dry ermanente'Medium
<Seearte'as
s,ntu,erene,
t,oaS,en
secadora a temperatura media).
Low (Baja): para prendas sensibles al calor con el r6tulo Tumble Dry Low (Secar en
secadora a temperatura baja) o Tumble Dry Warm (Secar en secadora a temperatura
e&lida).
Extra Low (Extrabaja) (DV456") - ofrece una opci6n de secado con calor a la menor
temperatura posible.
Cuando usa los delos Manual Dry (Secado manual), puede ajustar el tiempo de
secado presionando el bot6n de selecci6n de tiempo.
Durante el dclo Sensor Dry (Secado con sensor), el indicador luminico del tiempo se
eneuentra apagado porque el tbmpo de secado exacto se determina segOn los niveles
de humedad fluctuantes.
24
HUDSON
manual de instrucciones,
DV400-03170A
MES.indd
Sec6:24
sugerencias
2012-02-02
_C 11:37:51
I
Adjust Time (Ajustar tiempo) - puede agregar o restar tiempo a los tiempos
configurados autom&ticamente en los cities Wrinkle Release (Desarrugar) y Manual
Dry (Secado manual) (cities Time Dry (Secado con temporizador), Quick Dry (Secado
r_pido) o Air Fluff (Secado a temperatura ambbnte)).
Para agregar o restar tbmpo al ciclo, presione la teda Adjust Time (Ajustar tiempo) con
la flecha hacia arriba o hacia abajo hasta que aparezca el tbmpo deseado.
Wrinkle Prevent (Prevencidn de arrugas): ofrece aproximadamente 180 minutes
de secado intermitente con aire fresco al final del ciclo para reducir la formaci6n de
arrugas. Presione el bot6n Wrinkle Prevent (Prevenci6n de arrugas) para activar dicha
funci6n.
i!@!iiiii_!i_!i!:!!ii_i!i!iiiiiiiiiiiiiiiiiilili
:iiiii¸¸ji_ii!_i_i:!i!i!i_i!_i!_ii_i_i!_!_!_
!
La luz del indicador arriba de la tecla se iBminar& cuando sebccione Wrinkle Prevent
(Prevenci6n de arrugas).
La carga est_ seca y puede retirarla en cualquier memento durante el cido Wrinkle
Prevent (Prevenci6n de arrugas).
i¸¸III
Dii
I¸I¸i
Mixed Load Bell (Timbre de carga mixta) (DV456") - es una Narma que le notifica
cuando el nivel de secado promedio de una carga mixta con diversos tipos de telas
ha abanzado el centrifugado parcial (80 % seco). Ouando se alcanza este nivel, suena
una alarma durante cinco (5) segundos. Despu@ de que suena la aJarma, la secadora
Esta funci6n s6Jo puede seleecionarse en eI ciclo Sensor Dry (Secado con sensor) y eI
nivel de secado solo puede seJeceionarse desde Normal Dry (Secado norm@, More
Dry (M@ seco) y Very Dry (Muy seco).
quecontinuar_
usted
seieccion_
fuoeionando
basraioicio
del
qUeeido
usted
laapague
ropa
aleance
elverificar
nivel
de
Smart
Care
(Cuidado al
inteligente)
(DV456")UtiJiceola
esta
funci6n
para
elsecado
funcionamiento de la secadora mediante su tel6fono inteligente cuando observa algOn
probbma con el ebctrodom@tico. Esta funci6n se activa si mantiene presionado el
bot6n Mixed Load Bell _imbre de carga mixta) durante 3 segundos dentro de los 10
segundos posteriores al encendido de la secadora o cuando se produce un error.
Presi6nelo para detener y reiniciar los programas.
Elija su ciclo favorite, induidos el ciclo, la temperatura, la opci6n de nivel de secado,
etc. (Oonsulte la p@na 27 para conocer m_s detalles).
Presi6nelo una vez para encender la secadora y presi6nelo nuevamente para apagarla.
Si enciende su secadora y no toca ningOn bot6n durante 10 minutes, se apagar_
autom&ticamente.
manual
HUDSON
DV400-03170A
MIZS.indd
Sec6:25
de instrucciones,
sugerencias
25
2012-02-02
_C 11:37:52
I
SEGURO
Una funci6n
PARA NII_OS
para evitar que los niSos jueguen con la secadora.
Config uraci6n/Liberaci6n
Si desea configurar o liberar esta funci6n,
y Time (Tiempo) durante 3 segundos.
presione
simultfineamente
los botones
Temp. (Temp.)
Detalles del Seguro para niRos
Puede configurar
el Seguro
para ni_os mientras su secadora
Una vez que active el Seguro para ni_os, no responderA
Power (Encendido), hasta que libere dicha funci6n.
Se iluminarfi
el indicador
estA en funcionamiento.
ningOn bot6n,
excepto el bot6n
de Seguro para ni_os.
Si no liber6 el Seguro para ni_os, y luego apag6 y encendi6 la secadora, la funci6n Seguro
para ni_os continuarfi activada. Para liberar el Seguro para ni_os, siga las instrucciones
detalladas a continuaci6n.
[_
uando otros botones, salvo el bot6n Power (Encendido), no respondan,
el indicador de Seguro para ni_os. Si el Seguro para ni_os estA activado,
instrucciones
precedentes para desactivarlo.
LUZ DEL TAMBOR
Enciende el tambor
(DV456"
de la secadora
verifique
siga las
SOLAMENTE)
mientras se realiza el secado.
Encendido y apagado
Mantenga
m_s.
[_
presionado
el bot6n Wrinkle
Prevent (Prevenci6n
de arrugas) durante
3 segundos
o
Puede encender y apagar la luz del tambor cuando la secadora estfi funcionando y cuando
se detiene. Si no apaga la luz del tambor 5 minutos despu6s de encenderla, la luz del
tambor se apaga automfiticamente.
SENAL
Cuando
el ciclo haya finalizado,
se escucharA
una sepal sonora.
Si mantiene presionados
los botones Dry Level (Nivel de secado) y Temp (Temperatura)
durante 3 segundos o mAs, la sepal sonora sonarfi en forma intermitente.
Ajuste el volumen
de la sepal sonora o apAguela
Presione el bot6n repetidamente
26
HUDSON
manual de instrucciones,
DV400-03170A
MES.mdd
Sec6:26
para desplazarse
presionando
simultfineamente
el bot6n Signal (SePal).
por las opciones.
sugerencias
2012-02-02
CC 11:37:52
I
MI ClCLO
1, Los usuarios s61o pueden utilizar esta funci6n cuando el producto esta encendido yen modo de espera.
2. La conflguraci6n de My Cycle (Mi ciclo) consta de dos funciones, Save (Guardar) y Load (Cargar), que se
estabbcen segOn el tiempo en que se mantiene presionado el bot6n.
3,
4.
5.
Cuando el bot6n se mantiene presionado durante 3 segundos o mas: se establece la funci6n My Cycle Save
(Guardar mi ciclo), (se oir_ el sonido de la configuraci6n de opciones)
Cuando el bot6n se mantiene presionado durante menos de 3 segundos: se establece la funci6n My Cycle
Load (Cargar mi cido), (se oir_ el sonido de cambio de nivel)
Cuando se configura My Cycle Load (Cargar mi ciclo) y no existe ningOn programa guardado, se estabbce el
programa predeterminado.
Si se mantiene presionado el bot6n My Cycle (Mi cido), el LED de My Cycle se enciende. (Siempre que la secadora
cuente con dicho LED).
Los ebmentos que se guardan en la funci6n My Cycle (Mi ciclo) son: el programa, la temperatura y el nivel de
secado.
6.
Cuando se configura My Cycle Save (Guardar mi ciclo), los LED correspondientes al programa y a la opci6n
configurados actualmente parpadean a intervalos de 0,5 segundos durante 3 segundos, y si en esos 3 segundos.
se modifica la configuraci6n del programa y de la opci6n, los LED permanecen encendidos.
7.
La funci6n My Cycle Save (Guardar mi ciclo) no se puede configurar en estado de pausa y si el usuario intenta
configurada, se oir_ un sonido de error.
Si la funci6n My Cycle Load (Cargar mi ciclo) se configura mientras los LED correspondientes al programa y a la
opci6n parpadean debido a que se est& configurando la funci6n My Cycle Save (Guardar mi ciclo), los LED dejan
de parpadear y permanecen encendidos.
8.
9.
Si se presiona un boton para guardar una opci6n o si se modifica el programa mientras se configura My Cycle Save
(Guardar mi ciclo), el LED de My Cycle se apaga.
10. La funci6n My Cycle (Mi ciclo) se libera cuando el producto Ibga al final del cido o se apaga.
SMART CARE (DV456")
Esta funci@l permite comprobar el estado de la lavadora con un teldono inteligente.
1. Para activar la funcbn Smart Care, presione el boton Power (Encendido) para poner en fundonamiento la secadora
y Bego mantenga presionado el bot6n Mixed Load Bell _imbre de carga mixta) durante 3 segundos. Si presiona
un bot6n distinto al bot6n Mixed Load Bell _imbre de carga mixta) despu6s de encender la lavadora, ya no podr_
activar la funci6n Smart Care.
2.
3,
4,
5.
6.
7.
Si activa la funci6n Smart Care. la I_mpara sobre el bot6n Mixed Load Bell _imbre de carga mixta) parpadea 2 o 3
segundos y el indicador Smart Care se enciende en la pantalla.
Ejecute la app Smart Care en su tel6fono inteligente.
Puede usar la funci6n Smart Care s61o en un m6vil Samsung Galaxy.
Enfoque la c_mara del teldono inteligente hacia el panel de la pantalla del ebctrodom6stico.
Si enfoca la c_mara del teldono inteligente hacia el panel de la pantNla del ebctrodom6stico, el resultado se
reconoce autom_ticamente y el tipo de error y la soluci6n se muestran autom_ticamente en el teldono inteligente.
Si un error se produce m_s de una vez, ingrese manualmente el c6digo de error que se muestra en el panel de la
pantalla de la lavadora en la aplicaci6n Smart Care.
Descarga de la aplicaci6n Smart Care
,,
,,
Usuarios de Galaxy S: Para descargar la aplicaci6n, sebccione el menLi Samsung AppStore en Android Market
(presionando el bot6n Menu (Men0) en Android Market) o con@tese a http://mobile.kr.samsungmobib.com/apps
instale Samsung AppStore.
Usuarios de Galaxy $2: Para descargar la aplicaci6n, ejecute SamsungApps en la pantalla de inicio del teldono
inteligente e ingrese a Samsung AppStore.
e
Se recomienda deel uso
uso de
de Smart
la aplicaci6n
Precauciones
Care en tel6fonos Galaxy S o $2 que funcionen con la versi6n 2.2 de android.
,,
"
,,
Si un dispositivo de iluminaci6n (por ejemplo, un fluorescente o una I_mpara) se refleja en el panel de la
pantalla de la lavadora, es posible que el resultado no se reconozca facilmente.
Si un error se produce m_s de una vez, ingrese manualmente el c6digo de error que se muestra en el panel de
la pantalla de la lavadora en la aplicaci6n Smart Care.
Si el _ngulo de la camara del tel6fono inteligente y el panel de la pantalla de la lavadora no es el correcto, es
posible que el error no se reconozca adecuadamente.Mantenga el teldono inteligente respecto al panel de la
pantalla en el &ngulo que se muestra en la ilustraci6n.
manual
HUDSON
DV400-03170A
MES.indd
Sec6:27
de instrucciones,
sugerencias
27
2012-02-02
_7
11:37:52
I
LIMPIE EL FILTRO PARA PELUSAS
o
Despu6s
o
Para reducir el tiempo de secado.
de cada carga.
o
Para hacer uso de la energfa con mayor eficacia.
No haga funcionar
pelusas
colocado.
la secadora
sin el filtro para
Filtro
Marco delantero
Puerta
CARGUE
LA SECADORA
DE MANERA
ADECUADA
o
Coloque
o
En cargas mixtas, las telas pesadas y livianas se secan en forma diferente. Esto puede ocasionar que
las telas livianas est6n secas mientras que las telas pesadas queden hQmedas al final del ciclo de
secado.
o
Agregue una o mils prendas similares adicionales a la secadora cuando esti secando
prendas. Esto mejora el funcionamiento
de la secadora y la eficacia del secado.
o
Sobrecargar la secadora limita su funcionamiento
formacidn excesiva de arrugas en algunas telas.
sdlo una carga de ropa en la secadora
por vez.
y ocasiona
un secado
desparejo
sdlo una o dos
asf como
la
COMO COMENZAR
t.
Cargue
2.
Cierre la puerta.
3.
4.
Seleccione el ciclo y las opciones
Presione el botdn Inicio/Pausa.
5.
Se iluminaril
6.
El tiempo del ciclo calculado apareceri
en la pantalla.
El tiempo puede fluctuar debido a que los niveles de humedad
[_o
o
o
la secadora
dejando algo de espacio
la luz del indicador
libre. NO la sobrecargue.
adecuadas
para la carga (consulte
las piginas
23, 24, 25).
de la secadora.
fluctOan en la secadora.
Cuando haya finalizado el ciclo, la palabra "End" (Fin) apareceri en la pantalla.
Si presiona Power (Encendido), se cancelaril el ciclo y la secadora se detendr&
Los indicadores de Drying (Secando), Cooling (Enfriando)
se iluminariln durante tales fases del ciclo.
No coloque
ningOn objeto en la parte superior
de la secadora
y Wrinkle
cuando
Prevent
(Prevencidn
de arrugas)
esti en funcionamiento
ADVER_
28
HUDSON
manual de instrucciones,
DV400-03170A
MES.mdd
Sec6:28
sugerencias
2012-02-02
CC 11:37:52
I
y impi@7
PANEL DE CONTROL
Limpie con un paBo suave y h0medo.
No rocfe el panel directamente
No utilice sustancias
con limpiadores
abrasivas.
en aerosol.
El acabado del panel de control puede daBarse a causa de algunos productos
manchas de tratamiento previo al lavado.
Aplique dichos
productos
lejos de la secadora
y limpie el Ifquido derramado
removedores
de suciedad
y
o el rocfo inmediatamente.
TAMBOR
Elimine todas las manchas, tales como las de craydn, tinta o tintura de la tela (proveniente
nuevos, tales como toallas o jeans) con un limpiador com0n.
de artfculos
Posteriormente,
limpieza.
o solucidn de
seque las toallas o prendas viejas para eliminar todo exceso de manchas
Una vez que se hayan seguido estos pasos, es posible que las manchas
transferirfin alas cargas subsiguientes.
TAMBOR
ACABADO
CON PINTURA
aQn sean visibles,
EN POLVO
Para limpiar el tambor acabado con pintura en polvo, use un paBo humedecido
abrasivo, adecuado para las superficies.
Elimine los residuos
EXTERIOR
del limpiador
pero no se
con un limpiador
suave, no
y seque con un paBo limpio.
DE LA SECADORA
Limpie con un paso suave y hQmedo.
Proteja la superficie
No utilice sustancias
abrasivas.
de objetos afilados.
No coloque objetos pesados ni afilados ni tampoco el paquete de detergente sobre la secadora. Pueden
rayar o da_ar la cubierta superior de la secadora. Mantenga estos artfculos sobre el pedestal o en una caja
de almacenaje, que puede adquirir por separado. Toda la secadora tiene un acabado brillante. Evite rayar o
da_ar la superficie cuando use la secadora.
SISTEMA
Inspeccione
6ptimo.
DE DRENAJE
y limpie el sistema
DE LA SECADORA
de drenaje de la secadora
La tapa de drenaje exterior debe limpiarse
adecuado.
anualmente
con mAs frecuencia
para mantener
para garantizar
un rendimiento
un funcionamiento
cuidado
HUDSON
DV400-03170A
MES.indd
Sec10:29
y limpieza 29
2012-02-02
_7
11:37:52
I
i
cucjorono a_¢
I
Sugerencias
para prendas
especiales
Siga las instrucciones del fabricante o de la etiqueta de indicaciones para secar
prendas especiales. Si no se dispone de etiquetas con indicaciones, use la
siguiente informaciOn como guia.
Cubrecamas
y edredones
Ropa de cama
Cortinas
y paSos de tela
PaSNes
de tela
Prendas
con relleno
o
Siga las instrucciones
de la etiqueta con indicaciones
usando el ciclo Bedding (ropa de cama).
o
AsegQrese de que la prenda
usarla o guardarla.
o
Tal vez deba volver a colocarla
o
Utilice el ciclo Normal (Normal) y seque de a una sola frazada por vez
para Iograr un mejor funcionamiento
de la secadora.
o
AsegQrese de que la prenda
usarla o guardarla.
o
Utilice el ciclo Perm Press (Plancha permanente) y la temperatura
Medium (Mediana) para reducir la formacidn de arrugas.
o
Seque estos artfculos en tandas peque_as
resultados y retfrelos Io antes posible.
o
Utilice el ciclo Normal (Normal) y la temperatura
paSales suaves y mullidos.
de
o
30
HUDSON
de temperatura
Medium
y absorbe
la
con calor. Use el ciclo Air Fluff
(Sin calor. DV456" solamente).
o
NO seque almohadas de capoc o de goma espuma en la secadora.
Puede secar estos elementos en la secadora en tanto use el ciclo de
Utilice el ciclo Normal (Normal).
QUE £E DEBEN
manchados
paSos de tela, etc.).
en la etiqueta.
o embebidos
Sec5:30
ambiente.
EVlTAR:
para prendas
MES.mdd
a temperatura
Utilice el ciclo Air Fluff (Secado a temperatura ambiente) o el ciclo
Time Dry (Secado con temporizador)
y la opcidn de temperatura Low
(Baja) o Extra Low (Extrabaja) de acuerdo con las instrucciones
de la
etiqueta.
de fibra de vidrio (cortinas,
sugerencias
DV400-03170A
High (Alta) para
Agregue un par de toallas secas y un par de zapatillas limpias para
mejorar el funcionamiento
de la secadora y secar el artfculo.
Lanas, salvo que se recomiende
Artfculos
para obtener mejores
o
secado
o
seca antes de
ADVERTENCIASecar un artfculo de goma con calor puede
daSarlo u ocasionar un riesgo de incendio.
Plfisticos
(cortinas de baSo,
cubiertas
de muebles para
exteriores,
etc.)
Artfculos
uniforme.
o
Almohadas
ARTiCULOS
un secado
est6 completamente
NO seque con el ciclo de secado
(Secado a temperatura ambiente)
etc.)
seca antes de
Agregar toallas secas acorta el tiempo de secado
humedad.
Goma espuma (reverso de
alfombras,
mufiecos
de
hombreras,
para garantizar
Utilice el ciclo Normal (Normal) y la opcidn
(Mediana).
plumas (chaquetas.
bolsas
de dormir, edredones,
etc.)
peluche,
est6 completamente
o seque
en aceite vegetal o de cocina.
especiNes
2012-02-02
CC 11:37:52
I
CONTROLE
ESTOS PUNTOS SI SU SECADORA...
No funciona.
AsegOrese de que la puerta est6 cerrada con traba.
AsegOrese de que e[ cane de alimentad6n est6 enchufado a un
tomacorriente que funcione.
Contro[e los disyuntores o fusibles de su casa.
Presione el bot6n Start/Pause ([nicio/Pausa) nuevamente si [a puerta se abre
durante el cic[o.
No calienta.
Contro[e los disyuntores o fusibles de su casa.
Seleccione una opci6n de secado con calor distinta de Air Ruff (Secado a
temperatura ambiente).
En una secadora a gas, vedfique que el suministro de gas est6 abierto.
Limpie el filtro atrapapelusas y el conducto de drenaje.
La secadora puede haberse desp[azado a [a fase de enfriamiento del cic[o.
NO seca.
Vedfique todos los item antedores y, ademas...
AsegOrese de que [a tapa de drenaje hacia e[ exterior de la casa se pueda
abrir y cerrar sin inconvenientes.
Vedfique que el sistema de drenaje no presente obstruccbnes.
deben inspeccionarse y limpiarse todos los a_os.
Los conductos
Uti[ice un conducto de drenaje de metal rigido, de 4".
No la sobrecargue. 1 carga de lavado = 1 carga de secado.
Separe los articulos pesados de los articu[os [ivianos.
Es posible que sea necesario volver a colocar los articu[os grandes y
vo[uminosos, como [as frazadas o los edredones, para garantizar un secado
uniforme.
Verifique que la [avadora est6 drenando en forma correcta para extraer e[ agua
de la carga adecuadamente.
Es posible que la carga sea demasiado pequeBa como para secarse
correctamente. Agregue algunas toa[[as.
Hace ruido.
Verifique si en la carga hay objetos tales como monedas, botones flojos,
c[avos, etc. Retirelos de inmediato.
Es normal escuchar el ruido de [a va[vula de gas de [a secadora o que el ciclo
del dispositivo de calor se enciende o se apaga durante el ciclo de secado.
AsegOrese de que [a secadora est6 correctamente nivelada tal como se
describe en las instrucciones de insta[aci6n.
Es normal que [a secadora emita un zumbido debido a alta velocidad del aire
que se mueve por el tambor de la secadora y el sistema de drenaje.
No seca de manera uNforme.
Es posible que las costuras, los bo[sil[os y otras areas resistentes similares
no se sequen por completo cuando el resto de [a carga ha Ilegado al nivel de
secado se[eccionado. Esto es normal. Seleccione la opci6n Very Dry (Super
secado) si [o desea.
Si se seca un articu[o pesado con una carga Diana, por ejemplo una toal[a
con sabanas, es posible que el articulo pesado no se seque completamente
cuando el resto de la carga ha alcanzado el nivel de secado se[eccionado.
Separe los articulos pesados de los articu[os [ivianos para obtener mejores
resu[tados.
Tiene o[or.
Los o[ores del hogar, ya sea que provengan de [a pintura, el barniz, los
limpiadores potentes, etc., pueden ingresar en [a secadora con el aire
del ambiente. Esto es normal puesto que [a secadora extrae el aire de [a
habitaci6n, [o calienta y [o hace circular por el tambor y [o expulsa a trav6s del
drenaje hacia el exterior.
Cuando estos olores permanecen en el aire, ventile bien la habitaci6n antes
de usar la secadora.
guia de soluci6n
HUDSON
DV400-03170A
MES.indd
Sec4:31
de prob[emas
2012-02-02
31
_7
11:37:52
I
Se apaga antes de que la carga
este seca
•
o
Pelusa en las prendas
*
o
o
Limpie el filtro para pelusas antes de cada carga. Con algunas cargas que
producen grandes cantidades de pelusa, quiz4 sea necesario limpiar el filtro
durante el cido.
AIgunas telas preducen pelusa (per ejemplo, una toalla de algeddn blanco
con touche pelo) y deben secarse por separado de las prendas que atrapan
pelusa (por ejemplo, un par de pantalones de line negro)
Divida las cargas grandes en cargas mas pequehas para el secado
Revise bien los bolsillos antes de lavar y secar las prendas.
Prendas arrugadas despu_s del •
ciclo Wrinkle-Care (Antiarrugas)
•
Funciona mejor con cargas pequeflas de 1 a 4 prendas.
Oargue menos prendas. Oargue prendas de tipo similar.
Quedan olores en la
ropa despu6s de Refresh
(Refrescar).
Gotea agua de la boquilla
cuando eomJenza Steam-Care
(Proceso de vapor)
,,
Las telas que contienen olores fuertes deben lavarse en un ciclo normal.
,,
Esto se debe a la condensaci6n del vapor. El goteo de agua se detendr& en
unos minutes.
No seve el agua rociada
durante Steam-Care (Proceso
de vapor)
,,
El agua rociada es diffcil de ver cuando la puerta est& cerrada
CODIGOS
DE INFORMACION
Pueden aparecer
cddigos
para ayudarle a comprender
mejor qu6 ocurre con la secadora.
Filtro para pelusas obstruido
La ventilaci6n estfi obstruida
Limpie el filtro o el conducto de ventilacidn.
Si el problema contin0a. Ilarne al servicio t@nico.
HE
Temperatura de cabntamiento no valida
al poner en funcionamiento la secadora
Oomuniquese con el servicio t@nico.
La secadora funciona con la puerta
abierta
Oierre la puerta y luego reinicie.
Si el problema contin0a. Ilame al servicio t@nico.
La puerta no est& bien cerrada
Oomuniquese con el servicio t@nice.
bE
(DV422,DV400}
bE2
La unidad detecta un botdn que se ha
Dresionade mas de 30 segundos o que
est_ trabado.
AsegOrese de que NO haya botones presionados
constantemente. Pruebe reiniciar el cido.
FE
Frecuencia de fuente de alimentaci6n no
v_lida
Pruebe reiniciar el ciclo.
Probbma con el control ebctrdnico
Falla de cernunicacidn)
Oomuniquese con el servicio t@nice.
Para los cddigos
32
de informacidn
tE
dF
HUDSON
La carga de la secadora es demasiado pequefla. Agregue m_s prendas o
algunas toallas y reinicie el ciclo.
La carga de la secadora es demasiado grande. Retire algunas prendas y
vuelva poner en funcionamiento la secadora.
Si el problema continOa. Ilame al servicio t@nico.
que no figuran mils arriba, Ilame al 1-800-726-7864
guia de solucidn
DV400-03170A
Si el problema contin0a. Ilame al servicio t@nico.
MES.indd
(1-800-SAMSUNG).
de problemas
Sec4:32
2012-02-02
_C 11:37:52
I
ap ndice
TABLA DE INDICACIONES
SOBRE
LA TELA
Los siguientes sfmbolos ofrecen indicaciones acerca del cuidado de las prendas. La etiqueta de
indicaciones de la prenda incluye sfmbolos para lavado, blanqueado, secado y planchado, o limpieza a
seco cuando sea necesaria. El uso de sfmbolos garantiza la consistencia entre los fabricantes textiles de
artfculos nacionales e importados. Siga las indicaciones de la etiqueta para prolongar la vida Otil de la
prenda y reducir los problemas del lavado.
[]
Normal
m
Planoha permanente
Antiarrugas
/ Control /de
arrugas
[]
Colgar
Prendas suaves /
delicadas
]
Secar
en posici6n
horizontal
Lavado
o
para que escurra
No lavar
_
No retorcer
No usar blanqueador
Nosecar
ensecadora
a mano
A,to
p,aneha
vapor
agregado
a,a
Sin
Caliente
Medium
No planchar
Tibia/Tibia
Bajo
Te_:_#_at_
_®®
Secar colgado/tender
61A_a_*
Frfa
O
Cualquier
(Mediana)
calor
O
Sin calor / aire
No limpiar en seco
Cualquier blanqueador
(cuando sea necesario)
iii
i
iii_b---]
}
Secar colgado/tender
$61o blanqueador sin
cloro (con proteccidn
para ropa de color)
(cuando sea necesaria)
Alto
Ciclo de secado
secadora
Medium
en
Limpiar en seco
Colgar para que escurra
(Mediana)
S
Secar en posicidn
horizontal
Bajo
arrugas
Prendas suaves /
delicadas
** Los s[mbolos con punto representan las temperaturas de] agua del lavado apropiadas para diversas
prendas. El rango de temperatura para Caliente es de 41 ° a 52 °C (de 1050 a 125 °F), para Tibia es de 290 a
41 °C (de 850 a 105 °F:)y para Fffa es de 160 a 29 °C
(de 600 a 85 °F:). (L.a temperatura del agua del lavado debe abanzar un mfnimo de 16 °C (60 °F:) para que se
active el detergente y se Iogre un lavado efic_).
appendix
HUDSON
DV400-03170A
MES.mdd
Sec8:33
33
2012-02-02
_C 11:37:52
I
,Noj
PROTECCION
DEL MEDIO AMBIENTE
Este electrodom6stico
se fabrica con materiales reciclables. Si decide desechar este electrodom6stico,
siga
la normativa local relacienada con la eliminacidn de desechos. Corte el cable de alimentacidn
para que el
electrodom_stico
no pueda conectarse a una fuente de alimentacidn.
Quite la puerta para que los animales
y los nines peque_os no puedan quedar atrapades dentro del electrodom6stico.
DECLARACION
Este electredom_stico
DE CONFORMIDAD
cumple
con la nerma UL2158.
ESPECIFICACIONES
TIPO
DIMENSIONES
Div
Pulgadas
Div
(cml)
Pulgadas
(cm:)
C. Profundidad
A. Altura
B. Ancho
PESO
HUDSON
(109,1)
27" (68,6)
con la puerta
abierta a 90 °
49,9" (126,8)
D. Profundidad
29,4" (74,6)
56,20 kg (56,2 kg)
POTENClA DEL
CALENTADOR
34
43,0"
5300 W (Elec.)
22000
BTU/h (Gas)
appendix
DV400-03170A
MES.indd
Sec8:34
2012-02-02
CC 11:37:53
I
TABLA DE CICLOS
(o : configurado
en f_brica,
_ : seleccionable)
Normal
AIgoddn, ropa de trabajo, ropa de cama y de mesa
Secado normal
Potencia extra
Telas resistentes, tales como jeans, cord®roy y ropa de
trabajo pesedo
Secado normal
PDncha
Camisas, telas sint6ticas, tejidos, prendas de algoddn
sin arrugas y telas que requieren planchado permanent®
Secado normal
Prendasvoluminosas, tales como frezadas, s_banas,
edredones y almohadas
Secado normal
Ropa interior,blusas, lencerfe
Secado normal
Ropa de cama, coriinas, prendas para ni_ios
Muy seco (sin cambios)
Toallas de ba_lo y prendas similares
Secado normal
permanente
Secado con
sensor
Delicada
Toallas
©
©
Espuma, goma, pDstico
Secado
Secado Npido
manual
Secado con
Oarga pequetia
Oualquier carga
temporizador
Quitar arrugas
©
Camisas, pantalones, blusas
Normal
•
®
®
®
Plancha
permanent®
Secado con
sensor
®
®
i
o
Delicada
®
(DV456")
[
Desinfeccidn
®
]:aa[[as
®
®
®
Temperatura
seeado
manual
'
®
Secado rapido
Secado con
Quitar arrugas
Recomendaciones
sobre
®
®
®
®
®
®
®
®
®
®
®
®
®
®
®
®
el tamaffo
de
la
carga
Carga grande : Llene % del tambor. No agregue prendas pot encima de este nivel para que puedan
dar vueltas (:on Iibertad.
Q
* Para
ciclo
obtener
¢arga
media
Carga
peque_a
los mejores
: Llene
/_ del tambor.
: Coloque
resultados,
3
siga
a
5
prendasy
las
no
Ilene m_s de
recomendaciones
sobre
1/4
del tambor.
el tamaSo
de la carga
para
cada
de secado.
appendix
HUDSON
DV400-03170A
MES.indd
Sec8:35
35
2012-02-02
ZC 11:37:53
[
cj rant a
SECADORA
GARANT[A
SAMSUNG
L[MITADA
PARA EL COMPRADOR
ORIGINAL
El presente producto de la mama SAMSUNG, tal como Io provee y distribuye SAMSUNG ELECTRONICS
AMERICA, INC. (SAMSUNG) y Io entrega nuevo, en su embalaje de cart6n original al comprador o
consumidor original, estfi garantizado por SAMSUNG contra defectos de fabricaci6n de los materiales y la
mano de obra durante el peffodo limitado de la garantfa de:
un (1) a_o para todas las piezas y la mano de obra
Dos (2) a_os para las piezas del panel de control
La presente garantfa limitada comienza en la fecha original de compra y es vfilida L_nicamente para
productos comprados
y usados en los Estados Unidos.
Para recibir el servicio t6cnico de la garantfa, el comprador debe comunicarse con SAMSUNG con el fin de
que se determine el problema y los procedimientos
del servicio.
El servicio t6cnico de la garantfa s61o puede ser prestado por un centro de servicio t6cnico autorizado de
SAMSUNG.
Se debe presentar la factura de compra original como
autorizado de SAMSUNG.
prueba de compra
a SAMSUNG
o al servicio t6cnico
SAMSUNG prestara servicio t6cnico a domicilio durante el peffodo de la garantfa sin costo, sujeto a la
disponibilidad
dentro de los Estados Unidos contiguos.
El servicio t6cnico a domicilio no est_ disponible en todas las Areas.
Para recibir el servicio t6cnico a domicilio, el producto no debe presentar obstrucciones
y debe ser
accesible para el agente del servicio t6cnico.
Si el servicio t6cnico no estfi disponible, SAMSUNG puede optar por transportar el producto hasta y desde
el servicio t6cnico autorizado.
SAMSUNG reparar& reemplazar6, el producto u ofrecerfi un reembolso a su criterio y sin cargo adicional,
tal como se establece en la presente garantfa, con piezas o productos nuevos o reacondicionados
si se
comprueba que es defectuoso durante el perfodo limitado de la garantfa especificado anteriormente.
Todas las piezas y los productos reemplazados
pasan a ser propiedad de SAMSUNG y deben ser
devueltos a SAMSUNG.
Las piezas y los productos reemplazados
peffodo que sea el mils prolongado.
asumen
la garantfa original que resta, o noventa
(90) dfas, el
La presente garantfa limitada cubre defectos de fabricaci6n de los materiales y la mano de obra
encontrados
durante el uso normal y dom6stico de este producto y no ser_ vfilida para Io siguiente:
da_os que ocurran durante el envfo; entrega e instalaci6n; aplicaciones y usos para los cuales el presente
producto no fue destinado; nLimeros de serie o producto alterados; da_o cosm6tico o acabado exterior;
accidentes, abuso, descuido, incendio, inundaci6n, cafda de rayos, u otros casos fortuitos o de fuerza
mayor; uso de productos, equipo, sistemas, utilidades, servicios, piezas, suministros, accesorios,
aplicaciones,
instalaciones,
reparaciones, cableado externo o conectores no provistos ni autorizados por
SAMSUNG que da_en este producto o que acarreen problemas en el servicio; voltaje de la linea el6ctrica
incorrecto, fluctuaciones y sobretensi6n;
ajustes del cliente e incumplimiento
de Io establecido en el manual
de instrucciones,
instrucciones de mantenimiento
y ambientales que est_n cubiertas y recomendadas
en el
manual de instrucciones;
traslado y reinstalaci6n del producto; problemas causados por plagas.
La presente garantia limitada no cubre problemas derivados de la corriente, el voltaje o el suministro
el6ctrico incorrectos, las bombillas de luz, los fusibles de la casa, el cableado de la casa, el costo del
servicio t6cnico para recibir instrucciones o corregir errores en la instalaci6n.
SAMSUNG
36
HUDSON
no garantiza
el funcionamiento
ininterrumpido
o sin errores del producto.
warranty
DV400-03170A
MES.indd
Sec7:36
2012-02-02
_7
11:37:54
I
Excepto Io establecido en el presente, no existen garantfas sobre este producto, ya sean expresas o
t_citas, y samsung desconoce todas las garantfas que incluyen, aunque no en carficter taxativo, cualquier
garantfa t_cita de que el producto se encuentra en condiciones
aptas para la vent& de defraudaci6n
de
derechos o de que el producto se adecua a los fines especfficos para los cuales se adquiere.
Ning0n aval o garantfa otorgados por persona, compa_fa o corporacidn alguna con respecto al presente
producto revestir_ car_cter vinculante para samsung.
Samsung no ser_ responsable por p6rdida de ingresos o lucro cesante, imposibilidad
de generar
ahorros u obtener otros beneficios, o cualquier da_o derivado de circunstancias especiales, da_o
imprevisto o derivado causado por el uso, uso incorrecto, o incapacidad
para usar el presente producto,
independientemente
de la teorfa legal en que se funde el reclamo y aun cuando se le haya notificado a
samsung de la posibilidad de tales da_os.
Ning0n resarcimiento de ninguna fndole contra samsung superar_ el precio de compra del producto
vendido por samsung y causante del presunto da_o.
Sin limitar Io precedente,
el comprador asume todo el riesgo y la responsabilidad
por p6rdida, da_o o lesi6n
al comprador y a los bienes del comprador y a terceros y a sus bienes derivados del uso, uso incorrecto
o incapacidad para usar el presente producto. La presente garantfa limitada no se extender_ a ninguna
persona distinta del comprador
original del presente producto, es intransferible y establece su exclusiva
reparaci6n.
Algunos Estados no permiten limitaciones en cuanto al plazo de una garantfa implfcita, o la exclusidn o
limitacidn de da_os imprevistos o derivados, por Io tanto las limitaciones o exclusiones antedichas pueden
no aplicarse en su caso. Esta garantfa le otorga derechos especfficos, y adem_s puede tener otros
derechos que vaffan segOn el Estado en el que se encuentre.
Para recibir un servicio
t_cnico
Samsung Electronics
America,
1-800-SAMSUNG(726-7864)
de garantia,
comuniquese
Inc. 85 Challenger
Road
con SAMSUNG
a:
Ridgefield Park, NJ 07660
www.samsung.com
warranty
HUDSON
DV400-03170A
MES.mdd
Sec7:37
2012-02-02
37
_7
11:37:54
I
Scan the QR code* or visit
www.samsung.com/spsn
to view our he[pfu[
How-to Videos and Live Shows
*Requires
Scan this with your
reader
to be
_nstaLLed
on your
smartphone
smartphone
sTIENE PREGUNTAS O COMENTARIOS?
U.S.A
1-800-SAMSUNG(726-7864)
www.samsung.com
MEXICO
01-800-SAMSUNG (726-7864)
www.samsung.com
N. ° de cddigo:
HUDSON
DV400-03170A
MES.mdd
Sec7:38
DC68-03170A
MES
2012-02-02
_C 11:37:54
I