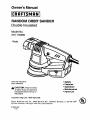
1
Owner's Manual
RANDOM ORBIT SANDER
Double Insulated
Model No.
315.116360
Ryobi
Save this manual
future reference
for
•
•
•
•
•
CAUTION:
Read and follow
all Safety Rules and Operating
Instructions before first use of
Safety
Features
Operation
Maintenance
Parts List
this product.
Customer Help Line:l-800-932-3188
Sears
Visit
Roebuck
the Craftsman
972000-952
11-01
and
Co,,
web page:
3333
Beverly
Rd.,
www.sears.com/craftsman
Hoffman
Estates,
IL 60179
USA
_e
v
ILJ
•
TableOf Contents.....................................................................................
2
•
Warrantyand Introduction
................................................................................
2
•
RulesForSafe Operation...............................................................................
3-5
•
ProductSpecifications
and Unpacking......................................................................
5
•
Features............................................................................................
6
•
Operation
............................................................................................
7-9
•
Maintenance..........................................................................................
10
•
ExplodedViewand RepairPartsList
.......................................................................
12-13
•
PartsOrdering/Service.................................................................................
14
FULL ONE YEAR WARRANTY ON CRAFTSMAN RANDOM ORBIT SANDER
If this rRIIFTSMI_N Random Orbit Sander fails to give complete satisfactionwithin one year from the date of
purchase, RETURN IT TO THE NEAREST SEARS STORE IN THE UNITED STATES, and Sears will replace it,
free of charge.
If this CRRFTSNAN Random Orbit Sander is used for commercialor rentalpurposes, this warranty applies for
only 90 days from the date of purchase.
This warrantygives you specificlegal rights,and you may also have other dghtswhich vary from state to state.
Sears, Roebuck and Co., Dept. 817WA, Hoffman Estates,IL 60179
Your sander has many features for maldng sanding
operations more pleasant and enjoyable. Safety,
performanceand dependability have been given top
priorityin the design of this sander making it easy to
maintain and operate.
A_,
_k
A
CAUTION: Carefully mad throughthis entire
owner's manual before usingyour new sander.
Pay close attention to the Rules For Safe
Operation, Warnings and Cautions. If you use
your sander properlyand only for what it is
intended, you will enjoy years of safe, reliable
service.
Look for this symbol to pont out important safety precautions.
safety is involved.
It means attentionll!
Your
WARNING
The operation of any sander can result in foreign objectsbeing thrown into your eyes, which
can result in severe eye damage. Before beginningpower tool operation, always wear safety
goggles or safety glasses with side shieldsand a full face shieldwhen needed. We
recommend Wide Vision Safety Mask for use over eyeglasses or standard safety glasses
with side shields, available at Sears Retail Stores. Always wear eye protectionwhich is
marked to complywith ANSI Z87.1.
The purpose of safety symbols is to attract your attention to possible dangera. The safety symbols, and
the explanations with them, deserve your careful attention and understandin 9. The safety warnings do
not by themselves eliminate any danger. The instructions or warnings they give am not substitutes for
proper accident prevention measures.
SYMBOL
MEANING
SAFETY ALERT SYMBOL:
Indicates danger, warning, or caution. May be used in conjunctionwith other symbolsor pictographs.
,_
DANGER: Failureto obey a safety warningwill resultin carious injuryto yourselfor to others.
Always follow the safety precautionsto reduce the dsk offire, alectdc shookand personalinjury.
&
WARNING: Failure to ohey a safety warningcan result in serious injuryto yourself or to others,
Always follow the safety precautionsto reduce the dsk of fire, electdc shockand personalinjury.
&
CAUTION: Failure to obey a safety warningmay result in propertydamage or personalinjuryto
yourself or to others. Always followthe safety precautionsto reducethe riskof fire, electricshock and
personal injury.
NOTE:
Advises you of informationor instructionsvital to the operationor maintenance of the equipment.
DOUBLE INSULATION
IMPORTANT
Double insulationis a concept in safety, in electric
power tools which eliminates the need for the usual
three-wire groundedpower cord. All exposed metal
parts are isolated from internal metal motor
componentswith protectinginsulation. Double
insulatedtools do not need to be grounded.
Servicingof a tool with double insulationrequires
extreme care and knowledgeof the system and
shouldbe performed only by a qualified service
technician. For service we suggest you return the tool
to your nearest Sears Store for repair. Always use
originalfactory replacement parts when servicing.
_,
KEEP GUARDS IN PLACE AND IN WORKING
ORDER,
WARNING: Do not attempt to operate this tool
untilyou have read thoroughlyand understand
completelyall instructions,safety rules, etc,
contained in this manual Fallure to complycan
result in accidents involvingfire, electricshock,
or serious personal injury, Save owners manual
and review frequently for continuingsafe
operation, and instructingothers who may use
this tool.
KEEP WORK AREA CLEAN. Cluttered areas
and benchesinvite accidents,
AVOID DANGEROUS ENVIRONMENT. Don't
use power tools in damp orwet locationsor
expose to rain. Keep work area well I_,
KEEP CHILDREN AND VISITORS AWAY. Alt
visitorsshouldwear safety glasses and be kept a
safe distance from work area, Do not let visitors
contact tool or extension cord.
READ ALL INSTRUCTIONS
KNOW YOUR POWER TOOL. Read owner's
manual carefully, Learn its applicationsand
limitationsas well as the specificpotential
hazards related to this tool.
GUARD AGAINST ELECTRICAL SHOCK BY
PREVENTING BODY CONTACT WITH
GROUNDED SURFACES, For example; pipes,
radiators, ranges, refrigeratorenclosures,
STORE IDLE TOOLS. When not Jnuse, tools
should be stored in a dry and high or locked-up
place - out of the reach of children.
II
DON'T FORCE TOOL, It will do the job better
and safer at the rate for which it was designed.
RULES FOR SAFE OPERATION
(Contlnued)
USE RIGHT TOOL. Don't force small tool or
attachment to do the job of a heavy duty tool.
Don't use tool for purpose not intended- for
example - A circular saw should never be used
for cutting tree limbsor logs.
WEAR PROPER APPAREL. Do not wear loose
clothingor jewelry that can get caught in tool's
moving parts and cause personal injury.Rubber
gloves and nonskidfootwear are recommended
when working outdoors.Wear protectivehair
coveringto contain long heirand keep it from
being drawn into nead_ air vents.
ALWAYS WEAR SAFETY GLASSES. Everyday
eyeglasses have only impact-resistantlenses;
they are not safety glasses,
PROTECT YOUR LUNGS. Wear a face or dust
mask if the operation is dusty.
PROTECT YOUR HEARING. Wear headng
protection dudog extended pedods of operation.
DON'TABUSE CORD. Never carry tool by cord
or yank it to disconnectfrom receptacle. Keep
cord from heat, oil, and sharp edges.
SECURE WORK. Usa clamps or a vice to hold
work. It's safer than using your hand and it frees
both hands to operate tool.
I
OUTDOOR USE EXTENSION CORDS. When
tool is used outdoors,use only extension cords
suitable for use outdoors. Outdoor approved
cords are marked with the suffixW-A, for example - SJTW-A or SJOW-A.
M
NEVER USE THIS OR ANY POWER SANDER
FOR WET SANDING. Failure to complycan
resultin electrical shock causing serious injuryor
worse.
KEEP HANDS AWAY FROM SANDING AREA.
NEVER USE IN AN EXPLOSIVE ATMOSPHERE. Normal sparkingof the motor could
ignite fumes.
INSPECT TOOL CORDS PERIODICALLY and if
damaged, have repaired at your nearest Sears
Repair Canter, Stay constantly aware of cord
locationand keep it well away from the sanding
area.
INSPECT EXTENSION CORDS PERIOD/CALLY and replace if damaged.
DON'T OVERREACH. Keep properfooting and
balance at all times. Do not usa while standing
on a ladder or unstable support, Secure tools
when working at elevated positions.
KEEP HANDLES DRY, CLEAN, AND FREE
FROM OIL AND GREASE. Always use a clean
cloth when cleaning. Never use brake fluids,
gasoline, petroleum-based products,or any
strong solventsto clean your tool.
MAINTAIN TOOLS WITH CARE. Keep tools
sharpand clean for best and safest performance.
Follow instructionsfor lubdcatiogand changing
accessories.
STAYALERTAND EXERCISE CONTROL.
Watch whet you are doing and use common
sense. Do not operate tool when you are tired.
Do not rush.
DISCONNECT TOOLS. When not in use, before
servicing,or when changing or adjusting sanding
belt, attachments, blades, bits, cutters,etc., all
tools should be disconnectedfrom power supply.
CHECK DAMAGED PARTS. Before further use
of the tool, a guard or other part that is damaged
should be carefully checked to determine that it
will operate properlyand perform its intended
function, Check for alignment of moving parts,
bindingof moving parts, breakage of parts,
mounting and any other conditionsthat may
affect its operation.A guard or other pert that is
damaged shouldbe properly repaired or replaced by an authorizedservice center,
REMOVE ADJUSTING KEYS AND
WRENCHES. Form habit of checking to see that
keys and adjustingwrenches are removed from
tool beforeturning it on.
I
extension cord 100 feet or less in length. A cord
exceeding 100 feet is not recommended. If in
doubt, use the next heavier gage. The smaller
the gage number,the heavier the cord.
AVOID ACCIDENTAL STARTING. Don'tcaw
plugged-intool with finger on switch, Be sure
switch is off when pluggingin.
MAKE SURE YOUR EXTENSION CORD IS IN
GOOD CONDITION, When using an extension
cord, be sure to use one heavy enough to carry
the current your productwill draw. An undersized
cord will cause a drop in line voltage resulting in
loss of power and overheating.A wire gage size
(A.W.G.) of at least 16 is recommended foran
DO NOT USE TOOL IF SWITCH DOES NOT
TURN IT ON AND OFR Have defective switches
replaced by an authorized service center,
INSPECT FOR and remove all nails from lumbar
before sanding.
DO NOT operate this tool while under the
influenceof drugs, alcohol, or any medication.
POLARIZED PLUGS. To reduce the risk of
electric shock,this tool has a polarizedplug (one
blade is wider than the other), This plug will fit in
a polarized outlet only one way. If the plug does
not fit fully in the outlet, reverse the plug, If it still
does not fit, contact a qualified electricianto
installthe proper outlet. Do not change the plug
in any way.
&
WARNING: Some dust created by power
sanding, sawing, grinding, drilling, and other
constructionactivities contains chemicals
known to cause cancer, birth defects or other
reproductive harm. Some examples of these
chemicals are:
• lead from lead-based paints,
• crystalline silica from bricks and cement
and other masonry products, and
WHEN SERVICING USE ONLY IDENTICAL
CRAFTSMAN REPLACEMENT PARTS.
• arsenic and chromium from chemicallytreated lumber,
SAVE THESE INSTRUCTIONS. Refer to them
frequently and use them to instructothers who
may use this tool. If you loan someonethis tool,
loan them these instructionsalso.
Your risk from these exposures varies,
depending on how often you do this type of
work. To reduce your exposure to these
chemicals: work in a well ventilated area, and
work with approved safety equipment, such as
those dust masks that are specially designed
to filter out microscopic particles,
WARNING: Collected sanding dust from
sending surface coatings such as polyurethanes,
linseed oil, etc,, can serf-lgnitein your sander
dust bag or elsewhere and cause fire. To reduce
the risk of fire, always empty your dust bag
frequently (10-15 minutes) while sending and
never store or leave a sander withouttotally
emptying its dust bag. Also follow the recommendations of the coatings manufacturers,
SAVE THESE INSTRUCTIONS
Sanding Disc Diameter
No Load Speed
Diameter of Orbit
5 in.
13,000 opm
5/32 in.
Your sander has been shippedcompletely assembled.
Inspect it carefullyto make sure no breakage or
damage has occurreddudng shipping,If any parts are
damaged or missing,contact your nearest Sears
Retail Store to obtain replacement parts before
attemptingto operate sander. A sending disc packand
this owners manual are included in the box.
Input
Rating
Net Weight
_k
120 volts,AC, 60 Hz only
3.0 Amperes
3.5 Ibs.
WARNING: If any parts are missing,do not
operate this tool untilthe missing parts are
replaced. Failureto do so could resultin possible
sedous personalinjury.
KNOWYOURSANDER
ELECTRICAL
See Figure 1.
Your sander has a precisionbuiltslectdc motor.It
shouldbe connectedto a power supply that is 120
volts, E0 Hz, AG only (normal household current),
Do not operate this tool on directcurrent (DC). A
substantialvoltage drop will cause a loss of powerand
the motorwill overheat. If your sander does not
operatewhen plugged intoan outlet, double-checkthe
power supply.
Before attempting to use any tool, familiarize yourself
with all operating features and safety requirements.
Your sander is suitable for sandingwith coarse,
medium, and fine grit sanding discs.
Features include easily operated lock-on button, and
a dust box for dustless sanding,
SWITCH
To turnyour sander ON, depress the switch trigger,
Release switchtrigger to turn your sander OFF.
FRONT
HANDLE
CONNECTION
RANDOM ORBIT
The randomorbit motionprovidesoverlapping sanding
movements by combining orbital and turning motion.
These overlapping sanding movements provide fast
cuttingactionwith excellent sanding results.
LOCK-ON
mJ1TON
REARHANDLE
SWITCH
TRIGGER
BACKING
SANDINGDISC
A
DUST
BOX
Fig, 1
WARNING: Do not allow familiarity with your sanderto make you careless, Remember that a careless
fraction of a second is sufficientto inflictsevere injuly.
SANDING DISC SELECTION
A WARNING
:Alwayswearsafetygoggles
or
safety glasses with side shields when operating
your sander. Failure to do so could result in
foreign objects being thrown into your eyes
resuRing in possible serious injury.
LOCK-ON
BUTTON
See Figure 2.
Your sander is equipped with a "lock-on" feature,
which is convenientwhen continuoussandingfor
extended pedods of time is required.To Iock,.on,
depressthe switchtrigger, push in and hold the lockon button locatedon the side of the handle,then
release switchtrigger. Release lock-on buttonand
your sander will continuerunning. To release the
lock, depress switchtrigger and release it.
If you have the "lock-on"feature engaged during use
and your sander becomes disconnectedfrom power
supply,disengagethe "lock.on"feature immediately,
LOCK-ON
BtlTrON
SWITCH
"rRtGG'ER
Selecting the correct size grit and type sanding disc is
an extremely importantstep in achieving a high
quality sanded finish. Aluminumoxide, siliconcarbide,
and other syntheticabrasives are best for power
sanding. Natural abrasives, such as flint and garnet
are too softfor economical use in power sanding.
In general, coarse gritwill remove the most matedal
and finer grit will producethe best finish in all sanding
operations.The condition of the surface to be sanded
will determine which grit will do the job. If the surface
is rough, startwith a coarse grit and sand untilthe
surface is uniform.Medium gnt may then be used to
remove scratches left by the coarser gdt and finer grit
used for finishingof the surface.Always continue
sanding with each grit until surface is uniform.
TO A'I-FACH SANDING
DISC
See Rgure 3.
•
Unplugyoursander.
_k
WARNING: Failure to unplugyour sander could
resultin accidental startingcausing serious
injury.
Carefullypeel adhesive backingfrom new
sandingdisc.
Align holes in sandingdisc with holes in backing
pad, then carefully press sticky side of disc
against pad as tightas possible. Nots: Holes in
sanding disc mustline up with holes in the
backingpad in order for the dustlessfeature of
your sander to functionproperly.
Fig. 2
WARNING: Your sander should never be
connected to power supplywhen you are
assembling parts, making adjustments, installing
or removing sandpaper, when cleaning, or when
not in use. Disconnectingyour sander will
prevent accidental startingthat could cause
serious
injury,
_k
BACKING
PAD
WARNING: Do not wear loose clothing or
jewelry when operating sander. They could get
caught in moving parts causing serious injury.
Keep head away from sander and sanding area.
Hair could be drawn into sander causing sedous
injury.
Fig. 3
WARNING: Before connecting your sander to
power supply source, always check to be sure it
is not in lock-on position (depress and release
switchtrigger). Failure to do so could result in
accidental startingof sander resulting in possible
sadous injury,Also, do not lock the triggeron
jobs where your sander may need to be stopped
suddenly.
APPLICATIONS
(Usa only for the purposes listed below)
• Sandingon wood surfaces.
• Removing rust from and sandingsteel surfaces,
PREPARING
Flush sandingcan be performed with your sander
wbentha front handle is removed from sander. See
Figure 5, Remove fronthandle by depressingtab
underfront handle while pullinghandle up and off of
sander, See Figure 6.
FRONT
HANDLE
TAB
1"0REMOVE
TOINSTALL
FOR OPERATION
For ease of operation,your sander has botha front
handle and rear handle. See Figure 4. This provides
for two-hand operation, which is necessary in order to
maintain propercontrolof your sander and keep both
hands clear of the sandingdisc and sanding area,
When operatingyour sander, always use both hands.
See Figures 4 and ,_
,6
SANDING
Clamp or othenNisasecure the work to prevent it from
moving under your sander.
_IL WARNING: Unsecured work could be thrown
towards the operatorcausing injury.
Fig. 4
Place sanderon workpiece so that all of sanding disc
surface is in contactwith workplace. Start your sander
and move it slowlyover workplace making successive
passes in parallellines, circles, or crosswise
movements. Upon completionof sanding operation,
turn sander off and wait until sanding disc comes to a
completestop before removing from workplace.
WARNING: Your sander shouldonly be on
when entire surface of sandingdisc is in contact
with workplace. Failureto follow this sanding
procedurecould result in loose sandingdisc
which could result in possible serious injury.
Do not force. The weight of the unit supplies
adequate pressure, so let the sanding disc and
sander do the work.Applyingadditional pressureonly
slowsthe motor,rapidlywears sanding disc and
greatly reduces sander speed. Excessive pressure
will ovedoad the motor causing possibledamage from
motoroverheating and can result in inferiorwork.Any
finish or resin on wood may soften from the frictional
heat. Do not allow sanding on one spot too long as
the sanders rapid action may remove too much
material, makingthe surface uneven,
SANDING (Continued)
TO INSTALL DUST BOX
Extended pedods of sendingas shown in Figure 5
may tend to overheat the motor. If this occurS,turn
sender off and wait until sandingdisc comas to a
complete stop,then remove it from workpiece.
Remove your hand from vent area and let motorcool.
See Figure 8
•
Realign dust box with rear of sender.
•
Slide dust box on sender as shownin figure 8. You
will feel a softclick as the tab snaps into place.
Note: As mentionedabove, be careful not to break
the tabs that secure dust box to sander.
DUSTLESS SANDING
The dust box located on the rear of your sender
providesa dust collectionsystem for your sander.
Sanding dust is drawn up throughthe holes of the
sandingdisc to collectin the dust box during sanding
operation. For more efficientoperation,empty dust box
when half full.
REMOVING DUST BOX
See Figure 7.
•
To release dust box, depresstabs located on each
side of dust box.
TABS
• Slide dust box down and liftfrom sender as shown
by the arrows in figure 7,
•
Do not press on the filter matedal with your handor
fingers. Filler material can be damaged.
Note: Filter material is located on the sides of dust
box.
•
Do not break tabs that secure dust box to sander.
•
Empty dust box.
TOINSTALL
DUSTBOX
REMOVE BANDING
DISC BEFORE STORAGE
Do not store your sander with a sandingdisc installed.
Heat generated from sanding causes the pressure
sensitiveadhesive to flow and form a tight bond
between the backing pad and sending disc.
Removingthe sending disc soon after you have
finisheda sandingoperation avoids letting the
adhesive set up. If the sandingdisc is left on the
beckingpad for an extended period of time after use,
the adhesivewill set up end cause the sandingdisc to
become difficultto remove. It may also tear when
removing.When this situationoccurs, it becomes
difficultto clean the backing pad for the next sanding
disc,
TABS
TOREMOVE
Fig, 7
Note: If you forget to remove the sending disc after a
sending operation, sand for a few minutesto soften
the adhesive backing before attemptingto remove
sending disc.
A
WARNING: Do not use this productas a
componentof other products.Also, do not use
attachments or accessoriesnot recommended
for use with this product,Any such use could
result in possibleserious personal injury.
WARNING: When servicing, use only identical
Craftsman replacement parts, Usa of any other part
may create a hazard or cause productdamage,
&
WARNING: A/ways wear safety goggles or
safety glasses with side shields during power tool
operation or when blowing dust. If operation is
dusty, also wear a dust mask,
G EN ERAL
Only the parts shown on parts list, page 13, are
intendedto be repaired or replaced by the customer.
All other parts represent an importantpart of the
double insulationsystem and shouldbe servicedonly
by a qualified Sears service technician,
LUBRICATION
Avoid using solventswhen cleaning plastic parts.
Most plasticsare susceptibleto damage from various
types of commercial solventsand may be damaged
by their use, Use clean clothsto remove dirt, carbon
dust, etc.
EXTENSION
_L WARNING: Do not at any time let brake fluids,
gasoline, petroleum-based products,penetrating
oils, etc. come in contact with plasticparts, They
contain chemicalsthat can damage, weaken or
destroy plastic.
It has been found that electric tools are subjectto
accelerated wear and possible premature failure when
they are used on fiberglass boats, sportscars,
wallboard, spacklingcompounds,or plaster. The
chipsand gdndingsfrom these materialsare highly
abrasive to electric tool parts such as bearings,
brushes,commutators,etc. Consequently, it is not
recommended that this tool be used for extended
work on any fiberglass material, wallboard, spackling
compounds,or plaster. During any use on these
materials it is extremely importantthat the tool is
creanedfrequently by blowing with an air jet.
All of the beadogs in this tool are lubricatedwith a
sufficientamount of high grade lubricantfor the life of
the unit under normal operating conditions,Therefore,
no further lubncationis required.
CORDS
The usa of any extension cord will cause some loss of
power. To keep the loss to a minimum and to prevent
tool overheating,usa an extension cord that is heavy
enough to carry the currentthe tool will draw,
Awire gage size (A.W,G.) of at least 16 is
recommendedfor an extensioncord 100 feet or less
in length, When workingoutdoors, use an extension
cordthat is suitablefor outdoor use. The cord'sjacket
will be marked WA.
CAUTION: Keep extension cords away from the
sandingarea and positionthe cord so that it will
not get caught on lumber,tools, etc., during
sanding operation,
,_k WARNING: Check extension cords before each
use, If damaged replace immediately.Never use
tool with a damaged cord since touchingthe
damaged area could cause electrical shock
resulting in serious injury,
Extension cords suitablefor use with your sander are
available at your nearest Sears Retail Store.
i
i
I
I
i
I
i
I
• i
CRAFTSMAN SANDER - MODEL NUMBER 315.116360
1
SEE NOTE "A"
4
5
7
10
11
OPTIONAL
ADAPTORPAD
(FORCONVERTING
SANDERTO
USENOOKANDLOOPTYPE
SANDINGDISCSI
i
NOTE: ii A ul - The assembly shown represents an important pad of the Double Insulated System.
To avoid the possibility of alteration or damage to the system, service should be
performed by your nearast Sears Repair Center. Contact your nearast Sears Retail
Store for Selvice Center information.
CRAFTSMAN SANDER-
MODEL NUMBER 315.116360
The modelnumberwill
numberin
all correspondencemgaKling
befound on a plate
yourCRAFTSMAN
attachedtothe motorhousing.Always
SANDER orwhen orderingrepairparts.
mentionthe model
SEE BACK PAGE FOR PARTS ORDERING
INSTRUCTIONS
PARTS LIST
Key
No.
Part
Number
Description
1
983110-001
Logo Plate ..................................................
1
2
969645-001
Front Handle ..............................................
1
3
983109-001
Data Plate ..................................................
1
4
973713-001
Skirt ............................................................
1
5
973714-003
Counterbalance .........................................
t
6
969655-001
Ball Bearing (NTN 6002LLUC3/1 E) ........... 1
7
981439-000
Bearing Cap w/Bearing (Inc. Key No. 6) .... 1
8
703493-818
Washer ......................................................
9
969649-00t
Screw (#8-32 x 112 in. Pan Hd.) ................. 1
10
975241-002
5 in. Disc Assembly ...................................
11
606066-013
Screw (#10-32 x 5/16 in. Pan Hd.) ............. 4
12
***
Sanding Disc ..............................................
1
13
969533-002
Dust Box ....................................................
1
14
969896-001
Small Gasket .............................................
1
15
970099-002
Seal ............................................................
1
16
974484-001
Optional Adaptor Pad ................................
1
972000-952
Owner's Manual
* Standard Hardware Item --May
Quan.
1
1
Be Purchased Locally
** This Adaptor Pad May Be Purchased For Use With Hook And Loop
Type Sanding Discs
*** Complete Assortment Available At Your Nearest Sears Retail Store
1
For repair of major brand appliances in your own home...
no matter who made it, no matter who sold it!
1-800-4-MY-HOME s" ytirne,dayor night
(1-800469-4663)
www.sears.com
To bring in products such as vacuums, lawn equipment and electronics
for repair, call for the location of your nearest Sears Parts & Repair Center.
1-800-488-1222
Anytime, dayor night
www.sears.com
For _e replacement parts, accessories and owner's manuals
that you need to do-it-yourself, call Sears PartsDirect s"!
1-800-366-PART
(1-800-366-7278)
e a.m.-
11 p.m. CST,
7 days a week
www.sears.com/partsdirect
To purchase or inquire about a Sears Service Agreement:
1-800-827-6655
7 a.rn. - 5 p.m. CST, Mon.-
Para pedir servicio de reparacibn a domicilio,
y para ordenar piezas con entrega a dornicilio:
1-888-SU-HOGAR
Sat.
Au Canada pourservice en fran;ais:
1-877-LE-FOYER
_
=
(%877-533-6937)
(1-888-784-6427)
]
HomeCentral"
@ Regiat ered Trademark /
© Seats, Roebud_ a_ld Co.
TM
Trl_enl_tk of Sears, Rodoud_ and Co.
® Marca Regi=rada / m M_ca de Fdbdca de Sear_ Roebudx an d CO.