1
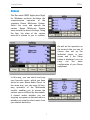
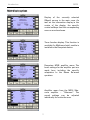
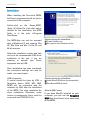
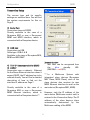
o M230 WIN App E 2.3.0 Content General .............................................. 1 M230 display options......................... 2 System Requirements ...................... 3 Installation......................................... 4 Carry out basic settings .................... 5 Connection Setup .............................. 6 M230 with network integration ........ 7 Multiroom System with slave connection.......................................... 9 Introduction M230 General The Re:control M232 Application (App) for Windows products facilitates the comprehensive operation of the complete Revox Multiroom System. Select the room and operate the various Revox Multiroom System sources with the direct-dial keys. Using the App, the state of the various sources is shown to you in realtime. As well as the operation on the musical side, you can of course also set up the individual timers in your rooms and if the Setup button is displayed, you can carry out the basic configuration of your Revox equipment. In this way, you can select and play your favourite music, which you have stored on your Revox Audio Server. In the same way, you can have full twoway operation of the Multimedia module, enabling you to access the various sources offered by this module. It doesn't matter whether you are enjoying a program on Internet radio or whether you want to select music from you network hard drive. 1 Introduction M230 M230 display options Display of the currently selected (Music) source in the main room. As well as the information display in the centre of the display, the specific control softkeys from the corresponding sources are also shown. Timer function display. This function is available if a Multiroom (sub-) module is installed in the Re:system device. Re:system M100 amplifier menu The basic settings for the amplifier part are made here, including the specific adaptation to the Revox Re:sound speakers. Amplifier menu from the M219 Sideroom amplifier – “Sideroom”. The sound settings can be adjusted individually for each side room. 2 Installation M230 System Requirements System requirements for controlling the Revox equipment via: Ethernet Revox Re:system M10 with integrated Ethernet interface or Revox Re:system M51/ M100 [Slave] with external M202 Ethernet interface. The M10 or M202 Ethernet interface must already be connected with your Ethernet network and must be configured. The complete Multiroom system must have the V2.00 system software, or higher. USB Revox Re:system M10 / M51 Mk2/ M100 with integrated USB interface on the back of the device. Note: An M51 Mk1 (SN < 3000; red standby LED) does not have a USB interface and therefore, cannot be controlled by USB. The complete Multiroom system must have the V2.00 system software, or higher. Serial via RS232 Revox Re:system M10 with integrated RS232 interface or Revox Re:system M51/ M100 with external M200/ M203 RS232 interface. Setting Serial Port mode RS232 Link The complete Multiroom system must have the V2.00 system software, or higher. 3 Installation M230 Installation When installing the Re:control M230, the Revox equipment should not yet be connected to the computer. on the Revox_M230_ Setup_32_64.exe file. If no other path is defined for the installation, the M230 folder is in the path c:\Program Files\Revox. Double-click Options during the installation: The M230-App can only be operated with a Windows PC and supports Win XP, Win Vista and Win 7 in the 32- and 64-bit versions. Create Desktop icon All program to the Autostart folder Follow the installation routine and only carry out the recommended USB driver installation at the end, if you are planning to operate your Revox equipment later by USB. Once installation has been completed, the connection settings can now be made - see next chapter. USB connection Options during the installation: If control should be done by USB, a Re:system device (M10, M51 Mk2, M100) will be connected with the computer by USB after the installation of the M230. This step completes the driver installation. Otherwise, under certain circumstances, there could be errors with the FTD2XX.DLL file. Install Revox USB driver (recommended) Start Revox M230 terminal Note for MAC users If you have MacOS installed on your computer, you can use the Re:control M234 App from Revox in the same way as the M230. 4 Configuration M230 Carry out basic settings After the program has been installed, a V icon appears in the Status bar on the bottom right of the screen. Right-click on the V icon. Now select the Setup option. You can make essential settings through this overview window. Stay On Top The M230 window always stays on the top screen layer regardless of whether new programs are opened. Start Maximized Currently this has no function. Size (Small – Medium - Large) Here you select the size of the M230 window. Default Position If this checkbox is activated, the M230 window always appears bottom right on the screen. If the checkbox is cleared, the M230 remembers its last position appears there again next time it is started. Default Room In the case of a Revox Multiroom System with several side rooms, the preferred room can be selected here that should be displayed when the M230 is started. Show Setup Button If this checkbox is activated, a Setup button appears in the M230 menu if "Main Room" is chosen from the room selection. With all other rooms, a Local button is display regardless of this function setting. Connection Calls the Setup window for the connection settings between the computer and the Revox equipment. See next page for description. 5 Configuration M230 Connection Setup The access type and its specific settings are selected here. You will find the system requirements for this on Page 3. Serial Port Connection via serial RS232. Directly available in the case of a Re:system M10 or over a Re:connect M200 and M203 interface, which is connected with a Re:system device. USB Link Connection via USB. Cable type: USB A B Available in the case of Re:system M10, M100 and M51 Mk2* Important notes * M51 Mk2 can be recognised from the blue standby LED. (M51 Mk1 = red LED) TCP/ IP (recommended for M230) UDP/IP Connection over a network - Ethernet As the Revox Ethernet interface doesn't support DHCP, the IP address has to be entered directly. You will find a detailed description of how to find out the interface IP address on Page 7. ** In a Multiroom System with integrated slave devices (Re:system M51 Slave, M100 Slave), each of the slave devices also requires its own M202 Ethernet interface as well as the main device (Re:system M51, M100). Directly available in the case of a Re:system M10 or over a Re:connect M202 Ethernet interface, which is connected with a Re:system device**. However, only the IP address of the main device (Multiroom central unit) is entered in the Connection Setup. The IP address of the slave devices is/are automatically determined by the Multiroom cabling of the M230. 6 Configuration M230 M230 with network integration I have a Re:system M10 Reading out Revox IP address In order to be able to use the M230 App in an Ethernet network, you have to read out the IP address of the Revox Ethernet interface and enter it in the Re:control M230 Connection Setup menu. There is no display with an M10 system that allows you to directly read out the IP address of the integrated Ethernet interface. Connect your computer via USB to the M10 and select the option USB Link (M10). in the Connection Setup. If you now start the M230 and call the Setup on the M10 (activate the Setup button in the Re:control M230 - see Page 5), you can call the TCP/IP menu using the Ethernet softkey and read out the M10's assigned IP address there. Press the Menu softkey on the first page (Client List). The second TCP/IP Setup page appears. Depending on the Re:system model, there are different ways of finding out this IP address. For Re:system M10 For Re:system M15/ M100 Note down the IP address (192.168.120.200 in this example) and now enter this in the M230's Connection Setup [TCP/IP]. 7 Configuration M230 I have a Re:system M51/ M100 If you have a Re:system M51/ M100, you can read out the IP address of the connected M202 Ethernet interface directly on the M51 or M100 display. Reading out using an M202 Note down the IP address (192.168.120.200 in this example) and now enter this in the M230's Connection Setup [TCP/IP]. Switch the M51/ M100 on using the Power button on the front of the unit. Now press the small Setup button on the M202 Ethernet interface. Fig.: M202 with Setup button The following appears on the M51/ M100 display: If you now press the Menu key in the display, the second TCP/IP Setup page appears 8 Configuration M230 Multiroom System with slave connection Control of a Multiroom Slave system with the Re:control M230 In a Multiroom System with a Re:system M100 Slave device, the slave device also requires its own M202 Ethernet interface as well as the main device). However, only the IP address (here192.168.0.5) of the main device (Multiroom central unit) is entered in the Connection Setup. The IP address of the slave device (here 192.168.0.6) is automatically determined by the Multiroom cabling of the M230. 9 Configuration M230 Re:control M230 WIN User Manual 10