1
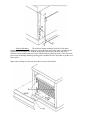
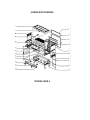
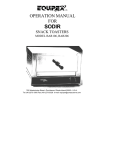
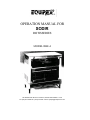
OPERATION MANUAL FOR
SODIR
ROTISSERIES
MODEL RBE-4
765 Westminster Street • Providence, Rhode Island 02903 • U.S.A.
Tel: (401)273-3300 Fax: (401)273-3328 e-maiI: [email protected]
Operation Manual - RBE4
IMPORTANT SAFEGUARDS
When using electrical appliances, basic safety precautions should always be followed,
including the following:
1.
Read all the instructions.
2
Water must be added to the drip tray to prevent the grease smoking or possibly
catching fire.
3. Do not touch hot surfaces. Use handles and knobs.
4. To avoid electrical shock, do not immerse the power cord, plug, or connection box in
water or other liquid.
4.
Close supervision is necessary when any appliance is used or near children.
6.
Unplug from outlet when not in use and before cleaning. Allow to cool
before putting on or taking off parts and before cleaning the appliance.
7.
Do not operate any appliance with a damaged cord or plug or after the appliance
malfunctions, or has been damaged in any manner. Return appliance to the nearest
authorized service facility for examination, repair, or adjustment.
8.
The use of accessory attachments not recommended by the appliance manufacturer
may cause injury.
9
Do not use outdoors.
10. Do not allow cord to hang over edge of table or counter, or to touch hot surfaces.
11. Do not place on or near a hot gas or electric burner, or in a heated oven.
12. Extreme caution must be used when moving an appliance containing hot oil.
13. To disconnect, turn any control to "OFF" then remove plug from the wall outlet.
14. Do not use appliance for other than its intended use.
15. SAVE THESE INSTRUCTIONS
Page - 3
INTRODUCTION
The SODIR Model RBE-4 rotisseries are designed to offer quality food cooking and roasting. The
units are constructed of food service quality stainless steel and tinted tempered (safety) glass. The
rotisseries are front-loading units that feature infrared quartz elements as a source of heat, an
attractive roast / hold / display cabinets and the see-through doors that can be successfully used in a
deli or other facilities where customers can watch food preparation. Model RBE-4 comes equipped
with one roasting spit that will hold up to 4 standard size chickens and a warming shelf that will
hold up to 10 birds. The unit is furnished with an ON/OFF switch, rotary control switch that allows
to use either two heating elements turned on, or just one ele ment working. An indicator (red) light
lets operator know when the element(s) are on. The cabinet is equipped with a lamp located over
the warming shelf for better display of the cooked product.
SPECIFICATIONS
Model
Electrical
Plug Configuration
RBE-4
208/240V, 1PH, 2.2KW, 9/11A
NEMA-6-15P
INSTALLATION
The SODIR rotisserie needs to be connected to a grounded outlet of proper voltage (208V or
240V). DO NOT place the unit in a damp area or near steam sources. Consult your local authorities
to determine if and what kind of ventilation is required for this type of cooking appliance.
ASSEMBLY
The SODIR rotisserie comes from the factory assembled, but with the doors and deflector plates
removed for shipping.
Door Mounting: The doors are supplied with one top hinge attached to the door. The other
hinges are packed in the carton. To mount the doors, put a metal bushing provided on the shaft of
the attached top hinge; then place the hinge with the bushing into the hole on the top. Next, place
the second hinge (provided) with the bushing into the hole on the bottom and slide the glass door
into the hinge. Align the hole in the door with the hole in the hinge, then attach the door to the
bottom hinge using the screw, flange and nut provided. Repeat the mounting procedure for the
opposite door (see drawing below).
Deflector Mounting:
The deflectors mount around the back side of the quartz
heating elements. To mount the deflector, remove the back panel of the unit by unscrewing two
black knobs located in the rear. With the back panel removed, place the hook side of the
deflector onto the pins located on the sides of the housing (see drawing below). This is the same
place where the heating elements protecting grill is mounted. Reverse procedure to put the cover
back in place.
Note: when cleaning, use the same procedure to remove the deflector
Assembling Spits and Forks:
First, mount the forks on to the spit. To do so,
start with a U-shaped fork and mount it on to the spit about 2" from one of the spit's ends
with the fork facing inside. Follow by mounting all Z-shaped forks on to the spit;
then finish the assembly with a U-shaped fork facing inside. Distribute the forks evenly
over the length of the spit; then tighten the mounting screws provided. Place the square end
of the spit into the square motor gear drive located on the inside wall of the rotisserie. Place
the other end into the holder on the other side.
Note: the motor gear drive and the spit holder are moveable in and out (front to back),
which allows to adjust the position of the spit against the heating elements in order to
achieve the desired results by cooking at different distances from the heat source
Before operating the rotisserie, remove the bottom drip pan, the warming shelf rack and
pan and clean them thoroughly.
Note: it is necessary to add water to the drip tray located at the bottom of the unit. We
strongly recommend doing it to prevent the product drippings and grease from smoking
and possibly catching fire. It also makes the cleanup much easier
OPERATION
The assembled rotisserie is now ready for operation. The group of two heating elements is
controlled by the rotary switch. By turning the rotary switch knob clockwise, you can set
the unit to work on FULL POWER (two elements on, gear motor working), HALF
POWER (one element on, gear motor working) or GEAR MOTOR ONLY (all elements
off). The fourth position is the OFF position.
Place the product to be cooked on the spit so that the weight is as evenly distributed as
possible. The forks on the spit should be positioned 90 degrees apart in order to hold the
product firmly. Place the spit with the product with its square end into the square motor
gear drive. Place the other end of the spit on to the holder. Select the distance between the
spit with the product on it and the heating elements that will allow achieving desired results
using two spit hooks provided.
With the spit loaded and in place, close the front doors, turn the ON/OFF switch to ON
position and select cooking or holding by turning the rotary switch to full power (both
heating elements on) or half power (one heating element on). The red indicator light will be
lit and the spit will start to rotate. Upon completion of cooking/roasting, turn the rotary
switch knob to the OFF position (if you want to unload the spit) or to the GEAR MOTOR
ONLY position (if you want to hold the product for a short period of time. We recommend
letting the product cool slightly before handling it. After some cooling, the product may be
removed and placed on the rack of the warming shelf.
Note: the product on the spit must be able to turn freely, not touching the sides. Do not
overload the spit
The SODIR rotisseries can be used for a wide variety of foods. Cooking times will vary
depending on food products and desired results. The typical roasting time for a 2-1/2 Lb.
chicken is 50 to 75 minutes when using fall power (both heating elements on).
Note: to improve shelf life of the product placed on the warming shelf for holding, wrap
product in oven bags or aluminum foil
CLEANING
WARNING: Disconnect (unplug) electrical power supply before cleaning
CAUTION: Allow the glass doors to cool before cleaning. Do not spray hot glass
with cold liquid
CAUTION: Do not spray hot heating elements with any liquid
Cleaning is very important in maintaining a safe and well working rotisserie. Allow the
unit to cool before cleaning. The warming shelf rack and pan, the bottom drip tray, the
back covers, the deflector, the spit and the forks are removable for cleaning. Upon
removing, clean them separately using a damp cloth or sponge and mild cleaning liquid
soap. If needed, use scouring pad on the spit and the forks. The exterior and interior of the
housing should be cleaned with a cloth dampened lightly with a soap and water mixture.
Use a clean lint-free cloth to remove the excess water or soap.
DO NOT spray the housing with any liquid
DO NOT allow water to drip into the housing around the electrical components
DO NOT wash oven under running water
DO NOT use an abrasive sponge on exterior or interior surfaces
Inspect all parts on a regular basis to ensure that all parts are in good working order. If a
part is damaged, have the unit repaired by an authorized service agency prior to returning
the unit to operation. If you have trouble locating a service agency in your area, call
EQUiPEX, LTD. at 1-800-649-7885 and ask for customer service.
SODIR ROTISSERIES
MODEL RBE 4
EQUIPEX, LTD.
14-Sep-00
SPROT-04-03
765 Westminster Street, Providence, RI 02903
tel: (401)273-3300 fax: (401)273-3328
Toll free: 1-800-649-7885
SODIR Model RBE-4 Rotisserie (208 -240V/60/1Phase)
Drawing #
Part Number
Quantity
Description
Old Part Number
1
600021110
2
600031210
1
Roof
P-S9030110
1
Top Rear Cover
P-S9020110
3
600041210
1
Bottom Rear Cover
P-S9022110
4
000891210
1
Deflector
P-S9023108
5
610061210
1
Water Tray
P-S9044110
6
610071210
1
Warming Shelf Tray
P-S9041110
7
B09003
2
Magnetic Assembly
P-S209003
8
H01006
2
Glass
P-S801006
9
A15020/2
2
Glass Handle
P-S115020/2
10
F03019
1
Spit
P-S603019
11
F03021
2
Fork U-shape
P-S603021
12
F03020
3
Fork Z-shape
P-S603020
13
A03008
1
Motor Assembly, 220V
P-S103008
14
A13005
4
Foot
P-S113005
15
A18005
1
Lamp Assembly
P-S118005
16
A17001/3
4
Knob, Back Cover
P-S117001/3
17
A01001
1
Rotary Switch
P-S101001
18
A14078
1
Knob, Thermostat
P-S114078
19
A07002
1
Switch, On/Off
P-S107002
20
A08008
1
Red Pilot Light, 220V
P-S108015
21
A16004
1
Terminal Block
P-S116004
22A
D01033
2
Heating Element, 220V
P-S401033
22B
D04003
2
Quartz Tube
P-S404003
H01006A
2
Door Hardware Kit
P-S801006A
F01030
1
Wire Warming Shelf
P-S601030
EQUiPEX LTD., Limited Warranty
Your new Equipex product is warranted to the original purchaser for a period of one year from the date of purchase.
This limited warranty is against defects in material and/or workmanship, and includes labor for replacement of defective parts,
provided repairs are performed by an authorized service agency. The CUSTOMER must inform the Service Agency of the
possibility of warranty coverage and provide a copy of the dated sales or delivery receipt BEFORE WARRANTY REPAIRS
ARE BEGUN. Replacement parts and accessories are warranted for ninety (90) days from the date of purchase when
purchased separately and will be verified by dated sales receipt OR packing slip for that item. All parts or accessories replaced
under warranty must be returned to the Service Agency.
THE FOLLOWING ARE NOT COVERED UNDER WARRANTY:
1.
Damage caused by abuse, misuse, dropping, or other similar incidental damage caused by or as result of failure to follow
assembly, operating, cleaning, user maintenance or storage instructions.
2. Labor to replace parts which have become inoperative due to normal use or abuse.
3.
Material or labor to renew or repair scratched, stained, chipped, pitted dented or discolored surfaces, attachments or
accessories.
4.
Transportation charges to or from an authorized service agency for repair of a machine designated as "CARRY IN
SERVICE" (table top models).
5.
Labor charges to install or test attachments or accessories which are replaced for any reason.
6.
SHIPPING DAMAGES. Visible and hidden damages are the responsibility of the freight carrier. The consignee must file
the claim promptly against the carrier, or upon discovery, in case of hidden shipping damages. KEEP ALL ORIGINAL
CONTAINERS AND PACKING MATERIALS FOR CARRIER INSPECTION.
Equipex, Ltd., or any of its affiliates, distributors, officers, directors, agents, employees or insurers will not be obligated
for consequential or other damages, losses, or expenses in connection with or by reason of or the inability to use the
machine for any purpose.
THIS WARRANTY IS GIVEN EXPRESSLY AND IN LIEU OF ALL OTHER WARRANTIES,
EXPRESSED OR IMPLIED, FOR MERCHANTABHJTY AND FOR FITNESS TOWARD A PARTICULAR
PURPOSE AND CONSTITUTES THE ONLY WARRANTY MADE BY EQUIPEX, LTD.
Please call your local dealer to arrange for service
11-25-96
765 Westminster Street • Providence, Rhode Island 02903 • U S A
Tel: (401)273-3300 Fax: (401)273-3328