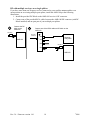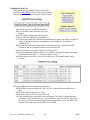
1
Amb-OS Media, LLC
AMR-100
Operations Manual
Firmware 1.61
Revision 36
08/28/08
Rev. 36 – Firmware version 1.61
2
©
2008
TABLE OF CONTENTS
CONTENTS OF PACKAGE...........................................................................................................5
DESCRIPTION................................................................................................................................5
General Description.....................................................................................................................5
Help......................................................................................................................................5
Overview of Connections and controls........................................................................................6
File Reception......................................................................................................................6
Live Streams........................................................................................................................7
Live programs....................................................................................................................7
Classic DVB PIDs.............................................................................................................7
File Playback........................................................................................................................7
Targets...............................................................................................................................7
Target Maps.......................................................................................................................8
Digital Ports.......................................................................................................................9
Playlist..................................................................................................................................9
Triggers................................................................................................................................9
Timed Playback.................................................................................................................10
Relay Description...............................................................................................................10
Internal Clock.....................................................................................................................13
Resetting the receiver to default settings...........................................................................13
Dish Alignment..................................................................................................................13
Front Panel Description.............................................................................................................14
Front Panel Buttons............................................................................................................14
Rear Panel Description..............................................................................................................15
Connections........................................................................................................................15
INSTALLATION..........................................................................................................................16
RF...............................................................................................................................................16
RF with 1 Wegener Unity 4000® Receiver.......................................................................17
RF with multiple receivers on a single splitter..................................................................18
Audio..........................................................................................................................................20
Analog................................................................................................................................20
Digital................................................................................................................................20
Receiving Files...........................................................................................................................20
Ethernet......................................................................................................................................21
DHCP Server reboot..........................................................................................................21
IP Address Change.............................................................................................................22
Relay Specifications...................................................................................................................23
Input Closure Pin Numbers................................................................................................23
Output Relay Closures Pin Numbers.................................................................................23
OPERATIONS...............................................................................................................................25
Front Panel Description.............................................................................................................25
Display...............................................................................................................................25
Deauthorized Message:......................................................................................................26
Front Panel Menu Options.........................................................................................................27
Settings Menu............................................................................................................................29
IP Address Submenu..........................................................................................................29
Receiver Utilities...............................................................................................................33
Receiver Utilities – Submenu Items..................................................................................33
Resetting to Default Closures............................................................................................36
DATE MENU....................................................................................................................39
©
Rev. 36 – Firmware version 1.61
3
2008
Audio Playback Description......................................................................................................41
Analog................................................................................................................................41
Digital................................................................................................................................42
Streaming...........................................................................................................................42
Playback after a power loss........................................................................................................42
HTML INTERFACE.....................................................................................................................43
Access to the AMR-100 Web page............................................................................................43
General diagnostics....................................................................................................................44
System Statistics................................................................................................................44
General Statistics:............................................................................................................44
Receiver Statistics............................................................................................................45
Data Statistics..................................................................................................................46
Stream Statistics...............................................................................................................47
Target Mapping...............................................................................................................47
Audio Statistics................................................................................................................47
Ethernet Statistics............................................................................................................47
Drive Statistics.................................................................................................................48
Scheduled Event List.........................................................................................................49
Trigger Event Lists............................................................................................................50
Command Interface............................................................................................................51
General Commands............................................................................................................52
REBOOT.........................................................................................................................52
RELAY # ON/OFF..........................................................................................................52
RELAY var......................................................................................................................52
SET ZONE #....................................................................................................................52
SET DST #.......................................................................................................................53
Network Commands..........................................................................................................54
DHCP ON/OFF...............................................................................................................54
NEWIP #.#.#.#.................................................................................................................54
NEWNETMASK #.#.#.#.................................................................................................54
NEWGATEWAY #.#.#.#................................................................................................54
WEBPORT #...................................................................................................................54
Audio Control Commands.................................................................................................55
AUDPLAY......................................................................................................................55
AUDSTOP.......................................................................................................................55
AUDFADE......................................................................................................................55
ALLSTOP........................................................................................................................55
TSTOP.............................................................................................................................55
TMAP# Target.................................................................................................................56
Satellite Diagnostics...........................................................................................................57
DEFINITIONS...............................................................................................................................59
Rev. 36 – Firmware version 1.61
4
©
2008
CONTENTS OF PACKAGE
1 – AMR-100 AMB-OS Receiver
1 – AC power cable
1 – RF Splitter
1 – DC Block filter
2 – RG-6 Cables
1 – Quick Installation Guide
DESCRIPTION
General Description
Help
If you experience a problem with your installation or just need technical help, call:
1-877-AMBOS2U
1-877-262-6728
or visit:
www.amb-os.com
Support questions:
[email protected]
Program requests:
[email protected]
WARNING
To receive programs on the AMR-100, you must send an email to
[email protected] or you will not receive any programs for your AMR-100.
Rev. 36 – Firmware version 1.61
5
©
2008
Overview of Connections and controls
Front
Display
Function Buttons
Power Indicator
Back
Power Cord
RF-In
RS-232 Ethernet
Relay Connector
Optional Ports
Relay Exp. Digital inputs
Reset Switch
AES/EBU SPDIF OPT
AES/EBU SPDIF OPT
Port 1
Port 2
Digital Outputs
Left Right Left Right
Port 1
Port 2
Analog Outputs
File Reception
The AMR-100 receives files via a satellite RF carrier. Many systems use a live program type
feed, sending a program in real time to a receiver. The station then has to record the feed or
play it live. The AMR-100 receives a digital file that is sent as a file in faster than real time
and stores it on the AMR-100 receiver.
After the file is successfully received, the station may play the file out the analog and digital
ports for a “live” program to air or to record for later playback. The file also can be
transferred from the receiver to an automation system through a local network at the station.
The Ethernet connection allows the station to transfer files and to verify the integrity of the
received file. If the receiver is allowed an Internet connection, the receiver will communicate
back to the uplink server, verify the file, and receive any missing packets. Thus an
interruption of RF from the satellite feed will not prevent a file from being completely
received. The IP ADDRESS CHANGE section describes how to set up the AMR-100 to a
proper internal network address and has the correct address to communicate with the uplink
server.
Rev. 36 – Firmware version 1.61
6
©
2008
NOTE:
An Internet connection to the AMR-100 is not necessary for the receiver to
operate. However, if there is no Internet connection, the AMR-100 cannot notify
the uplink server of missing packets in a file and receive those packets. Thus an
interruption in power or RF will result in a corrupt file.
Files are automatically deleted at some time after their air date, as specified by the program
producer.
Live Streams
Live programs
Live programs come through the AMR-100 just like the Wegener Unity 4000®. The programs
are sent from the satellite uplink site and come out a port (target) on the back of the
AMR-100 receiver. Because of the ability to address specific receivers for files, specific
receivers have to be permissioned to receive a live program. In the Amb-OS Utility, you can
see what live programs have been permissioned for your receiver. The AMR-100 Statistics
page will list the number of live programs for your receiver.
Live programs are also sent to TMAP target which is assigned by the station. The description
is found in the Target Maps section.
Classic DVB PIDs
The AMR-100 can also play the programs carried on the Wegener Unity 4000®. These are
the programs referred by the three alphanumeric designators as programs or networks (FN1,
AA1, etc.). The intent is to provide an emergency service should your Wegener Unity 4000®
need repair and not a permanent replacement for these programs.
Some of these programs carry protected content and to keep that secure, a receiver has to be
permissioned to receive the content. If you need to use a one of those programs on your
AMR-100 to continue service, please contact the network and ask them for permission to
carry the program on the AMR-100. Once Amb-OS receives permission from the network to
allow your receiver to decode that program, you will be permissioned for that program for
the length of time the network has given Amb-OS.
File Playback
Targets
The audio outputs are called “Targets” and there are only three basic targets on the receiver.
1. The audio outputs are T1 and T2 (Target 1 and 2) and include the digital outputs (see the
description below). These can be addressed as separate left and right ports: T1L, T1R,
T2L and T2R.
2. An Ethernet stream (T224.0.0.1:5004) that can be decoded by another computer or by an
appliance dedicated to decoding streams.
3. A file (Trecordedprogram.MP2) which allows a receiver to take a live program and
record for later playback. “Trecordedprogram.MP2” is the name you want to use to for
the recorded program. TFOCUS_DAILY.MP2 would be the target and the file name on
the receiver would be FOCUSDAILY.MP2.
Rev. 36 – Firmware version 1.61
7
©
2008
All targets need to use the audio ports as the primary target. If you want to stream a program
on your internal network on target T224.0.0.1:5004, the program also will have to use an
audio port. The AMB-OS transfer program will require you to enter which audio port you
want to use. It is possible to have four streams and use each of the audio targets as a separate
source. Thus you can have the following:
1. T224.0.0.1:5004 and using T1L as the main output
2. T224.0.0.2:5004 and using T1R as the main output
3. T224.0.0.3:5004 and using T2L as the main output
4. T224.0.0.4:5004 and using T2R as the main output
The audio coming out the mono analog targets will be summed, but the stream still will be in
stereo. This also is true for recording a live stream. To specify a target with a filename
(Tfilename.mp2) also will have to have an analog target.
Files can be played back on the audio output ports (targets) in stereo, mono, or in a
combination of that. The two stereo analog output targets can be used as described (two
stereo), as four individual mono outputs, or one stereo and two mono outputs. A stereo
program that is sent as a mono feed out either the left or right side of a target is summed into
a mono feed. Thus by sending two stereo programs out Target 1 (T1) as mono feeds (one
stereo program on the left and another stereo program on the right) would have each
program’s left and right summed together and then sent out the left or right side of the port.
The first stereo program would be sent out the left channel on T1-L as a summed mono
program and the other stereo program would be sent out T1-R as a different summed mono
program. This list provides the possible combinations.
1. Target 1 (T1) and Target 2 (T2) used a true stereo outputs.
2. T1 as a stereo output and T2 as two mono output ports (T2L and T2R).
3. T1 as two mono outputs (T1L and T1R) and T2 as a stereo output.
4. T1 as two mono outputs (T1L and T1R) and T2 as two mono outputs (T2L and T2R).
Target Maps
Mapped targets use one of six physical outputs, but can be addressed by a single name. A
live program may have a target of TMAP1 and the station can assign that to any of the six
analog targets: T1, T2, T1L, T1R, T2, T2L or T2R. TMAP0 is reserved for special programs
or emergency broadcasts (***This will be implemented in a future firmware revision). If it is
left on its default (None), the AMR-100 will not receive any of the broadcasts on that map.
TMAP0 is assigned to a port, it also has to be enabled from the front panel. See the
Emergency Enable in the Front Panel section.
The mapped names are with their default mapping:
TMAP0 – None (***Future firmware revision)
TMAP1 – T1 (stereo)
TMAP2 – T2 (stereo)
TMAP3 – T1L (mono)
TMAP4 – T1R (mono)
TMAP5 – T2L (mono)
TMAP6 – T2R (mono)
Normally programs can use the hardware port (T1, T2, T1L, etc.), because the connections to
the air chain stay the same. If different configurations would be used, you can specify a
mapped target, the target in the playlist stays the same even if the external routing is changed.
If the TMAP1 is mapped to T1L, then when the TMAP1 target is specified in a playlist, it
will play out T1L (mono). However, if you change the mapping of TMAP1 to T2 (stereo),
then when TMAP1 is used as a target, it will go out the second port in stereo.
Rev. 36 – Firmware version 1.61
8
©
2008
This has little use internally to a station, but it becomes valuable to a live program, because
the head-end of the program, does not know what port a receiver is connected to for airing.
The program producer will communicate to the station what TMAP port they will use. They
may, for example, say they will be using TMAP2 for their program and the station will map
that to the physical port they want to use for the program. If the station wants that program to
come out T1, then they would map TMAP2 to T1. However, another station uses a mono
feed and wants the same program to come out T2R. That station would map TMAP2 to T2R.
When the program is sent, each station would get the same program out the ports they
assigned. Please see the AMR-100 Manual to see how to program the ports.
Digital Ports
The digital ports are part of the analog targets and cannot be addressed separately from the
analog ports. Whatever is played on T1 also is played on the digital outputs (AES-EBU,
SPDIF, Optical) of T1. All of the outputs on a target (digital and analog) are always the
same. If two different programs are played out a target on the left and the right, the digital
output ports also have the different programs playing out the left and the right. The following
illustrates this.
Program 1: Adventures in Odyssey
Program 2: Grace to You
Program 1 is sent out T1L and Program 2 is sent out T1R
Program 1 is summed as mono and sent out T1L
Program 2 is summed as mono and sent out T1R
T1L has the summed audio of Adventures in Odyssey program
T1R has the summed audio of Grace to You program
The analog T1L has Adventures in Odyssey on the left channel as does the AES-EBU, SPDIF
and Optical output ports as assigned to T1.
The analog T1R has Grace to You on the right channel as does the same AES-EBU, SPDIF
and Optical outputs ports assigned to T1.
If you have an AES-EBU input to your board and both channels go to air on a stereo station,
the left channel of your station will have Adventures in Odyssey summed to mono and the
right channel will have Grace to You summed to mono.
Playlist
The AMR-100 has a playlist that controls when files are played and what can trigger a file
playback. It also works with live feeds to insert spots and produce relay closures. The playlist
is managed by the AMB-OS program that transfers programs. Please see the documentation
that came with that program.
Triggers
Triggers initiate an action on the AMR-100 receiver. An input closure can be used to start a
file playing and another input closure can cause the file to stop playing. Wiring a switch to a
start button on the board can be wired to input closure #1. A trigger can be set up to play a
file whenever that button is pressed. Thus, if Insight for Living is assigned to play when input
closure #1 is pressed, whenever that switch is pressed, Insight for Living is played.
A series of programs can be assigned to an input closure. For example, if you played 10
programs during the day, all of them could be assigned to play when that switch is pressed.
By putting the programs in the order they play, each one would play in the order they are
Rev. 36 – Firmware version 1.61
9
©
2008
listed. The first time the switch is pressed the first program plays. The next time the switch is
pressed the second program plays and so forth. Thus one switch on the board could play all
the programs assigned to that switch during a broadcast day.
Another switch could be used to stop the program. This would be similar to the “PLAY” and
“STOP” remote switches used for a CD player.
A text trigger can be sent by an automation program through an RS-232 serial port with a
specific instruction to start a program. Again, the same text can be sent and the programs
would play in the order they are listed. However, text commands can be more specific and
call an exact program. A text string can be as specific as PLAY-TTT5-11-11-11 or as general
as PLAY. The AMB-OS Utility program can build that list for you. The playlist manual can
be found at http://www.amb-os.com/support.html.
Timed Playback
A schedule can be set up to play a file at a specific time for recording or going live to air.
Thus if you played Back to the Bible right after the news at 10:04:30, a schedule can setup to
play the program for that day at 10:04:30. The same thing can be done for playback a file for
recording overnight. You can have the AMB-OS transfer program build a list of files that you
want to record and then have your automation record them when you want to record them.
The Amb-OS Utility program can build that playlist for you. The playlist manual can be
found at http://www.amb-os.com/support.html.
Relay Description
The output relays can be customized to your needs, but misusing this feature, you can
experience unexpected results. This section describes how the relays are used. The wiring for
the relay closures can be found in RELAY SPECIFICATIONS and the assignment of relays
can be found in Closure Map.
WARNING
Whenever you begin a new program that uses relay closures, be sure you get a
specification of how the program provider intends on using the closures.
Relays are sent by program providers and can be embedded in recorded programs and
interfaced with an automation system. Four relays are used for programming functions and
two are assigned to specific functions. Relays #1-#4 are for general programming use. Relay
#5 is used as the clock sync pulse for setting clocks. Relay #6 is used to indicate a failure in
the receiver. Four conditions are monitored:
1. RF
2. LNB short
3. Ethernet connection
4. Internet connection to the uplink server
When Relay #6 is triggered, the front panel indication is used to determine what has
happened. As described in the FRONT PANEL DESCRIPTION section, there are three
boxes in the middle of the screen. For example, if relay #6 was triggered and the front panel
indicated a loss to the Internet, you would know that the receiver still had RF and was
connected to your local network, but it could not find the uplink server through the Internet.
Rev. 36 – Firmware version 1.61
10
©
2008
WARNING
If you assign relays #5 or #6 to a programming function and then turn on the
alarm or Time Interval, you must go back to the Relay Map and change the
assignment to another available relay or you will get unpredictable results. The
Relay Map does NOT change automatically when the alarm or Time Intervals
are activated.
Relays #5 and #6 can also be used for programming functions, but then they cannot be used
for alarms or time syncing your clock. You can use #6 for an alarm and not use the clock
sync function and have relays #1-#5 available for programming functions (see Closure Map).
The same thing is true if you use #5 for time syncing and do not use #6 for alarms. That
would give you relays #1-#4 and #6 for programming functions (see Closure Map).
If you do not use the Time Interval relay (#5) to set your clocks or the alarm relay (#6) for
RF and network failures, then you can assign these two relays (#5 and #6) to one of the
programming functions (see CLOSURE MAP section). Relays 5 and 6 can be used to send
closures to your automation system. However, if you decide to make use of the alarm or
Time Interval later, you must change the relay function assigned to #5 or #6 to another
available relay. If you do not do this, if a program provider sends a command that closes one
of them, your alarm would trigger or it would set your time. You must go back to the Relay
Map area and change that function from relay #5 to another available relay.
Rev. 36 – Firmware version 1.61
11
©
2008
Descriptions
Program Start, Port 1 Left:
Program End, Port 1 Left:
Break Start, Port 1 Left:
Break End, Port 1 Left:
Program Start, Port 2 Left:
Program End, Port 2 Left:
Break Start, Port 2 Left:
Break End, Port 2 Left:
Program Start, Port 1 Right:
Program End, Port 1 Right:
Break Start, Port 1 Right:
Break End, Port 1 Right:
Program Start, Port 2 Right:
Program End, Port 2 Right:
Break Start, Port 2 Right:
Break End, Port 2 Right:
Relay names and Default assignments:
Name
Relay # State – Off, Pulse, On (default listed)
P1LS
None
Off
P1LE
1
Pulse
B1LS
None
OFF
B1LE
2
Pulse
P2LS
None
Off
P2LE
3
Pulse
B2LS
None
Off
B2LE
4
Pulse
P1RS
None
Off
P1RE
None
Off
B1RS
None
Off
B1RE
None
Off
P2RS
None
Off
P2RE
None
Off
B2RS
None
Off
B2RE
None
Off
When assigning functions to specific relay closures, remember that the “Left” assignment
should be used for stereo programs. Thus, playing a program out (live or prerecorded) port 1
in stereo or out port 1 in mono on the left channel, use the “Left” assignment. When playing
a mono program out the right channel of a port, use the “Right” assignments.
The state of the relay determines what happens when a command is sent. When a program
sends a command to the relay, here is what happens with each state.
1. OFF: The relay maintains its current state. If it was closed, it will stay closed.
2. ON: The relay will close stay that way until a release command is sent. If it was
already closed, then it will stay closed.
3. PULSE: The relay will close for one second and then release. If the relay was closed,
it will open one second after receiving the command.
The intent of the relay mapping is to allow you to assign a relay to a specific port. For
example, if you want a relay #2 to close only at the end of programming material when
you’re getting live programs on port 1, then you would map P1LE to relay #2.
Rev. 36 – Firmware version 1.61
12
©
2008
Internal Clock
The internal clock is incredibly accurate because it is set by the GPS time standard at the
uplink facility. It automatically adjusts for the new Daylight Saving Time rules that went into
effect in 2007, with Daylight Saving Time beginning on the second Sunday in March and
ending on the first Sunday in November. The local time zone can also be set.
Because the clock is accurate, relay #5 can be used to keep your local clocks in sync. The
time sync (see CLOCK INTERVAL section) can be set for any minute and second.
Resetting the receiver to default settings
At times it may be necessary to reset your receiver to the factory settings. If you change the
display contrast setting (see LCD SETTINGS section) and make the display unreadable, you
must reset the receiver.
1. Unplug the receiver
2. Hold [ENTER] as you plug in the receiver
3. Release the [ENTER] after the splash screen becomes visible
This will not change your IP settings.
Dish Alignment
The AMR-100 has an option to assist in aligning your dish (see DISH ALIGNMENT
section). The system shows a number that corresponds to the strength of the carrier. With no
carrier detected the display says:
Align:
80(No Lock)
When the proper signal is detected the display changes to:
Align:
Symlock 11.52
As the alignment gets closer, the number will increase and a Symlock of around 11 is very
good.
Rev. 36 – Firmware version 1.61
13
©
2008
Front Panel Description
The front panel display gives the status of the receiver. The main screen shows relays, audio
output, and the status of the RF and Ethernet (see FRONT PANEL section).
Front Panel Buttons
To the right of the display are four buttons:
[UP] arrow
[DOWN] arrow
[BACK]
[ENTER]
The [UP] and [DOWN] arrow will change the display from its status screen to informational
and setup screens. Pressing [ENTER] will put you to a settings screen. Pressing the [UP] and
[DOWN] arrows will show you the current settings. Pressing [ENTER] will allow you to
change settings and [BACK] will return to the previous screen. It also will save any changes
you made.
Rev. 36 – Firmware version 1.61
14
©
2008
Rear Panel Description
Connections
The AMB-OS AMR-100 Receiver has several connections to facilitate program playback
and transfers. The connectors are:
16
1
2
3
4
5 6
7
8
9
10 11
12
13
14
15
1. Power – A standard computer type power cable is used
2. RF – F-type Connector: L-Band input from the satellite antenna
3. RS-232 – 9-pin sub-d female (DTE) connector for serial communication (a modem cable
is needed to connect to a computer)
4. Ethernet – Standard RJ-45 Ethernet network cable connection
5. Reset Switch
Reboots the receiver without performing a power recycle.
Audio outputs:
There are two sets of digital outputs that correspond to the two stereo analog outputs.
They are listed in the same order as you see them on the back of the receiver from
left to right.
Digital – Port 1
6. AES-EBU – XLR type connector
7. SPDIF – BNC connector
8. Optical – standard optical cable
Digital – Port 2
9. AES-EBU – XLR type connector
10. SPDIF – BNC connector
11. Optical – standard optical cable
Analog – Port 1
12. XLR connector – Left channel
13. XLR connector – Right channel
Analog – Port 2
14. XLR connector – Left channel
15. XLR connector – Right channel
16. Relays – 25-pin sub-d connector (the connector pinout is described in the RELAY
SPECIFICATIONS section)
Rev. 36 – Firmware version 1.61
15
©
2008
INSTALLATION
RF
The following are provided to connect the AMR-100 to your satellite antenna.
1 – RF Splitter
1 – DC Block
2 – RG-6 cables
The AMR-100 uses the same satellite and transponder as your existing Wegener Unity 4000®
receiver(s). If your station has only one Wegener receiver connected to your satellite antenna, the
supplied splitter and cables can be used to connect RF to both receivers.
To connect your AMR-100 to RF if you have more than one Wegener receiver connected to your
satellite antenna or if you are powering your antenna’s LNB from an outboard power supply,
refer to the instructions in “RF with multiple receivers.” If the DC power to drive your
antenna’s LNB comes from your Wegener Unity 4000®, you can continue to have it supply
power, but you need to install the supplied 2 port splitter following instructions below.
WARNING
Do not short the center lead of the RF cable to the shield or you may damage the
receiver.
Rev. 36 – Firmware version 1.61
16
©
2008
RF with 1 Wegener Unity 4000® Receiver
1. Install the provided DC Block on the AMR-100 receiver’s RF connector.
2. Disconnect the RF antenna cable from the Wegener Unity 4000® receiver.
3. Attach the input side (marked IN) of the splitter to the antenna cable that was
disconnected from the Wegener Unity 4000® receiver.
4. Connect one of the supplied RG-6 cables to the power-pass output port of the splitter
(marked OUT and has a diagonal line pointing to the input); connect the other provided
RG-6 cable to the remaining output marked OUT) of the splitter
5. Take the RG-6 cable connected to the DC pass output of the splitter and connect it to the
input of the Wegener Unity 4000® receiver, being careful not to short the center
conductor of the cable to the shield. Then connect the other RG-6 cable to the DC Block
(previously installed on the RF connector of the AMR-100 receiver).on the RF connector
of the AMR-100 receiver).
Connect the DC
block to the
AMR-100
1
3
Connect the RF to
the splitter
DC Block
Connect one RG-6 cable from the
DC pass port of the splitter to the
Wegener Unity 4000
5
DC Pass
RF from
antenna
Out
In
AMR-100
Out
Wegener
Unity 4000
DC Pass
Disconnect the
RF from the
Current Receiver
2
RF from
antenna
4
Connect the RG-6
cables to the outputs of
the splitter
RF from
antenna
Out
In
Out
DC Block
DC Pass
RF from
antenna
Wegener
Unity 4000
Out
In
Connect the other RG-6
cable to the other port on
the splitter and to the DC
block on the input on the
AMR-100
Out
AMR-100
If you want the AMR-100 to provide power to the LNB, merely install the DC Block on the
Wegener receiver and swap the RG-6 cables coming from the splitter. Remember that in order
for a receiver to power the LNB through the supplied splitter it must be connected to the power
pass port (see #3 above). It does not matter which one supplies power, but the unit that does
not supply DC power needs to have the DC Block installed.
Rev. 36 – Firmware version 1.61
17
©
2008
RF with multiple receivers on a single splitter
If you have more than one Wegener receiver connected to your satellite antenna and have an
open position on an existing multiple port splitter, install the AMR-100 per the following
instructions:
1. Install the provided DC Block on the AMR-100 receiver’s RF connector.
2. Connect one of the provided RG-6 cables between the AMR-100 RF connector (with DC
Block installed) and an open port of your multiple port splitter.
Connect the DC
block to the
AMR-100
1
2
Connect one of the RG-6 cables to DC block on the
AMR-100
DC Block
DC Pass
RF from
antenna
AMR-100
Out
Wegener
Unity 4000
In
Out
Out
DC Block
Out
AMR-100
Rev. 36 – Firmware version 1.61
18
©
2008
If you have more than one Wegener receiver connected to your satellite antenna but have no
available splitter ports you may either (1), attach the DC Block to the AMR-100 receiver and
then install a splitter with more unused ports (not provided) or (2), pick a Wegener Unity 4000®
receiver to which you’d like to attach the provided 2 port splitter. Case (1) is the preferred
method, but if you have a unique situation or if you must install using case (2), please call AMBOS technical support for a consultation (877-AmbOS2U or 877-262-6728).
Connect the DC
block to the
AMR-100
1
DC Block
3
Connect the RF to
the splitter
DC Pass
RF from a
multiple
splitter
Out
In
AMR-100
2
RF from
a multiple
splitter
Disconnect the
RF from the
Current Receiver
Connect one RG-6 cable from the
DC pass port of the splitter to the
Wegener Unity 4000
5
Out
4
Wegener
Unity 4000
Connect the RG-6
cables to the outputs of
the splitter
DC Pass
Out
In
Out
DC Block
DC Pass
RF from a
multiple
splitter
Wegener
Unity 4000
RF from
a multiple
splitter
Out
In
AMR-100
Connect the other RG-6
cable to the other port on the
splitter and to the DC block
on the input on the AMR-100
Out
WARNING
If you have only one Wegener Unity 4000® receiver and it supplies the DC power
to the LNB, the newly-added AMR-100 must have the DC Block installed on it!
Rev. 36 – Firmware version 1.61
19
©
2008
Audio
Analog
The analog audio connectors are standard XLR connectors. Remember, there are two stereo
ports or targets on the receiver. The output of these will be discussed in detail later, but each
of the two ports can be played in stereo (2 stereo ports), all mono (4 mono ports) or mixed (1
port stereo and the other 2 mono channels).
Left
Right
Port 1
Left
Right
Port 2
XLR Pinout:
Pin 1: Ground
Pin 2: Lo
Pin 3: High
Digital
The digital connectors are labeled Port 1 and Port 2. There are three digital outputs for each
port, but they all will have the same audio on them as the analog Port 1. These digital outputs
are at 48K. Connect these to your digital equipment.
At this point, the receiver will receive programs and can play programs in timed events so you
can record the programs at the same time you get them currently.
Receiving Files
Remember, the receiver does NOT play out programs like a traditional receiver. Files are sent to
the receiver and then they must be scheduled to play or transferred. Please see the Amb-OS
Utility to do these things.
Send an email to [email protected] with a list of the programs you want to receive. Include
your station call letters and receiver serial number.
Rev. 36 – Firmware version 1.61
20
©
2008
Ethernet
The Ethernet connection takes a standard network cable and should be on the same network as
your automation to simplify program transfers. However, the Ethernet is not required to schedule
playback events. To communicate to the receiver, a computer must be connected to the same
network subnet as the receiver. If that network can access the Internet, the receiver can
communicate back to the uplink server. The main function of this is to insure you have an error
free file. Remember, if a file loses some packets during transmission, the communication through
the Internet back to the uplink server to retrieve those packets and complete the file and can
only happen if the AMR-100 has access to the Internet.
The Ethernet address or, more accurately, the IP address of the receiver should be set to
something compatible with your local network. The default address is assigned by DHCP
(Dynamic Host Configuration Protocol). If your network administrator wants to assign a specific
address, that must be done by the front panel. A one or two digit subnet addresses should have
leading 0’s. For Example: 192.168.1.20 should be entered as: 192.168.001.020.
WARNING
If you put in an IP address manually, you must also put in the subnet mask and
the default gateway. If not, you cannot exit the IP Address menu.
DHCP Server reboot
If you use DHCP to set your IP Address and you have a power failure or your DHCP router or
server reboots, your IP Address to your AMR-100 can change. If you are using the Amb-OS
Utility, you will need to verify the IP Address is the same as the setting Amb-OS Utility. If the
AMR-100 changed its IP Address as a result of the reboot (power loss or a reboot), you will need
to change the Amb-OS Utility to match the new IP Address of the AMR-100.
Rev. 36 – Firmware version 1.61
21
©
2008
IP Address Change
Setup Date
1. Press [ENTER] and you will see a menu bar with
Firmware: 1.61
“Setup” highlighted.
Serial No: 2001000
2. Press [ENTER] then press [DOWN] until “IP
IP Addr: DHCP
Addr: DHCP” is highlighted; then press
Receiver Utilities
[ENTER].
3. Press [DOWN] until “DHCP” is highlighted; then
press [ENTER] to select “NO” as the option.
DHCP:
NO
“NO” and “YES” are the only two options
4. Press [BACK] to save that setting.
IP Addr: 192.168.001.100
5. Press [DOWN] until “IP Addr:” is highlighted;
then press [ENTER]. The first digit will be
Gateway: 192.168.001.001
highlighted as seen in the figure to the right.
6. Press [UP] or [DOWN] until you get the first digit
Netmask: 255.255.255.000
correct and press [ENTER]. That will take you to
the next digit. Repeat this step until you have the desired IP address. You may press
[BACK] to return to a previous value that was entered incorrectly. The last digit’s
[ENTER] command will exit the address-setting dialog.
7. Press [DOWN] to highlight “Gateway”.
8. Using the method as described in #7, enter the gateway IP address.
9. Press [DOWN] to highlight “Netmask”. If the default (255.255.255.0) is correct for your
local network, press [BACK] to save any previous changes or wait approximately 15
seconds for any changes to be saved automatically. If the default values are not correct
for your local network repeat the method as described in #7 above until the Netmask is
correct. After selecting the last digit, pressing [ENTER] will exit the Netmask-setting
dialog and once again highlight “Netmask”. Now you may manually press [BACK] to
save any changes made or wait approximately 15 seconds for the changes to be saved
automatically. The remaining IP menu items (“Server1” and all after) do not need to be
changed at this time.
With the correct IP address, Default Gateway and Subnet Mask entered, you can run the supplied
program to create playlists, transfer files and play programs.
Rev. 36 – Firmware version 1.61
22
©
2008
T
Relay Specifications
One side of the input relays needs to be shorted to ground, pin 7, to create a closure. A rail
voltage, pin 13, is supplied to pull up the other side of the input. The shield is also a ground
connection.
Input Closure Pin Numbers
Tie pins 8, 21, 11 and 24 to the pin 13 (rail voltage)
#1 – Pin 9 should short to ground for a closure
#2 – Pin 22 should short to ground for a closure
#3 – Pin 12 should short to ground for a closure
#4 – Pin 25 should short to ground for a closure
Output Relay Closures Pin Numbers
#1 – Pin 1 and 14
#2 – Pin 2 and 15
#3 – Pin 3 and 16
#4 – Pin 4 and 17
#5 – Pin 5 and 18 (reserved for Time Sync pulse)
#6 – Pin 6 and 19 (reserved for Alarm)
The time sync pulse settings are under the CLOCK INTERVAL settings section.
The alarm relay (#6) will close on the following conditions:
RF problems:
• Loss of RF
• Shorted LNB
Network problems
• No Ethernet connection
• No connection to the AMB-OS server
The RF ALARM SETTING is a submenu under RECEIVER UTILITIES . The NETWORK
ALARM SETTINGS are under the IP ADDRESS submenu.
The output closures are Form A type closures and need a pull up to create the closure. You can
use the provided rail voltage on Pin 13.
Rev. 36 – Firmware version 1.61
23
©
2008
The following diagram shows the use of a +12V external pull-up source. Pin 13 is not connected
to anything and the +12V source connects to pins 24, 11, 21 and 8.
The following diagram shows the use of a +5V external pull-up source.
Rev. 36 – Firmware version 1.61
24
©
2008
OPERATIONS
Front Panel Description
Display
Input Closures
(no inputs closed)
Relay Output Closures
(no output relays closed)
Audio Status
(no audio playing)
Emergency message
enabled
(***Future firmware)
Connection Status
RF Input
(RF good)
Internet Connection
(connected to uplink
server)
Message Line
Ethernet
(connected to internal
network)
Emergency Message Enabled: This indicates whether the AMR-100 will receive a broadcast
on TMAP0. This enables the AMR-100 to receive a special broadcast or if there is an
emergency broadcast for the entire network. To receive these broadcasts, TMAP0 must have
an assigned audio port and the “*” must be visible on the screen. The status of TMAP0 can
be seen with the other TMAPs when looking at the System Statistics from the HTML
Command Interface.
Closure Indicators: The small boxes at the top of the screen indicate a relay output closure or
input closure. The group of four boxes will display input closures and the group of six boxes
will display the output closures. A clear box means the input closure or output relay is open.
A black box means the input or relay is closed.
Audio Status Indicators: On power-up, there are two boxes under the relay indicators. They
are labeled St-1 and St-2. When clear, no audio is playing out the audio ports. When they
turn black, it means audio is coming out that port. The boxes split into two individual boxes
when two mono programs play out a port and they are labeled 1L and 1R or 2L and 2R.
Again, when clear, there is no audio and when black, there is audio.
Audio Status
Audio Status
Audio port 1 is playing
different mono
programs out the
left and right
channels.
Audio port 2 is playing a
stereo program
Network/RF indicators: Under the audio status boxes are three boxes labeled: RF, Lan and
Inet. If you have a good RF signal, the RF box is black. If the Ethernet cable is connected to
a network, the Lan box is black. If the receiver can access the Internet and attach to the
uplink server, the Inet box is black. These functions will be discussed in detail later.
Rev. 36 – Firmware version 1.61
25
©
2008
Alarm Relay #6 closed
No RF indication
Message Line: The last line on the display is black and it is the message window. Messages
sent by the satellite link are displayed on this line.
Pressing any button will change the screen to display the SETTINGS and DATE.
Deauthorized Message:
The network administrator can disable a receiver. If that happens, the following message
appears on the screen with only the message line below it: Deauthorized
In the event your receiver becomes “Deauthorized,” you need to call AMB-OS to have it
restored to normal operation.
Deauthorized
1-877-AMBOS2U for help
Rev. 36 – Firmware version 1.61
26
©
2008
Front Panel Menu Options
The following chart is a tree of all the options in the front panel setup.
Settings
Firmware
Serial
IP Addr
Receiver Utilities
MAC
PID
Alarm
Freq
DHCP
Symrate
IP Addr
Alarm
Gateway
Eb/No
Netmask
Avg BER
Server 1-4
AGC
Port 1-4
Puncture
Cmd Addr
Shorts
Cmd Port
Lost Lock
Web Port
Bad Block
Align
Clock Interval
Off
Closure Map
Minutes
P1LS
Target Map
Second
P1LE
B1LS
LCD Settings
B1LE
Resistance Ratio
...
Reference
P2RS
HD Model
P2RE
B2RS
HD Size
B2RE
Relay Test (menu hidden)
Audio Test
Date
Date Time
Zone
Daylight Saving Time
Rev. 36 – Firmware version 1.61
27
©
2008
The SETTINGS display shows the following options and the “*” indicates setting has
optional parameters, but the “*” is not on the screen.
Firmware: 1.61 (or current version)
Serial No: 2001000 (your serial number)
*IP Addr: 192.168.1.100 (an example of an internal IP address only)
*Receiver Utilities
*Clock Interval
*Closure Map
*Target Map
*LCD Settings
HD Model: ST38021 5A
HD Size: 76319meg
*Audio Test
Rev. 36 – Firmware version 1.61
28
©
2008
Settings Menu
IP Address Submenu
MAC XXXXXXXXXXXX (unique to each receiver and cannot
be changed)
*Alarm: ON (default – assigned to Relay #6)
The alarm closes on the following conditions:
1. Loss of Ethernet connectivity to the network
2. Loss of connection the server
To change the setting, follow this procedure.
1. Press [ENTER] – ON is selected
2. Press [ENTER] to change it to OFF
3. Press [BACK] to return to the IP Address submenu
If you are not going to connect your receiver to your internal
network or to the Internet, turn the alarm setting to OFF.
*DHCP: YES
1. Press [ENTER] – YES is selected
2. Press [ENTER] to change to NO
3. Press [BACK] to return to the IP Address submenu
IP Addr
MAC
Alarm
DHCP
IP Addr
Gateway
Netmask
Server1
Port1
Server2
Port2
Server3
Port3
*IP Addr: XXX.XXX.XXX.XXX (See IP ADDRESS
Server4
CHANGE section) – Remember 1 and 2 digit subnet
addresses have leading 0’s (.002. for .2. and .030. for .30).
Port4
If you use a manual IP address (DHCP = No), you must
Cmd Addr
enter a subnet mask and default gateway to be able to
Cmd Port
exit the menu.
1. Press [ENTER] – first digit is selected
Web Port
2. Press [UP] or [DOWN] to change the digit to the desired
value
3. Press [ENTER] when have the number you want (it will move to the next digit)
4. Press [UP] or [DOWN] to select next digit
5. Press [BACK] to go back to the previous digit to correct it, if necessary
6. Do this for all 12 digits, then press [ENTER] to save and return to the IP Address
submenu
*Gateway: 192.168.1.1 (This is your network’s Internet gateway and provided by your
network administrator. This number is for illustration purposes only.) – Remember 1 and
2 digit subnet addresses have leading 0’s (.002. for .2. and .030. for .30).
1. Press [ENTER] – First digit is selected
2. Press [UP] or [DOWN] to change the digit to the desired value
3. Press [ENTER] when have the number you want (it will move to the next digit)
4. Press [UP] or [DOWN] to select next digit
5. Press [BACK] to go back to the previous digit to correct it, if necessary
6. Do this for all 12 digits, then press [ENTER] to save and return to the IP Address
submenu
Rev. 36 – Firmware version 1.61
29
©
2008
*Netmask: 255.255.255.0 (Normally, this should not be changed) – Remember 1 and 2 digit
subnet addresses have leading 0’s (.002. for .2. and .030. for .30).
1. Press [ENTER] – First digit is selected
2. Press [UP] or [DOWN] to change the digit to the desired value
3. Press [ENTER] when have the number you want (it will move to the next digit)
4. Press [UP] or [DOWN] to select next digit
5. Press [BACK] to go back to the previous digit to correct it, if necessary
6. Do this for all 12 digits, then press [ENTER] to save and return to the IP Address
submenu
The four server entries in this section reflect a mirrored server configuration at the uplink site
with two diverse Internet routes to each server. Servers 1 and 2 represent the main server and
its two different Internet paths. Servers 3 and 4 represent the backup server and its two
different Internet paths.
*Server1: 72.159.94.35 This should be entered for the receiver to communicate back to the
main AMB-OS server at the uplink site to retrieve missing data. It is the main server at
the uplink site. Remember 1 and 2 digit subnet addresses have leading 0’s (.002. for .2.
and .030. for .30).
1. Press [ENTER] – First digit is selected
2. Press [UP] or [DOWN] to change the digit to the desired value
3. Press [ENTER] when have the number you want (it will move to the next digit)
4. Press [UP] or [DOWN] to select next digit
5. Press [BACK] to go back to the previous digit to correct it, if necessary
6. Do this for all 12 digits, then press [ENTER] to save and return to the IP Address
submenu
*Port1: 25000 This is always 25000. If you change this port number, your receiver will not
communicate with the main AMB-OS server at the uplink site.
1. Press [ENTER] to select 2
2. Press [UP] or [DOWN] to change the digit to the desired value
3. Press [ENTER] to move to the next one
4. Press [BACK] to return to a previous digit to correct it
5. Press [ENTER] to go to each digit. When you press [ENTER] at the last digit, it will
save your new port number and return to the IP Address submenu
NOTE
A port number of 00000 will stop the AMB-100 receiver from trying to connect to
the AMB-OS server at the uplink site. You should use this setting if and only if,
you do not have an Internet connection for your AMR-100 receiver.
*Server2: 209.169.52.43 This is the alternate Internet route to the main AMB-OS server at
the uplink site to retrieve missing data and does not need to be modified. Remember 1
and 2 digit subnet addresses have leading 0’s (.002. for .2. and .030. for .30).
1. Press [ENTER] – First digit is selected
2. Press [UP] or [DOWN] to change the digit to the desired value
3. Press [ENTER] when have the number you want (it will move to the next digit)
4. Press [UP] or [DOWN] to select next digit
5. Press [BACK] to go back to the previous digit to correct it, if necessary
6. Do this for all 12 digits, then press [ENTER] to save and return to the IP Address
submenu
Rev. 36 – Firmware version 1.61
30
©
2008
*Port2: 25000 This is always 25000. If you change this port number, your receiver will not
communicate with the main AMB-OS server at the uplink site.
1. Press [ENTER] to select 2
2. Press [UP] or [DOWN] to change the digit to the desired value
3. Press [ENTER] to move to the next one
4. Press [BACK] to return to a previous digit to correct it
5. Press [ENTER] to go to each digit. When you press [ENTER] at the last digit, it will
save your new port number and return to the IP Address submenu
*Server3: 72.159.94.36 This is the backup server to the main AMB-OS server at the uplink
site to retrieve missing data and does not need to be modified. Remember 1 and 2 digit
subnet addresses have leading 0’s (.002. for .2. and .030. for .30).
1. Press [ENTER] – First digit is selected
2. Press [UP] or [DOWN] to change the digit to the desired value
3. Press [ENTER] when have the number you want (it will move to the next digit)
4. Press [UP] or [DOWN] to select next digit
5. Press [BACK] to go back to the previous digit to correct it, if necessary
6. Do this for all 12 digits, then press [ENTER] to save and return to the IP Address
submenu
*Port3: 25000 This is always 25000. If you change this port number, your receiver will not
communicate with the main AMB-OS server at the uplink site.
1. Press [ENTER] to select 2
2. Press [UP] or [DOWN] to change the digit to the desired value
3. Press [ENTER] to move to the next one
4. Press [BACK] to return to a previous digit to correct it
5. Press [ENTER] to go to each digit. When you press [ENTER] at the last digit, it will
save your new port number and return to the IP Address submenu
*Server4: 209.169.52.44 This is the alternate Internet route to the backup server to the main
AMB-OS server at the uplink site to retrieve missing data and does not need to be
modified. Remember 1 and 2 digit subnet addresses have leading 0’s (.002. for .2. and .
030. for .30).
1. Press [ENTER] – First digit is selected
2. Press [UP] or [DOWN] to change the digit to the desired value
3. Press [ENTER] when have the number you want (it will move to the next digit)
4. Press [UP] or [DOWN] to select next digit
5. Press [BACK] to go back to the previous digit to correct it, if necessary
6. Do this for all 12 digits, then press [ENTER] to save and return to the IP Address
submenu
*Port4: 25000 This is always 25000. If you change this port number, your receiver will not
communicate with the main AMB-OS server at the uplink site.
1. Press [ENTER] to select 2
2. Press [UP] or [DOWN] to change the digit to the desired value
3. Press [ENTER] to move to the next one
4. Press [BACK] to return to a previous digit to correct it
5. Press [ENTER] to go to each digit. When you press [ENTER] at the last digit, it will
save your new port number and return to the IP Address submenu
Rev. 36 – Firmware version 1.61
31
©
2008
*Cmd Addr: 239.239.239.128 (This should never change unless instructed to do so by
support personnel. It is the port used to send commands to the AMR-100 receiver through
its ‘html’ interface – see the HTML INTERFACE section) – Remember 1 and 2 digit
subnet addresses have leading 0’s (.002. for .2. and .030. for .30).
1. Press [ENTER] – First digit is selected
2. Press [UP] or [DOWN] to change the digit to the desired value
3. Press [ENTER] when have the number you want (it will move to the next digit)
4. Press [UP] or [DOWN] to select next digit
5. Press [BACK] to go back to the previous digit to correct it, if necessary
6. Do this for all 12 digits, then press [ENTER] to save and return to the IP Address
submenu
*Port1: 23456 (This should not be changed unless instructed to do so by support personnel. If
you change this port number, your receiver will not accept commands through the ‘html’
interface – see the HTML INTERFACE section).
1. Press [ENTER] to select 2
2. Press [UP] or [DOWN] to change the digit to the desired value
3. Press [ENTER] to move to the next one
4. Press [BACK] to return to a previous digit to correct it
5. Press [ENTER] to go to each digit. When you press [ENTER] at the last digit, it will
save your new port number and return to the IP Address submenu
*Web Port: 80 (Normally, this does not need to be changed..) If you have multiple web
access pages at your location, you may need to change this. You change this port number
through ‘html’ interface – see the HTML INTERFACE section.
1. Press [ENTER] to select 0 – the display will change to 00080
2. Press [UP] or [DOWN] to change the digit to the desired value
3. Press [ENTER] to move to the next one
4. Press [BACK] to return to a previous digit to correct it
5. Press [ENTER] to go to each digit. When you press [ENTER] at the last digit, it will
save your new port number and return to the IP Address submenu.
6. To change the port to 8080
a. Press [ENTER] at the first 0 to move to the second 0.
b. Press [UP] to change the number to 8 – the display will read 08080
a. Press [BACK] to save the setting
Rev. 36 – Firmware version 1.61
32
©
2008
Receiver Utilities
The Receiver Utilities Submenu has the
following options (* – means the value can
be changed, but it is NOT on the display).
*PID: 0x400
*Freq: 01.106575000
*Symrate: 07140000
*Alarm: ON (default – assigned to Relay #6)
Eb/No: 10.00
Avg Ber: 5
AGC: 8555
Puncture: 1/2
Shorts: 0
Lost Lock: 0
Bad Block: 20
*Align: Off
Receiver Utilities – Submenu Items
Receiver Utilities
PID
Freq
Symrate
Alarm
Eb/No
Avg BER
AGC
Puncture
Shorts
Lost Lock
Bad Block
Align
*PID: 0x400 (This is the main Program ID of the
carrier and should not be changed unless instructed to do so by support personnel).
1. Press [ENTER] to select 4 (or the first digit after the 0x…)
2. Press [UP] or [DOWN] to change the digit to the desired value
3. Press [ENTER] to move to the next one
4. Press [BACK] to return to a previous digit to correct it
5. Press [ENTER] to go to each digit. When you press [ENTER] at the last digit, it will
save your new port number and return to the Receiver Utilities submenu
*Freq: 01.106575000 (This is the frequency of the carrier and should not be changed unless
instructed to do so by support personnel).
1. Press [ENTER] to select 0 (or the first digit in the frequency)
2. Press [UP] or [DOWN] to change the digit to the desired value
3. Press [ENTER] to move to the next one
4. Press [BACK] to return to a previous digit to correct it
5. Press [ENTER] to go to each digit. When you press [ENTER] at the last digit, it will
save your new port number and return to the Receiver Utilities submenu
*Symrate: 07140000 (This is the bandwidth of the channel and should not be changed unless
instructed to do so by support personnel).
1. Press [ENTER] to select 0 (or the first digit of the data rate)
2. Press [UP] or [DOWN] to change the digit to the desired value
3. Press [ENTER] to move to the next one
4. Press [BACK] to return to a previous digit to correct it
5. Press [ENTER] to go to each digit. When you press [ENTER] at the last digit, it will
save your new port number and return to the Receiver Utilities submenu
Rev. 36 – Firmware version 1.61
33
©
2008
*Alarm: ON (default)
Relay #6 closes on any of the following conditions:
1. Loss of RF
2. A short to the LNB
To turn the alarm off, use the following procedure.
1. Press [ENTER] to access the menu.
2. Press [ENTER] to edit the menu.
3. Press [DOWN] to get to the RECEIVER UTILITIES
4. Press [ENTER] to edit the utilities
5. Press [DOWN] to get to ALARM
6. Press [ENTER] to set it to OFF
7. Press [BACK] to save the changes
8. Press [BACK] until you are back to the main screen
Eb/No: 11.00 (This is relative your location, dish size, alignment, cable type and distance)
Avg BER: 6 (This is the average Bit Err Rate and should be under 10 normally)
AGC: 8500 (This shows the amount of AGC and should be around 8000)
Puncture: 1/2 (This is the Forward Error Correction rate)
Shorts: 0 (This counts the number of shorts on the LNB and should be 0 normally)
Lost Lock: 0 (This counts the number of times the receiver lost lock on the signal and
normally should be 0)
Badblock: 25 (This counts the number of bad data blocks received and it should be less then
30)
*Align: Off (default) This puts the receiver in dish alignment mode – see DISH
ALIGNMENT section.
1. Press [ENTER] to enable the dish alignment mode – This brings up a screen with:
a. 80 (No lock)
b. Symlock 11.98 – it will stay on that display until any other key is pressed
2. Press any key to return Receiver Utilities submenu
*Clock Interval (Time sync relay) – default: OFF
This selects the minutes and seconds when relay #5 closes to synchronize your clocks. This
can be set to any minutes or seconds you desire.
Clock Interval
The time sync used on the Wegener Unity 4000® is
at 54:30. The following procedure sets the time
Off
sync relay on and the relay closure at 54:30. The
Minutes
receiver comes shipped with this function off.
Seconds
1. Press [ENTER] to access the menu
2. Press [ENTER] to edit the menu
3. Press [DOWN] to get to the CLOCK INTERVAL
4. Press [ENTER] to edit the settings
5. Press [ENTER] to turn the relay ON
6. Press [DOWN] to get to MINUTES:
7. Press [ENTER] to set it to 54
8. Press [DOWN] to get to SECONDS:
9. Press [ENTER] to set it to 30
10. Press [BACK] to save the changes
11. Press [BACK] until you are back to the main screen
The Time Sync relay closes for one second at the MM:SS setting. With the example listed
above, relay #5 would close every hour at XX:54:30 and open at XX:54:31.
Rev. 36 – Firmware version 1.61
34
©
2008
*Closure Map
This allows you to change the relay assignments.
The Relay Specification section lists the different
functions and states. The names are listed in the
illustration to the right. The numbers are the relay
numbers. All six relays can be used if the time sync
and the alarm functions are not used. If they are
used, however, only the first four relays are
available. This section assumes that the alarm (#6)
and time sync (#5) functions are used and only
relays #1-#4 are available.
The Relay Test Menu is only accessible by holding
down the [UP] and [DOWN] at the same time while
in this menu.
Closure Map
P1LS
P1LE
B1LS
B1LE
…
P2RS
P2RE
B2RS
B2RE
General instructions:
Relay Test Menu - hidden
1. [ENTER] moves between fields and accepts
changes
2. [BACK] goes to a previous field and saves the setting only when you are on the name of
the relay (P1LS, P1LE, etc.)
3. [UP] and [DOWN] change values
Changing settings:
1. Press [ENTER] to edit the closure map and highlight P1LS
2. Press [ENTER] to move to the relay – this will be 1 in the default settings
3. Press [UP] or [DOWN] to change this to any of the available relays (in the default
setting, only relays #1-#4 are available)
4. Press [ENTER] to move to the state – in the default settings, this will be ON
5. Press [UP] or [DOWN] to change the setting from ON to OFF or PULSE
6. Press [ENTER] to highlight P1LS
7. Press [BACK] to save your setting
Until you press [BACK] you will rotate through the NAME, RELAY and STATE.
To reset the closure map to its default settings, you must enter the Relay Test Menu
(pressing [UP] and [DOWN] at the same time) and then press [UP] and [DOWN] at the
same time while in the Relay Test Menu. The following section describes that procedure.
Rev. 36 – Firmware version 1.61
35
©
2008
Relay Test Menu
This menu allows you to verify input closures and close the relays to verify connections. The
menu item is not listed and is activated by pressing [UP] and [DOWN] at the same time.
Closure Test
1. Press [ENTER] to enter the closure test
2. Press [UP] or [DOWN] to select the relay you want to test
Relay #1 selected, but not activated
3. Press [ENTER] to activate a relay – the box of the selected relay will darken
Relay #1 Activated
4. Press [ENTER] to clear the relay – the box of the selected relay will lighten
5. Press [BACK] to exit the closure test and return to the Settings submenu
When an input closure is closed, the appropriate box goes black and then clears after it is
released.
Input #1 closed, inputs #2 - #4 open
Resetting to Default Closures
When you are in the RELAY TEST menu, you can press [UP] and [DOWN] at the same time
to reset the closure map to its default setting.
Rev. 36 – Firmware version 1.61
36
©
2008
*Target Map
This menu allows you to change a target map to any of the analog targets. The default
mappings are:
TMAP1 = T1 (stereo)
TMAP2 = T2 (stereo)
TMAP3 = T1L (mono)
TMAP4 = T1R (mono)
TMAP5 = T2L (mono)
TMAP6 = T2R (mono)
To access the target menu:
General instructions:
1. [ENTER] changes the mapping of the highlighted Target Map
2. [BACK] goes to the previous menu and saves the settings
3. [UP] and [DOWN] moves between the Target Maps
Changing settings:
1. Press [ENTER] twice to enter the edit mode of the front panel settings (the Firmware
X.XX should be highlighted
2. Press [DOWN] until Target Map is highlighted
3. Press [ENTER] to edit the target map and highlight TMAP1
4. Press [ENTER] to change the mapping
5. Press [UP] or [DOWN] to move to the next Target Map
6. Press [BACK] to save your setting
Rev. 36 – Firmware version 1.61
37
©
2008
*LCD Settings
This changes the contrast of the display. Be very
LCD Settings
careful, because you can make the display
Resistance Ratio
unreadable and you will have to reset the receiver to
Reference Voltage
its default settings (see RESETTING THE
RECEIVER TO DEFAULT SETTINGS section).
1. Press [ENTER] to edit the Resistance Ratio
2. Press [UP] or [DOWN] to change the settings – this makes “coarse” adjustments to
the contrast of the display
3. Press [ENTER] to move to Reference Voltage
4. Press [UP] or [DOWN] to change the settings – this makes “fine” adjustments to the
contrast of the display
5. Press [ENTER] to save your settings and return to the Settings submenu
WARNING
If you adjust the display to an unreadable condition, you can restore the display
by using a “Cold Boot.” This is done by unplugging the AMR-100 receiver and
press and hold the [ENTER] button as you plug in the AMR-100. This will
reset the display to its normal settings.
A Cold Boot will stop the audio playback and it must be rebooted to restore the
audio playback!
HD Model: ST38021 5A (This is the model number of the internal hard drive)
HD Size: 76319meg (This is the size of the internal hard drive – approximately 80 GB)
*Audio Test
1. Press [ENTER] to start the test. It will generate two different tones (a lower tone on the
left channel and a higher tone on the right channel). The display will say:
Now playing a low tone
on the left, and a high
tone on the right. Press
any key to exit this test.
2. Press any key to exit the test (as described on the display)
Rev. 36 – Firmware version 1.61
38
©
2008
DATE MENU
Only three options exist on the Date Menu:
Date and time
Zone
Daylight Saving Time
DATE
Date Time
In a few minutes after connecting the RF to the
AMR-100, it will sync its time based on the
embedded time in the RF carrier. The carrier
sends GMT and the receiver changes the hours
to reflect the Zone and Daylight Saving Time setting.
Zone
Daylight Saving
After the time is synced from the RF carrier, you CANNOT change the date and time. When
you enter the edit mode in this menu, you will be taken to the Zone setting and NOT be able
to change the date or time. If the month is highlighted when you press [ENTER], then you
either have entered the menu before the time sync or the RF is not connected.
Date Time:
The receiver wakes up based on the time setting it had during testing at the factory.
You may change this only before the AMR-100 syncs its time with the RF carrier.
Time Zone:
Zone: Eastern (default)
The zone can be set to any time zone. When changing the Time Zone setting, the hour
display will change automatically to reflect the new time zone. Only seven zones are
named. The other zones are reflected in hours to or from GMT (GMT-1, GMT+12,
etc.) The names zones are:
• Atlantic
• Eastern
• Central
• Mountain
• Pacific
• Alaska
• Hawaii
After the clock has received its time sync from the RF carrier, the time
immediately changes to reflect a change in the zone. Thus, changing the zone
from Eastern to Central at 11:34:35 will cause the time to change to 10:34:35
immediately.
Rev. 36 – Firmware version 1.61
39
©
2008
Daylight Saving Time
Daylight Saving Time: Yes (default)
This tells the receiver to make the change to and from Daylight Saving Time each
year. If the setting is “No” then the receiver will not change the time at the start or
end of Daylight Saving Time. If Daylight Saving Time is in effect, changing this from
NO to YES will cause the hour to change appropriately. If Daylight Saving Time is
not in effect, changing this setting will have no affect on the hour. If your locality
does not observe Daylight Saving Time, change the setting to “No” so it will not
change the time. The new rules for Daylight Saving Time have been incorporated in
the receiver (DST begins on the 2nd Sunday in March and ends on the 1st Sunday
in November).
General setting procedure:
[ENTER] moves from each element to the next and saves the settings after the last
option (Daylight Saving Time) is selected.
[UP] and [DOWN] changes the settings
[BACK] moves the selection backwards, for example, if you are changing the
minutes and press [BACK], you will move to the hours.
The following procedure takes you through setting all the options.
The month is the first setting you highlight if the receiver has not synced it time
with the RF carrier or to the Zone setting if it has synced to the RF carrier.
[ENTER] highlights month (only if the time has not synced to the RF carrier)
[UP] and [DOWN] changes the month
[ENTER] highlights day of the month
[UP] and [DOWN] changes the day
[ENTER] highlights the year
[UP] and [DOWN] changes the year
[ENTER] highlights the hour (in 24 hour format)
[UP] and [DOWN] changes the hour
[ENTER] highlights minutes
[UP] and [DOWN] changes the minutes
If the receiver has synced its time with the RF carrier, when you press
[ENTER] to enter the edit mode, this is your first setting.
[ENTER] highlights Zone (is the first setting if the time has been synced to the RF
carrier)
[UP] and [DOWN] changes the Zone
[ENTER] highlights Daylight Saving Time
[UP] and [DOWN] changes the setting from YES to NO
[ENTER] saves the settings and returns you to the DATE status screen
Rev. 36 – Firmware version 1.61
40
©
2008
Audio Playback Description
Analog
NOTE:
All audio playback must done by an internal playlist or a trigger (see Playlist).
There is no method to playback audio from the front panel.
The analog outputs are the main outputs and all other outputs (digital and IP streaming) are
paired to the analog outputs. That means you cannot have any more than four mono programs
playing. With mono programs playing on Port 1-L and Port 1-R, all three digital outputs for Port
1 will have the mono program playing on Port 1-L on its left channel and the mono program on
Port 1-R on the right channel. Port 2 does the same. With a stereo program playing out the
analog port, all three digital outputs for that port will have the same stereo program playing.
You can have the following configurations:
2 – Stereo (Port 1-L&R, Port 2-L&R)
3 – 1 stereo program on Port 1-L&R and 2 mono programs: 1 on Port 2-L and 1 on Port 2-R
3 – 2 mono programs: 1 on Port 1-L and 1 on Port 1-R and 1 stereo program on Port 2-L&R
4 – 4 mono programs: 2 on each port – 1 on Port 1-L, 1 on Port 1-R, 1 on Port 2-L and 1 on
Port 2-R
The AMR-100 will mix a stereo program to mono when you send it out a mono port. A stereo
program sent out Port 1-L will have the left and right mixed to mono on that port.
NOTE:
You can have 1 stereo and 2 mono outputs, but the 2 mono outputs must be on the
same general port. You cannot have a stereo channel from Port 1-L and Port 2-R
while having mono outputs on Port 1-R and Port 2-L. If Port 1 is stereo (L&R),
Port 2 can have separate mono programs on Port 2-L and Port 2-R. The same
thing can be done with Port 2 stereo and mono on Port 1-L and Port 1-R.
Rev. 36 – Firmware version 1.61
41
©
2008
Digital
The digital outputs mirror the analog outputs. Whatever comes out the analog comes out on all
the digital ports. So, two mono programs coming out Port 1-L and Port 1-R will come out the
AES-EBU, SPDIF, and OPTICAL as two programs, one on the left and one on the right. Also,
you cannot send any audio out the digital without it going out the analog ports. Port 1 and Port 2
can be different programming, but the audio coming out the analog outputs of Port 1 also will
come out the digital outputs (AES-EBU, SPDIF, and OPTICAL) of Port 1. The same is true for
Port 2.
NOTE:
All the outputs for each port (analog and digital) are always the same. Whatever
comes out of Port 1 analog (stereo or mono) comes out the digital ports (AESEBU, SPDIF and OPTICAL for Port 1. You CANNOT have one thing come out of
the digital ports for Port 1 and something else come out of the analog for Port 1.
Streaming
The AMR-100 can stream audio out the Ethernet port, but, like the digital outputs, they must
have an associated analog output. The Ethernet stream is always in stereo, which means you can
play a program out Port 1-L and stream that same program out the Ethernet port. The analog
output on Port 1-L will be mono and mix the stereo to a mono signal, but the output of the
Ethernet will be in stereo.
The streaming audio cannot be decoded by Windows Media Player®. However, a program called
VideoLAN® (http://www.videolan.org) can be used to decode the Ethernet stream.
Playback after a power loss
Audio will resume after a power loss to the receiver. The audio will NOT resume from where it
was at the time of the power loss, but rather where it would be if the power had not been lost.
The following is an example of what you would hear.
1.
2.
3.
4.
5.
A program was started at 9:00:00
At 9:09:45 power was lost to the receiver and audio terminated
Power was restored at 9:11:20
The AMR-100, after rebooting, will resume audio at approximately 9:11:50
The audio will play what was supposed to be playing at 9:11:50 had the power not been
lost
Thus, the audio playing after power is restored, would be 11:50 into the program and the
program will end at its scheduled time. A 25-minute program will end at 11:25.
Rev. 36 – Firmware version 1.61
42
©
2008
HTML INTERFACE
Access to the AMR-100 Web page
To access the receiver remotely, you need to have it connected to your internal Ethernet
network.
Open an Internet browser window and enter the IP Address of the receiver into the address
line of the browser. Your IP Address was set at the beginning of the installation. However, if
you do not remember what that was, go to the AMR-100 and press the [DOWN] arrow and it
will be next to the IP Addr: line.
Firmware: 1.61
Serial No: 2001000
IP Addr: 192.168.1.100
Receiver Utilities
1. Open your default browser
2. Enter the IP Address of the receiver (for this example it is 192.168.1.100)
3. Press GO on the address line of the browser
You will get the following screen:
Rev. 36 – Firmware version 1.61
43
©
2008
The menu in the middle has the following:
General Diagnostics has:
System Statistics
Scheduled Event List
Trigger Event Lists
Command Interface
Satellite Diagnostics has:
1-Minute Receiver Summary
15-Minute Receiver Summary
General diagnostics
System Statistics
This shows the settings of the receiver. They are the same as the listings described in the
FRONT PANEL section.
General Statistics:
GENERAL STATISTICS
------------------------------------Firmware Ver:
1.61
TID:
2000000
Processor Speed:
600Mhz
Bus Speed:
120Mhz
Ethernet Addr:
00a0e12e8480
DHCP:
No
IP Address:
10.100.0.133
Netmask:
255.255.255.0
Gateway:
10.100.0.254
Server 1:
72.159.94.35:25000
Server 2:
72.159.94.36:25000
Free Memory:
19506176
Time:
16:26 10/18/07
Zone:
Mountain
DST:
YES
Time Running:
1:37
Description of items:
Firmware Ver gives the current firm level of the operating system
TID is the AMR-100’s ID number or serial number
Processor Speed is the speed of the processor
Bus Speed is the speed of the data/address bus
Ethernet Addr is MAC address of the AMR-100
*DHCP describes is the IP address is selected automatically
*IP Address is the internal network address of the AMR-100
*Netmask is the network mask
*Gateway is the address of the Internet gateway of your internal network
Server 1 is the address:port of the primary AMB-OS uplink server
Server 2 is the address:port of the secondary AMB-OS uplink server
Free Memory describes the amount of unused internal memory for the operating system
*Time is the time (without seconds) and the date
*Zone is the time zone
*DST is whether Daylight Saving Time is in effect or not
Rev. 36 – Firmware version 1.61
44
©
2008
Time Running is the amount of the time the receiver has been running
The “*” items can be changed and they can be done by the front panel (see FRONT PANEL
section). They can also be changed through the Command Interface (see COMMAND
INTERFACE section below).
Receiver Statistics
RECEIVER STATISTICS
------------------------------------PID(s):
0x0400
Carrier Status:
Acquired
AGC:
8845
Pre-FEC Avg BER:
1
Eb/No:
10.56
Bad Blocks:
7
Continuity Errs:
0
LBand Freq:
1106575000
Adjusted Freq:
1106562500
Symbol Rate:
7140000
Puncture Rate:
1/2
Over Current Ev:
0
I2C Errors:
0
Lost Lock Ev:
0
The settings marked with “*” can be changed, but should only be done when directed to do
so by an authorized AMB-OS support person. The other settings describe the health of the
receiver.
PID(s) is the Program Identification number of the carrier. This should be changed only when
directed by an AMB-OS support person.
Carrier Status is the state of the carrier. It should be “Aquired.”
AGC shows the relative strength of the RF carrier and the higher the number the better.
Pre-FEC Avg BER is the Average Bit Error Rate before the FEC (Forward Error Correction)
is applied.
Eb/No is the Energy per Bit above Noise and measures the quality of the data in the carrier. It
is possible to have a low AGC (low RF), but a high Eb/No if the data is good. Likewise, a
strong AGC (high RF) could have a low Eb/No if the carrier has interference to the data.
Bad Blocks measures how many blocks of data have been received that could not be
corrected with FEC (Forward Error Correction). With a high AGC and Eb/No, it should
be a very small number. A high number would indicate the RF has problems because of
interference, bad reception, poor peaking of the dish or faulty equipment like the LNB or
cabling.
Continuity Errs records the number of MPEG frames that were lost. This should correspond
to the bad blocks count. The transponder that AMB-OS and the CRC use is a DVB
compliant transponder and uses MPEG frames to transmit data.
LBand Freq is the frequency of the LNB output to the receiver. This should be changed only
when directed by an AMB-OS support person.
Adjusted Freq is how much the frequency has to change to keep the carrier locked. With a
new LNB, this should match the LBand frequency exactly.
Symbol Rate represents the data rate of the carrier and is roughly the same as the data rate of
the carrier. The AMB-OS carrier shares space with the CRC carrier and the combined
data rate is here. This should only be changed when directed by an AMB-OS support
person.
Puncture Rate describes the amount of Forward Error Correction. Redundant data is sent on
the carrier to fill lost bits to preserve the integrity of the data. This should be changed
only when directed by an AMB-OS support person.
©
Rev. 36 – Firmware version 1.61
45
2008
Over Current Ev counts the number of times the LNB drew too much current. These events
(Ev) always should be 0. If not, you should check your LNB.
I2C Errors (I squared C – I2C) count the errors the processor has. Any errors here indicate an
internal problem in the receiver and it will need to be repaired.
Lost Lock Ev counts the number of time the receiver lost its lock with the carrier. If these
events (Ev) happen, you should make sure your dish is properly aligned. It also happens
during the spring and fall sun transit outages, because the carrier is lost when the satellite
comes directly between your antenna and the sun. If nothing has changed, then this
should be 0.
Data Statistics
DATA STATISTICS
------------------------------------Control Address:
239.239.239.128
Control Port:
23456
Control Pkts:
5622
MPEG IRQs:
93079005
Transp Pkts:
1478019952
Transp Pkt Errs:
28
Transp Syn Errs:
0
Data Queue:
0 of 2000132
Data Queue Max:
78396
Data Queue Ovf:
0
Control Address is the address used by the receiver to receive commands from the Command
Interface.
Control Port is the port used by the receiver to accept the commands from the Control
Address.
Control Pkts (control packets) reflect the number of packets sent to the receiver from the
Command Interface.
MPEG IRQs (MPEG Interrupt Requests) count the number of interrupt requests generated to
process data from the transport stream.
Transp Pkts (Transport Packets) counts the number of packets received from the transport
stream.
Transp Pkt Errs (Transport Packet Errors) counts the number of packet errors from the
transport stream. This number should be low; however, during the Sun Transit Outages,
this will climb up significantly. If you see this number increasing, make sure you check
your equipment. Severe weather also could cause it to climb. Most of the errors will be
fixed by the FEC (Forward Error Correction).
Transp Syn Errs (Transport Packet Synchronous Errors) counts the packets that do not have a
valid header. This should be 0 most of the time.
Data Queue gives you the size of the queue and is a fixed number. This is the temporary
storage for data as it comes from the data stream.
Data Queue Max is the amount of valid data in the queue to be processed.
Data Queue Ovf (Overflow) counts the number of times the data queue overflowed the data
queue. This should always be 0.
Rev. 36 – Firmware version 1.61
46
©
2008
Stream Statistics
STREAM STATISTICS
------------------------------------Eastern Time:
12:53 06/18/08
Permed Streams:
6
This shows the time the report was generated and the number of permissioned streams (live
programs or DVB streams from the Wegener®system). The time is in Eastern Time, because
stream permissions are given according to Eastern Time, because most networks and live
programs use that as their standard. The exact live streams the AMR-100 is getting are listed
in the Amb-OS Utility Software. Please see that manual for further details.
Eastern Time: The time the report was generated
Permed Streams: The number of streams, either live or from the Wegener® system the
receiver has permissions to air
Target Mapping
TARGET MAPPING SETTINGS
------------------------------------TMAP0:
None (*** Future firmware revision)
TMAP1:
Stereo 1 (T1)
TMAP2:
Stereo 2 (T2)
TMAP3:
Mono 1 Left (T1L)
TMAP4:
Mono 1 Right (T1R)
TMAP5:
Mono 2 Left (T2L)
TMAP6:
Mono 2 Right (T2R)
Target Maps (TMAP) allow the AMR-100 to use a different physical output for the same
name. Live streams can send a program to a TMAP number and the station can have the
program come out their port or target. TMAP0 is reserved for special or emergency
broadcasts. See the TMAP Command under the HTML Command Interface section.
Audio Statistics
AUDIO STATISTICS
------------------------------------Playing Audio:
NO
Audio IRQs:
3060454
Playing Audio reports whether audio is playing out a port.
Audio IRQs (Interrupt Requests) count the number of times the audio playback system
requested an interrupt from the process.
Ethernet Statistics
ETHERNET STATISTICS
------------------------------------Connections:
1
IP Datagrams:
236
IP Fragments:
0
Connections show the number of units connected to the Ethernet port on the receiver.
IP Datagrams count the number of IP packets coming to the AMR-100.
IP Fragments are the number of packets that were incomplete in the network and
coming to the AMR-100
Rev. 36 – Firmware version 1.61
47
©
2008
Drive Statistics
DRIVE STATISTICS
------------------------------------Open Files:
0
Space Used:
2221Mb
Space Left:
74078Mb
Open Files reports the number of files open for playback on the AMR-100. If you had four
mono files playing, that number would be 4.
Space Used reports the amount of drive space with data (used space).
Space Left reports the amount of free space on the drive. If there is not enough drive space
available for an incoming file, the file will not be stored. All files are automatically
deleted after their air date from the hard drive on the receiver.
Rev. 36 – Firmware version 1.61
48
©
2008
Scheduled Event List
This page shows the scheduled timed events in the
playlist (see PLAYLIST section). When you first install
your receiver, this will have no entries as shown below.
Action is the type of event that will happen.
Time is time and/or date when the event will
happen.
Source is what file or program will be played.
Target is where the output has been addressed.
Level shows how much the signal has been attenuated by showing its relative volume. A
setting of 0dB means there is no attenuation and a reading of –inf means it is
completely off.
Ramp shows the fade listed in playlist file for that file or event. It shows how many
seconds of fade the program will have at the end of the file.
Output Target shows you which output Port is being used
State shows whether the output is active or not. When it is blank, the output is not being
used for that action and a “1” means the output is active.
The following shows two files. One will be played at 01:30:00 and the other one at
02:00:00.
The column labeled Action has the following entries:
OPEN/SEEK is when the AMR-100 “cues” the file. It does that one second before it
plays.
PLAY shows that it will play at 01:30:00.
STOP shows when the file will end at 01:52:00.
The Time column shows when each event will happen. The Source column shows the
exact name of the file that will play. Target shows the port that will be used to play
the file. Level shows the starting, playing and ending volume (-inf = off, 0dB = full
volume). The Ramp shows how the file will be faded.
Rev. 36 – Firmware version 1.61
49
©
2008
Trigger Event Lists
This link takes you to a page listing events that happen on
an input closure or on a command sent by satellite or serial
port. The system calls these trigger events. If an event
happens on a closure sent by a program producer, then it
will have a serial string that causes a program or spot to air.
This text is listed. If an input closure is used, they are
described as Input 1, Input 2, Input 3 or Input 4. There can
be a maximum of 100 triggers, but only those that are used
are listed. The example to the right shows six trigger
events.
Clicking on one of the events is shown in the following illustrations. The first one shows a
trigger based upon a text command sent to the receiver. Notice that it has the same
information as the Scheduled event. However, the chart does not populate until the text has
been sent and the trigger has caused a file to play.
The following illustration shows an input closure trigger.
Rev. 36 – Firmware version 1.61
50
©
2008
Command Interface
This page allows you to send commands to the receiver. The image below has the list of
commands and a brief description of those commands. The window is where the command is
typed then you press Execute. For example to close Relay #1, you type “relay 1 on” and then
press Execute. The window will change and repeat the command saying it was executed. To
get back to the Command page, press the backspace key or the press the back arrow in your
browser. To open the relay, type “relay 1 off” and press Execute. The case of the command
doesn’t matter, but the illustrations show them in upper case to highlight them. Only 60
characters can be entered into the Command Interface window. After that, it will scroll to the
left.
Rev. 36 – Firmware version 1.61
51
©
2008
General Commands
REBOOT
This causes the system to be rebooted. Audio playing from a timed event (see Schedules)
will restart at the point it would have been had the system not been rebooted.
Warning
Rebooting will cause the receiver to quit playing audio!
Syntax: REBOOT
RELAY # ON/OFF
This will close the relay specified in the command. The command RELAY 1 ON will close
relay #1. This is extremely useful in testing relays. Closing relays #5 and #6 should be used
with extreme caution after completing wiring. If your alarm has been wired and you issue
“RELAY 6 ON,” your alarms will activate. Likewise, if you have wired your clock
synchronization circuit and issue the command “RELAY 5 ON,” this will cause your clocks
to sync to the time described in the CLOCK INTERVAL section. For example, if you have
set the Clock Interval (Time Sync) to 54:30 and you tell the receiver to close relay #5 at
XX:11:45, your system will be sync to 54:30 at 11:45.
Syntax: RELAY 1 ON or RELAY 1 OFF
RELAY var
This sends a command to the mapped relay (see RELAY DESCRIPTION section). If you are
using relay #1 as the P1LE (Program End, Port 1 Left) and you want to verify the relay will
respond correctly, you can send the command to that map. If you have mapped P1LE to relay
#1 as a pulse, then when you execute RELAY P1LE, the relay should close for one second
and then open. The “var” are all the mapped names in RELAY DESCRIPTION.
Syntax: RELAY P1LE
SET ZONE #
Allows you to set the receiver to your local time zone or to any time zone. If you need to
sync your time to your network headend, you can set the time zone to that. It can be set to
any time zone, but the common ones are:
3 = Eastern
2 = Central
1 = Mountain
0 = Pacific
-1 = Alaska
-2 = Hawaii
Syntax: SET ZONE 3
Rev. 36 – Firmware version 1.61
52
©
2008
SET DST #
Sets the receiver to Daylight Saving Time or to Standard Time.
0 = Standard Time (No DST) – used for those who do not participate in DST, e.g.
Arizona. The time will not change when DST goes into effect or when it ends.
1 = If your locality observes Daylight Saving Time (DST) and your receiver needs to
adjust for that.
Syntax: SET DST 0
Rev. 36 – Firmware version 1.61
53
©
2008
Network Commands
DHCP ON/OFF
This turns DHCP ON or OFF. When DHCP is on the IP address of the receiver is selected
automatically by a DHCP Router. That is usually in a router or high-speed (DSL or cable)
modem.
Syntax: DHCP ON or DHCP OFF
NEWIP #.#.#.#
This allows you to set the IP address of the AMR-100 receiver. Your network administrator
must provide this address if DHCP is set to OFF.
Syntax: NEWIP 192.168.1.145
NEWNETMASK #.#.#.#
The Netmask is a filter that rejects or accepts communications from other computers on the
network. Normally this is 255.255.255.0 and it accepts all communication with the first three
set of numbers that match the computers IP address. Thus an IP address of 192.168.1.100
with a Netmask of 255.255.255.0 will accept communication from any computer on the
network that has an IP address in the range of 192.168.1.0 to 192.168.1.255.
Syntax: NEWNETMASK 255.255.255.0
NEWGATEWAY #.#.#.#.
Sets the Internet gateway of your network. This is usually the address of the router or highspeed modem. Your network administrator needs to provide that information if DHCP is
OFF.
Syntax: NEWGATEWAY 192.168.1.1
WEBPORT #
Sets the Web or HTTP port number. This is normally set to 80, but at times an installation
will have more than web interface device and another port may be needed. The other typical
number is 8080.
Syntax: WEBPORT 8080
Rev. 36 – Firmware version 1.61
54
©
2008
Audio Control Commands
AUDPLAY
Plays a specified file on a target on the receiver. This function needs the exact file name to
play correctly. It will not mix two programs together, but it will sum a program to a mono
source. By specifying T1, the program will play in stereo out audio port 1. TlL will send the
file out the left side of target 1 (audio port 1) and sum it to mono. If you send the command
before a previous command completed, the first audio will stop and the second piece will
play.
Syntax AUDPLAY filename.mp2 ON T1
AUDSTOP
This stops playing the audio that was initialized by the AUDPLAY command.
Syntax: AUDSTOP
AUDFADE
This will stop the audio playing, but fade it out rather than just shutting it off.
Syntax: AUDFADE
ALLSTOP
This command will stop all audio playing on all ports. Normally, whatever starts the audio
playing has to stop it. An AUDPLAY command normally needs an AUDSTOP or
AUDFADE command to stop the audio. This command will stop all audio, regardless of
what started it playing.
WARNING:
If you are playing audio out any target directly to air, ALLSTOP will stop the
audio from playing and take it off the air! TSTOP will stop the audio on specific
target and if that is going to directly to air, it will also take you off the air!
Syntax: ALLSTOP
TSTOP
This command is similar to ALLSTOP, but it allows you stop a specific target from playing
regardless of what started it. Use this command with caution. It can be used to stop only the
left or the right channel. However, if the audio was started as stereo on the target
(AUDPLAY filename.mp2 ON T1), it will not stop the audio. If two programs are playing
separately on T1L and T1R, you can stop one or the other by specifying the appropriate
target (T1L or T1R). If T1R is targeted to stop, T1L will continue playing. The command to
stop T1 (no L or R parameter) will only stop the left channel.
Syntax: TSTOP T1
TSTOP T1L
TSTOP T1R
Rev. 36 – Firmware version 1.61
55
©
2008
TMAP# Target
This commands allows you to change the TMAP to another target. The defaults are listed in
the TMAP section. A section under the system statistics shows the current mapping on the
AMR-100 receiver. The target can be any one of seven targets:
T1 = Port 1 stereo
T1L = Port 1 mono – left side only
T1R = Port 1 mono – right side only
T2 = Port 2 stereo
T2L = Port 2 mono – left side only
T2R = Port 2 mono – right side only
None = No target – a file will NOT play
Seven TMAPs exist: TMAP0, TMAP1, TMAP2, TMAP3, TMAP4, TMAP5 and TMAP6.
TMAP0 is for special or emergency broadcasts.
Syntax: TMAP1 T1
TMAP1 T2L
Rev. 36 – Firmware version 1.61
56
©
2008
Satellite Diagnostics
The AMR-100 has fixed amount of memory that it uses to track events. Because it would
take too much memory to track all events, two summary tables are provided to assist you in
troubleshooting any problems.
1. The 1-Minute Summary takes snap shot every minute and records a summary of
errors in that minute.
2. The 15-Minute Summary takes a snap shot every 15 minutes and records a summary
of errors in that time frame.
The following two illustrations show the two summary pages. Both report the same things,
but the time of each varies in accordance to its page. The 1-Minute Summary has an entry
every minute and the 15-Minute Summary has an entry every 15 minutes.
The columns have the same names:
• Packets processed: How many data packets have been sent to and received by the
AMR-100
• Multicast Datagrams: If you receive a live stream, this records the number data
packets sent and received by the AMR-100
• Bad Blocks: The shows the number of blocks that could be corrected by Forward
Error Correction (FEC)
• Continuity Errors: This records the number of MPEG frames that were lost. This
should correspond to the bad blocks count. The transponder that AMB-OS and the
CRC use is a DVB compliant transponder and uses MPEG frames to transmit data.
• EbNo: This is the Energy per Bit above Noise and measures the quality of the data in
the carrier. It is possible to have a low AGC (low RF), but a high Eb/No if the data is
Rev. 36 – Firmware version 1.61
57
©
2008
•
•
good. Likewise, a strong AGC (high RF) could have a low Eb/No if the carrier has
interference to the data.
Average BER: This is the Average Bit Error Rate before the FEC (Forward Error
Correction) is applied.
Lost Locks: Lost Locks are the number of time the receiver lost its lock with the
carrier. If this happens, you should make sure your dish is properly aligned. It also
can happen during the spring and fall sun transit outages, because of the carrier being
lost when the satellite comes directly between your antenna and the sun. If nothing
has changed, then this should be 0.
Rev. 36 – Firmware version 1.61
58
©
2008
DEFINITIONS
Daylight Saving Time – The practice of changing the time during the summer by one hour to
have more daylight during waking hours. http://tf.nist.gov/general/history.htm
DHCP or Dynamic Host Configuration Protocol – A system of assigning IP addresses to
computers on a network to avoid conflicts of having more than one computer having the
same IP address.
DSL or Digital Subscriber Line – A method of providing high-speed access to the Internet
through a telephone line.
DST – See Daylight Saving Time
DVB or Digital Video Broadcast – The standard for digital broadcasts on satellite www.dvb.org
FEC – See Forward Error Correction.
Forward Error Correction – The amount of extra data sent with the original data to be able to
correct any errors in the data during transmission.
GMT – See Greenwich Mean Time
Greenwich Mean Time – The time measured at the Greenwich Meridian Line at the Royal
Observatory in Greenwich. www.greenwichmeantime.com/what-is-gmt.htm
HTML or HyperText Markup Language – This is the standard language used for web pages. A
browser translates the text page to the graphical representation displayed by the computer.
IP Address or Internet Protocol Address – Assigns a unique number to computers on a network.
No computers can have the same IP address in a given network.
MP2 – A standard of video compression used in DVB (Digital Video Broadcast), DVD disks and
professional audio. This has fewer issues with multiple compression steps and retains its
quality, so it works better in professional audio applications. It is MPEG-1 Layer 2.
MP3 – A standard of audio compression designed to improve compression and retain quality
audio. It is used primarily for personal audio and is subject to severe recompression
anomalies. It is commonly understood as MPEG-1 Layer 3.
MPEG or Motion Picture Engineers Group – This is the body that creates the data standards for
audio and video compression. File formats sometimes shorten this to MPG. www.mpeg.org
MPG – See MPEG
PID or Program ID or Identifier – The unique ID of the program used by a receiver on a standard
DVB carrier.
Targets – The port that will output the audio. It is referred to in reference the place the decoded
audio is sent or targeted to play. The targets refer directly to the output ports. Target 1
equates to the analog output port 1.
Triggers – Text commands or input closures that cause the receiver to initiate an action. A trigger
may cause a program to begin playing or stop a program from playing.
Rev. 36 – Firmware version 1.61
59
©
2008