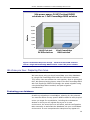
1
SERVERS: DATABASE CONSOLIDATION ON DELL POWEREDGE R810 SERVERS *See hardware details on Page 3. A Principled Technologies report commissioned by Dell Table of contents Executive summary ........................................................3 New Dell technology makes major savings easy .................4 Features of the new Dell PowerEdge R810 ........................ 4 Features of the new Intel Xeon Processor 7500 series ........ 4 Features of Microsoft SQL Server 2008 R2 ........................ 5 The power of consolidation ............................................. 5 Running the numbers ......................................................7 Under 12 month payback ............................................... 7 224 percent ROI in 3 years ............................................. 9 The Dell PowerEdge R810 performance story .....................9 24 databases, 4 instances, 1 server ................................. 9 We show you how: Preparing the move ........................... 14 Evaluating your databases ............................................ 14 Configuring your storage .............................................. 15 Installing SQL Server 2008 ........................................... 16 Installing the database instances .................................. 18 We show you how: Making the move .............................. 19 Upgrade Advisor makes it easy ..................................... 19 Side-by-side migration ................................................. 21 We show you how: After the move ................................. 23 Logins and dependencies.............................................. 23 Summing it all up ......................................................... 25 Appendix A. Return on investment .................................. 26 Test case ................................................................... 26 Consolidation factor ..................................................... 26 Power savings ............................................................. 27 3-year cost savings ..................................................... 27 Acquisition costs ......................................................... 30 Operating cost savings ................................................. 30 Payback period ........................................................... 31 Assumptions ............................................................... 32 Appendix B. Example database survey ............................ 34 Appendix C. Preparing the storage .................................. 36 Setting up the storage ................................................. 36 Configuring the Dell PowerEdge R810 storage ................. 36 Appendix D. Installing SQL Server 2008 .......................... 38 Appendix E. Installing Upgrade Advisor ........................... 40 Appendix F. Migrating databases .................................... 42 Appendix G. Transferring Windows logins ........................ 45 Appendix H. Transferring SQL Server logins ..................... 46 About Principled Technologies ........................................ 48 Servers: Database consolidation on Dell PowerEdge R810 servers Executive summary Advances in processor, server, and database technologies enable enterprises to reduce costs by consolidating multiple older databases onto a single newer, faster server. The new Dell PowerEdge R810 featuring the latest Intel Xeon Processor 7500 series can let organizations realize significant consolidation savings. This Principled Technologies (PT) Guide is the result of performance tests and consolidation procedures we performed. We provide concepts and procedures that will help you successfully consolidate your Microsoft® SQL Server® 2000 instances from multiple older servers onto a single Windows Server® 2008 R2 system running SQL Server 2008 R2. We compared the performance and power consumption of both the new and old solutions, and then we analyzed these and other factors to gauge the level of savings you could realize. As the results from our hands-on tests show, the Dell PowerEdge R810 server can run as many as 24 older database workloads, each of which will perform as well as if it were on a dedicated older server. Such consolidation saves space, reduces system management costs, lowers licensing costs and decreases power consumption by over 85 percent. The result is an estimated 3 Servers: Database consolidation on Dell PowerEdge R810 servers payback period of less than 12 months and a 3-year return on investment (ROI) of 224 percent. New Dell technology makes major savings easy The new Dell PowerEdge R810 features the latest Intel Xeon Processor 7500 series. It allows organizations to consolidate unprecedented numbers of SQL server databases on to a single server, resulting in significant savings. Features of the new Dell PowerEdge R810 The Dell PowerEdge R810 offers many new features for maximizing performance on database and other applications and for minimizing operational expenses, including the following: Power. The Dell PowerEdge R810 includes enhancements that let it use less energy than many older servers. When you consolidate many legacy servers onto a single Dell PowerEdge R810, the potential power savings are dramatic. Processors. The Dell PowerEdge R810 uses the Intel Xeon Processor 7500 series. These processors automatically adjust their speed and energy usage to meet the requirements of your applications, improving performance and saving power. Combined with support for ever-increasing amounts of memory, this makes the Dell PowerEdge R810 an excellent database consolidation platform. Management. The Dell PowerEdge R810, like all late-model Dell servers, comes with the Dell Lifecycle Controller. This tool simplifies management by providing a single interface for management functions and by storing critical system information in the system itself. There are no CDs or USB keys to keep track of for drivers or firmware. Features of the new Intel Xeon Processor 7500 series The new Intel Xeon Processor 7500 series offer businesses a number of advantages: Larger cache. The new Intel Xeon Processor 7500 series contains 24 MB of shared L3 cache, increasing the previous-generations processors’ cache amounts by a significant margin. More L3 cache means faster processing, and better database performance. Greater scaling power. The newest generation of Intel processors brings 8 processing cores to each chip, along with hyper-threading, totaling 16 logical processors per physical processor. The larger number of logical processors, coupled with the expansion from two-socket (2S) to 4S platforms, elevates the 4 Servers: Database consolidation on Dell PowerEdge R810 servers Intel Xeon Processor 7500 series to a new level of power and scalability. QuickPath. QuickPath Technology provides fast access to the increased memory addressable by these processors. Turbo Boost. Turbo Boost Technology automatically allows processor cores to run faster than the base operating frequency if the server is operating below power, current, and temperature specification limits. Reliability, Availability, and Serviceability (RAS) features. Intel adds RAS features to the new Xeon Processor 7500 series platform, such as Machine Check Architecture (MCA). Now the CPU can isolate issues on the chip or in memory in real time, alert the operating system to log the error, and avoid crashes. Features of Microsoft SQL Server 2008 R2 SQL Server 2008 R2 is the latest release of Microsoft’s database management platform. As with each release, Microsoft has added new features to expand on the capabilities of their Database Management System (DBMS) platform. Where earlier versions of SQL Server required database administrators to largely rely on either in-house applications or third-party tools to monitor multiple instances, SQL Server 2008 R2 simplifies multi-server management. SQL Server 2008 R2 also introduces the SQL Server Utility, offering a rapid enterprise view of the complete environment and utilization statistics. Microsoft scales SQL Server up with this release, as SQL Server 2008 R2 now supports up to 256 logical processors, which offers organizations extreme flexibility when planning for new system purchases and consolidation opportunities. The power of consolidation What is consolidation? Generally speaking, consolidation is the process of combining multiple items to make a single, more effective unit. In an IT context, you can consolidate the following: Physical servers. After a successful server consolidation, all applications should run on fewer servers than before. Ideally, those applications should run at least as well as they did previously, and potentially better. Storage. Depending on your setup, consolidating servers may let you also consolidate storage by moving data from a number of servers to a single large disk storage subsystem in a new server. Space. As you consolidate servers, you will likely reduce the number of racks or even the number of locations that house servers. 5 Servers: Database consolidation on Dell PowerEdge R810 servers In this database-specific Guide, we address the consolidation of multiple stand-alone SQL Server 2000 instances to a system powered by the latest Intel Xeon Processor 7500 series. As we will demonstrate, consolidating multiple instances to one physical machine saves on space, hardware costs, licensing costs, power, cooling, and administrative overhead. Why consolidate? An effective server consolidation effort has the potential to yield an environment with more consistent management practices and improved reliability, security, and hardware utilization—all while maintaining the previous level of application performance. Consolidation can also yield a variety of cost savings: Hardware savings. Buying, powering, and supporting fewer servers brings obvious savings. Other potential hardware cost savings include the need for fewer racks and network switches: as the number of servers decreases, these costs decrease as well. Software license savings. Consolidation can save an organization significant money in software licenses. We present a detailed example of potential license savings in our earlier guide, ―Consolidating SQL Server 2000 and SQL Server 2005 databases to SQL Server 2008 on Windows Server 2008 Enterprise on Dell Servers.‖1 Maintenance and staff savings. A consolidated infrastructure offers many opportunities for maintenance, support, and staffing cost savings. Less hardware and associated equipment means fewer servers that require security patches, monitoring, and other ongoing maintenance. Reduced support costs. The cost of a given level of support is typically proportional to the size of the installation. By reducing the number of servers, support costs are also likely to decrease. Power and cooling savings. Consolidating servers saves power and cooling by using fewer more efficient systems. Sizing and baseline performance One key to a successful consolidation is sizing, the process of gathering different performance baselines so you have an approximate set of requirements the new hardware platform must meet. You do this by determining the performance characteristics of existing hardware during normal business operations, and then applying growth and scalability estimates. 1 http://www.dell.com/downloads/global/solutions/public/white_papers/Consolidating _SQLServer_databases_onto_a_Dell_server.pdf 6 Servers: Database consolidation on Dell PowerEdge R810 servers Among the characteristics to examine on each server are the following: Processor utilization Memory requirements of the operating system and applications Disk layout Database size Expected database growth Maximum concurrent users Types and rates of transactions against the databases The server you select for consolidation must do more than match the combined capacity of all the other current servers today. It also must have enough excess capacity to still perform well at the end of its expected life span. The Dell PowerEdge R810 we tested for this Guide demonstrates the concept of a high-performance server that can readily support significant consolidation. It has four Intel Xeon processors L7555 with 8 cores and 128GB of RAM and has been optimized to reduce both power consumption and heat dissipation. In addition, the two Dell EqualLogic PS5000XV iSCSI SAN arrays give the server access to multiple terabytes of enterprise storage. Running the numbers Under 12 month payback Payback period As we discuss above, consolidating older database servers lets you reduce energy usage, save data center space, reduce software license costs, and lower management costs. Tests in PT labs show that a four-socket Dell PowerEdge R810 server with the new Intel Xeon Processor L7555, 128GB RAM, and two Dell EqualLogic PS5000XV storage arrays (which we refer to as the Dell PowerEdge R810 solution) could consolidate two full racks of older database servers and storage (24 AMD Opteron 254-based HP ProLiant DL385 servers with 4 GB of RAM— each pair of which shared one of 12 HP StorageWorks MSA30 storage enclosures [we refer to these as the 24 HP ProLiant DL385 solutions]). Such consolidation would deliver rapid return on investment (ROI) and a quick payback. We used the open-source DVD Store (DS2) benchmark to provide a workload representative of a real-world database application. With it, we measured the database performance of an older server-andstorage solution running Microsoft Windows Server 2003 R2 with 7 Servers: Database consolidation on Dell PowerEdge R810 servers Microsoft SQL Server 2000. We measured how many of those workloads the new Dell PowerEdge R810 solution could host. The new server ran Microsoft Windows Server 2008 R2 and Microsoft SQL Server 2008 R2. We detail the test results in The Dell PowerEdge R810 performance story section of this Guide. The Dell PowerEdge R810 solution was able to consolidate 24 of these workloads while still maintaining the same average orders per minute (OPM) as the solution it replaced. That consolidation could deliver payback in less than 12 months and an ROI of 224 percent after 3 years. Dell PowerEdge R810 solution pays back the initial investment in under 12 months Cumulative costs $400,000 $350,000 $300,000 $250,000 $7,715 savings at 1 year $200,000 $94,801 acquisition costs $150,000 $100,000 $212,747 savings at 3 years Payback in 11.1 m onths $50,000 $0 1 3 5 7 9 11 13 15 17 19 21 23 25 27 29 31 33 35 Months HP ProLiant DL385 solution x 24 Payback period 1st-year savings Dell PowerEdge R810 solution Acquisition costs 3rd-year savings Figure 1: The payback period and accumulated estimated costs for the 24 servers and 12 storage arrays in the HP ProLiant DL385 solutions and the server and two storage arrays in the Dell PowerEdge R810 solution. The Dell PowerEdge R810 solution delivers payback and savings within the first year. Lower costs and higher savings are better. Figure 1 graphs the payback period and the cost savings of the Dell PowerEdge R810 solution. The line representing the Dell PowerEdge R810 solution accumulates the initial investment cost and the monthly costs of the solution. The initial investment cost includes the list price of the server and the storage arrays as well as the costs of migrating from the HP ProLiant DL385 solutions to the newer Dell PowerEdge R810 solution. The line for the HP ProLiant DL385 solutions shows the accumulated costs of these solutions. The lines cross at the end of the payback period, the point at which solution savings equal the initial investment. 8 Servers: Database consolidation on Dell PowerEdge R810 servers Savings continue after the payback period. By the end of year one, we project savings of $7,715 with the Dell PowerEdge 810 solution. The Dell PowerEdge R810 solution used a little less than 1/7th of the power, 1/24th of the Microsoft Windows Server and Microsoft Windows SQL Server licenses, under 1/10th of the data center rack space of the 24 HP ProLiant DL385 solutions, and requires less administrator time to manage fewer servers and storage arrays. See Appendix A for more information on these savings and calculations. 224 percent ROI in 3 years We calculate the return on the investment in the Dell PowerEdge R810 solution by dividing the savings after 3 years, $212,747, by the acquisition costs, $94,801. ROI is 224 percent after 3 years. The Dell PowerEdge R810 performance story 24 databases, 4 instances, 1 server Our multiple-instance testing with DVD Store Using our new hardware environment, which consisted of a single Dell PowerEdge R810 and two Dell EqualLogic PS5000XV iSCSI SAN arrays, we installed multiple instances of SQL Server 2008 R2 to simulate the benefits of consolidating multiple SQL Server 2000 workloads from the HP ProLiant DL385 solutions to the Dell PowerEdge R810 solution. To simulate a real-world multi-instance consolidation effort, we installed four SQL Server instances and consolidated six of the legacy workloads per instance on the Dell PowerEdge R810. The total number of legacy workloads we were able to consolidate while still maintaining, on average, the same overall throughput as before, was 24. About DVD Store DVD Store Version 2 is an open-source application with a back-end database component, a front-end Web application layer, and a driver layer that actually executes the workload. DS2 models an online DVD store. Simulated customers log in; browse movies by actor, title, or category; and purchase movies. The workload also creates new customers. Browsing movies involves select operations, some of which use full-text search and some of which do not. The purchase, login, and new customer stored procedures involve update and insert statements, as well as select statements. The DS2 benchmark produces an orders per minute metric (OPM), which we report in this Guide. For more details about the DS2 tool, see http://www.delltechcenter.com/page/DVD+Store. 9 Servers: Database consolidation on Dell PowerEdge R810 servers Our test bed setup On the HP ProLiant DL385 server running Windows Server 2003 R2 with SP2 and one instance of SQL Server 2000, we used 4 GB of RAM, allocating 3 GB of RAM to user processes via the boot.ini /3GB switch as was typical in a server of its time. We used four internal hard drives (73GB 15,000 RPM SCSI) that we configured in two RAID 1 volumes, installing the OS on one volume and using the other volume for SQL Server logs. We configured the external storage as one large RAID 5 LUN containing seven 146GB 10,000 RPM disks in an HP StorageWorks MSA30 storage enclosure. Because our goal was to emulate a 3- to 5-year-old database server, we chose RAID 5 for the external storage, a configuration typical of the time. On the Dell PowerEdge R810 server running Windows Server 2008 R2 and four instances of SQL Server 2008 R2, we used 128 GB of RAM, allocating equal amounts of RAM to each SQL Server instance in the properties of each instance. We used two internal hard drives (146GB 15,000 RPM 6Gb SAS) in a RAID 1 configuration, installing the operating system and SQL Server 2008 R2 instances on that internal volume. We used four additional internal drives in a RAID 10 configuration for SQL Server logs (146GB 15,000 RPM 6Gb SAS). All internal drives were attached to the PERC H700 internal 6Gb SAS storage controller. We configured a Dell EqualLogic PS5000XV storage group having two members, each with one storage pool assigned. In each storage pool, and hence on each array, we created two volumes, each of which contained SQL Server data relevant to one SQL Server instance. The Dell EqualLogic PS5000XV storage used all 146GB 15,000 RPM SAS disks. We assigned a minimum of 20 GB of RAM and a maximum of 30 GB of RAM to each SQL Server instance to ensure equal balancing of memory resources among SQL Server instances. We ran only one database workload on the single SQL Server instance on the HP ProLiant DL385 as the system memory and disk subsystems of the system were saturated with just one database workload. We ran four SQL Server instances, a real-world number for the Dell PowerEdge R810, and added database workloads evenly across the SQL Server instances making sure the average OPM across all 24 workloads exceeded the original OPM on the HP ProLiant DL385. In Figure 2, we show the consolidated SQL Server layout, consisting of four distinct SQL Server instances, each containing six databases. Two of the SQL Server instances’ data resided on one Dell EqualLogic PS5000XV array, while the remaining two were on the second Dell EqualLogic PS5000XV array. 10 Servers: Database consolidation on Dell PowerEdge R810 servers Figure 2. Consolidated SQL Server 2008 R2 instance layout for our testing. For client machines, we used desktop systems running Windows Server 2003 R2 with SP2. Each of these client machines ran the DS2 workload, which spawned 32 threads against each database workload and ran with no think time. On the HP ProLiant DL385 server, we used one client and one SQL Server 2008 R2 instance, containing one database. On the Dell PowerEdge R810 server, we used four SQL Server 2008 R2 instances, each containing six databases, for a total of 24 databases. We used 12 clients and each targeted two databases. This simulated a heavily loaded environment on all of our databases. We ran the DS2 benchmark with a 10GB database. On average, each SQL Server 2008 R2 database workload on the Dell PowerEdge R810 solution delivered better performance than did a single HP ProLiant DL385 solution with the same workload. We then estimated the monthly costs for maintaining the 24 HP ProLiant DL385 solutions and the single Dell PowerEdge R810 solution, and estimated the payback period for the investment in the Dell PowerEdge R810 solution. 11 Servers: Database consolidation on Dell PowerEdge R810 servers Our testing results As Figure 3 shows, we were able to run 24 SQL Server 2008 R2 database workloads (six databases on four instances), all simultaneously achieving an average throughput greater than the HP ProLiant DL385 solution’s orders per minute score. To be specific, the average OPM delivered by each of the 24 workloads on the Dell PowerEdge R810 solution was 7,523, while the average OPM delivered by 1 workload on the HP ProLiant DL385 solution was 6,639. Orders per minute per workload 8,000 7,000 OPM 6,000 5,000 4,000 3,000 2,000 1,000 0 1 HP ProLiant DL385 workload Dell PowerEdge R810 (average of 24 workloads) Figure 3. Average OPM of 24 database workloads on the Dell PowerEdge R810 solution versus a single database workload on the HP ProLiant DL385 solution. Greater OPM is better. 12 Servers: Database consolidation on Dell PowerEdge R810 servers As Figure 4 shows, the combined OPM of 24 SQL Server database workloads on the Dell PowerEdge R810 solution were over 27 times greater than the single HP ProLiant DL385 solution database workload. Total orders per minute: 1 HP ProLiant DL385 solution vs. 24 workloads on 1 Dell PowerEdge R810 solution 200,000 Orders per minute 150,000 100,000 50,000 0 HP ProLiant DL385 solution Dell PowerEdge R810 solution Figure 4. Combined orders per minute of 24 database workloads on the Dell PowerEdge R810 solution versus a single HP ProLiant DL385 solution database workload. Greater OPM is better. Power savings As Figure 5 shows, assuming we were running 24 HP Proliant DL385 servers, each using one-half of the HP StorageWorks MSA30 external enclosure, and therefore a total of 12 enclosures, we would significantly reduce our power consumption. Power consumption at idle and under load both decreased by over 85 percent when switching to the Dell PowerEdge R810 solution. We calculated this by taking the overall wattage from the HP ProLiant DL385 solution, then multiplying the server wattage times 24 and the storage wattage times 12. We contrast this with the total power consumption of the Dell PowerEdge R810 solution. Lower wattage is better. 13 Servers: Database consolidation on Dell PowerEdge R810 servers Idle power usage: 24 HP ProLiant DL385 solutions vs. 1 Dell PowerEdge R810 solution 12,000 10,000 Watts 8,000 6,000 4,000 2,000 0 24 HP ProLiant DL385 solutions 1 Dell PowerEdge R810 solution Figure 5. Simulated idle power savings – 24 HP ProLiant DL385 solutions versus a single Dell PowerEdge R810 solution. Lower idle power is better. We show you how: Preparing the move We have shown why you should consolidate your older databases to a single Dell PowerEdge R810 with four Intel Xeon Processor 7500 series. Now we address the next question: How to accomplish this? We discuss planning issues, setup of the Dell PowerEdge R810 with Dell EqualLogic PS5000XV storage, the actual migration using a simple backup/restore method, and post-migration considerations. Evaluating your databases As with any migration or consolidation, planning is a key element. You must be aware of many specific details related to each physical server you target for consolidation, including the maintenance window in which you will migrate the server to its new environment, the users the move will affect, and the configuration tasks necessary to assimilate the databases into your consolidated environment. A more comprehensive example survey appears in 14 Servers: Database consolidation on Dell PowerEdge R810 servers Appendix B. Information to gather before consolidation includes the following: Server OS version and patch level SQL Server version and patch level Number of logins on this SQL Server instance, and what type of logins these are (Windows or SQL) Current backup strategy and schedule for the databases on this server Replication details for this SQL instance, if any Detailed information regarding permissions and roles SQL Agent jobs on this SQL Server After moving your databases to their new SQL Server instance, you must make sure that any system or application using the database has updated connection information. This includes logins, permissions, applications, SQL Agent jobs, third-party backup products, and so on. Gathering baseline performance data During your research phase, you should use Performance Monitor, SQL Server Profiler, and other tools to gather data on the typical query load and performance statistics on the databases you are considering moving to the new environment. This effort serves two purposes. First, it provides a prime opportunity to identify potential problems before you move to a consolidated solution. Second, you can use the information you gather to map out your resource allocation needs, which you can then use to configure your new instances, either by using memory allocations, CPU affinity, or Resource Governor settings. Configuring your storage In our test bed, we used two Dell EqualLogic PS5000XV iSCSI SAN arrays. This section provides an overview of the Dell EqualLogic PS5000XV configuration process when used in conjunction with the Dell PowerEdge R810. Appendix C provides complete, detailed installation instructions. Power on the Dell EqualLogic PS5000XV array, and log in via the serial console. Proceed through the initialization wizard steps, assigning a group name and member name, and configuring the IP address for the first NIC, eth0. If this array has been previously used, you can reset the array to factory defaults by issuing the ―reset‖ command. Connect the Dell EqualLogic PS5000XV array and Dell PowerEdge R810 to the gigabit switch that 15 Servers: Database consolidation on Dell PowerEdge R810 servers will be used strictly for iSCSI traffic. Use all three NICs on the Dell EqualLogic PS5000XV and three of the four NICs on the Dell PowerEdge R810. Configure the Dell PowerEdge R810 NICs to be used for iSCSI traffic, assigning each a valid IP address and subnet mask. Configure jumbo frames network optimizations on both the network switch and the NIC configuration inside Windows Server 2008 R2 if necessary. Using Internet Explorer, browse to the storage group IP address on the Dell EqualLogic PS5000XV storage, log in, and configure the arrays with an appropriate RAID policy. Create the necessary volumes, specifying a size and snapshot reserve policy if required. Install the latest Host Integration Toolkit from Dell EqualLogic for configuration of the iSCSI initiator and MPIO drivers. Installing SQL Server 2008 For this Guide, we assume that Windows Server 2008 R2 is installed on the server. Although not required, you should, when possible, deploy SQL Server 2008 R2 on a member server in an Active Directory domain. Do not make the SQL Server service domain accounts members of the Domain Administrators group. In fact, grant only the necessary rights on the local server to the SQL Server service account as part of your pre-installation checklist. The SQL Server installation software creates the local groups it needs for its security purposes. This section provides an overview of the SQL Server 2008 R2 installation process. Appendix D provides full, detailed installation instructions. NOTE: We installed SQL Server 2008 R2 November Community Technology Preview (CTP). Later versions may have different menu options, so your installation experience may vary. 1. Insert the SQL Server 2008 R2 DVD into the DVD drive. If prompted to enable the .NET Framework Core role, click OK. On the Installation Center screens, choose Installation, then choose to proceed with a new installation. (See Figure 6.) 16 Servers: Database consolidation on Dell PowerEdge R810 servers Figure 6. SQL Server 2008 R2 Installation Center options. Proceed through the first several installation steps, entering license information, and installing prerequisites with default options specified. On the Setup Role screen, choose a SQL Server Feature Installation. On the Feature Selection screen, select only what you need for your particular configuration. (See Figure 7.) In our case, we chose the Database Engine with Full-Text search and the management tools. 17 Servers: Database consolidation on Dell PowerEdge R810 servers Figure 7. Choosing features for installation. On the first installation, choose to install the default instance. On subsequent installations on the same server, choose named instance and provide a name for the instance. Configure the credentials of the SQL Server service account and SQL Server Agent accounts. Specify SQL Server administrators and also specify the authentication mode desired for your configuration. Microsoft recommends Windows Authentication mode, but legacy applications may require SQL Server authentication. Complete the installation. Installing the database instances While there can be only one default instance, SQL Server 2008 R2, as with previous versions of SQL Server, allows you to have multiple named instances. These instances function largely independently of one another; each has its own security contexts, collation settings, etc. (For more information, see http://msdn.microsoft.com/en-us/library/ ms143531(SQL.105).aspx.) To install one or more named instances, as we did for our testing, follow the same procedures as installing a default instance, with the exception of a few configuration changes during the process. First, on the Feature Selection screen, if you are installing a named 18 Servers: Database consolidation on Dell PowerEdge R810 servers instance of the database engine, you need only check the Database Engine checkbox. The instances share the workstation components, so you don’t need to install those components a second time. The second and more important change in the installation procedure for a named instance is on the Instance Configuration screen. Here you must choose the Named Instance option and supply a name for the instance. Organizations typically have naming conventions for instances that make instance management easier, so follow those rules when naming this instance. We show you how: Making the move Upgrade Advisor makes it easy The SQL Server 2008 R2 Upgrade Advisor is a major aid in migration research. This utility, which the SQL Server 2008 R2 setup wizard includes, scans legacy databases and SQL Server components for compatibility issues, features, and syntax the newer DBMS does not support, as well as many other critical components. The utility lets you view reports quickly in the Upgrade Advisor interface or save reports for later review. You can install and execute the Upgrade Advisor on machines running Windows XP SP3, Windows Vista® SP1, Windows Server 2003 SP2, or Windows Server 2008. The Microsoft .NETTM framework is also a requirement. BEST PRACTICE: Use the Upgrade Advisor tool on your SQL Server 2000 database and import a trace file to the Upgrade Advisor tool for analysis. The trace file lets the Upgrade Advisor detect issues that might not show up in a simple scan of the database, such as TSQL embedded in applications. Your migration research and planning must account for such instances. You can capture traces of TSQL using SQL Server Profiler on your SQL Server 2000 server during typical hours and analyze these traces using the Upgrade Advisor. To install the Upgrade Advisor, use the following steps: 1. Insert the SQL Server 2008 R2 DVD. On the splash screen, click Install SQL Server Upgrade Advisor. Click Next to begin the installation wizard, accept the licensing terms, and click Next. Click Next to accept the default Registration information, click Next to accept the default 19 Servers: Database consolidation on Dell PowerEdge R810 servers installation path, and click Next to begin the installation. Once you have installed the SQL Server 2008 R2 Upgrade Advisor, you can use this software to scan your SQL Server 2000 instances for potential migration issues. This section provides a brief walkthrough; Appendix E gives more detailed instructions. 1. Select Start | All Programs | Microsoft SQL Server 2008 R2 November CTP | SQL Server 2008 R2 Upgrade Advisor. Click the Launch Upgrade Advisor Analysis Wizard link, and click Next to begin. Enter the SQL Server 2000 server name, and select the features you want the Upgrade Advisor to analyze. Alternatively, click Detect to have the Upgrade Advisor remotely scan the SQL Server 2000 server and detect which components are running on the SQL Server 2000 server. (See Figure 8.) Figure 8. Upgrade Advisor component selection. 20 Servers: Database consolidation on Dell PowerEdge R810 servers Provide proper authentication to SQL Server 2000, and select the database you want to analyze. If necessary, you can also input SQL script files and trace files here. You may have legacy Data Transformation Services (DTS) packages on the SQL Server 2000 server. The DTS packages may be present in the file system or in the database itself. If you selected DTS, or if the Upgrade Advisor automatically detected the presence of DTS packages, you must now select the DTS location you want to analyze. Click Run to start the analysis. Run times vary. Following the analysis of your SQL Server 2000 server, you can view the Upgrade Advisor report, which lists warnings and errors. (See Figure 9.) Figure 9. Sample Upgrade Advisor output report. Side-by-side migration In this section, we provide an overview of the processes involved in migrating your database from SQL Server 2000 to SQL Server 2008 R2 on the Dell PowerEdge R810. We provide detailed instructions in Appendix F. 21 Servers: Database consolidation on Dell PowerEdge R810 servers We performed all SQL Server 2000 administration using Query Analyzer and Enterprise Manager, the two main tools in the SQL Server 2000 environment. Likewise, we performed all administration for the SQL Server 2008 R2 installation using SQL Server Management Studio, the main administration interface for SQL Server 2008 R2. NOTE: Be aware that various methods exist for migrating databases between instances and versions of SQL Server, including detach/attach, backup/restore, and the copy database wizard. We chose to use the backup/restore method. Backing up your SQL Server 2000 database Using the SQL Server 2000 server, take the following steps to back up your database. Backup times vary. 1. To keep users from issuing updates during the migration process, you can either set the database to read-only mode or set the access property to SINGLE_USER. Both choices immediately sever all user connections. See Appendix F for details on setting the database to single-user mode. Perform a full backup of your SQL Server 2000 database, as we did in Figure 10. See Appendix F for details. Figure 10. SQL Server 2000 backup configuration. 22 Servers: Database consolidation on Dell PowerEdge R810 servers NOTE: If the time a full backup requires is unacceptable given your migration maintenance schedule, you can take the full backup at a previously scheduled time, and at this point of the migration take only a differential or transaction log backup. If the transaction log size is small relative to the data file size, this approach can decrease migration time significantly. If you go this route, however, be certain to keep your backup chain intact. Restoring your database to SQL Server 2008 R2 server On the SQL Server 2008 R2 server, take the following steps: 1. Open SQL Server Management Studio, connect to the SQL Server 2008 R2 instance, and restore the database. (Restore times vary.) See Appendix F for details. NOTE: At this step, you must give your new database the same name as your SQL Server 2000 database. Changing the name could break applications that refer to the database by name. While in SQL Server Management Studio, reset the database access property to multi-user, and set the compatibility level to SQL 2008 (level 100). See Appendix F for details. We show you how: After the move After you have completed your side-by-side migration, you typically will need to perform some post-migration tasks. Your specific list of tasks will depend heavily on your pre-migration research and planning. In this section, we briefly discuss a couple of the most common tasks. Logins and dependencies Windows and SQL Server logins As in past versions of SQL Server, there are two methods of authenticating to SQL Server 2008 R2: Windows logins and SQL Server logins. You create and administer Windows logins at the Active Directory domain level, and you can assign those logins rights to SQL Server resources. You create and manage SQL Server logins, however, within SQL Server. The processes for extracting login information and creating the transferred login entities on the migration server is very similar for both Windows authenticated logins and SQL Server authenticated logins. You should, however, 23 Servers: Database consolidation on Dell PowerEdge R810 servers take some extra steps to ensure a smooth migration for SQL Server logins. Below, we describe how to script both Windows authenticated logins and SQL Server authenticated logins to a query window and recreate them on the new SQL Server 2008 R2 server. Step 6 refers solely to the SQL Server login type. Please see Appendix G for details on transferring Windows logins and Appendix H for details on transferring SQL Server logins. To transfer logins, take the following steps on the SQL Server 2008 R2 server. Note that steps 1 through 5 apply to both Windows logins and SQL Server logins. 1. In SQL Server Management Studio, in the Object Explorer pane, connect to both your SQL Server 2000 server and your SQL Server 2008 R2 server. Be sure to have the Object Explorer Details tab open (View | Object Explorer Details). 2. Expand the tree view of the SQL Server 2000 server, browse to the security tab, and click the logins node. In the Object Explorer Details, you will now see a list of all logins on the SQL Server 2000 server. 3. If necessary, use the sorting and filtering options in the Object Explorer Details tab, and take note of which logins you would like to migrate. Select them by clicking; use the standard Windows controls (Ctrl key, Shift key, etc.) to select multiple logins. 4. Right-click the logins you selected, and choose Script Login As | Create To | New Query Window. Be sure to change the connection of this query window to connect to your new SQL Server 2008 R2 server, if it is not doing so already, by rightclicking and selecting Change Connection. 5. Execute the script on your SQL Server 2008 R2 server to create the logins. If you are transferring Windows-based logins, the process is complete. If you are transferring SQL Server logins, continue with Step 6 below. 6. For SQL Server logins, the script you executed in Step 5 creates the login, marks it as disabled, and assigns it a random password, but the script does not map the login to the database user. To avoid having a database user that is ―orphaned‖ from a login, use the sp_change_users_login 24 Servers: Database consolidation on Dell PowerEdge R810 servers stored procedure, to view orphaned users and to map a user to a login. Appendix H provides an example of this process. SQL Server Agent jobs Almost all installations schedule SQL Server Agent jobs that run against their databases. You must migrate these jobs to your new SQL Server 2008 R2 server. Locate the jobs you need to migrate in SQL Server Management Studio (on your SQL Server 2000 server) under the SQL Server Agent, right-click them, and choose Script Job As | Create To | New Query Window. Connect to the SQL Server 2008 R2 server, and run the resulting script in a query window. Other external dependencies Your pre-migration research may well have yielded a list of items for you to implement now; the list might include references to file shares, database mail or SQL Mail configurations, stored procedures in system databases, and/or linked servers. Addressing these external dependencies will ensure a smooth finish to your migration. Summing it all up The Dell PowerEdge R810, powered by Intel’s latest generation Xeon Processor 7500 series, offers a compelling case for consolidation of your SQL Server resources from a legacy SQL Server 2000 environment to a new environment with SQL Server 2008 R2. As this Guide has explained, ROI is provided in less than 1 year, application throughput increases, and power consumption drops dramatically as a result of this migration. In addition, the tools provided by SQL Server 2008 R2 simplify migrating your databases. With careful planning, you can execute migrations with little difficulty and with no interruption of service to users. 25 Servers: Database consolidation on Dell PowerEdge R810 servers Appendix A. Return on investment This section estimates the return on investment and expected payback period for a hypothetical enterprise that plans to consolidate SQL Server databases from multiple legacy servers and storage solutions onto a single newer, more powerful Dell serverand-storage solution. The payback period is an estimate of how many months it would take to recapture initial investment costs when consolidating multiple 4-year-old HP ProLiant DL385 solutions onto a single Dell PowerEdge R810 solution. The ROI analysis projects costs over 3 years for both the legacy and newer solution and calculates the ratio of the acquisition costs of the newer solution to the 3-year costs savings. Test case We consider the following specific legacy environment running Microsoft SQL Server 2000 on Microsoft Windows Server 2003 R2 with Service Pack 2: Twenty four AMD Opteron 254-based HP ProLiant DL385 servers with 4 GB of memory and 12 HP StorageWorks MSA30 storage enclosures We calculate the cost savings for a migration to the following Dell solution running Microsoft SQL Server 2008 R2 on Microsoft Windows Server 2008 R2: One Dell PowerEdge R810 with four Intel Xeon Processor L7555s and 128 GB of memory and two Dell EqualLogic PS5000XV storage arrays Consolidation factor We used benchmark results from our DS2 testing to determine the number of older servers with accompanying storage that a Dell PowerEdge R810 solution could replace. Our results showed that an enterprise could replace 24 HP ProLiant DL385 solutions with a single Dell PowerEdge R810 solution. We use 24 as our consolidation factor. In our tests, the HP Proliant DL385 solution used half of the HP StorageWorks MSA30 enclosure. We therefore assume that two HP ProLiant DL385 servers can share each HP storage array for a total of 24 HP ProLiant DL385 servers and 12 HP StorageWorks MSA30 enclosures. 26 Servers: Database consolidation on Dell PowerEdge R810 servers Power savings We measured power to the test servers and storage when idle and while running the benchmark under peak load. We measured energy usage of the HP StorageWorks MSA30 with both a full enclosure and a half enclosure and use the full enclosure results for this ROI analysis. We averaged the idle and peak load results to estimate a power usage under typical load for the test configurations. We then calculated solution totals for the Dell PowerEdge R810 solution and the 24 HP ProLiant DL385 solutions that we compare in this ROI analysis. Figure 11 shows our results. Typical power usage: 24 HP ProLiant DL385 solutions vs. 1 Dell PowerEdge R810 solution 12,000 Watts 10,000 8,000 6,000 4,000 2,000 0 24 HP ProLiant DL385 solutions 1 Dell PowerEdge R810 solution Figure 11: Estimated power usage under typical load for the single Dell PowerEdge R810 solution and 24 HP ProLiant DL385 solutions. Typical power is the average of idle power and power under load. Lower results are better. 3-year cost savings We estimated acquisition costs and ongoing operating costs for the two solutions over a 3-year period. In this analysis, the Dell PowerEdge R810 solution delivered payback within the first year, offsetting its acquisition costs by major savings in operating costs and delivered a significant ROI over 3 years. 27 Servers: Database consolidation on Dell PowerEdge R810 servers Acquisition costs include the purchase price of the server and storage hardware for the Dell PowerEdge R810 solution as well as the labor costs to plan and carry out the migration. Operating costs include hardware support costs, software licenses and support agreements, facility costs for space and data center ports, energy costs, and management costs. We assume operating costs are the same for each of the 3 years. We do not calculate net present value, internal rate of return, or use other discounted cash flow methods that factor the time value of money into the evaluation. Figure 12 shows the 3-year costs for the two configurations. Specifically, it shows that acquisition costs of the Dell PowerEdge R810 server are offset by its savings in operating costs. 3-year costs: 24 HP ProLiant DL385 solutions vs. 1 Dell PowerEdge R810 solution $400,000 $350,000 Three-year savings = $212,747 Dollars $300,000 $250,000 $200,000 $372,672 $150,000 $65,124 $100,000 $94,801 $50,000 $0 24 HP ProLiant DL385 solutions Acquisition costs Dell PowerEdge R810 solution 3-year operating costs Figure 12: Estimated 3-year costs for the 24 HP ProLiant DL385 solutions and a single Dell PowerEdge R810 solution. Lower costs are better. 28 Servers: Database consolidation on Dell PowerEdge R810 servers Five benefits of the Dell PowerEdge R810 solution drive the cost savings for this solution: Replaces up to 24 HP ProLiant DL385 servers and 12 HP StorageWorks MSA30 storage enclosures. The increased capabilities of the Dell PowerEdge R810 solution enable consolidation of multiple older systems for the specific workload we tested. Fewer servers and storage arrays lower system administration labor costs. There is significant savings for this consolidation in labor costs for server and storage administration. We estimate that the 24 older servers and 12 older storage arrays require 10 times more time to administer than the new Dell PowerEdge R810 solution. Energy consumption is about one-seventh that of the 24 HP ProLiant DL385 solutions it replaces. The Dell PowerEdge R810 solution provides considerable energy savings over the older HP ProLiant DL385 solutions that it replaces. Requires only one Windows Server and Windows SQL Server license instead of 24 for the legacy solution. Consolidation provides immediate savings for the organization that maintains software assurance agreements. We assume the enterprise maintains Microsoft Software Assurance agreements for the Microsoft Windows Server 2003 version, and that it can transfer and upgrade one of these for use on the new server. After the migration, the enterprise will realize savings by not renewing the remaining software agreements, which we assume are due for renewal. We assume that the enterprise, which is running SQL Server 2000 on the legacy servers, would not maintain Software Assurance on a software version that old. We therefore don’t include any ongoing SQL Server 2000 costs for the legacy solution. We include both per-server license costs and Software Assurance costs for Windows SQL Server 2008 R2 Enterprise edition on the new solution. Even with that license cost, the enterprise saves on software with the consolidated solution through the savings in Software Assurance costs for retired licenses. Requires approximately one-tenth of the data center rack space. Each server in both the legacy and consolidated solutions requires 2u of rack space for the server, and each storage array uses 3u of rack space. The HP ProLiant DL385 solutions use a total of 84u, filling two 42u racks; the Dell PowerEdge R810 solution requires only 8u for one server and two storage arrays, filling less than a fifth of a 42u rack. 29 Servers: Database consolidation on Dell PowerEdge R810 servers Acquisition costs Figure 13 details the acquisition costs. Category Server cost Storage cost Description One Intel Xeon Processor L7555-based Dell PowerEdge R810 server Two arrays of Dell EqualLogic PS5000XV storage with 16 450GB 15,000 RPM disks Migration planning and execution 160 hours of staff time for migration Total investment Server, storage, and migration planning and execution costs combined Dell PowerEdge R810 solution $31,514 $54,398 $8,889 $94,801 Figure 13: Acquisition costs for the Dell PowerEdge R810 solution. Dell provided the hardware components of the Dell PowerEdge R810 solution and their list prices. We included Dell installation services in the purchase cost of the server. We used our experience to estimate the migration costs. We assume that the enterprise consolidates the 24 older servers onto one Dell PowerEdge R810 server-and-storage solution using the easy and efficient processes described in this document. We estimate 80 hours of staff time for migration planning and 80 hours to carry out the migration. We include migration of the hardware, operating system, and SQL Server software, and the 10GB databases we included in our testing. Migration of additional software would add to the migration time as would any factors that add to the complexity of the migration. We estimate all staff costs based on a loaded annual system administrator cost of $100,000. Operating cost savings Figure 14 shows the 3-year operating costs and operating cost savings of the Dell PowerEdge R810 solution for the five categories of operating costs that we consider in this analysis. 30 Servers: Database consolidation on Dell PowerEdge R810 servers Costs for 1 Dell PowerEdge R810 solution Savings category Hardware support Servers and storage arrays Software costs Microsoft Windows Server and Microsoft SQL Server Facility costs Rack space and port costs Energy costs Power and cooling Management costs Labor for server and storage array administration Total Costs for 24 HP ProLiant DL385 solutions 3-year savings for Dell PowerEdge R810 solution $9,660 $43,848 $34,188 $20,820 $54,072 $33,252 $4,398 $14,832 $10,434 $7,746 $34,920 $27,174 $22,500 $225,000 $202,500 $65,124 $372,672 $307,548 Figure 14: 3-year operating cost savings for Dell PowerEdge R810 solution. Payback period The payback period identifies the point at which we estimate the operating cost savings equal the acquisition costs and the acquisition starts to show a cost benefit or profit. In calculating the estimated payback period, we assume that investment costs occur at the beginning of the year of the acquisition and annual or 3-year operating costs spread evenly across the months. Figure 15 shows the payback calculation for the Dell PowerEdge R810 solution and the 24 HP ProLiant DL385 solutions. Payback category One-time initial investment (includes server, storage hardware, and migration costs) Monthly cost (annual costs divided by 12; includes hardware support, maintenance and service contracts, software support agreements, facility costs, energy costs, and management costs) Payback period Dell PowerEdge R810 solution 24 HP ProLiant DL385 solutions Difference $94,801 (HP ProLiant $94,801 $0 DL385 is lower) $8,543 (Dell $1,809 $10,352 PowerEdge R810 is lower) ($94,801/$8,543=11.1 months) Figure 15: Payback calculation for the Dell PowerEdge R810 solution and the 24 HP ProLiant DL385 solutions. 31 Servers: Database consolidation on Dell PowerEdge R810 servers Assumptions We made many assumptions about the hypothetical enterprise that drive the costs in this analysis. Different assumptions would create a different cost picture. We made the following assumptions in estimating acquisition costs: The enterprise would dedicate the entire newer Dell PowerEdge R810 server and the two Dell EqualLogic PS5000XV storage arrays to the tasks carried out by the 24 HP ProLiant DL385 solutions it was replacing. The log files would be on two internal disks on each legacy server, and on four internal disks on the new server. We made the following assumptions in estimating the support, maintenance, and service contract costs for hardware: The enterprise would typically select a 3-year support package with 7-day, 24-hour coverage, and 4-hour response time for newer hardware, and would take over support internally after those agreements expire. Therefore, for the Dell PowerEdge R810 solution, we included the costs for 3-Year ProSupport for IT and Mission Critical 4HR 7x24 Onsite Pack in our cost estimates and divided those costs by 3 to show the annual cost. The enterprise would dedicate the HP ProLiant DL385 servers and storage enclosures to the tasks our benchmark tests model. For the HP ProLiant DL385 solutions, we estimated an annual in-house support cost of $400 per server and $300 per storage array, plus costs to replace failed disks based on PT estimates of a 4 percent annual disk replacement rate. We made the following assumptions in estimating the costs of software support agreements: The HP ProLiant DL385 solutions used Windows Server 2003 R2 Enterprise Edition with per-server licenses, and the enterprise kept up-to-date software assurance agreements for that software. The business updated the Dell PowerEdge R810 operating system to Windows Server 2008 R2 Enterprise Edition by upgrading one of the licenses used by the HP ProLiant DL385 solutions. 32 Servers: Database consolidation on Dell PowerEdge R810 servers The enterprise saved the cost of the freed up software assurance agreements. These agreements were due for renewal at the time of the solution acquisition. The enterprise purchased a SQL Server 2008 R2 Enterprise Edition per server license for the Dell PowerEdge R810 solution and software assurance agreement for that software. The enterprise already owned the necessary Client Access Licenses (CALs). We made the following assumptions in estimating facility costs, which include rack-based space costs and Ethernet port costs: We estimated a fixed data center cost per rack, prorated by the percentage of the rack the solution used. We estimated an annual per server data center ports cost of $159 based on PT experience. We made the following assumptions in estimating energy costs: We measured energy costs for active and idle power consumption values and used the average of the active and idle power from the benchmark runs to calculate year-round power. Average cost per kWh of power. Source: National commercial average for December 2009 from http://www.eia.doe.gov/cneaf/electricity/epm/table5_6_a.h tml. The December 2009 average was $0.973 per kWh. We estimated the energy cost of cooling the servers and storage arrays to be equal to the energy cost required for running the systems. We used the following assumptions in estimating the management costs: Support costs are separate from administration costs and are included under 3-year support, maintenance, and service contract costs for newer hardware. 33 Servers: Database consolidation on Dell PowerEdge R810 servers Appendix B. Example database survey In this appendix, we provide an example survey of detailed information you may want to gather about the SQL Server instances and databases you’re targeting for consolidation. While this survey is a good starting point, it may not contain every relevant detail for your particular environment. 1. 2. 3. Hardware level a. CPU i. Vendor ii. Model iii. Number of cores per socket b. Memory i. Total quantity in GB ii. Memory speed c. Storage i. Quantity, both current and projected growth. ii. Disk speed iii. Repository type (Fibre Channel SAN, iSCSI SAN, SCSI direct-attached) iv. Disk interface (SCSI, SAS, etc.) OS level a. Server name b. IP address, subnet, etc. c. Domain information d. Operating system version, build number, and service pack e. Drive letter information and layout SQL instance level a. Whether it’s clustered, version, edition (Workgroup, Standard, Enterprise), 64-bit or 32-bit (and if 32-bit, with or without AWE), and service pack level b. Authentication mode (Windows only or Mixed Mode?) c. Instance name (if not a default instance) d. SQL port number (i.e., is it the default 1433 or another port? If a named instance, what is the port?) e. Communication protocol (named pipes or TCP/IP?) f. Service account and all service permission information (does SQL Agent run under a different service account?) g. Are there any non-default master or model database objects? h. Are there any linked server objects? i. Are other SQL modules involved or dependent on this instance (e.g., Analysis Services, Reporting Services, etc.)? j. Default installation directories, data directories, and log directories k. Tempdb – highly volatile? Slightly volatile? Medium usage? 34 Servers: Database consolidation on Dell PowerEdge R810 servers 4. Database level a. Database properties and options b. Recovery model, auto-shrink, etc. c. Files and filegroups (size and location) d. Backups i. How many full backups, and on what schedule? ii. How many differential backups, and on what schedule? iii. How many log backups, and on what schedule? iv. Current backup window? v. Can backup window shift to accommodate the consolidated backup window? e. Other database issues i. Is this database in a replication configuration? ii. Is this database a partner in a mirroring session (2005/2008 only)? iii. Do any SSIS/DTS packages reference this database? iv. Do any SQL Agent jobs reference this database? f. Users/Logins i. Number of users this database affects ii. Would this database require a login whose name conflicts with another name on the target consolidation server? If so, you would need to create the login and map the database user using sp_change_users_login 35 Servers: Database consolidation on Dell PowerEdge R810 servers Appendix C. Preparing the storage For the testing we conducted for this Guide, we used two Dell EqualLogic iSCSI SAN arrays, connected to our server with a Dell PowerConnect 5448 Ethernet switch. On the storage, switch, and server we enabled jumbo frames on all NICs and followed other guidelines provided by Dell regarding best practices for iSCSI storage. Below we address the specifics of setting up your iSCSI storage. Setting up the storage 1. Configure the switch to use jumbo frames. For more information, locate your switch user manual. The Dell PowerConnect switches’ documentation can be located at http://support.dell.com. 2. Connect eth0 on the storage controller to the Dell PowerConnect 5448 switch. 3. Connect at least one NIC on the server to the Dell PowerConnect 5448 switch. 4. Connect a serial cable to the storage array and configure a serial client on a workstation machine. 5. Log in to the array and issue the reset command, which will reset the array to factory defaults, after which the setup wizard starts. 6. Provide a member name, group name, member IP address, group IP address, subnet mask, gateway, and login information. 7. Cable a workstation to the storage-dedicated switch and navigate to the group IP address. Enter the login credentials. 8. Click the member and proceed through the member initialization steps, providing a RAID configuration. We chose to configure the member via the command line, however, and used RAID 10 no spares mode as fault tolerance was not an issue. Each environment is different so choose your RAID level carefully. 9. Click the Network tab, and configure each NIC, providing an IP address for eth1 and eth2 to communicate with your iSCSI network. Enable eth1 and eth2. 10. Right-click volumes and configure the volumes necessary for your server. Configuring the Dell PowerEdge R810 storage On our server we used six internal 6Gbps 15,000 rpm 146GB SAS disks. We configured two disks in a RAID 1 configuration and the remaining four disks in a RAID 10 configuration. Below, we cover 36 Servers: Database consolidation on Dell PowerEdge R810 servers the specifics on configuring the internal storage, and then connecting to the iSCSI storage from Windows Server 2008 R2. Configuring the internal storage 1. 2. 3. 4. 5. 6. On boot, Press Ctrl+R to enter the RAID controller BIOS. Our controller was a PERC H700. Highlight the controller, press F2, then choose to create the new virtual disk. Provide the desired RAID setting, such as RAID 1, 5, 10, and so on. Choose the relevant disks for this volume. Press OK to complete the volume configuration. Highlighting the new virtual disk, press F2, then Initialization, then Start Init. This will fully initialize your virtual disk Repeat steps 2 through 5 for the remaining virtual disks in your server. Configuring the iSCSI storage in Microsoft Windows 2008 R2 1. 2. 3. 4. 5. 6. 7. 8. 9. 10. 11. 12. 13. 14. Log into the server. Install the latest Host Integration Toolkit from Dell EqualLogic, accepting all defaults. This will require a reboot of the server. After reboot, click Start, then type iSCSI in the search box. Click the iSCSI Initiator option to invoke the iSCSI initiator. In the Quick Connect box, enter the IP address of the Dell EqualLogic group and click Connect. Connect to each LUN, choosing to enable multipathing on each connection. On the Volumes and Devices tab, click the Autoconfigure button so that iSCSI will start faster after boot for the necessary SQL Server storage. Close the iSCSI initiator and then open the Server Manager application by clicking the Server Manager icon in the taskbar. Choose Storage, then Disk Management. Right-click the uninitialized external volume, and choose Initialize Disk, then choose MBR. Right-click the volume, and choose New Simple Volume. Click Next. Keep the default drive space, and click Next. Assign the appropriate drive letter, and click Next. Choose NTFS, assign a 64KB allocation unit size, and check the Perform a quick format checkbox. Click Next, and click Finish. Repeat steps 9 through 13 for the remaining external volumes. 37 Servers: Database consolidation on Dell PowerEdge R810 servers Appendix D. Installing SQL Server 2008 Install an instance of Microsoft SQL Server 2008 R2 by following these steps. This installation walkthrough only covers the installation of the Database Engine and Management Components. For other components, such as Reporting Services, Integration Services, or Analysis Services, see Microsoft documentation at http://msdn.microsoft.com/enus/library/ms143219(SQL.105).aspx. NOTE: We installed SQL Server 2008 R2 November CTP. Final versions of SQL Server 2008 R2 may have differing menu options. Allow at least 30 minutes to complete the installation. 1. 2. 3. 4. 5. 6. 7. 8. 9. 10. 11. 12. 13. 14. Insert the installation DVD for SQL Server 2008 R2 into the DVD drive. If autoplay does not begin the installation, navigate to the SQL Server 2008 R2 DVD, and double-click. If prompted with a .NET installation prompt, click Yes to enable the .NET Framework Core role. At the SQL Server Installation Center screen, click Installation. Then click New installation or add features to an existing installation. At the Setup Support Rules screen, click OK. At the Product Key screen, enter your licensing information, if applicable, and click Next. At the License Terms screen, accept the license terms, and click Next. At the Setup Support Files screen, click Install. At the Setup Support Rules screen, click Next. At the Setup Role screen, choose SQL Server Feature Installation, and click Next. At the SQL Server 2008 R2 Feature Selection screen select the features which your organization requires. The features we chose for our testing were: Database Engine Services, FullText Search, Client Tools Connectivity, Client Tools Backwards Compatibility, Management Tools – Basic, Management Tools – Complete, and click Next. At the Installation Rules screen, click Next. At the Instance Configuration, enter the appropriate details for your configuration. For a default instance, leave the defaults selected. For a named instance, enter a new instance name and adjust the file paths as necessary. At the Disk Space Requirements screen, click Next. 38 Servers: Database consolidation on Dell PowerEdge R810 servers 15. At the Server Configuration screen, choose the service account, preferably an Active Directory domain account, fill in a password if necessary, and click Next. 16. At the Database Engine Configuration screen, choose an authentication mode. If your legacy servers use SQL Server logins at all, then select Mixed Mode. If you exclusively use Active Directory domain accounts in your SQL Server environment, then choose Windows Authentication. 17. If necessary, enter a password for the system administrator (SA) account, click Add Current User, and click Next. 18. At the Error Reporting screen, click Next. 19. At the Installation Configuration Rules screen, click Next. 20. At the Installation screen, click Install. 21. At the Complete screen, click Close. 22. After the SQL Server 2008 R2 installation process completes, check Microsoft’s Web site for the latest SQL Server service pack. There were none at the time we wrote this Guide. 39 Servers: Database consolidation on Dell PowerEdge R810 servers Appendix E. Installing Upgrade Advisor In this example, we walk through the steps to install and run the SQL Server 2008 R2 Upgrade Advisor and save reports. 1. 2. 3. 4. 5. 6. 7. 8. Insert the SQL Server 2008 R2 DVD. On the Planning screen, click Install SQL Server Upgrade Advisor. Click Next to begin the installation wizard, accept the licensing terms, and click Next. Click Next to accept the default Registration information, click Next to accept the default installation path, and finally click Next to begin the installation. At the Completing the Microsoft SQL Server 2008 R2 Upgrade Advisor screen, click Finish to exit the setup. Start the Upgrade Advisor by selecting Start | All Programs | Microsoft SQL Server 2008 R2 November CTP | SQL Server 2008 R2 Upgrade Advisor. Click the Launch Upgrade Advisor Analysis Wizard link. Click Next on the Welcome screen. On the SQL Server Components screen, by default the Upgrade Advisor populates the server name field with the local computer name. If you need to scan a remote server, type the computer name or IP address of the SQL Server you want to analyze and do one of the following: Click Detect to allow the Upgrade Advisor to scan the components on the SQL Server instance you specified. (We chose this option.) Select the components of the SQL Server instance you would like the Upgrade Advisor to scan. NOTE: If you are analyzing an instance of SQL Server Reporting Services, you must install and run the SQL Server 2008 Upgrade Advisor software on the hardware where SQL Server 2000 Reporting Services is running, because the Upgrade Advisor cannot scan Reporting Services resources across the network. Do not enter the SQL Server instance name. The Upgrade Advisor will scan the server you specify and check for multiple instances of SQL Server. If you are scanning clustered components of SQL Server on a failover cluster SQL Server instance, enter the failover cluster instance name. If you are scanning non-clustered components, such as the workstation tools, on a failover cluster, enter the computer name of the specified node. 9. On the Connection Parameters screen, specify the Authentication Type and credentials if necessary. 40 Servers: Database consolidation on Dell PowerEdge R810 servers 10. On the SQL Server parameters screen, select one or more databases and, if you so desire, supply a trace file or SQL script file to analyze. Should you wish to use a trace file, you must generate it before you begin the Upgrade Advisor. For instructions about how to generate a trace file, see http://msdn2.microsoft.com/enus/library/ms187929(SQL.105).aspx 11. If you specified analysis of Data Transformation Packages (or if the detection process discovered DTS on the SQL Server 2000 server), you should now choose whether you want the Upgrade Advisor to scan for (a) DTS packages on the SQL Server 2000 server or (b) DTS package files stored on the file system. We kept the default of Analyze DTS packages on Server. Click Next to continue. 12. On the Confirm Upgrade Advisor Settings screen, review your choices, and then click Run to begin the analysis. 13. When the analysis completes, click Launch Report to view the analysis report. 14. You can now use the drop-down filter tools to view report items by component or by issue severity. NOTE: If you want to export the report to comma separated value (CSV) format, click Export Report in the lower right corner of the Upgrade Advisor interface. 41 Servers: Database consolidation on Dell PowerEdge R810 servers Appendix F. Migrating databases In this appendix, we give detailed instructions about a basic sideby-side migration of a user database from a SQL Server 2000 server to a SQL Server 2008 R2 server. There are multiple methods of accomplishing this task, including using TSQL commands and automated tools. Here, we discuss performing the database migration using the graphical interface tools Microsoft provides with SQL Server 2000 and SQL Server 2008 R2. 1. 2. 3. 4. Log into Windows on the SQL Server 2000 server as either an administrative user or a user with full rights on SQL Server 2000. Start Query Analyzer by selecting Start | All Programs | Microsoft SQL Server | Query Analyzer. Enter your server name, and select Windows Authentication. Set the database to single-user mode to ensure no updates occur. NOTE: Setting the database to single-user mode immediately disconnects all users, causing them to lose any work in progress. You must notify your users well in advance of setting the database to single-user mode. 5. To set the database to single-user mode, in the query window, paste the following command, where <DatabaseName> is the name of the database you are migrating: USE [master] GO ALTER DATABASE [<DatabaseName>] SET SINGLE_USER WITH ROLLBACK IMMEDIATE GO 6. 7. Press F5 to execute the query. Close Query Analyzer. When Query Analyzer gives you the chance to save the query, click No. 8. To back up the database and prepare for migration, open Enterprise Manager by selecting Start | All Programs | Microsoft SQL Server | Enterprise Manager. 9. In the left pane, expand Microsoft SQL Servers | SQL Server Group | (local) (Windows NT) | Databases. 10. Right-click the database, and select All Tasks | Backup Database. 11. Keep the default of complete backup. 12. Click Add… to add a backup device, then the ―…‖ button to browse to the backup location you want to use. Select a 42 Servers: Database consolidation on Dell PowerEdge R810 servers folder, and enter a filename, such as DatabaseNameMigrationBackup.bak. 13. Click OK to close the Backup Device Location window, and then click OK to close the Select Backup Destination window. NOTE: To simplify moving the database later, we recommend creating the backup in a shared local folder. 14. Optionally, on the Options tab, select the checkbox to Verify your database backup upon completion. NOTE: This option increases backup time but checks the integrity of the backup file. We chose to verify the backup. 15. Click OK to begin the SQL Server 2000 database backup. (Backup times vary with database size and backup device configuration.) 16. After the backup completes, in Enterprise Manager, under Databases, right-click the database, and choose All Tasks | Take Offline. The old database is now offline, so SQL Server 2000 will not allow any connections to it. 17. Log out of Windows on the SQL Server 2000 server. 18. Log into Windows on the SQL Server 2008 R2 server. 19. In Windows Explorer, navigate to either the shared network location or the portable storage device that you used to store your database backup. 20. Copy the backup file, and paste it to a local directory of your choice. (Copy time varies with network speed and file size.) 21. Open SQL Server Management Studio by selecting Start | All Programs | Microsoft SQL Server 2008 R2 November CTP | SQL Server Management Studio. 22. Select Database Engine for Server type, and type the server name in Server name. For Authentication, we used Windows Authentication. 23. In the Object Explorer pane, right-click Databases, and select Restore Database. 24. Enter the name of the database in the ―To database‖ box. NOTE: It is critical to use the same database name as on your SQL Server 2000 server. If the database name does not match, applications that depend on the database name may break. 25. Click the ―From device‖ radio button, and then click ―…‖ to browse to the local folder where you copied the backup file. 43 Servers: Database consolidation on Dell PowerEdge R810 servers 26. Click Add to add the backup file location. Browse to the appropriate folder, find the backup file, select it, and click OK. Then click OK to return to the Restore Database window. 27. Select the checkbox that now appears in the Restore column. Optionally, click Options on the left, and ensure the file locations are appropriate in the Restore As column. 28. Click OK to begin the restore. Note the progress indicator in the lower left of the Restore window. (Restore time varies with database size and server and disk subsystem speed.) 29. After the restore is complete, you must change the database access state back to multi-user and upgrade the compatibility level by performing the following steps: a. Right-click the database in Object Explorer, and select Properties. b. Click Options on the left side to access database options. c. Change Compatibility level to SQL Server 2008 (100). d. Scroll down to Restrict Access, and change to MULTI_USER. e. Click OK. f. Click Yes to agree to shutting down other connections. 44 Servers: Database consolidation on Dell PowerEdge R810 servers Appendix G. Transferring Windows logins In this appendix, we provide detailed instructions for migrating transferring Windows-based logins from a SQL Server 2000 server to SQL Server 2008 R2 in an Active Directory environment. For information about transferring logins when using SQL Server authentication, see Appendix H. 1. 2. 3. 4. 5. 6. 7. 8. 9. On the SQL Server 2008 R2 server, log into Windows, then open SQL Server Management Studio by selecting Start | All Programs | Microsoft SQL Server 2008 R2 November CTP | SQL Server Management Studio. On the Connect to Server screen, select Database Engine for the server type, enter the computer name of your SQL Server 2000 server, and click Connect. Select View | Object Explorer Details to bring up the Object Explorer Details tab. In the Object Explorer pane, expand the Security folder, and then highlight the Logins folder. Add the Login Type column to the display by right-clicking the column-header area in the Object Explorer Details pane and selecting Login Type. Now Windows Logins appear as Login Type 0. Optionally, use the column headers to sort by Default Database, or use the filter button to find only logins that you are interested in migrating. Using the standard Windows multi-select key combinations (Ctrl key or Shift key), highlight the logins you are interested in migrating. Right-click the highlighted logins, and select Script Login as | CREATE To | New Query Editor. On the Connect to Database Engine screen, change the Server name to your SQL Server 2008 R2 server, and click Connect. Click Execute to run the resulting script. 45 Servers: Database consolidation on Dell PowerEdge R810 servers Appendix H. Transferring SQL Server logins In this appendix, we give detailed instructions on transferring SQL Server logins from a SQL Server 2000 server to SQL Server 2008 R2. For information about transferring logins when using Windows authentication, see Appendix G. Transferring logins 1. 2. 3. 4. 5. 6. 7. 8. 9. On the SQL Server 2008 R2 server, log into Windows, then open SQL Server Management Studio by selecting Start | All Programs | Microsoft SQL Server 2008 R2 November CTP | SQL Server Management Studio. On the Connect to Server screen, select Database Engine for the server type, enter the computer name of your SQL Server 2000 server, and click Connect. Select View | Object Explorer Details to bring up the Object Explorer Details tab. In the Object Explorer pane, expand the Security folder, and then highlight the Logins folder. Add the Login Type column to the display by right-clicking the column-header area and selecting Login Type. Now SQL Server Logins appear as Login Type 2. Optionally, use the column headers to sort by Default Database, or the Filter button to find only logins that you are interested in migrating. Using the standard Windows multi-select key combinations (Ctrl key or Shift key), highlight the logins you are interested in migrating. Right-click the highlighted logins, and select Script Login as | CREATE To | New Query Editor Window. On the Connect to Database Engine screen, change the Server name to your SQL Server 2008 R2 server, and click Connect. Click Execute to run the resulting script. Mapping transferred logins to database users After transferring SQL Server logins from server to server, you must map those logins to the database users that you migrated during the restore process. 1. 2. 3. On the SQL Server 2008 R2 server, log into Windows. Then open SQL Server Management Studio by selecting Start | All Programs | Microsoft SQL Server 2008 R2 CTP | SQL Server Management Studio. On the Connect to Server screen, select Database Engine for the server type, enter the computer name of your SQL Server 2008 R2 server, and click Connect. Right-click the relevant database, and select New Query. 46 Servers: Database consolidation on Dell PowerEdge R810 servers 4. Enter the following command, and click Execute: EXEC sp_change_users_login 'Report'; 5. 6. 7. For each user output from the above step, map these ―orphaned‖ users to the appropriate matching SQL Server login by taking the following steps. Open a query window on the SQL Server 2008 R2 server using steps 1 through 3 above. For each login you wish to map, enter the following command, and click Execute: EXEC sp_change_users_login 'Auto_Fix','SQLLogin'; 8. 9. The above command maps the database user ―SQLLogin‖ to the SQL Server login of ―SQLLogin‖. This procedure assumes that the database user and SQL Server login have the same value. To reset the password and enable the account, enter the following command, and click Execute: USE [master] GO ALTER LOGIN [SQLLogin] WITH PASSWORD=N'Password1' GO ALTER LOGIN [SQLLogin] ENABLE GO Note: This process assumes that you have already migrated the applicable database to the new server. 47 Servers: Database consolidation on Dell PowerEdge R810 servers About Principled Technologies We provide industry-leading technology assessment and fact-based marketing services. We bring to every assignment extensive experience with and expertise in all aspects of technology testing and analysis, from researching new technologies, to developing new methodologies, to testing with existing and new tools. When the assessment is complete, we know how to present the results to a broad range of target audiences. We provide our clients with the materials they need, from market-focused data to use in their own collateral to custom sales aids, such as test reports, performance assessments, and white papers. Every document reflects the results of our trusted independent analysis. Principled Technologies, Inc. 1007 Slater Road, Suite 300 Durham, NC, 27703 www.principledtechnologies.com We provide customized services that focus on our clients’ individual requirements. Whether the technology involves hardware, software, Web sites, or services, we offer the experience, expertise, and tools to help you assess how it will fare against its competition, its performance, whether it’s ready to go to market, and its quality and reliability. Our founders, Mark L. Van Name and Bill Catchings, have worked together in technology assessment for over 20 years. As journalists they published over a thousand articles on a wide array of technology subjects. They created and led the Ziff-Davis Benchmark Operation, which developed such industry-standard benchmarks as Ziff Davis Media’s Winstone and WebBench. They founded and led eTesting Labs, and after the acquisition of that company by Lionbridge Technologies were the head and CTO of VeriTest. Principled Technologies is a registered trademark of Principled Technologies, Inc. All other product names are the trademarks of their respective owners. Disclaimer of Warranties; Limitation of Liability: PRINCIPLED TECHNOLOGIES, INC. HAS MADE REASONABLE EFFORTS TO ENSURE THE ACCURACY AND VALIDITY OF ITS TESTING, HOWEVER, PRINCIPLED TECHNOLOGIES, INC. SPECIFICALLY DISCLAIMS ANY WARRANTY, EXPRESSED OR IMPLIED, RELATING TO THE TEST RESULTS AND ANALYSIS, THEIR ACCURACY, COMPLETENESS OR QUALITY, INCLUDING ANY IMPLIED WARRANTY OF FITNESS FOR ANY PARTICULAR PURPOSE. ALL PERSONS OR ENTITIES RELYING ON THE RESULTS OF ANY TESTING DO SO AT THEIR OWN RISK, AND AGREE THAT PRINCIPLED TECHNOLOGIES, INC., ITS EMPLOYEES AND ITS SUBCONTRACTORS SHALL HAVE NO LIABILITY WHATSOEVER FROM ANY CLAIM OF LOSS OR DAMAGE ON ACCOUNT OF ANY ALLEGED ERROR OR DEFECT IN ANY TESTING PROCEDURE OR RESULT. IN NO EVENT SHALL PRINCIPLED TECHNOLOGIES, INC. BE LIABLE FOR INDIRECT, SPECIAL, INCIDENTAL, OR CONSEQUENTIAL DAMAGES IN CONNECTION WITH ITS TESTING, EVEN IF ADVISED OF THE POSSIBILITY OF SUCH DAMAGES. IN NO EVENT SHALL PRINCIPLED TECHNOLOGIES, INC.’S LIABILITY, INCLUDING FOR DIRECT DAMAGES, EXCEED THE AMOUNTS PAID IN CONNECTION WITH PRINCIPLED TECHNOLOGIES, INC.’S TESTING. CUSTOMER’S SOLE AND EXCLUSIVE REMEDIES ARE AS SET FORTH HEREIN. 48