1
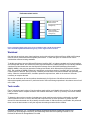
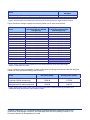
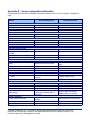
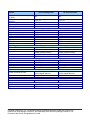
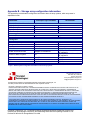
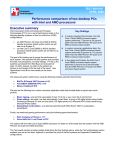
TEST REPORT
OCTOBER 2008
Virtualized Exchange workload performance comparison of end-to-end
solutions with iSCSI storage connections: Dell PowerEdge 2950 with Dell
EqualLogic PS5000 vs. HP ProLiant DL385 with HP StorageWorks EVA 4400
Executive summary
Dell Inc. (Dell) commissioned Principled Technologies
(PT) to compare the virtualized Exchange 2007 workload
performance of two server-and-storage solutions with
iSCSI connections:
•
Dell PowerEdge 2950 server and Dell EqualLogic
PS5000 storage array
HP ProLiant DL385 server and HP StorageWorks
EVA 4400 storage array
•
KEY FINDINGS
z
The Dell PowerEdge 2950 server and Dell
EqualLogic PS5000 storage array delivered
21.4 percent more virtualized Exchange
workload performance
than the HP ProLiant
TEST REPORT
DL385 server and HP StorageWorks EVA
FEBRUARY 2006
4400 storage array (see Figure 1).1
z
The Dell PowerEdge 2950 server and Dell
EqualLogic PS5000 storage array delivered
18.2 percent more virtualized Exchange
workload performance/watt than the HP
ProLiant DL385 server and HP
StorageWorks EVA 4400 storage array (see
Figure 2).2
Both servers contained two processors and 32 GB of
RAM, and both connected to their storage with iSCSI.
Each server ran multiple Exchange 2007 workloads, one
per virtual machine (VM). Each VM’s workload used the
Microsoft Exchange Load Generator. By combining
multiple virtual machines with a disk-intensive workload,
the test placed a heavy load on both the server and the
storage. Thus, it measured the performance of the overall solution--server and storage.
Figure 1 compares the peak number of virtual machines running a Microsoft Exchange 2007 workload that each
solution ran with acceptable performance (a response time of a second or less on all tasks). The Dell solution
achieved 17 simultaneous virtual machines (VMs), while the HP solution delivered only 14 such VMs. Thus, the
Dell solution had a 21.4 percent performance advantage over the HP solution. (The Workload section explains in
more detail the virtualized
Exchange 2007 workload.)
Virtualized Exchange 2007 workload results
18
Number of virtual machines
16
14
HP ProLiant DL385
server and HP
StorageWorks EVA
4400 storage array
12
10
8
Dell PowerEdge 2950
server and Dell
EqualLogic PS5000
storage array
6
4
2
0
-
Figure 1: Virtualized Exchange 2007 workload performance results for the two server-andstorage solutions we tested.
1
Figure 2 illustrates the
performance/watt for each of
the two solutions. In this chart,
we normalized the results for
each workload to those of the
solution with lower
performance/watt. We
compute performance/watt by
dividing the benchmark’s
score by the average power
consumption, in watts, of the
solution during the period the
benchmark was delivering
peak performance.
As Figure 2 shows, the Dell
solution delivered 18.2 percent
more performance/watt than
the HP solution.
Principled Technologies, Inc., Virtualized Exchange workload performance comparison of end-to-end solutions with iSCSI storage
connections: Dell PowerEdge 2950 with Dell EqualLogic PS5000 vs. HP ProLiant DL385 with HP StorageWorks EVA 4400, October
2008.
2
Ibid.
Performance/watt results
Normalized comparison
1.40
1.20
HP ProLiant DL385
server and HP
StorageWorks EVA 4400
storage array
1.00
0.80
0.60
Dell PowerEdge 2950
server and Dell
EqualLogic PS5000
storage array
0.40
0.20
0.00
-
Figure 2: Performance/watt results for the servers normalized to that of the HP ProLiant DL385
server and HP StorageWorks EVA 4400 storage array solution. Higher numbers are better.
Workload
Our goal was to see how many virtual machines running this workload on Microsoft Server 2008 with Exchange
2007 the server could handle with acceptable performance. To reach that goal, we created a new custom
workload that reflected existing standards.
To build that workload, we used Microsoft Exchange LoadGen 2007, an industry-standard tool for benchmarking
an Exchange Mail Server. We used as the basis of that workload the LoadGen settings from an industry-standard
virtualized mail benchmark that uses the Microsoft Exchange Server 2003 MAPI Messaging Benchmark 3
(MMB3). MMB3 is the previous generation Exchange benchmark, which Microsoft has replaced with LoadGen
2007. We modified the MMB3 workload so it would work on the latest version of LoadGen 2007 by using the
Custom feature of that tool. During the tests, LoadGen performs tasks to simulate a standard user generating mail
activity. When the workload finishes, LoadGen reports the response time, which is the number of seconds
necessary to complete the task.
We ran this workload on all virtual machines simultaneously for 30 minutes. We defined a solution to have
delivered acceptable performance if it performed each of the test Exchange operations in less than a second in all
of the VMs.
Test results
Figure 3 shows the total number of virtual machines each solution could handle during testing. For an acceptable
score, a solution had to complete all tasks in the LoadGen workload in 1000 ms (1 second), in all virtual machine
LoadGen tests.
To determine the maximum number of simultaneous virtual machines each solution could handle, we added
virtual machines until one or more of the VMs had a response time on some operations of greater than one
second. We then subtracted one VM to identify the total number of VMs the solution could handle. We performed
three runs at the total number to verify the response time always remained below 1000ms.
Principled Technologies, Inc.: Virtualized Exchange workload performance comparison of end-to-end
solutions with iSCSI storage connections: Dell PowerEdge 2950 with Dell EqualLogic PS5000 vs. HP
ProLiant DL385 with HP StorageWorks EVA 4400
2
Server
Dell PowerEdge 2950 server and Dell EqualLogic PS5000 storage array
HP ProLiant DL385 server and HP StorageWorks EVA 4400 storage array
Total number of virtual
machines
17
14
Figure 3: The total number of virtual machines for the two server-and-storage solutions. Higher numbers are better.
Figure 4 shows the average response time from the median run for each virtual machine.
Server
Virtual machine 1
Virtual machine 2
Virtual machine 3
Virtual machine 4
Virtual machine 5
Virtual machine 6
Virtual machine 7
Virtual machine 8
Virtual machine 9
Virtual machine 10
Virtual machine 11
Virtual machine 12
Virtual machine 13
Virtual machine 14
Virtual machine 15
Virtual machine 16
Virtual machine 17
Dell PowerEdge 2950 server
and Dell EqualLogic PS5000
storage array
302.50
385.53
361.85
372.87
373.67
443.43
401.00
352.87
323.43
386.38
451.48
352.12
387.00
356.28
313.38
301.33
435.03
HP ProLiant DL385 server
and HP StorageWorks EVA
4400 storage array
929.73
798.80
580.22
796.67
849.42
461.85
670.22
787.83
813.45
842.23
750.32
503.23
596.42
773.05
N/A
N/A
N/A
Figure 4: Average response time from median run for each virtual machine for the two server-and-storage
solutions. Lower numbers are better.
Figure 5 details the power consumption, in watts, of the server-and-storage solutions while idle and during the
median run of the virtualized Exchange 2007 workload.
Server
Dell PowerEdge 2950 server and Dell
EqualLogic PS5000 storage array
HP ProLiant DL385 server and HP
StorageWorks EVA 4400 storage array
Idle power (watts)
Average power (watts)
1,068.46
1,178.58
1,020.88
1,146.76
Figure 5: Average power usage (in watts) of the server-and-storage solutions while idle and during the median run of
virtualized Exchange 2007 workload. Lower numbers are better.
Principled Technologies, Inc.: Virtualized Exchange workload performance comparison of end-to-end
solutions with iSCSI storage connections: Dell PowerEdge 2950 with Dell EqualLogic PS5000 vs. HP
ProLiant DL385 with HP StorageWorks EVA 4400
3
Test methodology
Each server arrived with ESX 3i hypervisor installed on an internal USB key.
Booting to VMware ESX Server 3i 3.5.0
We performed the following steps in order to boot to VMware ESX Server 3i 3.5.0 build 82664 on the server under
test:
1. Power on the server.
2. Enter the Bios.
3. Enable the internal USB port.
4. Place the internal USB port at the top of the boot order.
5. Save and restart the server.
Installing Virtual Infrastructure Client on the controller
We managed VMware ESX Server with a separate system we call the controller. We ran Microsoft Windows
Server 2003, Enterprise Edition on this system and connected it to the VMware ESX Server with a network
switch. We performed the following steps to install the necessary VMware Infrastructure Client software on
this system:
1. Insert the Virtual Infrastructure install CD into the CD drive.
2. In the Choose Language window, leave the default English selected, and click OK.
3. At the Welcome screen, click Next.
4. At the Introduction screen, click Next.
5. At the License Agreement screen, check the I accept the terms in the license agreement radio button,
and click Next.
6. At the Customer Information screen, enter tester in the User name field, and click Next.
7. At the Installation Type screen, select the VMware Infrastructure Client radio button, and click Next
8. At the Ready to Install screen, click Install.
9. At the InstallShield Wizard Completed screen, click Finish.
10. Before you can properly use the VMware ESX Server, you must first install a license file. You can
deploy that file with either host-based or server-based licensing. For our testing, we used the hostbased license method by following these steps:
a. To install the license, click the Configuration tab in the Virtual Infrastructure Client.
b. Under the Software section on the left side of the screen, click Licensed Features.
c. Make sure the license file (which VMware should have provided with the copy of VMware
ESX Server) is on the controller.
d. Click Edit next to the License Sources.
e. In the pop-up window, select Use Host License File.
f. Click Browse, and browse to the location of the license file on the server.
g. Click Open to select the file.
h. Click Edit next to VMware ESX Server License Type.
i. Select VMware ESX Server Standard, and click OK.
Configuring network adapters with Virtual Infrastructure Client
Before we set up the VMs, we had to configure the network adapters on the VMware ESX Server. To
accommodate all the network traffic the test required, we used two network ports on the VMware ESX Server.
We assigned the external network port the IP address of 192.168.0.100 during the VMware ESX Server
installation, because the Virtual Infrastructure Client uses this port to communicate.
We performed the following steps to configure the VMware ESX Server for the network adapters:
1. Within the Virtual Infrastructure Client window, select the configuration tab for the VMware ESX Server.
2. In the hardware section, select Networking to view the network setup.
3. Click Properties for Virtual Switch vSwitch0.
4. In the vSwitch0 Properties window, highlight the Virtual Machine Network, and click Edit.
5. Rename the Network Label to External Network.
6. Click OK to close the window.
Principled Technologies, Inc.: Virtualized Exchange workload performance comparison of end-to-end
solutions with iSCSI storage connections: Dell PowerEdge 2950 with Dell EqualLogic PS5000 vs. HP
ProLiant DL385 with HP StorageWorks EVA 4400
4
7.
8.
9.
10.
11.
12.
Click Close to close the Properties window.
On the Networking configuration tab, click Add Networking.
Select Virtual Machine for the connection type, and click Next.
Under Create a virtual switch, select vmnic1, and click Next.
Change the Network Label to Mail Network, and click Next.
At the summary page, click Finish.
Creating a virtual machine
The steps below describe how we created a base virtual machine. We performed the following basic steps to
create each of the VMs the test required. We list the exact parameters we specified for each VM in the section
below on installing and configuring that VM.
1. In Virtual Infrastructure Client, highlight the VMware ESX Server (localhost.localdomain).
2. Select FileÆNewÆVirtual Machine.
3. Select Custom on the Select the Appropriate Configuration screen, and click Next.
4. Enter the Virtual Machine Name, and click Next.
5. Select the Storage that will hold the VM, and click Next.
6. Select the Operating System for the VM, and click Next.
7. Use the drop-down box to select the number of virtual processors for the VM, and click Next.
8. Select the amount of memory for the VM, and click Next.
9. Select the Network Connection for the VM, and click Next.
10. Accept the default option for the SCSI Adapter, and click Next.
11. Leave the default option to create a new virtual disk on the Select a Disk screen, and click Next.
12. Enter the virtual disk size, and click Next.
13. Leave the default options for the Specify Advanced Options, and click Next.
14. Review the virtual machine summary, and click Finish to create the virtual machine.
Installing and configuring the mail server
To set up this server, you must install several software components. The following subsections detail the
necessary installation processes. Before following these instructions, make sure to statically assign an IP address
for the server under test, and then plug that port into another system or router. This allows the server to correctly
add the domain server function. We recommend making the IP address 192.168.x.250, where x is the VM
number. For example, the first mail server would have an IP address 192.168.1.250.
1. Follow the steps in the earlier Creating a virtual machine section using the following VM specifications:
a. Name: MailServer
b. Virtual processors: 1
c. Virtual memory: 2048 MB
d. Virtual Disk Size: 40 GB
e. Virtual Network: Mail Network (keep the default Windows Network DHCP settings)
2. Install Microsoft Windows Server 2008, Enterprise x64 Edition in the VM.
3. When asked to choose a partition to install the OS to, click New.
4. Enter 24,576 for the size of the partition and click Create.
5. Highlight the newly created partition, and click Format.
6. When formatting completes, click New.
7. Enter 8,192 for the size of the partition and click Create.
8. Highlight the newly created partition, and click Format.
9. When formatting completes, click New.
10. Enter 8,190 for the size of the partition and click Create.
11. Highlight the newly created partition, and click Format.
12. When formatting completes, highlight the 24 GB partition and click Install.
13. Finish the installation procedure using default settings.
14. Right-click the VM in the Virtual Infrastructure Client window, and select Install VMware tools.
15. Reboot the VM.
16. Right-click the desktop, and select Personalize.
17. Click the Screen Saver link.
18. Click the Screen saver drop-down menu, and select (None).
Principled Technologies, Inc.: Virtualized Exchange workload performance comparison of end-to-end
solutions with iSCSI storage connections: Dell PowerEdge 2950 with Dell EqualLogic PS5000 vs. HP
ProLiant DL385 with HP StorageWorks EVA 4400
5
19.
20.
21.
22.
23.
24.
25.
Click Apply.
Click Change power settings.
Click Change plan settings under Balanced.
Change the Turn off monitor drop-down menu to Never.
Click Save changes and close the Power Options, Screen Saver Settings, and Personalization windows.
Open the Start menu, type regedit in the search field and press Enter.
To allow the VM to automatically log into the OS after a system reboot, change the following Registry key
to have the values shown here:
[HKEY_LOCAL_MACHINE\SOFTWARE\Microsoft\Windows NT\CurrentVersion\Winlogon]
• DefaultPassword=Password1
• AutoAdminLogon=1
• DefaultUsername=administrator
26. Restart the VM.
Installing the domain controller
1. Set a static IP address using the following steps:
a. Right-click the network icon in the quick-launch bar, and choose Network and Sharing Center.
b. Click Manage network connections.
c. Right-click the local area connection, and choose Properties.
d. Select Internet Protocol Version (TCP/IPv4), and click Properties.
e. Select the Use the following IP address radio button and enter 192.168.0.250 in the IP
address field.
f. Press Tab to auto-fill 255.255.255.0 in the Subnet mask field.
g. In the Preferred DNS server field, enter 127.0.0.1 and click OK to close the IPv4 properties
window.
h. Click Close.
2. Give the computer a name using the following steps:
a. Click Start then right-click Computer and select Properties.
b. Click Change Settings.
c. Click Change.
d. Enter mailserver in the Computer name field, and click OK.
e. In the Computer Name/Domain Changes pop-up window, click OK.
f. Click OK.
g. In the Microsoft pop-up window, click Restart Now.
3. Promote the mailserver to domain controller by following these steps:
a. Select StartÆCommand Prompt.
b. Type dcpromo.
c. At the Welcome pop-up window, click Next.
d. At the Operating System Compatibility screen, click Next.
e. At the Choose a Deployment Configuration screen select the Create a new domain in a new
forest radio button, and click Next.
f. At the Name the Forest Root Domain screen, type a domain name (mailserver.com), and click
Next.
g. At the Set Forest Functional Level screen, choose Windows Server 2008 from the drop-down
menu, and click Next.
h. At the Additional Domain Controller Options screen, accept the defaults, and click Next.
i. When the Static IP assignment window pops up, click Yes, the computer will use a dynamically
assigned IP address.
j. When the Active Directory domain Services Installation Wizard window pops up, click Yes.
k. At the Location for Database, Log Files, and SYSVOL screen, click Browse next to the Database
folder field and choose the D:\ drive. Click Next.
l. At the Directory Services Restore Mode Administrator Password screen, enter a password, and
click Next.
m. At the Summary screen review the selections, and click Next.
n. When the installation software prompts you to do so, insert the OS CD, and click OK.
Principled Technologies, Inc.: Virtualized Exchange workload performance comparison of end-to-end
solutions with iSCSI storage connections: Dell PowerEdge 2950 with Dell EqualLogic PS5000 vs. HP
ProLiant DL385 with HP StorageWorks EVA 4400
6
o. At the Completing the Active Directory Installation Wizard screen, click Finish.
p. When the system prompts you to reboot the server, click Restart Now.
q. After the server reboots, log in to the system.
Installing Internet Information Services 6.0
1. Select StartÆAdministrative ToolsÆServer Manager.
2. Click Add Roles.
3. At the Select Server Roles screen click Web Server (IIS).
4. In the pop up Add features required for Web Server (IIS) window, click Add Required Features.
5. Click Next.
6. At the Web Server (IIS) screen, click Next.
7. At the Select Role Services screen select the IIS 6 Metabase Compatibility, IIS 6 Management Console,
Basic Authentication, Windows Authentication, Digest Authentication, and Dynamic content Compression
checkboxes, and click Next.
8. At the Confirm Installation Selections screen, click Install.
9. At the Installation Results screen, click Close.
Installing Exchange Server 2007
1. Insert the Microsoft Exchange Server 2007 CD.
2. In the pop up AutoPlay window, click Run Setup.EXE.
3. Steps 1 and 2 should already be completed and grayed out.
4. Click Step 3: Install Microsoft Windows PowerShell.
5. Select StartÆCommand Prompt.
6. In the Command Prompt window type ServerManagerCmd –I PowerShell and press Enter.
7. When the installation completes, close the Command Prompt window.
8. Click the link to Step 4: Install Microsoft Exchange Server 2007 SP1.
9. Click Next to go past the introduction screen.
10. Accept the license agreement, and click Next.
11. Select No for error reporting, and click Next.
12. Select Typical Exchange Server Installation, and click Next.
13. Leave the organization name at default (First Organization), and click Next.
14. Select No to the question about client computers running Outlook 2003 and earlier, and click Next.
15. If a warning about a lack of SMTP appears after the check finishes, ignore it.
16. Click Install to start the installation process.
17. Once installation is complete, click Finish. Exchange should automatically open the Exchange
Management Console.
Configuring Exchange Server 2007
1. If Exchange does not automatically open the Exchange Management Console, select StartÆAll
ProgramsÆMicrosoft Exchange Server 2007ÆExchange Management Console.
2. In the left pane, expand Organization Configuration, and select Hub Transport.
3. In the action pane on the far right, select New Send Connector.
4. Name the send connector SMTP, select the intended use as Internet, and then click Next.
5. In the Address space window, click Add.
6. In the SMTP Address Space window, put * as the address, make sure Include all subdomains is checked,
and click OK.
7. Click Next.
8. Accept defaults for the next two pages by clicking Next.
9. At the New Connector page, click New to create the connector.
10. Click Finish to close the New SMTP Send Connector wizard.
11. In the left pane of the Exchange Management Console window, expand Server Configuration, and select
Mailbox.
12. In the Database Management tab, right-click First Storage Group, and select New Public Folder
Database.
13. Name the new public folder database Public Folder Database, and click New.
Principled Technologies, Inc.: Virtualized Exchange workload performance comparison of end-to-end
solutions with iSCSI storage connections: Dell PowerEdge 2950 with Dell EqualLogic PS5000 vs. HP
ProLiant DL385 with HP StorageWorks EVA 4400
7
14. In the Completion page, click Finish to close the New Public Folder Database window.
15. Close the Exchange Management Console, and reboot the server.
16. Once the server successfully reboots, log in, and select StartÆAll ProgramsÆAdministrative
ToolsÆActive Directory Users and Computers.
17. In the Active Directory Users and Computers window, select test.com in the left pane, and open Users in
the right pane.
18. Right-click a blank area in the Users folder, and select NewÆUser.
19. In the New Object - User window, complete the name fields as you wish (we used first name: test, last
name: tester, logon name: tester), and select Next.
20. Enter a secure password (we used Password1), and check Password never expires.
21. In the pop-up information window, click Accept.
22. Select Next to close the New Object – User window.
23. Double-click the new user to bring up the Properties window.
24. Under the Member Of tab, click Add.
25. In the Enter the object names to select dialog box, type Domain Admins; Exchange Organization
Administrators, select Check Names to verify, and then click OK.
26. Click OK to close the user Properties window and close Active Directory Users and Computers window.
27. Select StartÆAll ProgramsÆMicrosoft Exchange Server 2007ÆExchange Management Console.
28. In the left pane of the Exchange Management Console window, select Recipient Configuration; and in the
right pane, select New Mailbox.
29. In the New Mailbox window, select User Mailbox, and click Next.
30. In the User Type page, select Existing users, and click Add.
31. Select the new account you created earlier, and click OK to add it to selection box.
32. Click Next.
33. In the Mailbox Settings page, leave the Alias textbox with default settings, and select Browse in the
Mailbox database selection spot.
34. In the Select Mailbox database window, select Mailbox Database, and click OK.
35. Click through the next screens to create the new mailbox, and close when you have done so.
36. Close the Exchange Management Console.
37. Select StartÆAll ProgramsÆMicrosoft ExchangeÆSystem Manager.
38. In the left window pane, expand Server Configuration and Mailbox so the First Storage Group is visible.
39. Right-click First Storage Group, and select Properties.
40. Click Browse, and change the Transaction log and System path location to E:\.
41. Check the Enable circular logging box.
42. Click Apply.
43. When the pop-up message appears asking if you want to perform this task, click Yes.
44. When the message appears saying that all mounted stores are back online, click OK.
45. Right-click First Storage Group and select New Mailbox Database.
46. Under Mailbox database name, write Mailbox Database 2.
47. Click the Browse button and select E:\Mailstore. If there is not a directory called Mailstore, create it.
48. Click the New button to create the database.
49. Right-click Mailbox Store under First Storage Group, and select Properties.
50. Select the Database tab.
51. Click Browse, and move the Exchange database and Exchange streaming database to E:\.
52. Check the box beside This database can be overwritten by a restore.
53. Click Customize next to Maintenance interval.
54. Remove all blue from the boxes so the system will not perform maintenance, and click OK.
55. At the Mailbox Store Properties window, click Apply.
56. When a warning message appears, click Yes.
57. When the message that the database files have been moved appears, click OK.
58. Click OK to close the Mailbox Store Properties window.
59. Right-click Mailbox Store 2 under First Storage Group, and select Properties.
60. Select the Database tab.
61. Click Browse, and move the Exchange database and Exchange streaming database to E:\.
62. Check the box beside This database can be overwritten by a restore.
Principled Technologies, Inc.: Virtualized Exchange workload performance comparison of end-to-end
solutions with iSCSI storage connections: Dell PowerEdge 2950 with Dell EqualLogic PS5000 vs. HP
ProLiant DL385 with HP StorageWorks EVA 4400
8
63.
64.
65.
66.
67.
68.
69.
70.
71.
72.
73.
74.
75.
76.
77.
78.
79.
80.
81.
82.
83.
Click Customize next to Maintenance interval.
Remove all blue from the boxes so the system will not perform maintenance, and click OK.
At the Mailbox Store 2 Properties window, click Apply.
When a warning message appears, click Yes.
When the message that the database files have been moved appears, click OK.
Click OK to close the Mailbox Store 2 Properties window.
Right-click Public Store under First Storage Group, and select Properties.
Select the Database tab.
Click Browse, and move the Exchange database and Exchange streaming database to E:\.
Check the box beside This database can be overwritten by a restore.
Click Customize next to Maintenance interval.
Remove all blue from the boxes so the system will not perform maintenance, and click OK.
At the Public Store Properties window, click Apply.
When a warning message appears, click Yes.
When the message that the database files have been moved appears, click OK.
Click OK to close the Public Store Properties window.
In the left pane of the Virtual Infrastructure Client, right-click the MailServer1 VM, and select Install
VMware Tools.
At the Install Tools pop-up window, click OK.
Click Next through the Installation Wizard to install the VMware Tools. This process accepts all defaults.
When the installation completes, click Finish.
Click Yes to reboot the virtual machine.
Cloning the VMs
We followed the steps below to copy a VM with VMware Converter. They assume you have installed the VMware
Converter on the same machine as the VMware Virtual Infrastructure Client.
1. Open VMware Converter, and click Import Machine.
2. At the Welcome screen, click Next.
3. At the Source screen, click Next.
4. Select VMware ESX Server for the Source, and click Next.
5. Enter the IP address, user name, and password of the VMware ESX Server, and click Next.
6. Select the virtual machine that you want to copy (for example: Base32), and click Next.
7. For the Source Data, leave the default (Import all disks and maintain size), and click Next.
8. At the Destination screen, keep the default, and click Next.
9. For Destination Type, select VMware ESX server, and click Next.
10. Enter the IP address, user name, and password of the VMware ESX Server, and click Next.
11. Enter the virtual machine name (for example, if you are copying Base32, the server you are configuring
could be IdleServer1, MailServer1, or WebServer1), and click Next.
12. Select the host system, and click Next.
13. Select the Datastore, and click Next.
14. Select the Network connection for the virtual machine, and click Next.
15. Leave the default Customization settings, and click Next.
16. Review the summary, and click Finish to begin copying the virtual machine.
Installing and configuring the mail client
We used a separate ESX Server running virtual clients for all mail clients. To create the mail client, you must
install several software components. Before following these instructions, make sure to statically assign an IP
address for the client, and then plug that port into the system under test. This allows the client to correctly join the
domain. We followed this process for each installation:
1. Follow the steps in the earlier Creating a virtual machine section using the following VM specifications:
a. Name: MailClient
b. Virtual processors: 1
c. Virtual memory: 512 MB
d. Virtual Disk Size: 8 GB
e. Virtual network: External Network (keep the default Windows Network DHCP settings)
2. Install Microsoft Windows Server 2003 R2 Enterprise x64 Edition Service Pack 2 on the VM.
Principled Technologies, Inc.: Virtualized Exchange workload performance comparison of end-to-end
solutions with iSCSI storage connections: Dell PowerEdge 2950 with Dell EqualLogic PS5000 vs. HP
ProLiant DL385 with HP StorageWorks EVA 4400
9
3.
4.
5.
6.
7.
8.
Assign a computer name of “Clientx” for the mail client, where x is the client number.
For the licensing mode, use the default setting of five concurrent connections.
Enter a password for the administrator log on.
Select Eastern Time Zone.
Use typical settings for the Network installation.
Use “Testbed” for the workgroup.
To set up this server, we had to install several additional software components. The following subsections detail
the necessary installation processes.
Joining the domain
1. Select StartÆControl PanelÆNetwork ConnectionsÆLocal Area Connection.
2. Click Properties.
3. Highlight Internet Protocol (TCP/IP), and click Properties.
4. Select the Use the following DNS server addresses radio button and enter the IP of the DNS server in the
Preferred DNS server field. Click OK.
5. Right-click My Computer, and select Properties.
6. Under the Computer Name tab, click Change.
7. In the Computer Name Changes window, under the Member of section, select the Domain radial box, and
type test.com.
8. Select OK to start joining the domain.
9. When the window appears asking for a person qualified on the domain, enter Tester as the username
and Password1 as the password.
10. Click OK at the welcome pop-up window and the window warning that you must reset the computer for
the changes to take effect.
11. Click OK in the System Properties window.
12. When a pop-up appears asking if you want to restart now, click Yes to restart your computer.
Installing Internet Information Services 6.0
1. Select StartÆControl PanelÆAdd or Remove Programs.
2. Click Add/Remove Windows Components.
3. Select Application Servers, and click Details.
4. Click ASP.NET, and make sure a check appears in the check box.
5. Select Internet Information Services (IIS), and click Details.
6. Click OK to close the Application Server window.
7. At the Windows Components Wizard, click Next to begin the installation.
8. When the system prompts you to do so, insert the OS CD, and click OK.
9. At the Completing the Windows Components Wizard window, click Finish.
10. Close the Add or Remove Programs window.
Installing Exchange Server 2007 and Load Generator
1. Insert the Microsoft Exchange Server 2007 CD. The CD should automatically launch the installation
software.
2. Click the link to Step 1: Install .NET Framework 2.0.
3. When you arrive at the download link, download the x64 version of the .NET Framework, and install.
4. Click the link to Step 3: Install Microsoft Windows PowerShell; this takes you to the download link.
5. When you arrive at the download link, download Microsoft Windows PowerShell, and install with defaults.
6. Search for and download SP1 for .NET Framework 2.0.
7. Install SP1 with all defaults.
8. Click the link to Step 4: Install Microsoft Exchange Server 2007 SP1.
9. Click Next to go past the introduction screen.
10. Accept the license agreement, and click Next.
11. Select No for error reporting, and click Next.
12. Select Custom Exchange Server Installation, and click Next.
13. Check Management Tools, and click Next.
14. After the check finishes, click Install to start the installation process.
Principled Technologies, Inc.: Virtualized Exchange workload performance comparison of end-to-end
solutions with iSCSI storage connections: Dell PowerEdge 2950 with Dell EqualLogic PS5000 vs. HP
ProLiant DL385 with HP StorageWorks EVA 4400
10
15. Once installation is complete, click Finish.
16. Download and install Load Generator using all defaults.
Preparing Load Generator
1. Log into the MailClient using the tester account.
2. Select StartÆAll ProgramsÆMicrosoft ExchangeÆExchange Load Generator.
3. When the Load Generator window appears, select Start a new test.
4. Select Create a new test configuration, and click Continue.
5. Enter tester as the account name.
6. In the Specify test settings window, type Password1 as the Directory Access Password and Mailbox
Account Master Password, and click Continue with recipient management.
7. Make 500 users in each Mailbox Database, and click Continue.
8. To accept defaults for Advanced recipient settings, click Continue.
9. In the Specify test user groups window, select the plus sign to add a user group.
10. Change the Client Type to Outlook 2007 Online and the Action Profile to Custom, and click Continue.
11. Leave defaults in Remote configurations, and click Continue.
12. Click Save the configuration file as, and name it Loadgencfg.
13. Click Start the initialization phase (recommended before running the test) to start initialization. The
initialization process might take a few hours.
Power measurement procedure
To record each server’s power consumption during each test, we used an Extech Instruments (www.extech.com)
380803 Power Analyzer/Datalogger. We connected the power cord from the server under test to the Power
Analyzer’s output load power outlet. We then plugged the power cord from the Power Analyzer’s input voltage
connection into a power outlet. For the storage arrays, which have multiple power cords, we plugged all of the
cords for each array into a power strip and then plugged the power strip into the Power Analyzer’s output load
power outlet.
We used the Power Analyzer’s Data Acquisition Software (version 2.11) to capture all recordings. We installed the
software on a separate Intel processor-based PC, which we connected to the Power Analyzer via an RS-232
cable. We captured power consumption at one-second intervals.
To gauge the idle power usage, we recorded the power usage for 2 minutes while each system was running ESX
Server 3i but otherwise idle, meaning no VMs were powered on.
We then recorded the power usage (in watts) for each system during the testing at 1-second intervals. To
compute the average power usage, we averaged the power usage during the time the system was producing its
peak performance results. Since we measured the power of the server and storage separately, we added the
average power of both together to get the total power. We call this time the power measurement interval. See
Figure 5 (idle and average peak power) for the results of these measurements.
Testing procedure
To perform the test, we used a series of batch files. First, we powered on all virtual machines. We made each wait
for the controller to copy a file to begin the test. Before beginning the test, we let all equipment sit for 1 hour and
30 minutes to ensure the virtual machines were idle and had finished running any background tasks. Then we
executed the start batch file on our controller, which copied a file to all virtual machines to start LoadGen. After
LoadGen finished, we used another batch file to copy the results from all virtual machines. The batch files simply
used the copy command and referred to all virtual machines by their IP addresses. Once a run finished, we used
a restore batch file, which restored the mailstore to the original state. This allowed us to always start from the
same point in testing.
Principled Technologies, Inc.: Virtualized Exchange workload performance comparison of end-to-end
solutions with iSCSI storage connections: Dell PowerEdge 2950 with Dell EqualLogic PS5000 vs. HP
ProLiant DL385 with HP StorageWorks EVA 4400
11
Appendix A – Server configuration information
This appendix provides detailed configuration information about the servers, which we present in alphabetical
order.
Server
General dimension information
Height (inches)
Width (inches)
Depth (inches)
U size in server rack
Power supplies
Total number
Wattage of each
Cooling fans
Total number
Dimensions (H x W) of each
Voltage
Amps
General processor setup
Number of processor packages
Number of cores per processor
package
Number of hardware threads per core
System Power Management Policy
CPU
Vendor
Dell PowerEdge 2950
3.5
19
27
2
3.5
19
26.5
2
2
750
2
800
4
2.5 x 2.5
12
2.10
6
2.5 x 2.5
12
1.80
2
2
4
4
1
Always On
1
Always On
Intel
AMD
Third Generation AMD Opteron
2356
B3
Socket F (1207)
2.30
1,000
64 KB + 64 KB (per core)
Name
Quad-Core Intel Xeon E5440
Stepping
Socket type
Core frequency (GHz)
Front-side bus frequency (MHz)
L1 cache
C0
LGA 771
2.83
1,333
32 KB + 32 KB (per core)
2 x 6 MB (each 6 MBs shared by
2 cores)
NA
L2 cache
L3 cache
Platform
Vendor and model number
Motherboard model number
Motherboard revision number
BIOS name and version
BIOS settings
HP ProLiant DL385
Dell PowerEdge 2950
CN-0WW126-13740-86H-0285
A02
Dell BIOS Version 2.3.1
Enabled Virtualization
Technology, Enabled USB 2.0
Controller
2 MB (512 KB per core)
2 MB (shared)
HP ProLiant DL385 G5
PACEN0D9VVZ1FA
0D
HP BIOS A09 (v2.10)
Enabled AMD Virtualization,
Enabled USB 2.0 Controller
Memory module(s)
Vendor and model number
Type
Speed (MHz)
Samsung M393T5160QZACE6Q0
PC2-5300
667
Samsung M395T5160QZ4-CE65
PC2-5300
667
Principled Technologies, Inc.: Virtualized Exchange workload performance comparison of end-to-end
solutions with iSCSI storage connections: Dell PowerEdge 2950 with Dell EqualLogic PS5000 vs. HP
ProLiant DL385 with HP StorageWorks EVA 4400
12
Server
Speed in the system currently running
@ (MHz)
Timing/Latency (tCL-tRCD-iRPtRASmin)
Size
Number of RAM modules
Chip organization
Hard disk
Vendor and model number
Number of disks in system
Size
Buffer size
RPM
Type
Controller
Controller driver
Operating system
Name
Build number
File system
Kernel
Language
Graphics
Vendor and model number
Chipset
Type
Memory size
Resolution
Network card/subsystem
Vendor and model number
Type
Driver
Optical drive
Vendor and model number
USB ports
Number
Type
Dell PowerEdge 2950
HP ProLiant DL385
667
667
5-5-5-15
5-5-5-15
32 GB (8 x 4 GB)
8
Dual-sided
32 GB (8 x 4 GB)
8
Dual-sided
Seagate ST973451SS
2
73 GB
16 MB
15,000
SAS
LSI SAS 1068E
mptscsi_2xx
HP DH072BB978
2
72 GB
16 MB
15,000
SAS
HP Smart Array P400 Controller
cciss
VMware ESX Server 3i v3.5
82664
ext3 (server)
Vmfs3 (virtual machines)
2.4.2147.0.1.ELvmnix
English
VMware ESX Server 3i v3.5
82664
ext3 (server)
Vmfs3 (virtual machines)
2.4.2147.0.1.ELvmnix
English
ATI ES1000
ATI ES1000
Integrated
32 MB
1,024 x 768
ATI ES1000
ATI ES1000
Integrated
32 MB
1,024 x 768
Broadcom Corporation NetXtreme
II 5708 Gigabit Ethernet
Integrated
bnx2
Broadcom Corporation NetXtreme
II 5708 Gigabit Ethernet
Integrated
bnx2
TEAC CD-224E CD-ROM
HP DVD-ROM
5 (1 internal)
USB 2.0
5 (1 internal)
USB 2.0
Figure 6: Detailed system configuration information for the two test servers.
Principled Technologies, Inc.: Virtualized Exchange workload performance comparison of end-to-end
solutions with iSCSI storage connections: Dell PowerEdge 2950 with Dell EqualLogic PS5000 vs. HP
ProLiant DL385 with HP StorageWorks EVA 4400
13
Appendix B – Storage array configuration information
This appendix provides detailed configuration information about the array systems, which we present in
alphabetical order.
Enclosure
General dimension information
Height (inches)
Width (inches)
Depth (inches)
U size in server rack
Power supplies
Total number
Wattage of each
Cooling fans
Total number
Dimensions (H x W) of each
Voltage
Amps
Hard disk
Dell Equal Logic PS5000XV
HP EVA 4400
5.5
19.0
21.5
3
3.5
19.0
22.0
2
2
450
2
575
4
4x4
12 volts
1.8 amps
4
2.5 x 2.5
12 volts
1.68 amps
Vendor and model number
Seagate ST3146855SS
Number of disks in system
32
Size
Buffer Size
RPM
Type
146 GB
16 MB
15,000
SAS
HP BF146DA47C and HP
BF146DA47A
19 x HP BF146DA47C and 13 HP
BF146DA47A
146 GB
16 MB
15,000
Fibre Channel
Figure 7: Detailed system configuration information for the two array systems.
Principled Technologies, Inc.
1007 Slater Rd., Suite 250
Durham, NC 27703
www.principledtechnologies.com
[email protected]
Principled Technologies is a registered trademark of Principled Technologies, Inc.
All other product names are the trademarks of their respective owners
Disclaimer of Warranties; Limitation of Liability:
PRINCIPLED TECHNOLOGIES, INC. HAS MADE REASONABLE EFFORTS TO ENSURE THE ACCURACY AND VALIDITY OF ITS
TESTING, HOWEVER, PRINCIPLED TECHNOLOGIES, INC. SPECIFICALLY DISCLAIMS ANY WARRANTY, EXPRESSED OR
IMPLIED, RELATING TO THE TEST RESULTS AND ANALYSIS, THEIR ACCURACY, COMPLETENESS OR QUALITY, INCLUDING
ANY IMPLIED WARRANTY OF FITNESS FOR ANY PARTICULAR PURPOSE. ALL PERSONS OR ENTITIES RELYING ON THE
RESULTS OF ANY TESTING DO SO AT THEIR OWN RISK, AND AGREE THAT PRINCIPLED TECHNOLOGIES, INC., ITS
EMPLOYEES AND ITS SUBCONTRACTORS SHALL HAVE NO LIABILITY WHATSOEVER FROM ANY CLAIM OF LOSS OR DAMAGE
ON ACCOUNT OF ANY ALLEGED ERROR OR DEFECT IN ANY TESTING PROCEDURE OR RESULT.
IN NO EVENT SHALL PRINCIPLED TECHNOLOGIES, INC. BE LIABLE FOR INDIRECT, SPECIAL, INCIDENTAL, OR
CONSEQUENTIAL DAMAGES IN CONNECTION WITH ITS TESTING, EVEN IF ADVISED OF THE POSSIBILITY OF SUCH DAMAGES.
IN NO EVENT SHALL PRINCIPLED TECHNOLOGIES, INC.’S LIABILITY, INCLUDING FOR DIRECT DAMAGES, EXCEED THE
AMOUNTS PAID IN CONNECTION WITH PRINCIPLED TECHNOLOGIES, INC.’S TESTING. CUSTOMER’S SOLE AND EXCLUSIVE
REMEDIES ARE AS SET FORTH HEREIN.
Principled Technologies, Inc.: Virtualized Exchange workload performance comparison of end-to-end
solutions with iSCSI storage connections: Dell PowerEdge 2950 with Dell EqualLogic PS5000 vs. HP
ProLiant DL385 with HP StorageWorks EVA 4400
14