1
Installation
Model
and Operating
Numbers
Guide
I Warranty
lZ42PX2D/Z42PX2DH/Z42PX2tDiZ42PX21DH
ze
0
1
zenit
(!> Z(XWI i}ht 2OO__,LG Electronics
I PLASMA TV
USA, Inc,
h_,__
Warning/Caution
WARNING/CAUTION:
TO REDUCE THE RISK OF ELECTRIC
SHOCK DO NOT REMOVE COVER (OR BACK).
SERVICEABLE
PARTS iNSiDE
REFER TO QUAUF_ED
SERVICE PER_NNEL
NO USER
the presence
of uninsu_ated
'dan_rous
the product's
that to
may
of st.dfi_
The
lightning flash
w_h arrowhead
sym_I, ve]tege"
within within
an equilateral
triangle,enclosure
is intended
alertbe the
user to
cient magnitude to constitute a risk of e_estric shock to persons.
The exclamation
im_nt
anca
point within
operating
an equilateral
and maintenance
triangle
(se_icing)
is intended
instructions
to alert the user to the presence
in the literature
accompanying
of
the app[F
WARNING/CAUTION:
TO PREVENT
F_RE OR SHOCK
HAZARDS,
DO NOT EXPOSE
THIS
PRODUCT
TO RAiN
OR MOISTURE_
FCC NOTICE
A Class
B digital device
This equipment
has been tested
and found to comply
with the _imits for a Class
B digital
device,
pursuant
to Part
15 of the FCC Ru_e& These limits are designed to provide reasonable
protection
against harmfu_ interference in
a residential
installation,
This equipment
generates,
uses and can radiate radio frequency
energy and_ if not
inst_m_
and used in accordance
with the instructions,
However, there is no guarantee that interference
cause harmful interference
to radio or television
and on, the user is encouraged
° Reorient
- hcrease
to try to correct
or relocate the receiving antenna.
the separation between the equipment
- Connect the equipment into an outlet
- Consult the dealer or an experienced
may cause harmful
interference
to radio communications.
wi[I not occur in a particular instai[a_en,
ff this equipment
d_s
reception, v_ich can be determined
by turning the equipment
off
the interference
by one or more of the foilowing
measures:
and receiver.
on a circuit different
radio[TV technician
from that to which the receiver
for help_
is connected
• Any changes or modifications not expressly approved by the party res_nsible
ance could void the user's authority to operate the equipment,
for comptF
CAUTION:
Do not attempt to modify this product in any way without wntten
ific_ion could void the user's authority to operate this product.
authoriza_on
from LG Electronics.
Unauthorized
m,_
PRODUCT
TO
COMPLIANCE:
The responsible party for this devi_ compliance
Zen_h E_ectronics Corporation
1o201-816_2000
is:
Marked and Distributed in the United States by LG Electronics
1000 Sylvan Avenue, Englewood Cliffs, NJ 07632
http :t!www ze n ith,co m
U.S.A., Inc.
WARNING/CAUTION
TO
REDUCE
RAIN
2
Plasma
TV
OR
THE
RiSK
OF
FIRE
AND
ELECTRIC
SHOCK,
DO
NOT
EXPOSE
THIS
MOISTURE
206_4022
Safety
Instructions
I
ions
F
IMPORTANT
SAFETY
INSTRUCTIONS
important safety instructions
shaJl be provided with each apparatus
This information
sheet, or be located before any operating instructions in an instruction for installation
tus, This infom'_tion shaii be given in a language acceptable to the c_untry
important safety instructions shah be entitled "important Safety Instructions".
shalt be given in a _parate
booklet or
for use and supptied with the appara-
where the apparatus is intended to be used, The
The following safety instructions
shall be includ-
where applicable,
and, when used, shah be verbatim as follows. Additional safety information
may be inctuded by adding
statements
after the end of the fomtowing safety instruction
list, At the manufacturer's
option, a picture or drawing th_ illustrates the intent of a specific safety instruction may be piaced imn_diately
adjacent to that safety instruction
:
1. Read these instructions,
2, Keep these instructions.
3, Heed ati warnings,
4. Follow all instructions,
5, Do not use this apparatus near water.
6, Clean only with dry cloth,
7, Do not block any ventilation openings. Install in accordance with the manufacturer's
8. Do not install near any heat sources such as r_lators,
heat registers,
instructions,
stoves, or other apparatus (including ampli-
fiers)that produce heat.
9. Do not defeat the safety purpose of the polarized or groundtng-ty_
plug, A polarized plug has two blades with
one wider that= the other. A grounding type plug has two blades and a third grounding prong, The wide blade or the
third prong are provided for your safety, If the provided plug d_s
not fit into your outlet, consult an electrician
for
replacement of the obsolete outlet,
10. Protect the power cord from being walked on or pinched particularly at plugs, convenience _ceptacles,
and the
point where they exit from the apparatus,
11. Only use att_hments/accessories
specified by the manufacturer.
12. Use only with the cart, stand, tdpod, bracket, or table s_cHled
by the manufacturer, or sold with the apparatus.
When a cart is used, use caution when moving the cart/apparatus combination to avoid Injury from tipover.
_RTABLE
206_4022
CART
WARNING
Owner's
Manual
3
Safety Instructions
13. Unplug this apparatus during lightning
t4. Refer all servicing to qualified
storms or when unused for long periods of time.
service personnel. Servicing is required
in any way, such as po_r-supply
when the apparatus has been damaged
cord or plug; is damaged, liquid has been spilled or objects have fallen into
the apparatus, the apparatus has exposed to rain or moisture, does not operate normally, or has been dropped.
15, CAUTION
concerning
the
Power Cord
Most appliances recom_nd
:
they be placed upon a dedicated circuit; that
is, a single outlet circuit which powers only that appliance and has no
additional
outlets or branch circuits. Check the specification page of
this owneCs manual to be certain.
Do not overload wall outlets. Overloaded wall outlets, loose or damaged
wall outlets, extension cords, frayed power cords, or damaged or
cracked wire insulation are dangerous. Any _ these conditions could
result in electric shock or fire. Periodically examine the cord of your
appliance, and if its appearance indicates damage or deterioration,
unplug it, discontinue use of the appliance,
and have the cord replaced
with an exact replacement part by an authorized servicer.
Protect the power cord from physical or mechanical abuse_ such as being
twisted, kinked, pinched, closed in a door, or walked upon. Pay
particular attention to plugs, wall outlets, and the point where the
cord exits the appliance.
16, O_door
WARNING
Use Marking
:
- To Reduce
The Risk
Of Fire Or El_tric
Shock,
Do Not Expose
This Appliance
To Rain Or Moisture,
17. Wet Location Marking :
Apparatus shall not be exposed to dripping
or splashing and no objects filled with liquids, such as vases, shall
be placed on the apparatus.
4
Plasma TV
206_4022
Contents
WamingiCaution
Safety instructions
...............................
.............................
Manual Sound
Front Surround
2
3-4
TV S_akers
OrJOff Setup
BBE .................................
................................
Installation
Accessories
Installation
..............................
_nstructions
..................
1he TV as_
_nJ¢_
8
9~10
11
11-- 12
b _e wail to prote_
tum_
.................................
External Equipment
Connections
An_nna
or Cable Connection
the set
11
13-18
13_14
..........
...........
VCR Setup
.........................
Extemat AiV Sou rce Setup
................
DVD Setup .............................
CableCARD
_ Setup, . .................
HDSTB Setup
....................
PC Setup
...........................
Monitor Out Setup
......................
Digita_ Audio Output
......................
HDM[ ............................
14
15
15
16
16
17
18
18
19~21
Operation
Turning the TV On .....................
On-screen
Menus Language
Selection
........
Setup Menu Options
EZ Scan (Channe_ Search)
..................
ManuaJ S_n
..........................
Channe} Edit .......................
Manua_ Picture Cor4rof (Custom Option)
Color Temperature
Contro_ ................
Vi_o
Reset
..........................
29
Audio Menu Options
Audio Language
........................
EZ SoundRite / EZ Sound ..................
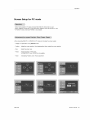
Setup
Setup
(See
and Operation,
and Operation
pages
1. Unpack
2. Connect
Setup
for PC mode
Programming
the Remote
26
Programming
Codes
26
Troubleshooting
Control
IR Codes
37
38
38
39
Device
Setup
39
40
41
42
42
..................
43
................
44~49
................................
M_intenance
Product
52
........................
Checklist
53~54
......................
55
.................................
Specifications
Warranty
50~51
......................
56
.........................
57
.................................
59 ~60
Checklist
connection
and operational
TV and all accessories,
video
in remote
setup options,)
5_ Turn video
and audio equipment.
see pages 13_18.
3 _nsta_Jbatteries
...................
Checklist
13~21 for available
all external
Screen
External
27
27
32
32
33
33
34
34
35
En_rgency
Alert Message
............
EPG (Electronic
Program Guide)
...............
Brief Info ................................
EZ Mute ................................
Freeze & Magnify ...........................
24
25
25
25
26
30
30
30
31
Cable menu options
.....................
Scrambled
channe_ ......................
Cable Channel List ......................
23
23
24
......
27
28
Stereo!SAP
Broa_asts
Setup ..........
_me Menu Op_ons
Auto CJock Setup
.........................
Manual C_ock Setup
.....................
On/Off Timer Setup
.....................
Sleep Timer / Auto Off ..................
Option Menu Features
Aspect Ratio Contro_ ......................
Cinema 3:2 M_e
Setup ..................
Caption ...............................
Caption /Text
...........................
Caption Option
..........................
JSM Meth_
...........................
Low Power ............................
Lock Menu Options
Parenta_ Lock Setup
CableCARD
_' Function
22
22
DTV Signa_ Strength
......................
Channe_ Label Setup
....................
input Source ...........................
Input Label ............................
Video Menu Options
EZ Picture
........................
.....
28
29
7
Connection
Options
......................
Remote Control Key Functions ...........
Option)
................
Intr_uction
Controls
Controt (Custom
....................
6. Select
source equipment
viewing
on,
source for TVI
See pages 25.
control
7, Fine4une
See page 9,
source
image
and sound
to your piersona[
prefer-
ence or as required by source,
See pages 26_ _,
4, Turn TV on.
See page 22.
8. Additional features set up
See Contents above,
After
206-4022
reading this m_nual,
keep it handy
for future
reference.
Owner's
Manual
5
IntroductiOn
I n!
io n
What is a Plasma
Display
Panel (PDP)?
A plasma display pane_is the _atest display technology and the best way to achieve flat panel displays with excellent image quality
and large screen sizes that are easily viewabie, Re PDP can be thought of as a descendant of the neon lamp and it can be also
be viewed as a series of fluorescent _amps,
How does it work?
PDP is an array of c_tls, known as pixels, which are comprised of 3 sub pixels, corres_nding to the co_ors red, green, and blue.
Gas in a plasma state is used to react with phosphors in each subopixel to produce colored light (red, green, or b_ue) These phosphors are the same types used in Cathode Ray Tube (CRT) devices such as televisions and common computer rr#nitors.
You get the dch, dynamic
16 million different colors.
inches thick.
c_tors that you expect
All of these mean th_
160 ° - Wide angle range
Each sub-pixel
you get perfect
is individually
controlled by advanced
e_ectronics to produce over
irr_ages that are easily viewabfe in a display that is less than 5
of vision
"four flat panel plasma screen offers an exceptionally broad viewing angle =oover 160 degrees. This means that the disptay is
dear and visible to viewers anywhere in the room who can see the screen.
Wide Screen
The screen of the Plasma Display is so wide that your viewing experience is as if you are in a theater,
Multimedia
Connect your plasma display to a PC and you can use it for conferencing, games, and tnternet browsing, The Picture-imPicture
feature ailovcs you to view your PC and ,video images simultaneously,
Versatile
The light weight and thin size _kes
fit.
The
PDP
Manufacturing
Pr_ess:
it easy to in.It
a few
your plasma display in a variety of locations where conventional TVs wiII not
minute
colored
dots
may
be
present
on
the
PDP
screen
The PDP (Plasma Display Panel)_ which is the display device of this preduct_ is composed
of 0,9 to 2_2 millioncells A few cell
defects will normat_y occur in the PDP manufacturing
process _veral
tiny, minute colored dots visible on the screen should be
acceptable,
This also occurs in other PDP manufacturers'
products, The tiny dots appearing
does not mean that this PDP is defective, Thus a few ceit defects are not sufficient cause for the PDP to be exchanged
or returned, Our production technoiogy
minimizes these cell defects during the manufacture
and operation of this produ_,
6
Plasma
TV
206_4022
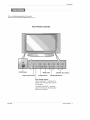
Introduction
This is a simp_ffie,d representation
Here shown
may be somewhat
of front panel_
different
from
your TV
Front
Panel
Controls
POWER Button
MENU Button
Remote Control; Sensor
TV/V[DEO Button
Power
Standby
CableCARD":
standby
mo_,
-Inserting
orange
Illuminates
Illuminates
green
red in
when the
on_
Me CabteCARD
in standby
mode
when the TV is turned
206-4022
VOLUME (4,1_) Buttons
Indicator
-Without
TV i_ turned
CHANNEL (V, A) B_tons
TM
: Illuminates
Hluminates
green
on
Owner's
Manual
7
Introduction
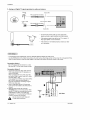
Back Connection
Panel
S-VIDEO
[np_
A connection
available to provide better picture quality than the video inp_.
VIDEO Input
Connects the video signal
video device,
from a
AUDIO Input
Use to connect to hear stereo
from an externaJ devil.
RGB/AUDIO
CableCARD
Used for
TM
INPUT
Remote
Connect the monitor output connecter
from a PC to the appropriate
input porL
DVDiDTV
CabteCARD TM
received from
Cable Service
Provider,
these
Input
acks,
(DVI:
HDMIiDVI
connect a
Digital Visual;
Interface/Component2)
Audio/Video
Connect audio/video
DV}(Video)
Input/
ou_ut
signa_ to
HDMIiDVI.
Digital Audio Output
Connect
digita_ audio
from various ty_s of
external device
these jacks,
equipment.
Note: In
standby mode,
these ports wi# not
work_
S_Video
Plasma
TV
Port
Input
Connect SVideo out from
an S-VIDEO
Antenna
Connect
input
over=the o
air signaEs to this
device to the SWDEO input,
Monitor Output
Connect a second TV
or Monitor
from
to
Connect
cable
CABLE Input
signals to this
_ack, either directly
or through
a cabte box.
Power Cord
_cket
This -P# operates on an AC power. The voltage
is indicated on the Specifications
page. Never
attempt
8
Control
Connect your wi red
remote contro_ here
(Coat, orient 1-2)
Connect a component
video!audio
device to
Digital Audio
sound
to operate
the TV on DC power.
206_4022
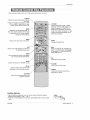
Introduction
When
using the remote
control,
aim it at the remote
contral
sensor
on the TV.
TV
- Rotates
the input mode between Antenna
and CabEe,
- Video, Front Video,
Component
1 _2, RGB-
DTV (or RGB=PC) and HDM_!DV_ input
sources, screen returns to the last TV.
Selects the remote oporating mode: TV,
DVD, VCR, AUDFO, CABLE or STB. SeJect
a mode other than TV, for the remote to
operate
an external
Extema_ input modes rotate in regular
sequence:
Antenna, Cable, Video, Front
Video, Component
1_2, RGB-DTV
(or
RGB-PC) and HDMI/DVL input sources
(Video, Front Video_ Component
1-2 input
sources are linked automatically,
these are connected
)
device.
Brings up the main menu to the screen,
RATIO
Changes
Clears
aI_ omscreen
displays
TV viewing
Lets you select
and returns
to
from any menu.
the amount
only if
the aspect
ratio
When you watch the TV, information
disp_ays on top of the screen. Not available
in Component
1-2, RGB and HDM_/DVl
mode. (Refer _ p.41 )
of time before
your TV turns if.seif off
FAV
Scralis the Favorite channels.
Switches
the sound on or off.(Refer
to p.42)
EZ
Selects a factory preset
depending on the viewing
picture mode
environment,
Tones
to the recent channels.
FREEZE
Freezes
the currer_Ny-viewed
Main picture
Selects
the sound
appropriate
program's
picture.
is frozen.
for the
character.
Installing Bakeries
• Open the battery compartment
cover on the back side and instal_ the batteries
matching correct palarity (+ with + - with =).
• Install t_ 1.5V AA batteries. Don't mix o_d or used batteries with new ones. Close
cover.
206-4022
Owner's
Manual
9
Introduction
Turns
VCRtDVD BUTTONS
Contro_ some video
your TV or any other programmed
equipment
on or off, _pending
on mode.
cassette
or DVD players. ("RECORD"
avai{ab_e for DVD p_ayers.)
Shows program
THUMB_K
{Ul_'Down/Lefl)
Righf_ENTER)
Moves the Lis_ngs Gdd forward
ward in 24 hour increments
\.
the sound
the sound
appropriate
gram's
or back-
"-..\
\-\
Setect a closed caption:
Off, CC1-4, Text1-4,
Selects
is not
schedule
Allows you to navigate the omscreen
menus
and adjust the system settings to your prefo
e fence,
_ncreases/decreases
recorders
button
CHANNEL
UPfD,OWN
Selects available channe{s
found with EZ
_an,
PAGE UP/PAGE DOWN
Moves from one full set of screen
ma_on
infOr-
to the next one.
level
for the procharacter.
_tects
MTS sound:
SAP in AnaL_
_angaage
mode.
Mono,
Stereo,
Change
and
the audio
in DTV mode.
ADJ
Adjusts
_reen
_sition_
size, and phase in
PC mode.
LIGHT
Illuminatesthe remote control
buttons of selected mode,
'tO
Plasma
TV
206_4022
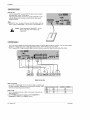
Installation
i
I
Ensure that the following accessories
where you purchased the product
Owneds
Manual
are included
with your
p_asma display.
Batteries
If an accessory
-
Secure
D-sub
Control
the TV assembly
by joining
please
contact
the dealer
Power Cord
2-VVaH bracke_
Remote
is missing,
it to a wa_l by using the TV!lNall
15 pin Cable
brackets.
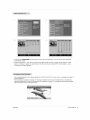
° ff the set will be mounted on a desk top_ insert
the 2 eye-bolts and tighten them securely in the up_r
holes as shown.
Install the wa_l brackets on the wa[_ with 2 bo_ts _, (net
suppli_
with the product), as shown,
Match Me height of the eye-boL_ and the walt brackets.
Check to be sure the eye-botts and the brackets are
tightened securely_
• _cure
the TV assembly to the wal_ with strong strings
or wire caMes, (not supplied with the product), as
shown.
206-4022
Owner's
Manual
11
Ins_llation
• The TV _n be instalied in vadous ways such as on a wall, or on a des_op etc
• The TV is designed to be mounted horizontally. The speakers shown are optonaL
• It is recommended
Mat Z4 2 _× 2 D Z 4 2-_X 2D
quality pi_re
and sound.
.
rr_de_ only be used at an altitude
It is recommended
that Z 4 2 F_× 2 D H, Z 4 2 f' X Z 1DH model
quality picture and sound,
of _ess than 3281 feet (lO00m)
to Get the best
only be used at an attitu de of less than 658 t feet (200Ore) to get the best
GROUNDING
Ensure
that you connect
the ea_
ground
wire to prevent
Power
Supply
possible
electric shock
If grounding
methods are not possible,
have a qualified
electrician install a separate circuit breaker, Do not try to ground the
unit by connecting
_ to telephone
wires,
lightening
Shoff,,¢ircu_
rods, or gas pipes.
Breaker
For proper ventilation,
allow a dear_
ance of 4 '_on each side and the top,
2,36" on the bottom,
wail
Detailed
are included
Stand
Pedestal
TV
Desktop
on a Desktop
mount
minimum
ailowab_eclearances
Plasma
instructions
in the optona[
Installaton
To Install
12
and 2" from the
instaJtation
for adequate
ven@a_on
206_4022
Installation
1, Analog
and
Digital
TV
signals
Wall Antenna
Socket
For optimum
picture quality,
_,_,_
or Outdoor
Malti4ami[y
provided
Antenna
adjust antenna
on
without
antenna
a Cable
direction
Dweilings/Apartments
(Connect to wa_t antenna
Wail Antenna
s_ket)
Bror_e
ZjJ
2. Analog
and Digital
Box Connections
if nee_d,
TV signals provided
Wire
on cable
B_oe_
Cable
206_4022
Wire
TV Wait
Owner's
Manual
13
Ins_llation
3. Analog and Digital TV signals provided on cable and; antenna
f
Antenna
Bronze Wire
Cable IV Wa_t
Jack
t'um d®kwise
RF Coaxial
to t_hien.
Wire (75 ohm)
-
To improve the picture quatity in a poor signal area,
p_ease purcha_
a signal amplifier and instaJl properly.
° If the antenna
Way Signal
needs to be split for two TVs
Splitter"
install a '2-
in the connections,
° If the _tenna
is not installed
er for assistance,
properly,
contact
your deah
To avoid picture noise (interference),
leave an adequate distance between the VCR and TV
Use the JSM Method (on the Option menu) feature to avoid having a fixed image remain on the screen for a long period
if the 4:3 picture format is used; the fixed Jrr_ages on the sides of the screen may remain visible on the screen.
of time.
Connection
Option 1
Set VCR output switch to channel 3 or 4 _d
then tune the TV to the same channel number.
Connection
1. Connect
Option
2
the audio and video c_bles
from
the
VCR's output iacks to the TV input jacks, as
shown in the figure.
When connecting
the TV to VCR, rr_atch the
jack colors (Video = yellow, Audio Left = white,
and Audio Right = red).
if you connect an S-VIDEO output from VCR to
the S-VIDEO input, the picture quality is
improved; compared
to connecting
a regular
VCR to the Video input.
2. Insert a video ta_ into the VCR and press
PLAY on the VCR. (Refer to the VCR owner's
manuaJ .)
3. _lect
the input source with using the
TViVlDEO
button on the remote control Note
that this TV finds the connected
input sources
automaticaJly
for Video, Front Video and
Component
1-2. It is presumed that RGB and
HDMI!DW
sources are connected.
Do not connect to both Video
S-Video at the same time.
14
Plasma
TV
O
[]
VCR Rear
and
206_4022
Installation
How
to connect
Connect the audio and video cabtes from the external equip =
merits output jacks to the TV input jacks, as shown in the
figure.
When connecting the -PC to external equipment,
match the
jack cotors (Video = yellow, Audio Left = white, and Audio
Right = red)
How
to use
1 Select the input source with using the TM/VIOEO button
the rerr_>te controi Note that this TV finds the connected
on
input sources autom_icatly
for Video, Front Video and
Component
1-2 It is presumed that RGB and HDM_/DV_
sources are connected.
2, Operate
the corresponding
external
Camcorder
equipment,
Video Game
Device
DVD
or
How
I
to connect
Connect the DVD video o_puts
(Y, P& PR) to the COMPONENT
(Y, PB, PR) INPUT
audio outpu_ to the AUDIO iNPUT jacks on the TV, as shown in the figure
jacks
on the TV and connect
2, If your DVD only has an S-Video output jack, connect this to the S-V_DEO input on the TV and connect
to the AUDIO INPUT jacks on the TV, as shown in the figure.
Note: If your DVD player does not have component
video output, use S-Video.
How
the DVD audio
outputs
to uSe
I. Turn on the DVD player_ insert a DVD.
2, Use the TVNIDEO
button on the remote control to select Component
the Video or Front Video external input source.)
3. Refer to the DVD pfayeCs manaal for opera4Jng instructions.
,
the DVD
Component
input ports
To get be_er picture quality, connect
nent inpt._t ports as shown below,
l
Component
on the TVports
1 or Component
2. (If connected
to S=VIDEO,
select
a DVD pqayer to the compo-
No tea:
. Digital Audio will not work" for Component
I input source.
. DigitalAudio
operation has priodty ff DigitalAudio
andAUDlO
are connected
at lhe same lime.
I
206-4022
L/R
on
DVDoutput
ptayerports
Video
Owner's
Manual
15
Ins_llation
How to use
Insert the CableCARD
'_ received from the came so.ice
the CabEeCARD _ slot of TV back panel.
provider
to
If the pairing information
a_ut this TV and the CabteCARD
is auto°
matically displayed
on the screen, contact with the cabte service
provider
by phone.
Note :
* CableCARD
_ have the types
These 3 types of CaMeCARD
Caution:
-
d Motorob3, Scientific Atlant& SCM etc.
'_ can be uscd for this PLASMA
TV.
When removing the CabteCARD
drop it as this my cause impact
CaMeCARD
r',_
_', do not
to the
This TV can receive Digi_l Over4he-a_r/Cable
signals without an extemaE digi_l set-top box. However, if you do receive
signals from a digital set-top box or other digitaJ external device, refer to the figure as shown beUow.
This TV sup_rts
HDCP (High-bandwidth
Digi_l Contents Protection) protocol for Digital Contents (480p,720p,1080i).
Digital
DIgftal Set4op Box
How
to connect
Use the TV's
COMPONENT
(Y_ PB, P_) _NPUT, RGB or HDM_iDVI
for vi_o connections,
depending on your set4op
make the corresponding
audio connections
How
box connector,
jack
Then,
to use
1. Turn on the digitaJ set4op box. (Refer to the owner's manual for the
digita_ set4op box.)
2. Use TViVIDEO
on the remote controJ to select Component
1,
Component
2, RGB-D-P¢, or HDMI!DVI source,
16
Plasma
TV
Signa!
480i
Component
Yes
480£_
720£
1080i
Yes
Yes
Yes
1/2 .
RGB-DTV
_ HDM!f£)\,/t
No
Yes
Yes
Yes
206_4022
Installation
-
This TV provides Rug and Play capability,
meaning that the PC adjusts automatically
to the TV's settings,
The TV perceives 640x480, 6OHz as DTV 480p based on the PC graphic card, change the screen scanning
card accordingly:
rate for the graphic
<When the PC supports OVl>
How
to connect
1. Connect
the PC to HDMI/DVI
2. If the PC(or the sound
TALAUD_O(OPTICAL)
port of this TV with an HDMF-to-DVt
card of the PC) has a fiber optic digital
card of the PC) has an analog
port _ocated on the right side of RG8
How To Use
1. To get the best picture
HDMI/DVl
T¢/VIDEO
3. Check
mode.
button
quality,
is a_so available
change
and contrast
change
supplied
with this product).
connector,
connect
the PC's audio output
to DIGI-
output
connector,
connect
the PC's audio output
to AUDLO INPUT
card to 1_4x768,
option of S_UP
60Hz
menu.(Refer
to P.25)
for this purpose.
may be noise associated
the PC output
on the VIDEO
the PC graphic
audio
port.
in input source
the image on your TV. There
changed,
iNPUT
adjust the PC graphics
input source
if noise is present,
brightness
output
port for DW INPUT.
3. If the PC(or the sound
2. Select
cable(not
audio
m,_nu
to another
with the resolution,
reseMion,
unti_ the picture
card or censult
change
is dear:
the manufacturer
vertical
the refresh
if the refresh
pottem,
contrast
rate to another
or brightness
rate of the PC graphic
of the PC graphic
in PC
rate or adiust the
card can not be
card.
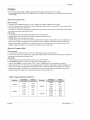
<When the PC supports RGB>
How
to connect
1. Connect
the PC to RGB _NPUT port of this TV with a RGB cable(not
2. If the PC(or the sound
card of the PC) has an analog
port _ocated on the right side of RG8
How
INPUT
audio
output
supplied
connector,
with this product),
connect
the PC's audio ou_ut
to AUDIO
iNPUT
port.
To Use
1. To g_
the best picture quality,
2. Select
RGB-PC
Once you select
3. Check
mode.
input source
RGS-PC
adjust the PC graphics
in input source
in main input option
the image on your TV. There
If noise is present,
brightness
and contrast
changed,
change
Monitor
720x400
640x480
Horizontal
Frequency(KHz)
TVNIDEO
with the resoMion,
resolution,
unti_ the picture
to P.25)
button
is dear.
the manufacturer
ch_ge
is also available
vertical
the refresh
If the refresh
pattern,
for this purpose.
contrast
rate to another
rate of the PC graphic
of the PC graphic
or brightness
in PC
rate or adjust the
card can not be
card,
(RGB-PC)
Vertical
Frequency(Hz)
Resolution
Horizontal
Frequency(KHz)
Vertical
Frequency(Hz)
35156
5625
37.879
60.31
70.08
37,927
85,03
4&077
72.18
31 469
59.94
46.875
75.00
37.861
72.80
53.674
85.06
37,500
75.08
48.363
60,00
56.476
70.06
6&023
75,02
43,269
2064022
_nu
to another
60 Hz.
menu.(Refer
menu,
may be noise associated
card or consult
Specifications
31,469
of SETUP
the PC output
on the VIDEO
the PC graphic
Display
Re_lution
change
card to 1024x76&
option of SETUP
85_,
800x600
1024x768
Owner's
Manual
17
Ins_llation
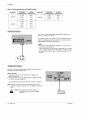
Monitor Display Specifications (HDMIiDVL Mode)
Ho rizontal
Frequency(KHz)
Resolution
31.469
640x480
37.861
8_x600
Vertical
Frequency(Hz)
Resolution
Horizontal
Frequency(KHz)
Vertical
Frequency(Hz)
59.94
48.363
60.00
72 80
56.476
70.06
60.023
75.02
1024x768
37.500
75 O0
35,156
56.25
37 _879
_,31
48.077
72,18
48.875
75.00
The TV has a special signa_ output
hook up a second TV or monitor.
capability
Connect
to the TV's
the second
TV or monitor
which allows
you to
MONITOR
OUTPUT.
See the Operating Manual of the second TV or monitor
details regarding that devicds
input setting&
for further
Notes:
* Component,
RGB-PCiRGB_DTV.
cannot be used for Monitor out.
HDM_/DVL
DTV input sources
, When connecting with external audio equipments,
such as amplifers or speakers
ptea_
turn the TV speakers off.(Refer to p.28)
* We recommend
to use the video and audio output jacks for VCR
recording.
Send the TV's audio to extemaE audio equipment
the Digital Audio Output (Optical) port
How
(stereo
system)
via
to conrtect
1. Connect
(OpticaO
2_ Connect
cat) input
one end of an optical cable to the TV Digita_ Audio
Output port
the other end of the opti_i
cable to the digital audio
on the audio equipment,
See the external
Note:
audio
equipment
instruction
(opt-
rrk3nua_ for operation,
When connoting
with extema! audio equipments,
such as
ampfifers or speakers
ptease turn the TV sl_akers
off.(Refer
to
p 28;
Caution:
18
Plasma
TV
Do not look into the optical output port,
Looking at the iaser beam may damage
your vision,
206_4022
Installation
14_H
_N_TI_I
MULTIM_
iI'_RF_
- HDMI TM, the HDMi logo and High-Definition
Multimedia interface is a trademark or registered trademark of HDMI Ucensing_"
- This TV can receive the High-Definition
Mult_dia
Interface(HDMt)
or the Digital Visual lnterface(DVl).
-This TV supports HDCP(High-bandwidth
Digital Contents Protection) Protocol for 720x480p,
1280x720p,
and 1920x1080i
resolution,
- When you connect this TV with a source device(DVD
prayer, Set Top Box or PC) suppo_ng
Auto HDMI/DVl
function, the output
resolu_on of the source device wilt be automatic_ly
set to 1280x720p.
- If the source device does not support Auto HDMI/DV[,
you need to set the output resolution appropriately.
To get the best picture quality, adjust the DVD Ptayer or Set Top Box's output reso[u_on to 1280x720p, and the PC graphics card's
output resolution to 1024x76&
60Hz,
- If the source device has an HDM[ output, no other audio connection
is necessary
because HDMFto°HDMI
connection
includes
both video and audio,
- If the source
device
has a DVl output
and no HDMI output_ a separated
audio
connection
is necessary.
<When the source device(DVD player or Set Top Box) supports HDMI>
How
To Connect
1. Connect the souse device to HDMItDV]
port of this TV with an HDMI cable(not
2. No separated
audio connection
is necessary:
How To Use
supplied
with this product)
- If the source device supports Auto HDM[ function, the output resolution of the source device will _ automatically
- If the source device does not support Auto NDM], you need to set the output resolution appropriately.
To get the best picture quality, adjust the output resolution of the source _v{ce
to 1280x720p.
- Select HDMIiDVl
input source in input source option of SETUP menu.(Refer
to P.25)
TV/VIDEO
button is atso ava#able for this purpose.
set to 1280x720p.
<When the source device(DUD player or Set Top Box) supports DVI>
How
To Connect
I. Connect the source device to HDMI/DV]
port of this TV with a HDMFto_DVI
2. A separated
audio connection
is necessary.
3_ tf the source
INPUT.
device
has a fiber optic
4. If the source device has an analog
right si_ of RGB INPUT port.
How To Use
digital
audio
audio
output
output,
connector,
connect
connect
the audio
cable(not
output
supplied
to DIGITAL
the PC's audio outp_
with this product).
AUDiO(OPTICAL)
to AUDIO
INPUT
- if the source device suppo_
Auto DVt fun_on,
the output resolution of the source device wif[ be autom_ticaIUy
If the source device does not support Auto OVl, you need to set the o_put resofution appropriately.
To get the best picture quality, adjust the output resolution of the source device to 1280×720p
- Select HDMi/DVl
input source in input source option of SETUP menu(Refer
to £25)
TV/VIDEO
button is also available for this purpose
206-4022
port for DVl
port located
on the
set to 1280x720p_
Owner's
Manual
19
Ins_llation
Cable sample
f.-
(not supplied
___
4_
with the product)
HDMI
Cable
HDMI
to DVI Cable
(not supplied
with the product)
(not supplied
with the product)
Fiber Optic Digital Audio Cable
Analog
Audio Cable(RCA
(not supplied
type)
with the product)
Analog Audio Cable(Stereo
to RCA type)
(not supplied with the product)
jJ
20
Plasma
TV
206_4022
Installation
How
to use
1 Connect
the HDM_/DVl
Source
Devices(DVD
Player or Set Top Box or PC) and the TV SET
2, Turn on the display by pressing the POWER button on the TV SET and HDM]iDW
Source
3, Select HDMi/DVI
Input source in input source option of SETUP menu,(Refer
to P.25)
Devices
remote
control
4 Check the image on your TV SET, There may be noise associated
with the resofution, vertice[ pattern, contrast or brightness
in
HDMt/DVI Source Devices
ff noise is present, change the HDM[!DVl
Source Devices to another resolution, change the refresh
rate or adjust the brightness
and contrast on the menu ur_tJI the picture is dear, [f the refresh rate of the PC graphics card can
not changed, change the PC graphics card or consult the manufacturer
of the PC graphics cord,
Notes:
Depending on the g_phics
¢_rd_ DOS mode may not work if you use a HDMI to DVI Cable
- Avoid keeping a fixed imago on the TV SET screen for a long period of time. The fixed image may become permanently" imprinted on the _reen,
Use the Orbiter screen saver when possibte_
- When Source Devices connected
HDMI/DV!
input, output PC Reeolution(VGA,
SVGA, XGA), Pos#io& Size may not fit to
Screen, As shown the lower picture, press the ADJUST button to adjust the screen Position of TV SET and contact an PC
graphics card service cente_:
- When Source Devices connected
HDMI/DW
Input output TV SET Re.solution(48Op_ 720p 108@)_ TV SET Display fit EtA/CEA_
86I-B Specification
to Scr_n_
If not, refer to the Manual of HDMI/DVI
Source Devices or contact your service cente_
o In case HDMI/DVI
Source Devices is not connected
Cable or poor cable connectio&
"NO SIGNAL" OSD display in HDMI/DW
Input, And In case of, Video Resolution
not supported
TV SET output in HDMI/DVI
Source Devices, "INVALID FORMAT" OSD
display_ Refer to the Manual of HDMI/DVI
Source Devices or contact your service center,
PC mode
in This Mode, the Supported
TV SET Resolution
1920 x 1080 I @ 59,94Hzi60Hz
16:9
1280 x 720 P @ 59.94Hz/60Hz,
16:9(preferred
720 x 480 P @ 59.94Hz / 60Hz, 16:9
720 x 480 P @ 59.94Hz / 60Hz, 4:3
In This Mode, the Supported
640
640
640
- 800
800
- 800
- 800
x
x
x
x
x
x
x
480
480
480
600
600
6_
6_
@
@
@
@
@
@
@
format)
Specification
60Hz
72Hz
75Hz
56Hz
60Hz
72Hz
75Hz
1024 x 768 @ 60Hz(preferred
1024 x 768 @ 70Hz
1024 x 768 @ 75Hz
206_4022
PC Resolution
Specification
format)
Owner's
Manual
21
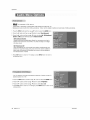
in this m_ual
the OSD {On Screen Dismay) may _
examine to help you with the W o_ion
First cc_aeet power _ord correctly. A_this m_eer_
different _om your T¢_s _,4_se
_ is ju_ an
tf_e TV switches lo standby n_×/_
la stan_Sy moxSe_oturn TV oe. press the 0iI, _._V_DE:O ,,, OH (& iT') huron on the TV er p_ess #_ POWER
TV INPUT TVNIDEO
2
CH (A l T)_ Num_
Selec_ the viewing soar_
(Q ~ g) b_._11on
on the remote eol"l_r(£
by using TV/VID£O huron on the remo_e contro4.
This TV is programmed to remember which power state _ was last set _o. even if _'_e_,_er
3
£_er_ tie shed us :_sgtt_e TV_press t_
, t_y_
cord is out
POWER bu_on on the r_lo_e ¢o_tro_ The TV reve_s te sta#dby mode
i_ter_d to be a_sy on _,acat_d'_dtscor_nect the _s_uer peg ti'o_s tt_eway _wet
e_fle_.
, _4dS'_eutCabteCARD _: _@mir_atee_ed in sta_dby _:_'?ede,
;ttuminates _reen w£_t} the TV _etur_
• _eserd_g _e C_@CARD
0
u:/ttumit_es
orartge ia s_a_'}dbymode, fl@m_aatesgreer_ wt_
on
the TV is turned on
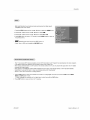
TV Set:up
The menus can be shown on _e s_s_'een_n the selected Iang_a_
1 P[ess the MENU button a_
n'let_j
First se_,x yc_r _anguage
_@n us_ & / T buses to select the _!;I
2 P_ess tt_e _ bu_on, and _he_ u_ & 1 _ buttoo to select _e
3 P_ess _s l_ burn a_ then use _ll/_ b_tlon to select you_ desired lar_uage.
Free] this peiet on, the et_-ecreer_ mem-_s will be shown i_ the s_ec:_ed _
g_age.
4 Press EXIT butlor_ _o return tO TV vi_¢ir_ e_ _ess
the previous menu
22
P_asma TV
MENU butt0_i t:ereturn te
206°4022
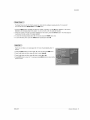
Operatic_;_
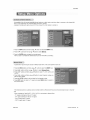
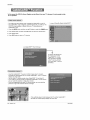
- Automatically finds a_ c}_n_e_s available through antennae o_ cable inputs and slores them in memory on the channe{ list
o Run EZ Scer_ again atter any AntennalCabte _ect_n
cha_s
A password is requ red _ogain access to EZ Scan menu i_the Lock System s turned on.
t
Press the MENU butto_ and _er_ use A _T button to _4ect _
2 Press _heI_ bU_tOna_d then _se & fT bulon to _l_t
3. Press the ENTER _lon
Allow EZ Scan to _plete
_
menu
_
to _gin the char_nel search
the chan_el _rch cyc_ for ANTENNA, and CABLE.
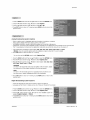
t P_8s the MENU button and thee u_
_ _T b#Aon _o select the SETUP menu
2 Press _e _ bulon a_d thee use _ _• bulon to select Mo_
_---_n
3. Press the _ button and the_ u_e _ __ button to select TV. DTV, CATV, and
CADTV
4. Press tlr_eI_ button a_d then use A _• button 1o select chanr_/ numbe_ yeu
want to add or delete,
5. Press the ENTER button to add or de_ete to_ t_e cha_el
n_mber.
6_ P_÷SS[XIT button to [eh,Jm V3TV vie_¢in# or #_ess MENU button to {etl,jm V._
lhe p_evious nr_R[._
" _#s
Edit.
number _sa ph,.csiea_chat}hal t_umbe_ which is diff_,ten_hem the _om_at ct&ettne_numt_4r shown in Channe_
• When insert_n_ the Ca_eCARD_
• TV ana_
CAT"_ CADTV i_ t'_'t worMng in Man_:_atScan.
antenna(overothe-aiO TV s_qn_
D TVi dig#a_ antennatOvero#_oa)d 7V s_gna_
CATV' analog cable TV a_goa_
CADTV digitat cable TV signal
206-4022
Owner's Manua_ 28
Operation
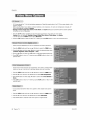
Creaie twe d_ffere_l ly[_es d ¢hanne_ }_e_s_mmemery "Custom List '_amd
"Favorite List" from _ defautt channel hst created #ore _e EZ 8can channei
a._arch.
- A Cus_em Ust can _ created by _Ogg_ingeach c_'_aenelca _ eft wilh ENTER
button The char_neB im t_a Cus_;,m Ust are di%_ayed ir_black eolef, and ihe
cPannels de_ete_ from the Custom List are disp_ay_ in gray color_ Once a
e_nnel is highlighted y_ can add or delete the channe_ by re_erring _othe
s_aH window a_the t¢,_p-_lta:)me_ d the screen You cam c_ea_e yew ow_
Fav<:>dleLieL Usa t_e FAV bu_on er_ lhe _emeLe (,'_'drOIwhen a channel
h_gh_ghted and then y_ can add or _leta the channel totfrom the _avo_te
Met
1. Press the M_NU bution and then u_ _ _
2, Press the _
button and thee us4__ _
burton to se_eeith_sS_
bu_'_ to se_ct C_r_el
3 Press the _ button _ou wil_ now see a ec_eer'_filled w_tb ¢_ne}
a previ@_:picture
menu
_
humors
and
4. Use _ t_ _ f_ button to select a ehah_el and then _
the ENTER but_e to
add or de_e_ it. Press FAV button to add bhe channeI to the Favorite Def.
5. Pleas EX_ bu_on _ retain te TV viewir_ or _ress MENU bu_on to i'etum to _he
previous menu
,. Shows how strong your DTV signal is and whaler you need to adiust you_ antenna _ digita_cable input
The b_ghei, the signal strength, the _esslikely y_ ale to expe_'_nce picture degtadati_}_
- OTV S_nal: Only when the inf,)t£ signal _sDTV or CADTV tbis function is available
1, Press the _ENN buiten ar_l then u_ & _
2, Press the _
button and then u_
3 Vi_w the on-screen s_gna_s_en_h
r_;_e_ved
bu_on ta s_e_i the $_JP
me#u
& __ butto_ _#se_ct _r_ s_
monitor to see _hequa_i_ d _e signa_ being
4, P_ess _J(,|T button to return to TV viewing or p_ess M_NU button _o_etum to the
previous menu
P/asma TV
206,,4022
:24
"
labeb fo_ your charalels
I_ a channel tabe_is provid¢_don the si_e] frorn the broadcasting station_ the 'IV displays a abort name _or a channel
even _ you did_t preset a _abetfar the o_nnek
C_OOSe
_ies_
1 Press l_/e MENU ba_lan and the_ use A _V button to selee_ the &_J'P me#u
2 Preen _e It, butteH and the_ use A ,,'_' butto_ to select _r_l
_k
8 Press the IP bu_ea Y(_._wil! n(_w s_ a sereen filled with Let_S and a preview scr_n,
4 U_ the CHAfv bu_oa to selee_ a ¢_{_ne{ to Label
5 U_ A _T/<
fib buttoe to seIect the appropriate tabe_ for the channel, thee press ENTER buses 1os_ the Labe_ to
the setect_td channel
_fyou press _NTER
butten in %V view ng made, you w_ltsee the ohan_e_ banner.
, _or e×ampte:
Change the p,_;_uresource so you can watch your SV, cable *D_,VCR; DV©, o_ any other devices that are cennect_
1_ Press the MENU baSeR and then u_ • _ bu_en to _lect
2 Press the !_ batto_ a_s_then u_ _ t_ but!_ |_ se}_st _
She_;_
_ce
_o you_ TV
menu.
3 Press the _ bud!on a_'_dthef_ u_ & /• bu_o# to select the sea,tee: Anten[ia
Cable, Video, Fr_ Video, Come.eat1
Cotangent2
RGB*Di'V (or RGB.PC)_
HDMVDVI
4. Press EXI_ b_tton to re[urn to TV view_
previous menu
o{ press M_NU buti_os to [e_um to the
• _:_t_jgle _GB:DTV acid RGB-PCI sdect RGB-DT_(e¢ RGB-P@_ and preen _
bu_en
:
Sets a ilabei to each _npat source or le[s you skp _he #spul so _rce whi@ is eat
in u_ when yeaJpress TVtVI_O
bu_on.
1. Press the M_U
2 Press the_
bui_oa a[_d _herru_
_ __ butter' te select lhe _P
menu
button and then u_ & _V button to s@ect _ut_!
3 Press the _ button and then use _ z• bu_en to select the source: Video, Front
Video Component1 Comanche2, RGB HDMitDVL
4 Press the _il z_ bulto_'_to select the la_l
5 Press _XIT buttor_ to retain to TV v@wing or press _EN_ buttc_ to return to the
previous menu
2064022
Owt_r_
Manual
25
Opera#on
°
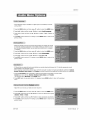
EZ Picture a@usts the TV lot me best p<ture ap[_arar'_;e Se_eet me preset va_t_ n the EZ Pic1_._{e
n*_nu based on me
pr_ram category
W_en adiestin 9 Video menu options (contrast brightness cob< sharpness, Int end color temperalure menua_ y; EZ
Pictere autoi_r_k_a _ychanges to ¢Qst_om
- Dayl|ght
N_ma!
Hight T|_,
Movie Video Game a_d Spot_ settings are preset fo_ op_m_._mpketure quaiit# a_
the factory and are not ad}us_b_e.
1 Press Ibe _ PIC butto_sre_aled@ to select lhe picture ap_a[arlce setup eption as sh@wnbelow:
Custom (your own set_mgs} Daylighi,
Norn__l Night Time Movie, Vt_
_me,
ned Spor_;_
- Yo_ can also e_e the V_EO mena to adjust _ Pi_wte.
2 Press the EX_ button to save and return b TV v_w_n 9 or pre_s MENU be_on to return _ the prevmoe menu.
Adius_ _he p_etureappearance b s_it yo_ prefe_enee and v_ew_r_9
si_uat@es
1 Press ibe MENU bu_bn ned thee use & _V button to sel_;t the _
2 Press _e I_ bu_on and then use A YV button to seteet _he_s_r_
menu
picture option
3. Press the _ button and _en usa _I ziP,bulton to make appropriate adjus_en[s.
4_ Press EXIT bu_e_ k] return to TV viewing or press MEN_ butIo_ Io return _:Othe
p_evio_s menu
Ch(_se on_ d thr_ automatm @lot adi_sstmente Set to warm _oenhan¢:e _tter
colo_s sueh as _d _ _ b eoo_b see tess inten_ cobrs with mo_e blue
1 Press the MENU bu:R_ and thee use & _V button lo se_e/_tlhe V;_EO merm
2 Press tF_;_ button ar_ thee a_ A _• bu_ee to ee_:mtC_
3 Press the _ butto_ mid then use & ¢• b_on
W_
t_ se_
_r_e_e
@her _
4 Press _XIT batten to return to 7V vi÷wing o_ press _NU
previous menu.
ot
baron 1o _etum to the
Use te qUeHy reset al__he Video menu opt{ons to their otig na_factory p[esw_t
ve_es
1 Press, #_e MENU
2 Pres_ _
_
bu_on
3, Press tt-_ I_ butt_
26
baron
P@sma TV
and tber_ use & _V b_[ton
and then
u_
,1_,-_ button
to select
to se_ct
lo reset the V_deo menu options
V_
_o _ig_nal
the V_
me_u,
_,
vah#es,
20G45_2
Other _ar_esges may be ave tabIe it a digital signa _sprovided by the broad°
casting statler
1_Press the MENU button and then use A _V bu_en to sel_t
2 Press _el_
the A_O
buAon and _en use A _T but"ton to select A_,_
menu
La,_e.
3, Press _he i_ button and then use A _V b_Jttor_to se_ecL Er_glsh Spanish_ or
_:ench
4 Press E×_ butt_q to ret_m to TV viewing _ press MENU bu_on te return to the
previous menu,
.. Scans to:chang_-_ _nsound _e_e/durra9 eommerciais, than adjusts the sound
to r_atch the speoiiied audio level EZ Sour_Rite makes sure that _he volume
lave! remains consisi:en_ whether you ale watchiag a commercial or a regu{ar
TV pr_am
1. Press the MENU bu_4o_and then use A _V bu_ton te saint
the &_
menu.
2 Press the Ib bu8or_ and then use A JT button to seteCt _Se_r_le.
3, P_ess the _ but_¢_'_ and then use & _ V batten
4, Press EX_ butk_n to Letde
p[evio_s reeeu
to setec_ _
te TV v_ewin 9 ar press
M_NU
e: _.
butten
te re_um to the
EZ Sound lets you enio_ the best S_and w_tt®_J_any spec a! adi_s_men_ _¢au_
the TV _ts the appropriate soun:d
options ba_d on t#'_ pr_ram content.
When ad}us[_ng seu_ eptioas (t_ble _ss a_d f_ant earre_nd) manualiy_ EZ Sound ee_'na_cai/y switches _o C_to_.
- N_mal
Stature
News Mu_c
ar_:lT_te_
are prese_ for go_ seund quality at 1he factory and are eat adius_able
I
Press
the EZ SOUND
C_tom
- You _n
bulten
(y_;_r own se4tings}
al_ adiuet _ _"_
2. Press
me_o
_IT
bb_o£
,. Adiust
the _eund
ref_ated_y
te select
No_al
S_a_
in the AUDIO
to save and return
to suit you: _ste
_he appropriate
_ews
mere
to TV viewing
end r_m
M_C
o_ press
s{_Jnd setup
and
MEN_
as shown below:
Theater,
buses
to rett_m to t_e p_evious
situations.
1. Press _e MENU butte# and then use _ _V butto_ to select the _0
menu_
2 Press the I_ button and then use _ _V buAon |o setect tte desired sound ep#on
(_alance
T_e'_le n,r _)
3 Press the _ b_tton and then use _ z_ butt_
to make appropriate ad_as_ents
4 Press EX_ button to re[uT_ to TV viewing or press M_NU bu_e_ to return to _P_e
pd:)vious me_,
206-4022
Owner_ Manual
27
Ope_at_en
is a tr'adernafk of SRS Lab_. Ir_c
.* TruS_foued XT technoi:_y is l_rs_fpora_ed _m_ £cense tom SRS Labs _rs;
Manufactured u_r
tcense _ro_ Do_by Labyatories
"Oolby_ ar_ the _oubte D symbol are #adem_rks d Do_by babo[atof/e4_
1 Press t£@MENU bu_
a#d then use Ai,tT butto_ to select the Alb_:lO me_u.
2 P_e,_she !_ bulen and hen u_
A zV btJl_s_ to select_nI
Su,._d,
& Press the 1_ button and t_en _Jse& __ button to setect ¢_, _
$¥s_
or $_It {Sound Re_l#eva_System:} _o_
XII',
_t'_,e_
,3D _choSound
S¥_|em
Crea_es a stu_ _g simulated stereo eff_[s from aRy _ono sound 8r_d a
_ea/stic _hree-d mensier_a_ second with a very wide and de_) seared stage
ritestereo sound.
2ekes advanta_ of any rnultF.channe_format without needing _ add e×t_a
speakers of equi#menb Diae9 c_ad_ bass endchmerd and the addti_._ d
s_ereoaud_ enhancgment that prefixes ae immersive sound e×_f_enc_
from standard stereo material
4 Press EXIT bule;_ t; _etun to TV viewing or press MEN_ bWten _e _etum te
the previous menu
- TurnTV spea£ers el if using e×lemalaudio equ p_-_enLFeature fume the TV
Spea_ers _Son Or_ cx eJf.
1 P_ess _he MENU butlon and then use ,L __
b_.lten to select the A_lO
menu
2 P_ess the I_ b_tton and thee use ,i, f_ button _o_ee_ _Sl_e_.
3. Ress the _ b_t_n and thee use &/_
b_l_n
_o_ee_ _.
4. Ress EXIT b_tof_ to return to TV viewingor press MENU button Io re_um k> the
previous rr_nu
28
Pf,'_sma TV
206_4022
, BBE High Ddini_on Sound restores ctarRy and presenoe for be_er speech
inie_ligibility aT_dmusic _ealism
t. P_ess _
MENU buttor_ and then use A _T buttor_ to select _e A_|O
menu,
2 P_÷ss the _ button and _hen use A _T button _ se_x;l _E.
3 P_e_ssthe _ button and _hen u,_ A _T button to se_;l
_
or O{I.
4 Press EXIT buttes to return to TV viewing or press MENU _dtton to return to
the previeus menu
• _
Manda_ured
un_r
license #ore _E
. Treble Bass or BBE aren't suitable for _
Sound _ne.
TS_
mode.
This TV e_n receive MTS s4ereo pYc9rams and any SAP (Sec_ndeq/Audio Program) thor accompanies the stereo p_ogram:
if the star,on transmits an additiona_ sound sig_a_ as well as the origine_ o_e
- Wt'_o hawng se_eceedS_eteo or SAP bt_tto_ on the remo[e control ths TV can orfly r_:,*eve the s_gnaI wb_n _heTV slatio_
transro_ts the proper s_r a_s
Mo_o sound is a#tomaSca_y rece_,_ed# the brc_d@st is only _ Mono; eve_ _eugh Stereo or SAP has been selec£ed,
- Se_'t Mono if yo_Jws_qt/e isten ie m_o sound during steree/SAP b
_n9
Stereo or SAP can be r_ived
in a Anaiog c_nnet
1, Use the SAP button to select you_ des#e_ MIS mo_e in e ana_ _nel
Each time you prese the _P
S_etee or SAP eppe_r in turn
" f other iang_._ee a_'eavailable (_ #_e d}gilai signa, select _hem wi_h #_e SAP bt_o_.
belton Mono
2. Pr÷ss _X_ b_e_r k_ save a_d _e_umto TV v_ewing.
206-4022
©_r}ers-
MamJa#
29
Opera#on
lhe l_
_seel autematioally from a dig_taicha_ne_ s_gna_
The di.gi_t channel eigna_ includes informa_on for Shec_rent rime provid_ by Shebroadcastin@ station
- Sol the c!_k manually i_the current time is set incorrect!y by the auto ClOCkfunction
1 Press the MENU bu_c_ and then u_ & _*T butt_
to se_ct the T_
menu
2 P_es #}e _ buyer at_d _en L_ A l T button te setec_ ,&u_ Ci_
3 Press _e I_ bu_ton a_d then u_ A _'V bo_len Ioselect _or_.
4 P_e_s #_e_ button a_d then [J_) _ _• begun to select _u_ viewing a_ea t#_e
zor_: _,
Cen_,,-_[ Mo_t_.
Pacific, Alaska_ or _aallo
5 Press EXIT _u_ton to return te fV viewing or press M_N_ burn
_he previous menu
o # current _Jmeset_ng is wrong, _e_t the dock rnanuailly.
o Whe_ you set up [V guide on screen system _edIC_
se_eclrd
1 Press the _ENU bu_-} and then use & f_
butt_
to return to
menu is not
to se_cl _he_
2. Press #_e!_ button ar_ _';en #_ _ __ bu_on to sele_;t M_
menu,
_.
3 Press the _ b_tten a_/J bher_use _ __ buttontoseteet eil_tBr the year, data
o_ time option Once selected use _e A _ b_£ton to set the yea_ date and
_ime ®#ons
4 Press EX_ buttan to return to TV viewing or press M_N_ bu_on te re_um te
ihe previous menu
,.
o
11mar hJne_on operates Only iSLhecurrent _me has been set.
Off-_rne_ function overrides OmTirne_ function if they a_e bd_ set to the same t_me
The TV rnLusfbe n standby mode for ihe On-T_mer ta werk
If you do not p{ese any bu_on wathin 2 hours after the TV turns on with rne On 11mer tunrt_cm, the TV wiUautemabea_ly reve£ to
standby mode
1 Press the MENU button and then u_ _ fv
buttc_ to se_ct the Trt_._ menu.
2 Press trve_ butt_ and then use _ t_ buff/on to setert _
Th_,t
or _T_t
3 Press #_e_ but_en and then us8 _ _ boron to select On
* Tocance__I
I_,u_iur_tk__lectOff
4. Pres_ the _ bu_on and '_henuse _ _T huron to set it_ h_r.
5. Press _e _ button a_t £hen {_se_ _
button to se_ _'_ minu_es.
6 For only _ _
f_acl_io_
Pre_ the _ button and then use _ / V button to select the channel a_turn-on.
Press the _ b_ton an_ then use & _T burn
7 Pre_
previous
30
to set tb@sound lave at tureen
EXIT bettoB to return to TV viewing o_ press MEN_ button to relum to _he
meeu,
P@en_aTV
206,4022
he Seep T_merlures lhe ifV oft at i_e preset t_me Note tha_this _tt'_ng is c_eared wLen _
- You can also set u_ the _leep _mer
n the T_E me_,
TV is turned
I Press _he TIMER b_lon repeatedly to se_e¢_the number d minules ;rst _he_ option aptness on _he _'_een
to!_owed by ee follew_ sleep timer options: 10 _, 30, 60, 90 120, 180, and 240 minutes
2 When _ number of minutes you want is disp_Sy_ on the set.n,
coun_ down from the number o_ minutes _4ected
3 _TO
c#e_ _
Fema_r_ngmihu_s before _
press _e ENTER bution The timer begins to
TV byns c_ press re@TIMER butten _ce
4_ Iocaece_theS_eep[irner,
presstieT|MER bullonre_ated_ tose_
,, _f set _ on an8 the_e _s no inpuI[ signal
m_u_es
1 Press
#_
MENU
huron
the TV t_ms o# automaticaiiy
and _he_ use _ t_
button
to select
the T_
2 Pre_s _he _ button ar_<]tte_
use _ _ I
buffoe _o sd_dt
_L_
3 Pressthe
use A _
button to se_
@¢r=_
I_ button ar_ th_
4 Press EXIT button
_evious
menu
20G4022
to return to TV viewing
e_ter 10
menu
Ot_.
or preps MEI%I_ button
to re_um to _he
Owne{_ Manua_ 81
- Lets yc_ choose the way ao ar_a_ picture w_tb a 43 aspect ra_io is d splayed on yc&_tT'V with a 16:9 ratio pi_ure t_ymat
When you recede an analG._picture wi_ a 4:3 aspect ratio on y_[ 16:9 TV_you need to s_ci_ how the pmture is to be dis
played
If you are viewin# a picture w_th a 16:9 as_ct ratio_y_ can't use the Horizon aspect ratio option.
- _40n_onaspect ra'bois not available to{ C_m_nent t-2(480p_20Fz1080i)/RGB@TV (480p_/1080i}t_DM!_VI*DTV
(720p/10_0@TV(720p/_ Oa_i}input _Jf_e
In RGB PC/DVI@C _apu_source on_y use 4:3 or 169 aspect ratio are available.
/ ff a fixed #_age _Sd_sp/ayed oe #_e screen @t 8 tong #me. Ltimag_emay beeline imp6n_ed _ tt_ screen and rerm_in visi_
b_e
1 P_ess the RATIO bu_ton _eT_ated_yto setect the desired pm_uCetom_at.
Y_ can a_so ad}ust _s]l_ct _-e
inthe 0_0_
menu.
Select the preper picture pr_..'¢_tflOnlo match the source's irr_aOe. (4:3 .....413 16:9 .....16:9)
Choose @3 when you want _ vi_
the _eRand right s_des
Choose 1_
a p#;t#re with an odgina_ 4:3 aspect _a_ie wWagray bars appeari_# at both
when yo_ wan_ to ad_._stthe picture horizon_ly,
in a _inear proportion to _iilt_
Choose Hogan wher_ you want lo adjust _he picture in a n_4inear
sides, to create a spectacuia_ view
- Zoo_
en_e scr_
p@pertioe that is more en ar£_ at both
1
Choose ZOO_ I when y_u want _o view tf_e p_ctu_ew theut any altera-i_
of the picture wi_i be ctc_d.
Howeve_ the top a_d bo_c_u portio_s
Cheese _e_ _ when you want the pk;tute to l*_ a tared both verlJoa}Iy e×terFJed and ce3pped The p_u_e tak_g a ha_ay trad_aoff be#_@n a tera_on and screen coverage.
- Clr_
Zoom
Choose Cl_,e_a _m
wren y_ wan_ Ie enlarge the picture
_neorr_t ptoporbon,
: _4_e_}e
r_uet_
the pietu_ size the _tr_ge may become d_atect_;_
You can adjust the eo_arge preport_o_ of Cin÷ma Zoem using _ zV button The adiustment range is t.-.16,
° Moot rrFovies a_e 24 #amed_¢,
but TV aigna_ is 30 ttamesi_c.
This optioe/aS the TV do 8:2 pule°down _eration _o_you to watch
merges a_ the t_s_ motion appearance.
1 Press tf_ _EN_ bu_ter_and then use & _
huron to se_}¢t the O_ON
2 Press lhei_ bu_)n aod then us,9 _ _V bu_tonto_ect
3 Press _e i_ b_on and _henu_t _ _
b_t_
metal,
__
to select _
O_.
4. Press EXIT butten !o return to TV viewing or press MEN_ button to return to the
previo_Js meRu
This feaa_'e
(}2
P_asma TV
_@" #'_
48@ me_<e
206_4022
QDers#or_
I
Press the ME_
bul{on and then see A _T bu_n
2. Press _e _ I:<;¢_¢_at<} then _
to select the O_ION
3. Press the _ b_er_ and then _;_ A t T bu_r_ to _lect _
4. Press EXIT b_Jttonto rehJm to I'V vi_ing
previous menu.
Analog
8roa¢lcasti_
System
menu
A JV b_c_ te setec_Cc_,_l¢_
_' _.
er press MENU huH_ h) _lum to the
CapUons
Select a caption mode tel displaying _tioning
information i_provided on a p_ogram.
Analog oapho_ displays in_ormafl<_'_at an_ position on the screen
Te_ d_ep_eysintormatJon usua}_y at me bottom posibon and is used _ e data servia.
o Captio_/q_exL # provided by tt_ebroadcaster, wou:_dbe ava_labtefo_ botb digital and ana[_ channels en the Anten_a/Cabie
This TV is pregrammed to _mo_ize the capBoni'te_{ mode wh_eb was last set 1o, wt_n y_J t$&mlhe p_essr ell
1 Use the CC b_tt_l repestediy _e seJect ('3apt_r'_CC1 CC_, CC_ _4
, _Mute
sho_S the selected eap_e_s option (if avaiiab_e on prcsram}
2 P_ese EXIT b_io_i to save aw_ _e_um to TV vi_wi_g
• You csn _iso u_
the OPTION
me_
to select
1. Press the MENU buttcm and _en use _ _
TextI Te_,
Te_x_3, O{ T_t4
when the TV sound is m_led
C_t_on/'T_
button to select the O_ION
me_u.
2 Pros the _ but{<_ and then _._ _ _V be/1_'_ta _lec_ CapttoniTex_
3 Press _e I_ b_ton 8r_ then u_, A _ button to select caption: CC_, _,,
CC4, Tex|l, T_xt_ Text,
o_ Text4
¢C_
• C_'J_T|ON
The term fo_ the words that scroll across the bottom of _e TV screen usua_y
the audio podi,oe d {he p_(_yam prov[<_d _er the hea_ing _ml_._red
The term _o¢_he words _hat appear in a _a_geb_ac_f_ame and a_most cover
the eM_re screen usually messages provi¢_ by _he breadcaste_
4 Press EXIT bu_on to ret_
previous menu
D_ita!
Bto_caating
_oTV wew_ng or press MENU bu#on to _e_umto rne
System
Captions
Choose _he iiang_age you wa_t the DTV/CADTV Cap_ions te appea n.
o Languages ca!_ be chosen for d_gi_alsources on_y if they a_e in8 uded o_ _he program
1. Press the MENU b_ttOn and theh use & _V button tOseL÷ct the OPTION meeu
2. P_ess the _ b_J_ and then _;_ _ _V bu_K_ to _lect Cap_ion/Te_.
3. Press the I_ t_g_ and _n use _ _V but_
guages: _llsh
Spall_sh Or ¥_el'_ch
lo select available c_tioa
laa_
4, Press EX_ button to return to ]_Vv_ew_ngor press MEN_ button to return to the
p[evio_Js mea_._
206*4022
_4ner's
Manua_ 33
O_ratlon
OJstomize the DTV/CADTV captions that _;_ar
1 Press tim MENU
meeu,
butt_
on ym_r screen,
and then uee & _Y buyers to select
the O_ZON
2 Press the _ bu_on are then tee A _T bu_on b _rs_t _O1_,
3 Pre_s_tL_e_" butbn a_} titan _se Ii _t_ bL_n b s_(J
C_
4 Use A _V bu_on to c_Jsterr}izeU'mStyle Font e_c_to yo_r prderea@, A pine
qew _xm is pr@_
a£the _xt_
d _hes_sr_r_ u_ it¢e_ the captKer_
langu_e.
• _:
Set tt_ size of t_"ewords
• rent: Seed a ty_iace br the w_s_ds
• Text @_:
Ohoose a cobr tot the text.
- Te_t Op_:
S_,)ecfy the opacity bt the le×t (:ebr,
• Bg (_¢kg_eund)_bt:
Sebct a background colo_
• _ (k_:kg_o_d)_ltF
Seie_t the epaci_y _or the backgrouild
COLO.
•_
•_
'P_pe Se_et an e_4e lye.
_et:
S_lect a c_or br em edges
5 Press EXIT b_tter_ b return te IV viewing or press MENU button to retdn
to the prevaous mer_a
-
A t[ozer_ s#li palate
image rema ning
sore@n,
t
dismayed
on the screen
even t:hough the image is chm_ged
from a PCNideo
game
U_} our ani_
_or probnged
_riode
methm:_ to rain mze
wil tesuit
i_ a ghost
any f_×c_ image oil the
Press _he MENU but[c£_ and then u_ A f V bu_lee b se_ed the OPTION
m÷_u
2 Pmsxstim _ button and hen use _ _V batt(m iO se#ec! __
3 Preee _£__ b_jtt_ and then use a, / V butbe to seb_ _t_er _o_aL
WaSh,
_bl|e_
W_'te
Ot Inve_e_
f image s_ickirtg is never a problem, SM is nel rmceseaty o set _e Nermai
• Wh|te wash
Whib Wash rem0ves _m_a_mnt images from U'mS¢_en
Note: A_
ve
r_tim,_e may be _
le to dear e-nt_rdyruth
_te
Wash. 7b rdum to n_ermd rip,wing, press t_ a_y buses.
• Otbltel
O_tet may help pre_est ghost images H¢_eveL it }s beet net to alb_t_ any
fixed image to remain on the screen To avoid a permaner_{ image on the
screen _he mage w]l move or_ce pm 2 m_rmtes: Ldt --_ RLght --_U_tde ....
_mSi@
_,_Righ_ -_ Lat_ _- Dewnside _. U_tde
• Inve_len
hversion wil au_:m_a_icaI_ynvert lhe plasma d s{Jay pane_cob every 30
mieutes,
4
34
Press E_IT bu_on to return to TV viewn 4 or press MENU b_on
the previous menu
P_asma TV
b return to
20£_4022
L)peratJon
Low _wer
reduces the plasma display powe_ _msumptio_!
I P_ess the MENU but_Y_ a_"_dihen u_
A _ T bu_l{:mto se#ect _he O_'ION
2_ P_ess the _ button _r_d _he_'_
u_ & _T but_or__ose_t
_w
3 Press the _ huron and _he_ use A _T button to se_t
On O__|
_wer,
" When t/_J se_ec_On the sc_eei1,da_ker_s,
4, Prese EX|T button to return to TV v_wing or press _NU
the pr_vio_Js r_,enu
206-4022
bu_on to return to
Owner_ Manual
35
Operatien
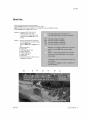
Parenta_ Control
can be used to btock specific
channeis,
ratings
and other viewing
sources
The Parental Control Function (V-Chip) is used to block program viewing based on the ratings sent by the broa_asfJng
station.
The default setting is to allow al_ programs to be viewed. Viewing can be blocked by choosing the type of the program and the cate@aries. It is _so possible to block aJ[ program viewing for a time peril.
To use this function, the following must be done :
1. Set ratings and categories
to be blocked,
2. Specify' a password
& Enable the lock
V-Cl_ip _lng
and categories
Rating guidelines are provided by broadcasting
stations. Most television programs
Rating and/or Individua_ Cate_ries,
Movies that have been shown at the theaters
System (MPAA) on_y:
Ratings
for Movies
Movie Ratings :
• Blocking Off
,G
• PG
° PG-I 3
,R
• NC-17
oX
If you set PG-13
Ratings
previously
in theaters:
(Permffs all programs)
(Genera] audience}
(Parental guidance sug_sted)
(Parents strongly cautioned)
(Restricted)
(No one 17 and under admitted)
(Adult onty)
; G and PG movies wilt be available _ PG-13,
for Television
programs
"_G
• TV-PG
• TV-14
• TV-MA
° TVoy
• TV-Y7
including
(Genera{
made-for-TV
movies
and X will be b_ocked_
:
audience)
(Mature audience
(AII children)
only)
(Children
older)
7 years
TV Rating Children:
° Age
• Fantasy Violence
(applies
(applies
to TV-Y, TWY7)
to TV=Y7)
TV Rating General:
• Age
• Dialogue - _xual
dialogue
• Language - adult language
• Sex - sexual situations
• Violence
(applies
(applies
(applies
(applies
(applies
to
to
to
to
to
Plasma
R NC-17
(Parental guidance suggested)
(Parents strongly cautioned)
Input Block
• Video, Front Video
° Component
1_ 2
• RGB_ HDMI/DW
36
shown
and television
movies can be btocked by TV
or direct4o-video
movies use the Movie Rating
TV
TV-G, TV-PG,
TV-PG, T\J-14)
TV-PG, TV-14,
TV-PG, TV-14,
TV*PG, TWt4,
TV-14, TV-MA)
TV-MA)
TV-MA)
TV-MA)
(On, Off)
(On, Off)
(On, Off)
206_4022
SOt up bisck n9 schemes to baock s_3f_c charmers ratings and o×lema_ viewing sources
o A
d s nsquited togain access toth_smenu,
1, PreestheMENU hUrOn and _n
Then_ press the _ _._c_
useA _T buttontoselectthe_CK
menu.
• The TV is Set up wtlb the ini_al password "0-O-G0k
2. Use the A V button to _s_
#am the _ol!@_'ang
Loc_ Menu op_ons. Or_9 t._
_t_on isseceded change _e settings _o y,ca_{pr_erence_
- Lock System: En\a_es of dtsabbs _e b_ki_g _heme you set up prevF
ousG
" _ Password: Cha_ge tbe password by inputting a rsew passwe_d twice
- Bi_k Cl_aot:
BlOcks any chancels tha_ you do _t want to watch or
that you do not want your children to watch
, Mov_ _tng
(MPAA): BtOC_Smovies a_:xsording_o tf'_ _:_vie ratings iimts specified so children canRo_ v_w ceR_in movies, You can set the rat.,
_gS iimit by biock n 9 e{Jt alli_L® movies wdh the ra_mgs above a s_ecit_ed
_ve_ K_D n mind mat the m@ae _at ngs I_rat_on_y appi_es to movies
shown on TM not fV pr_rams., s_h as soap _as
. TV _attog-Chtldra:
Preveets citdld_en from wawh n9 set.in c_i!@'e_YsTV
programs a_O_di_ to the ratings iimit ee_ _ho ehi_dre_ rating does act
apply _o other TV programs Unless ye_sb_ock oeMa_nTV programs iintendo
ed k_ mahJre audiences n the TV Rating ,- sub menu your @'gdren can
view those pr_rams,
• W P_ttng-Ger_ral: _ssed on the ratings blocks cer_in TV pr_rams that
you and your tamiiy de net want le view,
• l_p_t _i_k:
Enables yo_ to se_t a so_rce to biock _om _ extemai
soa_oe devices you have hooked up
3, Pte_ EX_ bursa to return to TV viewing or press _EN_
|t_ provisoes mer_u
* £f y_
eve€ te,_:get your pase_d,
20G4022
b_,£tonto return te
key _n '7'}?', _7',"7 on t_m remote c_troL
Owner's Manuat
37
Opera#on
* in this manual, the OSD (On Screen
the TV o_ration_
Display)
may _
different
from your TV'S because
nn c_e
- The Cable sub menu displays when inserting the CableCARD
" to the TV,
= The Cab]eCARD '_ type is Motoroia_ Scientific Atlante (SA), or SCM etc, The
OSD (On screen display) is different from your TV according to your
CableCARD
_ type,
1, Press the MENU
button
2, Press the I_ button
and then use A _V
and then use A/V
button to select
button
to select
the CA]B_
your desired
_ is just example
of Scientific
to help
Atlanta
Cab]eCARD
TM
menu_
item
3, Press the I1_ button,
4, Press EXIT button
to return to TiV viewing_
Le) CableCARDTM/Host
_D Screen
As shown, the parring number means your TV and
CableCARD
TM tD. For further information regarding
cable TV serviee, contact
your Ioca_ cable TV se_,i_
provider(s).
Insert the Cab_eCARD _, If you de it at first, it _kes about 1 minute to
exchange the data between the -PC and the CabieCARD
"' Then, TV screen
displays as shown righL
Let your cable TV service provider know CableCARD
_ _D and Host ID_
If your cable TV service provider is registered
CableCARD _' ID and Host ID,
you can watch the premium or high value channe_
If you ever registered to the cable _ service provider, you can watch the
premium or high value channel without a message,
If the certificate
_esn't
the OSD (On screen
38
Plasma
TV
match
display)
between
displays
the TV and the CabfeCARD
as shown
'_'
_ett.
206_4022
2 ¸-
3_
I
_ you enter the C_am._l _t
as the piclure 3 above,
4 ¸,
atle_ ru_sr_ingme EZ Scan w_theut CableCARD _' yo{J car_s_
the cable cb_r_
iist
2 insert the Cab!eCARD TM TP_enthe TV r_ewe a new cabS÷¢ha_
iist which iS _aua_y _e part chaanel, I_takes
abou_ 2,~3 mim._tes to gutsier _he _/ble channei lis_ a_te_ nse@r_g lhe CabieCARD _ as _e pk:Ce_e4 above
(Occasiena_iy mere thaa _t _me}
_faf_ emerges_cy situabon occurs during watd'}ing the TV/DTV_'C,_3V!CADTV, you car_ receive a message from cable TV
servioe p_evide_(s},
When receMeg an emergertcy message t_@message s @spIayed on the _reer_ as s_n
betow er the chancre; is
cha_ged abtoma_cally tea chan,nei that ma_sins the em_eCgencymessage The message ,_i_iautomatically d sappear
afte_ some time, ar>d return [e _he _astcha_w_el
206-4022
Owr_r_
Ma_aa_ 39
Remote
Control
EPG (Electronic Program Guide)
(In DTV mode)
- Th_s sys_m has an Bledror_i¢ P_ram Osi/de (EPG} to he_pyour' navigation through a]llthe passible viewing ep_ons.
- The EPG supplies in_om_atien s(_3has pr'_3_an"_listings sta_l a_d er_:t ti_
fer all available service5
o Th_sIu_tioa can be u_d on_y wi_r _he EPG ido_matien, is breadcasted by broadcasting companies
..The EPG di_lays the pr_am de_:rlBt_n _or next 7 days.
- Th_s l_nctio_ ;s on_y supped'ted i_ OTV mode
1, Press _@ GUIDE b_-_on to swrlch on EPG
2. Pre_s t_e A pT _1 _, button te _leo_ de,red program _hen p_ess the ENTER bulon to display the
selected p_ogram.
3 Press the GUIDE or EXIT bulloa agai_ _esw_tch off EPG and ret_m _oTV vie_ r_g
40
P_aama 7 V
2_1)G4022
O#er3tton
Brief Info.
- _ief !_'_foshows the p_esen_ sc_een i_lf_msbo_a,
Press the INFO but_or_to show t_qeBrief tnfe on the scr_n,
|NFO button d_s not work s Com_nentl
Com_nen_
RGB ard HDM#_V/modes.
- Press #_e INFO bu_on or EXIT button to exit,
Operation:,
Vrs_hi_ TViDTV/CATV/CADTV
• W_tChir_g'_d_s Pro_t Vid_
- [r_Com_x'}en_l Componer_r2_RGB,
HDM_ffDVl rr¢_s |NFO bu_ is not
- Show _he g#esent scr_[_ ir#<_mat_on
, On Wa[ching wi_hthe upper tnput signa_,
#tess the _FO bu_on
, Press tile _NFO but_{_lor EX_ _, _o_l to
eX_L
A: _snr_r info_mat_
B: Progr&m tilJe
C: Day d _k
Mo_l_, Y@3[
D: P_c_ram staA _me
E: Program profess ba[
F: Program _i_ash_me
G: Pte\senttirt_
H: A_tiona_ in_mabon, Rete_ to _
expta_at_o_on _e r_ht
B
206-4022
C
icon
D
F
G
Owneyis Manua_ 41
Operation
EZ Mute
Nothing to do with Caption on!Off using MUTE button_ the mode seiected Caption/Text
is to be displayed,
When you repe_ediy
press the MUTE button, the sound mode is changed in turn, (Refer to the picture below)
j_
Mute
: Sound
is muted,
EZ Mute : a special mute mode to
activate the dosed caption automaflca_iy.
T
Mute
Note: EZ Mute does not operate
_
: Sound
in Com_nenbtRGB/HDMt/DVI
is enabled.
modes,
Freeze & Magnify (DTV/CADTV 720p, or 1080i mode only)
-
Eniar_s
the picture with correct proportions,
When enia_ing
the picture, the image may become
1, Press the FREEZE
button
in 720p or 1080i
distorted,
mode.
2. Use the & V 7<1 / I_ buttons to select the screen section to be magnified.
3. To return to norma_ viewing press the FREEZE button again.
Note : The Magnify feature is avaitabte only in 720p or 1080i mode,
FRE_E
button works in aft video formals,
42
Plasma
TV
but the
206_4022
_fat_v_r_
Scr n
Setup for PC mode
, When RGB cor_ned to PC iP@utand _ect the RGB,-PC, th_s function is used.
, Whe_ HDM/{TVl cormect to PC ir_put arid se_ed HDMt_'DV r_pu_ _his fonct/or_ s _lsed
, in RGBo_TV mode, SIZE and PHASE is not available,
,Aflet eon_'_ec_in(_
RGP_PC ei' HDM//DW to PC npu_ and checking the SOr_n quafi_y
D_$olayPC Adjust Menu Using A_UST
button,
Posi'[i_a
Adjust _he screen p,r_Jt_on,Afle_ displaying _he Adius_ se_t
Size
Adjust the scr_n
Phase
Ad}#St tb_ phase of Pxel dock
_nHDM_/DVI@C mode, PHASE is r_ol avai_bae
Rese{
niqa_izat_ng Positi_
206-4022
the sdeen pos_i,s_'_,
sze
Size_ Phas@adjustment
Owner's Manua/
48
External
Control
Device
External
Setup
Co ntrol Devi ce Set up
Conne_ the RS_232C input jack to an external control device (such _ a computer or an A/V control
and control the Monitor's functions externally,
Connect the seda] port of the control device to the RS-232C jack on the Monitor back panel.
RS-232C connection
cables are net supplied with the Monitor,
system)
PC
1
No,
2
No
Pin connexion
Name
RXD (Receive
4
DTR (DTE
7
6
8
RTS (Ready to send)
DSR (Clear
(DCE side
ready)
#TS
to send)
No Connection
9
si_
7-Wire
(Standard
PC
RXD
TXD
GND
DTR
DSR
RTS
iiii
iiiii
iiiiii
ready)
@
44
Plasma
TV
3-Wi re Configu rations
(Not standard)
Configurations
RS-232C cable)
PDP
PC
TXD
RXD
5:::
GND
6;:;
DSR
DT R
CTS
..........................................................................
8
RTS
9
O O
9i
CTS
D-Sub
51
/. ...........................................
_
data)
D-Sub
RXD
TXD
GND
DTR
DS R
RTS
CTS
PDP
TXD
iiiililililiiiiiiiiiiii_3!!i!ii!ii!ii!ii!i_ii_ii_ii_iii
iiiilililililililji,i:2:!_i!ililiiii:i!:_ii_il
RXD
iiiiiiiiiiiiiiiiiiiiiiii_:!i:!i:iiiii!iii!i:i::i::i:i:'J
GND
DTR
i!i!i!i!i!iiii_i_:ii,li_i:_6:ii!ii!ii!ii!ii!ii:iiii!:!!ili
DSR
i!i!i!i!i!i!i!i!i!i_i_i_ii_i!i_i_ii_ii_i!_i_i!_!i
......................
RTS
i!i_iligiigiigiigiigiigi:!:i!_iB!iii!:zli_ii_ii_ii_ii_ii!ii!ii
!_ii_ii_ii_ii_ii_ii_ii_ii_ii_ii_:,8!_!_!_!_!_!i!:_i!::'i
CTS
__
___i!_!_:_!__!__!__!__!__!__!__!__!__!__!__
D-Sub 9
D-Sub 9
206_4022
Extema_ Control Devi_'e SetKp
U_ this function to s_Jci_ a mon_to_ iD number,
Rder to ReN Data Mapping. See pa_ 46
1 Press the MENU bu_on and then use A zT baBon to select the _JP
2 Press tl_ _ b_J_ and than u_ A ,,T button to _ect
merm
S_
desired man _or IO number, The adNstment range d SZ_I'_ is 1 ~ 99
4. P_essEXiT b_n
previous menu,
to return to 1V viewing or press MEt,IU button to retam to bhe
. _ud rate 9600 bps (UART}
* Data length : 8 b_ts
" Party None
•Siop bit : I bi_
, Oemmuraca_on e_e
: ASCii code
' U_< a crossed (reverse} cabS.
[[CommandllC_mar_12H
COMMAND ! COMMAND2
DATA
(Ne_ade#mab
OL P_
k
a
0-o 1
_J&Asp_ Ratio
04. Screen Mu_
k
k
c
d
*
0_ I
05, Voi_me Mute
_
e
0--_2
(_ Vo:_;meO'entr_ .............................
_
..............
t
0 _ 64
68. Night.s
09. C<£'_
k
k
h
i
0 ._
0 _ 64
i0.
i!
t2,
i3,
k
k
_
k
i
k
_
m
0,~ 64
0~_
0~ 1
0 ,-_i
15 _ss
I6 _arx_
k
k
s
t
0 _..
0~
17. ()s_ T;am_era_e
18 _SMMe_od
k
i
_
P
0_ 2
*
20. O¢oiter Time _:_N
2! @bRer Pix_ _1_ing
i
j
r
s
t *_FE
! ~3
T_qt
Sharpness
O_D Seiect
Re_e _r_
Lo_ M_e
COM:
CON:
2S Chanrel A_i
m
b
_/_)_ 0!
25. I_
x
b
*
Select
206-4022
D£A 0
XSet _D[{ ][Oata][Cr]
J
* lCemmand 1]: Frst _mand
te c_trol the set.(j k,m or x}
[Command 2]: Second command to contro_ the _t,
{Set [D]: "_)u (:an a@Jst tt_eset ID _a_e
desked monitor
_Dnembet In Setup menu AdNstmet_t ran_ s t
,oo99, When selec_ng Set [D 0' every connec_e_
_he Td is coatr_le& Se_ ID is indicat_ as decima
(1_99} on n_e and as He×a dec#nN (0×0_0x63}
o_ transm!sa_on#eceiving protc_o_,
, [DATA]: _b transmit e_mand
data
Transmit FW data to read status d command,
lCr: Carriage Return
ASCii c_£_ OxOD
" [ !: ASC# code space (Ox20)
[[Oommand2l[
][Set IDI[ ][OKl[Data]Ix]
]
The Monitor t_ansm_ls #£}K (acknowledgement} based c_
this _ormat when r_eivie_ no_ma data. At this time, i_the
data s data tend mode i{ ndR_es Deaent sla_es da_a {_
the data {s data write mode t returns t_e data c#the PC
computa_,
[[Comma d2I[ [Set iDli }{NG][Datai×]
]
The Moni_o_ #ansmits ACK (acknowledgement} ba_d en
this _orreat when reeeMn_ abnormal data from nOnoviaNe
_unchons or communication errors.
Data
DgTA1
i : Negal C@
2: NO_:supported _unot_>n
3t wait more 1#he
OAT/{2
@ATA
3
DATA4
DATA5
Ow_rS
Manuat
45
External
01.
•
Control
Power
Device
Setup
(Command2:a)
To control
Power On/Off
05. Volume
of the Monitor.
• To control volume mute on/off.
You can also adjust mute using the MUTE button on
remote control.
Transmission
Transmission
[[k][a][
Data
][Set ID][
][Data][Cr]
]
0 : Power Off
1 : Power
On
[[k][e][
Acknowledqement
Data
[[a][
][Set ID][
][OK][Data][x]
* In a like manner,
transmit
based on this format, Acknowledgement
presents status about each function,
'FF' data
data feedback
•
(Main
Picture
Input)
Transmission
[[k][b][
Data
][Set ID][
][Data][Cr]
0: DTV
1 : Analog
2: Video
3: Front Video
4: Component
Component
RGB-DTV
RGB-PC
HDMI/DVI
on)
off)
J
(Command2:f)
Control
volume with the volume buttons
][Set
ID][ ][Data][Cr]
Min:0~
]
Max:64
• Refer to 'Real data mapping'
as shown
below.
A cknowledqement
[[f][
03. Aspect Ratio (Command2:c)
(Main picture format)
To adjust the screen format,
You can also adjust the screen format using the RATIO
button on remote control or in the Option menu.
Transmission
ID][ ][OK][Data]ix]
Contrast
]
(Command2:g)
To adjust screen contrast.
You can also adjust contrast
in the Video
menu.
Transmission
[[k][g][
Data
][Set
ID][
Min:0~
][Data][Cr]
]
Max:64
• Refer to 'Real data mapping'
as shown
below.
Acknowledqement
J
][Data][Cr]
][Set
07.
I
•
[[k][c][
][Set
Date
1:4:3
6: Set by program
2:16:9
3: Horizon
10: Cinema
Zoom (1)
1 F: Cinema
Zoom
4: Zoom 1
5: Zoom 2
J
][OK][Data]ix]
To adjust volume.
You can also adjust
on remote control,
Data
1
[[b][ ][Set ID][ ][OK][Data]ix]
ID][
Volume
[[k][f][
2
Acknowledgement
•
][Data][Cr]
Transmission
I
5:
6:
7:
8:
][Set ID][
06.
•
To select input source for the Monitor.
ID][
Acknowledgement
[[e][
02. Input Select (Command2:b)
][Set
0 : Volume mute off (Volume
1 : Volume mute on (Volume
2 : EZ Mute
]
if other functions
Mute (Command2:e)
l[g][
][Set ID][
][OK][Data]ix]
]
08. Brightness (Command2:h)
•
To adjust screen
brightness.
You can also adjust brightness
(16)
in the Video menu.
Transmission
Acknowledqement
[[c][
][Set ID][
][OK][Data]ix]
]
[[k][h][
][Set
Data
Min:0-
ID][
][Data][Cr]
]
Max:64
• Refer to 'Real data mapping'
as shown
below.
Acknowledqement
04. Screen
Mute (Command2:d)
[[h][
][Set
ID][ ][OK][Data]ix]
J
I_ To select screen mute on/off.
Transmission
* Real data mapping
[[k][d][ ][Set ID][ ][Data][Cr]
]
Data 0 : Screen mute off (Picture on)
1 : Screen mute on (Picture off)
0
Step 0
A
Step 10 (SET
ID 10)
F
10
!
Step 15 (SET
Step 16 (SET
ID 15)
ID 16)
63
64
Step 99 (SET
Step 100
ID 99)
Acknowledqement
[[d][ ][Set ID][ ][OK][Data]ix]
46
Plasma
TV
]
206-4022
External
Control
Device
Setup
09. Color (Command2:i)
13. Remote Control Lock Mode (Command2:m)
I_ To adjust the screen color.
You can also adjust color in the Video
•
menu.
Transmission
][Set ID][
Data
Min:0-
][gata][Cr]
]
Max:64
• Refer to 'Real data mapping'.
Acknowledqement
][Set ID][
][OK][gata][x]
See page 46.
To adjust the screen
[[k][m][
][Set Ig][
Data
0: Lock off
]
•
Transmission
][Set ID][
Data
Red:0~Green:64
][Data][Cr]
J
][Set
][OK][gata][x]
][OK][Data][x]
J
Ig][
in the Video
See page 46.
][Set ID][
][OK][Data][x]
menu.
J
I_ To adjust bass.
You can also adjust bass in the Audio menu.
[[k][s][
Data
][Set ID][ ][Data][Cr]
Min: 0 ~ Max: 64
J
• Refer to 'Real data mapping'.
See page 46.
See page 46.
Acknowledqement
ID][ ][OK][Data][x]
J
[[s][
][Set ID][
][OK][Data][x]
•
I_ To select OSD (On Screen Display) on/off.
Transmission
J
(Command2:t)
16. Balance
12. OSD Select (Command2:l)
][Set ID][
J
Transmission
• Refer to 'Real data mapping'.
To adjust balance.
You can also adjust balance
in the Audio
menu.
Transmission
][Data][Cr]
0: OSD off
J
1: OSD on
[[k][t][
Data
Acknowledgement
ID][ ][OK][Data][x]
][Set Ig][
][gata][Cr]
• Refer to 'Real data mapping'.
J
J
Min: 0 ~ Max: 64
See page 46.
Acknowledgement
[[t][
206-4022
J
15. Bass (Command2:s)
][Set ID][ ][Data][Cr]
Min: 0 ~ Max: 64
[[I][ ][Set
][gata][Cr]
• Refer to 'Real data mapping'.
[[r][
Sharpness (Command2:k)
Acknowledqement
Data
J
Min: 0 ~ Max: 64
See page 46.
Transmission
[[k][I][
]
1: Lock on
Acknowledqement
!_ To adjust the screen sharpness.
You can also adjust sharpness
][Set
][gata][Cr]
To adjust treble.
You can also adjust treble in the Audio menu.
Data
to 'Real data mapping'.
[[ j ][ ][Set ID][
[[k][
][Set Ig][
[[k][r][
Acknowledqement
[[k][k][
Data
on
Transmission
[[k][j][
11.
controls
14. Treble (Command2:r)
tint.
You can also adjust tint in the Video menu.
• Refer
and the front panel
Acknowledqement
[[m][
10. Tint (Command2:j)
•
control
Transmission
[[k][i][
[[i][
To lock the remote
the set.
][Set ID][
][OK][Data][x]
J
Owner's
Manual
47
External
Control
Device
Setup
17. Color Temperature (Command2:u)
21.
I_ To adjust color temperature.
You can also adjust color temperature
menu.
I_ To adjust pixel number in orbiter function.
in the Video
][Set ID][
O: Medium
][Data][Cr]
1: Cool
]
Setting (Command2:s)
Transmission
][Set ID][
I[s][
][OK][Data][x]
I
Aeknowledqement
2: Warm
A ckno wledqement
I[u][
Pixel
I[ j ][s][ ][Set ID][ ][Data][Cr]
Data Min: 1 ~ Max:3
Transmission
I[k][u][
Data
Orbiter
][Set ID][
][OK][Data][x]
I
]
22. Tune
Command
(Command:
m a)
I_ To tune channel to following physical/major/minor number
18.
ISM
(Command2:p)
Method
I_ To avoid
having
a fixed
image
Transmission
remain on screen.
I[m][a][][SetID][][Data0][][Data1][ ][Data2][][Data3][][Data4][][Data5][Cr]I
Transmission
[[j][p][
][Set
Data
1:
2:
4:
8:
ID][ ][Data][Cr]
I
Data
Inversion
Orbiter
White Wash
Normal
0: Physical Channel Number(Transmit
][Set Ig][
code)
NTSC cable: 01, 0E~7D
ATSC air:01 ~45
A ckno wledoement
[[p][
by Hexadecimal
NTSC air:02~45
ATSC cable:01 ~87
][OK][gata][x]
Data 1 ,Data 2: Major Channel Number (two part)/Channel Number (One part)
I
Data1: High byte
Data2: Low byte
Two part channel number: Major number-Minor
number
One part channel number: If the channel band is ATSC
19.
Low
(Command2:q)
Power
I_ To control the Low Power function
You can also adjust
digital cable, it can be used. In case of using one part chan
nel number, minor channel does not need.
on/off.
Low Power in Option
menu,
Data 5:
Transmission
I[ j ][q][
Data
][Set
Data 3, Data 4: Minor Channel Number(Data 3: High byte)(Data 4: Low byte)
ID][ ][Data][Cr]
I
Acknowledgement
I[q] [ ][Set ID][
][OK][Data][x]
Two/One
6
Part
Channel
5
Main
0
Two
0
Sub
1
One
1
Using
_hysical
Channel
Use
No Use
4
Resew
ed
3
x
0
0
0
x
O
0
x
0
0
x
O
x
2
1
operation time term.
0
Step
0
NTSC Air
0
1
NTSO Cable
1
O
ATSC Air
0
1
1
ATSC
C_sd
O
1
0
0
ATSC
_
h_
x
0
1
0
1
ATSC
_
irc
x
O
1
1
O
A'PSC
c_e auto
x
O
1
1
1
Rese_ed
x
×
×
x
x
1
1
1
I
20. Orbiter Time Setting (Command2:r)
I_ To adjust orbiter
Main/Sub
Picture
0: Low Power off
1 : Low Power on
x
1
...
Rese_ed
Transmission
I[ j ][r][
Data
][Set ID][
][Data][Cr]
I
Min: 1 - Max: FE
Acknowledgement
I[r][
48
][Set ID][ ][OK][Data][x]
Plasma
TV
I
206-4022
External
Control
Device
Setup
*All
data are transmitted
by Hexadecimal
code
*Two/One
part Channel:
6th bit
This bit is used in a cable-ready
system.
*Using physical
channel: 5th bit
If the channel band is NTSC air or NTSC cable, channel tuning can be done by only physical channel. In this case, using
physical channel bit must be low(0).
But if the channel band is ATSC air or ATSC cable, there are
two cases that physical channel enable or disable.
If the physical
this bit low(0).
channel sending is meaningful,
If the physical channel sending
you should set
is meaningless,
yeu should set this bit high(l).
Example)
1. Analog channel: NTSC cable, channel number(35),
main
picture Command:
ma 00 23 xx xx xx xx 01 attribute(0x01):
main picture, two part(it's not mandatory),
using physical channel, NTSC cable 'xx' data: don't care major and minor channel
number in case analog channel tuning.
2. Digital channel: ATSC air, channel number(don't
know physical channel, major(30), minor(3)),
sub picture
Command:
ma 00 xx 00 1E 00 03 A2 attribute(0xA2):
sub picture, two part, not using physical channel, ATSC air 'xx' data:
don't care analog channel number in case digital channel tuning.
3. Digital channel: ATSC air, channel
number(physical(20),major(20),
minor(3)),
sub picture
Command:
ma 00 14 00 14 00 03 82 attribute(0x82):
sub picture, two part, using physical channel, ATSC air.
A cMTo wledqement
[a][
][Set ID][
][OK][DataO][Datal][Data2][Data3][Data4][Data5][x]
[a]
][Set ID][
] NG][Data0
25. Input select(Command: x b) (Main Picture Input)
I_ To select input source
Transmission
I[x][b][][Set
for TV.
ID][][Data][Cr]
I
Data Structu re
DATA(Hex)
INPUT
oo
DTV
(Antenna)
01
DTV
(Cable)
10
Analog
(Antenna)
11
Analog
(Cable)
20
Video
21
Front
40
Component
1
41
Component
2
50
RGB
DTV
6O
RGB
PC
90
HDMI/DVI
Video
[x
Acknowledgement
23. Channel Add/Del (Command: m b)
I_ To add and delete
I[b][ ][Set ID][ ][OK/NG][Data][x]
the channels
Transmission
I[m][b][
Data
][Set ID][
0: Channel
1 : Channel
][Data][Cr]
I
Delete
Add
Acknowledgement
[b][
][Set ID][
][OK][gata][x]
[b]
][Set ID][
][NG][Data][x]
24.
Key (Command:
I_ To send IR remote
m c)
key code
Transmission
J[m][c][][Set
Data
ID][
Key code:
][Data][
][Cr]
I
Refer to page 51.
Acknowledqement
i[c][
][Set ID][
206-4022
][OK][Data][x]
I
Owner's
Manual
49
IRCodes
I
I_
Connect
your wired
remote
contro_ to the Remote
Control
port on the TV:
I_ Output waveform
Sir_gte pulse, medu]at_
with 37 917KHz s_;nal at 455KHz
Carrier frequency
__J
[__j
1__
FcA_=I/Tc=
fosc/12
Duty ratb =-_
T1/ffc = 1/3
I_ Configuration
of f_me
• 1st frame
Lead
Low
HkJh
_..
" Repeat frame
__J
----_
I_ L_d
R_al
eod_ --
'I
u_,
,.!
eo_
__J
4,5 ms
9 ms
I_ Repeat code
__J
9 ms
225
ms
I_ Bit description
• Bit "0°
__[--]
" B_ "1°
t.:,°
I
I-'_
I_ Frame i_te_al
t ,i2 ms
224 m_
: "If
The waveform is frar_smitled as long as a key is depresaexL
Tf
__I--1
T!
_ [
I--1I
TI_ 108ms @455KHz
50
Plasma
TV
206_4022
IRCodes
Code
(Hexa)
Note
TV/VlDEO
TV INPUT
R/C Button
R/C Button
08
C4
C5
79
0E
POWER
POWER
POWER
RAT_O
TIMER
R/C Button {Power On/Off)
#!_[ete
!R #£#e (On!Y P£we[ On)
D!_rete
!R ##De (##lY P#vce[ 0#)
R/C Button
R/C Button
i0 ~ 19
4C
1A
09
Number Key 0~ 9
- (Dash)
FLASHBK
MUTE
R/C
R/C
R/C
R/C
65
02
FREEZE
VOL A
R/C Button
RiC Button
03
00
VOLv
CH ,I,
RIO Button
R/C Button
01
1E
AA
39
40
41
07
06
CH V
FAV
_NFO
CC
A
T
_1
I_
R/C
R/C
RiC
RiC
R/C
RiC
R/C
RiC
44
43,
ENTER
MENU
RiC Button
R/C Button
52
_
BtC B#tton
58
BXIT
65
0A
CB
FREEZE
, SAP
. ADJUST
5A
DO
BF
206-4022
Function
0B
OF
ON
OFF
SOUND
VIDEO
_tont
Video
COMPONENT
Button
Button
Button
Button
Button
Button
Button
Button
Button
Button
Button
Button
6_# Bu#£n
RiC Button
R/C Button
R[C By#o#
1
Di_ret e !B Code (Vide o input _iec#on)
Discrete IR Code (Front V!deo !nput Selection)
Discrete !R Code (C0mponent!
!nput Se!ec_en)
D5
RGB-pO
Discrete
IR Code (RGB:PC
C6
HDMI/DVl
76
77
AF
Ratio 4:3
Ratio t6:9
Ratio Zoom
Di_rete
D!_rete
D!_rete
Discrete
IR Code
_R Code
_R Code
IR Code
Input S#lection)
(HDMIiDV_ Input Selection)
(Only 4:3 Mode}
(Only 16:9 Mode)
(On_y Zoom1 Mode)
Owner's
Manual
51
Programming
theRemote
Programming
I1_ The remote is a multi-brand
other manufacturers.
Note that the remote
1, To find out whether
the Remote
or a universaf
rr_3y not control
your remote
remote
a_t models
can operate
It can be pr_rammed
of other
the device
to operate
most remote4-.,ontro_lable
devices
of
b_nds.
without
programming,
turn on the device
such as a VCR
and press the
corresponding
mode button on the remote
After that, press the POWER button, if the device is turned off then it res_nds
pro_dy
and the remote need not to be programmed,
if not, the remote should be programmed to operate the device. The programming procedures are explained
below.
2, Press the MENU
minatod.
and MUTE
If you den"t press
step 2.
any button
button
continuously
for 20 seconds,
at the same
time for 2 secends_
the Uight on the mode button
the current
will be turned
selected
off. in that case
3. Enter code numbers using the number button on the retT_ote by refenng
the code table on the following
the button, the light blinks at a time. If the device turned off, the programming
is successful,
4. Press the MENU
5. Test the remote
52
Plasma
TV
button
functions
to store the code.
After blinking
to see if the device
res_nds
device
button
will be il[u=
you have to repeat from
pages,
When
preying
twice, this code is stored.
properly.
If not, repeat from
step 2.
206_4022
Pf'ogramming
Codes
Programming
Bra_
C_
klWA
034
kKA_
016
043
t25
146
_,MPRO
t_NAM
072
031
033
103
W_DBYNAMIICS
0i2
O_
039
3ROKSONIC
035
037
129
3ANON
_,APEHART
028
108
031
033
}RAIG
003
0,40
135
03i
033
041
005
_7
0i0
065
112
108
116
110
11'1
_,URTIS
MATHES
]AEWOO
046
Stand
Codes
KENWOOD
014
034
047
048
012
I_2_
013
LLOYD
001
101
034
LXI
003
124
LG (GOLDSTAR)
043
MAGIN
MAGNAVOX
MARk_TZ
11t
119
039
043
TEAC
034
039
043
(Y-_
QUARTZ
011
014
TECHNICS
03i
033
070
114
I23
QUASAR
ROA
033
013
(_
_'_O
075
033
145
034
TEKNIKA
019
101
031
033
034
0,39
013
014
040
04i
062
0_3
THOMAS
034
0i7
034
101
1_
TMK
006
04.0
031
TOSHIBA
063
034
041
008
059
0!3
0_2
042
112
047
I31
067
0,6,8
TOTEVIStON
040
!0!
0i2
031
030
048
012
031
{}33
SAMSUNG
032
040
i02
104
Vl DEOSON
040
MEMOREX
003
0!0
014
0GI
105
I07
109
I12
WARDS
033
101
034
10"2
063
134
072
139
113
125
115
120
122
059
SANSUI
022
_3
048
135
SANYO
003
_7
010
014
S_TT
102
0i7
I34
037
112
129
003
_8
009
0110
013
014
017
C&_O
031
101
042
073
08-I
031
0_
149
003
056
_
057
03i
058
077
078
14.9
033
034
046
029
031
034
035
MINOLTA
013
020
MITSUBISNI
013
04.9
620
651
045 04B
059 ¢_1
036
129
037
131
046
138
101
i53
:ISHER
003
c'J_8 009
010
:UNA_
034
MTC
034
040
3E
031
{133
063
072
MULTITECH
024
034
!_
136
t44
147
NED
012
04.8
023
30
t07
132
012
0,45
NORDMENDE
043
41TACHt
004
018
026
01_
OPTONIDA
053
0_
043
031
_3
03"3
137
1570
PANASONIO
066
133
070
140,
074
NSTANq*REPLAY
IOL
031
033
013
026
031
_CPENNY
012
013
015
040
_
101
151
PENTAX
033
055
C6"J,
152
i01
MEII
046
lid]
054
0t2
MGA
050
053
040
027
i30
040
VICTOR
_,_DEO G_EPTS
025
048
034-
VECTOR R_EARCH
017
043
033
UNITECH
006
033
031
148
014
_:MERSON
031
O14
058
053
043
0i2
144
010
RUNC©
SAL©RA
034
059
_ENSEN
JVC
i40
147
008
R_CO
3YNATECH
-=LECTROHOME
KAR_N
10.9
101
027
(,_3
_7
i0'1
145
003
069
012
VIDEO
REALISTIC
MARTA
MATSU
)BX
4ARleeN
SEARS
039
043
083
SHARP
SHINTOM
SONY
145
033
063
PHtLCO
031
034
067
PHtLIPS
03t
067
033
071
034
101
PILOT
101
PIONEER
013
B_21
048
054
SOUNOESIGN
034
STS
013
SYLVANIA
03i
067
SYMPHONIC
TANDY
034
Brand
010
8rand
c_s
C¢OLFJtCHANNE2
030
046
1i2
053
kJIN
HAMUN
H_TACHI
049
052
O_
055
kNTRONIK
014
HOSPITALIiTY
070
077
_RCHER
005
JERROLD
002
{;03
004
008
PRUOER
059
_,A BLE STAR
_ENTUR
ON
026
092
009
074
010
052
069
PTS
011
073
_E NTURY
007
I_'_
101
005
P U LS AR
100
RCA
04'1
REGAL
049
REGENCY
REMBRANT
057
025
SAMSUNG
102
!01
030
(_8
011
L';45
041
046
LN-2
055
C_
065
085 0g0
PIONEER
034
076
051
_ST
016
N_¢_S WEEK
LG (G©LDSTAR)
M-NET
001
037
065
_
MACOM
033
_,OMBANO
_OMTRONICS
080
019
081
03,0
MAGNAVOX
MEMOREX
010
100
012
}_AMOND
023
MOVIE
028
032
EAGLE
_:ASTERN
020
057
NSC
015
073
028
038
071
_JA_I£t,4T}FIOATLP*_C'rA
003
043
OAK
016
031
037
053
SHER_TECH
022
PANASONIC
044
047
SIGNAL
030
PARAGON
i00
SIGNATURE
052
PHILIPS
006
SL
030
007
VOICE
LECTRICORD
L_0
{_
032
3E
072
3EMIN_
008
0"22
.3
052
074
206-4022
040
066
025
O_
TIME
024
033
054
034
131
040
012
034
039
043
034
048
056
058
072
080
101
_'_,.,.4 008
030
_--3
f_4
039 042
]OLOUR
0i7
031
053
QBg
003 _,4
CITIZEN
046
013
062
076
C-".,_,es
024
YAMAHA
ZENITH
034
003
024
kBC
{_3,7 0i4
C
131
Brand
052
Codes
TATUNG
072
108
043
_d
i08
PULSAR
033
,043
C_
PORTLAND
}AYTRON
039
Brand
039
012
064
013
079
02{}
MARX
052
063
Brand
Codes
SPRUCER
047 078
STARCOM
STAR,GATE
002
008
TAD_RAN
030
TAE
048
074
07i
072
050
KWANG
110
TA_HAN
TANDY
105
017
TEXSCAN
029
TODOM
039
C40
056
TOSHIBA
100
UNKA
UNTED
007
004
014
053
024
UNIVERSAL
005
C_7
014
024
VIEWSTAR
026
0i2
02?
015
032
018
O_
086
087
088
089
i00
I14
060
ZENITH
CABLE
Owner's
Manual
0_3
53
Programming
Codes
Brand
Codes
ALPBASTAR
DSR
Brar_
123
AMPUCA
050
BIRDV_EW
051
1_
129
CHANNELMASTER
013
036
014
955
0i5
CHAPARRAL
008
00%:_ 012
CIITOH
054
CURTIS
DRAKE
MATHES
Codes
Brand
Codes
133
RACE SKY $_*TELLIT_
t43
RANASON_C
060
PANSAT
12i
TC,SHtBA
002
I27
1t7
071
UNUDEN
0i6
044
078
GENER__IIN_'RL_4_NT003
018
H_TACHI
}'_JL_S_ON'r_,_CKER
6?7
1134
_4
016
031
059
i01
139
033
1_
03:,Z 039
057
19}4
HUGHES
068
@29
_1
CABLE
RICO
t05
PRESIDENT
019
102
145
0_
010
JANIEL
JERROLO
060
061
PRIMESTAR
PROSAT
030
072
1!0
007
011
052
112
1!6
KATHREtN
108
R©A
066
1_
074
LEGEND
051
REALISTIC
043
DX ANTENNA
024
046
056
076
LG
001
SAMSUNG
123
ECHOSTAR
038
093
040
09)4
0S7
095
_8
g'9_
L/3TRON
LJXOR
132
062
144
097
098
099
1_
MACOM
010
_9
063
125
122
E bECTRO
EUROPLUS
HOME
017
CY21 022
027
MEMOREX
NEX_,,'VAVE
057
028
124
NORSAT
069
07'8
8raod
C_
8raod
Codes
AtWA
014
C@8
070
'3_
JVC
004
125
1_
139
2_
KED
185
186
187
KENWOOD
AKA_
230
163
038
170
0_
171
067
197
ANAM
003
014
0t1
023
059
1_
189
216
21'?
252
235
236
BURMECTER
CARVER
CLARION
DAEWOO
027
102
053
148
060
198
DENON
0iS
076
130
EAN'rASIA
071
FI NEARTS
022
FISHER
089
O&_J
LG(GOLDBTAR)
001
087
021
107
HAtTAn
HARMAN/KAR
DON
NKEL
013
03;5,
107
130
025
045
042
048
043
_9
079
080
_6
101
135
136
1ii
VtEWSTA_R
WINEGARD
i15
128
I46
ZENITH
08t
082
091
I20
14-1
_1Et'4'f _F_ ATL_A
032
047
SONY
t03
STARCAST
SUPER
GUIDE
04 i
020
!24
125
TEECOM
023
02_
075
Braod
Cedes
PHILIPS
026
!12
143
PIONEER
039
042
043
_3
TOSHIBA
137
065
t15
{_I
1_3
093
t27
094
_}
THE
V_CTOR
061
088
089
_
Br_
113
WARDS
089
RCA
080
"YAMAHA
054
BAD
LOTTE
045
014
L_46
016
036
RCX
REALIS_C
092
t03
106
086
100
172
173
1'74
SAMSUNG
t24
145,
146
182
199
i75
176
177
17S
193
194
195
203
_4
221
179
201
1_
202
181
208
183
2!3
8ANSU}
204
011
244
135
245
138
24_
144
!43
214
219
223
232
SANYO
0i9
O83
234
238
2443
SCOTT
i06
18,6
SHARP
03i
(;32
05i
052
072
156
_,2
184
117
199
119
2_
206
2fY9
SHERWOOD
SONY
005
_
t58
044
118
045,
12_
109
248
114
249
TAE_ANG
012
tY20
073
074
076
0?7
t05
161
_91
192
210
6!2
{YL_
239
188
2_
068
LX_
103
MAC NAVOX
MARANTZ
1i 1
002
018
020
034
,041
081
097
!12
MCINTOSH
MCS
049
104.
MEMOREX
107
025
058
062
069
NAD
046
078
0?9)
095
12!
ONKYO
013
040
04-1
047
t62
163
164
165
122
152
149
153
150
154
!51
155
048
133
O_
140
057
132
166
205
1'67
_!
I68
233
169
242
157
1_
159
1@
189
201
22,2
224
2"2'6
22?
243
OPTIMUS
218
131
9)55
199
037
225
247
158
RANASON_O
007
033
064,
113
22,3
24,i
251
PENNEY
142
104,
TEAC
TECHNCS
010 (_55 106 136
185 187 237
101 113 128 134
8raod
C_des
8raod
Codes
8raod
C_
B_
Codes
APEX
_iGi3_L
DENON
022
020
014
MAC NAV©X
MARANTZ
013
024
PHiUPS
PIONEER
013
004
SONY
THOMPSON
007
005
@_
GE
0o5
0'_
_i
MITSUBSH
002
PROCEED
021
TOSHIBA
'319
00#
027
NAB
023
PROSCAN
005
_6
YAMAHA
009
0!8
,jiVC
012
ONKYO
008
017
RCA
005
_
ZENi'[!4
010
06
LG
001
PANASON_C
003
_
SAMSUNG
011
015
FiAR_N
54
KAR_N
Plasma
TV
010
016
_6
092
Codes
14?
QUASAR
190
066
0_,7
O3O
211
034
_4
(257
215
OEg
110
083
138
KOHEL
024
108
099)
137
085
_4
065
089
114
FUJITSU
_A[ELU1'£SERWC_CO028
Codes
088
142
050
005
14i
147
PERSONAL
RHIUPS
B_
025
206_4022
Troubtoshooting
Checktist
Troubleshooting
Checklist
• hstaH
No
or poor
color.
new batteries.
Keep a sufficient
• Activate
distance
any function
(If sti]t picture
(Refer
to p.9)
between the TV and the VCR,
to restore
is on the screen
the brightness
of the picture,
for more than 5 minutes,
the screen
gets dark.}
[ or.,o!.ros°oK,.g
j
_i-_! _:_ 17:1
!-_:::: ¸¸-7¸
_:i¸
f
No output from o,eof
L
the speakers
206-4022
.
Adju_ It.=!_zrtcein the A_ZO menu.(Referto p.27)
Owner's
Manual
55
Maintenance
te n a nc e
Early
malfunctions
can be prevented.
Careful; and regular
new TV. Be sure to turn the power off and unplug
cleaning
the power
_n
extend
cord _fore
_e
a_unt
of time you win have your
you begin any cteaning.
1. Here's a great way to keep the dust off your screen for awhile.
Wet a soft cloth in a mixture of lukewarm
water and
a li_e fabric softener or dish washing detergent
Wring the cloth until it's almost dry, and then use it to wipe the
screen
2,
Make sure the excess
water
is off the screen_ and then
To remove dirt or dust, wipe the cabinet
Please be sure net to use a wet cloth,
let it air-dry
w_th a soft, dry_ iint4ree
before you turn on your TV
cloth,
If you expect to leave your TV dormant for a long time (such as a vacation), it's a good idea to unplug
the power cord to protect against possibie damage from _ighming or power surgec,
56
Plasma
TV
206_4022
Specification
uct
ons
Width (inches
/ mm)
47.6 / 1210
Height (inches
/ mm)
27_6 f 701
Depth (inches
/ mm)
11.6 / 295
Weight
(pounds
79 / 35.9
t kg)
Resolution
852 x 480 (Dot)
Power requirement
Television
Program
System
Coverage
External Antenna
Oper_Jr_
Operating
•
206-4022
Impedance
Temperature Range
Humidity
Range
AClOO-240V
NTSC-M,
ATSC,
VHP 2 ~ 13 UHF 14 ~ 69, CATVI
- 50!60Hz
64 & 256 QAM
_ 135, CADTV
1 ~ 13&
DTV 2 ~ 69
75 _
32 _ 104';'F (0 - 40°C)
Less than 80%
The specifications shown above may be changed without prior notice for quality improvement,
Owner's
Manual
57
58 Plasma
TV
206_4022
Zenith
under
will repair
or replace
your product,
at Zenith's
option,
if it proves to be defective
in material
or workmanship
normal
use, during
the warranty
period
("Warranty
Period")
listed
below,
effective
from
the date of original
consumer/end
effective
only
user
when
WARRANTY
purchase.
This warranty
is good
used in the United
States.
only
ONE
PARTS:
ONE
YEAR
YEAR
Repair
for the
THIS
Parts
Date
of Purchase.
In Home
the
Date
of Purchase.
Center
at 1-877-9ZENITH
schedule a service appointment.
WARRANTY
IS IN
of the
LIEU
Units
original
are
Please
be repaired
or factory
option.
If repaired,
or remanufactured.
Visit
Replacement
period
Service.
Your unit will
stitute
model
our
of the
parts
website
Call the Zenith
or replaced
reconditioned
used
in the
• damage
• service
WARRANTY
OF ANY
caused
required
DOES
in shipping
as a result
including
incorrect
consult
the owner's
requirements)
other
• set-up
NOT
WARRANTIES,
APPLY
or insufficient
AC supply
(please
manual
for power
supply
systems,
cable conequipment,
or
or
damage
caused
by improper
adjustments
• damage
caused
by other
system
components
• any unitthat
has been modified
or incorporated
into any other
product
• replacement
of batteries
on the remote
• damage
(including
cosmetic
damage),
or replacement
control.
failure,
or use
CUSTOMER
of your
loss
under these
CONCERNING
PIXEL
FUNCTIONALITY:
Plasma TVs typically
contain
a small
number
ed and is in compliance
with manufacturer's
ation
with a new, subunit,
at Zenith's
repair
may
be new
EXPRESS
OR
IMPLIED,
INCLUDING
lasts, so the
you may also
WITHOUT
PURPOSE.
TO THE
TO THE EXPRESS
CONSEQUENTIAL,
LIMITATION,
LOST
WHETHER
BASED
IN
of incidental
or conse-
above exclusion
or limitation
have other
rights
that vary
may not
from
stat
TO:
installation,
components
in a video system
or adjustment
on consumer
controls,
The costs of repair
to
warranted
OTHER
or transit
of improper
• installation
or repair
of antenna
verters,
cable company
supplied
Interactive
at http://www.zenithservice.com
SPECIAL,
OR PUNITIVE
DAMAGES
OF ANY NATURE,
INCLUDING,
WITHOUT
LOST OR CORRUPTED
PROGRAMMING
OR DATA,
OR ANY OTHER
DAMAGE
TORT,
OR OTHERWISE.
Some states
do not allow the exclusion
or limitation
LIMITED
or personal injury due to misuse, abuse, negligence, improper maintenance
or storage, or to acts
of nature or other causes beyond Zenith's control.
(Causes beyond Zenith's control include but are not
limited to lightning strike, power surges, power outages and water damage.)
• Image burn-in
• repair or replacement
of warranted parts by other
than Zenith Authorized
Service Centers.
• units purchased or serviced outside of the U.S.A.
• product
where the original factory serial numbers
have been removed, defaced or changed in any
way.
• product sold and labeled as "as is, where is" or similar disclaimer.
excluded
circumstances
shall
Your Plasma
Television
contains
about
of pixels that do not function
normally.
specifications,
indicating
that any pixel
be borne by the consumer.
one million
individual
pixels.
Your display
has been inspectdefects
do not affect
the oper-
display.
INTER-ACTIVE
To obtain
customer
uct
information,
or
locations
CENTER
assistance,
Dealer
or
is
warranty.
quential
damages
or limitations
on how long an implied
warranty
apply to you. This warranty
gives you specific
legal
rights
and
to state.
THIS
and
(1-877-993-6484)
LIMITATION,
ANY WARRANTY
OF MERCHANTABILITY
OR FITNESS
FOR A PARTICULAR
EXTENT
ANY IMPLIED
WARRANTY
IS REQUIRED
BY LAW, IT IS LIMITED
IN DURATION
WARRANTY
PERIOD
ABOVE.
ZENITH
WILL
NOT
BE LIABLE
FOR ANY
INCIDENTAL,
INDIRECT,
PROFITS,
CONTRACT,
product
IS HANDLED:
the
service.
and
remaining
user
from
purchase
date. You will be required
to submit
a legible
copy of your bill of sale or proof of delivery
when
warranty
consumer/end
from
Effective
Date of Warranty:
Your warranty
period
Begins
on the date of sale to the original
consumer/end
user. KEEP THE DEALER'S
DATED BILL
OF SALE OR PROOF OF DELIVERY
as evidence
of the
requesting
original
HOW SERVICE
PERIOD:
LABOR:
to the
NUMBERS:
prodService
Call 1-877-9Zenith
365 days per year)
menu.
Or visit
our
website
(1-877-993-6484)
and select
appropriate
(24 hours a day,
options
from
the
at http://www.zenithservice.com
BEFORE
CALLING
FORSERVICE:
• Please check your operating
guide
- you
• Please have your product
model
number,
lation available.
may avoid a service
call.
serial number
and the date
• If a replacement
Zenith
against
unit is required,
under
some
a credit
card number
as surety
you return
the
• If a replacement
unit to Zenith.
defective
unit within
10 working
days.
unit is received,
please
use the carton
• Parts and service
in accordance
with
charge.
Other service
requirements
tory warranty
service,
pendently
owned
and
write
or call the
operated
service
Zenith
Customer
organizations.
your
ty
product
problem
Please
online.
that
could
fill
This
out
and
information
affect
you.
TO CONTACT
ZENITH
BY MAIL:
LG Customer
Interactive Center
201 James
Record
Road
Huntsville,
Alabama
35824
http ://www.zenithservice.com
P/N : 3828VA0528D
(_)
mail
you may
shipment.
and
the Zenith
warranty
will be at the owner's
• To assure
proper
credit
and avoid
unnecessary
ing any product
for Zenith
Warranty
Service.
for details.
IMPORTANT:
circumstances
for advanced
are Zenith's
expense.
Interactive
your
Product
Zenith
Registration
to reach
you
from
that
unit
responsibility
If you have
Center.
obtain
below
Card
or the
date
of original
instal-
be asked to provide
a reserve
deposit
to
Your credit
card will not be charged
if
packaging
charges,
you must
Contact
the number
allows
of purchase
in returning
the
and will be provided
problems
in obtaining
Service
may
be provided
without
satisfac-
by inde-
a Return Authorization
before
returnor your authorized
Zenith
repair
facility
or go to www.zenithservice.com
promptly
defective
should
we discover
a safety
to
register
or reliabili-