1
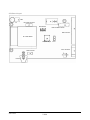
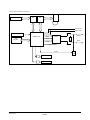
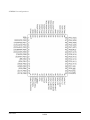
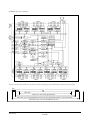
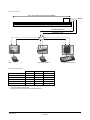
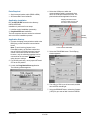
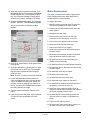
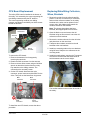
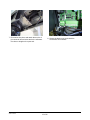
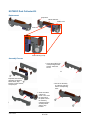
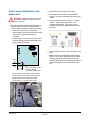
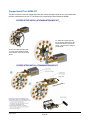
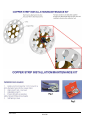
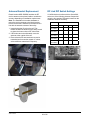
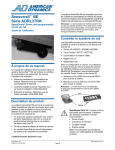
SensorRail™ IIIE
ADRL3TRK Series
About this Guide
SpeedDome® Ultra Programmable
Dome on a Rail
Service Guide
• How to repair or replace components on the
CPU board.
This guide explains how to service the SensorRail
IIIE system. However it does not explain:
• How to program or operate the system. Refer to
SensorRail IIIE User Guide 8200-0593-04.
CAUTION: Only a certified
installer is authorized to install this
equipment. Installation by anyone
else will void the SensorRail
warranty.
• Product specifications. Refer to SensorRail IIIE
Installation Guide 8200-0593-02.
If you need assistance, contact...
American Dynamics Technical Services
United States:
Toll Free 800-507-6268, Option 2
International: 561-912-6259, Option 2
Fax: 845-624-7658
Contents
About this Guide.................................................... 1
About the Product.................................................. 1
Theory of Operation .............................................. 2
Preventive Maintenance...................................... 12
Functional Check ............................................. 12
Structure Check and Maintenance................... 12
Trolley Check and Maintenance ...................... 13
Servicing.............................................................. 15
Firmware Upgrade ........................................... 15
Motor Replacement.......................................... 17
CPU Board Replacement................................. 18
Replacing/Retrofitting Collectors,
Wires, Brackets ................................................ 18
KST25DC Dust Collector Kit ............................ 20
Power Supply Modification and Adjustment .... 22
Copper Install Tool ADRLCIT .......................... 23
RF Attenuator................................................... 25
Light Reduction Kit ........................................... 25
Antenna Bracket Replacement ........................ 28
RF Link DIP Switch Settings ............................ 28
Self-Tapping Screw Installation ....................... 29
End Cover Replacement.................................. 29
Ordering Parts ..................................................... 30
Specifications ...................................................... 33
Declarations ........................................................ 34
In Europe:
Technical Services at EMEA AD Technical Support
+800 CALL TYCO or (+800 22 55 8926)
From the UK: 08701 238 787
Direct: +31 475 352 722
Fax: +31 475 352 725
Hours: 09:00–17:00 CET-EET-GMT
About the Product
The SensorRail IIIE system enables a SpeedDome
Ultra dome camera to transmit video as it moves
along a rail to the ideal surveillance position.
The system consists of:
•
•
•
•
•
•
•
•
2.5m rail sections (number determined by the total
length of the rail) with installation hardware
A light reducing section at each end of the rail
Ceiling suspension assembly, which includes M8
threaded rods, ceiling attachment hardware (not
supplied), and mounting stirrups
Copper tracks
Camera trolley with dome camera, RF transmit
antenna, and motor
PowerRail module that supplies dc power to the
camera trolley, converts RS-422 data to RS-232 data
used by the trolley, and receives the video signals
from the dome camera
Trolley stop and retrieval tool
RF receive antenna.
© 2006 Sensormatic Electronics Corporation
SENSORRAIL IIIE
SERVICE GUIDE
8200-0593-03, REV. A
1 of 34
CPU Connections
Theory of Operation
Power connector (J1)
Pin
1
2
3
4
Trolley CPU
The CPU in the trolley filters command data from a
matrix switcher or controller. Movement along the
rail is accomplished by sending an IRIS or FOCUS
command. This command is sent to the dome
camera by the matrix switcher, which the trolley
CPU converts to left and right instructions.
Function
27Vdc
0V
RS-232 TX
RS-232 RX
Main connector (J2)
Pin
1
2
3
4
5
6
7
8
9
10
11
12
13
14
15
16
Note: To the matrix switcher, the trolley CPU board
is transparent. However, some commands are
delayed compared to what is typical for a dome
camera’s response.
This section describes the CPU to help you
perform maintenance efficiently. It does not provide
detailed information on internal electronic
components.
Board Layout
Refer to figures on pages 7 and 8.
The CPU board manages all trolley functions. The
main CPU functions and components are as
follows:
• Main connector: Provides power to the motor
and receives data from the encoder and the
dome (RS-422 bi-directional communication).
Function
Not used
RS-422 TX– to Dome
RS-422 TX+ to Dome
RS-422 R to Dome
RS-422 RX+ to Dome
27Vdc to Dome
0V to Dome
VB channel (encoder)
5Vdc to Encoder
VA channel (encoder)
SC Synchro (encoder)
Not used
Motor –
Temp probe (future)
Not used
Motor +
Transmitter connector
Pin
1
2
3
4
5
6
• Power connector: Receives 27Vdc and RS232 data provided by the four sliding collectors.
• Five LEDs: Enable quick diagnostics in case of
technical problems.
• RF 2.4GHz transmitter board: Replaceable by
removing four soldered attachment points.
Function
5Vdc
GND
12Vdc
GND
Composite video IN
GND
• RF 2.4GHz emitter connector: Provides power
and composite video signal to RF link emitter.
• BNC connector: Receives composite video
signal from the dome.
• ATMEGA 128 microcontroller: Receives all
external data and drives the motor.
• Electronic brake devices: A relay and a
resistor that slow the motor by applying
resistance to the motor.
• Optical sensors: Detect optical strips at the
beginning and the end of the rail.
• JTAG connector and DIP switches: Used for
factory programming and future features.
SENSORRAIL IIIE
SERVICE GUIDE
8200-0593-03, REV. A
2 of 34
ATMEGA 128 Microcontroller
The ATMEGA 128 µP has the following features:
Note: The following information refers to diagrams
on pages 8 through 10.
• 128K bytes of in-system programmable flash
with read-while-write capabilities
• 4Kb EEPROM
The CPU is an ATMEGA 128, a low-power CMOS,
8-bit micro (µP) controller based on AVR enhanced
RISC architecture.
• 4Kb SRAM
• 53 general-purpose I/O lines
• The ATMEGA 128 combines a rich instruction
set with 32 general-purpose working registers.
• 32 general-purpose working registers
• By executing powerful instructions in a single
clock cycle, the ATMEGA 128 achieves
throughputs approaching 1MIPS per MHz.
• 4 flexible timer/counters with compare mode
and PWM
• Real-time counter (RTC)
• 2 UARTs
• Matrix switcher commands are received through
Port E (PE0, PE1) of the ATMEGA 128. Then,
IRIS or FOCUS codes extracted from the data
frame activate PWM drivers through
• Byte oriented two-wire serial interface
-
Port B (PWM = motor speed),
• 8 channel, 10-bit ADC with an optional
differential input stage having programmable
gain
-
Port C (Cmd = CW or CCW rotation),
(Disable = motor ON or OFF), and (Brake).
• Programmable watchdog timer with internal
oscillator
• All remaining data from the frame are sent
directly to the dome camera through Port D
(PD2, PD3) using an RS-232 / RS-422 full
duplex converter.
• SPI serial port
• IEEE 1149.1 STD. compliant JTAG test
interface (also used for accessing the on-chip
debug system and programming)
• All the 32 registers connect to the Arithmetic
Logic Unit (ALU), enabling access to two
independent registers in one single instruction
executed in one clock cycle. The resulting
architecture is more code efficient while
achieving throughputs up to ten times faster
than conventional CISC microcontrollers.
• 6 software-selectable power saving modes
• On-chip ISP flash enables program memory to
be reprogrammed in-system through an SPI
serial interface, conventional nonvolatile
memory programmer, or on-chip boot program
running on the AVR core.
• Boot program can use any interface to
download the application program in the
application flash memory
• Software in the boot flash section continues to
run while the application flash section is
updated, providing true read-while-write
operation.
The device is manufactured using Atmel’s highdensity, nonvolatile memory technology.
SENSORRAIL IIIE
SERVICE GUIDE
8200-0593-03, REV. A
3 of 34
ATMEGA 128 pin description
Motor Command
Pin
When the ATMEGA microcontroller receives an
IRIS or FOCUS command, it sends one of four
output signals to the PWM driver (sampling
frequency is 25kHz).
Description
VCC
Digital Supply Voltage
GND
Ground
Port A (PA7…PA0)
These ports are 8-bit, bi-directional
I/O ports with internal pull-up
resistors (selected for each bit). Their
output buffers have symmetrical drive
characteristics with high sink and
source capability. As inputs, these
ports pins externally pulled low will
source current if the pull-up resistors
are activated. Their pins are tri-state
when a reset condition becomes
active, even if the clock is not
running.
Port B (PB7…PB0)
Port C (PC7…PC0)
Port D (PD7…PD0)
Port E (PE7…PE0)
Port F (PF7…PF0)
• PWM: Digital value directly related to the
movement speed of the trolley (1–256 steps).
• Cmd (0 or 1): Value related to the rotation (CW
or CCW) depending on the known position of
the trolley along the rail as given by the
encoder.
• Disable (0 or 1): Value used to inhibit or not
inhibit PWM drivers (motor ON or OFF).
• Brake (0 or 1): Value used to command the
relay of the brake device. To slow and stop the
motor, the relay turns off and a dissipative
resistor shunts the motor. During the braking
process, the motor is disconnected from power.
Note: Port F also serves as the
analog input to the A/D converter. If
the JTAG interface is enabled, the
pull-up resistors on pin PF7 (TDI),
PF5 (TMS) and PF4 (TCK) activate
even if a reset occurs. The TDO pin
is tri-state unless TAP states that
shift out data are entered. Port F also
serves functions of the JTAG
interface.
Port G (PG7…PG0)
Port G is a 5-bit, bi-directional I/O
port with internal pull-up resistors
(selected for each bit). Port G output
buffers have symmetrical drive
characteristics with high sink and
source capability. As inputs, Port G
pins externally pulled low will source
current if the pull-up resistors are
activated. Port G pins are tri-state
when a reset condition becomes
active, even if the clock is not
running.
RESET
A low level on this pin for longer than
the minimum pulse length generates
a reset, even if clock is not running.
XTAL1
Input to the inverting oscillator
amplifier and internal clock operating
circuit.
XTAL2
Output from the inverting oscillator
amplifier.
AVCC
A/D converter externally connected
to Vcc.
AREF
Analog reference pin for the A/D
converter.
PEN
Programming enable pin for the SPI
serial programming mode. Holding
this pin low during a power-on reset
causes the device to enter the SPI
serial programming mode. PEN has
no function during normal operation.
SENSORRAIL IIIE
SERVICE GUIDE
Speed is maintained using rotation pulses and the
synchronization top pulse from the encoder, fixed
to the motor, the encoder sends 500 pulses per
rotation through its channel plus a synchronization
top pulse per rotation.
Several speeds are available depending on
commands sent to the µP:
• Manual nominal speed: 3m/s (9.84ft/s)
• Initialization speed: 1m/s (3.28ft/s)
• Patrol mode: 1.5m/s (4.92ft/s)
• Preset speed: 6m/s (19.69ft/s)
• Preset positioning speed: 0.3 m/s (0.98ft/s)
One motor rotation corresponds to a 7.8125cm
(3.08in) movement along the rail. For example,
when the trolley is moving along the rail at 1m/s
(3.28ft/s), the motor rotates at 12.8RPS (768RPM).
A 16-bit internal counter performs the speed
calculation. The counter is incremented by the VA
channel from the encoder and read once every
10ms.
Speed is calculated by comparing the difference
between two counter readings multiplied by 100,
and then divided by 64. For example (speed in
cm/s): 100 cm/s = 768 RPM = 384000 pulses/min
= 6400 pulses/sec = 64 pulses/10ms.
The PWM value update (real speed of the trolley
comparing the user requested speed) is performed
once every 0.5 sec.
8200-0593-03, REV. A
4 of 34
Trolley Positioning
I Max Circuit
In addition to speed regulation, the motor encoder
also performs trolley positioning. As stated
previously, one motor rotation corresponds to a
7.8125cm (3.08in) movement along the rail. Motor
rotation is also equal to 128 rotations per 10
meters of movement.
To avoid burning up the motor due to electrical
over current, an “I Max” circuit is installed on the
CPU. This circuitry provides feedback of 0.6V per
ampere (with an extreme limitation of 5.2A). If overcurrent is detected, the trolley sends a disable
command (PC3-Port C) to the PWM drivers to stop
the trolley motor.
At maximum motor speed, the encoder sends a
TOP_SYNC signal once every 7.3ms and the 16bit internal counter increments every 7.3ms.
However, if the duration between two pulses is less
than 6ms, it is considered a false reading and is
not used.
On-board Adjustments
The CPU board does not have any adjustments.
Port Assignments
Using the above specifications as a reference
point, trolley position is determined by counting
motor rotations (using the TOP_SYNC signal from
the encoder) and by comparing current and
previous counter values.
Port assignments related to trolley functions are as
follows:
Port A:
Port B:
PB7: PWM (motor speed control)
Counter increment or decrement is performed
according to trolley movement (forward or
backward). Trolley direction is known by the
software and confirmed by a SENS signal.
Two optical sensors (A and B) detect the pass-by
from one rail section to another and also recognize
the start and end of the rail. The start of the rail is
detected only by sensor A and the end of the rail is
detected by both sensors (A and B). Sensor B also
detects a spot label positioned at the end of each
track section.
Port C:
PC0: Default LED 2 (lit when a default occurs;
motor is disabled)
PC1: CMD (determines the CW or CCW rotation of
the motor)
PC2: default LED 1 (lit when a default occurs;
motor is disabled)
PC3: DISABLE (motor ON or OFF)
PC4: not used
PC5: BRAKE (Motor brake ON or OFF)
PC6 and PC7: not used
Port D:
PD0: B channel from the encoder
PD1: A channel from the encoder
PD2: RX from Dome (through RS232/RS422
converter)
PD3: TX to Dome (through RS232/RS422
converter)
PD4: TOP_SYNC from the encoder
PD5: not used
PD6: A channel from the encoder
PD7: not used
Port E:
PE0: RX from the matrix
PE1: TX to the matrix
PE2: not used
PE3: Watchdog (voltage critical value 20V +/- 13%)
PE4: not used
PE5: Optical sensor A
PE6: not used
PE7: Optical sensor B
Port F:
PF0: Temperature sensor (not used)
PF1: Not used
PF2: I Max measurement
PF3: Not used
PF4: JTAG TCK (for firmware update purposes)
PF5: JTAG TMS (for firmware update purposes)
PF6: JTAG TDO (for firmware update purposes)
PF7: JTAG TDI (for firmware update purposes)
Port G:
Not used
The ability to differentiate the start and end of the
rail in conjunction with the new positioning system
enables the trolley to move even when the optical
strips are reached and thus reduce the length of
the dead zone.
A built-in odometer records trolley movement in
kilometers. This measurement is performed by
incrementing a counter at the TOP_SYNC pulse
independent of direction. When the value reaches
640000, the odometer increments by 1.
SENSORRAIL IIIE
SERVICE GUIDE
Not used
PBO to PB6: (not used)
8200-0593-03, REV. A
5 of 34
RF 2.4GHz Link and Planar
Antenna
Vision Area, Dead Zone, and
Maintenance Area
• The RF emitter is built into the trolley CPU and
the receiver into the PowerRail (see PowerRail
section).
Vision Area: Is the area in which the trolley will be
able to move. It is equal to the total length of the
rail minus the “dead zones”.
• This RF system has five channels to address
potential interference with other 2.4GHz devices
such as bar code scanners.
Dead Zone: Is the 1.5m (5ft) zone at each end of
the rail. This zone allows the trolley to safely stop
in case of a positioning management system
failure.
• The trolley also supports 5.8GHz. The optional
5.8GHz antenna kit is for use in countries that
authorize this frequency.
Maintenance Area: Is the 0.6m (2ft) area at each
end of the rail. This area enables the trolley to be
removed from the rail for repair or replacement.
PowerRail
The PowerRail module:
• Provides power and data to the rail
• Supports power conversion from 90-240Vac
50/60HZ to 24Vdc/5A
• Supports data conversion from RS-422 to RS232
• Includes the RF video link receiver and planar
receiving antenna
• Direct connection through the DB29 plug
enables product configuration and
troubleshooting, using a laptop and AD
SensorRail Control software
• Main power connection is through an IEC
connector that includes an AC filter
• Data connects through a standard 4-position
terminal (RS-422) and a 3-position terminal
(RS-232).
SENSORRAIL IIIE
SERVICE GUIDE
8200-0593-03, REV. A
6 of 34
CPU Board Layout
BNC
RF 2.4GHz connector
DIP Switches
Electronic Brake Devices
Main Connector
RF 2.4GHz Emitter
ATMEGA 128 µP
X-Tal
Power Connector
JTAG Connector
B Sensor
SENSORRAIL IIIE
SERVICE GUIDE
8200-0593-03, REV. A
7 of 34
Trolley Circuit Block Diagram
To Matrix
Max
202
232 to
422
VA channel
Synchro top
Watchdog
JTAG
Interface
ATMEGA 128
PWM
PWM
Drivers
Motor +
Cmd
Motor -
Disable
I max
Brake
Sensor A
Sensor B
SENSORRAIL IIIE
SERVICE GUIDE
8200-0593-03, REV. A
8 of 34
ATMEGA Pin configurations
SENSORRAIL IIIE
SERVICE GUIDE
8200-0593-03, REV. A
9 of 34
ATMEGA 128 block diagram
Vision area (for surveillance), dead zones (for stopping), and maintenance areas (for servicing)
Rail
Vision Area
Vision Area + Two 1.5m (4.9ft) Dead Zones
Vision Area + Two 1.5m (5ft) Dead Zones +Two 30cm (1ft) Light Reduction Sections = Total Length of Rail
Total Length of Rail + Two 0.6m (2ft) Maintenance Areas
SENSORRAIL IIIE
SERVICE GUIDE
8200-0593-03, REV. A
10 of 34
Interconnection
From 10 to 100 meters (32.8ft to 328.08ft)
220Vac
PowerRail
RS-422 Half Duplex
Composite Video
Or
VM96 V5.0 & RCTTRKE
ADTT16E & RCSN422
AD Matrix & AD Keyboard
Matrix Compatibility
VM16 / ADTT16 (**)(***)
VM96
AD2150 (*)
AD168
AD1024 (*)
MP48
Movements
Yes
Yes
Yes
Yes
Yes
Yes
Presets
4
Unlimited
16
4
16
4
Patterns
3
3
3
3
3
3
* Requires AD2083-02AX code translator.
** Requires RCSN422 code translator.
*** Including remote control via Intellex™ and Network Client™
SENSORRAIL IIIE
SERVICE GUIDE
8200-0593-03, REV. A
11 of 34
Structure Check and Maintenance
Preventive Maintenance
Preventive maintenance helps prevent malfunctions
and safety-related issues. Maintenance is
performed by a functional check, and if necessary,
cleaning.
1. Using a soft cloth soaked with isopropyl
alcohol, clean the following rail parts:
• Copper tracks (use a screwdriver to insert the
cloth into the PVC holder.
• Clean the aluminum where optical encoders
read along the rail.
Functional Check
2. Using a dry, soft cloth without alcohol, clean
the cowling as follows:
To detect unusual rail operation, a functional check
should be performed using AD SensorRail™
Control software before and after maintenance.
Procedure
1. Connect the communication cable (DB25-DB9)
between your laptop and the PowerRail module.
Move jumpers ST3 and ST4 in the module to the
PC position before launching AD SensorRail
Control software.
a. Detach one side of the cowling from the rail
by inserting a plastic “credit card like” card
into the cowling groove at the start of the rail
and pulling it gently along the cowling.
b. Using a soft cloth, gently wipe off dust from
the inside of the cowling.
CAUTION: Do not press hard on
the cowling to avoid scratching it.
3. Check the following parts:
• Rail junctions/jointing plates
ST3
ST4
• Nuts securing the M8 rods to the stirrups
• Tension of anti-sway cables
• Receiving antenna fixture.
2. Using the software, run the trolley to observe
possible failures such as power dropouts, picture
instability, and inaccurate presets.
3. Double click the Output 2 LED to view
“kilometers” on the main window.
4. Check every function, especially presets and
patterns.
5. Check optical stop detection (see CAUTION
below). The dome can be oriented to see the
function LEDs on the CPU board.
CAUTION: Do not run the trolley at full
speed in case of detection failure.
6. Check the DATA link (in and out).
Communication LEDs can be seen from the
Dome.
7. Write down all failures.
SENSORRAIL IIIE
SERVICE GUIDE
8200-0593-03, REV. A
12 of 34
Trolley Check and Maintenance
Guiding and Stabilizing Wheels
1. Using a soft cloth soaked with alcohol, clean the
following trolley parts:
Tracking and stabilizing wheels absorb vibrations
and force coming from the trolley movement and rail
junctions.
• Tracking wheels (4)
Estimated lifetime for these wheels is 10000km;
therefore, no replacement should be expected.
However, for safety reasons, check for lateral
excess movement of the bearings.
• Stabilization wheels (2)
• Pressure roller (1)
• Sliding contacts (4).
2. Using a soft cloth dry clean (without alcohol) the
following trolley parts:
• Optical sensors
• Dome lens.
3. Check wear on the following trolley parts:
• Wheels (tracking and stabilization)
• Sliding contacts
• Pressure roller belt wear
4. Perform an overall check of trolley parts such as
collectors and pantographs.
Sliding Collectors
When copper collectors are worn, the plastic
support can slide against the PVC holder. This will
generate noise and dust and can potentially
deteriorate the PVC holder.
Check the height between the contact surface and
the bottom of the plastic support. New contacts are
20mm thick. As shown below, if the collector is worn
more than 3mm, replace it. Estimated lifetime for
contacts is 8000km.
20mm
17mm
SENSORRAIL IIIE
SERVICE GUIDE
8200-0593-03, REV. A
13 of 34
Drive Wheel Adjustment Screw
Roller Belt Tension
The drive wheel adjustment and stop screws allow
a range of adjustment for best performance. After
adjustment, if the trolley still does not meet
specifications, change the motor or motor drive
wheel.
Roller belt tension must be correct. Too tight, the
belt will generate rolling noise; too loose, the gears
could ruin the belt resulting in trolley positioning
problems.
Visually check belt tension by pressing the belt with
your finger. If tension is correct, the belt should
deflect no more than 1cm.
There is no adjustment available for belt tension.
When the belt is too loose, replace it as follows:
Removing the motor assembly:
M6 Retaining Screws
1. Mark the position of the old motor to ensure the
new motor is installed in the same location.
Adjustment
Screw
Stop
Screw
2. Remove the two M6 screws at each end of the
motor support.
3. Pull out the motor assembly from the trolley
4. Remove the belt from the motor gear.
Re-installing the motor assembly:
1. Install a new belt and place the motor assembly
in its groove.
2. Re-install the M6 retaining screw to the left in the
picture. Do not secure it yet.
3. Re-install the M6 retaining screw to the right in
the picture. Do not secure it yet.
4. Adjust the position of the motor using the mark
made during the removal process.
5. Securely tighten both screws ensuring the motor
is still in place.
SENSORRAIL IIIE
SERVICE GUIDE
8200-0593-03, REV. A
14 of 34
• Aux 3 or 4 enables access to the dome camera
menu.
Servicing
Note: Turn Aux 3 or 4 off after viewing to return
to control of trolley movement.
Firmware Upgrade
• Supports new RS-422 command for expanded
presets up to 16.
To improve motor management and product
reliability, SensorRail III firmware was redesigned.
Version 5.56 offers the following enhancements:
• Improved motor management avoids excessive
power usage and increases product reliability by
preventing motor burn out.
• Electronic motor brake provides increased
security in case of CPU failure.
• Motor management enables up to 3m/s
(9.84ft/s) nominal speed and up to 6m/s (19.69
ft/s) on target, versus 2m/s (6.56ft/s) and 4m/s
(13.12ft/s) with SensorRail II.
Firmware upgrades are performed by flashing
memory in the ATMEGA microcontroller.
• Firmware upgrades are performed by EPROM
flash using a standard communication cable
and a laptop. To perform this operation, a
software utility distributed to certified Tyco
personnel and certified dealers is required.
• Memory flash application supports
Windows 2000 and Windows XP Pro.
• Standard serial COM port is required to
communicate with the ATMEGA in the CPU.
• Dead zone reduced from 5m (16.4ft) to 3m
(9.84ft) at each end of the rail by implementing
an acceleration and deceleration ramp on the
motor; also allows full use of rail length.
• Exit all other programs and disable anti virus
software while loading.
Compatibility: SensorNet to RS-422 code
converter requires upgrading to 0701-2814-0102.
This also supports MegaPower LT Version 1.1.11
and higher.
• Firmware upgrade via EPROM flash provides
an effective way to keep up with the latest
version.
Note: New trolley software is based on software
used with the USB controller called AD SensorRail
Control, product code ADRL3ESWCU, and is not
compatible with SoftRail™ software. Obtain new
trolley software from Tech Support.
Like the SensorRail II, this software provides the
functionality of the SpeedDome Ultra VII with the
exception of privacy zones, competitor’s protocols,
freeze frame, direction indicator, iris and home
position. Main software functionalities include: pan,
tilt, zoom, presets (matrix dependent), patterns
(maximum of 3), and sequences.
Note: The flash utility will still work. However, in
some cases, lock bits for flashing the chip are set
wrong. If flash programming fails, order a new
board.
SensorRail III firmware was written using C++™.
Please refer to manufacture files for complete
details of the firmware.
Note: To avoid unnecessary trolley retrieval,
always flash the trolley at the start of the rail.
SensorRail III CPU firmware upgrade
ADRL3ESW4 provides four new functions for the
trolley.
• Aux 1 resets the trolley to off.
• Aux 2 displays the software version and trolley
travel, in kilometers, on the video screen for
about 5 seconds. For example:
8000km shown
V 5.56 008000
Note: Turn Aux Output 2 off after viewing to
return to control of trolley movement.
SENSORRAIL IIIE
SERVICE GUIDE
8200-0593-03, REV. A
15 of 34
4. Select the COM port to which the
communications cable is connected. Once
done, the COM port window will close. The
picture below shows application functions.
Parts Required
• Serial communications cable (DB25 to DB9)
• AD SensorRail Control software.
Displays firmware version
present in flash memory and
the dome camera address
Application Installation
Run the SETUP.EXE located on the directory
INSTALLER\DISK.
Installation is performed in two steps:
1. LabView engine installation (automatic)
2. ProgChariotV3.exe installation.
The host computer does not need to be rebooted
at the end of the installation process.
Initiates
Flashing
Application Start-up
1. Connect the laptop communications cable to the
DB25 plug on the PowerRail communication
board.
Communication Status Bar
Note: To avoid moving jumpers in the
PowerRail module, an alternate method is to
use an RS-232 to RS-422 converter from the
control room where the RS-422 terminates.
However, only the rail being upgraded can be
connected to the converter. DO NOT connect
other domes or trolleys.
5. Select the PROGRAM button. The AVRprog
window appears:
2. For RS-232 mode only, move jumpers ST4 and
ST5 to the PC position.
3. Launch the ProgChariotV3.exe application.
The following window appears:
6. The trolley’s CPU is now in boot mode, and the
two red LEDs should light.
7. Using the BROWSE button, select the firmware
(.HEX) file you want to flash into the ATMEGA.
SENSORRAIL IIIE
SERVICE GUIDE
8200-0593-03, REV. A
16 of 34
8. When the correct firmware file selected, click
the PROGRAM key. The message PROGRAM
ERASE appears in the communication status
bar. The erroneous message “Erasing failed”
will also occur (wait for message to go away).
Motor Replacement
9. Click the PROGRAM key again. The message
ERASE…DEVICE…PROGRAMMING appears.
To replace the motor:
The motor is located at the rear drive wheel of the
trolley. Replacement motor ADRL3MOTORP is
shipped with the encoder installed.
1. Mark the position of the old motor to ensure the
new motor is installed in the same location.
After a few seconds, the following window
appears:
2. Unscrew the two M6 screws at each end of the
motor support.
3. Unplug the encoder cable.
4. Disconnect the motor wires from the main
connector on CPU board (pins 12 and 16).
5. Pull out the motor assembly from the trolley.
6. Remove the belt from the motor gear.
7. Pull out the motor from its support.
8. Remove the gear from the motor axle using an
M3 Allen wrench.
9. Remove the thermoplastic insulation from each
wire and de-solder them from the motor.
10. Re-solder the wires on the new motor (note
polarity on the motor body).
10. Click OK to initiate flashing. A bar graph shows
the progress.
11. Re-install new 2cm (5in) thermoplastic insulation.
12. Re-install the gear on the motor axle. Secure the
M3 Allen screw.
11. Close the application by clicking the X in upper
right corner (not the EXIT key). The firmware
has now been upgraded and the trolley will
perform a reset.
13. Re-install the motor into its support.
Note: There is no need to re-boot the computer.
12. Launch AD SensorRail Control software to
verify the firmware has been correctly flashed
into the ATMEGA microcontroller. Check the
firmware version by toggling Aux Output 2 on
and off, and then click Calibrate Rail to enable
the trolley learn the rail length.
14. Reconnect the encoder plug.
15. Re-install the belt on the motor gear.
16. Re-install the motor support on the trolley.
17. Re-install the M6 retaining screw (the left one in
the picture), but do not secure it yet.
13. Test the forward and reverse function of the
trolley.
18. Adjust the motor position by sliding it into its
support so that the belt is located in the middle of
each gear (motor & pressure roller).
14. If the RS-232 mode was used, ensure jumpers
ST4 and ST5 are moved back to RS-422
control.
19. Re-install the M6 motor retaining screw to the
right (see picture on page 14) and tighten the
screw.
20. Tighten the left retaining screw.
21. Reconnect the motor wires to pins 12 and 16 of
the main connector on the CPU board.
SENSORRAIL IIIE
SERVICE GUIDE
8200-0593-03, REV. A
17 of 34
CPU Board Replacement
The trolley CPU board is installed in the bottom of
the trolley. It is secured by the corner supporting the
rear sliding contacts and by the RF antenna.
The corner supporting contacts, rear sliding
contacts, and antenna are held by two Allen screws
behind the antenna.
Replacing/Retrofitting Collectors,
Wires, Brackets
1. Remove the trolley from the rail and carefully
place it on its side. Locate the 4-pin connector,
and mark the collector numbers on the trolley
brackets so the wires can be replaced in the
correct order. Wire labels should match the
numbers marked on the brackets.
Note: The picture shows bare aluminum
brackets; the shipped product will be black.
CPU Board
2. Open the black cover and remove the old
brackets using an Allen wrench. Leave the old
collectors on their brackets.
Antenna
3. Remove the number sleeves from the old wires
and place them on the new wires.
4. Transpose the numbers recorded on the old
brackets to the new brackets.
Sliding
Contacts
5. Install new mounting studs on the new brackets
using M5 nuts. Snap the new collectors on the
mounting studs.
6. Install the new brackets, ensuring the Tx antenna
mounts to the bracket that has three bends to
hold the antenna at the correct height.
To remove the CPU board:
1. Remove the antenna from its support by
removing the two bolts.
2. Detach the SMA connector from the antenna.
3. Remove the two Allen screws using an M6 Allen
wrench to detach the bracket from the trolley.
Pay attention to the sliding contacts. The
connection wire can easily loosen.
4. On the CPU board, disconnect the main
connector, power connector and the BNC for the
video. Then pull out the board from its grooves.
BNC
Connector
Main
Connector
The smaller bracket mounts on the other side of
the trolley.
SMA
Connector
Power
Connector
To install the new CPU board, reverse the above
procedure.
SENSORRAIL IIIE
SERVICE GUIDE
8200-0593-03, REV. A
18 of 34
7. Route wires into place and attach them to the 4pin connector shown below and to the collectors.
Cut wires to length on the open end.
SENSORRAIL IIIE
SERVICE GUIDE
8. Secure the black cover, and check the
connections and numbers.
8200-0593-03, REV. A
19 of 34
KST25DC Dust Collector Kit
Replacement
Strip Brush
KST25 Collector
Plastic Case
Push Pin
Dust Collecting Cavity
Assembly Process
1. Insert strip brushes into
corresponding dovetail
pockets. Follow the
arrows.
Exploded view shows all
assembly components:
Plastic cases, strip
brushes, KST25 collector,
and push-pins.
3. Secure the assembly
by snapping push-pins
into the corresponding
holes.
2. Insert the KST25
collector as
shown. Then mate
the other half of
the plastic case to
the assembly.
Carefully align the
dovetail pockets
with the strip
brushes.
SENSORRAIL IIIE
SERVICE GUIDE
8200-0593-03, REV. A
20 of 34
Approximately
0.5mm
Copper strip and collector contact line (red line).
Brush stock material when assembled with a new
collector sits below the contact line.
KST25 Collector
Approximately
2.5–3.0mm
Note: If collectors are worn-out, before installing new
brushes, trim brush hair approximately 0.5mm.
SENSORRAIL IIIE
SERVICE GUIDE
8200-0593-03, REV. A
21 of 34
2. After drilling, clean filings from the area.
Power Supply Modification and
Adjustment
3. Reconnect wires and turn on the PowerRail
module. The trolley should perform its power-up
routine.
WARNING! Unplug the power cord to the
PowerRail module to ensure there is no
power to the rail.
4. Using a voltmeter set to dc (Track 1 = voltage,
Track 2 = Gnd), connect its probes to the
contacts shown below. Then using a small
screwdriver, adjust the potentiometer to 27Vdc
maximum.
1. Using the template below to determine the hole
location, drill a 10mm hole in the PowerRail
module to gain access to the adjustment screw.
• About 5mm up the drill bit, wrap tape
approximately 10 times around the bit to stop
it so it does not go too deep into the
enclosure.
• Grease the bit or use a vacuum close to the
bit while drilling to prevent metal filings from
getting into the enclosure.
5. Test the trolley’s motion to the furthest point and
back.
Note: Because the PowerRail module RS-422
output is not tri-state, additional devices cannot
be daisy-chained or parallel-wired to the rail.
Instead, connect the rail to separate channels on
an RS-422 system, or use an RS-422 junction
box.
12mm
28mm
10mm dia. hole to access
the power supply
adjustment potentiometer
The PowerRail module is shown below with the
new access hole. Note plastic screws and thick
washer in plastic used to isolate the power
supply from the rail. This prevents multiple
ground paths if you have RF video issues.
SENSORRAIL IIIE
SERVICE GUIDE
8200-0593-03, REV. A
22 of 34
Copper Install Tool ADRLCIT
This tool is used to install new copper strips and also reverse old copper strips due to green patina from
previous collectors that ran over it. The latest tool is turned using a wheel instead of handles.
To unwind the copper back into
the rail, flip the support bars 180°
and rest the wheel in the slot as
shown. Use the service trolley to
pull the strips.
To wind the existing copper back
on to the wheel, rotate the wheel
in the direction of the arrow shown
above.
SENSORRAIL IIIE
SERVICE GUIDE
8200-0593-03, REV. A
23 of 34
SENSORRAIL IIIE
SERVICE GUIDE
8200-0593-03, REV. A
24 of 34
RF Attenuator
Light Reduction Kit
(dc to 6GHz usable)
SR3-END-COVER and ADRL3BUL3.5U
This kit prevents light reflections from entering the
cowling from each end of the rail.
1. Mount the ection onto the existing rail using the
hardware provided.
2. Attach the top hat to the top of the section to
cover the large cutout.
3. Add extra cowling to the rail structure.
4. Attach the new end cover.
Note: be sure to follow the installation guide for
minimizing light reflections into the cowling.
The RF attenuator is located at the transmit
antenna on the trolley.
IMPORTANT! Ensure the customer understands
that if installation requirements are not met, some
light reflections cannot be removed from the
picture on the video monitor.
CAUTION: The attenuator is required
to comply with the CE regulation.
Rail
Distance
RF
Attenuator
Part
Number
10–45m
50–75m
75–100m
30dB
20dB
10dB or 15dB
ADSMA30DB
ADSMA20DB
ADSMA10DB
ADSMA15DB
Old metal end
cover shown.
Note: There are environmental circumstances that
may require a different value.
SENSORRAIL IIIE
SERVICE GUIDE
8200-0593-03, REV. A
25 of 34
9. Let the roll of strap uncoil to the floor, and very
carefully, power up the rail. As the trolley
homes, it will pull some of the strap into the rail.
Trolley Retrieval Tool
ADRLSTBL100 and ADRLEST
The trolley retrieval tool (also called the end
stop/strap tool) enables a technician to pull the
trolley back without removing the cowling when the
trolley does not return to the start end of the rail.
1. At both ends of the rail, remove the stop screw
and slide out the spring and old stop block.
2. At the end of the rail, insert the new service
block.
3. Remove the camera trolley.
4. Fold the end of the strapping tape ¾ inch back
on itself. Then use a soldering iron to make a
hole in the folded tape.
5. Attach the strapping tape to the new service
block using an M3 screw.
6. With the strap facing the start end of the rail,
slide the block by hand into the stop groove for
about 50cm (20in).
10. After the trolley homes, use AD SensorRail
Control software to set the maximum speed to
1m/s (3.3ft/s) so the trolley slowly pulls the
block and strap to the end of the rail. When
done, return the speed to 3m/s (9.8ft/s).
11. Once the trolley reaches the end of the rail,
remove the service block holding the tape at the
start end of the rail, turn the block around and
reinsert it into the stop groove, followed by the
spring and stop screw. Once this assembly is
installed, tighten the stop screw.
12. If the trolley requires service and does not
return to the start end of the rail, remove the
stop screw and spring at the start end and pull
the strap to move the trolley to the start of the
rail. Then, follow the steps above to reinstall the
strap.
7. Slide the trolley into the rail as far as it will go.
The strap should also slide.
8. At the start end of the rail, insert the slit of the
second service block into the stop groove to
hold the tape above it.
SENSORRAIL IIIE
SERVICE GUIDE
8200-0593-03, REV. A
26 of 34
SR3 SERVICE ASSEMBLY
Service block
Note: Do not punch hole into strapping tape! Material will
break! Instead use a soldering iron to burn the hole into the
tape.
Tape feeding procedure
Service block slot feature to be used to secure
second block on the aluminum structure while
feeding the tape attached to the other one.
SENSORRAIL IIIE
SERVICE GUIDE
8200-0593-03, REV. A
27 of 34
Antenna Bracket Replacement
RF Link DIP Switch Settings
Plastic bracket ADRL3RXBRK enables the RF
receive antenna to be placed inside or outside the
structure depending on installation requirements.
If 2.4GHz devices interfere with the SensorRail,
select one of the following alternate frequencies
using the four-position DIP switch located on the
transmitter board of the trolley.
Note: The installation kit contains hardware to
mount the receive antenna to the black bracket.
Ensure the bracket is installed so the antenna is in
line with the transmit antenna of the trolley.
DIP Switch
Channel
1
2
3
4
Channel 1
(2414.5MHz)
ON
OFF
OFF
OFF
Channel 2
(2428.5MHz)
OFF
ON
OFF
OFF
2. If RF holes cannot be eliminated, move the
antenna to the outside of the rail.
Channel 3
(2442.5MHz)
ON
ON
OFF
OFF
3. Ensure that the RF antenna does not receive
transmissions from another system. If it does,
select a different transmission frequency.
Channel 4
(2456.5MHz)
OFF
OFF
ON
OFF
Channel 5
(2470.5MHz)
ON
OFF
ON
OFF
1. Insert the bracket 15cm into the rail. This
bracket enables the antenna to be easily moved
to where the least number of RF holes exist.
SENSORRAIL IIIE
SERVICE GUIDE
8200-0593-03, REV. A
28 of 34
Self-Tapping Screw Installation
End Cover Replacement
Two self-tapping screws, one at each at each end
of the rail, prevent the PVC holder from coming out
of the rail.
If RF video dropouts occur, use the black plastic
end cover ADRL3ECB. Affix the plastic cover using
the same screws that held the metal version.
Using a drill with a Phillips bit, thread each screw
into the rail as shown below. Ensure the screw
does not touch the copper or connector at the start
and end of the rail.
SENSORRAIL IIIE
SERVICE GUIDE
CAUTION: The black cover is only used
with the new rail extension containing
the top hat. DO NOT use this cover
without the rail extension. See “Light
Reduction Kit” on page 25.
8200-0593-03, REV. A
29 of 34
Ordering Parts
The list below shows parts available for service. Please contact local marketing for price and delivery time.
Product Code
Description
Trolley
ADRL3EVCUPE
SensorRail III, fully equipped trolley, with 2.4GHz HF transmitter, Dome VII, PAL
ADRL3WHEELSP
SensorRail III, 4 trolley wheels, universal
ADRL3DRVSYSP
SensorRail III, driving system, with pressure roller, mount, universal
ADRL3MOTORP
SensorRail III, motor, universal
ADRL3DRVACCP
SensorRail III, driving system accessories, with gear & belt, universal
ADRL3CMF25U (OBS)
SensorRail III, sliding contact, universal
ADRL3CPUU
SensorRail III, CPU board, PAL
ADRL3RFT24P
SensorRail III, RF link, transmitter 2,4GHz, PAL
ADRL3ATEN24U
SensorRail III, RF transmitter antennas 2,4GHz , PAL
ADRL3RFT58P
SensorRail III, RF transmitter 5,8GHz, PAL
ADRL3ATEN58U
SensorRail III, PowerRail, RF antenna transmitter 5,8GHz, PAL
KST25
Set of 4 copper/graphite collectors
KST25DC
KST25-BRKFR
Bracket for the SensorRail KST25 collectors front 3 bends
KST25-BRKR
SensorRail III dust collector kit
ADRL3RXBRK
Bracket for the SensorRail KST25 collectors rear 2 bends
Rx antenna black plastic kit with screws
ADRLCIT
SR3 copper install tool
ADRLEST
SR3 end stop/strap tool
ADRLSTBL100
Strapping tape black, 100m (328.1ft)
ADSMA10DB
SR3 RF attenuator 10dB Tx Ant
ADSMA15DB
SR3 RF attenuator 15dB Tx Ant
ADSMA20DB
SR3 RF attenuator 20dB Tx Ant
ADSMA30DB
SR3 RF attenuator 30dB Tx Ant
ADRL3ESWCU
AD SensorRail control utility version 1.0 (available from Tech Support only)
PowerRail
ADRL3PWRLP
SensorRail III, PowerRail complete, 27Vdc, with RF receiver, antenna PAL
ADRL3PWROP
SensorRail III, PowerRail only 27Vdc, PAL
ADRL3PWRRECP
SensorRail III, PowerRail, RF receiver 2,4GHz, PAL
ADRL3PWRANTP
SensorRail III, PowerRail, RF receiver antenna 2,4GHz, PAL
ADRL3PWRR58P
SensorRail III, PowerRail, RF receiver 5,8GHz, PAL
ADRL3PWRA58P
SensorRail III, RF antenna receiver 5,8GHz, PAL
SENSORRAIL IIIE
SERVICE GUIDE
8200-0593-03, REV. A
30 of 34
Product Code
Description
Rail
ADRL3TRACKU
SensorRail III, full rail 5m (16,4ft), with PVC holder, 4 jointing plates, 2 stirrups
ADRL3TRACK5U
SensorRail III, rail only 2,5m x 2, with 4 jointing plates, 18 screws, universal
ADRL3FE901U
SensorRail III, PVC holder 2,5m x 2, universal
ADRL3ETRIERU
SensorRail III, 2 stirrups, universal
ADRL3RESORTU
SensorRail III, C125-180-360, 4 springs, universal
ADRL31350U
SensorRail III, 2 N°1350, universal
ADRL3OPTICU
SensorRail III, optical strip (7,5 meters), universal
ADRL3UNVI55U
SensorRail III, copper, VA860/8-55, universal
ADRL3UNVI90U
SensorRail III, copper, VA860/8-90, universal
ADRL3UNVI100U
SensorRail III, copper, length >100m, universal
SR3-END-COVER
Sensor Rail 3 NEW end covers and accessories.
ADRL3ECB
SR3E end cover black plastic kit
ADRLEST
SR3 end stop/strap tool
ADRLSTBL100
Strapping tape black, 100m (328.1ft)
ADRL3-AUX-BRK
Aux bracket kit stirrup
Copper Track
ADRL3CUI10U
SensorRail III, copper tracks 10m (32,81ft), 4 rolls of 10m, universal
ADRL3CUI15U
SensorRail III, copper tracks 15m (49,21ft), 4 rolls of 15m, universal
ADRL3CUI20U
SensorRail III, copper tracks 20m (65,62ft), 4 rolls of 20m, universal
ADRL3CUI25U
SensorRail III, copper tracks 25m (82,02ft), 4 rolls of 25m, universal
ADRL3CUI30U
SensorRail III, copper tracks 30m (98,43ft), 4 rolls of 30m, universal
ADRL3CUI35U
SensorRail III, copper tracks 35m (114,83ft), 4 rolls of 35m, universal
ADRL3CUI40U
SensorRail III, copper tracks 40m (131,23ft), 4 rolls of 40m, universal
ADRL3CUI45U
SensorRail III, copper tracks 45m (147,64ft), 4 rolls of 45m, universal
ADRL3CUI50U
SensorRail III, copper tracks 50m (164,04ft), 4 rolls of 50m, universal
ADRL3CUI55U
SensorRail III, copper tracks 55m (180,45ft), 4 rolls of 55m, universal
ADRL3CUI60U
SensorRail III, copper tracks 60m (196,85ft), 4 rolls of 60m, universal
ADRL3CUI65U
SensorRail III, copper tracks 65m (213,25ft), 4 rolls of 65m, universal
ADRL3CUI70U
SensorRail III, copper tracks 70m (229,66ft), 4 rolls of 70m, universal
ADRL3CUI75U
SensorRail III, copper tracks 75m (246,06ft), 4 rolls of 75m, universal
ADRL3CUI80U
SensorRail III, copper tracks 80m (262,47ft), 4 rolls of 80m, universal
ADRL3CUI85U
SensorRail III, copper tracks 85m (278,87ft), 4 rolls of 85m, universal
ADRL3CUI90U
SensorRail III, copper tracks 90m (295,28ft), 4 rolls of 90m, universal
ADRL3CUI95U
SensorRail III, copper tracks 95m (311,68ft), 4 rolls of 95m, universal
ADRL3CUI100U
SensorRail III, copper tracks 100m (328,08ft),4 rolls of 100m, universal
ADRLCIT
SR3 copper install tool
SENSORRAIL IIIE
SERVICE GUIDE
8200-0593-03, REV. A
31 of 34
Product Code
Description
Mirrored Cowling
ADRL3BUL10U
SensorRail III, mirrored cowling 10m (32,81ft), universal
ADRL3BUL15U
SensorRail III, mirrored cowling 15m (49,21ft), universal
ADRL3BUL20U
SensorRail III, mirrored cowling 20m (65,62ft), universal
ADRL3BUL25U
SensorRail III, mirrored cowling 25m (82,02ft), universal
ADRL3BUL30U
SensorRail III, mirrored cowling 30m (98,43ft), universal
ADRL3BUL35U
SensorRail III, mirrored cowling 35m (114,83ft), universal
ADRL3BUL40U
SensorRail III, mirrored cowling 40m (131,23ft), universal
ADRL3BUL45U
SensorRail III, mirrored cowling 45m (147,64ft), universal
ADRL3BUL50U
SensorRail III, mirrored cowling 50m (164,04ft), universal
ADRL3BUL55U
SensorRail III, mirrored cowling 55m (180,45ft), universal
ADRL3BUL60U
SensorRail III, mirrored cowling 60m (196,85ft), universal
ADRL3BUL65U
SensorRail III, mirrored cowling 65m (213,25ft), universal
ADRL3BUL70U
SensorRail III, mirrored cowling 70m (229,66ft), universal
ADRL3BUL75U
SensorRail III, mirrored cowling 75m (246,06ft), universal
ADRL3BUL80U
SensorRail III, mirrored cowling 80m (262,47ft), universal
ADRL3BUL85U
SensorRail III, mirrored cowling 85m (278,87ft), universal
ADRL3BUL90U
SensorRail III, mirrored cowling 90m (295,28ft), universal
ADRL3BUL95U
SensorRail III, mirrored cowling 95m (311,68ft), universal
ADRL3BUL100U
ADRL3BUL3.5U
SensorRail III, mirrored cowling 100m (328,08ft), universal
3.5 meters mirror cowling to add when using SR3-END-COVER
SENSORRAIL IIIE
SERVICE GUIDE
8200-0593-03, REV. A
32 of 34
Environmental
Specifications
(Excluding Dome Camera)
Operational
Maximum rail length.................................. 100m (328.1ft)
Video travel distance .................................. 97m (318.3ft)
Travel speed:
Nominal....................................................3m/s (9.8ft/s)
Preset.....................................................6m/s (19.6ft/s)
Preset positioning................................0.3m/s (0.98ft/s)
Patrol mode...........................................1.5m/s (4.9ft/s)
Initialization mode ....................................1m/s (3.3ft/s)
Cowling density............. f0.7–f0.95 (15–16% penetration)
Camera....................... See manual supplied with camera
Controller ................. See manual supplied with controller
Electrical
Power requirements:
Supply voltage (auto switched) ... 90–240Vac, 50/60Hz
Current (120Vac)....................... 5A typical (10A surge)
Current (240Vac)...................... 2.5A typical (5A surge)
Operating temperature .................................. –10 to 50°C
Storage temperature ..................................... –20 to 65°C
Rate of change per hour (max.) .................10°C per hour
Altitude (max.) ............................. 3660m above sea level
Relative humidity......................0 to 95% non-condensing
Mechanical
Single rail section:
Length ........................................................2.5m (8.2ft)
Width ..................................................... 188mm (7.4in)
Height (w/o cowling) .............................. 141mm (5.6in)
Height (w/cowling) .................................. 255mm (10in)
Weight ......................................6.7kg/m (14.7 lbs/3.3ft)
Material.......................................... Extruded aluminum
Cowling material....................... 175 micron Polyester film
Trolley (w/dome camera)
Dimensions (H x W x L) .................225 x 131 x 400mm
Weight ....................................................... 5kg (11 lbs)
RF link transmitter:
RF frequency range .................... 2.4–2.483GHz (PAL)
over 5 channels
Transmission power .................................. 10mW EIRP
Video input ............................... Composite PAL 1V p-p
Video bandwidth........................................ 30Hz–5MHz
Power supply............................................. 12.8–15Vdc
Nominal current................................................. 240mA
RF link receiver:
RF frequency range .................... 2.4–2.483GHz (PAL)
over 5 channels
Video output ............................. Composite PAL 1V p-p
Sensitivity........................................ –86dBm (21dBµV)
Power supply.................................................. 8–10Vdc
Nominal current................................................. 250mA
Trolley motor:
Nominal voltage ................................................. 24Vdc
Nominal speed ............................... 6700rpm clockwise
Nominal torque............................................ 1250m Nm
Nominal current (w/o load) ................................ 0.120A
Speed constant ............................................. 287rpm/V
Cabling
Power ........................................................ IEC connector
Video* .....................................................Coaxial RG59/U
RS-422 data .................. Cat. 5. 1 x twisted pair, shielded
* KX-6 for <300m from PowerRail to matrix switcher,
KX-8 for <800m from PowerRail to matrix switcher.
SENSORRAIL IIIE
SERVICE GUIDE
8200-0593-03, REV. A
33 of 34
Declarations
Regulatory Compliance
Emissions .................................................. EN 61000-3-2
EN 61000-3-3
Immunity ..................................................... EN 301489-3
Radio .......................................................... EN 300440-2
Safety ...............................................................EN 60950
EN 50371
Declarations
Thank you for using American Dynamics products. We
support our products through an extensive and worldwide
network of dealers. The dealer, through whom you originally
purchased this product, is your point of contact if you have a
need for service or support. Our dealers are fully empowered
to provide the very best in customer service and support.
Dealers should contact American Dynamics at
(800) 507-6268 or (561) 912-6259 or on the web at
www.americandynamics.net.
WARRANTY DISCLAIMER: Sensormatic Electronics
Corporation makes no representation or warranty with respect
to the contents hereof and specifically disclaims any implied
warranties of merchantability or fitness for any particular
purpose.
NOTICE: The information in this manual was current when
published. The manufacturer reserves the right to revise and
improve its products. All specifications are therefore subject to
change without notice.
LIMITED RIGHTS NOTICE: For units of the Department
of Defense, all documentation and manuals were developed at
private expense and no part of it was developed using
Government Funds. The restrictions governing the use and
disclosure of technical data marked with this legend are set
forth in the definition of “limited rights” in paragraph (a) (15)
of the clause of DFARS 252.227.7013. Unpublished - rights
reserved under the Copyright Laws of the United States.
TRADEMARK NOTICE: American Dynamics and
Sensormatic are trademarks or registered trademarks of
Sensormatic Electronics Corporation. Other product names
mentioned herein may be trademarks or registered trademarks
of Sensormatic or other companies.
COPYRIGHT: Under copyright laws, the contents of this
manual may not be copied, photocopied, reproduced,
translated or reduced to any electronic medium or machinereadable form, in whole or in part, without prior written
consent of Sensormatic Electronics.
MDR 3/06
www.americandynamics.net
SENSORRAIL IIIE
SERVICE GUIDE
8200-0593-03, REV. A
34 of 34