1
Strand Lighting - Dallas
10911 Petal Street
Dallas, TX 75238
Tel: 214-647-7880
Fax: 214-647-8031
Strand Lighting - New York
267 5th Ave, 4th Floor
New York, NY 10016
Tel: 212-213-8219
Fax: 212-532-2593
Strand Lighting - Asia Limited
Room 6-10, 20/F Delta House 3 On Yiu Street
Shatin, N.T. Hong Kong
Tel: + 852 2757 3033
Fax: + 852 2757 1767
Strand Selecon - Auckland
19-21 Kawana Street
Northcote, Auckland 0627
New Zealand
Tel: +64 9 481 0100
Fax: +64 9 481 0101
Strand Lighting - Europe
Marssteden 152
Enschede 7547 TD
The Netherlands
Tel: +31 53 4500424
Fax: +31 53 4500425
Website:
www.strandlighting.com
The material in this manual is for information purposes only and is subject to change without notice. Strand
Lighting assumes no responsibility for any errors or omissions which may appear in this manual. For comments and
suggestions regarding corrections and/or updates to this manual, please contact your nearest Strand Lighting office.
El contenido de este manual es solamente para información y está sujeto a cambios sin previo aviso. Strand
Lighting no asume responsabilidad por errores o omisiones que puedan aparecer. Cualquier comentario, sugerencia
o corrección con respecto a este manual, favor de dirijirlo a la oficina de Strand Lighting más cercana.
Der Inhalt dieses Handbuches ist nur für Informationszwecke gedacht, Aenderungen sind vorbehalten. Strand
Lighting uebernimmt keine Verantwortung für Fehler oder Irrtuemer, die in diesem Handbuch auftreten. Für
Bemerkungen und Verbesserungsvorschlaege oder Vorschlaege in Bezug auf Korrekturen und/oder
Aktualisierungen in diesem Handbuch, moechten wir Sie bitten, Kontakt mit der naechsten Strand LightingNiederlassung aufzunehmen.
Le matériel décrit dans ce manuel est pour information seulement et est sujet à changements sans préavis. La
compagnie Strand Lighting n'assume aucune responsibilité sur toute erreur ou ommission inscrite dans ce manuel.
Pour tous commentaires ou suggestions concernant des corrections et/ou les mises à jour de ce manuel, veuillez s'll
vous plait contacter le bureau de Strand Lighting le plus proche.
Information contained in this document may not be duplicated in full or in part by any person without prior written
approval of Strand Lighting. Its sole purpose is to provide the user with conceptual information on the equipment
mentioned. The use of this document for all other purposes is specifically prohibited. Certain features of the
equipment described in this document may form the subject of patents or patent applications.
Document Number: 2-450187-010
Version as of: December 13, 2010
Palette VL Lighting Control Console Installation & Setup Guide
©2010 Philips Group. All rights reserved.
Palette VL Lighting Control Console
Installation & Setup Guide
FOREWORD
1. Palette Software License
SET OUT BELOW ARE THE TERMS AND CONDITIONS UNDER WHICH YOU ARE PERMITTED TO USE THE BUNDLE OF
SOFTWARE COLLECTIVELY CALLED THE PALETTE SOFTWARE ("PALETTE"). PLEASE READ THIS INFORMATION
CAREFULLY. IF YOU USE PALETTE, YOU AGREE TO BE BOUND BY THESE TERMS AND CONDITIONS AND AS SUCH,
THIS DOCUMENT WILL CONSTITUTE A LEGAL AGREEMENT BETWEEN Horizon Control Inc. ("HCI") AND YOU AND SUCH
ENTITY (collectively referred to as "You" or "Your" hereinafter) GOVERNING ALL USE OF PALETTE.
1. Grant. HCI grants you a non-exclusive, royalty-free license to use the PALETTE and all modifications and upgrades thereof.
2. Copyright. HCI holds an exclusive, worldwide license to market and distribute PALETTE. HCI holds and retains all worldwide
rights, title and interests, including without limitation, copyright, in and to PALETTE and all source code, object code, executable
code, libraries and graphical representation (screen layout). You acknowledge that HCI is not selling or otherwise transferring title
or any rights in PALETTE to You. You may not modify, translate, adapt, reproduce, decompile, reverse engineer or disassemble
PALETTE.
3. Use. You agree to follow the instructions contained in PALETTE, and in the Materials provided with PALETTE from time to time,
for the installation and use of PALETTE. HCI may modify PALETTE at any time for any reason.
4. Disclaimer of Warranty. You expressly acknowledge and agree that your use of PALETTE is at your sole risk. HCI warrants that
PALETTE will be free from defect on the day you receive it which constitutes HCI's sole and exclusive warranty.
HCI EXPRESSLY DISCLAIMS AND EXCLUDES ALL OTHER WARRANTIES, EXPRESS AND IMPLIED, INCLUDING BUT NOT
LIMITED TO THE IMPLIED WARRANTIES OF MERCHANTABILITY AND FITNESS FOR A PARTICULAR PURPOSE. HCI
DOES NOT WARRANT THAT PALETTE WILL MEET ALL OF YOUR REQUIREMENTS OR THAT ITS OPERATIONS WILL BE
UNINTERRUPTED OR ERROR FREE, OR THAT ANY DEFECT WITHIN PALETTE WILL BE CORRECTED. FURTHERMORE,
HCI DOES NOT WARRANT NOR MAKE ANY REPRESENTATION REGARDING THE RESULTS OF YOUR USE OF PALETTE
IN TERMS OF CAPABILITY, CORRECTNESS, ACCURACY, RELIABILITY OR OTHERWISE. NO ORAL OR WRITTEN
INFORMATION, REPRESENTATION OR ADVICE GIVEN BY HCI OR AN AUTHORIZED REPRESENTATIVE OF HCI SHALL
CREATE A WARRANTY.
5. Remedies. In the event of a breach of the express warranty provided in Section 4 above, HCI will replace PALETTE with
another copy of PALETTE, if available; provided that you return the defective copy of PALETTE to HCI within thirty (30) days of the
date you receive it. You acknowledge that this Section sets forth Your SOLE AND EXCLUSIVE remedy and HCI's SOLE AND
EXCLUSIVE liability, for breach of warranty or any other duty.
6. Limitation of Liability. YOU ACKNOWLEDGE THAT HCI IS PROVIDING PALETTE AS IS.UNDER NO CIRCUMSTANCES,
INCLUDING BUT NOT LIMITED TO NEGLIGENCE, SHALL HCI BE LIABLE FOR ANY DIRECT, INDIRECT, INCIDENTAL,
SPECIAL, CONSEQUENTIAL OR OTHER DAMAGES IN TORT, CONTRACT, PRODUCT LIABILITY OR UNDER ANY OTHER
THEORY OF LAW RESULTING FROM THE INSTALLATION OR REMOVAL OF PALETTE, OR YOUR USE, OR INABILITY TO
USE, PALETTE, INCLUDING, WITHOUT LIMITATION, DAMAGES RESULTING FROM LOSS OF USE, PROFITS, DATA, OR
BUSINESS, AND DAMAGE TO YOUR INTERNAL COMPUTER SYSTEMS EVEN IF HCI OR AN AUTHORIZED
REPRESENTATIVE OF HCI HAS BEEN ADVISED OF THE POSSIBILITY OF SUCH DAMAGES. THIS EXCLUSION OF
DAMAGES IS EFFECTIVE EVEN IF THE EXCLUSIVE REMEDY STATED IN SECTION 5 ABOVE FAILS OF ITS ESSENTIAL
PURPOSE.
7. Controlling Law and Severability. This License shall be governed by and construed in accordance with the laws of the United
States and the State of Pennsylvania. If for any reason a court of competent jurisdiction finds any provision of this License, or a
portion thereof, to be unenforceable, that provision shall be enforced to the maximum extent permissible so as to affect the intent
of the parties and the remainder of this License shall remain in full force and effect. Any cause of action with respect to PALETTE
must be instituted within one year after the claim or cause of action has arisen or be barred.
8. Confidentiality. PALETTE and all Materials provided by HCI under this License are confidential and proprietary to HCI. You
agree to hold them in confidence, not to use them other than in connection with PALETTE and the performance of this License.
9. Complete License. This License constitutes the entire agreement between You and HCI with respect to PALETTE, and all
Materials provided to You by HCI and supersedes any prior or contemporaneous understandings, representations, statements or
agreements, written or oral, regarding PALETTE. No amendment to or modification of this License will be binding on HCI without
HCI's consent. HCI may modify this License at any time for any reason.
10. Headings. The section headings used herein are for convenience of reference only and do not form a part of these terms and
conditions, and no construction or inference shall be derived therefrom.
If you have questions about the PALETTE Software License, please send an email to [email protected] prior to using.
Foreword
i
Installation & Setup Guide
Notes
ii
Palette VL Lighting Control Console
Palette VL Lighting Control Console
Installation & Setup Guide
TABLE OF CONTENTS
Introduction
About This Guide ................................................................................................................................................... 1
Additional Documentation ..................................................................................................................................... 1
Customer Service and Support ............................................................................................................................... 2
Chapter 1. Overview
Components
Included Items ........................................................................................................................................................
Processor.................................................................................................................................................................
Accessories and Expansion Devices ......................................................................................................................
Monitor/Touchscreen ......................................................................................................................................
Optional Accessories (sold separately) ..................................................................................................................
Software Upgrades .................................................................................................................................................
Control Channel Upgrades .....................................................................................................................................
4
4
4
4
4
5
5
Features
Standard Features ................................................................................................................................................... 6
Optional Add-On Features ..................................................................................................................................... 6
Software Overview
PaletteOS Software.................................................................................................................................................
Off-Line Editor .......................................................................................................................................................
Control of Connected Devices................................................................................................................................
External Control .....................................................................................................................................................
7
7
7
7
Chapter 2. Installation and Power Up
Unpack
Site Requirements................................................................................................................................................. 10
Product Care ......................................................................................................................................................... 10
Unpack and Assemble Components..................................................................................................................... 10
Hook-Up
Connecting Console Components ........................................................................................................................
DMX512 Output...................................................................................................................................................
Remote Focus Unit (RFU)....................................................................................................................................
Vision.net..............................................................................................................................................................
11
11
12
12
Console Power Up
Power Up Procedure............................................................................................................................................. 13
Table Of Contents
iii
Installation & Setup Guide
Palette VL Lighting Control Console
Chapter 3. Controls
iv
Desk Layout
Console Overview ................................................................................................................................................
Palette VL16 Control Console.......................................................................................................................
Palette VL64 Control Console.......................................................................................................................
Programming Buttons Layout ..............................................................................................................................
Information Keys...........................................................................................................................................
Action Keys ...................................................................................................................................................
Numerical Keypad.........................................................................................................................................
Miscellaneous ................................................................................................................................................
M-Keys .................................................................................................................................................................
Softkeys ................................................................................................................................................................
Dialog Navigation Function ..........................................................................................................................
Tools and View Function ..............................................................................................................................
Intelligent Lighting Buttons and Encoders ...........................................................................................................
Playback Controls Layout.....................................................................................................................................
Playbacks.......................................................................................................................................................
Level Wheel..........................................................................................................................................................
Trackball/Mouse Controls ....................................................................................................................................
16
16
17
18
18
18
19
19
20
20
20
20
21
22
22
22
23
Button Details
Plus, Minus, @ (At), Full, Out .............................................................................................................................
Arrows ..................................................................................................................................................................
Blind .....................................................................................................................................................................
Copy......................................................................................................................................................................
Cue........................................................................................................................................................................
Dead Black Out Button.........................................................................................................................................
Delete....................................................................................................................................................................
Edit........................................................................................................................................................................
Go .........................................................................................................................................................................
Goto ......................................................................................................................................................................
Group ....................................................................................................................................................................
Halt / Back ............................................................................................................................................................
Load ......................................................................................................................................................................
Look......................................................................................................................................................................
Move .....................................................................................................................................................................
Number Buttons....................................................................................................................................................
On .........................................................................................................................................................................
Previous and Next.................................................................................................................................................
Record...................................................................................................................................................................
Undo .....................................................................................................................................................................
Release Playback ..................................................................................................................................................
Select.....................................................................................................................................................................
Shift ......................................................................................................................................................................
Softkeys ................................................................................................................................................................
Step Forward / Step Back .....................................................................................................................................
Tools .....................................................................................................................................................................
Up / Down.............................................................................................................................................................
24
24
24
25
25
25
25
25
25
26
26
26
26
27
27
27
27
27
28
28
29
29
29
30
30
30
31
Palette VL Lighting Control Console
Installation & Setup Guide
Update................................................................................................................................................................... 31
View...................................................................................................................................................................... 31
Processor Keyboard Shortcuts.............................................................................................................................. 32
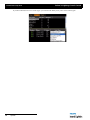
Software Configuration
Main PaletteOS Software Screen .........................................................................................................................
Cue List Directory ................................................................................................................................................
Cue List ................................................................................................................................................................
Channel and Attribute Grids.................................................................................................................................
Status Window Display ........................................................................................................................................
PaletteOS Control Panel .......................................................................................................................................
Application Controls .....................................................................................................................................
System Controls ............................................................................................................................................
Touch Screen Calibration..............................................................................................................................
Maintenance Controls ...................................................................................................................................
Information....................................................................................................................................................
Run/Shutdown Controls and Application List ..............................................................................................
Tracking Backup ...........................................................................................................................................
Remote Engine ..............................................................................................................................................
33
33
34
34
34
35
36
37
41
47
50
50
51
51
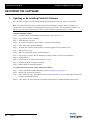
Restoring the Software
Updating or Re-Installing PaletteOS Software..................................................................................................... 52
Chapter 4. Setup
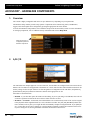
Accessory - Hardware Components
Overview ..............................................................................................................................................................
A/B C/D................................................................................................................................................................
Dead Black Out (DBO) ........................................................................................................................................
Console Setup.......................................................................................................................................................
QWERTY Keyboard Cue List Control .........................................................................................................
Level Entry Mode..........................................................................................................................................
Console Personalities ....................................................................................................................................
Macro Editor and Commands...............................................................................................................................
54
54
56
56
56
57
57
58
Chapter 5. Operation
Selecting Channels and Setting Levels
Channel Grid Overview........................................................................................................................................
Using the Keypad to Select Channels ..................................................................................................................
Level Entry Mode..........................................................................................................................................
Using the Mouse to Select Channels ....................................................................................................................
62
63
63
63
Recording a Cue or Look
Recording a Cue ...................................................................................................................................................
Fast Description.............................................................................................................................................
Detailed Description .....................................................................................................................................
Detailed Description......................................................................................................................................
Recording a Look (Submaster).............................................................................................................................
Look Pages ...........................................................................................................................................................
64
64
64
67
67
69
Table Of Contents
v
Installation & Setup Guide
Palette VL Lighting Control Console
Appendix A. Specifications
Palette VL Lighting Control Console ................................................................................................................... 72
Appendix B. Software Tips
Helpful Tips and Shortcuts ................................................................................................................................... 74
vi
Palette VL Lighting Control Console
Installation & Setup Guide
INTRODUCTION
1. About This Guide
Congratulations on your purchase of a Strand Lighting Palette VL Lighting Control Console. This guide provides
important information regarding safety, installation, and operation for all console hardware components.
Familiarizing yourself with this information will help you get the most out of your lighting system.
This guide describes the installation and operation procedures for the following models:
• 92811 Palette VL16 - 500 Channel, 16 submaster Console
• 92812 Palette VL16 - 1000 Channel, 16 submaster Console
• 92813 Palette VL16 - 1500 Channel, 16 submaster Console
• 92814 Palette VL64 - 500 Channel, 64 submaster Console
• 92815 Palette VL64 - 1000 Channel, 64 submaster Console
• 92816 Palette VL64 - 1500 Channel, 64 submaster Console
* Other channel counts may apply
Avoid spilling liquid on the equipment If this should happen, switch the equipment off immediately. To reduce the
risk of fire or electric shock, do not expose the equipment to rain or moisture.
For indoor use only.
This equipment is designed and manufactured to comply with international safety standards IEC950, UL1950, CS950
and is intended for use as part of a lighting control system. It must not be used for other purposes where there is a risk
of safety to persons. The equipment contains power voltages, socket outlets will be installed near the equipment and
be easily accessible.
• Working Voltage/Current: 90 - 240v
• Frequency: 50/60 Hz
• Max Ambient Temp: 50° C (122° F)
• Do not restrict ventilation
WARNING! It is important to read ALL included safety and installation instructions to avoid damage to the product
and potential injury to yourself or others.
2. Additional Documentation
The console's graphical user interface (GUI) is provided by Horizon Control, Inc. For detailed instructions on using
the PaletteOS software, refer to the PaletteOS software Help Menu within the software itself.
For the latest software documentation updates, please visit: www.strandlighting.com
For more information regarding DMX512 systems, refer to the DMX512/1990 Standards publication available from
United States Institute for Theatre Technology, Inc. (USITT).
USITT
6443 Ridings Road
Syracuse, NY 13206-1111 USA
1-800-93USITT
www.usitt.org
1
Installation & Setup Guide
Palette VL Lighting Control Console
3. Customer Service and Support
How to Reach Us
Contact Strand Lighting Customer Service at: 1-800-4STRAND (U.S.) or 1-214-647-7880 (international).
For a complete list of support and field service contacts, go to www.strandlighting.com, select the Support tab and
then the "Support/Field Service Contacts" link.
Additional Resources
For additional resources and documentation, please visit our website at: www.strandlighting.com
For a printed or printable version of the Palette Series Software User Manual or Web-based Help Manual, visit:
www.strandlighting.com
2
Palette VL Lighting Control Console
1.
Installation & Setup Guide
Overview
• Components
• Features
• Software Overview
3
Installation & Setup Guide
Palette VL Lighting Control Console
COMPONENTS
1. Included Items
The Palette VL Lighting Control Console system includes the following items:
• 1 x Console with built-in Trackball and Rotary Encoders
• 3 x Power Cables for all countries
• 1 x USB Mouse
• 1 x USB Keyboard
• 1 x Dust Cover
• 1 x External Power Supply
• 1 x Installation & Setup Guide
2. Processor
The console processor utilizes Microsoft® Windows to run a specially designed PaletteOS lighting control software.
The processor will not accept nor run standard Windows-based applications. It is only intended for use with the
PaletteOS software application.
3. Accessories and Expansion Devices
Monitor/Touchscreen
The console processor will support any standard CRT or LCD monitor. The monitor must be capable of 1024 x 768 or
higher resolution.
The processor also supports the use of a touchscreen monitor. Due to mouse driver requirements, only ELO
Touchscreens should be used. ELO touchscreens can be purchased from ELO TouchSystems (www.elotouch.com).
The AccuTouch 3000 series models are recommended, since they feature resistive technology (i.e. you can point with
objects other than your finger such as a pen, etc.) Purchase the USB type, NOT serial. If connecting a touchscreen,
some software configuration is required. Refer to "Touch Screen Calibration" on page 41.
Note: Using a touchscreen can enhance the usability of the console software and is highly recommended.
4. Optional Accessories (sold separately)
To purchase any Palette VL products or accessories, please contact your Authorized Strand Lighting Dealer.
Accessories:
67528
USB Key Drive (additional)
67533
USB / VGA Adapter (for third video monitor)
95022
Littlite® Gooseneck Lamp
95481
Dust Cover, presetPalette 32/64, Palette VL (spare)
Handheld Remotes:
4
66145
Wired Handheld Designer’s Remote with coiled 10 foot cable
66150
Wireless Handheld Remote Kit
Overview
Palette VL Lighting Control Console
Installation & Setup Guide
5. Software Upgrades
Software upgrades are free of charge and are available at: www.strandlighting.com
6. Control Channel Upgrades
The control channel functionality included with your console is pre-authorized at the level initially purchased.
However, the channel count can be easily upgraded at any time. To purchase a control channel upgrade for your
Palette VL Lighting Control Console, please contact your Authorized Strand Lighting Dealer.
Note: You may need to purchase ShowNet nodes or other DMX512 output devices if you exceed 1024 DMX.
Components
5
Palette VL Lighting Control Console
Installation & Setup Guide
FEATURES
1. Standard Features
General:
- 500 to 3000 channel memory operation (depending on
channel count purchased)
- 1024 DMX512 output
- 16,384 channel Ethernet support
- Unlimited cues up to (Cue 99999.999)
- Unlimited groups
- Unlimited looks
- Universal attribute control
- Windows® processor
- Installed Media Player, Internet Browser, E-mail, MS
Paint and PDF Reader
- Supports Pathport®, ShowNet, Art-Net, CKNet, Color
Kinetics™, and streaming E1.31 (ACN) Ethernet
Protocols
- Free offline editor available at:
www.strandlighting.com
- Remote video support
Playback:
- 16 Submasters on Palette VL16 (Unlimited Pages)
64 Submasters on Palette VL64 (Unlimited Pages)
- 4 moving light encoders
- Support for 2 monitors with optional USB video
adaptor
- Two timed/manual fader pairs
- True Last Action Tracking operation
- Unlimited cue list with unlimited simultaneous fades
- Integrated Trackball
- Level wheel
- Touchscreen monitor support
Control:
-
Split up/down fade times
Split up/down delay times
26 parts per cue (A thru Z)
Independent timing
Follow time
Cue loops
Channel check
Channel labels
Preset focuses
Preset or tracking style operation
32-bit fades
Fade times from 1/100 second to 20 days
Pre-programmed effects wizard
Moving light patch
Astronomical time clock and time events
Macros
Display Functions:
-
Live Editing
Blind editing
Attribute Status for simultaneous cue fades
Patch
Setup
Fader/Hardware Status
Virtual Submasters
Moving light attribute grid
Grand Master level
Printed reports in PDF format
Effects
Supports 3 video monitors up to 1280 x 1240
with optional USB video adapter (67533)
2. Optional Add-On Features
Connectivity To:
- Vision.net Architectural systems
- Supports Pathport®, ShowNet, Art-Net, CKNet, Color
Kinetics™, and streaming E1.31 (ACN) Ethernet
Protocols
- RS232
- PowerPoint
- Audio out (Media Player)
6
Overview
External Control:
- Remote Focus Unit (RFU) - Wired
- Remote Focus Unit (RFU) - Wireless
- Serial interface to architectural button station
networks
Palette VL Lighting Control Console
Installation & Setup Guide
SOFTWARE OVERVIEW
1. PaletteOS Software
The console processor utilizes Microsoft® Windows to run a specially designed PaletteOS lighting control software
developed by Horizon Control, Inc. The PaletteOS application works in conjunction with console hardware buttons/
sliders/playback faders/and encoders to provide control of external devices, data management, and show file storage.
Note: Other programs cannot be installed by end-user on the processor. Visit www.strandlighting.com for additional
compatible software downloads.
Benefits of PaletteOS Software:
• PaletteOS is a tracking-based application.
• PaletteOS adds an easy to use Graphical User Interface to the already powerful command-line syntax that is common to generations of Strand control. Now there is a choice to use traditional command-line syntax or use the
mouse and access pull-down menus and dialog boxes.
• PaletteOS displays a wealth of information on its graphical screen, allowing the user to work faster and more efficiently.
• PaletteOS can be upgraded, at no additional cost, when new software becomes available.
2. Off-Line Editor
A free off-line editor and remote video software is available at: www.strandlighting.com
3. Control of Connected Devices
Control of connected devices and/or lighting systems is achieved by using the console desk hardware in conjunction
with the PaletteOS software application. In some cases, actions can be performed using either the hardware or
software, providing you with a variety of choices suitable to your preferences and requirements.
• For more information about the hardware controls, refer to "Console Overview" on page 16.
• For more instructions on using the PaletteOS software, please refer to the Help system within the program itself
(by either selecting it from the Help Menu or pressing the [Help] button on the desk) or the Palette Series Software
User Manual.
4. External Control
The console can accept several forms of external control, depending on your console's particular configuration.
These include, but are not limited to, Touchscreens and Remote Focus Units. Refer to "Hook-Up" on page 11.
Software Overview
7
Installation & Setup Guide
Notes
8
Overview
Palette VL Lighting Control Console
Palette VL Lighting Control Console
2.
Installation & Setup Guide
Installation and Power Up
• Unpack
• Hook-Up
• Console Power Up
9
Installation & Setup Guide
Palette VL Lighting Control Console
UNPACK
1. Site Requirements
The console and its components require a sturdy, flat surface for installation. The surface should be able to support
the weight of the console (including the processor, monitor, etc.) and should provide suitable ventilation. Also, the
site should be clean (i.e. absent of any construction dust or debris) and dry. Before setting up, ensure that the
installation site meets these requirements. Refer to "Specifications" on page 71 for console dimensions and power
requirements.
2. Product Care
In the event the console needs to be cleaned, remove all power from unit and use only a very mild soap on a damp
cloth. Dry immediately with a soft lint-free cloth after cleaning. Never use harsh chemicals such as window cleaners,
paint removers, vinyl conditioners, etc.
It is recommended to gently blow out the sub pots and desk occasionally to prevent build up of dust and dirt.
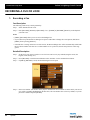
3. Unpack and Assemble Components
To unpack and assemble the console components, do the following:
Step 1. Remove console components from shipping container or case.
Step 2. Place console desk on installation surface.
Step 3. Place monitor and other external components close enough to console so that cabling will reach.
Step 4. Proceed to "Hook-Up" on page 11.
10
Installation and Power Up
Palette VL Lighting Control Console
Installation & Setup Guide
HOOK-UP
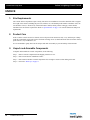
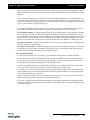
1. Connecting Console Components
To connect console components, do the following:
Step 1. At console rear panel, connect power supply (included).
Step 2. Connect monitor or touchscreen (sold separately).
Step 3. Install gooseneck lamps (sold separately).
Step 4. Connect USB mouse and keyboard.
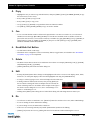
Note: The Palette VL 16 console is shown in the illustration below. Other Palette VL models will vary.
Power
Processor
DMX512 Out (XLR-5M)
PROCESSOR DETAIL
Power
Monitor (HDB-15F)
Serial (DB-9M)
Network
(RJ-45)
Audio (2)
Monitor
(HDB-15F)
USB (2)
Figure 1: Console Rear Panel
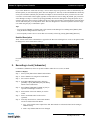
2. DMX512 Output
The console provides two standard XLR 5-pin connectors for connecting to DMX512 devices. Each connector
supports one DMX512 universe of 512 DMX channels. Connect DMX512 devices as shown in Figure 1.
Hook-Up
11
Palette VL Lighting Control Console
Installation & Setup Guide
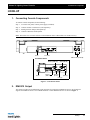
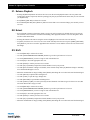
3. Remote Focus Unit (RFU)
The Remote Focus Unit (sold separately) is an optional
remote Ethernet device that can be connected to the console
using either a wired or wireless configuration. The two
connection options are as follows:
To RFU
RFU
Wireless
Access
Port
• CAT5 twisted-pair Ethernet cable from the back of the
console to the RFU. (The configuration can be routed
through walls, hubs, switches, etc.)
or
CAT5 Cable
• CAT5 twisted-pair Ethernet cable from the back of the
console to a wireless Access Port; and then from the
Access Port though the air to the RFU with wireless
receiver.
Figure 2: Remote Focus Unit Connection
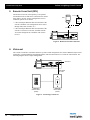
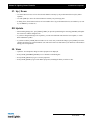
4. Vision.net
The console can interface with Strand Vision.net systems. In this configuration, the console’s DB9 Serial port can be
connected to a Vision.net RS232 Programming Station, which in turn connects to a Vision.net control station. The
following diagram shows a sample configuration:
Serial Port
RS232 Serial
Port Cable
Vision.net
8-Button Station
(63328)
Vision.net
RS232 Station
(63035)
Figure 3: Connecting to Vision.net
12
Installation and Power Up
Palette VL Lighting Control Console
Installation & Setup Guide
CONSOLE POWER UP
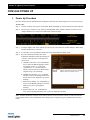
1. Power Up Procedure
Once the console has been installed and all components connected, the console and processor can be powered up.
To power up:
Step 1. At front of console, press power on/off button. When LED lights up, release button and console will boot.
Step 2. After boot up is complete, verify status by checking black status window at bottom of screen. If it says
"Outputs Disabled" you will need to enable them to On-Line status.
Step 3. To enable outputs, click "File" menu at top right of your screen and select "Enable Outputs." Black status
window should now say "On-Line."
Step 4. If you wish to view your hardware status, this can be found under the "Help" menu.
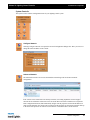
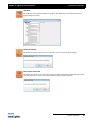
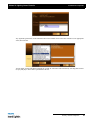
Step 5. Set your console's personality. This can be
found under "Hardware Setup" then clicking on
"Console". You will notice several options to
choose from:
a. GeniusPro (500 series) - GP: Command line
entry. Utilizes the British spelling of words,
for example "colour" vs. "color" and
"anticlockwise" vs. "counterclockwise".
This also uses the 500 series channel colors
(magenta is up, cyan is tracking).
b. LightPalette (500 series) - LP : Command
line entry. Utilizes US spelling and also uses
the 500 series colors (magenta is up, cyan is
tracking).
c. Palette Classic Europe - EU: Command Line
entry. Uses the British spelling as well as the
LP90 colors (cyan is up, magenta is
tracking).
d. Palette Classic US - US: Command Line
entry with US spelling and LP90 colors (cyan is up, magenta is tracking).
Note: All future definitions of button actions will assume the selection of Palette Classic US. This will send all
action buttons directly to the command line. If the dialogue box is requested, just press [SHIFT] then the action
button.
Console Power Up
13
Installation & Setup Guide
Palette VL Lighting Control Console
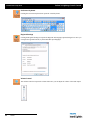
Step 6. While in "Hardware Setup>Console," verify that other important and systemic features are set correctly for
you.
a. Level Entry Mode - this is the format for Command Line Entry.
1) Use Enter Key - the Enter key finishes off all Command Line entries. For example, [1] [@] [5]
[ENTER] will set channel 1 to 50%.
2) Single Digit Entry - a single digit is used for level entry. For example, [1] [@] [5] will set channel 1
to 50%.
3) Two Digit Entry - two digits are used for level entry. For example, [1] [@] [5] [0] will set channel 1
to 50%.
b. Record Includes Subs - when checked, this will include levels that are outputting from submasters when
recording cues or looks. The default is unchecked. This status will appear on the command line when
you press [RECORD] by showing you either [LIVE-SUBS] or [LIVE+SUBS]
c. Show Cue List Controls - when checked, this will display the cue list control icon bar above the existing
list of cues.
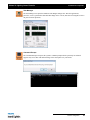
Step 7. Go to "Show Options>Cue List." Verify that the two options with check boxes are set correctly for you.
a. Goto Cue On Record - this ensures that the console is placed in the cue when the record function is used.
b. Release Fixtures on Record/Update - this ensures that all channels/fixtures are released when a cue is
recorded or updated.
14
Installation and Power Up
Palette VL Lighting Control Console
3.
Installation & Setup Guide
Controls
• Desk Layout
• Button Details
• Software Configuration
• Restoring the Software
15
Palette VL Lighting Control Console
Installation & Setup Guide
DESK LAYOUT
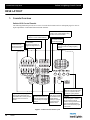
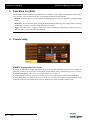
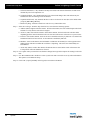
1. Console Overview
Palette VL16 Control Console
The following illustration provides an overview of console desk controls. Refer to subsequent pages for more indepth explanations of individual button and slider functions.
M-Keys Available for future software features.
Submasters 16 submasters with
individual bump buttons
and integrated LED.
Dead Black Out Buttons (configurable)
Provides a momentary or
toggle full-stage black out.
Playback Control - (configurable)
A/B automatic timed faders and
associated buttons, which provided
playback control of cues and
scenes.
Programming Buttons Provides direct access to
channels, playback control,
console setup and display
options.
Information Buttons - Provides quick
access to main screen displays, along
with time and level information.
S-Keys 12 context sensitive
functionality buttons.
Intelligent Lighting Buttons - Provides
special controls for intelligent lighting
fixtures.
Level Wheel Will change intensity
of selected channel.
While attribute
softkey is engaged,
it will change the
attribute value.
Figure 1: Palette VL16 Console Layout
16
Controls
Encoders Manual control encoders which
work in conjunction with the
Intelligent Lighting buttons.
Track Ball Provides navigation of software
GUI and control of channel
attributes. Pressing Shift and Fine,
toggles the Trackball between
Mouse Control and Moving Light
control modes.
Palette VL Lighting Control Console
Installation & Setup Guide
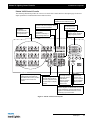
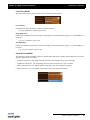
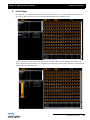
Palette VL64 Control Console
The following illustration provides an overview of console desk controls. Refer to subsequent pages for more indepth explanations of individual button and slider functions.
M-Keys Available for future software features.
Information Buttons - Provides quick
access to main screen displays, along
with time and level information.
Submasters 64 submasters with
individual bump buttons
and integrated LED.
S-Keys 12 context sensitive
functionality buttons.
Dead Black Out Buttons (configurable)
Provides a momentary or
toggle full-stage black out.
Playback Control - (configurable)
A/B automatic timed faders and
associated buttons, which provided
playback control of cues and
scenes.
Programming Buttons Provides direct access to
channels, playback control,
console setup and display
options.
Intelligent Lighting Buttons Provides special controls for
intelligent lighting fixtures.
Level Wheel Will change intensity
of selected channel.
While attribute
softkey is engaged,
it will change the
attribute value.
Encoders Manual control
encoders which
work in conjunction
with the Intelligent
Lighting buttons.
Track Ball Provides navigation of software GUI and control
of channel attributes. Pressing Shift and Fine,
toggles the Trackball between Mouse Control
and Moving Light control modes.
Figure 2: Palette VL64 Console Layout
Desk Layout
17
Palette VL Lighting Control Console
Installation & Setup Guide
2. Programming Buttons Layout
The programming section of the desk provides direct access to intensity channels, channel attributes, playback
control, console setup and display options.
Information Keys
• [LIVE] - Switches the Screen display to view the live screen. The live screen shows the current level of channels
and the active cue list.
• [BLIND] - Activates Blind Mode. While in Blind, the channel grid has a Grey background. You can also see the
Blind button in the Channel Grid toolbar become highlighted. While in Blind, moving the blue box with the
[ARROW KEYS] will preview cues automatically.
• [LOOKS] - Activates the Looks display, where it is possible to add or modify Looks pages or see what Looks have
been recorded in a page.
• [PATCH] - Switches the Screen display to view the patch screen and information.
• [LEVEL] - Shows the output levels for the channels.
• [TIMES] - Shows Time values for the channels.
Action Keys
• [HELP] - Activates online help system.
• [TOOLS] - Press [SHIFT] [TOOLS] to change current tool functions such as color picker,
channel check, flash, etc.
• [MOVE] - Moves a Cue or Look.
• [COPY] - Copies fixture attributes, Cues or Looks.
• [DELETE] - Deletes Cues and Looks.
• [VIEW] - Accesses information about selected cue, channel, look, group, function key, etc.
• [RECORD] - Stores lighting state as a Cue or Look. Ex: [RECORD] [CUE] [1] [ENTER].
• [UNDO] - Allows undoing of the last level change [UNDO] [ENTER], the last record
[UNDO] [RECORD] [ENTER], update, goto or delete action. Two presses releases selected
devices or undoes selected commands. Also closes open dialogue boxes. (See Button Details
for more info.)
• [UPDATE] - Stores changes to Cues and Looks. Ex: [Update] [Cue] [1] [ENTER].
• [LOOK] - A recorded state that can be accessed as groups, subs or palettes. Ex: [LOOK] [1]
[ON].
• [TIME] - Allows you to set the times for cues and other elements. Example [RECORD]
[CUE] [1] [TIME] [5] [ENTER].
• [CUE] - A recorded state that can be played back in time.
• [GOTO] - Places desired cue live on stage. Ex: [GOTO] [CUE] [1] [ENTER].
• [GROUP] - Specifies group selection. Ex: [GROUP] [1] [ON].
• [SHIFT] - Use in conjunction with other keys to open dialogue boxes.
• [ALT] - Changes the Softkeys to the upper set of softkey functions. (Refer to "Softkeys" on
page 20 for more information.)
18
Controls
Palette VL Lighting Control Console
Installation & Setup Guide
Numerical Keypad
• [EDIT] - Opens currently selected control for data entry (to change cue times, cue labels, etc.).
• [PREV] / [NEXT] - Advances to next or reverses to previous channel. Also acts as a tab key for navigating dialog
boxes.
• [THRU] / [- TO] / [+] - Used when entering a range or an exception of numbers. [-] is also used to enter staggered
levels and times.
• [FULL] - Takes intensity value to 100% for all selected channels.
• [ON] - Takes intensity value to 100% for all selected channels
• [OFF] - Takes intensity value to zero for all selected channels
• [@] - Used to enter specific intensity value for all selected channels.
• [REM DIM] - Switches all channels, except those which are selected, off.
• [CLEAR] - Used to clear back entries, one at a time on the command line. Shifted version clears the entire command line.
• [0 - 9, .] - 10-Key Numerical Entry.
• [ARROWS] - Moves blue box or changes values in number boxes.
• [ENTER] - Completes an action or selection.
Miscellaneous
LOAD
UP%
DOWN%
• [LOAD] - Places the state of the selected item into the live editor (if in Live) and the blind editor (if in Blind) Ex:
[LOAD] [CUE] [1] [ENTER].
• [UP%] - Takes selected channel up a predetermined amount (e.g. 10%). Also works in other instances, such as
time windows, data fields, etc.
• [DOWN%] - Opposite of the [UP%] button.
Desk Layout
19
Palette VL Lighting Control Console
Installation & Setup Guide
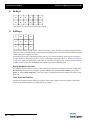
3. M-Keys
M1
M2
M3
M4
M5
M6
M7
M8
M9
M10
M11
M12
These buttons are reserved for future software expansion.
4. Softkeys
S9
S10
S11
S12
S5
S6
S7
S8
S1
S2
S3
S4
The 12 S-keys (softkeys) provide context sensitive functionality, which will assist in navigating PaletteOS software
dialog boxes and execute actions linked to the [TOOLS] and [VIEW] buttons. The amber LED will blink showing the
current control when a dialog box is open.
The softkeys can be used in conjunction with the [ALT] key for a total of 24 softkeys (broken up into two banks of
12: upper and lower.) When the [ALT] key is pressed, it will change to the Upper bank of 12. (Refer to "Action Keys"
on page 18 for location of the [ALT] key.) The LEDs on each softkey will light up to let you know that the softkey is
available, with the Lower bank illuminating amber and the Upper bank illuminating green.
Dialog Navigation Function
If a PaletteOS software dialog box is active, each of the softkeys will provide a related function. For example, if the
Record As Cue dialog is active, pressing [S1] prompts Cue List, [S2] prompts the Cue Number, [S4] prompts
Name, etc. If the Console Setup dialog is active, the softkeys would provide functions related to the console’s setup,
and so on.
Tools and View Function
Similar to the PaletteOS software dialog box operation, these softkeys will provide context sensitive functionality
after either the [SHIFT] [TOOLS] or [VIEW] buttons are pressed.
20
Controls
Palette VL Lighting Control Console
Installation & Setup Guide
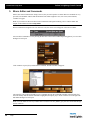
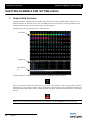
5. Intelligent Lighting Buttons and Encoders
The encoders and buttons found in this section of the
desk provide special controls for intelligent lighting
fixtures.
The rotary four encoders provide navigation of the
PaletteOS software and control of channel attributes.
The encoders are context sensitive to allow
appropriate control of attributes such as one percent,
one DMX512 step, one gobo, one second of time,
etc.
The buttons function as follows:
[GROUP]
• Use Group Quick Selection button to select
Groups of lights or for recording Groups of lights.
[POSITN]
• Use Position Quick Selection button to select
position control on the four rotary encoders, or for
recording Position Preset Focus palettes.
[COLOR]
• Use Color Quick Selection button to select position control on the four rotary encoders, or for recording Color palettes.
[GOBO]
• Use Gobo Quick Selection button to select Gobo control parameters on the four rotary encoders, or for recording
Gobo Preset Focus palettes. Press again to bank the four encoders to other Gobo wheels.
[OTHER]
• Use Other Quick Selection button to select Other attributes (user defined) or for recording "Other" Preset Focus
palettes.
[VIEW]
• Use View button to preview the recorded preset focus palettes for the currently selected attribute (Group, Position,
Color, Gobo, Other) on the screen.
[A] - [Y]
• Use these Quick Selection buttons for recalling or recording the Preset Focus Palettes.
[LIST]
• Use the List Quick Selection button to view the available options for the rotary encoder (e.g. in Position Mode, this
will show Linear Movement or Polar Movement).
[FX]
• Use Effects Quick Selection button to add intensity FXs or select Effects control parameters on the four rotary
encoders.
Desk Layout
21
Palette VL Lighting Control Console
Installation & Setup Guide
6. Playback Controls Layout
REL-PB
STEP
SELECT
STEP
STEP/
BACK
GO
The playback section of the desk provides controls for executing active cues and fading between two pre-stored
scenes. These faders consist of A/B and C/D, automatic timed sliders.
Playbacks
• [SELECT] - Selects cue list to display and default record location. Solid amber LED indicates there is a cue list on
this playback. Flashing amber LED means this cue list is selected.
• [STOP/BACK] - Halts active cue (if running) or steps back to previous cue (if stopped).
• [GO] - Activates next cue (following the active Cue) on the Cue List. Green LED will be solid when a cue list is
active and no cues are running. The Green LED will flash when cues are running. Both the Red and Green LEDs
will flash when the cue list is releasing.
• [REL-PB] - Releases currently selected playback or cue list.
• [STEP Up] [STEP Dn] - Steps forward or backward through a selected cue list.
• Playback Faders - Controls Fade times (in/out), cross faders, intensity masters, scene masters or Look page master. The playback faders can be setup to control different things as determined by the PaletteOS software. See "A/B
C/D" on page 54 for more details or refer to "Hardware Setup" in the PaletteOS software Help Menu.
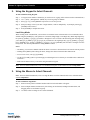
7. Level Wheel
The console features a level wheel which provides navigation of the PaletteOS software and control of
channel attributes. The wheel is context sensitive to allow appropriate control of attributes such as one
percent, one DMX512 step, one gobo, one second of time, etc. By default, it controls the intensity level of
the selected channels. If you press and hold any of S1 through S4 when a moving light is selected, you can
also control attributes. If you select edit on any blue box, the level wheel will change that value in
consistent increments (e.g. if you are editing cue time, it will increase or decrease the time in seconds).
Holding [SHIFT] while engaging the wheel will place the wheel in Fine Mode.
22
Controls
Palette VL Lighting Control Console
Installation & Setup Guide
8. Trackball/Mouse Controls
• [FINE/MOUSE] - Provides functions as follows:
Mouse: Pressing [SHIFT] [FINE/MOUSE] switches the trackball between Pan and Tilt modes, and Mouse mode/
movement (i.e. a toggle action). When in Mouse mode, these buttons will act as the standard Left, Right and Center buttons found on a mouse.
Fine: When [FINE/MOUSE] is held down (non-Shifted), the trackball provides fine adjustment of Pan and Tilt.
Without holding this button down, trackball movement is normal for Pan and Tilt. In this mode, the Left and Right
keys lock out either Pan or Tilt.
• [EDIT] - Opens currently selected control for data entry (to change cue times, cue labels, etc.).
• [PAGE] - Pages the Channel Screen display to display higher channel numbers. Shifted version displays lower
channel numbers.
• [ARROWS] - Moves the Blue Edit box on the screen.
Desk Layout
23
Installation & Setup Guide
Palette VL Lighting Control Console
BUTTON DETAILS
Note: The personality in which you have selected your console to operate in will change the way many of the
following buttons work. The following instructions will assume the Palette Classic US Console Personality. Direct
access to actions like Record will go straight to the Command Line. However, if a dialogue box solution is preferred,
press [SHIFT] and any Action button to reveal the appropriate dialogue box.
1. Plus, Minus, @ (At), Full, Out
• [FULL] [ON] and [OUT] will set the level of selected channels without having to press [ENTER].
• Use [FULL] and [OUT] to take the value to its upper or lower limit.
• Use the [/] key to select a range of channels or to specify Wait/Fade times in any time field.
• Use the [BACK] arrow key to clear the command line and deselect any selected channels.
• Use the [+] and [-] keys to enter ranges. For example:
[1] [/] [1] [0] [-] [7] [@] [5] [ENTER] sets fixtures 1 through 6 and 8 through 10 to 50%.
[1] [/] [1] [0] [@] [1] [0] [-] [1] [0] [0] [ENTER] would set fixtures 1 through 10 to levels 10, 20, 30, 40, 50, 60, 70,
80, 90 and 100% respectively.
2. Arrows
• The arrow keys move the blue box in the Cue List Look view and patch displays.
• To change a value, press the [EDIT] button.
• Holding down the [SHIFT] key and pressing the Up or Down arrows selects a range.
• Once a range is selected, press [EDIT], then type in a new value to change all cells to that value.
• If editing a numeric column (such as Time), after pressing [EDIT] use the level wheel to change the values. If multiple cells are selected, the values will change relative to each other. In the example below, if the wheel is used to
change the '3' to a '4', the '2' would change to a '3' and the '1' would change to a '2'.
• Holding down [SHIFT] while rolling the level wheel on any numeric field will change the value by 0.1.
• While in Blind Mode, moving the blue box will preview the highlighted cue.
3. Blind
• Press [BLIND] to enter the Blind display.
• While in Blind, the channel grid has a Grey background. The Blind button in the channel Grid toolbar will be highlighted.
• While in Blind, moving the blue box with the [ARROW KEYS] will Load cues automatically.
24
Controls
Palette VL Lighting Control Console
Installation & Setup Guide
4. Copy
• Highlight the cues you want to copy with the blue box, then press [SHIFT] [COPY] [NUMBER] [ENTER] to copy
the selected cue(s) to new cue(s).
• Press [COPY] [LOOK] to copy a Look.
• Press [COPY] [CUE] to copy a Cue.
• Use [#] [COPY] [#] [ENTER] to copy attributes from one channel to another.
• Use [SHIFT] [COPY] [BUMP] [BUMP] to copy one Look to another.
5. Cue
• A Cue is an item that has stored levels that can be played back in a set time. To record a cue, set a selection of
channels at levels then type [RECORD] [ENTER] to record the next available whole cue number. If none are
present, this will record cue 1. You can also record any cue number by typing [RECORD] [CUE] [1] [ENTER]. or
Change times by [CUE] [1] [TIME] [5] [ENTER] or jump to a cue with [GOTO] [CUE] [1] [ENTER]. More
advanced commands will be discussed later.
6. Dead Black Out Button
• Use this button to black out the stage.
• This button can be configured to work as a momentary button, a toggle button, or be disabled. See "Dead Black
Out (DBO)" on page 56 for setup details.
7. Delete
• The Delete feature allows removal of recorded items from a show. For example, [DELETE] [CUE] [1] [ENTER]
and [DELETE] [LOOK] [1] [ENTER].
• [SHIFT] [DELETE] will activate the Delete dialog box.
8. Edit
• Pressing the [EDIT] button allows changes to the highlighted cells in the Cue List or Look display (times, labels,
follows etc.) or in the patch displays. Move the blue highlighted cells using the [ARROW KEYS].
• If a range is selected, typing in a new value will change all cells to that value.
• If editing a numeric column (such as Time), after pressing [EDIT] use
the level wheel to change the values. If multiple cells are selected, the
values will change relative to each other. In the example on the right, if
the wheel is used to change the '3' to a '4', the '2' would change to a '3'
and the '1' would change to a '2'.
• Holding down [SHIFT] while rolling the level wheel while editing cells will change numeric values by 0.1.
9. Go
• Go will run a cue in the recorded time. Note: [SELECT] button does not have to be active (amber LED flashing).
• If a cue is running, the Green LED will be flashing.
• If you are sitting in a cue, the LED will be solid Green.
• If the Cue List is releasing, both the [GO] and the [HALT/BACK] LEDs will be flashing.
• [SHIFT] [GO] asserts the Cue List, grabbing full control of its attributes without advancing the Cue List.
Button Details
25
Installation & Setup Guide
Palette VL Lighting Control Console
10. Goto
• Goto will place that cue on stage in the time setup in Show Options>Cue List. Press [GOTO] [#] [ENTER] to take
the selected Cue List to the desired cue.
• If in the Windows UI console personality, the Cue Number edit box will be preloaded with the cue number of the
blue highlighted line.
• When using the [NEXT] key, a desired time for the cue to execute can be set. The recorded time is the default time.
11. Group
• A Group is a defined selection of channels at a recorded level. Activate a selection of channels at a level, then type
[RECORD] [GROUP] [1] [ENTER]. With the channels released, activate the group by typing [GROUP] [1] [ON]
to apply the selected channels at their recorded levels. To only select the channels, type [GROUP] [1] [ENTER].
The levels can now be adjusted with the level wheel or any level adjusting key. i.e. Full, On, Up%, Down%.
• Technically, these are stored as Looks, but you can just record and call up groups as previous generations of desks
have done.
• See "Show Options" in the PaletteOS software Help Menu for assigning Look pages to this key.
12. Halt / Back
• The [HALT/BACK] button will halt any running cues on its Cue List. A cue is running when the Green LED on
the GO button is flashing.
• If a Cue List is halted (flashing Red LED), pressing this button again will back up the Cue List.
• If the Cue List is releasing, both the [GO] and the [HALT/BACK] LEDs will be flashing.
• [SHIFT] [BACK] will go to the previous cue in recorded time. (This is very useful for encores.)
13. Load
Note: For those familiar with previous Strand Lighting Consoles, this does not work like the 500 Series of consoles
to load a cue on a playback.
• Unlike previous Strand consoles, Load will activate the recorded item’s information for editing. [LOAD] [CUE]
[1] [ENTER] will place all contents of cue 1 into either the Live editor (if in Live Mode) or the Blind editor (if in
Blind Mode). Channel information can be edited and then updated.
• If in the dialog box, press [S4] to load the entire state of the cue (all the cumulative levels that got you to the Look
on stage at that point in the Cue List).
• Edit the cue by changing levels, adding channels or releasing channels.
• Either press [UPDT] to update the loaded cue (watch the status area at the bottom of the screen) or press
[RECORD] to record it as a new Cue or Look.
• Press [LOAD] [LOOK] then the desired Look number to load a Look for editing.
26
Controls
Palette VL Lighting Control Console
Installation & Setup Guide
14. Look
• A Look is a location for a stored state that can be accessed as groups, submasters or palettes. Set channels at levels,
then type [RECORD] [LOOK] [1] [ENTER]. This will store the info as Look 1 and it will be accessed as Submaster 1.
• Alternately, you can set them to a level using the keypad by typing [LOOK] # @ Level [ENTER]. Attributes will
always go to their proper recorded level.
• Press [SHIFT] [RECORD] then a bump button to quickly record a Look to a master (if set up to do so).
• Groups are stored as Looks, even if the levels are not used.
15. Move
• Although you can move cues from one Cue List to another while working in one Cue List, moving cues is essentially renumbering cues. Highlight the cues you want to renumber with the blue box, then press [MOVE] [NUMBER] [ENTER] to renumber the selected cue(s) to new cue(s).
• While the Move dialog box is open, you can also select a new numbering scheme.
• Press [MOVE] [LOOK][#] [@] [#] [ENTER] to move Looks.
• Press [SHIFT] [MOVE] [BUMP][BUMP] to quickly move Looks.
• Use [#] [MOVE] [#] [ENTER] to move attributes from one channel to another.
16. Number Buttons
• By default, when typing on an empty command line these buttons will select Channels.
• Use in conjunction with the other keys (+, -, Thru etc.) to select ranges of Channels.
• While in dialog boxes, these keys fill in numeric fields.
• To change cue times, use these buttons in conjunction with the [ARROW KEYS] and the [EDIT] button to open
the blue box for editing.the blue box for editing.
17. On
• The [ON] button takes the selected channel(s) to the On level as set in Show Options.
18. Previous and Next
• Press [PREV] to select the last channel or press [NEXT] to select the next channel.
• When using with dialog boxes, press [PREV] to go to the previous control or press [NEXT] to go to the next control.
Button Details
27
Installation & Setup Guide
Palette VL Lighting Control Console
19. Record
Recording Cues:
• The Record function stores values into an item (usually Cues or Looks). To record a cue, press the [RECORD] button then [ENTER] to accept the auto-incrementing cue number or press the number of the cue you wish to record
and press [ENTER].
• Pressing [SHIFT] [RECORD] will open up the Record dialogue box. A default cue number is entered and the cursor is waiting for you to enter a new one (if necessary). The [ENTER] key will close the dialogue box and record
the cue to the selected Cue List.
• To quickly record to a different playback master, press [SHIFT] [RECORD] then the desired [SELECT] key on the
playback.
Recording Looks:
• To quickly record a Look, press [RECORD] then press a [BUMP] button.
• Press [RECORD] then press [LOOK], enter a number and press [ENTER].
• To record a group of channels, press [RECORD] then press [GROUP], enter a number and press [ENTER]. A
Look will be recorded (including the levels). Using the [GROUP] button, you can bring back the selected channels
and set them to any level using the level wheel or keypad.
Note: The Red LED will be on any time there is a change that has not been recorded.
20. Undo
• The Undo feature will reverse many commands. [UNDO] [ENTER] will reverse the last level change. UNDO
RECORD, UPDATE, DELETE and GOTO can all be reversed. Any attribute family can go back to its previous
location with [UNDO] [Attribute Family] like [POSITION].
• Press the button twice to activate the RELEASE command. The first stage of Release will release the last attribute
family that was adjusted.
• The second stage of Release will release all active channels.
• The third stage of Release will release any remaining channels.
• Press [SHIFT] [UNDO] to bring back previously released items. (This works in a three-stage process.)
Notes:
• If a dialogue box is open, the LED will be flashing. Pressing [UNDO] will close the dialogue box without changes
being committed.
• If channels are selected, the LED will be flashing.
• If channels have been changed but are not selected, the LED will flash in a step pattern.
28
Controls
Palette VL Lighting Control Console
Installation & Setup Guide
21. Release Playback
• Pressing the [REL-PB] button will release the Cue List on the selected playback master. The cue pointer will
remain at the current cue position, therefore pressing [GO] will put you back into the same state you were in before
you hit [REL-PB].
• Press [SHIFT] [REL-PB] to release all Cue Lists.
• Press and hold [REL-PB] and a [SELECT] button to release that Cue List and not change your currently viewed
Cue List.
22. Select
• Press a [SELECT] button to determine which Cue List cues will be written to by default when you record cues.
The 'selected' Cue List will have an amber LED flashing. Other playbacks that have Cue Lists assigned to them
will have solid amber LEDs.
• Pressing this button is the same as using the mouse to highlight a Cue List in the Cue List directory.
• To quickly record cues to a Cue List (even if it is not the currently selected Cue List) press [SHIFT] [RECORD]
then [SELECT]. The new cue will be appended to the end of the Cue List and the current Cue List selection will
not change.
23. Shift
• Use with [REL-PB] to release all Cue Lists.
• Use with [STEP FORWARD/BACKWARD] buttons to go to the top or bottom of a Cue List.
• Use with [ARROW KEYS] to select a range of cells with the blue box.
• Use with [GO] to assert the appropriate Cue List.
• Use with [BACK] to run the previous cue in cue time.
• Use with [UP] or [DOWN] to adjust the selected channel’s level by one percent.
• Use with Split Crossfaders or Single Crossfaders (A/B C/D fader setup under [S3] Hardware Setup) to manually
move backwards through a Cue List.
• When the command line is empty, holding down [SHIFT] and rolling the level wheel will scroll the channel grid.
• Use with [MOVE] to open the Move dialogue box.
• Use with [COPY] to open the Copy dialogue box.
• Use with [RECORD] to open the Record dialogue box.
• Use with [UNDO] or [REL] to restore previously released channels. If all three stages of release were used, this
will return them in three stages, in order.
• Use with [REL-PB] to release all Cue Lists.
• Use with [STEP FORWARD/BACKWARD] buttons to go to the top or bottom of a Cue List.
• Use with [ARROW KEYS] to select a range of cells with the blue box.
• Use with [GO] to assert the appropriate Cue List.
• Use with [BACK] to run the previous cue in cue time.
• Use with [UP] or [DOWN] to adjust the selected channel’s level by one percent.
• When the command line is empty, holding down [SHIFT] and rolling the level wheel will scroll the channel grid.
Button Details
29
Installation & Setup Guide
Palette VL Lighting Control Console
24. Softkeys
The softkey buttons are context sensitive to what you are doing. When no dialogue boxes are open, they provide
additional functionality that is not available with the hard buttons on the console. When a dialogue box is open, the
LEDs show you what buttons are used to jump to specific controls (lists, checkboxes, etc.). You can always see what
each button will do by reading the bubbles at the bottom of the screen. The LED will blink showing you what control
currently has focus.
Once a command is entered into the command line, you may notice green arrows appearing next to selected Ssoftkeys. These arrows correspond with the M-keys above. By selecting an S-key with an arrow you will notice the
M-keys change. For example, by pressing [RECORD], you will notice many of the S-keys have the option to select
additional M-keys. By selecting [S3] [RECORD TYPE], you now have four options to choose from in the M-keys
[M1-M4].
25. Step Forward / Step Back
• Pressing the relevant button steps you through the selected Cue List using the step-time set in the properties of the
Cue List ([VIEW] [SELECT]).
• If the Cue List is active ([GO] had been pressed at some point), the effect will be seen on stage. If it is not active,
only the Cue List pointer will move, awaiting a Go command.
• Use with [SHIFT] to move to the top or bottom of the selected Cue List.
• If a long cue is running (green LED is flashing on Go button) and you want to quickly complete it, press [STEP
FORWARD]. The cue will complete in the Cue List's step-time as determined by the Properties of the Cue List.
26. Tools
• Press [SHIFT] [TOOLS] to change the softkeys to the available tools. Select a tool ([S12] gives more options). Initiates softkey tool functions such as flip, channel check, flash, etc.
• If the LED is on, the tool is active. Press the button to turn off the tool.
• Pressing and releasing this button when the LED is off will toggle the last selected tool on.
Note: The status area at the bottom of the screen shows the current active tool.
30
Controls
Palette VL Lighting Control Console
Installation & Setup Guide
27. Up / Down
• Use these buttons to raise or lower the selected channel’s intensity by the pre-determined level in [S2] "Show
Options."
• Use with [SHIFT] to move the selected channel’s intensity one percentage point.
• In dialog boxes, these buttons will raise or lower number boxes by pre-determined levels (cue number by 10, time
by 10, SMPTE by 1 minute etc.).
28. Update
• When making changes live, press [SHIFT] [UPDT] to open the Update dialog box. Pressing [ENTER] will update
the current cue with the changed levels.
• If you have changed tracking levels or palettes, you can select different items from the list to update (i.e. Track
Back and Palette Update).
• If you have used the [LOAD] button to load a Cue or Look, once you make the changes, press [UPDT] to store the
changes and release any selected channels. (You will not be able to use this button if you did not use All Attributes
during your load operation.)
29. View
• Opens the View Properties dialog box where properties are displayed.
• Press [VIEW] [NUMBER] [ENTER] to see a channel’s Label dialog box.
• Press [VIEW] [SELECT] to get a Cue List's properties.
• Press [VIEW] [BUMP] to get a Look Master properties (including the ability to delete a Look).
Button Details
31
Palette VL Lighting Control Console
Installation & Setup Guide
30. Processor Keyboard Shortcuts
The following processor keyboard shortcuts can be used in place of the console buttons, if desired. For instructions on
setting up Cue List Control, refer to "QWERTY Keyboard Cue List Control" on page 56.
Button
+
Plus - Used in command line
-
Minus - Used in command line
*
At - Used in command line
.
Dot - Used on empty command line when entering point times
/
Thru - Used in command line and for entering Wait/Fade times
[
Open Square Brace - Step Back in Cue List
]
Close Square Brace - Step Forward in Cue List
\
Back Slash - Release Cue Lists (SHIFTED = releases all Cue Lists)
B
Blind Mode
C
Copy - Opens Copy dialogue box
D
Load
G
Group - Used when using Group on command line
L
Look - Used when using Look on command line
M
Move - Opens Move dialogue box
O
Goto
P
Palette - Opens Apply Levels dialogue box
Q
Cue - Use when using Cue on command line
R
Record - Allows you to record your cues via the command line
T
Tools - Hold down to change softkeys to Tools menu. Strike to toggle last Tool
U
Update - In Windows UI personality, [SHIFT] [UPDT] opens Updated dialogue box or updates
Loaded items in all other personalities via command line.
V
View - Opens View Properties dialogue box
Z
Back - Halts running cues, backs up the Cue List (SHIFTED = Go Back in time)
Arrow Keys
Moves the blue box
Backspace
Used in the command line to delete characters or de-select fixtures
Delete
End
Escape
Levels Out
Undo and multi-stage release of attributes and channels (three stage) (SHIFTED = restore)
Levels to Full
Insert
Opens blue box for editing, toggle controls in dialogue boxes
Page Up
Space
Controls
Deletes highlighted cue or puts delete on command line for deleting Cues, Looks or levels from cues
Home
Page Down
32
Function
Levels down by specified amount (default = 10%) (SHIFTED = -1%)
Levels up by specified amount (default = 10%) (SHIFTED = +1%)
Go on pending cue (SHIFTED = Assert current cue)
Alt C
Cues - Takes you back to the Live screen, whether it’s displaying Cues or Looks is based on where
you were last. This is the same as the [Live] button on the console.
Alt L
Looks - Toggles between Looks and Cues. This is the same as the [Looks] button on the console.
Alt P
Patch - This is the same as the [Patch] button on the console
Alt T
Timed Events - This is the same as going to the display pull-down and selecting Timed Events
Alt V
Variables - This is the same as going to the display pull-down and selecting Variables
Ctrl S
Save - Save shortcut
Palette VL Lighting Control Console
Installation & Setup Guide
SOFTWARE CONFIGURATION
1. Main PaletteOS Software Screen
The following pages are brief descriptions of the main PaletteOS software screen and its elements. More thorough
information is always available in the software’s Help Menu.
Help Menu
(Available on the auto-hiding taskbar)
Channel Grid
Colors in Grid
Cue List
Directory
Cue List
Controls
Cue List
Running Cue
and Attribute
Wheel Display
Effects List
Command Line
Status Window Display
Attribute Grid
Softkeys
2. Cue List Directory
The Cue List directory shows what Cue
Lists are in the the current show file and
ready for playback. It shows the current
cue, the next cue to be run, and any count
down times.
Software Configuration
33
Installation & Setup Guide
Palette VL Lighting Control Console
3. Cue List
The Cue List display allows instant access to altering cue
and attribute timing as well as labels, wait, follow, and
loop parameters. The blue box is moved around by using
[ARROW KEYS]. Pressing [EDIT] allows changes
within the cells.
4. Channel and Attribute Grids
The PaletteOS software provides a real-time status of all levels and effects in a cue in an user-friendly display. Users
can select levels or times in both Live and Blind modes to see what is happening during playback or programming.
If you have patched moving lights in your show, the Attribute Grid will appear below the channel Grid. Use the
display menu (S5 or the main windows menu) to toggle on or off each grid.
Colors in Grid
Channel Grid
Attribute Grid
Effects List
5. Status Window Display
The Status Window display shows the history of
changes, updates, etc. of the program(s) and file(s).
Different views can be selected using S11-Status softkey
when no moving lights are selected.
34
Controls
Palette VL Lighting Control Console
Installation & Setup Guide
6. PaletteOS Control Panel
The PaletteOS software runs on a custom processor under the Windows® Vista operating system (OS). An OS
system means that only the software necessary to run the console is installed and no unauthorized software can be
installed by the user. There are no user-configurable applications that are included in the OS. This protects the system
and the operating software parameters, assuring that system integrity is never compromised.
Since the Windows Vista OS is used, other features are available, such as a web browser, media player and file
manager. The Palette VL console can also be connected to a network to take advantage of services like DHCP
networking, mapped network drives, Internet connectivity, and more.
The Control Panel appears as soon as you exit the PaletteOS.
To access these special features, use the Control Panel (shown above) to launch applications, system configuration
and maintenance tools, and to view system information. The [S4] System softkey will access many features in the
control panel.
Note: You may have to press [Backspace] to access the main software menu. This will deselect, but not release any
captured channels.
The Control Panel provides management of your console,
lighting system configuration and data. It is divided into four
categories:
Date and Time
Applications
• Applications
• System
• Maintenance
Control Icons
• Information
Click a category to view its control icons, or in the case of
Information, its data.
The top bar displays the date and time. Pressing this bar will
collapse and expand the control panel.
System
Maintenance
Information
The following sections explain each control option.
Software Configuration
35
Installation & Setup Guide
Palette VL Lighting Control Console
Application Controls
The Applications section contains icons for launching the PaletteOS software or opening various accessory
applications.
Palette
The Palette icon launches the PaletteOS software.
Manage Files
The Manage Files icon launches the file manager which will allow you to move, copy and delete files on
the console.
Web Browser
The Web Browser icon launches the installed web browser for node configuration, rack configuration
and Internet activity.
Notepad
The Notepad icon opens the notepad which will allow you to take notes and edit text.
Note that you can save your *.txt document anywhere on the D:\ drive except in the \Horizon folder.
Feel free to make your own directory structures to suite your organizational needs.
Media Player
The Media Player icon launches the Windows Media Player for playing audio and video files.
PDF Viewer
PDF Viewer will allow you to view manuals, data sheets and other PDF format documents.
36
Controls
Palette VL Lighting Control Console
Installation & Setup Guide
System Controls
The System section contains configuration items for your lighting control system.
Configure Network
Clicking Configure Network icon opens the Network Configuration dialogue box. Here you can set or
change the static IP address of the console.
Advanced Network
The Advanced Network icon accesses the Windows networking tools for advanced network
configuration.
If the console can be connected to the facility's network, networking capabilities such as mapped
network drives and Internet connection can be accessed. Most LANs have a DHCP Server (Dynamic
Host Configuration Protocol) that automatically assigns network properties such as the IP address. In
most network situations, the console can be connected to the network via connecting a network cable up
to the back of the processor to either access the Internet or find shared drives on the network.
Software Configuration
37
Installation & Setup Guide
Palette VL Lighting Control Console
If a Static IP address is required, then follow the steps below to setup a network connection.
To manually setup a network connection:
Step 1. At Control Panel, click "Advanced Network" icon.
Step 2. Select "Local Area Connection" and then click "Change settings of this connection."
Note: Default gateway and DNS server will not need to be set for all local networking solutions.
Step 3. At Local Area Connection Properties, select "Internet Protocol Version 4 (TCP/Pv4)" and click
"Properties."
a. Choose "Use the following IP address" (typically 192.168.0.68).
b. Type in the static IP address and appropriate Subnet mask provided by the network administrator.
c. Type in a Default gateway if access to an outside of the LAN connection (i.e. connect to other networks
or Internet) is required.
d. Type in a Preferred DNS (Domain Name Server) for computer and website lookups.
e. Click "OK."
f. Click "OK" in the "Local Area Connection Properties" dialogue box.
g. Close the "Network Connections" window.
Note: There is no need to reboot the processor for network changes to take affect.
38
Controls
Palette VL Lighting Control Console
Installation & Setup Guide
Change Console Name
Clicking the Change Console Name icon opens the Change Console Name dialogue box. Note that once
you enter a new name and select "OK", the console will reboot to complete the configuration change.
Set System Time
Clicking the Set System Time icon opens the Date and Time dialogue box. Here you can change the
date, time and time zone configuration for the console.
To adjust the Time Zone (which is important if using Astronomical Events or want to synchronize the
system with World Time Services), click "Change time zone..." button and choose the appropriate time
zone. Check Daylight Savings Time box for adjusting to time changes. (The PaletteOS must be restarted
for the Time Zone change to take effect.)
The Internet Time tab determines whether or not the console will look to World Time Servers on the
Internet, such as time.windows.com, to synchronize the clock to World Standard Time. To do this all of
the following must be true:
• The processor must be connected to the Internet (see "Advanced Network" on page 37).
• The date must be set correctly.
• The time zone must be set correctly.
Software Configuration
39
Installation & Setup Guide
Palette VL Lighting Control Console
Set Screen Resolution
Clicking the Set Screen Resolution icon opens the Display Settings dialogue box. Here you can adjust
the resolution and configuration for two monitors.
Screen Saver Preferences
Clicking the Screen Saver Preferences icon opens the Screen Saver Settings dialogue box. Here you can
adjust or turn off the screen saver settings. (Note that the "Change Power Settings" options is not
accessible.)
40
Controls
Palette VL Lighting Control Console
Installation & Setup Guide
Mouse Options
Clicking the Mouse Options icon opens the Mouse Properties dialogue box. Here you can adjust the way
your mouse works with the console’s computer.
Touch Screen Calibration
The console processor supports the use of a touchscreen monitor. Due to mouse driver requirements,
only ELO Touchscreens should be used and connected with the USB cable, not the serial cable. ELO
touchscreens can be purchased from your local Strand Lighting dealer.
The AccuTouch 3000 series models are recommended, since they feature resistive technology (i.e. you
can point with objects other than your finger such as a pen, etc.) Purchase the USB type, NOT the serial
type.
After you have installed a touchscreen monitor, you will need to calibrate the screen. To do this, click the
"Touch Screen Calibration" icon. The ELO Touchscreen Properties dialogue box will allow you to
change various options for touchscreens, most importantly, the calibration. To do this, use the mouse to
touch the "Align" button. The screen should go white and you will be presented with a red target to
touch. Do this with your finger from a typical viewing angle. You will repeat this two more times.
Follow all on-screen prompts to complete the calibration process, then choose "OK" to exit.
Software Configuration
41
Installation & Setup Guide
Palette VL Lighting Control Console
On Screen Keyboard
Clicking the On Screen Keyboard icon opens the virtual keyboard.
Regional Settings
Clicking the Regional Settings icon opens the Regional and Language Options dialogue box. Here you
can adjust the regional location, keyboard and other input languages.
Volume Control
The Volume Control icon opens the volume fader. Here you can adjust the volume of the audio output.
42
Controls
Palette VL Lighting Control Console
Installation & Setup Guide
Task Manager
The Task Manager icon opens the Windows Task Manger dialogue box. Here the applications,
processes, services, performance data and other things can be viewed. (Note that accessing this screen is
not part of normal operation.)
Command Prompt
The Command Prompt icon opens the system’s command prompt which is primarily for technical
support. Only access this with full knowledge of the consequences of your actions.
Software Configuration
43
Installation & Setup Guide
Palette VL Lighting Control Console
Printer Setup
The Printer Setup icon opens the printer configuration controls. Here you can setup a printer for your
console.
Printing can be achieved by connecting the console to a Local Printer or a Local Area Network Printer.
The Network Printer option saves you from having to move the printer close to the console. It also
allows you to use any new printer you have successfully installed on your LAN without having to find
printer drivers.
For local printing, Strand Lighting recommends the following printers from Hewlett Packard (HP):
• HP DeskJet 1000 Series
• HP LaserJet 1100 Series
• HP Color LaserJet 2000 Series
USB Printers - Installing a USB printer should be plug and play and communication should be
established immediately.
Other Printers - In the event that communication is not established immediately, it is likely caused by
trying to install a printer that is not on Strand Lighting's recommended printer list. If this is the case, you
may attempt to install a non-recommended printer, but Strand Lighting cannot be held responsible for
the ability or lack of ability to successfully setup a non-recommended printer nor the quality of the
printouts. If you wish to proceed, follow the general outline of instructions below.
To add a printer:
Step 1. Shutdown Palette software. Control Panel will open.
Step 2. Click on "System" category.
Step 3. Click on "Printer Setup" icon. Printer dialog box will open.
44
Controls
Palette VL Lighting Control Console
Installation & Setup Guide
Step 4. At Printer dialog box, click "Add a Printer" button.
Step 5. At Add Printer dialog box, click either "Add a local printer" or "Add a network wireless or
Bluetooth printer" as required.
Step 6. Follow the wizard that allows you to browse for local printers or shared network printers. You
must make sure your system administrator has already established a shared printer on the LAN
and given you privileges to connect to and use it.
Once a printer has been added, it will become the default printer (check marked). You can add more than
one printer; you will just have to choose which one you want to print to if it is not the default printer.
The console also prints to Adobe® Portable Document Format (PDF) files. These files can be saved to
the hard drive or removable media (such as a USB flash drive) and printed elsewhere if a shared
(network) printer is not available. Browse the hard drive with Explorer and double-click on your PDF
files.
Software Configuration
45
Installation & Setup Guide
Palette VL Lighting Control Console
Firewall Settings
The Firewall Settings icon opens the Windows Firewall Settings dialogue box. Here you can adjust the
firewall settings of the console’s computer.
Defrag Drive
The Defrag Drive icon opens the Disk Defragmenter dialogue box. Here you can clean up your hard
drive by performing the defrag optimization.
46
Controls
Palette VL Lighting Control Console
Installation & Setup Guide
Maintenance Controls
The Maintenance section contains items that are primarily used by an authorized service center or by a user with
instructions from technical support.
Update Palette Software
The Update Palette Software icon opens the Palette Software Upgrades dialogue box. Here you can
perform a software update by launching a software update file.
Hardware Test
The Hardware Test icon opens the console test options screen. This functions allow you to perform a
hardware test to determine if there are any malfunctions with the buttons and sliders on your console.
Software Configuration
47
Installation & Setup Guide
Palette VL Lighting Control Console
Run the hardware test, select your console, select the panel to test and then activate all hardware elements. Any odd
behavior should be reported to an Authorized Service Center for diagnosis.
Launch Debugger
The Launch Debugger icon launches the Engine Status program and then the PaletteOS. This should
only be used when directed by a technical support specialist.
48
Controls
Palette VL Lighting Control Console
Installation & Setup Guide
USB View
The USB View icon launches the USB View program. This should only be used when directed by a
technical support specialist.
Delete All Settings
The Delete All Settings icon allows you to return the console to its factory default settings.
End Console Processes
The End Console Processes icon will stop all console programs from running. This should only be done
by an authorized service center or by instruction from a technical support specialist.
Software Configuration
49
Installation & Setup Guide
Palette VL Lighting Control Console
Information
This section provides useful technical information about the hardware, software and settings.
Run/Shutdown Controls and Application List
Launch / Show PaletteOS
This button launches the PaletteOS software application so you can begin programming a new show (or
load an existing show file). The button will also return users to the Palette Operating Software window.
Application List
Click the arrow to bring up the list of PaletteOS applications that are available.
50
Controls
Palette VL Lighting Control Console
Installation & Setup Guide
System Shutdown
This button will shutdown the console. Click "Yes" to proceed. If recent changes have not been saved,
the console will ask to save (or discard) changes before exiting.
Note: Answering either way (Yes or No) to the "Show Modified" dialogue box will shutdown the
console. DMX512 transmission will cease when the console is shutdown.
Note: If you wish to reboot the system, hold down [SHIFT] and select the red shutdown button on
screen. Then select "Reboot."
Tracking Backup
Tracking backup allows a second console or PC to stay in sync with the one that is driving the stage, so
in the event of a failure you can just switch to the backup and continue unscathed. The second device
must have equal authorization to the main system, but it can be in the form of a second console, or
simply a Horizon Universal Key on a networked laptop. If you have installed Palette PC, you will find a
Palette Backup shortcut in the Palette section of your START menu. To launch a tracking backup session
from another console, CTRL-click on the Palette icon in the Control Panel.
Remote Engine
Remote Engine allows a second console or PC to view and edit what is going on in the Main Console.
This means multiple programming sessions can be happening at the same time, or a designer can be
editing as well during a cueing session. If you have installed Palette PC, you will find a Remote Palette
shortcut in the Palette section of your START menu. To launch a remote engine session from another
console, CTRL-click on the Palette icon in the Control Panel.
Software Configuration
51
Installation & Setup Guide
Palette VL Lighting Control Console
RESTORING THE SOFTWARE
1. Updating or Re-Installing PaletteOS Software
If it is necessary to update or re-install the PaletteOS application onto the processor, follow the steps below.
Note: The processor always looks to removable media first upon startup for software updates. Therefore, it is
important not to leave a USB Key containing update software in the processor. This method does not archive the
install, but you can always find the software on our website. Follow the procedure below to re-install.
To update PaletteOS software:
Step 1. At Strand website, download upgrade file (file name: PaletteOSX.X.X.exe).
Step 2. Copy software file onto a USB key.
Step 3. Plug USB key into console.
Step 4. At console, close Palette console software. (Control Panel will launch.)
Step 5. From Control Panel, open File Manager.
Step 6. At folders list, locate the inserted USB key and select upgrade file (PaletteOSX.X.X.exe).
Step 7. Press [Ctrl] [C] to copy.
Step 8. Select D:\SavedInstalls folder on console hard drive.
Step 9. Press [Ctrl] [V] to paste. (The file should copy from the USB key to the console's hard drive.)
Step 10. Unplug USB key.
Step 11. Double-click D:\SavedInstalls\PaletteOSX.X.X.exe file.
Step 12. Follow all prompts to run upgrade program.
Step 13. Reboot console to complete installation.
To re-install current or previous version of PaletteOS software:
Step 1. Using Control Panel, launch File Manager. (Refer to "Manage Files" on page 36.)
Step 2. Browse to D:\SavedInstalls directory.
Step 3. If the version you want is here and the file name is PaletteOSX.X.X.exe, then you may double-click this file
to initiate the installation process.
Step 4. If the version you want is NOT here, then follow the instructions to Update PaletteOS Software above.
52
Controls
Palette VL Lighting Control Console
4.
Installation & Setup Guide
Setup
• Accessory - Hardware Components
Note: This chapter provides software operations which are necessary to configure console
hardware components.
53
Installation & Setup Guide
Palette VL Lighting Control Console
ACCESSORY - HARDWARE COMPONENTS
1. Overview
The console is highly configurable and can be set up in different ways depending on your requirements.
The Hardware Setup window provides setup options. Components such as button array panels, Grandmasters,
triggers, and console lights can be configured by pressing the appropriate tab in the window.
To access the Hardware Setup window, select "Hardware Setup" from the main softkey menu. For more information
on setting up components, refer to "Hardware Setup" in the PaletteOS software Help Menu.
Press tabs to bring up
configuration options for
hardware components
2. A/B C/D
The A/B faders have multiple purposes. On a new show file, the A/B faders are configured as Preset A/B Two Scene
Masters. The C/D faders are not applicable to the Palette VL console, therefore these will be disabled in the show file
and any settings for the C/D pair will have no effect. Regardless of configuration of the A/B faders, the [SELECT],
[HALT/BACK] and [GO] buttons will function as normal on the appropriate cue list.
All modes are described below:
• Disabled - If you chose this option, the sliders will do nothing. If you are just doing a "GO SHOW," this is the safest mode of operation as inadvertent moves on these faders will have no affect.
• PB Master + Crossfader - In this mode, the left-hand fader is the overall intensity master of the cue list assigned
to this playback and the right-hand fader is, at will, a manual cross fader. The [GO] and [Halt/Back] buttons function as normal, but at any time you can grab the fade and manually complete it using this handle. If you [Halt] the
cue, you can either press [GO] to complete it, or use the handle to manually complete the transition to the next cue.
If you are sitting in a cue, moving the handle will initiate the transition to the next cue.
54
Setup
Palette VL Lighting Control Console
Installation & Setup Guide
All levels going up and down will be affected. All times will be re-scaled to the distance the handle has to travel,
with the greatest time in the cue being measured using that distance and all others scaled to that. Wait times will be
scaled too.
At any point before reaching the end of travel, you can move the handle backward to reverse the transition. Once
you reach the end of travel, the next cue in the cue list will be pending. You do not have to physically reload a cue
or move the fader back to it's starting position. The next cue transition will begin by moving the fade off the end of
travel you just reached or by simply pressing [GO].
If you hold down [SHIFT] while manually moving a crossfader, you can move backwards through a cue list. (i.e.,
the cue that has just been completed will be the pending cue, rather than the next cue in the cue list).
• Cue List Split Crossfader - The Split Crossfader mode sets up the left-hand fader to, at will, manually control the
levels moving up in the next cue while the right-hand fader manually controls the levels going down in the next
cue. Moving these faders in tandem executes a standard crossfade. Both handles need to reach their end-travel destination before the cue completes. Once the cue completes, the pending cue changes and the handles are ready to
execute the next manual fade. You do not need to exercise the full travel of the handles to re-load the next cue.
• Look Page 1 & 2 Master - in this mode, the left fader will act as a master for submaster page 1 and the right fader
will act as a master for submaster page 2.
• Look Page 1 & 2 Crossfader - in this mode, the left fader will act as a master for submaster page 1 as normal and
the right fader will act as a master for submaster 2 inverted. This way you can slide them both together and use
them as a dipless crossfade mastering between two submaster pages.
Notes on Playback Handles:
• If you press [HALT] while a cue is in progress, you can manually complete the cue by pulling the handle.
• You can reverse the direction of the current fade at any time before the handle reaches its end-point destination.
• If you start a cue by pressing [GO], then while the cue is in progress, you move the handle, that is equivalent to
pressing [HALT] then manually completing the cue by pulling the handle.
• If you move the handle to Halt a cue, but then decide you want the cue to complete in cue-time, you can simply
press [GO]. You will have to park the handle at one end or another to make it active again.
• If you Halt a cue for any reason and choose to complete it using the handle, all times will be re-scaled to the distance the handle has to travel, with the greatest time in the cue being measured from top to bottom and all others
scaled to that. Wait times will be scaled too.
• It does not matter if the handle is at the top or bottom when you start to use it. As long as it is at one end, it will
function as a manual crossfader, moving you forward through the cue list.
• If you want to manually crossfade backwards through the cue list, hold down [SHIFT] while pulling the handle.
You will notice that the pending cue in gray at the bottom of the bubble will have a lower number than the current
cue in black text up top.
Accessory - Hardware Components
55
Installation & Setup Guide
Palette VL Lighting Control Console
3. Dead Black Out (DBO)
The Dead Black out has multiple functions. Whenever it is enabled, it is like pulling the Grandmaster slider down to
0% in zero time. There are macros that allow you to control this feature programmatically.
• Disabled - Select this option if you don't want to accidentally plunge your stage into darkness by pressing the DBO
button.
• Momentary - If you select this option, pressing the button will black out the stage only while you have your finger
on the button. Use this if you want to 'bump' the stage out for effect.
• Toggle - If the DBO is set as a toggle, pressing it once will black the stage out and pressing it again will restore it.
While the DBO is on, the red LED will flash rapidly.
Note: The red LED on the [DBO] button will flash slowly if the level of the handle is between 1% and 99%.
4. Console Setup
QWERTY Keyboard Cue List Control
By default, the QWERTY keyboard on the Palette VL processor will control the displayed Cue List. For example, the
[Spacebar] executes a Go; the [Z] key executes a Pause or Halt; and the Slash [\] will Release the Cue List. (For the
full QWERTY mappings, refer to "Processor Keyboard Shortcuts" on page 32).
If you uncheck this option, any method of controlling the cue list from the keyboard will be disabled (including
pressing [EDIT] in the first column of the Cue List). To run cues, you either need to press the dedicated buttons on the
console or use the Cue List Toolbar buttons using the Windows UI console personality with the mouse.
56
Setup
Palette VL Lighting Control Console
Installation & Setup Guide
Level Entry Mode
This option affects the way that you enter levels for channels from the keypad.
Use Enter Key:
Command Line, where the action is confirmed with the Enter key.
[1] [@] [7] [ENTER] : Channel 1 goes to 70%
Single Digit Entry:
Channel goes straight to the desired level after a single digit is entered following the [@] key (i.e. the [ENTER] key is
not used).
[1] [@] [7] : Channel 1 goes to 70%
Two Digit Entry:
Channel goes straight to the desired level after a percentage is entered following the [@] key (i.e. the [ENTER] key is
not used).
[1] [@] [7] [0] : Channel 1 goes to 70%
Console Personalities
The following Console Personality modes are available. Each mode offers a slightly different method of colors and
spellings. The modes are as follows:
• GeniusPro (500 series) - GP - British spelling, 500 series colors (magenta is up, cyan is tracking)
• LightPalette (500 series) - LP - US spelling, 500 series colors (magenta is up, cyan is tracking)
• Palette Classic Europe - EU - British spelling, LP90 colors (cyan is up, magenta is tracking)
• Palette Classic US - US - US spelling, LP90 colors (cyan is up, magenta is tracking)
Accessory - Hardware Components
57
Installation & Setup Guide
Palette VL Lighting Control Console
5. Macro Editor and Commands
Macros can contain Commands or Scripts, however, they are not keystroke recorders. Macros Commands are very
powerful, user-definable routines that the PaletteOS runs when assigned to cues, time events, macro buttons,
variables or triggers.
Note: If you need more advanced show-control automation and logical branching, refer to "Macro Editor and
Scripts" in the PaletteOS software Help Menu.
When a Command is assigned to the Cue Action of a cue, the macro icon will appear in the Action column.
You can add a Command to a cue by moving the blue box to the Action column and pressing [Insert]. A Cue Action
dialogue box will open:
Click on Macro or press [S5] to add a Macro Command. The Macro Editor will appear.
The main [S11] tab on the left should be set to Command, showing the commands available in the list under [S1].
Press the softkey until the desired command is highlighted, then press [S3] to insert it into the list on the right. The
Edit Macro dialogue box will open.
Note: You can double click on any available macro to add it to the list. [SHIFT] [S1] will move backwards through
the list of macros.
58
Setup
Palette VL Lighting Control Console
Installation & Setup Guide
Any arguments (parameters) of the command will be listed. Double-click on the Value column to set an appropriate
value, then click OK.
You can Insert as many individual commands as you like for each macro and order them by selecting their line and
use [S5] and [S6] to move them Up and Down in the list.
Accessory - Hardware Components
59
Installation & Setup Guide
Notes
60
Setup
Palette VL Lighting Control Console
Palette VL Lighting Control Console
5.
Installation & Setup Guide
Operation
• Selecting Channels and Setting Levels
• Recording a Cue or Look
Note: This chapter provides software operations which will get the system up and running.
For complete software operation instructions, refer to the Palette Series Software User
Manual.
61
Installation & Setup Guide
Palette VL Lighting Control Console
SELECTING CHANNELS AND SETTING LEVELS
1. Channel Grid Overview
Channel information is displayed on the Channel Grid (shown below) with the channel number on the top row of
numbers and the level on the bottom row. The color bubble below can be turned on or off using the Display menu.
Selecting a channel is the first step towards setting or modifying levels.
Channels may be selected with the mouse or with keystrokes.
Channel Grid
Attribute Grid
Running Effects
List
Selected channels are identified in the channel grid by a red highlight around the channel:
The level may still be controlled by other means (i.e, Cue Lists or Look Masters). Until you specify that you want to
change the level, you do not have control over it with the wheel or keypad. Once a level is altered, the red outline will
fill in and a white triangle (delta symbol - meaning changed) will appear. Attributes will be indicated by a red triangle
and text:
Note: Refer to "Selecting and Setting channels" in the PaletteOS software Help Menu for more instructions.
62
Operation
Palette VL Lighting Control Console
Installation & Setup Guide
2. Using the Keypad to Select Channels
To Select Channels Using Keypad:
Step 1. At keypad, enter number of channel(s) you wish to select. (Typing will be reflected in the Command Line.)
Step 2. Use + (And), / (Through) and - (Minus) keys to select groups of channels.
Step 3. Press [@] or [*] on the QWERTY keyboard to set a level in percent.
Step 4. Enter percentage value. If you enter a single number, it will be multiplied by 10 (example: pressing [5]
[ENTER] results in 50%).
Step 5. Press [ENTER] to complete the action.
Level Entry Mode
When working on the command line you can choose to terminate fixture selection and level set commands with or
without using the [ENTER] key. The options are to use Enter, Single Digit or Two Digit entry. With single digit entry
the syntax [1] [THRU] [1] [0] [@] [5] will take 1 through 10 to 50%. To achieve the same thing with Two Digit entry,
you would type [1] [THRU] [1] [0] [@] [5] [0]. If you wanted 5% in single digit entry, type [1] [THRU] [1] [0] [@]
[0] [5] [ENTER]. Note: Typing [1] [THRU] [1] [0] [@] [.] [1] [2] [7] [ENTER] will set fixtures 1 through 10 to 50%
in any mode. The decimal point identifies setting DMX512 values.
Notes:
• Alternately, you can select channels and roll the wheel to increase or decrease their level from the current position.
• Holding down [SHIFT] while rolling the wheel, changes the values in Decimal rather than Percent.
• To set a level of 5%, enter [0] [5] [ENTER].
• Use the [@] [LOOK] syntax to open the Apply Levels dialogue box to reference pre-recorded Looks as Palette VL
references.
• Make sure the Num Lock key is on before using the numeric keypad.
Note: For more detailed instructions, refer to "Command Line Syntax" in the PaletteOS software Help Menu.
3. Using the Mouse to Select Channels
Note: For more detailed instructions, refer to "Using the Mouse to Select Channels and Levels" in the PaletteOS
software Help Menu.
To Select channels Using Mouse:
Step 1. Position mouse pointer on channel number and left-click. Red outline will appear.
Step 2. Select multiple channels with mouse by left-clicking on first channel, holding left button down, and
dragging mouse to last channel in group.
Step 3. Use mouse wheel to change level of selected channels.
Selecting Channels and Setting Levels
63
Installation & Setup Guide
Palette VL Lighting Control Console
RECORDING A CUE OR LOOK
1. Recording a Cue
Fast Description
The following works in any console personality:
Step 1. Select channels and set levels.
Step 2. Press [RECORD] [ENTER] or [RECORD], Cue #, [ENTER] or [RECORD] [SELECT] on the Playback
you want to use.
Notes:
• [SHIFT] [RECORD] allows you to record via the dialogue box.
• If you want to keep the Record Cue dialogue box open to add a label or change the record options, hold down
[SHIFT] before pressing [SELECT].
• If the blue box is resting on the last cue of the cue list, the Record dialogue box will be automatically stuffed with
the next whole number if the last cue is a whole number. If it's a point cue, then the next point cue will be suggested.
Detailed Description
Step 1. Set the levels you want to record in a cue. The levels can be set by any method (using the mouse, the
keypad, Looks, Groups, etc.).
Step 2. Press [RECORD] or click the Record button on the "Tool Bar." for the command line solution.
Step 3. If [SHIFT] [RECORD] is used, the Record dialogue box will open:
Step 4. Enter a cue Number. (The number in the [S2] box should be the next available cue at the end of your cue list
or it will be cue number highlighted by the blue box.) The Cue Number box is active by default, so you can
just enter a number and press [ENTER].
64
Operation
Palette VL Lighting Control Console
Installation & Setup Guide
The following properties are optional:
[S1] - If needed, select the "Cue List" to record to. The default is the cue list you currently have selected.
[S3] - Change the "Record" option if needed. The default option is to record your Live as exactly what you
see on stage coming from the selected cue list. To find out what the other options mean and when to use
them, refer to the PaletteOS software Help Menu.
[S4] - Enter a Cue Label. This label will appear in the Cue List next to the cue (optional).
[S5] - Change the Default Cue Time. This box will automatically be stuffed with the value from the Default
Cue List Options.
[S6] - If you don't enter a Down Time, the Down Time will be the Cue time. If you do enter a Down Time,
the Cue Time is equivalent to the Up Time. If you need the cue to wait a specified amount of time before it
starts to fade (either Up or Down), use the Wait/Fade syntax in the time field.
[S7] - If you are recording to an existing cue and want to update in the changes, select "Update." Updating
means that the new data will be merged into the existing cue, not destroying data that is currently there. If
you are recording to an existing cue and don't select "Update," you will see the dialogue box shown below
after you press [ENTER].
[S8] - Check "Record Minus Subs" if you don't want to pull in levels from recorded submasters that are
active on stage.
[S9] - Opens the "Attribute" dialogue box to filter what will be recorded in this cue:
Notes:
• If you double-click [S5] (or any other softkey), it will 'solo' Position. That is, all other check marks will clear and
Position will remain checked. These softkeys are also mapped to the "Moving Light" buttons to the left of the
encoders.
• While in the main Record dialogue box, if you press [SHIFT], the softkeys will be displayed as follows:
Again, these softkeys are also mapped to the "Moving Light" buttons to the left of the encoders. Pressing any of these
changes the attribute masking without the need to open the "Attribute" dialogue box. You can also double-click any
attribute family to solo it.
[S10] - Select "Cue Only Mode" if you are updating a cue which is not the last cue in the cue list and you
don't want the changes you've just made to go past this cue. Tracking is ON by default, however, you can
change the default in [S2] "Show Options." (This option is disabled if you are appending to the cue list.)
Step 5. Press [ENTER] to close the dialogue box. If you are attempting to record over an existing cue and you have
not selected "Update" as described in [S7] above, you will be presented with the following dialogue box.
Recording a Cue or Look
65
Installation & Setup Guide
Palette VL Lighting Control Console
• Update (see above) is the default. Pressing [ENTER] or [S2] will close this dialogue box and update the existing
cue, not losing old cue data.
• Pressing [S1] "Delete and Replace" will delete the existing cue and record the new cue data to this cue number
using the channels specified in [S3] optional above.
• Pressing "Cancel" will close this dialogue box and return to the "Record" dialogue box.
Step 6. The recorded cue appears on the cue list.
Note on Recording Ranges of Cues:
If you want to record values through a range of cues, enter the range using the X/Y syntax in the [S2] box:
As soon as you type the "/" symbol for Thru, the Label, Cue Timing and Update control become inactive. When
recording through a range of cues, new cues will never be created as this type of recording is necessarily an update
operation. When you press "OK," you will be presented with this dialogue box:
66
Operation
Palette VL Lighting Control Console
Installation & Setup Guide
If you select "Block new values into cue range," each cue in the range will get the new values as determined by the
Record Options you selected with [S3] in the "Record" dialogue box. This may result in Redundant Data which may
or may not be desirable (normally only desirable in multiple cue list environments where you want to be sure each
cue will be in total control of those lights, regardless of what other cue lists are doing). By default, [S2] "Track new
values through cue range" is selected (so pressing [ENTER] will close this dialogue box using this option). If you
select this option, the values will be recorded in the first cue in the range and they will track until the end of the range.
You can still check [S10] "Cue Only Mode" in the "Record" dialogue box to not track beyond the end of the range,
even when using the [S2] "Confirmation" option.
Tips:
• You can use the [WHEEL] to change many of the controls in this dialogue box. Holding down [SHIFT] while
using the Wheel changes numeric values by 0.1.
• You can quickly record a cue to a cue list that is not currently selected by pressing [RECORD] [SELECT].
Detailed Description
These versions work via the command line as opposed to the Record Cue dialogue box. Access to all options within
the dialogue box can be found in the softkeys.
If a softkey is showing a green arrow, clicking on this softkey will enable more softkeys directly above it on the Mkeys.
2. Recording a Look (Submaster)
Look Masters (Submasters) can be set up and recorded in either the Live (Active) or Blind.
From Live Display:
Step 1. Select [LIVE] button from channel Grid Tool Bar.
Step 2. Select channels to be assigned to Look Master.
Step 3. Set levels for channels.
Step 4. Press [RECORD] then the Look # and press
[ENTER] or press [RECORD] then press Bump
button at desired submaster.
Step 5. Press [SHIFT] [RECORD] [LOOK] or [S12] to
open the Look dialogue record box.
Step 6. Enter number of the Look Master you wish to
record.
Step 7. Enter a Look Master label in the text box
(optional).
Step 8. From drop down list box, select which channels
will be recorded in this Look Master.
a. Live - will record the entire output of the desk. Will include or exclude subs based on the setting in
Hardware Setup.
b. Delta - only channels that have been changed.
Recording a Cue or Look
67
Installation & Setup Guide
Palette VL Lighting Control Console
c. Selected (all attributes) - only channels currently selected but will include all attributes for that fixture
whether they have been adjusted or not.
d. Captured Attributes - only channels that have been selected and changed. This will include only the
attributes that have been changed. Not all attributes.
e. Captured and Selected - only channels that have a red text for their level value (this is the default when
you press [RECORD] [GROUP].
f. Block Everything - Will store a hard level value for every channel that exists.
Step 9. Select the Look Type. From the drop down list box, select from the following options:
a. Additive (HTP): Highest Takes Precedence. Stored in this manner, the look will build upon other looks
and take over only when its stored level is higher.
b. Assertive (LTP): Last Takes Precedence. Stored in this manner, the look with work with other looks
depending upon the order in which the looks were activated. The last one will assert over a previous one.
c. Exclusive: stored in this manner, the levels are now controlled exclusively by this look. Cues other looks
and manual control will not override. It can ONLY be controlled by that look.
d. Inhibitive: stored in this manner, the look handle or submaster will normally be in the up position and
pulling it down will limit or inhibit the level that it is outputting. This is the same functionality as a
Grand Master.
e. Assert Only (HTP): stored in this manner, all attributes that are stored in that Look will remain at the
Look's position when the Submaster is released.
Step 10. Use "Update" when you want the levels that have changed to merge and not replace the existing levels in the
look.
Step 11. Use "Record Minus Subs" checkbox to select if you do not want to record levels set by other Look Masters.
This option is set in Hardware Setup.
Step 12. Click "OK" (or press [ENTER] on the keypad) to record the Look Master.
68
Operation
Palette VL Lighting Control Console
Installation & Setup Guide
3. Look Pages
By clicking the icon in the top left-hand corner of your screen titled "Look," you will be taken to the Look screen.
Here you are able to access all of your Looks pages and individual Looks within those pages.
You have the ability to bring up each individual look by clicking on that Look and dragging up the Virtual Look
Slider to the appropriate percentage, or by changing the percentage in the values column. The values within that Look
will be displayed in the channel grid.
Recording a Cue or Look
69
Installation & Setup Guide
Palette VL Lighting Control Console
If you move the blue box over to "Look Type," you now have the ability to set your Look to various types.
70
Operation
Palette VL Lighting Control Console
Installation & Setup Guide
A.
Specifications
71
Installation & Setup Guide
Palette VL Lighting Control Console
1. Palette VL Lighting Control Console
Technical Specifications:
• Supply Voltage Universal power supply 90-240V
• Approvals ETL listed and CE marked
• Construction Galvanized sheet steel and aluminum extrusion Flame retardant ABS controls
• Operating Temperature 0° to 50° C ambient (32° to 122° F)
• Humidity 5% - 95% non-condensing
• Storage Temperature -40° to 70° C (-40° to 158° F)
Weight:
• Palette VL16: 27 lbs (12.5 kg)
• Palette VL64: 38 lbs (17.5 kg)
Dimensions (LxWxH):
• Palette VL16 - 17.8 x 25.5 x 4.5" (640 x 452 x 115mm)
• Palette VL64 - 17.8 x 39 x 4.5" (991 x 453 x 115mm)
Connectivity:
• One (1) Ethernet RJ-45 port, Strand ShowNet compatible
• Three (3) USB ports (two on rear panel and one on front panel)
• Two (2) VGA monitor outputs (monitors not included)
• One (1) Serial port
• Two (2) DMX512 XLR-5 ports
• One (1) 1/8-inch Audio Out Port
• One (1) 1/8-inch Audio In Port
72
Palette VL Lighting Control Console
Installation & Setup Guide
B.
Software Tips
73
Installation & Setup Guide
Palette VL Lighting Control Console
1. Helpful Tips and Shortcuts
Below are some helpful tips and shorts to operate and program your Palette VL Control Console. Take a few
moments to review these for future use. The tips are also available through the PaletteOS software.
• Use the [HELP] button to get help on any specific button or in any dialogue box. To get help on buttons, press
[HELP] then the desired button.
• If your hardware is such that the A/B faders crossfade you between cues (see S3 - HARDWARE SETUP), holding
down [SHIFT] while moving the faders moves you backwards through the cue list.
• If you press and hold the softkeys accelerator for a pull-down list in a dialogue box, a large popup will appear,
allowing you to use the level wheel to select a value.
• You can add profiles to any timed fade (intensity, position, color, etc.). As you use the blue box to enter times, the
softkeys change giving you access to profiles such as slow start, damped and zigzag.
• The Universal Attribute Control allows you to move your moving lights in straight lines rather than arcs.
• Palette VL can read the SMPTE time off your MP3 files and you can synchronize cue lists to music.
• In the Hardware Setup under the Console tab, there is a checkbox that allows you to mute QWERTY keyboard
events for controlling Cue List.
• Attribute masking can be used when Moving, Copying, Recording, Loading or Updating cues and looks. Rather
than opening the [S9] Attribute dialogue box, hold down SHIFT and use the softkeys. Double pressing any
attribute family will solo it.
• Palette VL's Auto Move In Black will automatically set up your moving lights ready for the next cue their used in.
MIB features can be customized on a pre-cue basis using the cue Action dialogue box.
• Palette VL's ability to 'busk' moving lights is very powerful. You can change the attribute behavior of your moving
lights by VIEWing the properties of a Look Master.
• The Show Options has a field where you can set the level for the [ON] button. Double pressing the [ON] button
will always give you 100%.
• Every dialogue box has a small blue question mark in it. Press this button to get context sensitive help.
• Palette VL supports 100 Priority levels for Looks and Cue Lists. The highest priority is #1 and the default priority
is #70 for Cues and 70 for Looks.
• To enter times in the HH:MM:SS format, use two dots (i.e., “ .. ”) to make the colon. This format extends from
days (DD) to fractions of a second or frames (FF) in SMPTE time (i.e., DD:HH:MM:SS.FF). Note that frames or
the 100th of a second appear after a single decimal point.
• Moving Head channels can normally hit the same place on stage using two different sets of pan and tilt. Use the
FLIP TOOL to try cues out using either.
• [S12] is the Select softkey. Pressing it gives you twelve methods of selecting channels in your rig, including Evens,
Odds, Previous, Levels Going Up, channels Using Palettes etc. You can even store your own selection set similar
to Memory Store and Memory Recall on a calculator.
• Using the command line, you can alter intensity levels relative to their current position using the [1] [THRU] [1]
[0] [@] [+] [1] [5] [ENTER] syntax. The command line will read "UP" when you press [+]. Similarly you can
press [-] for “Down”. If you’re controlling moving light attributes, the [+] puts the word “Relative” in the command line.
• The Universal Attribute Control gives you six different color spaces to select and fade your color mixing channels.
• The Fan tool allows you to evenly spread out attribute values using one of the following functions: Center, Right,
Left, Ends, Random, Random Positive, Sine and Tangent. You can also repeat the fan throughout your selection
set.
• When controlling moving lights, double hit the softkey for an attribute to display a large pop-up with fixed
attribute values. The softkeys 1 through 12 map to these values for very quick access.
74
Palette VL Lighting Control Console
Installation & Setup Guide
• The command line supports relative movement of moving light attributes. For example, you can type [1] [THRU]
[1] [0] [PAN] [+] [9] [0] [ENTER].
• If you want one group of channels to move at a different rate than others in the same cue, you can either move
those channels to a different part or use the Independent Timing where each and every attribute of every channel
can have its own Wait and Fade time. This is handy if you want splayed offsets and are not concerned about managing parts in the cue list. To access Independent Timing, press [SHIFT] [EDIT] or the TIME bubble above the
channel grid.
• The four buttons below the encoders on the console open large popup selection lists for the attribute values currently assigned to those encoders. Spinning the encoder will highlight different values and pressing the button
again will put those values live to stage.
• If you enter a range of cues in the Record Cue dialogue box or command line, you have the option to record values
in all cues in the range, or to just record in the first cue and track through the rest.
• Time Events can trigger on specific days of the week or month and have hourly or daily repeat frequencies.
• Cues can steal away from active Looks Masters if both are at the same priority, but by default, looks and cues are
both priority 70.
• Use [SHIFT] with the arrow keys to select multiple cells with the blue box in the Cue List. This is handy for
changing many cues' times all at once. This is also how you select multiple cues to delete, move or copy (before
touching the [DEL], [MOVE] or [COPY] keys). Loops are easily created by highlighting multiple Action cells and
pressing [EDIT] to add follows and links.
• The A/B and C/D faders can be configured with S3 - HARDWARE SETUP to either manually fade the Up and
Down times, crossfade the cues, work as cue list masters or be manual two-scene masters.
• You can write a Block cue by selecting the ALL Levels (Block Cue) Record option in the record dialogue box, or
just by right clicking on a cue and selecting Block Cue. A horizontal line above the cue will show you that no
channels will track into this cue.
• You can rearrange the column in the Cue List by clicking and dragging the column headers.
• Use the Tools button to open Virtual 5X5 Button Arrays for Groups and Positions, Color and Gobo/Lens palette
access.
• The command line supports range entry of when setting levels. For example you can type [1] [THRU] [1] [0] [@]
[1] [0] [-] [1] [ENTER]. The [-] appears on the command line as the word "TO."
• When you record groups, the selection order is preserved for fanning and independent timing purposes.
• Configure the way the DBO (Dead Black Out) button works in S3 - HARDWARE SETUP. It can be a momentary
button, a toggled or disabled.
• The Track Sheet can show you every parameter of the moving lights in your rig. You can expand and collapse this
detail level on a per channel basis. Find the Track Sheets under the Display menu.
• The [UNDO] button has multiple functions. It will close any open dialogue box or it will release selected channels
if no dialogue box is open. Press [SHIFT] [UNDO] to bring back what you just cleared.
• DON'T USE THE TRACKPAD - you don't have to. Almost every function can be achieved using dedicated keys,
the Softkeys (S1 - S12), the [NEXT]/[PREV] button, the level wheel or the arrow buttons.
• If you put the forward slash character {/} at the beginning of a cue label, the text will appear italicized. If you use
an exclamation point {!} it will be bold.
• You can drag columns around in the Cue List to suite your needs. Double clicking on column separators will automatically size the column for you.
• You can move any selected channels in a cue to a separate part by pressing the PART softkey and then update the
cue. Move the blue box in the cue list to change cue part timing. Palette VL supports 26 different parts plus independent timing.
• The Grand Master can either include or exclude captured channels. Choose your option in S3 – HARDWARE
SETUP.
75
Installation & Setup Guide
Palette VL Lighting Control Console
• The NEXT/PREV button moves you through dialogue boxes. Use it with [SHIFT] to move backwards through a
dialogue box.
• You can delete cue parts by highlighting any cell part's line with the blue box and press the DEL key. The channels
in that part can either be moved to the main cue or removed from the cue altogether.
• While you are in a dialogue box, the SOFTKEYS will take you to the individual controls. The control that currently has the focus of the WHEEL, ARROWS or NUMBER KEYS will flash the amber LED on that SOFTKEY.
• Releasing channels works in three stages: First time you press [UNDO], it activates the Undo feature. The second
time you press it, it releases the last attribute you touched. The third press releases any currently selected (red
background) channels. The fourth press clears all captured channels. Use [UNDO] with [SHIFT] to make it an
"Oops" key (a three-stage process).
• The first time you press the [TOOL] key, you must use [SHIFT] [TOOL] and use the Softkeys to select the desired
tool. Next time, you can just touch the tools key quickly to toggle the tool on and off.
• Did you know that any cue with zero time (a 'button') will appear bold in the Next Cue column in the cue list directory.
• To quickly copy a Look Master, press [COPY] then the Look's [BUMP] button, then touch the desired new BUMP
button.
• While in Blind Mode, moving the blue box loads cues.
• To alter the selected channels by 1% instead of 10%, press and hold [SHIFT] while using the [UP] and [DOWN]
buttons.
• Time Events can trigger based on astronomical events such as sunrise and sunset. Palette VL has longitude and latitude values for nearly two thousand cities around the world.
• The console uses Horizon Control's Universal Attribute Control. This very powerful technology allows you to do
things like control color mixing lights in six different color spaces.
• Flash channel (a TOOL) works whether or not you have channels selected before you initialize the tool. If you type
channel # TOOLS|FLASH, that channel will start flashing. You can then type another channel number and press
enter to jump to it. Use the level wheel to scroll through channel quickly. Once you close the tool, the last channel
will be selected and ready for you to set its level.
• To make the channels wait a specific amount of time after the [GO] button has been pressed enter a Wait time. Do
this by editing the Cue Time box using the Wait/Fade syntax.
• You can remove any redundant data in your cue list by right-clicking in the cue list and select "Remove Redundant
Data." Alternately, you can do it on a single cue or range of cues by selecting them with the blue box first before
right-clicking and selecting "Remove Redundant Data."
• When editing Wait/Fade times using the blue box, use [FULL] to highlight the Wait time (start of line) and [OUT]
to edit the Fade time (end of line).
• To enter time in HH:MM:SS format, press the decimal key twice to make the colon. This is used for very long Fade
times or when entering SMPTE times.
• Holding down [SHIFT] while rolling the level wheel on any numeric field will change the value by 0.1.
• If you build a look that you like on one moving light, you can use the [COPY] button to copy its attributes to any
other light, regardless of make and model. This is on of the very powerful features of the Universal Attribute Control.
• If another cue lists steals away channels from your cue list, press [SHIFT] [GO] to 'Assert' your cue list. The current cue will not advance.
• If you hold down [SHIFT] while you press [HALT/BACK] the cue list will go back to the previous cue in cue time,
rather than the Halt/Back time.
• Busking Looks is a very powerful feature of the console. Look Master can be configured to give true Last Action
control to moving light attributes.
76
Palette VL Lighting Control Console
Installation & Setup Guide
• If you want to remove information in a cue, LOAD the cue, select the channels, release them, then press the
[UPDT] key to update the cue.
• To quickly record a Look Master, set the desired levels then press [SHIFT] [RECORD] then a [BUMP] button.
You can later edit the name of the Look by pressing [VIEW] then [BUMP] to get the Look's properties.
• If you are editing a numeric column (like time), after pressing [EDIT] you can use the level wheel to change the
values. If multiple cells are selected, the values will change relative to each other.
• Use Load to load cues or looks. You can load multiple items on top of each other to combine ideas.
• To quickly move a Look Master, press [SHIFT] [MOVE] then the Look's [BUMP] button. Then touch the desired
location's [BUMP] button.
• To quickly copy a Look Master, press [COPY] then the Look's [BUMP] button, then touch the desired new
[BUMP] button.
• Go to the Control Panel to change the way your track pad works. You can turn on or off features such as the tapclicks.
• To release all the Playbacks, press [SHIFT] [REL-PB].
• Use the File Open File Types combo to open Checkpoint files if you've made a mistake.
• To go to the top of a Cue List, press and hold [SHIFT] while pressing the [STEP UP] button. To get to the last cue
in a Cue List, press [SHIFT] [STEP DOWN].
• To scroll the channel grid, hold down the SHIFT key while rolling the level wheel. This only works when there are
no channels currently selected. To deselect all channels without affecting their set level, press the [BACKSPACE]
key until the command line is clear.
• To go to a cue without using the GOTO CUE dialogue box, use the ARROW KEYS to move the blue box to the
first column in the cue list on the desired cue and press [EDIT]. This is equivalent to double clicking on that cell
with the mouse.
• Using [S2] - SHOW OPTIONS, you can give each Cue List their own default Step times, Back times and Release
times.
• Your console worklights can have separate levels. Choose the desired levels in [S3] - HARDWARE SETUP.
• You can right click to Clear or Copy the contents of the History Status to the system clipboard. You can then paste
this text into Notepad to save it if need be.
• Typing [VIEW] [CHAN NUM] [ENTER] allows you to change the labels of a channel to make your channel Grid
a little easier to understand. Alternately, you can select them and right-click with the mouse and choose channel
Label.
• Right click on the divider to the left of the channel Grid to set 20 vs. 25 across.
• The Black Status window will tell you what tool you will get if you touch the [TOOLS] button. To change the tool,
press and hold [SHIFT] [TOOLS] and select a new tool using the Softkeys.
• If you want to get back to the stage display while in the patch, just press a [SELECT] key.
• Instead of using the command line to patch channels, try using the blue box. Select the first cell, press [EDIT], type
in the desired number then just keep pressing the [DOWN ARROW] rather than [ENTER].
• Press [S4] - SYSTEM to get to applications other than the PaletteOS, such as the file manager, notepad, web
browser and media player.
• Running your finger along the very right-hand side of the track pad allows you to adjust the levels of the selected
channels.
• Why print to paper? Just email your PDF output right from your desk.
• There is a text editor built into the PaletteOS that allows you to take notes. Get to it using [S4] - SYSTEM.
• Use the level wheel in dialogue boxes to scroll through lists, number boxes and combo boxes. Holding down
[SHIFT] while rolling the level wheel will change numeric fields by 0.1.
77
Installation & Setup Guide
Palette VL Lighting Control Console
• Go to the Control Panel to change your Screen Saver. Changing the Settings of "My Pictures Slideshow" allows
you to point to your own directory of images that you place on the hard drive.
• Create a chase easily by selecting a range of cues' ACTIONs with the blue box, press [EDIT] and select "Follow
After Fade." Then select the NEXT CUE to be linked to the first.
• When controlling moving lights, group multiple attributes together and control them simultaneously by holding
down combinations of [S1-S4] and rolling the level wheel.
• Palettes can be nested. If you build Position A from raw values, then build Position B using Position A, updating
Position A will affect Position B.
• You can Flip moving head channels easily by pressing [TOOLS] when Flip has been selected as the current tool..
Do this and update the cue when the light 'took the long way around' when running cues.
78
Notes
Part No: 2-450187-010