1
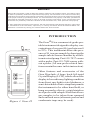
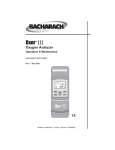
OXOR® II
INSTRUCTION 19-9126
Portable Oxygen Analyzer
Part No. 19-7037
& 19-7044
Rev. 6 – October 1999
Bacharach, Inc.
621 Hunt Valley Circle, New Kensington, PA 15068
PH: 724-334-5000 • FAX: 724-334-5001 • Web: www.bacharach-inc.com
E-mail: [email protected]
Printed in U.S.A.
® Registered Trademark
WARRANTY
Bacharach, Inc. warrants to Buyer that at the time of delivery this Product will
be free from defects in material and manufacture and will conform substantially
to Bacharach Inc.’s applicable specifications. Bacharach’s liability and Buyer’s
remedy under this warranty are limited to the repair or replacement, at
Bacharach’s option, of this Product or parts thereof returned to Seller at the
factory of manufacture and shown to Bacharach Inc.’s reasonable satisfaction to
have been defective; provided that written notice of the defect shall have been
given by Buyer to Bacharach Inc. within one (1) year after the date of delivery
of this Product by Bacharach, Inc.
Bacharach, Inc. warrants to Buyer that it will convey good title to this Product.
Bacharach’s liability and Buyer’s remedy under this warranty of title are limited
to the removal of any title defects or, at the election of Bacharach, to the
replacement of this Product or parts thereof that are defective in title.
All expendable items, such as electrochemical sensors, are warranted for a period
of six months.
THE FOREGOING WARRANTIES ARE EXCLUSIVE AND ARE GIVEN
AND ACCEPTED IN LIEU OF (I) ANY AND ALL OTHER WARRANTIES,
EXPRESS OR IMPLIED, INCLUDING WITHOUT LIMITATION THE
IMPLIED WARRANTIES OF MERCHANTABILITY AND FITNESS FOR A
PARTICULAR PURPOSE: AND (II) ANY OBLIGATION, LIABILITY,
RIGHT, CLAIM OR REMEDY IN CONTRACT OR TORT, WHETHER OR
NOT ARISING FROM BACHARACH’S NEGLIGENCE, ACTUAL OR
IMPLIED. The remedies of the Buyer shall be limited to those provided herein
to the exclusion of any and all other remedies including, without limitation
incidental or consequential damages. No agreement varying or extending the
foregoing warranties, remedies or this limitation will be binding upon Bacharach,
Inc. unless in writing, signed by a duly authorized officer of Bacharach.
Declaration of Conformity
Manufacturer's Name:
Manufacturer's Address:
Bacharach, Inc.
621 Hunt Valley Circle
New Kensington, PA 15068
European Operations:
Bacharach Europe
Sovereign House, Queensway
Leaminton Spa
Warwickshire CV31 3JR
United Kingdom
Product Name:
OXOR II
Conforms to the following product specifications
EMC:
A
European Directive 89/336/EEC
EN 500081-1 (Emissions)
EN 500082-1 (Immunity)
Copyright © 1995 Bacharach, Inc.
WARNING!
Because this instrument is used to detect and monitor materials and conditions which are listed by OSHA
or others as potentially hazardous to personnel and property, the information in this manual must be fully
understood and utilized to ensure that the instrument is operating properly and is both used and maintained
in the proper manner by qualified personnel. An instrument that is not properly calibrated, operated and
maintained by qualified personnel is likely to provide erroneous information, which could prevent user
awareness of a potentially hazardous situation for the instrument user, other personnel and property.
If, after reading the information in this manual, the user has questions regarding the operation, application
or maintenance of the instrument, supervisory or training assistance should be obtained before use.
Assistance is available by calling your nearest Bacharach Service Center.
1
INTRODUCTION
The Oxor® II is a commercial-grade portable instrument designed to display concentrations of oxygen (O2) gas between 0
to 25%. This instrument shows the presence of O2 in a gas sample by drawing the
sample into its sensor chamber by a builtin motorized pump. Part #19-7037 comes
with a probe. Part #19-7044 comes without a probe (All non-probe related functions remain the same in this instruction).
Figure 1. Oxor II
Other features and accessories of the
Oxor II include: A large, back-lit Liquid
Crystal Display (LCD), which allows the
display to be read in any lighting condition
from direct sun-light to total darkness; a
semi-detachable elastic strap that permits
the instrument to be either hand held, or
hung on nearby objects; a rigid stainless
steel probe with sample filter that allows
gas samples to be taken from cramped
and confined areas (alternate probes and
condensate traps may be used).
1
2
TECHNICAL CHARACTERISTICS
O2 Display Range ............. 0-25% O2
Accuracy .......................... ±0.8% O2
Response Time ................ 90% of final value within 40 sec.
Battery Requirements ...... 1.5 V, “C” cells, Qty. 4
Operating Time* .............. 14-16 hours, alkaline cells
Operating Temp. Range ... 23 to 104°F (-5 to 40°C)
Relative Humidity ............ 10-85% non-condensing
Weight (w/o batteries) ..... 13.6 ozs. (385 grams)
Dimensions ...................... 8.6 x 3.5 x 2.9 inches (218 x 89 x 74 mm)
* Times are with the backlight turned off. Continuous use of the backlight will
decrease battery life.
3
PREPARING THE OXOR II
FOR OPERATION
To prepare the instrument for operation, you
must install four “C” size batteries, and (if
desired) install the hose and probe as described
in the following paragraphs.
For your convenience, and to ensure that the
instrument will provide reliable O2 indications,
the O2 sensor is installed and the instrument
calibrated on a known O2 concentration at the
factory.
3.1
Battery Installation
Detach the elastic strap's metal clip at the bottom of the instrument, and slide off the battery
cover as shown in Figure 2. Then while observing proper battery polarity, install four “C” size
batteries into the instrument’s battery compartment. (Recommended battery types: Duracell
Alkaline or equivalent). After the batteries are
installed, replace the battery cover and the Figure 2. Battery
Installation
elastic-strap clip.
2
If batteries are accidently installed in the wrong polarity, a positive
temperature coefficient (PTC) thermistor will protect the instrument’s
electronic circuitry. The instrument will operate once batteries are
properly installed and the PTC thermistor is allowed to cool.
3.2
Probe Installation
Install the probe by sliding the end of its hose over the gas inlet port
on the top right side of the instrument as shown in Figure 3.
Figure 3. Probe Installation
3
4
OPERATION
To operate the Oxor II, you simply . . .
• Set its POWER switch to ON,
• Wait for the instrument to warm up (approx. 1 minute),
• Span the display (if necessary),
• Take a gas sample.
Detailed operating procedures are presented below:
4.1
Power ON/OFF
Turn on the instrument by sliding its POWER
switch to ON. Observe that when power is first
applied, all numerical LCD segments and the decimal point are tested for 5-15 seconds; after which, the LCD shows the
detected O2 level. (A minus sign may appear during power up as the
sensor stabilizes.) Turn off the instrument by sliding the POWER
switch to OFF.
4.2
Adjusting the Instrument
After being turned on and warmed up for at least 1 minute, the
instrument should indicate 20.9% in fresh air. If the instrument needs
to be zadjusted, proceed as follows:
1. Ensure that the instrument is sampling fresh air that is free of any
oxygen displacing gases.
2. Using a 1/8" flat-blade screwdriver, turn the
ADJUST potentiometer until the LCD shows
20.9%. An instrument can be considered properly adjusted with a display bounce of up to ±0.2%.
4.3
Backlight ON/OFF
The LCD can be read in low-light areas by setting the front panel
LIGHT switch to ON. The backlight stays on until turned off, or until
the POWER switch is set to OFF.
4
4.4
Using the Strap
The instrument's elastic strap allows the unit to be either hand-held, or
hung on nearby objects.
By sliding your hand between the instrument and its elastic strap, you
can hold onto the Oxor II with a minimum of effort. The instrument's
front panel slide switches can then be actuated by your thumb for onehanded operation. Or, by releasing the metal clip at the bottom of the
instrument's case, you can hang the instrument by its strap on nearby
objects such as nails, sheet metal, or valve handles.
4.5
Using the Probe
The basic probe, or the optional rigid stainless steel probe with handle,
connected to a flexible hose with sample filter can be used to draw a
gas sample into the instrument from the room, grilles, diffusers,
furnace flues, hot-water heater flues, and from inside furnaces heat
exchangers.
Both hose and probe are detachable from the instrument when sampling without the probe, or when sampling with a different probe is
desired.
Important: If condensation is observed within the hose, do not allow
water level to build up to a point where it cuts off flow.
4.6
Interpreting the Display
Gas Display
The LCD directly shows O2 levels in the range from
0 to 25%. The display on the right indicates a O2
level of 20.9%.
5
Low Battery Indications
When the battery voltage becomes low, the “LO
BAT” indicator appears. Although the instrument
will continue to operate and give percent O2 readings under these conditions, the batteries should be replaced as soon as
possible.
When the battery voltage becomes too low for the
instrument to operate, a “-1” is displayed on the
LCD. No O2 readings are provided under these
conditions.
4.7
Long-Term Storage
When storing the Oxor II for extended periods of time, set its POWER
switch to OFF and remove the batteries. After long term storage follow
Section 4.2 (Adjusting the Instrument) to make sure that the unit is
ready for use.
5
MAINTENANCE
The Oxor II needs to be calibrated at regular intervals to ascertain that
it still meets its accuracy specification. A regular calibration schedule
should be established. Detailed calibration, maintenance procedures
and parts lists are provided in the Service Manual (19-9133).
As a quick check of the instrument’s operation, perform a response
check by exposing the instrument to a gas source which is depleted of
Oxygen (e.g., cigarette smoke, a breath held for 15 seconds or more,
smoke from a recently snuffed -out match, or bottled nitrogen). If the
instrument doesn’t show a drop in the percentage of oxygen from that
source, or if the reading is obviously in error, DO NOT use the
instrument until it has been serviced by an authorized Bacharach
Service Center.
NOTE: DO NOT use this simple response check as a substitute for ensuring the instrument is properly calibrated.
6
6
PARTS/SERVICE
6.1
Parts List
6.2
Item
Part No.
Battery Cover
Basic Probe/Hose Assy.
Optional Probe/hose Assy.
19-3029
19-3086
19-3076
Bacharach Sales/Service Centers
United States
Bacharach, Inc.
621 Hunt Valley Circle
New Kensington, PA 15068
Phone: 724-334-5051
Fax: 724-334-5723
E-mail: [email protected]
Canada
Bacharach of Canada, Inc.
250 Shields Court, Unit #3
Markham, Ontario L3R 9W7 Canada
Phone: 905-470-8985
Fax: 905-470-8963
E-mail: [email protected]
México
Bacharach de México
Playa Regatas No. 473 Tercer Piso
Col. Militar Marte
Delegación Iztacalco, 08830
México D.F. México
Phones: +52-555-634-7740
+52-555-634-7741
FAX:
+52-555-634-7738
E-Mail: [email protected]
Website: www.bacharach-mexico.com
Europe
Bacharach Instruments
Sovereign House, Queensway
Leamington Spa
Warwickshire CV31 3JR
United Kingdom
Phone: +44-1926-338111
Fax: +44-1926-338110
Email: [email protected]
7
Notes:
8