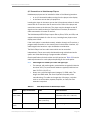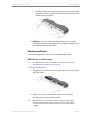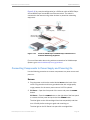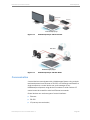
1
Kaleidescape System Installation Guide January 2012 Kaleidescape Installation Guide Kaleidescape, Inc. 440 Potrero Avenue Sunnyvale, CA 94085 USA This document is for informational purposes only. Kaleidescape makes no representations or warranties, express or implied, regarding the accuracy or completeness of the information contained herein and Kaleidescape shall have no obligation to provide updates to this information in the future. Copyright © 2008–2012 Kaleidescape, Inc. All rights reserved. Kaleidescape and the Kaleidescape logo are trademarks of Kaleidescape, Inc. and are registered in the United States and certain other jurisdictions. Other trademarks and trade names are owned by third parties and may be registered in some jurisdictions. Kaleidescape Part No. 101-0105-00 Rev 3. This document revision corresponds to software version 4.0. Bonjour, FireWire, Mac, iPhone, iPod and iTunes are trademarks of Apple Inc., registered in the U.S. and other countries. HDMI and High-Definition Multimedia Interface are trademarks or registered trademarks of HDMI Licensing LLC in the United States and other countries. Manufactured under license from Dolby Laboratories. Dolby is a trademark of Dolby Laboratories. Manufactured under license under U.S. Patent #’s: 5,451,942; 5,956,674; 5,974,380; 5,978,762; 6,487,535 & other U.S. and worldwide patents issued & pending. DTS and the Symbol are registered trademarks, & DTS-HD, DTS-HD Advanced Digital Out and the DTS logos are trademarks of DTS, Inc. Product includes software. © DTS, Inc. All Rights Reserved. Java and all Java based trademarks and logos are trademarks or registered trademarks of Sun Microsystems, Inc. in the U.S. and other countries. Kaleidescape Part No. 101-0105-00 Rev 3 Page 2 Kaleidescape Installation Guide Contents 1 Overview The Kaleidescape System . . . . . . . . . . . . . . . . . . . . . . . . . . . . . . . . . . . .7 System Components . . . . . . . . . . . . . . . . . . . . . . . . . . . . . . . . . . . . .7 Data Protection . . . . . . . . . . . . . . . . . . . . . . . . . . . . . . . . . . . . . . . . .8 System Control . . . . . . . . . . . . . . . . . . . . . . . . . . . . . . . . . . . . . . . . . . . . .9 Installation Requirements . . . . . . . . . . . . . . . . . . . . . . . . . . . . . . . . . . . .9 General Equipment . . . . . . . . . . . . . . . . . . . . . . . . . . . . . . . . . . . . Network Requirements . . . . . . . . . . . . . . . . . . . . . . . . . . . . . . . . . Audio Cables. . . . . . . . . . . . . . . . . . . . . . . . . . . . . . . . . . . . . . . . . . Video Cables. . . . . . . . . . . . . . . . . . . . . . . . . . . . . . . . . . . . . . . . . . 10 10 10 11 Installation Locations . . . . . . . . . . . . . . . . . . . . . . . . . . . . . . . . . . . . . . 11 Space Planning . . . . . . . . . . . . . . . . . . . . . . . . . . . . . . . . . . . . . . . 11 Power Supplies. . . . . . . . . . . . . . . . . . . . . . . . . . . . . . . . . . . . . . . . 11 A/V Connections to the Kaleidescape Players. . . . . . . . . . . . . . . 12 Unpacking and Inspection . . . . . . . . . . . . . . . . . . . . . . . . . . . . . . . . . . 12 Activating the System. . . . . . . . . . . . . . . . . . . . . . . . . . . . . . . . . . . . . . 13 2 Quick Start Step 1 – Verify Network Connections . . . . . . . . . . . . . . . . . . . . . . . . . 16 Step 2 – Set Up the Server . . . . . . . . . . . . . . . . . . . . . . . . . . . . . . . . . 16 Step 3 – Set Up the Movie and Music Players . . . . . . . . . . . . . . . . . . 18 Kaleidescape Support . . . . . . . . . . . . . . . . . . . . . . . . . . . . . . . . . . . . . 19 3 Physical Installation Planning the Installation . . . . . . . . . . . . . . . . . . . . . . . . . . . . . . . . . . . 20 Ventilation and Clearance . . . . . . . . . . . . . . . . . . . . . . . . . . . . . . . 20 Power Requirements . . . . . . . . . . . . . . . . . . . . . . . . . . . . . . . . . . . 21 System Design . . . . . . . . . . . . . . . . . . . . . . . . . . . . . . . . . . . . . . . . 22 Installing System Components . . . . . . . . . . . . . . . . . . . . . . . . . . . . . . 27 Rack Mounting Components . . . . . . . . . . . . . . . . . . . . . . . . . . . . . . . . 27 Servers . . . . . . . . . . . . . . . . . . . . . . . . . . . . . . . . . . . . . . . . . . . . . . 27 Kaleidescape Part No. 101-0105-00 Rev 3 Page 3 Kaleidescape Installation Guide Kaleidescape Players . . . . . . . . . . . . . . . . . . . . . . . . . . . . . . . . . . 29 Mini System . . . . . . . . . . . . . . . . . . . . . . . . . . . . . . . . . . . . . . . . . . 32 Connecting Components to the Network . . . . . . . . . . . . . . . . . . . . . . 34 Servers . . . . . . . . . . . . . . . . . . . . . . . . . . . . . . . . . . . . . . . . . . . . . . M500 Player. . . . . . . . . . . . . . . . . . . . . . . . . . . . . . . . . . . . . . . . . . M300 Player. . . . . . . . . . . . . . . . . . . . . . . . . . . . . . . . . . . . . . . . . . Music Player . . . . . . . . . . . . . . . . . . . . . . . . . . . . . . . . . . . . . . . . . . Mini System . . . . . . . . . . . . . . . . . . . . . . . . . . . . . . . . . . . . . . . . . . Wireless and Powerline Networking . . . . . . . . . . . . . . . . . . . . . . . 34 35 37 37 38 38 Connecting Components to Power Supply and Powering On . . . . . . 41 Servers . . . . . . . . . . . . . . . . . . . . . . . . . . . . . . . . . . . . . . . . . . . . . . M500 Player. . . . . . . . . . . . . . . . . . . . . . . . . . . . . . . . . . . . . . . . . . M300 Player. . . . . . . . . . . . . . . . . . . . . . . . . . . . . . . . . . . . . . . . . . Music Player . . . . . . . . . . . . . . . . . . . . . . . . . . . . . . . . . . . . . . . . . . Mini System . . . . . . . . . . . . . . . . . . . . . . . . . . . . . . . . . . . . . . . . . . 41 42 43 43 44 Tabletop Installation for the M500 Player . . . . . . . . . . . . . . . . . . . . . 45 Wall Mounting the M300 Player . . . . . . . . . . . . . . . . . . . . . . . . . . . . . 46 Site Preparation . . . . . . . . . . . . . . . . . . . . . . . . . . . . . . . . . . . . . . . Permanent Mounting. . . . . . . . . . . . . . . . . . . . . . . . . . . . . . . . . . . Removable Player Mounting . . . . . . . . . . . . . . . . . . . . . . . . . . . . . Power Supply Mounting. . . . . . . . . . . . . . . . . . . . . . . . . . . . . . . . . 46 48 50 51 Disk Cartridges . . . . . . . . . . . . . . . . . . . . . . . . . . . . . . . . . . . . . . . . . . . 52 Handling Disk Cartridges. . . . . . . . . . . . . . . . . . . . . . . . . . . . . . . . 53 Server Fault Tolerance . . . . . . . . . . . . . . . . . . . . . . . . . . . . . . . . . 54 Removing and Adding Disk Cartridges or Blanks . . . . . . . . . . . . 55 4 System Configuration Browser Interface . . . . . . . . . . . . . . . . . . . . . . . . . . . . . . . . . . . . . . . . . 63 Accessing the Browser Interface . . . . . . . . . . . . . . . . . . . . . . . . . 63 Troubleshooting if the Browser Interface Does Not Load . . . . . . 64 Viewing System Information . . . . . . . . . . . . . . . . . . . . . . . . . . . . . . . . 64 Setting System Preferences . . . . . . . . . . . . . . . . . . . . . . . . . . . . . . . . 65 Configuring System Components . . . . . . . . . . . . . . . . . . . . . . . . . . . . 67 System Components . . . . . . . . . . . . . . . . . . . . . . . . . . . . . . . . . . . Video and Audio Settings . . . . . . . . . . . . . . . . . . . . . . . . . . . . . . . Language Settings . . . . . . . . . . . . . . . . . . . . . . . . . . . . . . . . . . . . . Network Settings . . . . . . . . . . . . . . . . . . . . . . . . . . . . . . . . . . . . . . Control Settings . . . . . . . . . . . . . . . . . . . . . . . . . . . . . . . . . . . . . . . Kaleidescape Part No. 101-0105-00 Rev 3 67 71 87 88 89 Page 4 Kaleidescape Installation Guide Region Settings . . . . . . . . . . . . . . . . . . . . . . . . . . . . . . . . . . . . . . . 91 Screen Masking . . . . . . . . . . . . . . . . . . . . . . . . . . . . . . . . . . . . . . . 93 Viewing and Changing Groups. . . . . . . . . . . . . . . . . . . . . . . . . . . . . . . 95 Viewing Diagnostic Information. . . . . . . . . . . . . . . . . . . . . . . . . . . . . . 96 5 Control Systems Communication . . . . . . . . . . . . . . . . . . . . . . . . . . . . . . . . . . . . . . . . . . 99 Types of Control Devices . . . . . . . . . . . . . . . . . . . . . . . . . . . . . . . . . . 100 IR Remote Control . . . . . . . . . . . . . . . . . . . . . . . . . . . . . . . . . . . . Computer with a Web Browser . . . . . . . . . . . . . . . . . . . . . . . . . . Web Tablet . . . . . . . . . . . . . . . . . . . . . . . . . . . . . . . . . . . . . . . . . . Touch Panels . . . . . . . . . . . . . . . . . . . . . . . . . . . . . . . . . . . . . . . . Keypad Control for Music . . . . . . . . . . . . . . . . . . . . . . . . . . . . . . iPhone or iPod Software Applications. . . . . . . . . . . . . . . . . . . . . 6 100 101 103 103 105 106 Troubleshooting Preparation . . . . . . . . . . . . . . . . . . . . . . . . . . . . . . . . . . . . . . . . . . . . . 107 Troubleshooting Guide . . . . . . . . . . . . . . . . . . . . . . . . . . . . . . . . . . . . 107 Troubleshooting Power . . . . . . . . . . . . . . . . . . . . . . . . . . . . . . . . . . . 108 Troubleshooting Amber Lights. . . . . . . . . . . . . . . . . . . . . . . . . . . . . . 108 Troubleshooting Problems with the Network . . . . . . . . . . . . . . . . . . 110 Troubleshooting Problems with the Browser Interface . . . . . . . . . . 114 Troubleshooting Problems with Imports . . . . . . . . . . . . . . . . . . . . . . 116 Troubleshooting Problems with Audio & Video . . . . . . . . . . . . . . . . 119 Troubleshooting Parental Control . . . . . . . . . . . . . . . . . . . . . . . . . . . 121 Troubleshooting Kaleidescape Conductor . . . . . . . . . . . . . . . . . . . . 123 A Product Specifications B Notices C Network Requirements The Browser Interface . . . . . . . . . . . . . . . . . . . . . . . . . . . . . . . . . . . . 156 For Windows. . . . . . . . . . . . . . . . . . . . . . . . . . . . . . . . . . . . . . . . . 156 For Mac. . . . . . . . . . . . . . . . . . . . . . . . . . . . . . . . . . . . . . . . . . . . . 157 Special Cases. . . . . . . . . . . . . . . . . . . . . . . . . . . . . . . . . . . . . . . . 157 Kaleidescape Part No. 101-0105-00 Rev 3 Page 5 Kaleidescape Installation Guide Link Local Address. . . . . . . . . . . . . . . . . . . . . . . . . . . . . . . . . . . . 157 Server Serial Numbers . . . . . . . . . . . . . . . . . . . . . . . . . . . . . . . . 157 Installer Pages . . . . . . . . . . . . . . . . . . . . . . . . . . . . . . . . . . . . . . . 158 Network Switches . . . . . . . . . . . . . . . . . . . . . . . . . . . . . . . . . . . . . . . . 158 Gigabit Switch . . . . . . . . . . . . . . . . . . . . . . . . . . . . . . . . . . . . . . . Multiple Switches. . . . . . . . . . . . . . . . . . . . . . . . . . . . . . . . . . . . . Network Connections . . . . . . . . . . . . . . . . . . . . . . . . . . . . . . . . . Network Speed Test. . . . . . . . . . . . . . . . . . . . . . . . . . . . . . . . . . . 158 158 159 159 DHCP Reservations . . . . . . . . . . . . . . . . . . . . . . . . . . . . . . . . . . . . . . 159 Assigning Fixed IP Addresses Using DHCP Reservations . . . . . 159 Resetting an M-Class Player to Use a DHCP Address . . . . . . . . 160 Assigning Static Network Addresses . . . . . . . . . . . . . . . . . . . . . 160 D Installation Checklist Important First Steps . . . . . . . . . . . . . . . . . . . . . . . . . . . . . . . . . . Tools and Supplies. . . . . . . . . . . . . . . . . . . . . . . . . . . . . . . . . . . . Equipment . . . . . . . . . . . . . . . . . . . . . . . . . . . . . . . . . . . . . . . . . . Controls and Displays . . . . . . . . . . . . . . . . . . . . . . . . . . . . . . . . . Kaleidescape Part No. 101-0105-00 Rev 3 161 162 162 163 Page 6 Kaleidescape Installation Guide Section 1 Overview The Kaleidescape Installation Guide describes how to prepare the site network, set up and configure system components, and add new components to an existing installation. This document also describes basic operation and user configuration. Any Kaleidescape component can be used in any Kaleidescape System, regardless of the date of manufacture. Software updates are issued automatically via the Internet. The Kaleidescape System The Kaleidescape System is comprised of one or more servers connected via Ethernet to one or more players. Note: Kaleidescape also offers a stand-alone Mini System (server and player combined). Kaleidescape servers store movies and music and deliver this content to Kaleidescape players connected to audio and video equipment. The Kaleidescape System supports easy integration into audio, video and wholehouse control systems, such as Crestron, AMX, Elan, and Philips Pronto. A Kaleidescape System can be as simple as a single Kaleidescape server and player controlled with a handheld remote or can scale to multiple servers and players with integrated controls for lighting and screen masking. System Components Kaleidescape components are designed to be easy to install: simply connect the cables. Table 1-1 lists current Kaleidescape components. Kaleidescape Part No. 101-0105-00 Rev 3 Page 7 Kaleidescape Installation Guide Table 1-1 Overview Currently Available Kaleidescape Components Kaleidescape Component Model Number Description 1U Server KSERVER-1500 One rack-unit server with up to four 2 TB Disk Cartridges. Holds up to 150 Blu-ray Discs or 900 DVDs. 3U Server KSERVER-5000 Three rack-unit server with up to fourteen 2 TB Disk Cartridges. Holds up to 600 Blu-ray Discs or 3,600 DVDs. Mini System KSYSTEM-120 Complete Kaleidescape System in a single component with up to four 500 GB Mini Disk Cartridges. Holds up to 225 DVDs. M500 Player KPLAYER-M500 Movie player that imports and plays CDs, DVDs and Blu-ray Discs. Note: There are two versions of this player, M500-A and M500-B, depending on the Blu-ray Disc region. M300 Player KPLAYER-M300 Smaller version of the M500 Player without a disc tray, S-video, optical audio or RS-232. Plays imported CDs, DVDs and Blu-ray Discs. Note: There are two versions of this player, M300-A and M300-B, depending on the Blu-ray Disc region. Music Player KMUSIC-4000 Music player that supports up to four simultaneous, independent zones of highquality audio. Can also be used to import CDs and DVDs. Speed Reader KSPEEDREADER-2 Bulk media importer that handles up to 280 discs in one session. Note: Imports DVDs and CDs but not Blu-ray Discs. Data Protection Every Kaleidescape server includes RAID-K technology, a proprietary technology developed by Kaleidescape to provide data protection for movies Kaleidescape Part No. 101-0105-00 Rev 3 Page 8 Kaleidescape Installation Guide Overview and music. With RAID-K technology, a failed hard drive does not cause any loss of data. Unlike other variations of RAID technology, RAID-K allows new drives with different storage capacities to be added to the array. However, RAID-K technology does NOT allow swapping disk cartridges between servers. The 3U Server has an additional protection feature, a hot spare disk cartridge. If a drive fails, information on the failed disk is automatically rebuilt on the hot spare disk cartridge, and the Kaleidescape System continues to operate without loss of data protection. The hot spare disk cartridge reduces urgent service calls, and provides peace of mind for marine or other remote installations. System Control A Kaleidescape System can be controlled by several types of control devices. 0 0 0 0 0 Infrared (IR) remotes Touch panels Keypads iPhone or iPod software applications Web tablets Kaleidescape provides control modules and templates as well as sample programs for several products from leading manufacturers. Kaleidescape also provides database files and IR codes for popular IR remotes. For more information on control systems, see Control Systems on page 98. Installation Requirements The equipment required to install a Kaleidescape System depends on the installation site and system configuration. Basic requirements fall into four categories. Figure 1-1 shows a typical Kaleidescape System installation. 0 0 0 0 General equipment Network requirements Audio cables Video cables Kaleidescape Part No. 101-0105-00 Rev 3 Page 9 Kaleidescape Installation Guide Overview Internet Family Room 1000 Mbps router/switch (with DHCP) Mini System 1U Server M300 Player Guest Bedroom Master Bedroom Figure 1-1 Home Theater M500 Player M300 Player Typical Installation General Equipment The following basic items are required: • #2 Phillips screwdriver to rack mount system components • High-quality surge protector and sufficient outlets • Computer with a web browser Network Requirements The site network must meet the following minimum requirements: • High-speed Internet connection • Gigabit Ethernet switch with sufficient ports • Cat5 or better twisted-pair Ethernet cables with RJ45 connectors For detailed network requirements, see Network Requirements on page 156. Audio Cables Kaleidescape movie players have up to four audio connectors, including a combined audio/video High-Definition Multimedia Interface (HDMI) connector. For more information on audio installation, see Video and Audio Settings on page 71. Kaleidescape Part No. 101-0105-00 Rev 3 Page 10 Kaleidescape Installation Guide Overview Video Cables Some Kaleidescape players have up to four video outputs including a combined audio/video HDMI output. For more information about video installation, see Video and Audio Settings on page 71. Installation Locations When installing Kaleidescape Systems, the following considerations must be addressed: 0 0 0 Customer requirements Ventilation and clearance Proper grounding For detailed information on the best places to install components, see Physical Installation on page 20. Space Planning All Kaleidescape components, except the Speed Reader, fit in standard 19 inch racks and ship with removable mounting brackets. Note: Mini players also fit in a 19 in. rack when mounted on an optional Mini Player Rack-Mount Shelf. When planning the site, the following criteria must be met: • Components must have adequate ventilation • All components require a 1 inch clearance in front and a 2 inch clearance at the back • Front grilles must be unobstructed Some components need more space if the rack has a front door. • The 3U Server front panel opens outward from the top. • The 1U Server has a removable front panel for disk cartridge access • M500 Players, Music Players, and Mini Systems have disc trays that must be able to eject unobstructed. Power Supplies Kaleidescape component power supplies are universal input and operate on any nominal line voltage between 100–240 V, 50–60 Hz. Power outlets must be grounded and preferably shielded from power surges and brownouts. Kaleidescape recommends a high-quality surge protector Kaleidescape Part No. 101-0105-00 Rev 3 Page 11 Kaleidescape Installation Guide Overview for the server power source; a UPS is optional. See Table 3-1 on page 22 for a detailed list of component power consumption. A/V Connections to the Kaleidescape Players There are two options for installing Kaleidescape components. • A/V closet with cables that run from player to the video display • Same area as the display for (1) IR control, (2) disc tray access, and (3) short HDMI cable lengths Note: Check manufacturer specifications of cables to the A/V equipment. Table 3-2 on page 24 lists cable length limits for optical and coaxial cables. Unpacking and Inspection The Kaleidescape System ships with components individually boxed. Check the packing list to verify that all components are included in the order. Note: Be sure to save original packaging in case anything has to be shipped. Failure to use the original packaging for return shipments may void the warranty. 3U Server The 3U Server ships with disk cartridges and blank cartridges already installed in the server. The server ships with an IEC-type AC power cord and screws for rack mounting. 1U Server The 1U Server ships with disk cartridges in the shipping box that must be installed in the server. The server ships with an IEC-type AC power cord and screws for rack mounting. M500 Player The M500 Player ships in a single box with an IEC-type AC power cord, screws for rack mounting, a remote control and two AA batteries, and side panels wrapped in a separate pouch. M300 Player The M300 Player ships in a single box with the following items: • Bracket for wall mounting the mini player • Bracket for wall mounting the mini player power supply • Power supply and IEC-type AC power cord • Screws and drywall anchors for wall mounting brackets • Remote control and two AA batteries Kaleidescape Part No. 101-0105-00 Rev 3 Page 12 Kaleidescape Installation Guide Overview A Mini Player Rack-Mount Shelf contains a rack-mounting kit for mounting one or two mini players in a 19 in. rack. This shelf is available separately and can hold either the 1080p Mini Player or the M300 Player. Music Player The Music Player ships in a single box with an IEC-type AC power cord and screws for rack mounting. Mini System The Mini System ships with disk cartridges and blank cartridges already installed, in a single box with the following items: • Remote control and two AA batteries • IEC-type AC power cord • Rack mounting kit including cooling duct, two rack ears, and screws for rack, duct and rack ears • Ferrite bead for network cabling Kaleidescape DVD Collections DVD Collections ship in boxes containing approximately 100 DVDs. Activating the System The Kaleidescape System must be activated. Until the Kaleidescape System is activated, the following reminder message appears when playing a movie that has been imported into the system: This message can be dismissed a limited number of times to perform video calibration or other testing. When the number of dismissals reaches zero, the text remains and cannot be dismissed. At this point, the customer must activate the system to remove the activation message. Note: Movies or albums can be played from the tray without the message appearing. Blu-ray Discs, DVDs and CDs can also be imported before activation. This message disappears once activation is verified over the Internet. Use the following procedure to activate the system. Kaleidescape Part No. 101-0105-00 Rev 3 Page 13 Kaleidescape Installation Guide Note: Overview Activation must be performed by the system owner, not the dealer. 1. Open a web browser and go to www.kaleidescape.com/activate. The Activate your Kaleidescape System page appears. See Figure 1-2. Figure 1-2 Activation Window 2. Enter user information. 3. Scroll down and enter system information. Note that entering the serial number for a single component activates the entire system. 4. Select the button to agree to the terms of the Kaleidescape Service & License Agreement (SLA), then click on the Activate my Kaleidescape System button at the bottom of the window. Kaleidescape Part No. 101-0105-00 Rev 3 Page 14 Kaleidescape Installation Guide A message appears confirming a successful activation. See Figure 1-3. Figure 1-3 Activation Confirmation Message 5. Keep the Kaleidescape System on and connected to the Internet until the reminder message disappears. When activation is complete, Kaleidescape sends an email message back verifying activation. Kaleidescape Part No. 101-0105-00 Rev 3 Page 15 Kaleidescape Installation Guide Section 2 Quick Start This section describes the basic steps required to connect and test Kaleidescape System components. If problems occur, refer to Troubleshooting on page 107. Step 1 – Verify Network Connections All Kaleidescape components must be connected to the same local network. Connect the components to a 1000Base-T network switch. These instructions assume there is a router or DHCP server on the network to assign DHCP addresses. For more advanced network configuration, see Appendix C on page 156. For initial configuration, and to receive software, Movie Guide and Music Guide updates, the network must be connected to the Internet. Users must also complete the activation process at www.kaleidescape.com/activate. Test the network connection for each Kaleidescape component before installing by connecting the network cable for the component to a laptop, disconnecting the laptop from any WiFi networks, and opening a new, noncached web page. If the page fails to load, troubleshoot the network. Note: Connecting the server to a 100Base-TX switch port limits the server to seven simultaneous DVD playback zones or one Blu-ray zone and can slow down imports. Step 2 – Set Up the Server Kaleidescape players require a Kaleidescape server to operate. Always set up servers first. Note: If installing the Kaleidescape Mini System, refer to the Quick Install Guide packaged with the system. 1. Unpack and check against the packing list. a. 1U Server – 0 Kaleidescape Part No. 101-0105-00 Rev 3 Remove front panel and mount server chassis. Page 16 Kaleidescape Installation Guide Quick Start 0 Check disk cartridges for sticking latches, insert into server, then press each disk cartridge firmly to verify that each is completely seated. Replace front panel. b. 3U Server – 0 Open the front panel, remove disk cartridges and place on cushioned, anti-static surface. Do not stack cartridges. 0 Mount server. 0 Check disk cartridges for sticking latches, reinsert into server, and press each disk cartridge firmly to verify that each is completely seated. Close the front panel. 2. Connect one end of an Ethernet cable into the server NETWORK port and plug the other end into a 1000Base-T network switch. Connect the server AC power cable to a high-quality surge protector with a line-noise filter. Front panel status lights glow blue immediately. After about two minutes, disk cartridge status lights glow blue, turn off, then turn on again, and the server is ready to use. Check the color of the network indicator light on the server network port and confirm the correct color for a 1000Base-T connection. The left light indicates activity and is orange when a link is established. The right light blinks green for activity on a 1U Server and blinks amber on a 3U Server. The 1U Server and 3U Server power supplies are universal input and operate on any nominal line voltage between 100–240 V, 50–60 Hz. 3. Power on the server if front panel does not light. a. 1U Server – Press the POWER button on the front panel. b. 3U Server – Open the front panel and press the POWER button. If any status on the front of the server is amber, see Troubleshooting Amber Lights on page 108. 4. Open a web browser on a computer connected to the same network and enter http://my-kaleidescape/installer (Windows) or http://my-kaleidescape.local/installer (Mac) to bring up the browser interface. 5. Select the COMPONENTS tab and confirm that the serial number for the server on the components page matches the serial number on the server. (The serial number is located on the back of the server and behind the front panel.) Kaleidescape Part No. 101-0105-00 Rev 3 Page 17 Kaleidescape Installation Guide Quick Start 6. If the system has more than one server, select the GROUPS tab and assign servers to the correct groups. See Viewing and Changing Groups on page 95 for more information on assigning groups. Step 3 – Set Up the Movie and Music Players 1. Unpack and check against the packing list. 2. Mount the player according to the instructions provided with the component. 3. Plug one end of an Ethernet cable into the player NETWORK port and plug the other end into a 1000Base-T network switch. Verify that the switch is connected to the same network as the server. 4. Connect audio and video cables as appropriate for the installation. 5. Connect the player AC power cable to a high-quality surge protector with a line-noise filter. The front panel status lights of movie players glow blue in a few seconds. If a Music Player does not glow when plugged in, press the POWER button to turn it on. After about 30 seconds, longer during a software upgrade, the components pulse twice to signal that the component is ready to use. (Kaleidescape player power supplies are universal input and operate on any nominal line voltage between 100–240 V, 50–60 Hz.) Note: If the front panel does not turn blue when power is connected, verify that the power is on by pressing the POWER button on the player or the remote. If the player glows amber, verify that the server is running, verify network connections, then refer to Troubleshooting Amber Lights on page 108. 6. Open a web browser on the same network and enter http://my-kaleidescape/installer (Windows) or http://my-kaleidescape.local/installer (Mac) to bring up the browser interface. 7. Select the GROUPS tab and add the player to the same group as the server. Note: If there is more than one server on the network, the player glows amber until assigned to a group. 8. Select the COMPONENTS tab and set appropriate audio, video and other preferences as applicable based on installation requirements. 9. Turn on A/V equipment. The Kaleidescape logo or the onscreen user interface appears on the display when the A/V equipment is set to the correct input for the Kaleidescape system. Kaleidescape Part No. 101-0105-00 Rev 3 Page 18 Kaleidescape Installation Guide Quick Start 10. To import content on a Kaleidescape M500 Player, press the EJECT button on the front panel and place a DVD, Blu-ray Disc or CD in the tray. Press the IMPORT button to close the tray. Front panel lights begin pulsing, indicating that the import has begun. 11. Test the movie player using either the browser interface or an IR remote control. Test the music player using the browser interface. a. To use the browser interface, open a web browser and go to http://my-kaleidescape (Windows) or http://my-kaleidescape.local (Mac). Select the HOME tab. The CONTROL PANEL is in the lower right corner. Click the link (links are colored amber) for the player being tested. b. To use an IR remote other than the Kaleidescape Remote, program the remote for the Toshiba or Kenwood DVD player code set. For a list of all IR codes (in hex) available from Kaleidescape, or for the CCF file, go to www.kaleidescape.com/go/ir. Kaleidescape Support For detailed information refer to the appropriate section of the installation guide or search the knowledge base at www.kaleidescape.com/support. If additional help is required, contact Kaleidescape Support. 0 0 Send an email message to [email protected]. Call the Kaleidescape support line at +1 (650) 625-6160. When contacting Kaleidescape Support, be prepared to provide the serial number of the Kaleidescape server. The serial number label is located on the back of all components, and behind the front panels of Kaleidescape servers. Kaleidescape Part No. 101-0105-00 Rev 3 Page 19 Kaleidescape Installation Guide Section 3 Physical Installation Planning the Installation Ventilation and Clearance All Kaleidescape components, except the Kaleidescape M300 Player, fit standard 19-inch racks and ship with removable mounting brackets. The Mini Player Rack-Mount Shelf is an optional accessory kit for mounting up to two M300 Players in a 19-inch rack. Figure 3-1 shows minimum clearance requirements. For individual component dimensions and weights, refer to Appendix A, Product Specifications on page 124. Use the following guidelines when installing system components to ensure proper clearance and ventilation. These guidelines apply to all installations including rack mounting. 1. Mount components in a location with adequate ventilation. 2. Check for proper grounding if installing components in a rack. 3. Maintain a 2 in. (5 cm) clearance in back, and a 1 in. (2.5 cm) clearance in front and on the sides. 4. Ensure that front grilles are unobstructed. 5. Verify that the mounting site allows sufficient clearance for the 3U Server front panel which opens outward from the top. 6. Install the 1U Server so that the front panel can be easily removed to access disk cartridges. 7. Verify that there is sufficient space for the Kaleidescape M500 Player, Music Player, and Mini System disc trays to be able to slide out completely. Kaleidescape Part No. 101-0105-00 Rev 3 Page 20 Kaleidescape Installation Guide Physical Installation Hot air exhausted outside the component enclosure 2 in. (5 cm) minimum clearance in back 1 in. (2.5 cm) minimum clearance on front and sides Cool air intake Figure 3-1 Minimum Clearance Requirements Power Requirements Kaleidescape component power supplies are universal input and operate on any nominal line voltage between 100–240 V, 50–60 Hz. Verify that power outlets are grounded, preferably shielded from power surges and brownouts. Kaleidescape recommends a grounded outlet with a high-quality surge protector for the power source for players and servers. A UPS is optional for servers. Table 3-1 lists power requirements for each component. Kaleidescape Part No. 101-0105-00 Rev 3 Page 21 Kaleidescape Installation Guide Physical Installation Table 3-1 Component Power Requirements Component Power Consumption Maximum Current Draw 1U Server 66 W typical consumption with four 2 TB Disk Cartridges (86 W max) 1.0 A @ 100 V 0.42 A @ 240 V 3U Server 183 W typical consumption with fourteen 2 TB Disk Cartridges (205 W max) 3 A @ 100 V 1.3 A @ 240 V Mini System 85 W typical consumption with four 500 GB Mini Disk Cartridges (74 W standby; 90 W max) 1.5 A @ 100V 0.63 A @ 240 V M500 Player 36 W typical consumption (27 W standby; 44 W max) 0.37 A @ 120 V 0.18 A @ 240 V M300 Player 29 W typical consumption (19 W standby; 30 W max) 0.25 A @ 120 V 0.13 A @ 240 V Music Player 14 W typical power consumption (14 W standby; 20 W max) 0.5 A @ 100 V 0.21 A @ 240 V System Design Before beginning the installation, determine the type of the display and audio systems that will connect to Kaleidescape components. Kaleidescape Systems support combinations of the following outputs: • Video 0 0 0 0 High-Definition Multimedia Interface (HDMI) Component S-Video Composite • Audio 0 0 0 0 HDMI (Digital stereo or multi-channel) Coaxial (Digital stereo or multi-channel) Optical (Digital stereo or multi-channel) Analog (Stereo) A Gigabit network is suggested for all Kaleidescape Systems, and required if Blu-ray movies are played in more than one room at the same time. Kaleidescape recommends using a checklist for connections to expedite the installation process. For a sample checklist, see Appendix D Installation Checklist on page 161. Kaleidescape Part No. 101-0105-00 Rev 3 Page 22 Kaleidescape Installation Guide Physical Installation Figure 3-2 shows two basic network configurations. Note: If the existing switch has too few ports, or Ethernet cable lengths to the switch exceed 328 ft (100 m), add an extra switch to the network. Do NOT substitute a router. Connect additional switches to the switch. Do NOT use the router to connect two switches or bandwidth suffers. Note: Kaleidescape components are accessed through a computer browser interface, which MUST be on the same IP subnet. A second router creates an additional subnet and prevents communication. Gigabit router (with DHCP) Configuration 1 Personal computer Gigabit switch DSL/Cable modem M500 Player 3U Server M500 Player Configuration 2 Gigabit router (with DHCP) DSL/Cable modem Personal computer Gigabit switch Do NOT use a router here Gigabit switch M500 Player M500 Player 3U Server Figure 3-2 Kaleidescape Part No. 101-0105-00 Rev 3 Basic Network Configurations Page 23 Kaleidescape Installation Guide Physical Installation A/V Connections to Kaleidescape Players Kaleidescape players can be installed in either of the following locations: • In an A/V closet with cables running from the player to the display • In the same area as the A/V equipment Locating the player in the same area as the A/V equipment allows for direct control with an IR remote to the IR receiver on the front of the player and convenient access to the disc tray. The player must be located so that IR signals can be readily received, or fitted with an IR emitter/IR extension cable connected to a remote IR receiver. The Kaleidescape M500 Player imports Blu-ray Discs, DVDs, and CDs, and supports direct playback of a disc in a tray. Locating these players near a display area is ideal. If the movie player is controlled remotely, whether through an IR receiver, a programmable controller, or the control panel in the browser interface, A/V cable length limits become a major installation consideration. The Music Player has four audio zones which can be controlled independently. Zones are usually distributed through a distributed audio system and controlled through a programmable controller. Check specifications for both cables and A/V equipment. Table 3-2 lists the cable requirements for movie players depending on the audio option. Note: Cable lengths are limited by the cable and signal type. • For example, with audio signals, optical cables are typically limited to less than 16 ft (5 m) and coaxial cables are typically limited to less than 32–50 ft (10–15 m). • Always use a certified high speed (category 2) HDMI cable. The longer the HDMI cable, the more important the quality of the manufacturing. For cable runs longer than 10 meters, a solution such as an active cable, repeater, amplifier, or Cat5/6 or fiber extender is required. Table 3-2 Cable Requirements for Kaleidescape Players Signal Player Connections Cable Cable Connectors HDMI (video/audio) HDMI HDMI cable 19-pin HDMI Type A (outside dimensions: 13.9 mm × 4.45 mm) HDMI-DVI adapter + DVI cable (video only) Composite (video) Yellow RCA Kaleidescape Part No. 101-0105-00 Rev 3 RCA video cable Single RCA plug Page 24 Kaleidescape Installation Guide Physical Installation Table 3-2 Cable Requirements for Kaleidescape Players (Continued) Signal Player Connections Cable Cable Connectors Component (video) Three RCA connections 75-ohm YPbPr analog colored green (Y), blue component video cable (Pb), and red (Pr) Three RCA plugs S-Video (video) S-Video S-Video plug (4-pin mini-DIN) Digital coaxial (audio) Orange RCA Digital audio coaxial cable RCA plug Digital optical (audio) TosLink (not available on the M300 Player) Digital audio optical cable TosLink plug (not available on the M300 Player) Analog stereo (audio) Red and white RCA Analog stereo audio cable RCA plugs S-Video cable (not available on the M300 Player) The figures below show cable connections for Kaleidescape components. Network RS-232 Figure 3-3 Note: 1U Server Connections The 1U Server RS-232 connection is for diagnostic use and the USB ports are reserved. RS-232 Network Figure 3-4 Note: USB USB 3U Server Connections The 3U Server RS-232 connection is for diagnostic use. The USB ports and FireWire port are reserved. Kaleidescape Part No. 101-0105-00 Rev 3 Page 25 Kaleidescape Installation Guide Physical Installation Composite Video Coaxial Audio Network Network Reset Button Component Video HDMI S-Video Figure 3-5 Note: Analog Audio USB Optical Audio Remote IR-IN M500 Player Connections The USB port on the M500 is reserved. Composite Video DC Power HDMI Figure 3-6 Note: RS-232 Component Video Coaxial Audio Analog Audio Network Reset Button Remote IR-IN Network USB M300 Player Connections The M300 USB port is reserved. Network Analog Audio Coaxial Audio Figure 3-7 Kaleidescape Part No. 101-0105-00 Rev 3 Optical Audio RS-232 Music Player Connections Page 26 Kaleidescape Installation Guide Physical Installation Component Composite Coaxial Video Video Audio S-Video HDMI Analog Audio Optical Audio Remote IR-IN Zone 1 Zone 2 Zone 3 RS-232 USB Network Figure 3-8 Note: Mini System Connections The Mini System USB port is reserved. Installing System Components The Kaleidescape installation can be as simple as plug-and-play. Or apply optional settings such as local time zone and parental controls, and the system is ready to deliver movies and music. Disk cartridges can be added to expand server capacity as needed. Set up the Kaleidescape server before other system components. When installing a system with multiple servers, set up all the servers before setting up other components. Rack Mounting Components Servers Use the following procedures to rack mount a Kaleidescape server. 1. Verify that the rack is strong enough to bear the combined weight of the Kaleidescape components. 2. Position the server in the rack. A 3U Server weighs 58 lbs (26.3 kg) with fourteen disk cartridges installed. Use two people to lift and mount a fully loaded 3U Server. A 1U Server weighs 24 lbs (10.9 kg) with four disk cartridges installed. Always use proper lifting techniques. Kaleidescape Part No. 101-0105-00 Rev 3 Page 27 Kaleidescape Installation Guide Physical Installation 3. Attach the server to the rack by fastening rack ears with the four screws provided. A Phillips #3 screwdriver is required. 4. Check that disk cartridges are firmly seated. Disk cartridges are sensitive and susceptible to damage from shock. Use care when handling. Do not bump or drop. Disk cartridges are susceptible to electrostatic discharge. Be careful not to touch the exposed connector at the back of the disk cartridge. Static electricity can damage the electronics inside the disk cartridge. Always store and ship disk cartridges in an antistatic bag. Note: Do NOT operate the server with empty slots. Open slots compromise the cooling system. Insert blank cartridges into empty slots. a. 1U Server - Unpack disk cartridges and blanks. Save packaging. 0 Remove the front panel by tugging gently on both sides. 0 Install disk cartridges, then blanks. Insert the first disk cartridge into the first storage slot and push the disk cartridge in until the disk cartridge clicks into place. Refer to Removing and Adding Disk Cartridges or Blanks on page 55 for a detailed procedure. 0 Press firmly, then press once more to be sure disk cartridges are completely seated. Kaleidescape Part No. 101-0105-00 Rev 3 Page 28 Kaleidescape Installation Guide Physical Installation 0 Replace the front panel aligning the six posts on the back of the front panel with the six slots in the chassis and push the panel to snap the panel into place. b. 3U Server - Open the server front panel and push firmly on disk cartridges to verify that pre-installed disk cartridges and blanks have not become loose during shipment. Kaleidescape Players Use the following procedure to rack mount Kaleidescape players. M500 Player and Music Player Note: The M500 Player can also be installed on a tabletop. See Tabletop Installation for the M500 Player on page 45. 1. Rack mount the player. a. Tug gently on both sides of the front panel until panel comes off. Set the panel aside. b. Position the player in the rack and fasten to the rack by the mounting ears with the screws provided. Note: Player buttons can come loose or come out when the front panel is removed. Replace button caps so that the curvature of the buttons matches the curvature of the front cover and the icons are oriented correctly. Kaleidescape Part No. 101-0105-00 Rev 3 Page 29 Kaleidescape Installation Guide Physical Installation c. Replace the front panel. Align the three pegs in the front panel with the holes in the player chassis and press until the front panel snaps into place. M300 Player Rack mount the M300 Player with an optional rack-mount shelf. This shelf holds up to two M300 Players and fills one rack unit. 1. If installing two M300 Players, remove the two screws that secure the blanking plate, then the blanking plate. 2. Remove the bottom screw from the M300 Player. Mounting slots Bottom screw Kaleidescape Part No. 101-0105-00 Rev 3 Page 30 Kaleidescape Installation Guide Physical Installation 3. The player serial number is not visible after the player is mounted. Attach the extra serial number label (included in the packing box) to an area where the number can be read. Serial number 4. Align the mounting slots with the shelf pegs, and slide the player towards the back of the shelf until the player clicks into place. Repeat if installing a second player. 5. Turn shelf over and attach retaining screws. Do NOT use the screws that were removed. 6. Mount the rack on the shelf in the best forward position. 7. Adjust the rack ears so that rack ears are equally aligned from the front of the shelf. Loosen the four side screws, adjust the rack ears and tighten. Kaleidescape Part No. 101-0105-00 Rev 3 Page 31 Kaleidescape Installation Guide Physical Installation 8. Fasten the shelf to the rack using the lower holes in the rack ears. 9. Install screws in the upper two holes to secure the shelf. Note: The Kaleidescape M300 Player can also be mounted against a wall. See Wall Mounting the M300 Player on page 46. Mini System Use the following procedure to install the rack mount kit and mount the Mini System. 1. Press the tab on the rear of the side panel and slide the panel towards the back of the Mini System to remove. 2. Repeat for the remaining side panel. 3. Turn the Mini System over carefully. Use a #2 Phillips screwdriver to remove the four feet at the corners. Kaleidescape Part No. 101-0105-00 Rev 3 Page 32 Kaleidescape Installation Guide Physical Installation Use care when handling the Mini System. The Mini System contains fragile disk cartridges. 4. Position the cooling duct with the flat side down and the grille facing the front of the system. 5. Fasten the cooling duct to the Mini System with the six cooling duct screws packaged with the system. Use a #2 Phillips screwdriver; be careful not to overtighten the screws (2 in-lbs maximum torque). 6. Turn the Mini System right side up. 7. Align the rack ears with arrows pointing downwards. Attach rack ears to each side of the Mini System with the rack ear screws. Kaleidescape Part No. 101-0105-00 Rev 3 Page 33 Kaleidescape Installation Guide Physical Installation 8. Attach to rack in the best forward horizontal position. Be sure rack ears are equally aligned from the front. Connecting Components to the Network Use the following procedures to connect components to the network. Connect servers before connecting other components. The two lights above the network connection indicate activity and the type of connection. Servers 1. Connect the Ethernet cable to the port labeled NETWORK on the back of the server. The left light indicates activity and is orange when a link is established. The right light blinks green for activity on a 1U Server and blinks amber on a 3U Server. Kaleidescape Part No. 101-0105-00 Rev 3 Page 34 Kaleidescape Installation Guide Physical Installation 2. Plug the other end of the server Ethernet cable into a 1000Base-T Ethernet switch port. The server has an RS-232 serial port labeled CONTROL reserved for control systems. For more information, see Control Systems on page 98. M500 Player 1. Connect the Ethernet cable to the port labeled NETWORK on the back of the player. 2. Plug the other end of the Ethernet cable into an Ethernet switch. A Gigabit switch is strongly recommended, and required if more than one player is used to watch Blu-ray movies at the same time. The left light indicates connection speed. When a 1000Base-T link is established, this light is amber. When a 100Base-TX link, this light is green. The right light blinks green when there is Ethernet activity. The activity light on the M500 player also indicates that network RESET has been pressed. 3. Connect appropriate A/V cables. Refer to Table 3-2 for cable restrictions. 4. Connect control cables for the controller being used. The player can connect to three types of controllers. 0 0 0 Kaleidescape Part No. 101-0105-00 Rev 3 Serial controller (RS-232) Ethernet (TCP/IP) IR controller Page 35 Kaleidescape Installation Guide Physical Installation a. Connecting to a serial controller The M500 player acts as standard Data Terminal Equipment (DTE) with an RS-232 serial controller, connected via a female–female DB-9 serial cable. Use the pinout shown in Figure 3-9 to wire the DB-9 female connector. 1 DCD Data carrier detect (unused) 2 RD Receive data 3 TD Transmit data 4 DTR Data terminal reach (unused) 5 SG Signal ground 9 RI Ring indicator (unused) 8 CTS Clear to send 7 RTS Request to send 6 DSR Data set ready (unused) Figure 3-9 Serial Control Port Pinout (Male DB-9) For complete instructions for serial control, refer to the Kaleidescape System Control Protocol Reference Manual at www.kaleidescape.com/go/control-protocol. b. Connecting to the Ethernet No additional cabling is required for Ethernet (TCP/IP) controllers if the controller is part of the network. c. Connecting to an IR controller The IR receiver on the front of the player is paired with an IR emitter wired directly to the IR-IN port on the back panel of the player. Use the IR-IN port to connect the player to a remote IR receiver, an RF gateway, or a control system that sends IR commands. 0 Cut the emitter off any existing IR repeater or control system. 0 Solder a cable with an 1/8 in. (3.5 mm) tip-sleeve (mono) connector to the leads that were connected to the emitter. 0 Connect the signal to the tip of the connector and the ground to the sleeve. When this cable is connected to the player IR-IN port, the player receives the same IR commands that would have been sent by the emitter. Kaleidescape Part No. 101-0105-00 Rev 3 Page 36 Kaleidescape Installation Guide Physical Installation M300 Player 1. Plug an Ethernet cable into the port labeled NETWORK on the back of the player. 2. Plug the other end of the Ethernet cable into an Ethernet switch. A Gigabit switch is strongly recommended, and required if more than one player is used to watch Blu-ray movies at the same time. The left light indicates connection speed. When a 1000Base-T link is established, this light is amber. When a 100Base-TX link, this light is green. The right light blinks green when there is Ethernet activity. 3. Connect appropriate A/V cables. Refer to Table 3-2 for cable restrictions. 4. Connect IR controller cable if required. See M500 IR cabling instructions above. No additional cabling is required for Ethernet (TCP/IP) controllers if the controller is part of the network. Music Player 1. Plug an Ethernet cable into the port labeled NETWORK on the back of the player. The left light indicates activity and lights orange. The right light blinks amber when there is Ethernet activity. 2. Plug the other end of the Ethernet cable into an Ethernet switch. Kaleidescape Part No. 101-0105-00 Rev 3 Page 37 Kaleidescape Installation Guide Physical Installation 3. Connect appropriate A/V cables. Refer to Table 3-2 for cable restrictions. 4. Connect control cables. The Music Player can connect to two types of controllers. 0 0 Serial controller Ethernet IP To connect serial controller cable. see M500 Player IR cabling instructions above. No additional cabling is required for Ethernet (TCP/IP) controllers if the controller is part of the network. Mini System 1. Connect an Ethernet cable from the port labeled NETWORK on the back of the Mini System into an Ethernet switch. The right light is green when there is a 100Base-TX link and blinks when there is activity. The right light is orange when there is a 1000Base-T link and blinks when there is activity. 2. Connect A/V cables and control cables as required. The player can connect to three types of controllers. Refer to cabling instruction for the M500 Player on page 35. 0 Serial controller (RS-232) 0 Ethernet (TCP/IP) 0 IR controller When picking up or moving the Mini System, grasp the bottom of the system with two hands. Do NOT lift by the plastic side panels. Wireless and Powerline Networking The Kaleidescape server must be connected to the Internet to receive software updates and updates from the Movie and Music Guides, and to notify Kaleidescape if service is required. Although the reliability of a wired Internet connection is preferred, in some situations the most practical option is an Internet connection using one of the following technologies: • Wireless LAN • Powerline communication Wireless networks use radio frequencies to communicate without wires. Powerline networks carry data over a conductor also used for electric power transmission. Kaleidescape Part No. 101-0105-00 Rev 3 Page 38 Kaleidescape Installation Guide Physical Installation Wireless and powerline connections work well for providing Internet access to the Kaleidescape server, for connecting control systems, and for accessing the browser interface from a computer. However, a wired Ethernet network is required between the Kaleidescape components because of the small tolerance for latency while streaming movies or music. Wireless LANs A wireless router (or router and Wireless Access Point (WAP)) can be connected to a DSL or cable modem to provide wireless Internet connectivity. To connect a Kaleidescape server to the Internet, connect a wireless bridge (sometimes called a “wireless game adapter”) to the network connection on the Kaleidescape server. Follow the instructions for the wireless bridge to establish a connection. Using channels that are five channel numbers apart decreases the channel cross-talk and improves performance. In the United States, only channels 1 through 11 are available, which means that the only three wireless networks that do not overlap are channels 1, 6, and 11. Powerline Communications Powerline communication (PLC) uses electrical wiring to interconnect segments of an Ethernet network. There are several proprietary PLC standards, including HomePlug, HD-PLC, and UPA. All equipment used in a setup must have the same standards. To connect the Kaleidescape server to the Internet using a powerline network, plug a powerline adapter into an electrical outlet, and then to a router or switch with Internet access. Install a second powerline adapter near the Kaleidescape server, connect the adapter to the network connection on the Kaleidescape server and an electrical outlet. Note: Because standards vary, Kaleidescape recommends using two powerline adapters of the same make and model. Configuration Examples Any Kaleidescape server can be connected to the Internet with wireless or powerline networking equipment. Depending on installation requirements, many configurations are possible if the connection between player and server always uses Ethernet cabling. Figure 3-10 is a sample configuration for the Mini System. A wireless access point (WAP) or powerline adapter is connected to a router. The router is connected to the Internet access device (such as a cable or DSL modem). A Kaleidescape Part No. 101-0105-00 Rev 3 Page 39 Kaleidescape Installation Guide Physical Installation wireless bridge or powerline adapter is connected to the Mini System. Note that a wireless router performs the functions of both a router and a WAP. Internet access device Router (if not integrated) WAP or Powerline adapter Wireless bridge or Powerline adapter Mini System Figure 3-10 Kaleidescape Mini System with Wireless or Powerline Networking Equipment Figure 3-11 is a sample wireless configuration for a Mini System and an M300 Player. Both the Mini System and the M300 Player are connected to an Ethernet switch, which is connected to the Internet using either wireless or powerline networking equipment. Internet access device Router (if not integrated) WAP or Powerline adapter Wireless bridge or Powerline adapter Ethernet switch Mini System Figure 3-11 Kaleidescape Part No. 101-0105-00 Rev 3 M300 Player Mini System and M300 Player with Wireless or Powerline Networking Equipment Page 40 Kaleidescape Installation Guide Physical Installation Figure 3-12 is a sample configuration for a 3U Server with an M500 Player and an M300 Player connected to an Ethernet switch. The switch is connected to the Internet using either wireless or powerline networking equipment. Internet access device Router (if not integrated) WAP or Powerline adapter Wireless bridge or Powerline adapter Ethernet switch M300 Player 3U Server M500 Player Figure 3-12 3U Server, M500 Player and M300 Player with Wireless or Powerline Networking Equipment For more information about using wireless connections for Kaleidescape Systems, go to www.kaleidescape.com/go/wireless. Connecting Components to Power Supply and Powering On Use the following procedure to connect components to a power source and power on. Servers 1. Plug the power cord into the socket labeled AC-IN on the back of the server. Plug the other end into a grounded outlet with a high-quality surge protector for the server power source. A UPS is optional. 2. 3U Server — Open the front panel of the server and press the POWER button. 1U Server — Press the POWER button on the right side of the front panel or remove the front panel and press the blue POWER button. The blue lights on the disk cartridges illuminate sequentially and then turn off briefly before turning on again and remaining on. The blue light on the 3U Server hot spare disk cartridge blinks. Kaleidescape Part No. 101-0105-00 Rev 3 Page 41 Kaleidescape Installation Guide Physical Installation 3U Server with front panel down 1U Server with front panel off 3. Check that all lights are blue before closing the front panel. Do NOT operate the server with empty slots. Empty slots compromise the cooling system. Fill any empty slots with blank disk cartridges. 4. Leave the server connected to the Internet for at least one hour. 5. After waiting an hour, power off the server, then restart. This power off/on sequence installs the most recent software and activates licensing. The server can be powered on/off by pressing the POWER button, or can be rebooted remotely from the browser interface. See Configuring System Components on page 67. M500 Player 1. Plug the power cord into the socket labeled AC-IN on the back of the player. Plug the other end of the cable into a grounded outlet with a highquality surge protector. Kaleidescape Part No. 101-0105-00 Rev 3 Page 42 Kaleidescape Installation Guide Physical Installation 2. Press the POWER button on the front of the player. The front panel glows blue. M300 Player 1. Plug the DC power cord from the power supply into the socket labeled DC-IN on the back of the player. 2. Plug the AC power cord into the power supply. 3. Plug the other end of the AC power cord to a grounded outlet with a highquality surge protector. The M300 Player does not have a power button. The front panel glows blue when the player is connected to a power source. If the front panel does not glow blue, the player might be receiving power but set to standby mode. Use the ON button of a remote control to exit standby mode and turn on the player. Music Player 1. Plug the power cord into the socket labeled AC-IN on the back of the player. Plug the other end of the cable into a grounded outlet with a highquality surge protector. Kaleidescape Part No. 101-0105-00 Rev 3 Page 43 Kaleidescape Installation Guide Physical Installation 2. Press the POWER button on the front of the player. The front panel glows blue. Mini System 1. Plug the power cord into the socket labeled AC-IN on the back of the Mini System. Plug the other end of the cable into a grounded outlet with a high-quality surge protector. 2. To power on with the power button, pull down the front panel and press the POWER button located to the right of the disk cartridges. Wait 30 seconds for the system to power on and disk cartridge status lights to go on. After initial power on, pushing the POWER button toggles the Mini System in and out of standby mode. (Standby mode leaves the POWER button pulsing and the other button lights off. Disk cartridge status lights remain on.) Power can be applied three ways. • Using the Kaleidescape Mini System remote control • By the power button located under the front panel • Via the control protocol (RS-232 serial or TCP/IP commands (ENTER_STANDBY, LEAVE_STANDBY)) Kaleidescape Part No. 101-0105-00 Rev 3 Page 44 Kaleidescape Installation Guide Physical Installation Standby mode allows other components in the system to access the content on the Mini System and music zones 2 and 3 remain operational. However, while in standby, zone 1 cannot be used for movies or music. To power off the Mini System, press and hold the POWER button for 10 seconds. The disk cartridge lights turn off. Note: In case of power failure, when power is reinstated, the Mini System returns to the same state as when the power failure occurred. Tabletop Installation for the M500 Player The M500 Player is packaged with rack ears. Tabletop installation involves removing the rack ears and installing side panels. 1. Remove the four screws that fasten each of the rack ears to the player. Use a #2 Phillips screwdriver. 2. Identify the left side panel (as viewed from the front of the player). The number 502-1005 can be found in the middle of the inside of the left side panel. 3. Position the side panel tab to back, finger guide to front. 4. Align the six plastic tabs on the panel with the six slots on the left side of the player. Kaleidescape Part No. 101-0105-00 Rev 3 Page 45 Kaleidescape Installation Guide Physical Installation 5. Press the side panel tabs into the slots. 6. Slide panel forward until the panel locks into place and is flush with the back of the player. 7. Repeat for right side panel, number 502-1003. Note: Panels are purely cosmetic. If space is a consideration, panels can be left off. Wall Mounting the M300 Player The M300 Player ships with a bracket for mounting the player to a vertical surface and a bracket for mounting the power supply. The M300 Player can be mounted two ways. • Permanently to a wall with bracket screwed to the player • Without a screw in the bracket so the player can be easily removed Note: Mounting the M300 Player vertically can interfere with receiving IR commands by the IR receiver on the front of the player (just below the front panel). The IR-IN port on the back of the player can be used to connect the player to a remote IR receiver, an RF gateway, or a control system. See Connecting Components to the Network on page 34. Site Preparation Use the following procedure to prepare the mounting site. 1. Plan the location. Consider orientation, cable lengths, and ventilation as well as local building and electrical codes. The M300 Player can be mounted with connectors up or down. The shape of the bracket fits the shape of the player. Kaleidescape Part No. 101-0105-00 Rev 3 Page 46 Kaleidescape Installation Guide Physical Installation 2. Find a mounting spot that allows for cable length limitations. Make allowances for strain relief. 3. Determine if the power supply must be mounted with the player to keep the player within the DC cable length limitation [4 feet (1.2 meters)]. Note: Do NOT lengthen the DC cable of the power supply. 0.5 in. (1.3 cm) min. clearance for side vents 1 in. (2.5 cm) min. clearance in front Do NOT lengthen DC power cable 4 ft (1.2 m) 2 in. (5 cm) min. clearance in the back Power Supply Extend the AC power cables as needed 4. Verify that there is adequate airflow around the player (1 in. (2.5 cm) in front and 2 in. (5 cm) in back, minimum). Kaleidescape Part No. 101-0105-00 Rev 3 Page 47 Kaleidescape Installation Guide Physical Installation 5. Prepare mounting holes. Place the bracket or bracket template against the wall and mark the locations of the four holes. Invert bracket for mounting orientation with connectors up 6. Drill holes for fasteners. If the surface is wood or a similar material, drill a 3/32 in. (2 mm) pilot hole at each location. 7. Check that the mounting screws are the appropriate length. Do not use the screw anchors for wood. a. If mounting on drywall (hollow wall) or masonry (solid wall), drill a 3/16 in. (5 mm) hole for the screw anchors. Insert the anchors and tap with a hammer until anchors are flush with the surface. b. If mounting the power supply with the player, repeat steps for the power supply bracket. 8. The player serial number is not visible after the player is mounted. Attach the extra serial number label (included in the packing box) to an area where the number can be read. Permanent Mounting Use the following procedure to mount the M300 Player permanently. 1. Use a #1 Phillips screwdriver to remove the screw located on the bottom of the player. Mounting slots Bottom screw 2. Align mounting slots on the bottom of the player to bracket pegs. Kaleidescape Part No. 101-0105-00 Rev 3 Page 48 Kaleidescape Installation Guide Physical Installation 3. Slide the bracket down until the player clicks into place. 4. Fasten the bracket to the player with the retaining screw provided. Do NOT use the screw that was removed, that screw is too short. 5. Place the player and bracket over mounting holes. 6. Check that the mounting screws are the appropriate length. Do not use the screw anchors for wood. 7. Use a #2 Phillips screwdriver to fasten bracket with the mounting screws until the player and bracket are secure. Kaleidescape Part No. 101-0105-00 Rev 3 Page 49 Kaleidescape Installation Guide Physical Installation a. If mounting to drywall (hollow wall), or masonry (solid wall), drill a 3/16 in. (5 mm) hole for the screw anchors. Insert the anchors and tap with a hammer until anchors are flush with the surface. b. Tighten each screw with additional turns to expand the anchor inside the wall. See Table 3-3. c. If mounting the power supply with the player, repeat steps for the power supply bracket. Table 3-3 Drywall Mounting Drywall Thickness Number of Turns Required 3/8 inch 7 to 9 turns 1/2 inch 5 to 7 turns 5/8 inch 3 to 4 turns 3/4 inch 1 to 2 turns Removable Player Mounting Use the following procedure to mount the M300 Player so that the player can be easily removed and replaced. 1. Place the bracket over mounting holes. 2. Use a #2 Phillips screwdriver to fasten with mounting screws until the bracket is secure. Kaleidescape Part No. 101-0105-00 Rev 3 Page 50 Kaleidescape Installation Guide Physical Installation 3/16 in. hole for anchor or 3/32 pilot hole Screw anchor for drywall or masonry If mounting to drywall (hollow wall), or masonry (solid wall), drill a 3/16 in. (5 mm) hole for the screw anchors. Insert the anchors and tap with a hammer until anchors are flush with the surface. Tighten each screw additional turns, refer to Table 3-3 on page 50. 3. Align the player mounting slots to the bracket pegs and slide the player down until the player clicks into place. Power Supply Mounting Use the following procedure to mount the M300 Player power supply. 1. Follow the steps in Site Preparation on page 46 using the power supply bracket as a template. 2. Place the power supply inside the bracket with the label facing away from the wall. Kaleidescape Part No. 101-0105-00 Rev 3 Page 51 Kaleidescape Installation Guide Physical Installation To avoid electrical hazard and protect the player, use the power supply provided with the M300 Player. 3. Place the bracket and power supply over the holes and mount using a #2 Phillips screwdriver to fasten with mounting screws until the bracket is secure. If mounting to drywall (hollow wall) or masonry (solid wall), drill a 3/16 in. (5 mm) hole for the screw anchors. Insert the anchors and tap with a hammer until anchors are flush with the surface. Tighten each screw additional turns, refer to Table 3-3 on page 50. Disk Cartridges Kaleidescape servers use three types of disk cartridges depending on the server. See Figure 3-13. 0 0 0 1U and 3U Server disk cartridges Mini Disk Cartridges 5U Server disk cartridges Mini Disk Cartridge 1U and 3U Server disk cartridge Figure 3-13 Kaleidescape Part No. 101-0105-00 Rev 3 5U Server disk cartridge Kaleidescape Disk Cartridges Page 52 Kaleidescape Installation Guide Physical Installation Disk cartridges are sensitive mechanical devices susceptible to damage from shock. Handle carefully. Protect from bumps and drops. Always transport and ship disk cartridges in anti-static, well-cushioned containers. Handling Disk Cartridges Kaleidescape servers house disk cartridges that contain high-capacity hard drives to store movies and music. Disk cartridges are shipped with the server. Disk cartridges are pre-installed or packed in the shipping box depending on the server. Handling disk cartridges correctly is critical to prevent damage. Shock and Vibration Disk cartridges are sensitive mechanical devices susceptible to damage from shock. Do NOT shake or rattle disk cartridges. Damage to a disk cartridge is often difficult to detect and can cause sudden drive failure. Protect disk cartridges from bumps and drops and always transport or ship them in well-cushioned containers. Note: Shipping containers designed to protect disk cartridges are available from Kaleidescape. Electrostatic Discharge Avoid touching the exposed connector at the back of a disk cartridge. Static electricity can damage the electronics inside the disk cartridge. Always store and ship disk cartridges in an anti-static bag. Hard Drive Handling Video A short video produced by Seagate demonstrates the correct way to handle disk drives and avoid catastrophic damage. To view this video, go to www.kaleidescape.com/go/drive-handling. Kaleidescape Part No. 101-0105-00 Rev 3 Page 53 Kaleidescape Installation Guide Physical Installation Server Fault Tolerance RAID-K Data Protection Every Kaleidescape server includes RAID-K technology for content protection. RAID-K is a proprietary technology developed by Kaleidescape to provide the following features: • Better performance for movies and music • Increased safety for content storage • Content protection from a single drive failure • Incremental additions to storage capacity Unlike other variations of RAID technology, RAID-K allows new drives with different storage capacities to be added to the array. If a drive fails, RAID-K data and parity information allow the server to continue providing content from the failed drive until a replacement disk cartridge can be installed. Note: A failed disk cartridge must be replaced as soon as possible. If a second drive failure occurs on a 1U Server, 5U Server or Mini System before the first failed disk cartridge is replaced, content will be lost. RAID-K technology does NOT allow swapping disk cartridges between servers. Note: When a disk cartridge with a storage capacity larger than the other disk cartridges is added to servers other than the 3U Server, the larger capacity disk cartridge allots to storage the same amount of capacity as the largest disk already in the server. Any excess capacity is allotted to parity information. However, when a second large capacity disk cartridge is added, the entire storage capacity can be used to store movies and music. Note: When a disk cartridge with a storage capacity larger than the other disk cartridges is added to a 3U Server, the first larger disk is used as hot spare, second is used for data and some parity, the third is all data. 3U Server Hot Spare Disk Cartridge A hot spare disk cartridge is an additional disk cartridge installed in the 3U Server. The hot spare is immediately available as a replacement if an existing drive fails. The Kaleidescape server continues to operate because of RAID-K technology and no content is lost. Information on the failed disk is recreated on the hot spare disk cartridge. The hot spare disk cartridge can be identified by the slow blink on the blue light at the base of the disk cartridge. Active disk cartridges have steady blue lights. Kaleidescape Part No. 101-0105-00 Rev 3 Page 54 Kaleidescape Installation Guide Physical Installation When a failed disk cartridge is replaced, the replacement cartridge becomes the new hot spare disk cartridge. Note: Because the hot spare must be able to replace any disk cartridge in the array, the capacity of the hot spare cannot be smaller than any other disk in the array. (Servers other than the 3U Server do not have a hot spare disk cartridge and cannot begin failure recovery until a replacement cartridge is installed.) Removing and Adding Disk Cartridges or Blanks Server disk cartridge slots MUST be filled with disk cartridges or blanks. Disk cartridges can be added to expand server capacity or replaced as needed. Do not operate the server with empty slots. Always use blank cartridges to fill slots. Open slots compromise the cooling system. When a Disk Cartridge Can Be Removed If a server is powered on, the disk cartridge can be removed ONLY under the following conditions: • Disk cartridge status light glows amber which indicates that the disk should be removed. A Transport Disk turns amber when the import is complete, but it has not failed. • Disk cartridge status light is unlit indicating that the disk is not being recognized at all. (This could be just a seating problem.) If more than one disk cartridge status indicator glows amber or is unlit on the same server, turn the server off immediately by pressing the POWER button, and contact Kaleidescape Support at +1 650-625-6160 or send a message to [email protected]. When a Disk Cartridge Does Not Glow Blue Active disk cartridge status lights glow blue. If a disk cartridge status indicator light fails to glow blue when the server is powered on, it is usually for one of the following reasons: • The disk cartridge is improperly installed. Power off the server, remove the disk cartridge, and reinsert. Be sure that the disk cartridge is firmly seated. • The disk cartridge is defective. Kaleidescape Part No. 101-0105-00 Rev 3 Page 55 Kaleidescape Installation Guide Physical Installation Power off the server and remove the disk cartridge. Contact Kaleidescape Support for return information. • The disk cartridge was previously installed in another server. Removing and Adding Disk Cartridges in a 3U and 1U Server Removing a Disk Cartridge from a 3U or 1U Server Use the following procedure to remove a disk cartridge or blank from a 3U or 1U Server. 1. Access the front panel of the server. 3U Server – Pull down front panel. 1U Server – Tug gently on both sides of the front panel and remove. 2. Press the EJECT button (Kaleidescape logo) on the disk cartridge. (Blank cartridges do not have the logo on the EJECT button). 3U Server EJECT button 1U Server EJECT button 3. Gently glide the disk cartridge out of the slot. Kaleidescape Part No. 101-0105-00 Rev 3 Page 56 Kaleidescape Installation Guide Physical Installation Removing a disk cartridge from a 3U Server Removing a disk cartridge from a 1U Server 4. Place the disk cartridge in a well-padded container for safe storage and transport. 5. Insert a new disk cartridge in the empty slot. 6. For the 3U Server, close the front panel. For the 1U Server, replace the front panel by aligning the six posts on the rear of the front panel with the slots in the chassis and pushing the panel until the panel snaps into place. Adding a Disk Cartridge in a 3U or 1U Server A disk cartridge can be added at any time to increase server storage capacity, whether the server is running or not. Use the following procedure to add a disk cartridge to a 3U or 1U Server. 1. Access the front panel of the server. 3U Server – Pull down the front panel. 1U Server – Tug gently on both sides of the front panel and remove. 2. Verify that the latch on the disk cartridge, the gray plastic wedge that extends from the top of the disk cartridge, works properly. See Figure 3-14. The latch is designed to retract when the Kaleidescape logo (or white button on a blank) is pressed, and to pop up and engage with the chassis when a disk cartridge is inserted. If the latch sticks in the retracted position the disk cartridge does not lock in place and cannot operate properly. Note: If the latch sticks, follow the procedure to resolve the problem at www.kaleidescape.com/go/latch. Kaleidescape Part No. 101-0105-00 Rev 3 Page 57 Kaleidescape Installation Guide Physical Installation Figure 3-14 Disk Cartridge Latch 3. Align the disk cartridge to the slot. 3U Server – Latch goes to the top with lights at the bottom. 1U Server – Latch goes to the left with lights to the right. 4. Insert the disk cartridge into the open slot. Push firmly but gently until the disk cartridge clicks into place. Do NOT slam the disk cartridge. Adding a disk cartridge to a 3U Server Adding a disk cartridge to a 1U Server 5. Verify that the disk cartridge status light glows blue. Note: If replacing a single failed drive on a 3U Server, the newly installed disk cartridge becomes the new hot spare. The blue status light on the hot spare disk cartridge blinks at two second intervals. Kaleidescape Part No. 101-0105-00 Rev 3 Page 58 Kaleidescape Installation Guide Physical Installation 6. For the 3U Server, close the front panel. For the 1U Server, replace the front panel by aligning the six posts on the rear of the front panel with the slots in the chassis and pushing the panel until the panel snaps into place. Removing and Adding 5U Server Disk Cartridges Removing a 5U Server Disk Cartridge Use the following procedure to remove a disk cartridge or blank from a 5U Server. 1. Pull down the front panel. 2. Pull the latch on the disk cartridge down. 3. Slide the disk cartridge out carefully. 4. Insert a new disk cartridge into the empty slot. 5. Close the front panel. Adding a 5U Sever Disk Cartridge A Kaleidescape disk cartridge can be added at any time to increase server storage capacity, whether the server is running or not. Use the following procedure to add a disk cartridge to a 5U Server. Kaleidescape Part No. 101-0105-00 Rev 3 Page 59 Kaleidescape Installation Guide Physical Installation 1. Pull down the front panel. 2. Align the disk cartridge to the slot. The status light goes towards the top. 3. Pull the latch down on the disk cartridge. 4. With the latch down, slide the disk cartridge in as far as possible, just until the latch starts to close. 5. Close the latch completely and push on the label above the status light until the disk cartridge is firmly seated. If the latch is closed before inserting the disk cartridge, the disk cartridge cannot be seated properly and the drive can be damaged. 6. Verify that all disk cartridges are evenly aligned and status lights glow blue before closing the front panel. Kaleidescape Part No. 101-0105-00 Rev 3 Page 60 Kaleidescape Installation Guide Physical Installation Removing and Adding Mini Disk Cartridges Removing a Mini Disk Cartridge Use the following procedure to remove a disk cartridge or blank from a Mini System. 1. Pull down the front panel on the server. 2. Pull out the latch release on the disk cartridge. 3. Pull on the latch release and remove the disk cartridge. 4. Insert a new disk cartridge in the empty slot. Kaleidescape Part No. 101-0105-00 Rev 3 Page 61 Kaleidescape Installation Guide Physical Installation Close the front panel. Adding a Mini Disk Cartridge Kaleidescape disk cartridges can be added at any time to increase server storage capacity, whether the server is running or not. Use the following procedure to add a disk cartridge to a Mini System. 1. Pull down the front panel. 2. Align the disk cartridge to the slot. The status light must be on the right with the latch release handle closed. 3. Guide the cartridge all the way into the slot. A click sounds when the latch is engaged. See Figure 3-15. Figure 3-15 Mini Disk Cartridge Latch Release 4. Push on the disk cartridge to be sure the disk cartridge is completely seated. 5. Verify that the disk cartridge status light glows blue. 6. Close the front panel. Kaleidescape Part No. 101-0105-00 Rev 3 Page 62 Kaleidescape Installation Guide Section 4 System Configuration Browser Interface Kaleidescape Systems are configured through the browser interface with two main links: installer pages and user pages. 0 Installer pages are primarily used for initial setup during installation and are used to set the following parameters: • Server status and system information • Network settings • Video and audio settings • Region codes 0 User pages are used for user settings such as managing movie and music libraries, creating scripts, collections and mix albums, and setting parental control level. Accessing the Browser Interface There are three primary ways to access the installer pages: System URL, serial number URL, and server IP address. • System URL http://my-kaleidescape/installer (Windows) or http://my-kaleidescape.local/installer (Mac) • Serial number URL http://ks-[server_serial_number]/installer (Windows) or http://ks-[server_serial_number].local/installer (Mac) Replace [server_serial_number] with the 12-digit serial number of the server. For example, to access the browser interface of a server with the serial number 0000 0001 2345, enter http://ks-000000012345/installer. • IP address of the server http://[server_IP_address]/installer User pages are accessed without the /installer in the URL. Kaleidescape Part No. 101-0105-00 Rev 3 Page 63 Kaleidescape Installation Guide System Configuration Troubleshooting if the Browser Interface Does Not Load If using a Windows operating system and the web browser cannot load the browser interface using one of the methods above. Refer to Network Requirements on page 156. Viewing System Information After the Kaleidescape server is installed, powered on, and has an active network link, use the following procedure to check server status and change settings for the installation site. 1. Open the installer pages of the browser interface. a. With a single Kaleidescape System on the network, open a web browser and enter http://my-kaleidescape/installer (Windows) or http://my-kaleidescape.local/installer (Mac). Note: The System URL has the name my-kaleidescape but that name can be changed on the PREFERENCES tab. If the System URL has been changed, use the new address. b. If setting up separate (non-grouped) systems, each with a dedicated server on the same subnet, and System URLs have not been changed, use an address beginning with ks- followed by all twelve digits of the server serial number. Example: http://ks-00001000040b/installer (Windows) or http://ks-00001000040b.local/installer (Mac) 2. If a login page appears, enter the installer password if necessary and click LOGIN. Note: This step is not necessary if no password was set. The installer HOME page appears, displaying basic system status information. See Figure 4-1. (If a different installer page appears, select the HOME tab.) The left side of the page lists all Kaleidescape components in the system. 3. Verify that the connection is to the correct server by checking the serial number listed. The HOME page also shows software version, number of movies and albums on the server, as well as storage capacity and usage. Kaleidescape Part No. 101-0105-00 Rev 3 Page 64 Kaleidescape Installation Guide System Configuration Figure 4-1 Installer HOME Page If a component has a problem, an alert appears on every page of the browser interface. Figure 4-2 shows an example alert. Figure 4-2 Example of a Browser Interface Alert Setting System Preferences Use the following procedure to set system preferences. 1. Open the installer pages of the browser interface. 2. Select the PREFERENCES tab. See Figure 4-3. Kaleidescape Part No. 101-0105-00 Rev 3 Page 65 Kaleidescape Installation Guide System Configuration Figure 4-3 Installer PREFERENCES Page 3. Change the System URL if setting up multiple (non-grouped) systems at the same site. This descriptive name provides direct access to a server. Enter a descriptive name in the SYSTEM URL field. Characters must be lower case with no spaces. Click SAVE CHANGES. 4. Set the Time Zone. Select from the drop-down menu and click SAVE CHANGES. 5. Set the Music Zone Control. This option allows control of only the local music zone from onscreen display, or control of all music zones in the system from any player. Select the appropriate radio button and click SAVE CHANGES. 6. Set the HTTP Proxy Server if necessary. Use this option if the network has to communicate to the Internet through a proxy server. Configure the proxy server by entering the appropriate proxy server information and click SAVE CHANGES. 7. Set or change the Installer Password. Enter the current password, if any, then enter and confirm the new password. Click SAVE PASSWORD. Note: Setting an installer password is a precautionary procedure to prevent unauthorized modification of the system configuration, and can prevent children from overriding parental control settings. Note: If an installer password is forgotten, contact Kaleidescape Support. 8. Click RESET USER PASSWORD to clear the user password if a customer forgets the password. Kaleidescape Part No. 101-0105-00 Rev 3 Page 66 Kaleidescape Installation Guide System Configuration Configuring System Components The COMPONENTS tab lists properties for system components. Use the following procedures to view and set video and audio format preferences, and network settings. System Components 1. Open the installer pages of the browser interface and select the COMPONENTS tab. A list of the components in this system appears including detailed information about each component (serial number, IP address, MAC address, storage capacity, storage available, front panel lighting, and temperature). See Figure 4-4. Figure 4-4 Kaleidescape Part No. 101-0105-00 Rev 3 Installer COMPONENTS Page Page 67 Kaleidescape Installation Guide System Configuration 2. Input meaningful Device Names for each player or Mini System, for example Living Room or Guest Room. Then click OK. The Device Name identifies the component throughout the user interface. For example, the Device Name appears as the name of the onscreen display control panel for the component movie zone and on the PARENTAL CONTROL tab in the user pages of the browser interface. 3. Click on the Control the onscreen display link to bring up the control panel for the player. This is the same onscreen display control panel used on the user pages and can be used for testing and troubleshooting system configurations. 4. Set the brightness of the Front Panel Lights. Use the drop-down menu to select brightness, then click OK. 5. Set Import privilege. Use the drop-down menu to allow or not allow imports from the tray on this device, then click OK. Any player (or Mini System) with a disc tray has the option to allow or disallow imports. This option prevents guests or children from accidentally importing content. With import disabled, movies and albums can still be played from the tray. 6. Select whether or not to open a disc tray automatically When an Import Finishes. Use the drop-down menu, then click OK. Note: This option is useful if the component in question is behind a door that can prevent the tray from ejecting properly. Note: Mini Systems do not eject the tray automatically when an import finishes because the disc tray is behind the front panel. 7. The Preferred Movie Format selects the format used when the user presses PLAY. If widescreen is selected, the fullscreen version can still be played by selecting PLAY FULLSCREEN VERSION in the onscreen display. Note: M-Class players always use the 16:9 version. 8. Use the drop-down menu to select the a format, 4:3 for full screen viewing or 16:9 for widescreen display, then click OK. This option is applied when multiple versions of a DVD with different aspect ratios are stored on a Kaleidescape server. For example, the DVD A Bug’s Life contains both widescreen and full screen versions on the same disc. The Preferred Movie Format indicates which is given preference when the user presses play. If widescreen is selected as the preference here, the fullscreen version can still be played by selecting Play Fullscreen Version in the onscreen display. This option gives preference to one version or the other when just pressing Play. Kaleidescape Part No. 101-0105-00 Rev 3 Page 68 Kaleidescape Installation Guide System Configuration Note: M-Class players always give preference to the 16:9 version. 9. Select the Screen Saver Timeout period. This option selects how long the onscreen display stays on before showing the screen saver. Use the drop-down menu to select the timeout duration, then click OK. If selecting a screen saver timeout of more than 5 minutes (default), a warning message appears about display burn-in. See Figure 4-5. Be sure to consult the manufacturer’s documentation. Figure 4-5 Display Burn-in Warning Message 10. Name the Music Zones. Enter the names for the music zones in the text boxes and click OK. It is often useful to choose practical names such as living room, patio, or bedroom. The music zone name appears on the HOME tab of the user pages of the browser interface for the corresponding music zone control panel and throughout all user interfaces. The onscreen display lists the names of the music zones if the control zone feature is enabled, and control panels list the zones by name. 11. Click the Control Music on Zone # link to bring up the control panel for that music zone. This is the same music control panel used on the user pages to control music in areas without a display device and is useful for testing and troubleshooting system configurations. 12. Click OK after changing the information for a component. Temperature Bar A temperature bar shows the current operating temperature of each component. If a component is in, or approaching, the red section of the high temperature range, click the Help link. A window appears with instructions for corrective action. See Figure 4-6. If a component is in, or approaching, the red low temperature range, the room temperature is likely too cold. Refer to the environmental specifications in Appendix A on page 124. Kaleidescape Part No. 101-0105-00 Rev 3 Page 69 Kaleidescape Installation Guide System Configuration Figure 4-6 Component Temperature Help Window Restart The RESTART button is used to restart components remotely. It takes about two minutes to restart a server or Mini System. Any imports in progress are aborted. Restarting the server prompts the server to check for software updates, and Movie Guide and Music Guide updates. A restart also clears alerts; however, if the condition still exists, the alerts reappear. Components must be restarted for network changes to take effect. Settings The SETTINGS button is used to access specific configuration tabs. • Servers have two settings tabs: NETWORK and CONTROL. • Movie players and the Mini System have seven settings tabs: VIDEO, AUDIO, LANGUAGE, NETWORK, CONTROL, REGION, and SCREEN MASKING. • Music Players have three tabs: NETWORK, CONTROL, and REGION. Note: Older players without disc trays do not have REGION settings tabs. There are variations for video, audio, and language settings depending on the component. 0 M-Class players (M500 and M300 Players) 0 Mini System and 1080p players (KSYSTEM-120, KPLAYER-6000, KPLAYER-300) 0 Movie Player 2 and Movie Players (KPLAYER-2000, KPLAYER-2500, KPLAYER-5000) Kaleidescape Part No. 101-0105-00 Rev 3 Page 70 Kaleidescape Installation Guide System Configuration Each component must be configured individually. Players have several video outputs which are all active simultaneously. Use the VIDEO tab to optimize video for each player in the system. If a player is connected to more than one display device (either using several video outputs from the player or a matrix switcher) video cannot be optimized for each display device. One set of settings must be chosen for the movie player that presents the fewest problems for all connected displays. Video and Audio Settings Video Settings for M-Class Players Figure 4-7 shows video configuration settings for M-Class players. Each player can support 37 downstream HDCP devices. Figure 4-7 Kaleidescape Part No. 101-0105-00 Rev 3 Video Settings for the M500 and M300 Players Page 71 Kaleidescape Installation Guide System Configuration 1. Select the Primary Video Output format from the drop-down menu. The primary output is typically the output that connects to the primary display device (the display most watched). Default setting is HDMI. 2. The player synchronizes audio and video for the primary video output, although all video outputs remain active. The video outputs cannot be controlled independently. • When HDMI is the primary video output, component video output is 480i/576i. • 1080p is available only over HDMI. • When component is the primary video output, HDMI has the same video mode as component. • 1080p24 output from DVD content is not supported. Only Blu-ray content is explicitly authored for playback at 24 frames per second. Selecting the wrong primary video output or the wrong video modes can result in bad color, flickering, mismatched aspect ratio, or no picture at all Consult display documentation if necessary. 3. Select Video Mode from the drop-down menus. Video mode choices for other video outputs are automatically set depending on the primary video output selected and its video modes. Copy control restrictions forbid outputting DVD content at resolutions higher than 480p or 576p over component video outputs. Do not choose any video mode that the display does NOT support. For example, if the display does not support PAL video modes, select DO NOT PLAY for PAL media formats. If a user tries to play a PAL formatted movie, a message appears stating that the display does not support PAL format. The video modes for other video outputs are displayed below the dropdown menus. 4. Configure how full screen 4:3 movies will appear on a 16:9 display. Select the radio button to determine how a movie appears on the screen. • PLAY WITHOUT STRETCHING (default) causes black bars to appear on the sides of a 4:3 image. • PLAY WITH HORIZONTAL STRETCHING causes the image to fill the display screen but will distort 4:3 images. Kaleidescape Part No. 101-0105-00 Rev 3 Page 72 Kaleidescape Installation Guide System Configuration 5. Click OK to save settings. 6. Select Show Advanced Video Settings for options related to performance and calibration. See Figure 4-8. Figure 4-8 Kaleidescape Part No. 101-0105-00 Rev 3 Advanced Video Settings for M500 and M300 Players Page 73 Kaleidescape Installation Guide System Configuration a. Select the appropriate radio button for Adjust onscreen display picture size to control how messages are placed at the edges of the display. 0 LARGE is the default when HDMI is selected as the primary output. 0 SMALL is the default when HDMI is NOT the primary output. Use this setting if messages near the edge of the screen are cut off on the display with the large setting, for example, Pause, or Play. Note: This adjustment can also be performed through the onscreen display System Status option. b. Enable video brightness blacker-than-black and whiter-than-white to calibrate the display. Disable after calibration for viewing. M-Class players can output the full luma range, but it causes video mode changes between the onscreen user interface and movies, and causes some disc menus and subtitles to appear incorrectly. c. Configure Detail enhancement for HDMI Video to influence how sharp the edges of scaled video appear. (Option is only available if HDMI is the primary video output.) d. Enable Deep Color for HDMI Video only if all devices on the HDMI video path support deep color. (Option is only available if HDMI is the primary video output.) e. Click OK to save settings. Audio Settings for M-Class Players M-Class players support Linear PCM (up to 7.1), Dolby Digital, Dolby TrueHD, DTS Digital Surround®, DTS-HD Master Audio™ and MPEG audio. However some codecs can only be output as bitstreams. M-Class players can be used to watch DVD and Blu-ray movies with nearly any audio receiver or processor. To hear lossless audio tracks (for example, Dolby TrueHD or DTS-HD Master Audio) from Blu-ray Discs without alteration, the A/V receiver or audio processor must be able to decode these formats. When lossless audio is being played using BITSTREAM PASSTHROUGH, the coaxial, optical and analog audio outputs are silent. Figure 4-9 shows audio settings for M-Class players. Kaleidescape Part No. 101-0105-00 Rev 3 Page 74 Kaleidescape Installation Guide System Configuration Figure 4-9 Audio Settings for M500 and M300 Players Table 1 shows the output with default settings. These settings provide maximum compatibility. Table 1 Outputs with the Player Decode (Default) Audio Setting Audio Output Format HDMI Coax/Optical Analog CD PCM stereo PCM stereo Stereo DVD PCM up to 5.1 channels Source bitstream Blu-ray Disc PCM up to 5.1 channels DTS up to 5.1 channels Stereo or PCM Stereo Stereo 1. Configure the HDMI audio decode mode. • Player Decode Mode • Bitstream Pass-Through Mode The audio decode mode affects all other audio settings. The decode mode determines if the player or the receiver decodes the audio. Audio can be sent as multichannel PCM over HDMI by default, with all outputs enabled, or it can be passed through to HDMI with other outputs disabled. Kaleidescape Part No. 101-0105-00 Rev 3 Page 75 Kaleidescape Installation Guide System Configuration Player Decode Mode Select PLAYER DECODE (default) to hear Blu-ray secondary audio or when coaxial, optical, or analog audio outputs are used. PLAYER DECODE sends 48 kHz PCM output over HDMI, up to 5.1 channels depending on content and cabling. In PLAYER DECODE mode, optical/coaxial outputs carry DTS Digital Surround when the soundtrack has more than two channels. Audio can be output over optical/coaxial from any Blu-ray movie in this manner. • Secondary audio with picture-in-picture Blu-ray Discs support a secondary audio track typically used for interactive audio and commentary. This track is mixed with the main audio so both tracks can be heard at the same time. M-Class players play secondary audio with picture-in-picture when in the PLAYER DECODE mode. (To hear unaltered primary audio, the players must be set to the BITSTREAM PASS-THROUGH setting.) • Downmixing In PLAYER DECODE mode, M-Class players downmix DTS Digital Surround and Dolby Digital soundtracks to stereo audio output when playing Blu-ray Discs or DVDs. Bitstream Pass-Through Mode Select BITSTREAM PASS-THROUGH to send 7.1-channel Blu-ray soundtracks over HDMI at the highest bandwidth possible (up to 192 kHz or 7.1 channels) at the expense of other features. The lossless audio formats available on Blu-ray Discs, such as Dolby TrueHD, DTS-HD Master Audio and 7.1-channel PCM, exceed the capabilities of analog and optical/coaxial audio outputs. These formats are only available over HDMI, and only when using the BITSTREAM PASSTHROUGH mode. This setting turns off the analog and optical/coaxial outputs, and picture-in-picture audio cannot be heard. Table 2 shows behavior with the BITSTREAM PASS-THROUGH setting. Table 2 Outputs with the Bitstream Pass-through Audio Setting Audio Output Format HDMI Coax/Optical Analog CD PCM stereo PCM stereo Stereo DVD Source bitstream off off Blu-ray Disc Source bitstream off off Kaleidescape Part No. 101-0105-00 Rev 3 Page 76 Kaleidescape Installation Guide System Configuration In BITSTREAM PASS-THROUGH mode, optical/coaxial audio outputs are silent. 2. Configure the Number of audio channels. Select the audio capabilities of the receiver. (Option is available only if PLAYER DECODE is selected.) If the audio level for movies is lower for M-Class players than the audio level for music and there are only two speakers, set the number of audio channels to two. 3. If using a coaxial or optical connection, select the audio formats that the receiver supports. If the receiver connected to coaxial or optical does not support DTS Digital Surround or Dolby Digital, these soundtracks can be decoded by the player and stereo PCM output instead. The Audio receiver connected to optical/coax supports option is used when a receiver, processor or display using the coaxial or optical S/PDIF connection has limited audio format decoding capabilities. Most modern receivers and processors offer comprehensive audio format decoding, and so the default option can be used. But for more limited devices, audio can be sent as PCM stereo only, or as any format except DTS Digital Surround. 4. Select Show advanced audio settings to override automatic information provided via the HDMI EDID or adjust other settings. See Figure 4-10. Kaleidescape Part No. 101-0105-00 Rev 3 Page 77 Kaleidescape Installation Guide System Configuration Figure 4-10 Advanced Audio Settings for M500 and M300 Players a. Audio track for DVD movies Some DVDs have more than one version of the movie soundtrack in the preferred language. Select which audio format to use when these movies are played. b. HDMI capability override Audio receivers connected via HDMI automatically provide information via EDID used to determine the audio formats sent by Kaleidescape Part No. 101-0105-00 Rev 3 Page 78 Kaleidescape Installation Guide System Configuration the player to the receiver. In rare cases, these capabilities must be overridden because of an EDID that is inaccurate or has been corrupted by an HDMI extender or switcher. c. Stereo mode for movies Select whether PCM stereo audio from any output contains simple left and right channels, or contains additional channel information compatible with Dolby Surround decoders. If the output is connected to a sound bar or receiver capable of Dolby Surround / Pro Logic / Pro Logic II decoding, select DOLBY SURROUND. d. Select the audio dynamic range for movies. If the range between soft and loud sounds is too great, select ENABLE DRC. e. Click OK to save settings. Configuring M-Class Player Audio Behavior to Match 1080p Player Audio Behavior A 1080p Player sends stereo audio over analog, sends DVD source bitstream audio over optical/coaxial, and sends either of these two formats over HDMI, depending on the configuration setting. The default behavior of an M-Class player is similar to the 1080p Player audio for optical/coaxial and analog outputs; however, the DVD source bitstream is converted to up to 5.1-channel PCM over HDMI. If an attached HDMI device does not support 5.1-channel PCM, stereo audio is used. There is no new configuration setting to match exact 1080p Player audio behavior. Some audio configuration settings can be modified to resemble the volume levels and configuration settings of the 1080p Player more closely. • Number of audio channels can be set to Two-channel (always send stereo PCM). • Dynamic range preference for movies can be set to Enable DRC. Kaleidescape Part No. 101-0105-00 Rev 3 Page 79 Kaleidescape Installation Guide System Configuration Troubleshooting Audio Problems with M-Class Players Problem Action No audio over analog, 1. Play a CD, which always produces the stereo audio optical, coaxial, or HDMI output. If there is no output, check for a problem with connection cabling, audio receiver or processor, or television. 2. If the CD plays, but movie audio does not, verify that the PLAYER DECODE setting is selected in the audio settings. With this setting all audio outputs are active. DVD and Blu-ray Disc audio share the same setting. No audio over HDMI The BITSTREAM PASS-THROUGH setting (a) sends lossless audio formats, which may not be accepted by the attached equipment, and (b) does not play picture-in-picture audio. When PLAYER DECODE is selected, there is 5.1-channel PCM audio over HDMI for both DVD and Blu-ray movies. If the attached device does not support 5.1-channel PCM, at least stereo PCM can be heard. Kaleidescape Part No. 101-0105-00 Rev 3 Page 80 Kaleidescape Installation Guide System Configuration Video Settings for the Mini System and 1080p Player Figure 4-11 shows video configuration settings for the Mini System and 1080p Player. Figure 4-11 Video Settings for the Mini System or 1080p Player (top) 1. Select the Primary Video Output format from the drop-down menu. The primary video output is typically the output that connects the player to the primary display device (the display most watched). Default setting is HDMI. Kaleidescape Part No. 101-0105-00 Rev 3 Page 81 Kaleidescape Installation Guide System Configuration The player synchronizes audio and video for the primary video output, although all video outputs remain active. The video outputs cannot be controlled independently. 2. Select Video Mode from the drop-down menus. Video mode choices for other video outputs are automatically set depending on the primary video output selected and its video modes. Copy control restrictions forbid outputting DVD content at resolutions higher than 480p or 576p over component video outputs. Selecting the wrong primary video output or the wrong video modes can result in bad color, flickering, mismatched aspect ratio, or no picture at all Consult display documentation if necessary. Do not choose any video mode that the display does NOT support. For example, if the display does not support PAL video modes, select DO NOT PLAY for PAL media formats. If a user tries to play a PAL formatted movie, a message appears stating that the display does not support PAL format. The video modes for other video outputs are displayed below the dropdown menus. 3. Select How full-screen 4:3 movies will appear on a 16:9 display. Select the radio button to determine how movie appears on the screen. • DON'T STRETCH MOVIE - ADD VERTICAL BLACK BARS ON EITHER SIDE causes black bars to appear on the sides of a 4:3 image. • STRETCH MOVIE HORIZONTALLY TO FILL THE 16:9 SCREEN causes the image to fill the display screen but distorts 4:3 images. 4. Select How Letterboxed 4:3 Movies appear on 16:9 displays. Some 4:3 DVDs are letterboxed, containing black bars above and below the image to maintain the theatrical aspect ratio. When viewed on a widescreen display, black bars are sometimes added to the left and right of 4:3 DVDs, which can lead to black bars on all four sides of the image. The small image in the center of a black field is sometimes referred to as a “postage stamp” image. Click the radio button next to ZOOM to fit the display or ADD SIDEBARS. The ZOOM option fills the screen, but can lead to distortion. See Figure 4-12. Kaleidescape Part No. 101-0105-00 Rev 3 Page 82 Kaleidescape Installation Guide System Configuration Figure 4-12 Note: Letterbox Effect The movie player can only zoom letterboxed 4:3 movies recognized by the Kaleidescape Movie Guide. 5. Select Black Level for component video. Click the radio button next to 0 IRE BLACK LEVEL SETUP (recommended) or 7.5 IRE BLACK LEVEL SETUP. See Figure 4-13. Note: This setting only affects video displays that use component video as the primary video output. Figure 4-13 Video Settings for the Mini System or 1080p Player (bottom) 7.5 IRE black level refers to the EIA-770.1 video standard, which uses 7.5 IRE for black. This is sometimes referred to as standard black level. Kaleidescape Part No. 101-0105-00 Rev 3 Page 83 Kaleidescape Installation Guide System Configuration 0 IRE black level refers to the EIA-770.2 video standard, which uses 0 IRE for black and is referred to as darker or enhanced black level. The 0 IRE selection works well with most displays and processors. If this setting produces loss of detail in dark areas of the image, try 7.5 IRE instead. Note: If the display has been calibrated and the black level is changed, the display must be recalibrated for correct black and white levels. 6. Select Detail enhancement for HDMI video. Click the radio button next to NONE, LOW (default setting), MEDIUM or FULL. Either the movie player or video processor/scaler can add detail enhancement (influencing how sharp the edges of scaled video appear) to upscaled HDMI video output. If the video processor/scaler performs detail enhancement, select NONE. Otherwise, select a level that matches the type of the display. 7. Click OK to save settings. Audio Settings for the Mini System and 1080p Player Figure 4-14 shows the audio configuration settings for the Mini System. Figure 4-14 Audio Settings for the Mini System 1. Select type of preferred Audio for DVD Movies. Click the radio button next to DOLBY DIGITAL (default), DTS or PCM. Kaleidescape Part No. 101-0105-00 Rev 3 Page 84 Kaleidescape Installation Guide System Configuration Non-M-Class player optical and coaxial digital outputs are always active, regardless of any other settings. HDMI audio is only active if the HDCP handshake is successful. Analog stereo outputs are active for any audio except DTS Digital Surround. Audio from movies with any audio format is output over HDMI, optical and coaxial cables, and the audio system must do the decoding. Note: The movie player always outputs PCM audio when playing a CD. 2. Select the HDMI audio output preference. Select AUTO DETECT (default), MULTICHANNEL, or STEREO. This option is used to override the information automatically provided by the receiver via the HDMI EDID. 3. Click OK to save settings. Video Settings for the Movie Player and Movie Player 2 (KPLAYER-2000, KPLAYER-2500, KPLAYER-5000) Figure 4-15 shows video configuration settings for older Kaleidescape players. Note: Each category of options has an amber text help link. Kaleidescape Part No. 101-0105-00 Rev 3 Page 85 Kaleidescape Installation Guide Figure 4-15 Kaleidescape Part No. 101-0105-00 Rev 3 System Configuration Video Settings for Older Kaleidescape Players Page 86 Kaleidescape Installation Guide System Configuration 1. Select all the types of outputs that the display supports by checking the checkboxes. 2. Select native video modes for the displays from the drop-down menus. The native mode refers to the number of pixels in the display resolution. 3. Select Primary video output from the drop-down menu. 4. Select the video mode for each format from the drop-down menus. The video mode can be selected automatically or can be specified. When automatic is selected, the system selects based on the capabilities selected above. Specifying a mode is usually recommended. 5. Configure the letterbox display. Click the applicable radio button. 6. Select black level for component video. Click the applicable radio button. 7. Click OK to save settings. Audio Settings for the Movie Player and Movie Player 2 (KPLAYER-2000, KPLAYER-2500, KPLAYER-5000) See Audio Settings for the Mini System and 1080p Player on page 84. Language Settings A preferred language for movie playback can be configured for each player. 1. Select the LANGUAGE tab, then select the Preferred Language from the drop-down menu. See Figure 4-16. Figure 4-16 LANGUAGE Tab Settings If NONE is selected, movies play in the original language. If a language is selected, movies from a country that speaks the preferred language are played with the original soundtrack without subtitles. 2. For movies from countries that do not speak the preferred language, select whether or not to see subtitles or hear a soundtrack dubbed in Kaleidescape Part No. 101-0105-00 Rev 3 Page 87 Kaleidescape Installation Guide System Configuration the preferred language. (The disc must contain subtitles or an overdub soundtrack in the selected language for these options to be active.) 3. Click OK to save settings. Network Settings Kaleidescape components, by default, obtain IP addresses from a DHCP server. Use the following procedure if a static IP address must be set (used with control systems) or to change other network parameters. 1. Select the NETWORK tab. Information about the current network configuration for the component is displayed. See Figure 4-17. Figure 4-17 NETWORK Tab Settings 2. Most control systems that communicate via TCP/IP require a fixed address for each component connected to the control system. The safest and easiest way to do this is to create a DHCP reservation in the router and use the default Obtain IP configuration automatically setting. DHCP reservations help prevent duplicate addresses from being assigned, provide simple centralized management, and provide automatic updates when network settings change. Kaleidescape Part No. 101-0105-00 Rev 3 Page 88 Kaleidescape Installation Guide System Configuration With DHCP reservations, network parameters such as IP address, subnet mask, router IP, and DNS servers are configured in one place (at the DHCP server). If any of these parameters change, only the DHCP server has to be modified. For most installations, the DHCP server built into the router is perfectly adequate. DHCP reservations are usually made using MAC addresses. The procedure to create DHCP reservations is device-specific. Refer to the documentation for the router or DHCP server. If DHCP reservations are not an option, select Use the following IP configuration and manually enter the IP Address, Subnet Mask, Default Gateway, and DNS Servers. This information is required for interactive BD-Live features of Blu-ray Discs to operate correctly 3. For M-Class players, select the radio button to allow or deny Internet access through BD-Live. If not interested in chat, downloaded trailers, or other Internet features, or have privacy concerns, select DENY INTERNET ACCESS. 4. Click OK. Control Settings Use the following procedure to configure control settings. 1. Select the CONTROL tab. Figure 4-18 shows the control settings for a server. Figure 4-19 shows the control settings for a player. Figure 4-18 Kaleidescape Part No. 101-0105-00 Rev 3 CONTROL Tab Settings for Servers Page 89 Kaleidescape Installation Guide System Configuration Figure 4-19 CONTROL Tab Settings for Players 2. Select the appropriate serial port settings for the player from the drop-down menus. Table 3 shows server settings and default serial port settings for players. Server control settings cannot be changed but control software settings must match the server control settings. Table 3 Server Settings and Default Player Control Settings Server Player Baud Rate 115 200 19 200 Data Bits 8 8 Parity Bits none none Stop Bits 1 1 Flow Control none none 3. Select the Control Protocol Device ID from the drop-down menu. The Control Protocol Device ID (CPDID) allows indirect access to the Kaleidescape Part No. 101-0105-00 Rev 3 Page 90 Kaleidescape Installation Guide System Configuration Kaleidescape component through another component. This is called command routing. Assigning a unique device identifier allows a controller to communicate with multiple Kaleidescape devices with one connection. The only module provided by Kaleidescape that requires CPDIDs to be set is the AMX module. Other modules communicate directly with the player. Note: It is NOT usually necessary to connect a server to a control system. The server is generally used as a gateway to perform command routing to other devices with CPDIDs. When connecting a serial controller directly to a player or Mini System via an RS-232 control port, communication parameters must be set to match the serial controller. The M300 Player has no serial port but can be controlled directly via TCP/IP or IR, or a CPDID can be set for routing control protocol commands from another Kaleidescape component with a serial port. For detailed information about control protocol configuration, refer to the Kaleidescape System Control Protocol Reference Manual at www.kaleidescape.com/go/control-protocol. • Set the Control Protocol Device ID to NONE if control is linked directly to the player. • If command routing is used, select a number from the drop-down menu. 4. Select the infrared (IR) code set by selecting one or more of the checkboxes. Both the Kenwood and Toshiba options are selected by default to provide maximum flexibility when programming an IR remote. Click OK. To turn off a code set, uncheck the box and click OK. 5. Select IR remote behavior for the paging button by clicking one of the two radio buttons. Note: If the paging button behavior seems reversed, select the other option. Region Settings Blu-ray Discs Select the REGION tab to view the Blu-ray Disc region code of an M-Class player. See Figure 4-20. Kaleidescape Part No. 101-0105-00 Rev 3 Page 91 Kaleidescape Installation Guide Figure 4-20 System Configuration REGION Tab Settings M-Class players are shipped with Blu-ray Disc region A or region B. The Blu-ray Disc region code of an M-Class player cannot be changed by the end user or installer. Only Blu-ray Discs compatible with the region code can be played. Many Blu-ray Discs are region-free and can be played on any M-Class player. Kaleidescape does not recommend mixing players and discs with different Blu-ray regions in the same system because not all players would be able to play all Blu-ray movies. DVDs Most DVDs are authored for a specific region. Players must be set to the region required to import and play DVDs from the tray. Any player can play a movie from the server once it has been imported, regardless of the DVD region code. The DVD region is identified in the Region drop-down menu. See Figure 4-20. Players in the same system can be set to different DVD region codes. Use the following procedure to change the region setting to import a DVD from another region. 1. Insert a DVD from the region in the disc tray on Mini System or player. Kaleidescape Part No. 101-0105-00 Rev 3 Page 92 Kaleidescape Installation Guide System Configuration Note: When inserting a DVD from a different region, disable automatic tray ejection temporarily to keep the DVD in the player during the region change. Open the COMPONENTS tab of the browser interface and select DO NOT EJECT DISC from the When Import Finishes drop-down menu. Click OK to save changes. 2. Select the REGION tab. 3. Select the new required DVD region from the Region drop-down menu. Default is 1 - UNITED STATES, CANADA. 4. Click OK. Note: The region setting can only be changed four times. Therefore import all content from the same region at one time. The region setting does not have to be changed for playback from the server. Note: Direct playback DVDs (not imported into the system) only play if DVDs match the current region setting of the player. Screen Masking Movie players send control messages with aspect ratio and screen masking information to the control system every time a movie plays. Control systems use this information to position screen masks, engage special projection lenses, and adjust the aspect ratio mode of the display device. The player can be configured to ensure that masks do not cover any part of the onscreen display or subtitles (for DVDs). Note: If screen masking does not adjust for a movie, the movie might not be recognized by the Kaleidescape Movie Guide. Use the Kaleidescape loan process to send the disc for processing. For more information go to www.kaleidescape.com/loan. The Kaleidescape Movie Guide includes aspect ratio information for most movies. This information can be used by a control system to automate screen masking and anamorphic lens movement, to optimize the presentation of each movie. A small percentage of movies, including the Bluray release of The Dark Knight, has more than one aspect ratio within the feature. For these movies, the Movie Guide indicates a single aspect ratio so that none of the active image is cropped or projected into the masks. This method results in unmasked black bars during some of the movie, but avoids distracting lens or mask movement during the movie. • M-Class players feature only a 16:9 user interface. • Most home theaters with masking have constant image height masking. Use the following procedure to set screen masking options and subtitle repositioning Kaleidescape Part No. 101-0105-00 Rev 3 Page 93 Kaleidescape Installation Guide System Configuration 1. Select the SCREEN MASKING tab. See Figure 4-21. Figure 4-21 SCREEN MASKING Tab Settings 2. Select the type of screen masking on the display. Click on the appropriate radio button. a. Select DOES NOT USE SCREEN MASKING OR IT USES AUTOMATICALLY CONTROLLED SCREEN MASKING if the display uses an automatically controlled screen masking system. This option causes the player to reposition onscreen display elements only when the player receives control messages indicating that screen masking is being used. b. Select USES SCREEN MASKING THAT IS NOT AUTOMATICALLY CONTROLLED if screen masking is not automatically controlled. With this option, the player operates as if screen masking is present even without receiving a control message indicating masking is in use. 0 Select this option if the control system does not send messages to the player, even though the control system might be using messages from the player to control the screen masking. 0 This option is also appropriate for screen masking systems that are controlled manually or fixed to a certain aspect ratio. When the player is set to use screen masking not automatically controlled, the player always shows display elements within the movie image so that elements are not covered by screen masking. Kaleidescape Part No. 101-0105-00 Rev 3 Page 94 Kaleidescape Installation Guide System Configuration Note: For more information on programming a control system for automatic screen masking, refer to the control system documentation on www.kaleidescape.com/support/control-systems. 3. Select how to display subtitles when screen masking is used. Click on the appropriate radio button. DVDs often place subtitles below the movie image to avoid interfering with the movie image. Screen masking systems sometimes cover subtitles positioned below the movie image. (Unless configured for use with a screen masking system, the player does not change the position of subtitles. Subtitles appear in the original position.) a. Select POSITION DVD SUBTITLES WITHIN THE MOVIE IMAGE to cause the player to position subtitles within the movie image. With this option, subtitles can always be read even when part of the screen is covered by masking or cropped by a lens. b. Select LEAVE DVD SUBTITLES WHERE THEY ARE if the screen masking system is designed to leave room for subtitles at the bottom of the screen. Subtitles appear in the original position, which can place them below the movie image. Display elements continue to be placed within the movie image. Note: Subtitles can be repositioned only for DVD movies (not Blu-ray Discs). Note: Click the Help file link for screen masking to see pictorial examples. 4. Click OK. Viewing and Changing Groups When multiple Kaleidescape servers are on the same local subnet, servers first appear as individual systems. Each new server defines a group on a subnet. Servers on the same local subnet can be placed in groups to combine storage to form one movie and music library for players in the same group. Note: If there is only one group of servers, players automatically connect to that group even if not explicitly placed in a group. With multiple groups of servers, each component must be associated with a group after being added to the network and powered on. The front panel of a player glows amber until placed in a group with a server. Use the following procedure to configure groups. 1. Select the GROUPS tab. The Groups page displays all groups on the subnet. See Figure 4-22. Kaleidescape Part No. 101-0105-00 Rev 3 Page 95 Kaleidescape Installation Guide System Configuration Figure 4-22 Installer GROUPS Page 2. To add a component to a group, find the component, then select the group from the ADD TO GROUP drop-down menu. The page reloads and the component now has an amber REMOVE FROM GROUP link to remove the component from the group. 3. To remove a component from a group, click the REMOVE FROM GROUP link. The page reloads and the component now has a drop-down menu. When setting up multiple systems, be careful to select and add components to the correct groups. Assigning Bulk Loaders and Speed Readers to Groups If importing content with a Bulk Loader or Speed Reader, assign these components to the correct group. If these components are not in a group, the components cannot import content into a server. Viewing Diagnostic Information A Kaleidescape server periodically communicates with several Kaleidescape services. The Diagnostics page provides information to help verify that the server is correctly configured. Use the following procedure to view services information. 1. Select the DIAGNOSTICS tab. See Figure 4-23. Kaleidescape Part No. 101-0105-00 Rev 3 Page 96 Kaleidescape Installation Guide System Configuration Figure 4-23 Installer DIAGNOSTICS Page 2. Check Kaleidescape Services DNS Name Resolution to verify that the server can resolve the IP address for each Kaleidescape service listed. If not, change the network settings for the DNS server address. Note: If a time appears in the Last Success column, this is the time the server successfully identified the IP address of the service. 3. Check the Kaleidescape Services Summary for information about when the server last attempted and succeeded to use each service. Log Upload Sends information from the server to Kaleidescape for alerts, system dashboards, and improving Movie Guide information. Movie Guide Provides updated movie information, such as synopses, bookmarks, and cover art. Music Guide Provides updated music information such as album title, artist, genre, year of release, and cover art. Software Download Provides software updates. Time Synchronization Provides the current time. Version Query Indicates when a software update is needed. 4. Check the Duplicate IP Address Detection Summary to discover if any duplicate IP addresses are associated with Kaleidescape components. This condition must be corrected to prevent serious networking problems. 5. To resolve duplicate IP addresses, see Troubleshooting Problems with the Network on page 110. Kaleidescape Part No. 101-0105-00 Rev 3 Page 97 Kaleidescape Installation Guide Section 5 Control Systems Kaleidescape players support almost any control device. • • • • • • Infrared (IR) remotes Touch panels Computer with a web browser Web tablets One-way keypads iPhone or iPod software applications Kaleidescape provides control modules along with touch panel templates and sample programs for most leading control systems. Kaleidescape also provides databases and IR codes for popular IR remotes. For specific product support including modules and reference manuals, go to www.kaleidescape.com/support/control-systems. The following figures show examples of typical setups for Kaleidescape players and control devices. Display Remote Kaleidescape player Figure 5-1 Kaleidescape Part No. 101-0105-00 Rev 3 Kaleidescape Player and IR Remote Control Page 98 Kaleidescape Installation Guide Control Systems Touch panel Processor Display Router Kaleidescape player Figure 5-2 Kaleidescape Player and Touch Panel Web tablet Speakers Amplifier Wireless Router Kaleidescape player Figure 5-3 Kaleidescape Player and Web Tablet Communication A control device communicates with a Kaleidescape System using a simple text-based protocol over Ethernet or RS-232, or IR. Although connected to a single component, a control device can route messages to any Kaleidescape component using device ID numbers or serial numbers. IR control cannot be routed like serial and Ethernet commands. Control devices can use three types of control interfaces. 0 0 0 Ethernet RS-232 IR (one-way communication) Kaleidescape Part No. 101-0105-00 Rev 3 Page 99 Kaleidescape Installation Guide Control Systems Kaleidescape recommends using TCP/IP over Ethernet for control connection in most cases. TCP/IP over Ethernet has several advantages over RS-232. • • • • • • Enables significantly faster communications Provides error detection and correction Uses standard Cat5/5e/6 cable and pinout Allows longer cable run Requires only a single network port Usually requires no additional equipment or wiring Bandwidth can be a key issue, especially with multi-zone systems. Textbased feedback from several zones can cause noticeable response latency over an RS-232 connection. This is especially critical if controlling multiple Kaleidescape components through a single RS-232 port. If the controller does not support an Ethernet connection, an RS-232 connection can provide the same level of control. If the controller does not support either an Ethernet or RS-232 connection, IR can be used for oneway control. For more information on control connections, refer to the Kaleidescape System Control Protocol Reference Manual at www.kaleidescape.com/go/ control-protocol and the IR Hex codes at www.kaleidescape.com/go/ir-hex. Types of Control Devices Kaleidescape provides a wide range of templates, modules, and sample programs for control systems from several manufacturers. Some manufacturers also provide templates, modules and IR libraries to control Kaleidescape movie servers. Control devices can be simple IR remotes or touch panels. IR Remote Control The simplest control device is a generic IR remote control for a DVD player. Every M-Class player and Mini System comes with a Kaleidescape Remote. Insert the batteries that come with the remote; the remote does not have to be programmed. IR Code Sets The Kaleidescape movie player supports two major infrared remote control code sets. Kaleidescape Part No. 101-0105-00 Rev 3 Page 100 Kaleidescape Installation Guide Control Systems • Code set used by Toshiba DVD players and other manufacturers including Philips, Magnavox, Zenith, Onkyo, and Marantz • Code set used by Kenwood DVD players Types of Remotes IR remotes (other than the Kaleidescape Remote) fall into the following basic categories: • Pre-programmed • Learning • PC Programmable Pre-programmed Remotes Pre-programmed remotes only require setting the remote to control a Toshiba or Kenwood DVD player. Custom buttons that jump directly to Kaleidescape menu selections are not available. Learning Remotes Learning remotes can be used two ways: as a general remote with a Toshiba or Kenwood code set, or set to accept (learn) Kaleidescape-specific commands from a device that can generate these commands (for example, the Kaleidescape Remote). PC Programmable Remotes PC Programmable remotes can support commands specific to the Kaleidescape interface and provide a more complete experience. The manufacturer provides software that allows the remote to be programmed via a computer. This type of programming often allows IR codes to be imported in hex format (usually copying and pasting the codes into a text box), or from a Philips CCF file. For a list of all IR codes (in hex) or CCF format available from Kaleidescape, or for the CCF file, go to www.kaleidescape.com/go/ir. Templates are available for download for RTI, URC, and Elan remotes. Kaleidescape is also included in IR code database libraries for URC, Logitech Harmony and Opus. Computer with a Web Browser The Kaleidescape System can be controlled from a web browser using the control panels on the browser interface. Kaleidescape Part No. 101-0105-00 Rev 3 Page 101 Kaleidescape Installation Guide Control Systems Access the browser interface, go to the HOME tab, and select a player or music zone from the CONTROL PANELS section on the bottom right of the Home page. See Figure 5-4. Figure 5-4 Home Page of the User Pages of the Browser Interface Depending on the selection, the control panel for the onscreen display or music zone appears. Figure 5-5 shows the control panel for a player with an onscreen display. Figure 5-6 shows the control panel for a music zone without an onscreen display. Figure 5-5 Kaleidescape Part No. 101-0105-00 Rev 3 Onscreen Display Control Panel Page 102 Kaleidescape Installation Guide Control Systems Figure 5-6 Music Zone Control Panel Web Tablet Any Windows-based web tablet can be used as a dedicated Kaleidescape controller with the Web Tablet Setup program. This program prompts for information, then creates shortcuts on the Start Menu. The web tablet now displays the player control panel in full screen mode when turned on. For more information on web tablet control, go to www.kaleidescape.com/support/control-systems. Touch Panels Kaleidescape supports several variations of touch panel control. • Onscreen Display with Video • Onscreen Display without Video • Standalone music control interface for music zones Onscreen Display with Video Onscreen Display with Video (OSD Video) displays the Kaleidescape onscreen display on the touch panel, along with other controls, by using a video window on the touch panel. Touching the video display makes selections or navigates menus. OSD Video provides the richest user experience and is the implementation suggested by Kaleidescape whenever possible. See Figure 5-7. Note: Always use the connection that provides the highest signal quality. Fonts are small and hard to read if using composite video connections. Kaleidescape Part No. 101-0105-00 Rev 3 Page 103 Kaleidescape Installation Guide Figure 5-7 Control Systems Example Onscreen Display with Video Onscreen Display without Video Onscreen Display without Video (OSD No Video) provides supplemental information with text-based details for content. The touch panel replicates the details pages for movies or albums while browsing the onscreen display. See Figure 5-8. Figure 5-8 Kaleidescape Part No. 101-0105-00 Rev 3 Example Onscreen Display without Video Page 104 Kaleidescape Installation Guide Control Systems Standalone Control for Music Zones The standalone music control interface for music zones provides text-based music controls on touch panels in rooms without video displays (e.g., hallways). A user can browse and control music playback. See Figure 5-9. Figure 5-9 Example Music Control Interface When selecting the touch screen for an installation, consider whether a video display is present and the technical capabilities of the touch panel. Installations can require more than one type of touch panel interface to provide the best control for every zone. For more information, go to www.kaleidescape.com/support/control-systems. Keypad Control for Music In-wall keypads are convenient for music zones that have no video display and no touch panel. There are two types of keypad control. 0 Keypad presets With keypad presets, a keypad can be programmed to play a music selection. Presets can be set to behave like car radio buttons. Press and hold to store, then press to recall. 0 Music collections With music collections, a keypad can be programmed so users can cycle through music selections within a music collection. This interface enables cycling through any collection by using the NEXT and PREVIOUS buttons. Kaleidescape Part No. 101-0105-00 Rev 3 Page 105 Kaleidescape Installation Guide Control Systems An installer can program a keypad to control music on a Kaleidescape System as long as the keypad can send a programmer-defined string over RS-232 or TCP/IP. Kaleidescape also provides keypad control modules for several manufacturers that can be downloaded from the Kaleidescape website. Note: The keypad must be able to send a programmer-defined string. Presets cannot be triggered via IR. For more information on keypad control commands, refer to the Kaleidescape System Control Protocol Reference Manual at www.kaleidescape.com/go/control-protocol. iPhone or iPod Software Applications Remotescape Inc., has developed an iPhone and iPod touch application specifically designed to provide remote control for the Kaleidescape System. The Remotescape application brings the Kaleidescape Experience to the familiar iPhone interface. Kaleidescape Part No. 101-0105-00 Rev 3 Page 106 Kaleidescape Installation Guide Chapter 6 Troubleshooting Preparation The following tools are recommended: 0 0 0 0 A laptop with an Ethernet port and a serial port A router with at least four ports At least three tested Cat5e or Cat6 patch cables Null modem serial cable The following equipment is optional, but useful and can save time. • Kaleidescape Remote • Blu-ray Disc, DVD and CD • Portable display • AC Socket tester The following information and access can be required to troubleshoot Kaleidescape Systems. • Serial number of at least one component in the Kaleidescape System, preferably the server • Access to the back of the Kaleidescape equipment Troubleshooting Guide The following tables provide information to troubleshoot most common problems encountered during installation. Table 1 Troubleshooting Power Table 2 Troubleshooting Amber Lights Table 3 Troubleshooting Problems with the Network Table 4 Troubleshooting Problems with the Browser Interface Table 5 Troubleshooting Problems with Imports Table 6 Troubleshooting Problems with Audio & Video Table 7 Troubleshooting Parental Control Table 8 Troubleshooting Kaleidescape Conductor Kaleidescape Part No. 101-0105-00 Rev 3 Page 107 Kaleidescape Installation Guide Troubleshooting Troubleshooting Power Problem Probable Cause The front panel does not glow when power is applied. Check that the power source is turned on and 1. Power source is not turned on or there is a power cables are secure. Verify the socket is live by using a socket tester. loose power connection. 2. The component is in standby mode. Solution Use the ON button on a remote control to exit standby mode and turn on the player. If a remote is not available, press the POWER button on an M500 Player, Music Player, Mini System, 1U Server or 3U Server. 3. No contact between front panel and chassis. Clean contacts and reseat the front panel. Press the POWER button to verify that the front panel is not defective or that contacts have failed. Troubleshooting Amber Lights Problem Probable Cause Solution Front panel glows amber, and the network link and activity status lights are not on. Component is not connected to network. • Verify that Ethernet cables are properly terminated. Check that correct connector is used with the cable type (stranded or solid conductor). • Verify that Ethernet cables are connected to a switch. • Check that the switch is turned on and functioning properly. Disk cartridge blue status light blinks. This indicates the hot spare in a 3U server. The front panel glows 1. Component network connection is not amber, and network full-duplex or at least link and activity status 100Base-TX. lights are on. 2. Component cannot contact a network DHCP server. Kaleidescape Part No. 101-0105-00 Rev 3 This is normal operation. Check that the component is connected to a fullduplex 100Base-TX or 1000Base-T switch. Hubs and half-duplex switches are not supported. If used, expect degraded performance or no playback at all. Verify that the network DHCP server is functioning properly. Page 108 Kaleidescape Installation Guide Problem Troubleshooting Probable Cause Solution The front panel glows 3. There are no available DHCP addresses. amber, and network link and activity status lights are on. Configure the network DHCP server with larger IP address range. Disk cartridge status light glows solid amber. Turn off the server, wait 30 seconds for the drive to spin down, then check for sticking latch and reseat the disk cartridge. Be sure the disk cartridge is completely seated, then turn the server back on. 1. Disk cartridge is either not seated properly, latch is sticking, or is failing. Be sure DHCP address pool is large enough and does not overlap devices with static IP addresses. Note: If the latch sticks, see article at www.kaleidescape.com/go/latch. If the status light remains amber or unlit after other drives light, the disk cartridge is probably defective and must be replaced. Contact Kaleidescape Support. 2. Disk cartridge was previously used in another server. A complete set of disk cartridges can be moved from one server to another server, provided both servers use the same type of disk cartridge and there are enough slots in the destination server for all of the disk cartridges. 3. Transport disk has completed importing content. Remove transport disk. Disk cartridge status light flashing amber. Replace the hot spare with a drive with equal or The hot spare does not have enough capacity to greater capacity than the largest drive in the file replace at least one of the system. drives. Disk cartridge status light does not come on. Disk cartridge is either not Turn off the server, wait 30 seconds for the drive to spin down, reseat the disk cartridge, then turn seated properly or is the server back on. failing. If the status light remains unlit after other drives light, contact Kaleidescape Support. Server front panel alternates between amber and blue. Network problem. Kaleidescape Part No. 101-0105-00 Rev 3 Contact Kaleidescape Support. Page 109 Kaleidescape Installation Guide Troubleshooting Troubleshooting Problems with the Network Problem Probable Cause Solution Network status lights are not on. 1. Component has not finished the boot process. Wait two minutes for component to finish booting. If the component does not boot, contact Kaleidescape Support. Indicators that boot process is complete: • 5U Server - disk cartridge status lights all on • 3U Server - disk cartridge status lights all on and hot spare blinks • 1U Server - disk cartridge status lights all on • Mini System - disk cartridge status lights all on • When booting a server, the disk cartridge status lights come on in a sequential pattern. When the boot completes, the front panel blue glow dims. 2. Network cable is defective or not connected. Check cable termination and seating. Check with known good network cable. 3. Switch port is faulty. Reboot the switch. Test with a known good switch. Move cable to known good port. A simple router can be a good tool for diagnostics. Use the router and bypass the home network to determine that the Kaleidescape System works correctly. Then proceed with network troubleshooting. 4. Server is powered off. Turn server on. Component does not 1. Component is powered Turn component on. show up on off. COMPONENTS tab of 2. Network cable is not Check cable termination and seating. the browser interface. connected properly. 3. More than one DHCP server is issuing IP addresses. Verify that there is only one DHCP server on the network. 4. No DHCP server or no Verify there is a DHCP server and that the DHCP available IP addresses. server has available IP addresses in the DHCP range. (The DHCP server is usually in the router.) Kaleidescape Part No. 101-0105-00 Rev 3 Page 110 Kaleidescape Installation Guide Problem Troubleshooting Probable Cause Component does not 5. Incorrect network settings. show up on COMPONENTS tab of the browser interface. Solution • Make sure all settings are correct. Check the list of Kaleidescape devices by entering my-kaleidescape/lskd.html into the browser. This procedure will confirm if the IP address settings are correct. • Network settings might have to be changed through the serial port. Refer to the article at www.kaleidescape.com/go/set-networksettings. 6. Network divided with VLANs. Check network settings to make sure all Kaleidescape devices are on the same segment (or VLAN). 7. Incorrect KEAOS version. KEAOS 4.0.0 or better is required for M-Class players. Note: To find current version, refer to the article at www.kaleidescape.com/go/keaos-version. 8. Duplicate IP address. • Check on DIAGNOSTICS tab for duplicates. • Change the IP address on the device causing the conflict. This device is very likely newly added to the network. For example, a new print server is added to the network at the same address as a Kaleidescape component. 9. Components not assigned to the same group. Verify that components are properly assigned to groups. Open the installer pages of the browser interface and select the GROUPS tab, then verify that groups are assigned correctly. 10. Managed switch configuration. Verify that ports are set up correctly in the switch configuration. Onscreen display error 1. Insufficient bandwidth Test by playing back Kalahari, One Six Right, or a for playback Blu-ray movie, as this content requires the most message. bandwidth. “This player cannot access your library. Check that all 2. Faulty switch/router components are 3. Using a hub running and your network is functioning 4. Bad import properly.” 5. Network cable Kaleidescape Part No. 101-0105-00 Rev 3 Verify that wiring and switch are 1000Base-T. Fix or replace switch. Replace hub with 1000Base-T switch. Check to see if playback stops at the same point in a movie every time. If this is the case, delete the movie (use the browser interface to put the movie into the trash can, then delete permanently), and re-import. Check for poor termination. Page 111 Kaleidescape Installation Guide Troubleshooting Problem Probable Cause Server is offline/not communicating with Kaleidescape. 1. Internet connection is Contact the Internet service provider. down. 2. Incorrect DNS Solution Change to a valid DNS server. 3. MTU (Maximum This setting can usually be changed in the Transmission Unit) size router. 4. Incorrect or missing network settings (default gateway, subnet mask, DNS servers) Use DHCP reservations instead of static IP address, or connect a laptop wired to the same cable as the server and verify the laptop can access the Internet. Get the network settings for the laptop using the ipconfig command in the command prompt screen (Start, Run, Command). Use the default gateway, subnet mask, and DNS servers listed for the Kaleidescape server on the COMPONENTS page of the browser interface. If using a Mac, use ifconfig in a terminal window. 5. Server not powered on. Power on the server. If the server does not appear to be booting, retrieve diagnostic information from the server and send to [email protected]. Refer to the Quick Reference Guide at www.kaleidescape.com/go/diagnostic-info. 6. Server cannot boot. Retrieve diagnostic information from the server and send to [email protected]. Refer to the Quick Reference Guide at www.kaleidescape.com/go/diagnostic-info. Connection is half-duplex. 100Base-TX connection established between 1000Base-T components. 7. Router is faulty or powered off. If the router is powered on, try resetting. If the router comes on, but the problem reappears frequently, the router should be replaced. 1. Hub used Replace hub with 1000Base-T switch. 2. Using incorrect network cable Check that Cat5e or Cat6 cables are used for all network connectors. 3. Switch is set up incorrectly. If the switch is managed, verify that all ports are set to allow for a 100Base-TX/1000Base-T fullduplex connection. Not all pairs were used when terminating the Cat5e/Cat6 cable. Terminate using all eight wires. A 1000Base-T connection requires that all 4 pairs be terminated. Kaleidescape Part No. 101-0105-00 Rev 3 Page 112 Kaleidescape Installation Guide Troubleshooting Problem Probable Cause Solution Duplicate IP address 1. The static IP address assigned is within the DHCP range. Either change the DHCP range on the DHCP server (usually the router), or change the static IP address to be outside the range. Be careful not to set IP address to the same IP address as another static device. 2. Two DHCP servers on the same network. Eliminate one of the DHCP servers or consult an IT professional to ensure the network is configured properly. 3. Two devices assigned the same static IP address. Change the IP address on the device causing the conflict. This device is very likely newly added to the network. Cannot resolve 1. Incorrect DNS setting hostnames with DNS. 2. DNS server is not resolving correctly. Change DNS setting to a known good setting. Network setting Disc menu does not recognize the player connection to the Internet when trying to use BD-Live. Open the browser interface, select the COMPONENTS tab, click the SETTINGS button for the M-Class player, select the NETWORK tab. Verify that ALLOW INTERNET ACCESS is selected. If a static IP address is set, verify the default gateway, subnet mask, and DNS servers. Note: Check DIAGNOSTICS tab to identify duplicates. Kaleidescape Part No. 101-0105-00 Rev 3 Change DNS setting to a known good setting. Page 113 Kaleidescape Installation Guide Troubleshooting Troubleshooting Problems with the Browser Interface Problem Probable Cause Solution Cannot access the browser interface. 1. Server is not powered on. Verify that the server is powered on. 2. Not using the correct For Mac, use access URL for a Mac. http://my-kaleidescape.local or http://my-kaleidescape.local/installer or ks- followed by the server twelve-digit serial number; for example, http://ks-00001000040b.local/installer or use the IP address of the server found on the System Summary page on the onscreen display. Note: If browser interface still does not appear, see Accessing the Browser Interface on page 63. 3. The network connection is failing for the computer or server. Check network connections for the computer and the server. Connect a laptop to each cable and open a different web page (so page is not loaded from cache). If the page fails to load, troubleshoot the network. 4. Network is set up so that System URL on the Kaleidescape browser interface cannot be opened. Refer to Network Requirements on page 156 for instructions on checking and updating computer network settings to allow the web browser access to a Kaleidescape system. or Use the IP address of the server found on the System Summary page on the onscreen display. 5. Server connected to a Use a switch to connect the server to the site network, or connect the PC to the router. router that hides the server from the PC. When trying to access the browser interface, redirected to Kaleidescape website or get 404 error. NetBIOS is required to view the URL http://my-kaleidescape but is frequently blocked by firewalls and other protective software. Kaleidescape Part No. 101-0105-00 Rev 3 Use the IP address of the server as address for the browser interface. For example, if the server IP address is 172.16.31.1, access the browser interface at http://172.16.31.1. The simplest method to get the current IP address of the server is look at the System Summary on the onscreen display. If using DHCP, this IP address can change over time. See Network Requirements on page 156. Page 114 Kaleidescape Installation Guide Problem Troubleshooting Probable Cause Information in browser 1. Multiple Kaleidescape interface does not Systems are set up on match the system. the local network and using the same System URL. Solution Use address http://ks-[server_serial_number]/installer to open the installer pages of the browser interface, select the PREFERENCES tab to change the System URL. Note: If NetBIOS does not resolve, use the server IP address. 2. Components are not powered on and therefore do not appear on browser interface. Check power and connectivity. 3. There are multiple Kaleidescape servers and groups are assigned incorrectly. Verify the group assignments on the GROUPS tab on the browser interface. Control panels in the Latest version of Java is browser interface do not installed. not control the player. Browser interface is running slowly. Enable Java in the web browser or go to www.java.com to download the latest version. The download process verifies that Java is running and installed before updating. Mismatched IP addresses Open the COMPONENTS tab in the browser interface, click the SETTINGS button for the component, select NETWORK tab and make settings changes, then reboot the applicable component. Browser interface will load slowly until the change takes place; however, loading http://my-kaleidescape/lskd.html will not be slow. Use this page to verify the settings of each Kaleidescape components. Kaleidescape Part No. 101-0105-00 Rev 3 Page 115 Kaleidescape Installation Guide Troubleshooting Troubleshooting Problems with Imports Problem Probable Cause Solution CD, DVD or Blu-ray Disc fails to import (possibly ejecting). 1. Disc is not a CD, DVD or Blu-ray Disc, contains computer data, or was inserted with label down. Verify that the disc is a movie or album and is face up in the tray. IMPORT tab message: “Disc is not a DVD or music CD” 2. Disc has already been Movie or album has already been imported. If imported not on the list view, check the trash can and parental control settings. IMPORT tab message: “Disc already imported” 3. Disc is dirty, scratched, or flawed. Check the disc for surface defects and clean if necessary. IMPORT tab message: • Clean disc by wiping from the center of the disc outward. Do NOT wipe around the “Problem reading disc” surface in a circular motion. • Try another copy of the movie or album. 4. Server has a failed disk drive or is rebuilding the disk array. Imports are disabled during a rebuild. • Check the browser interface to see if a disk is rebuilding. • A rebuild can take 24–48 hours depending on the amount of content on the drive. Confirm that the browser interface does not show that a drive is rebuilding or a drive is missing or failed, then try importing content. 5. Disc import is disabled Open the COMPONENTS tab in the browser for a player. interface. Change the Import setting to allow imports. 6. System is not licensed Contact Kaleidescape Support for movie and music license information. for both movies and music. 7. Server is full. Go to the HOME page of the browser interface or System Summary on the onscreen display to check available capacity of the server. 8. Drive failure. Contact Kaleidescape Support. Kaleidescape Part No. 101-0105-00 Rev 3 Page 116 Kaleidescape Installation Guide Troubleshooting Problem Probable Cause Solution CD, DVD or Blu-ray Disc fails to import (possibly ejecting). 9. Disc is poorly authored. • Use the Kaleidescape loan process to send the disc for processing. For more information go to www.kaleidescape.com/loan. • See list of poorly authored DVDs at www.kaleidescape.com/go/poorly-authoreddvds. 10. Disc cannot be imported. IMPORT tab message: “DVD/Blu-ray Disc cannot be imported” 11. Server restarted Use the Kaleidescape loan process to send the disc for processing. For more information go to www.kaleidescape.com/loan. Try importing again. IMPORT tab message: “System restarted during import” 12.DVD region does not match the region setting of the player. Change DVD region setting for the player. Open the COMPONENTS tab in the browser interface, click the SETTINGS button for the IMPORT tab message: player, select the REGIONS tab, and make region settings change to match the region on “Disc is a region xx the DVD. DVD” Region Setting Can Only Be Changed 4 Times. Note: If content from two regions is imported frequently, use two players, each set to a different region. The TV must support the output format of the disc to play the content, PAL or NTSC. (Blu-ray Discs for any region can be imported with any player; however only discs from the region that matches the player can be played. This is the opposite from DVD. With DVD, the region code must match the player to import a DVD. Once imported, the disc can be played from any player, regardless of the region code.) 13.Blu-ray Disc is not encrypted. M-Class players can play but cannot import nonAACS content at this time. 14. Blu-ray Disc contains AVCHD content. M-Class players cannot play AVCHD content at this time. 15. User ejected the disc. Some imports take a long time because of the authoring method. Try importing again and leave IMPORT tab message: in the tray until import is complete. “Eject button pressed” Kaleidescape Part No. 101-0105-00 Rev 3 Page 117 Kaleidescape Installation Guide Problem Troubleshooting Probable Cause 1. Network fault between DVD import takes player and server. longer than about 30 minutes per disc or Blu-ray Disc takes 2. DVD is poorly longer than about authored. 60 minutes per disc (average speed). 3. Disc is dirty, scratched, or flawed. Solution Verify there are no network disconnects or faulty Ethernet cables and slow switches, and that the network is active. These DVDs can take several hours to import. Do not eject the disc until the import is complete. If ejected prematurely, all import progress is lost. Check the disc for surface defects and clean if necessary. IMPORT tab message: • Clean disc by wiping from the center of the disc outward. Do NOT wipe around the “Problem reading disc” surface in a circular motion. • Try another copy of the movie or album. 4. Too much network traffic. • If the server network connection is operating at 100Base-TX, stop movie playback from some players or stop importing some DVDs. • Put the M-Class player and server on a 1000Base-T network to improve Blu-ray import speed. Import fails with a Bulk Loader or Speed Reader. 1. Bulk Loader does not support the disc format. Try the disc in a different Kaleidescape component. 2. Changer must be reset. Reset the changer. See the article at www.kaleidescape.com/go/reset-bulk-loader. 3. Import stopped after an hour on the Speed Reader. Disc was poorly authored. Try importing again with the timeout set to 6 hours, or try importing with a different Kaleidescape component. IMPORT tab message: “Import skipped after 1 hour” Kaleidescape Part No. 101-0105-00 Rev 3 Page 118 Kaleidescape Installation Guide Troubleshooting Troubleshooting Problems with Audio & Video Problem Probable Cause Solution No audio 1. Audio cables loose or disconnected. Check audio cable connections and terminations. 2. Wrong audio source selected Verify that the audio system is set to play Kaleidescape audio. • Use one of the multichannel audio outputs 3. Playing back a DTS (optical, coaxial, or HDMI connected to audio track with a multichannel receiver) non-M-Class player while using the stereo If using HDMI and connected to analog outputs or multichannel receiver, set HDMI audio HDMI output preference to MULTICHANNEL. • Or set the preferred audio track to something other than the DTS. Open the COMPONENTS tab in the browser interface, click the SETTINGS button for the component, select the AUDIO tab, and make audio settings changes. 4. Error in the control system programming If using a controller with the Kaleidescape system, check controller programming and connections. 5. Home-authored content Some home-authored content can contain video but no audio. Refer to the article at www.kaleidescape.com/go/home-movies. 6. Using optical, coaxial, • Open the COMPONENTS tab in the browser or analog output for an interface, click the SETTINGS button for the M-Class player when M-Class player, select the AUDIO tab, and playing a movie, and set the HDMI audio decode mode to HDMI audio decode PLAYER DECODE. mode is set to • Listen to audio through the HDMI BITSTREAMconnection. PASSTHROUGH No audio in multiple zones 1. Zones not set correctly Verify that the zone to be controlled is the zone that is actually being controlled. 2. Using optical coax, or analog output of an M-Class player when playing a movie and HDMI audio decode mode is set to BITSTREAMPASSTHROUGH Kaleidescape Part No. 101-0105-00 Rev 3 • Open the COMPONENTS tab in the browser interface, click the SETTINGS button for the player, select the AUDIO tab, and set the HDMI audio decode mode to PLAYER DECODE. • Listen to audio through the HDMI connection. Page 119 Kaleidescape Installation Guide Problem Troubleshooting Probable Cause Audio level for movies Setting for number of too low audio channels is incorrect No video Solution If using two speakers with an M-Class player, set the number of audio channels to two channels. Open the COMPONENTS tab in the browser interface, click the SETTINGS button for the player, select the AUDIO tab, and make AUDIO settings changes. 1. Video cables are loose Check video cable connections. HDMI cables or disconnected and related components are a common source of problems. Use known good display to verify the cable connection and signal from the player. 2. Display does not Check the video modes supported by the support current player display. output. Open the COMPONENTS tab in the browser interface, click the SETTINGS button for the component, select the VIDEO tab, and make VIDEO settings changes to a supported video mode. 3. Static IP on player A player set to a static IP address can have a does not match the IP blue glow indicating the player is on the same range of the server. network as the server but can be on a different subnet. Refer to article at www.kaleidescape.com/go/link-local. 4. Onscreen display but no video playback Test the Kalahari HD movie playback. This film is HD but has no HDCP protection. If Kalahari plays back, then the problem is an HDCP issue. The Kaleidescape player likely cannot communicate with the display to verify that content playback is allowed. See the article at www.kaleidescape.com/go/troubleshootingvideo. 5. Home-authored content Home-authored content which does not follow Kaleidescape guidelines might import but can fail to play back. Refer to the article at www.kaleidescape.com/go/home-movies. 6. Player is not on the network or not making a connection with the server. There is no video from a non-M-Class player without a network connection to the server. Follow the troubleshooting steps above. Use known good display to verify the cable connection and the signal from the player. 7. Wrong source selected. Verify the source setting is correct on the display, switcher, A/V receiver, or A/V processor. Kaleidescape Part No. 101-0105-00 Rev 3 Page 120 Kaleidescape Installation Guide Troubleshooting Problem Probable Cause Solution Video appears distorted or compressed. Display aspect ratio not set properly Stop playback. • Open the COMPONENTS tab in the browser interface, click the SETTINGS button for the component, select the VIDEO tab, and check the media format playback options. • Check the aspect ratio settings on the display device or scaler. Video stalls or stutters. 1. Fault in network path between player and server Verify there are no network disconnects or faulty Ethernet cables and slow switches, and that the network is active. Note: Does not apply to a Mini System with no external players. 2. Too much network traffic on a 100Base-TX network A Kaleidescape server supports simultaneous DVD playback for up to seven players or import for up to three DVDs on a 100Base-TX Ethernet connection. Only one Blu-ray movie can be played from a server using a 100Base-TX connection. Turn off some players, or stop importing some movies, or connect the server to a 1000Base-T Ethernet connection (cable and switch). 3. HDMI handshake problem Verify integrity of cables and check connections. Bypass any switchers, baluns, A/V receivers, or A/V processors, and go directly to display. A good test is to connect directly to a known good display and verify stalling does not occur. Troubleshooting Parental Control Problem Probable Cause Solution Movies are missing from display. Parental control is active. Check the default parental control level of the player. If the player is set to an undesired level this problem will continue until this setting is changed. Change to appropriate level. Enter a passcode if necessary. Movie is in the trash can. Open the MOVIES tab in the browser interface and remove movie from the trash can. Kaleidescape Part No. 101-0105-00 Rev 3 Page 121 Kaleidescape Installation Guide Cannot enter the passcode. Troubleshooting Remote is not programmed correctly. Program the remote correctly. Kaleidescape components can be programmed with IR codes for a standard Toshiba or Kenwood DVD player. Numeric keypad is not Keypad was not added to showing up on the the template. touch panel. Add keypad to the touch panel template. Parental control is not Default level is set working on a specific incorrectly for that player. player. Check the PARENTAL CONTROL tab on the browser interface to verify that the player is set to the correct level. If AUTOMATIC SAFE LEVEL is selected, the default rating will be displayed in the paragraph on the bottom right of the page. After entering the 1. Wrong passcode passcode, movies are still missing. Try again. 2. Time out exceeded Parental control menu Restricted content is selected to be hidden. in onscreen user interface does not list restricted content. Note: A forgotten passcode can be changed on the PARENTAL CONTROL tab without knowing the old passcode. Enter the passcode again or extend the timeout on the browser interface. Enter the passcode from any screen on the onscreen display even if the option is not visible. Cannot determine rating for a movie to make sure the movie is hidden for certain ratings. Movie is unrecognized and Temporary solution is edit the rating manually does not have the correct from the MOVIES tab. rating. Permanent solution is to use the Kaleidescape loan process, see www.kaleidescape.com/loan. Cannot block adult content. Confusion with how to set 1. Open the PARENTAL CONTROLS tab on the up just two levels of browser interface. parental control when four 2. Set a passcode for Restricted content and levels are available. set the rating to all movies. 3. Next set the rating for The main library to the acceptable movie rating for the whole family. 4. Click OK. If the players are set to Automatic Safe Level, this procedure works for a simple two-level configuration. Kaleidescape Part No. 101-0105-00 Rev 3 Page 122 Kaleidescape Installation Guide Troubleshooting Troubleshooting Kaleidescape Conductor Problem Probable Cause Conductor does not connect. 1. Computer name is too Check computer properties and verify that the long. computer name is 14 characters or less. Change the name if necessary. 2. NetBIOS problem. Solution • See Network Requirements on page 156. • Contact Kaleidescape Support. Conductor does not work on the Mac. This configuration is not supported. Conductor is not supported on a Mac. However a Windows emulator such as Parallels Desktop can be used. If an emulator is used, the Windows version of iTunes must be installed because Conductor does not sync with the Mac version. Cannot sync Conductor on a VLAN through a second router. Computer uses NetBIOS and NetBIOS does not work across VLANs. Kaleidescape Part No. 101-0105-00 Rev 3 Connect computer to the same LAN as the server. Page 123 Kaleidescape Installation Guide Appendix A Product Specifications Kaleidescape 1U Server, Model KSERVER-1500 Dimensions: 17.5 in. × 1.7 in. × 18.8 in. (W × H × D) (44.5 cm × 4.3 cm × 47.8 cm) • 1 rack unit • Front panel protrudes 1 in. (2.5 cm) Weight: • 15.0 lbs (6.8 kg) with no disk cartridges installed • 24.0 lbs (10.9 kg) with four 2 TB Disk Cartridges installed Disk Cartridges • KDISK-2000-L: 2.2 lbs (1.0 kg) • KDISK-BLANK-L: 0.35 lbs (0.16 kg) • KDISK-1000-L: 2.0 lbs (0.9 kg) • KDISK-750-L: 2.0 lbs (0.9 kg) • KDISK-250-L: 2.0 lbs (0.9 kg) Ventilation: • Minimum 1 in. (2.5 cm) ventilation space at the front • Note: Make sure rack or other doors do not reduce the 1 in. (2.5 cm) air space required at the front of the chassis. Storage: • One 2 TB Disk Cartridge for data protection (RAID-K parity) • Each additional 2 TB Disk Cartridge stores 50 Blu-ray Discs, 300 DVDs, or 3,300 CDs • Expandable to four 2 TB Disk Cartridges for a maximum of 6 TB data storage (150 Blu-ray Discs or 900 DVDs) • More servers can be added to provide thousands of movies and albums in one library Power: • 100–240 V, 50–60 Hz, universal input • 66 W typical (86 W max) consumption with four 2 TB Disk Cartridges installed • 72 W typical (112 W max) consumption with four 250 GB, 750 GB or 1 TB Disk Cartridges installed Environment: Operating temperature: 41°F to 86°F (5°C to 30°C) Storage temperature: -4°F to 140°F (-20°C to 60°C) Relative humidity: 5% to 90% non-condensing Maximum operating altitude: 10,000 ft (3000 m) Heat output: • 2 TB Disk Cartridges 290 BTU/hr (86 W) 250 GB, 750 GB or 1 TB Disk Cartridges 382 BTU/hr (112 W) Minimum 2 in. (5 cm) ventilation space at the rear Bandwidth: • Serves DVD movies or music to up to 45 zones simultaneously • Serves Blu-ray movies to up to 5 zones simultaneously • 4 simultaneous imports Connections: • 100Base-TX/1000Base-T Ethernet (RJ45) • RS-232 for control systems (DB-9 male) • Two USB 2.0 (reserved) Certifications: • CSA (IEC 60950-1:2001, CSA 60950-1-03) • FCC Class B • GOST R • CE • RoHS compliant Airflow: 10 CFM (17 m3/hr) min Kaleidescape Part No. 101-0105-00 Rev 3 Page 124 Kaleidescape Installation Guide Product Specifications Kaleidescape 3U Server, Model KSERVER-5000 Dimensions: 17.5 in. × 5.2 in. × 19.3 in. (W × H × D) (44.5 cm × 13.2 cm × 49.0 cm) • 3 rack units • Front panel protrudes 1.1 in. (2.8 cm) Weight: • 29.0 lbs (13.2 kg) with no disk cartridges installed • 59.0 lbs (26.8 kg) with fourteen 2 TB Disk Cartridges installed Disk Cartridges • KDISK-2000-L: 2.2 lbs (1.0 kg) • KDISK-BLANK-L: 0.35 lbs (0.16 kg) • KDISK-1000-L: 2.0 lbs (0.9 kg) • KDISK-750-L: 2.0 lbs (0.9 kg) • KDISK-250-L: 2.0 lbs (0.9 kg) Ventilation: • Minimum 1 in. (2.5 cm) ventilation space at the front • Note: Make sure rack or other doors do not reduce the 1 in. (2.5 cm) air space required at the front of the chassis. Storage: • Two 2 TB disk cartridges for data protection (RAID-K parity and hot spare) • Each additional 1 TB disk cartridge stores 25 Blu-ray Discs, 150 DVDs, or 1,650 CDs • Each additional 2 TB disk cartridge stores 50 Blu-ray Discs, 300 DVDs, or 3,300 CDs • Expandable to fourteen 2 TB Disk Cartridges for a maximum of 24 TB data storage (600 Blu-ray Discs or 3,600 DVDs) • More servers can be added to store thousands of movies and albums in one library Power: • 100–240 V, 50–60 Hz, universal input • 183 W typical (205 W max) consumption with fourteen 2 TB Disk Cartridges installed • 199 W typical (270 W max) consumption with fourteen 750 GB or 1 TB Disk Cartridges installed Environment: Operating temperature: 41°F to 86°F (5°C to 30°C) Storage temperature: -4°F to 140°F (-20°C to 60°C) Relative humidity: 5% to 90% non-condensing Maximum operating altitude: 10,000 ft (3000 m) Heat output: • • 750 GB or 1 TB Disk Cartridges 921 BTU/hr (270 W) 2 TB Disk Cartridges 700 BTU/hr (205 W) Airflow: 40 CFM (68 m3/hr) min Kaleidescape Part No. 101-0105-00 Rev 3 Minimum 2 in. (5 cm) ventilation space at the rear Bandwidth: • Serves DVD movies or music to up to 45 zones simultaneously • Serves Blu-ray movies to up to 5 zones simultaneously • 4 simultaneous imports Connections: • 100Base-TX/1000Base-T Ethernet (RJ45) • RS-232 control port (DB-9 male) • Two USB 2.0 (reserved) • IEEE 1394 (FireWire) 6-pin (reserved) Certifications: • CSA (IEC 60950-1:2001, CSA 60950-1-03) • FCC Class B • GOST R • CE • RoHS compliant Page 125 Kaleidescape Installation Guide Product Specifications Kaleidescape M500 Player, Model KPLAYER-M500 Dimensions: 17.5 in. × 1.7 in. × 13.8 in. (W × H × D) (44.5 cm × 4.3 cm × 35.0 cm) without side panels Video Outputs: • HDMI • 1 rack unit Component YPbPr (RCA connectors) • • S-Video • Front panel protrudes 1 in. (2.5 cm) • Composite (RCA connector) Weight: 10.0 lbs (4.6 kg) Power: • 100–240 V, 50–60 Hz, universal input • 36 W typical consumption (27 W standby, 42 W max) Environment: Operating temperature: 41°F to 95°F (5°C to 35°C) Storage temperature: -4°F to 140°F (-20°C to 60°C) Relative humidity: 5% to 90% non-condensing Maximum operating altitude: 10,000 ft (3000 m) Heat output: 143 BTU/hr (42 W) max Airflow: 7 CFM (12 m3/hr) min Ventilation: • Minimum 1 in. (2.5 cm) ventilation space at the front • Minimum 2 in. (5 cm) ventilation space at the rear Note: Make sure that the air space required at the front of the chassis is maintained. Network: 100Base-TX/1000Base-T Ethernet (RJ45 connector) Video Modes: 1080p60/50/24, 1080i60/50, 720p60/50, 576p, 576i, 480p, 480i Audio Outputs: • HDMI • Digital coaxial (RCA connector) • Digital optical (TosLink connector) • Analog stereo (RCA connectors) Audio Formats: • Dolby Digital, Dolby TrueHD • DTS Digital Surround, DTS-HD Master Audio • MPEG Audio • PCM Disc Media: CD Audio, CD-R, CD-RW, DVD, DVD-R, DVD-RW, DVD+R, DVD+RW, DualDisc, BD-ROM, BD-R, BD-RE Blu-ray Disc: • 1080p/24 • Dolby TrueHD • DTS-HD Master Audio • BD-Live • Profile 2.0 Region Codes: DVD region code can be changed up to four times Blu-ray region code cannot be changed by user KPLAYER-M500-A (region A) Control Connections: • Front panel IR receiver window • IR input (1/8 in. mini-plug) • RS-232 control port (DB-9 male) Kaleidescape Part No. 101-0105-00 Rev 3 KPLAYER-M500-B (region B) Certifications: • CSA (IEC 60950-1:2001, CSA 60950-1-03) • FCC Class B • GOST R • CE • RoHS compliant Page 126 Kaleidescape Installation Guide Product Specifications Kaleidescape M300 Player, Model KPLAYER-M300 Dimensions: 8.4 in. × 1.7 in. × 10.6 in. (W × H × D) (21.3 cm × 4.3 cm × 26.9 cm) Note: Optional rack-mount shelf is available to hold two M300 Players in one rack unit Weight: • 3.0 lbs (1.4 kg) includes 1 lb (0.5 kg) power supply • Rack-mount shelf: 0.5 lbs (0.2 kg) Power: • 100–240 V, 50–60 Hz, universal input • 28 W typical consumption (20 W standby, 28 W max) Environment: Operating temperature: 41°F to 95°F (5°C to 35°C) Storage temperature: -4°F to 140°F (-20°C to 60°C) Relative humidity: 5% to 90% non-condensing Maximum operating altitude: 10,000 ft (3000 m) Heat output: 96 BTU/hr (28 W) max Airflow: 6 CFM (10 m3/hr) min Ventilation: • Minimum 1 in. (2.5 cm) ventilation space at the front • Minimum 2 in. (5 cm) ventilation space at the rear Network: 100Base-TX/1000Base-T Ethernet (RJ45 connector) Control Connections: • Front panel IR receiver window • Video Outputs: • HDMI • Component YPbPr (RCA connectors) • Composite (RCA connector) Video Modes: 1080p60/50/24, 1080i60/50, 720p60/50, 576p, 576i, 480p, 480i Audio Outputs: • HDMI • Digital coaxial (RCA connector) • Analog stereo (RCA connectors) Audio Formats: • Dolby Digital, Dolby TrueHD • DTS Digital Surround, DTS-HD Master Audio • MPEG Audio • PCM Blu-ray Disc: • 1080p/24 • Dolby TrueHD • DTS-HD Master Audio • BD-Live • Profile 2.0 Region Codes: Blu-ray region code cannot be changed by user • KPLAYER-M300-A (region A) • KPLAYER-M300-B (region B) Certifications: • CSA (IEC 60950-1:2001, CSA 60950-1-03) • FCC Class B • GOST R • CE • RoHS compliant IR input (1/8 in. mini-plug) Kaleidescape Part No. 101-0105-00 Rev 3 Page 127 Kaleidescape Installation Guide Product Specifications Kaleidescape Music Player, Model KMUSIC-4000 Dimensions: 17.5 in. × 1.7 in. × 13.8 in. (W × H × D) (44.5 cm × 4.3 cm × 35.0 cm) • 1 rack unit • Front panel protrudes 1 in. (2.5 cm) Weight: 10.0 lbs (4.6 kg) Power: • • 100–240 V, 50–60 Hz, universal input 14 W typical consumption (14 W standby, 20 W max) Environment: Operating temperature: 41°F to 95°F (5°C to 35°C) Storage temperature: -4°F to 140°F (-20°C to 60°C) Relative humidity: 5% to 90% non-condensing Maximum operating altitude: 10,000 ft (3000 m) Heat output: 70 BTU/hour (20 W) max Airflow: 2.5 CFM (4.2 m3/hr) min Network: 100Base-TX Ethernet (RJ45 connector) Control Connection: RS-232 control port (DB-9 male) Audio Outputs: Four simultaneous independent audio zones • Four digital coaxial (RCA connectors) • Four digital optical (TosLink connectors) • Four analog stereo (RCA connectors) Audio Formats: PCM Disc Media: CD Audio, CD-R, CD-RW, DVD, DVD-R, DVD-RW, DVD+R, DVD+RW, DualDisc Certifications: • CSA (IEC 60950-1:2001, CSA 60950-1-03) • FCC Class B • GOST R • CE • RoHS compliant Ventilation: • Minimum 1 in. (2.5 cm) ventilation space at the front • Minimum 2 in. (5 cm) ventilation space at the rear Note: Make sure rack or other doors do not reduce the 1 in. (2.5 cm) air space required at the front of the chassis. Kaleidescape Part No. 101-0105-00 Rev 3 Page 128 Kaleidescape Installation Guide Product Specifications Kaleidescape Mini System, Model KSYSTEM-120 Dimensions: • With side panels 17.8 in. × 3.3 in. × 17.3 in. (W × H × D) (45.1 cm × 8.4 cm × 43.9 cm) • Without side panels 16.0 in. × 3.3 in. × 17.3 in. (W × H × D) (40.6 cm × 8.4 cm × 43.9 cm) • With rack-mount kit (2 rack units) 16.0 in. × 3.5 in. × 17.3 in. (W × H × D) (40.6 cm × 8.9 cm × 43.9 cm) Weight: • 20.0 lbs (9.1 kg) without Mini Disk Cartridges installed • 24.0 lbs (10.9 kg) with four Mini Disk Cartridges installed Disk Cartridges Storage: • One 500 GB Mini Disk Cartridge for data protection (RAID-K parity) • Each additional 500 GB Mini Disk Cartridge stores 75 DVDs or 825 CDs • Expandable to four Mini Disk Cartridges for a maximum of 1.5 TB data storage (225 DVDs) • Multiple Mini Systems and servers can be grouped seamlessly to provide storage for thousands of movies and albums Bandwidth: • Serves DVD movies or music to up to 15 zones simultaneously • 4 simultaneous imports Video Outputs: • HDMI • KDISK-500-M: 0.7 lbs (0.3 kg) Component YPbPr (RCA connectors) • • S-Video • KDISK-BLANK-M: 0.4 lbs (0.2 kg) • Composite (RCA connector) Power: • 100–240 V, 50–60 Hz, universal input • 85 W typical (74 W standby, 90 W max) consumption with four 500 GB Mini Disk Cartridges Environment: Operating temperature: 41°F to 95°F (5°C to 35°C) Storage temperature: -4°F to 140°F (-20°C to 60°C) Video Modes: • High definition 720p, 1080i and 1080p at 50/60 Hz • NTSC 480i, 480p • PAL 576i, 576p • Best resolution selected automatically through HDMI Audio Outputs: Zone 1 Relative humidity: 5% to 90% non-condensing • HDMI Maximum operating altitude: 10,000 ft (3000 m) • Digital coaxial (RCA connector) • Digital optical (TosLink connector) Heat output: 308 BTU/hour (90 W) max • Analog stereo (RCA connectors) Airflow: 15 CFM (26 m3/hr) min Zones 2 and 3 Ventilation: • Minimum 1 in. (2.5 cm) ventilation space at the front • Analog stereo (RCA connectors) Audio Formats: • Dolby Digital Minimum 2 in. (5 cm) ventilation space at the rear • DTS • MPEG Audio Note: Make sure rack or other doors do not reduce the 1 in. (2.5 cm) air space required at the front of the chassis. • PCM • Kaleidescape Part No. 101-0105-00 Rev 3 Page 129 Kaleidescape Installation Guide Product Specifications Disc Media: CD Audio, CD-R, CD-RW, DVD, DVD-R, DVD-RW, DVD+R, DVD+RW, DualDisc Connections: • 100Base-TX/1000Base-T Ethernet (RJ45) • Front panel IR receiver window • IR input (1/8 in. mini-plug) • RS-232 control port (DB-9 male) Certifications: • CSA (IEC 60950-1:2001, CSA 60950-1-03) • FCC Class B • GOST R • CE • RoHS compliant Kaleidescape Part No. 101-0105-00 Rev 3 Page 130 Kaleidescape Installation Guide Appendix B Notices Compliance FCC Notice This equipment has been tested and found to comply with the limits for a Class B digital device, pursuant to Part 15 of the FCC Rules. These limits are designed to provide reasonable protection against harmful interference in a residential installation. This equipment generates, uses, and can radiate radio frequency energy and, if not installed and used in accordance with the instructions, may cause harmful interference to radio communications. However, there is no guarantee that interference will not occur in a particular installation. If this equipment does cause harmful interference to radio or television reception, which can be determined by turning the equipment off and on, the user is encouraged to try to correct the interference by one or more of the following measures: • Reorient or relocate the receiving antenna • Increase the separation between the equipment and receiver • Connect the equipment to a different outlet or circuit than the one to which the receiver is connected • Consult a dealer or an experienced radio/TV technician for help CE Declaration The KSERVER-1500, KSERVER-5000, KPLAYER-M500, KPLAYER-M300, KMUSIC-4000, and KSYSTEM-120 carry the mark. These products have been tested and conform to the European Union 2004/108/EC directive and the 2006/95/EC Low Voltage Directive. These products are shipped with a formal Declaration of Conformity. WEEE Notice In compliance with European directive 2002/96/CE and norm EN50419:2005, this device must not be thrown away with household garbage. The device must be the object of an appropriate, selective removal procedure in order to recuperate it. Cooperation will contribute to the respect for the environment and the protection of our natural resources. Kaleidescape Part No. 101-0105-00 Rev 3 Page 131 Kaleidescape Installation Guide Notices Third-Party Software and Technology Licensing Information Kaleidescape Entertainment Appliance Operating System (KEAOS) This product includes software that is based in part on the work of the FreeType Team. The FreeType Project homepage is at http://www.freetype.org. — This product includes software that is based in part on the work of the Independent JPEG Group. — This product includes software developed by the Contributing Authors of the PNG Reference Library and Group 42, Inc. — This product includes software subject to the following Copyright and Permission Notice. The GIFLIB distribution is Copyright (c) 1997 Eric S. Raymond Permission is hereby granted, free of charge, to any person obtaining a copy of this software and associated documentation files (the "Software"), to deal in the Software without restriction, including without limitation the rights to use, copy, modify, merge, publish, distribute, sublicense, and/or sell copies of the Software, and to permit persons to whom the Software is furnished to do so, subject to the following conditions: The above copyright notice and this permission notice shall be included in all copies or substantial portions of the Software. THE SOFTWARE IS PROVIDED "AS IS", WITHOUT WARRANTY OF ANY KIND, EXPRESS OR IMPLIED, INCLUDING BUT NOT LIMITED TO THE WARRANTIES OF MERCHANTABILITY, FITNESS FOR A PARTICULAR PURPOSE AND NONINFRINGEMENT. IN NO EVENT SHALL THE AUTHORS OR COPYRIGHT HOLDERS BE LIABLE FOR ANY CLAIM, DAMAGES OR OTHER LIABILITY, WHETHER IN AN ACTION OF CONTRACT, TORT OR OTHERWISE, ARISING FROM, OUT OF OR IN CONNECTION WITH THE SOFTWARE OR THE USE OR OTHER DEALINGS IN THE SOFTWARE. — This product includes software developed by the University of Illinois at Urbana, and their contributors. This product includes software subject to the following Copyright, List of Conditions and Disclaimer. Copyright (c) 1998-2002 University of Illinois Board of Trustees Copyright (c) 1998-2002 Mark D. Roth All rights reserved. Redistribution and use in source and binary forms, with or without modification, are permitted provided that the following conditions are met: 1. Redistributions of source code must retain the above copyright notice, this list of conditions and the following disclaimer. Kaleidescape Part No. 101-0105-00 Rev 3 Page 132 Kaleidescape Installation Guide Notices 2. Redistributions in binary form must reproduce the above copyright notice, this list of conditions and the following disclaimer in the documentation and/or other materials provided with the distribution. 3. All advertising materials mentioning features or use of this software must display the following acknowledgement: This product includes software developed by the University of Illinois at Urbana, and their contributors. 4. The University nor the names of their contributors may be used to endorse or promote products derived from this software without specific prior written permission. THIS SOFTWARE IS PROVIDED BY THE TRUSTEES AND CONTRIBUTORS "AS IS" AND ANY EXPRESS OR IMPLIED WARRANTIES, INCLUDING, BUT NOT LIMITED TO, THE IMPLIED WARRANTIES OF MERCHANTABILITY AND FITNESS FOR A PARTICULAR PURPOSE ARE DISCLAIMED. IN NO EVENT SHALL THE TRUSTEES OR CONTRIBUTORS BE LIABLE FOR ANY DIRECT, INDIRECT, INCIDENTAL, SPECIAL, EXEMPLARY, OR CONSEQUENTIAL DAMAGES (INCLUDING, BUT NOT LIMITED TO, PROCUREMENT OF SUBSTITUTE GOODS OR SERVICES; LOSS OF USE, DATA, OR PROFITS; OR BUSINESS INTERRUPTION) HOWEVER CAUSED AND ON ANY THEORY OF LIABILITY, WHETHER IN CONTRACT, STRICT LIABILITY, OR TORT (INCLUDING NEGLIGENCE OR OTHERWISE) ARISING IN ANY WAY OUT OF THE USE OF THIS SOFTWARE, EVEN IF ADVISED OF THE POSSIBILITY OF SUCH DAMAGE. This product includes software subject to the following Copyright, List of Conditions and Disclaimer. Copyright (c) 1997, 1998 Todd C. Miller <[email protected]> All rights reserved. Redistribution and use in source and binary forms, with or without modification, are permitted provided that the following conditions are met: 1. Redistributions of source code must retain the above copyright notice, this list of conditions and the following disclaimer. 2. Redistributions in binary form must reproduce the above copyright notice, this list of conditions and the following disclaimer in the documentation and/or other materials provided with the distribution. 3. The name of the author may not be used to endorse or promote products derived from this software without specific prior written permission. THIS SOFTWARE IS PROVIDED "AS IS" AND ANY EXPRESS OR IMPLIED WARRANTIES, INCLUDING, BUT NOT LIMITED TO, THE IMPLIED WARRANTIES OF MERCHANTABILITY AND FITNESS FOR A PARTICULAR PURPOSE ARE DISCLAIMED. IN NO EVENT SHALL THE REGENTS OR CONTRIBUTORS BE LIABLE FOR ANY DIRECT, INDIRECT, INCIDENTAL, SPECIAL, EXEMPLARY, OR CONSEQUENTIAL DAMAGES (INCLUDING, BUT NOT LIMITED TO, PROCUREMENT OF SUBSTITUTE GOODS OR SERVICES; LOSS OF USE, DATA, OR PROFITS; OR BUSINESS INTERRUPTION) HOWEVER CAUSED AND ON ANY THEORY OF LIABILITY, WHETHER IN CONTRACT, STRICT LIABILITY, OR TORT (INCLUDING NEGLIGENCE OR OTHERWISE) ARISING IN ANY WAY OUT OF THE USE OF THIS SOFTWARE, EVEN IF ADVISED OF THE POSSIBILITY OF SUCH DAMAGE. This product includes software developed by the University of California, Berkeley and its contributors. This product includes software subject to the following Copyright, List of Conditions and Disclaimer. Copyright (c) 1990, 1993 The Regents of the University of California. All rights reserved. Kaleidescape Part No. 101-0105-00 Rev 3 Page 133 Kaleidescape Installation Guide Notices Redistribution and use in source and binary forms, with or without modification, are permitted provided that the following conditions are met: 1. Redistributions of source code must retain the above copyright notice, this list of conditions and the following disclaimer. 2. Redistributions in binary form must reproduce the above copyright notice, this list of conditions and the following disclaimer in the documentation and/or other materials provided with the distribution. 3. All advertising materials mentioning features or use of this software must display the following acknowledgement: This product includes software developed by the University of California, Berkeley and its contributors. 4. Neither the name of the University nor the names of its contributors may be used to endorse or promote products derived from this software without specific prior written permission. THIS SOFTWARE IS PROVIDED BY THE REGENTS AND CONTRIBUTORS "AS IS" AND ANY EXPRESS OR IMPLIED WARRANTIES, INCLUDING, BUT NOT LIMITED TO, THE IMPLIED WARRANTIES OF MERCHANTABILITY AND FITNESS FOR A PARTICULAR PURPOSE ARE DISCLAIMED. IN NO EVENT SHALL THE REGENTS OR CONTRIBUTORS BE LIABLE FOR ANY DIRECT, INDIRECT, INCIDENTAL, SPECIAL, EXEMPLARY, OR CONSEQUENTIAL DAMAGES (INCLUDING, BUT NOT LIMITED TO, PROCUREMENT OF SUBSTITUTE GOODS OR SERVICES; LOSS OF USE, DATA, OR PROFITS; OR BUSINESS INTERRUPTION) HOWEVER CAUSED AND ON ANY THEORY OF LIABILITY, WHETHER IN CONTRACT, STRICT LIABILITY, OR TORT (INCLUDING NEGLIGENCE OR OTHERWISE) ARISING IN ANY WAY OUT OF THE USE OF THIS SOFTWARE, EVEN IF ADVISED OF THE POSSIBILITY OF SUCH DAMAGE. — This product includes software developed by the OpenSSL Project for use in the OpenSSL Toolkit (http://www.openssl.org/). Copyright (c) 1998-2002 The OpenSSL Project. All rights reserved. Redistribution and use in source and binary forms, with or without modification, are permitted provided that the following conditions are met: 1. Redistributions of source code must retain the above copyright notice, this list of conditions and the following disclaimer. 2. Redistributions in binary form must reproduce the above copyright notice, this list of conditions and the following disclaimer in the documentation and/or other materials provided with the distribution. 3. All advertising materials mentioning features or use of this software must display the following acknowledgment: "This product includes software developed by the OpenSSL Project for use in the OpenSSL Toolkit. (http://www.openssl.org/)" 4. The names "OpenSSL Toolkit" and "OpenSSL Project" must not be used to endorse or promote products derived from this software without prior written permission. For written permission, please contact [email protected]. 5. Products derived from this software may not be called "OpenSSL" nor may "OpenSSL" appear in their names without prior written permission of the OpenSSL Project. 6. Redistributions of any form whatsoever must retain the following acknowledgment: "This product includes software developed by the OpenSSL Project for use in the OpenSSL Toolkit (http://www.openssl.org/)" Kaleidescape Part No. 101-0105-00 Rev 3 Page 134 Kaleidescape Installation Guide Notices THIS SOFTWARE IS PROVIDED BY THE OpenSSL PROJECT "AS IS" AND ANY EXPRESSED OR IMPLIED WARRANTIES, INCLUDING, BUT NOT LIMITED TO, THE IMPLIED WARRANTIES OF MERCHANTABILITY AND FITNESS FOR A PARTICULAR PURPOSE ARE DISCLAIMED. IN NO EVENT SHALL THE OpenSSL PROJECT OR ITS CONTRIBUTORS BE LIABLE FOR ANY DIRECT, INDIRECT, INCIDENTAL, SPECIAL, EXEMPLARY, OR CONSEQUENTIAL DAMAGES (INCLUDING, BUT NOT LIMITED TO, PROCUREMENT OF SUBSTITUTE GOODS OR SERVICES; LOSS OF USE, DATA, OR PROFITS; OR BUSINESS INTERRUPTION) HOWEVER CAUSED AND ON ANY THEORY OF LIABILITY, WHETHER IN CONTRACT, STRICT LIABILITY, OR TORT (INCLUDING NEGLIGENCE OR OTHERWISE) ARISING IN ANY WAY OUT OF THE USE OF THIS SOFTWARE, EVEN IF ADVISED OF THE POSSIBILITY OF SUCH DAMAGE. — This product includes cryptographic software written by Eric Young ([email protected]). Copyright (C) 1995-1998 Eric Young ([email protected]) All rights reserved. This package is an SSL implementation written by Eric Young ([email protected]). The implementation was written so as to conform with Netscapes SSL. This library is free for commercial and non-commercial use as long as the following conditions are adhered to. The following conditions apply to all code found in this distribution, be it the RC4, RSA, lhash, DES, etc., code; not just the SSL code. The SSL documentation included with this distribution is covered by the same copyright terms except that the holder is Tim Hudson ([email protected]). Copyright remains Eric Young's, and as such any Copyright notices in the code are not to be removed. If this package is used in a product, Eric Young should be given attribution as the author of the parts of the library used. This can be in the form of a textual message at program startup or in documentation (online or textual) provided with the package. Redistribution and use in source and binary forms, with or without modification, are permitted provided that the following conditions are met: 1. Redistributions of source code must retain the copyright notice, this list of conditions and the following disclaimer. 2. Redistributions in binary form must reproduce the above copyright notice, this list of conditions and the following disclaimer in the documentation and/or other materials provided with the distribution. 3. All advertising materials mentioning features or use of this software must display the following acknowledgement: "This product includes cryptographic software written by Eric Young ([email protected])." The word 'cryptographic' can be left out if the routines from the library being used are not cryptographic related. 4. If you include any Windows specific code (or a derivative thereof) from the apps directory (application code) you must include an acknowledgement: "This product includes software written by Tim Hudson ([email protected])." THIS SOFTWARE IS PROVIDED BY ERIC YOUNG "AS IS" AND ANY EXPRESS OR IMPLIED WARRANTIES, INCLUDING, BUT NOT LIMITED TO, THE IMPLIED WARRANTIES OF MERCHANTABILITY AND FITNESS FOR A PARTICULAR PURPOSE ARE DISCLAIMED. IN NO EVENT SHALL THE AUTHOR OR CONTRIBUTORS BE LIABLE FOR ANY DIRECT, INDIRECT, INCIDENTAL, SPECIAL, EXEMPLARY, OR CONSEQUENTIAL DAMAGES (INCLUDING, BUT NOT LIMITED TO, PROCUREMENT OF SUBSTITUTE GOODS OR SERVICES; LOSS OF USE, DATA, OR PROFITS; OR BUSINESS INTERRUPTION) HOWEVER CAUSED AND ON ANY THEORY OF LIABILITY, WHETHER Kaleidescape Part No. 101-0105-00 Rev 3 Page 135 Kaleidescape Installation Guide Notices IN CONTRACT, STRICT LIABILITY, OR TORT (INCLUDING NEGLIGENCE OR OTHERWISE) ARISING IN ANY WAY OUT OF THE USE OF THIS SOFTWARE, EVEN IF ADVISED OF THE POSSIBILITY OF SUCH DAMAGE. The licence and distribution terms for any publically available version or derivative of this code cannot be changed. i.e. this code cannot simply be copied and put under another distribution licence [including the GNU Public Licence.] — This product includes software subject to the following Copyright Notice, List of Conditions and Disclaimer. Copyright 1994-2008 The FreeBSD Project. All rights reserved. Redistribution and use in source and binary forms, with or without modification, are permitted provided that the following conditions are met: Redistributions of source code must retain the above copyright notice, this list of conditions and the following disclaimer. Redistributions in binary form must reproduce the above copyright notice, this list of conditions and the following disclaimer in the documentation and/or other materials provided with the distribution. THIS SOFTWARE IS PROVIDED BY THE FREEBSD PROJECT "AS IS" AND ANY EXPRESS OR IMPLIED WARRANTIES, INCLUDING, BUT NOT LIMITED TO, THE IMPLIED WARRANTIES OF MERCHANTABILITY AND FITNESS FOR A PARTICULAR PURPOSE ARE DISCLAIMED. IN NO EVENT SHALL THE FREEBSD PROJECT OR CONTRIBUTORS BE LIABLE FOR ANY DIRECT, INDIRECT, INCIDENTAL, SPECIAL, EXEMPLARY, OR CONSEQUENTIAL DAMAGES (INCLUDING, BUT NOT LIMITED TO, PROCUREMENT OF SUBSTITUTE GOODS OR SERVICES; LOSS OF USE, DATA, OR PROFITS; OR BUSINESS INTERRUPTION) HOWEVER CAUSED AND ON ANY THEORY OF LIABILITY, WHETHER IN CONTRACT, STRICT LIABILITY, OR TORT (INCLUDING NEGLIGENCE OR OTHERWISE) ARISING IN ANY WAY OUT OF THE USE OF THIS SOFTWARE, EVEN IF ADVISED OF THE POSSIBILITY OF SUCH DAMAGE. The views and conclusions contained in the software and documentation are those of the authors and should not be interpreted as representing official policies, either expressed or implied, of the FreeBSD Project. — Part of the software embedded in this product is eCos – Embedded Configurable Operating System, a trademark of Red Hat, Inc. under version 1.1 of the Red Hat eCos Public License (RHEPL). A Source Code version of the Covered Code and a description of the Modifications, all as defined in the RHEPL, may be obtained, under the terms of the RHEPL, by request sent to [email protected]. All warranty, support, indemnity, liability or other terms that may be offered by Kaleidescape are offered by Kaleidescape alone, and not by Red Hat Inc. or any Contributor (as defined in the RHEPL). Kaleidescape agrees to indemnify Red Hat Inc. and every Contributor for any liability they may incur as a result of such terms. This product includes software subject to the following Notice and Disclaimer. Part of the software embedded in this product is eCos - Embedded Configurable Operating System, a trademark of Red Hat. Portions created by Red Hat are Copyright (C) 1998, 1999, 2000 Red Hat, Inc. (http://www.redhat.com/). All Rights Reserved. THE SOFTWARE IN THIS PRODUCT WAS IN PART PROVIDED BY RED HAT AND ANY EXPRESS OR IMPLIED WARRANTIES, INCLUDING, BUT NOT LIMITED TO, THE IMPLIED WARRANTIES OF MERCHANTABILITY AND FITNESS FOR A PARTICULAR Kaleidescape Part No. 101-0105-00 Rev 3 Page 136 Kaleidescape Installation Guide Notices PURPOSE ARE DISCLAIMED. IN NO EVENT SHALL THE AUTHOR BE LIABLE FOR ANY DIRECT, INDIRECT, INCIDENTAL, SPECIAL, EXEMPLARY, OR CONSEQUENTIAL DAMAGES (INCLUDING, BUT NOT LIMITED TO, PROCUREMENT OF SUBSTITUTE GOODS OR SERVICES; LOSS OF USE, DATA, OR PROFITS; OR BUSINESS INTERRUPTION) HOWEVER CAUSED AND ON ANY THEORY OF LIABILITY, WHETHER IN CONTRACT, STRICT LIABILITY, OR TORT (INCLUDING NEGLIGENCE OR OTHERWISE) ARISING IN ANY WAY OUT OF THE USE OF THIS SOFTWARE, EVEN IF ADVISED OF THE POSSIBILITY OF SUCH DAMAGE. — This product includes software written by Jean-loup Gailly and Mark Adler. — This product includes software subject to the following Copyright and Permission Notice. COPYRIGHT AND PERMISSION NOTICE Copyright (c) 1996 - 2005, Daniel Stenberg, <[email protected]>. All rights reserved. Permission to use, copy, modify, and distribute this software for any purpose with or without fee is hereby granted, provided that the above copyright notice and this permission notice appear in all copies. THE SOFTWARE IS PROVIDED "AS IS", WITHOUT WARRANTY OF ANY KIND, EXPRESS OR IMPLIED, INCLUDING BUT NOT LIMITED TO THE WARRANTIES OF MERCHANTABILITY, FITNESS FOR A PARTICULAR PURPOSE AND NONINFRINGEMENT OF THIRD PARTY RIGHTS. IN NO EVENT SHALL THE AUTHORS OR COPYRIGHT HOLDERS BE LIABLE FOR ANY CLAIM, DAMAGES OR OTHER LIABILITY, WHETHER IN AN ACTION OF CONTRACT, TORT OR OTHERWISE, ARISING FROM, OUT OF OR IN CONNECTION WITH THE SOFTWARE OR THE USE OR OTHER DEALINGS IN THE SOFTWARE. Except as contained in this notice, the name of a copyright holder shall not be used in advertising or otherwise to promote the sale, use or other dealings in this Software without prior written authorization of the copyright holder. — This product includes software subject to the following Copyright and Permission Notice. Copyright (c) 1997-1999 Silicon Graphics Computer Systems, Inc. Permission to use, copy, modify, distribute and sell this software and its documentation for any purpose is hereby granted without fee, provided that the above copyright notice appear in all copies and that both that copyright notice and this permission notice appear in supporting documentation. Silicon Graphics makes no representations about the suitability of this software for any purpose. It is provided "as is" without express or implied warranty. — This product includes software that is subject to the following Copyright Notice and Disclaimer. Copyright Notice Some or all of this work - Copyright (c) 1999 - 2004, Intel Corp. All rights reserved. Disclaimer and Export Compliance 1. INTEL MAKES NO WARRANTY OF ANY KIND REGARDING ANY SOFTWARE PROVIDED HERE. ANY SOFTWARE ORIGINATING FROM INTEL OR DERIVED FROM Kaleidescape Part No. 101-0105-00 Rev 3 Page 137 Kaleidescape Installation Guide Notices INTEL SOFTWARE IS PROVIDED "AS IS," AND INTEL WILL NOT PROVIDE ANY SUPPORT, ASSISTANCE, INSTALLATION, TRAINING OR OTHER SERVICES. INTEL WILL NOT PROVIDE ANY UPDATES, ENHANCEMENTS OR EXTENSIONS. INTEL SPECIFICALLY DISCLAIMS ANY IMPLIED WARRANTIES OF MERCHANTABILITY, NONINFRINGEMENT AND FITNESS FOR A PARTICULAR PURPOSE. 2. IN NO EVENT SHALL INTEL HAVE ANY LIABILITY TO LICENSEE, ITS LICENSEES OR ANY OTHER THIRD PARTY, FOR ANY LOST PROFITS, LOST DATA, LOSS OF USE OR COSTS OF PROCUREMENT OF SUBSTITUTE GOODS OR SERVICES, OR FOR ANY INDIRECT, SPECIAL OR CONSEQUENTIAL DAMAGES ARISING OUT OF THIS AGREEMENT, UNDER ANY CAUSE OF ACTION OR THEORY OF LIABILITY, AND IRRESPECTIVE OF WHETHER INTEL HAS ADVANCE NOTICE OF THE POSSIBILITY OF SUCH DAMAGES. THESE LIMITATIONS SHALL APPLY NOTWITHSTANDING THE FAILURE OF THE ESSENTIAL PURPOSE OF ANY LIMITED REMEDY. 3. Licensee shall not export, either directly or indirectly, any of this software or system incorporating such software without first obtaining any required license or other approval from the U. S. Department of Commerce or any other agency or department of the United States Government. In the event Licensee exports any such software from the United States or re-exports any such software from a foreign destination, Licensee shall ensure that the distribution and export/re-export of the software is in compliance with all laws, regulations, orders, or other restrictions of the U.S. Export Administration Regulations. Licensee agrees that neither it nor any of its subsidiaries will export/re-export any technical data, process, software, or service, directly or indirectly, to any country for which the United States government or any agency thereof requires an export license, other governmental approval, or letter of assurance, without first obtaining such license, approval or letter. — AMG Flow-Down License Terms (Terms of Use) This application incorporates software and technology of All Media Guide, LLC ("AMG"). The AMG software and technology (collectively, the "AMG Technology") allows End Users to access music-related data ("AMG Data") over the Internet and otherwise from Kaleidescape's AMG Database (the "AMG Databases") located on Kaleidescape's AMG Data Servers (the "AMG Servers") and to perform other functions. You may access and use AMG Data only by means of the intended End User functions of this application software. You agree that you will use the AMG Data, the AMG Technology, and the AMG Servers for your own non-commercial use only. You agree not to assign, copy, transfer or transmit the AMG Data to any third party. You agree not to use or exploit AMG data, the AMG Technology, the AMG Databases, or the AMG Servers, except as expressly permitted herein. You agree that your non-exclusive license to access the AMG Databases and to use the AMG Data, the AMG Technology, and the AMG Servers will terminate if you violate these restrictions. If your license terminates, you agree to cease any and all use of the AMG Data, the AMG Technology, and the AMG Servers. AMG reserves all rights in the AMG Data, the AMG Technology, and to the AMG Technology embodied in the AMG Servers, including all ownership rights. You agree that AMG may enforce its rights under this Agreement against you directly in its own name. AMG reserves the right to delete data from the AMG Databases or to change data categories for any cause that AMG deems sufficient. No warranty is made that the AMG Technology or AMG Servers are error-free or that functioning of AMG Technology or AMG Servers will be uninterrupted. AMG is not obligated to provide you with any new enhanced or additional data types or categories that AMG may Kaleidescape Part No. 101-0105-00 Rev 3 Page 138 Kaleidescape Installation Guide Notices choose to provide in the future and is free to discontinue its online services at any time. To the extent that you, the End User, provide any information or original works of authorship to be added to AMG Databases, you represent and warrant that you are the sole author of such work(s) and further hereby assign to AMG all rights of copyright therein, including the right to register the copyright in such work(s) as part of the AMG Database. THE AMG TECHNOLOGY AND EACH ITEM OF AMG DATA ARE LICENSED TO YOU "AS IS." AMG MAKES NO REPRESENTATIONS OR WARRANTIES, EXPRESS OR IMPLIED, REGARDING THE ACCURACY OF ANY AMG DATA ON THE AMG SERVERS. AMG DISCLAIMS ALL WARRANTIES EXPRESS OR IMPLIED, INCLUDING, BUT NOT LIMITED TO, IMPLIED WARRANTIES OF MERCHANTABILITY, FITNESS FOR A PARTICULAR PURPOSE, TITLE AND NONINFRINGEMENT. AMG DOES NOT WARRANT THE RESULTS THAT WILL BE OBTAINED BY YOUR USE OF THE AMG TECHNOLOGY OR ANY AMG SERVER. IN NO CASE WILL AMG BE LIABLE TO YOU OR ANY THIRD PARTY FOR ANY CONSEQUENTIAL OR INCIDENTAL DAMAGES OR FOR ANY LOST PROFITS OR LOST REVENUES RESULTING FROM YOUR USE OF AMG DATA, THE AMG TECHNOLOGY OR OTHERWISE. — This product includes software that is subject to the following Copyright Notice and Permission Notice. Copyright (c) 1998, 1999, 2000 Thai Open Source Software Center Ltd and Clark Cooper. Copyright (c) 2001, 2002, 2003, 2004, 2005, 2006 Expat maintainers. Permission is hereby granted, free of charge, to any person obtaining a copy of this software and associated documentation files (the "Software"), to deal in the Software without restriction, including without limitation the rights to use, copy, modify, merge, publish, distribute, sublicense, and/or sell copies of the Software, and to permit persons to whom the Software is furnished to do so, subject to the following conditions: The above copyright notice and this permission notice shall be included in all copies or substantial portions of the Software. THE SOFTWARE IS PROVIDED "AS IS", WITHOUT WARRANTY OF ANY KIND, EXPRESS OR IMPLIED, INCLUDING BUT NOT LIMITED TO THE WARRANTIES OF MERCHANTABILITY, FITNESS FOR A PARTICULAR PURPOSE AND NONINFRINGEMENT. IN NO EVENT SHALL THE AUTHORS OR COPYRIGHT HOLDERS BE LIABLE FOR ANY CLAIM, DAMAGES OR OTHER LIABILITY, WHETHER IN AN ACTION OF CONTRACT, TORT OR OTHERWISE, ARISING FROM, OUT OF OR IN CONNECTION WITH THE SOFTWARE OR THE USE OR OTHER DEALINGS IN THE SOFTWARE. Kaleidescape Conductor This product includes software developed by the OpenSSL Project for use in the OpenSSL Toolkit (http://www.openssl.org/). Copyright (c) 1998-2002 The OpenSSL Project. All rights reserved. Redistribution and use in source and binary forms, with or without modification, are permitted provided that the following conditions are met: Kaleidescape Part No. 101-0105-00 Rev 3 Page 139 Kaleidescape Installation Guide Notices 1. Redistributions of source code must retain the above copyright notice, this list of conditions and the following disclaimer. 2. Redistributions in binary form must reproduce the above copyright notice, this list of conditions and the following disclaimer in the documentation and/or other materials provided with the distribution. 3. All advertising materials mentioning features or use of this software must display the following acknowledgment: "This product includes software developed by the OpenSSL Project for use in the OpenSSL Toolkit. (http://www.openssl.org/)" 4. The names "OpenSSL Toolkit" and "OpenSSL Project" must not be used to endorse or promote products derived from this software without prior written permission. For written permission, please contact [email protected]. 5. Products derived from this software may not be called "OpenSSL" nor may "OpenSSL" appear in their names without prior written permission of the OpenSSL Project. 6. Redistributions of any form whatsoever must retain the following acknowledgment: "This product includes software developed by the OpenSSL Project for use in the OpenSSL Toolkit (http://www.openssl.org/)" THIS SOFTWARE IS PROVIDED BY THE OpenSSL PROJECT "AS IS"' AND ANY EXPRESSED OR IMPLIED WARRANTIES, INCLUDING, BUT NOT LIMITED TO, THE IMPLIED WARRANTIES OF MERCHANTABILITY AND FITNESS FOR A PARTICULAR PURPOSE ARE DISCLAIMED. IN NO EVENT SHALL THE OpenSSL PROJECT OR ITS CONTRIBUTORS BE LIABLE FOR ANY DIRECT, INDIRECT, INCIDENTAL, SPECIAL, EXEMPLARY, OR CONSEQUENTIAL DAMAGES (INCLUDING, BUT NOT LIMITED TO, PROCUREMENT OF SUBSTITUTE GOODS OR SERVICES; LOSS OF USE, DATA, OR PROFITS; OR BUSINESS INTERRUPTION) HOWEVER CAUSED AND ON ANY THEORY OF LIABILITY, WHETHER IN CONTRACT, STRICT LIABILITY, OR TORT (INCLUDING NEGLIGENCE OR OTHERWISE) ARISING IN ANY WAY OUT OF THE USE OF THIS SOFTWARE, EVEN IF ADVISED OF THE POSSIBILITY OF SUCH DAMAGE. — This product includes cryptographic software written by Eric Young ([email protected]). Copyright (C) 1995-1998 Eric Young ([email protected]) All rights reserved. This package is an SSL implementation written by Eric Young ([email protected]). The implementation was written so as to conform with Netscapes SSL. This library is free for commercial and non-commercial use as long as the following conditions are adhered to. The following conditions apply to all code found in this distribution, be it the RC4, RSA, lhash, DES, etc., code; not just the SSL code. The SSL documentation included with this distribution is covered by the same copyright terms except that the holder is Tim Hudson ([email protected]). Copyright remains Eric Young's, and as such any Copyright notices in the code are not to be removed. If this package is used in a product, Eric Young should be given attribution as the author of the parts of the library used. This can be in the form of a textual message at program startup or in documentation (online or textual) provided with the package. Redistribution and use in source and binary forms, with or without modification, are permitted provided that the following conditions are met: 1. Redistributions of source code must retain the copyright notice, this list of conditions and the following disclaimer. Kaleidescape Part No. 101-0105-00 Rev 3 Page 140 Kaleidescape Installation Guide Notices 2. Redistributions in binary form must reproduce the above copyright notice, this list of conditions and the following disclaimer in the documentation and/or other materials provided with the distribution. 3. All advertising materials mentioning features or use of this software must display the following acknowledgement: "This product includes cryptographic software written by Eric Young ([email protected])." The word 'cryptographic' can be left out if the routines from the library being used are not cryptographic related. 4. If you include any Windows specific code (or a derivative thereof) from the apps directory (application code) you must include an acknowledgement: "This product includes software written by Tim Hudson ([email protected])" THIS SOFTWARE IS PROVIDED BY ERIC YOUNG "AS IS" AND ANY EXPRESS OR IMPLIED WARRANTIES, INCLUDING, BUT NOT LIMITED TO, THE IMPLIED WARRANTIES OF MERCHANTABILITY AND FITNESS FOR A PARTICULAR PURPOSE ARE DISCLAIMED. IN NO EVENT SHALL THE AUTHOR OR CONTRIBUTORS BE LIABLE FOR ANY DIRECT, INDIRECT, INCIDENTAL, SPECIAL, EXEMPLARY, OR CONSEQUENTIAL DAMAGES (INCLUDING, BUT NOT LIMITED TO, PROCUREMENT OF SUBSTITUTE GOODS OR SERVICES; LOSS OF USE, DATA, OR PROFITS; OR BUSINESS INTERRUPTION) HOWEVER CAUSED AND ON ANY THEORY OF LIABILITY, WHETHER IN CONTRACT, STRICT LIABILITY, OR TORT (INCLUDING NEGLIGENCE OR OTHERWISE) ARISING IN ANY WAY OUT OF THE USE OF THIS SOFTWARE, EVEN IF ADVISED OF THE POSSIBILITY OF SUCH DAMAGE. The licence and distribution terms for any publically available version or derivative of this code cannot be changed. i.e. this code cannot simply be copied and put under another distribution licence [including the GNU Public Licence.] — This product includes software from the id3lib library. id3lib is covered by the GNU Library General Public License, Version 2, a copy of which is available at http:// www.gnu.org/licenses/. A source code version of the Library, all as defined in the GNU LGPL, may be obtained by request sent to [email protected]. — This product includes software from the LAME library. LAME is covered by the GNU Library General Public License, Version 2, a copy of which is available at http:// www.gnu.org/licenses/. A source code version of the Library, all as defined in the GNU LGPL, may be obtained by request sent to [email protected]. — This product includes software written by Jean-loup Gailly and Mark Adler. — This product includes software developed by the University of California, Berkeley and its contributors. This product includes software subject to the following Copyright, List of Conditions and Disclaimer. Copyright (c) 1991, 1993 The Regents of the University of California. All rights reserved. Redistribution and use in source and binary forms, with or without modification, are permitted provided that the following conditions are met: 1. Redistributions of source code must retain the above copyright notice, this list of conditions and the following disclaimer. Kaleidescape Part No. 101-0105-00 Rev 3 Page 141 Kaleidescape Installation Guide Notices 2. Redistributions in binary form must reproduce the above copyright notice, this list of conditions and the following disclaimer in the documentation and/or other materials provided with the distribution. 3. All advertising materials mentioning features or use of this software must display the following acknowledgement: This product includes software developed by the University of California, Berkeley and its contributors. 4. Neither the name of the University nor the names of its contributors may be used to endorse or promote products derived from this software without specific prior written permission. THIS SOFTWARE IS PROVIDED BY THE REGENTS AND CONTRIBUTORS "AS IS" AND ANY EXPRESS OR IMPLIED WARRANTIES, INCLUDING, BUT NOT LIMITED TO, THE IMPLIED WARRANTIES OF MERCHANTABILITY AND FITNESS FOR A PARTICULAR PURPOSE ARE DISCLAIMED. IN NO EVENT SHALL THE REGENTS OR CONTRIBUTORS BE LIABLE FOR ANY DIRECT, INDIRECT, INCIDENTAL, SPECIAL, EXEMPLARY, OR CONSEQUENTIAL DAMAGES (INCLUDING, BUT NOT LIMITED TO, PROCUREMENT OF SUBSTITUTE GOODS OR SERVICES; LOSS OF USE, DATA, OR PROFITS; OR BUSINESS INTERRUPTION) HOWEVER CAUSED AND ON ANY THEORY OF LIABILITY, WHETHER IN CONTRACT, STRICT LIABILITY, OR TORT (INCLUDING NEGLIGENCE OR OTHERWISE) ARISING IN ANY WAY OUT OF THE USE OF THIS SOFTWARE, EVEN IF ADVISED OF THE POSSIBILITY OF SUCH DAMAGE. — This product includes software subject to the following Copyright and Permission Notice. COPYRIGHT AND PERMISSION NOTICE Copyright (c) 1996 - 2007, Daniel Stenberg, <[email protected]>. All rights reserved. Permission to use, copy, modify, and distribute this software for any purpose with or without fee is hereby granted, provided that the above copyright notice and this permission notice appear in all copies. THE SOFTWARE IS PROVIDED "AS IS", WITHOUT WARRANTY OF ANY KIND, EXPRESS OR IMPLIED, INCLUDING BUT NOT LIMITED TO THE WARRANTIES OF MERCHANTABILITY, FITNESS FOR A PARTICULAR PURPOSE AND NONINFRINGEMENT OF THIRD PARTY RIGHTS. IN NO EVENT SHALL THE AUTHORS OR COPYRIGHT HOLDERS BE LIABLE FOR ANY CLAIM, DAMAGES OR OTHER LIABILITY, WHETHER IN AN ACTION OF CONTRACT, TORT OR OTHERWISE, ARISING FROM, OUT OF OR IN CONNECTION WITH THE SOFTWARE OR THE USE OR OTHER DEALINGS IN THE SOFTWARE. Except as contained in this notice, the name of a copyright holder shall not be used in advertising or otherwise to promote the sale, use or other dealings in this Software without prior written authorization of the copyright holder. — MPEG Layer-3 audio coding technology licensed from Fraunhofer IIS and Thomson. Supply of this product does not convey a license nor imply any right to distribute content created with this product in revenue-generating broadcast systems (terrestrial, satellite, cable and/or other distribution channels), streaming applications (via Internet, intranets and/or other networks), other content distribution systems (pay-audio or audio-ondemand applications and the like) or on physical media (compact discs, digital versatile discs, semiconductor chips, hard Kaleidescape Part No. 101-0105-00 Rev 3 Page 142 Kaleidescape Installation Guide Notices drives, memory cards and the like). An independent license for such use is required. For details, please visit http://mp3licensing.com. Kaleidescape M-Class Distribution This distribution includes software from the following libraries that are licensed under the GNU General Public License, Version 2. Libraries: ALSA, Bison, BusyBox, E2fsprogs, Minicom, GDB, GNU Readline, ARMulator, PSIM, SGX Embedded Systems DDK for Linux kernel, Linux Kernel, Kernel Headers, cramfs, Udev, Fusion Kernel Module, GStreamer Bad Plug-ins, GStreamer Base Plug-ins, NTFS 3G, eCos host tools, Automake, GCC, GNU Libtool, GNU M4, FUSE, procps, Intel Media Processor CE 3100 Software Development Kit (GPL libraries only). These libraries are the copyright of the respective authors of these libraries. You can copy, distribute, or modify these libraries under the terms of the GNU General Public License, Version 2. These libraries are distributed without any warranty. For more details, see the GNU General Public License, Version 2. A source code version of these Programs, as defined in the GNU General Public License, Version 2 may be obtained by request sent to [email protected]. A copy of the GNU General Public License, Version 2 is available at http://www.gnu.org/licenses/. — This distribution includes software from the following libraries that are licensed under the GNU General Public License, Version 3. Libraries: Autoconf, Binary Format Descriptor (BFD), Binutils. These libraries are the copyright of the respective authors of these libraries. You can copy, distribute, or modify these libraries under the terms of the GNU General Public License, Version 3. These libraries are distributed without any warranty. For more details, see the GNU General Public License, Version 3. A source code version of these Programs, as defined in the GNU General Public License, Version 3 may be obtained by request sent to [email protected]. A copy of the GNU General Public License, Version 3 is available at http://www.gnu.org/licenses/. — This distribution includes software from the following libraries: GStreamer, libicon, libmtp. These libraries are covered by the GNU Library General Public License, Version 2, a copy of which is available at http://www.gnu.org/licenses/. A source code version of these Libraries, as defined in the GNU Library General Public License, Version 2, may be obtained by request sent to [email protected]. — This distribution includes software from the following libraries: libiberty, libusb, DirectFB, GLib, GStreamer Good Plug-ins, GNU C Library. GNU C Library Ports, libfuse. Kaleidescape Part No. 101-0105-00 Rev 3 Page 143 Kaleidescape Installation Guide Notices These libraries are covered by the GNU Lesser General Public License, Version 2.1, a copy of which is available at http://www.gnu.org/licenses/. A source code version of these Libraries, as defined in the GNU Lesser General Public License, Version 2.1, may be obtained by request sent to [email protected]. — This distribution includes software that is subject to the following Copyright Notice, List of Conditions, and Disclaimer. Copyright (c) 2005-2009 Intel Corporation. All rights reserved. All rights reserved. Redistribution and use in source and binary forms, with or without modification, are permitted provided that the following conditions are met: 1. Redistributions of source code must retain the above copyright notice, this list of conditions and the following disclaimer. 2. Redistributions in binary form must reproduce the above copyright notice, this list of conditions and the following disclaimer in the documentation and/or other materials provided with the distribution. 3. Neither the name of Intel Corporation nor the names of its contributors may be used to endorse or promote products derived from this software without specific prior written permission. THIS SOFTWARE IS PROVIDED BY THE COPYRIGHT HOLDERS AND CONTRIBUTORS "AS IS" AND ANY EXPRESS OR IMPLIED WARRANTIES, INCLUDING, BUT NOT LIMITED TO, THE IMPLIED WARRANTIES OF MERCHANTABILITY AND FITNESS FOR A PARTICULAR PURPOSE ARE DISCLAIMED. IN NO EVENT SHALL THE COPYRIGHT OWNER OR CONTRIBUTORS BE LIABLE FOR ANY DIRECT, INDIRECT, INCIDENTAL, SPECIAL, EXEMPLARY, OR CONSEQUENTIAL DAMAGES (INCLUDING, BUT NOT LIMITED TO, PROCUREMENT OF SUBSTITUTE GOODS OR SERVICES; LOSS OF USE, DATA, OR PROFITS; OR BUSINESS INTERRUPTION) HOWEVER CAUSED AND ON ANY THEORY OF LIABILITY, WHETHER IN CONTRACT, STRICT LIABILITY, OR TORT (INCLUDING NEGLIGENCE OR OTHERWISE) ARISING IN ANY WAY OUT OF THE USE OF THIS SOFTWARE, EVEN IF ADVISED OF THE POSSIBILITY OF SUCH DAMAGE. — This distribution includes software that is subject to the following Copyright Notice, List of Conditions, and Disclaimer. Copyright (c) 2001, 2002, 2003, 2004, 2005, 2006, 2007 The Flex Project. Copyright (c) 1990, 1997 The Regents of the University of California. All rights reserved. This code is derived from software contributed to Berkeley by Vern Paxson. The United States Government has rights in this work pursuant to contract no. DEAC03-76SF00098 between the United States Department of Energy and the University of California. Redistribution and use in source and binary forms, with or without modification, are permitted provided that the following conditions are met: 1. Redistributions of source code must retain the above copyright notice, this list of conditions and the following disclaimer. Kaleidescape Part No. 101-0105-00 Rev 3 Page 144 Kaleidescape Installation Guide Notices 2. Redistributions in binary form must reproduce the above copyright notice, this list of conditions and the following disclaimer in the documentation and/or other materials provided with the distribution. Neither the name of the University nor the names of its contributors may be used to endorse or promote products derived from this software without specific prior written permission. THIS SOFTWARE IS PROVIDED "AS IS" AND WITHOUT ANY EXPRESS OR IMPLIED WARRANTIES, INCLUDING, WITHOUT LIMITATION, THE IMPLIED WARRANTIES OF MERCHANTABILITY AND FITNESS FOR A PARTICULAR PURPOSE. — This distribution includes software that is based in part on the work of the FreeType Team. The FreeType Project homepage is at http://www.freetype.org. — This distribution includes software that is based in part on the work of the Independent JPEG Group. — This distribution includes software developed by the Contributing Authors of the PNG Reference Library and Group 42, Inc. — This distribution includes software that is subject to the following Copyright Notice and Permission Notice. Copyright (c) 1998-2004, 2006 Free Software Foundation, Inc. Permission is hereby granted, free of charge, to any person obtaining a copy of this software and associated documentation files (the "Software"), to deal in the Software without restriction, including without limitation the rights to use, copy, modify, merge, publish, distribute, distribute with modifications, sublicense, and/or sell copies of the Software, and to permit persons to whom the Software is furnished to do so, subject to the following conditions: The above copyright notice and this permission notice shall be included in all copies or substantial portions of the Software. THE SOFTWARE IS PROVIDED "AS IS", WITHOUT WARRANTY OF ANY KIND, EXPRESS OR IMPLIED, INCLUDING BUT NOT LIMITED TO THE WARRANTIES OF MERCHANTABILITY, FITNESS FOR A PARTICULAR PURPOSE AND NONINFRINGEMENT. IN NO EVENT SHALL THE ABOVE COPYRIGHT HOLDERS BE LIABLE FOR ANY CLAIM, DAMAGES OR OTHER LIABILITY, WHETHER IN AN ACTION OF CONTRACT, TORT OR OTHERWISE, ARISING FROM, OUT OF OR IN CONNECTION WITH THE SOFTWARE OR THE USE OR OTHER DEALINGS IN THE SOFTWARE. Except as contained in this notice, the name(s) of the above copyright holders shall not be used in advertising or otherwise to promote the sale, use or other dealings in this Software without prior written authorization. — This distribution includes software written by Jean-loup Gailly and Mark Adler. — This distribution includes software that is subject to the following Copyright Notice and Permission Notice. Copyright (c) 2001-2008 The world wide DirectFB Open Source Community (directfb.org) Kaleidescape Part No. 101-0105-00 Rev 3 Page 145 Kaleidescape Installation Guide Notices Copyright (c) 2000-2004 convergence (integrated media) GmbH Permission is hereby granted, free of charge, to any person obtaining a copy of this software and associated documentation files (the "Software"), to deal in the Software without restriction, including without limitation the rights to use, copy, modify, merge, publish, distribute, sublicense, and/or sell copies of the Software, and to permit persons to whom the Software is furnished to do so, subject to the following conditions: The above copyright notice and this permission notice shall be included in all copies or substantial portions of the Software. THE SOFTWARE IS PROVIDED "AS IS", WITHOUT WARRANTY OF ANY KIND, EXPRESS OR IMPLIED, INCLUDING BUT NOT LIMITED TO THE WARRANTIES OF MERCHANTABILITY, FITNESS FOR A PARTICULAR PURPOSE AND NONINFRINGEMENT. IN NO EVENT SHALL THE AUTHORS OR COPYRIGHT HOLDERS BE LIABLE FOR ANY CLAIM, DAMAGES OR OTHER LIABILITY, WHETHER IN AN ACTION OF CONTRACT, TORT OR OTHERWISE, ARISING FROM, OUT OF OR IN CONNECTION WITH THE SOFTWARE OR THE USE OR OTHER DEALINGS IN THE SOFTWARE. — This distribution includes software that is subject to the following Copyright Notice, List of Conditions, and Disclaimer. This program, "bzip2", the associated library "libbzip2", and all documentation, are copyright (C) 1996-2007 Julian R Seward. All rights reserved. Redistribution and use in source and binary forms, with or without modification, are permitted provided that the following conditions are met: 1. Redistributions of source code must retain the above copyright notice, this list of conditions and the following disclaimer. 2. The origin of this software must not be misrepresented; you must not claim that you wrote the original software. If you use this software in a product, an acknowledgment in the product documentation would be appreciated but is not required. 3. Altered source versions must be plainly marked as such, and must not be misrepresented as being the original software. 4. The name of the author may not be used to endorse or promote products derived from this software without specific prior written permission. THIS SOFTWARE IS PROVIDED BY THE AUTHOR "AS IS" AND ANY EXPRESS OR IMPLIED WARRANTIES, INCLUDING, BUT NOT LIMITED TO, THE IMPLIED WARRANTIES OF MERCHANTABILITY AND FITNESS FOR A PARTICULAR PURPOSE ARE DISCLAIMED. IN NO EVENT SHALL THE AUTHOR BE LIABLE FOR ANY DIRECT, INDIRECT, INCIDENTAL, SPECIAL, EXEMPLARY, OR CONSEQUENTIAL DAMAGES (INCLUDING, BUT NOT LIMITED TO, PROCUREMENT OF SUBSTITUTE GOODS OR SERVICES; LOSS OF USE, DATA, OR PROFITS; OR BUSINESS INTERRUPTION) HOWEVER CAUSED AND ON ANY THEORY OF LIABILITY, WHETHER IN CONTRACT, STRICT LIABILITY, OR TORT (INCLUDING NEGLIGENCE OR OTHERWISE) ARISING IN ANY WAY OUT OF THE USE OF THIS SOFTWARE, EVEN IF ADVISED OF THE POSSIBILITY OF SUCH DAMAGE. — This distribution includes software that is subject to the following Copyright Notice, List of Conditions, and Disclaimer. Kaleidescape Part No. 101-0105-00 Rev 3 Page 146 Kaleidescape Installation Guide Notices Copyright 2002,2003,2004,2005 David A. Schleef <[email protected]> All rights reserved. Redistribution and use in source and binary forms, with or without modification, are permitted provided that the following conditions are met: 1. Redistributions of source code must retain the above copyright notice, this list of conditions and the following disclaimer. 2. Redistributions in binary form must reproduce the above copyright notice, this list of conditions and the following disclaimer in the documentation and/or other materials provided with the distribution. THIS SOFTWARE IS PROVIDED BY THE AUTHOR "AS IS" AND ANY EXPRESS OR IMPLIED WARRANTIES, INCLUDING, BUT NOT LIMITED TO, THE IMPLIED WARRANTIES OF MERCHANTABILITY AND FITNESS FOR A PARTICULAR PURPOSE ARE DISCLAIMED. IN NO EVENT SHALL THE AUTHOR BE LIABLE FOR ANY DIRECT, INDIRECT, INCIDENTAL, SPECIAL, EXEMPLARY, OR CONSEQUENTIAL DAMAGES (INCLUDING, BUT NOT LIMITED TO, PROCUREMENT OF SUBSTITUTE GOODS OR SERVICES; LOSS OF USE, DATA, OR PROFITS; OR BUSINESS INTERRUPTION) HOWEVER CAUSED AND ON ANY THEORY OF LIABILITY, WHETHER IN CONTRACT, STRICT LIABILITY, OR TORT (INCLUDING NEGLIGENCE OR OTHERWISE) ARISING IN ANY WAY OUT OF THE USE OF THIS SOFTWARE, EVEN IF ADVISED OF THE POSSIBILITY OF SUCH DAMAGE. Copyright Motorola, Inc. 2003 ALL RIGHTS RESERVED You are hereby granted a copyright license to use, modify, and distribute the SOFTWARE so long as this entire notice is retained without alteration in any modified and/or redistributed versions, and that such modified versions are clearly identified as such. No licenses are granted by implication, estoppel or otherwise under any patents or trademarks of Motorola, Inc. The SOFTWARE is provided on an "AS IS" basis and without warranty. To the maximum extent permitted by applicable law, MOTOROLA DISCLAIMS ALL WARRANTIES WHETHER EXPRESS OR IMPLIED, INCLUDING IMPLIED WARRANTIES OF MERCHANTABILITY OR FITNESS FOR A PARTICULAR PURPOSE AND ANY WARRANTY AGAINST INFRINGEMENT WITH REGARD TO THE SOFTWARE (INCLUDING ANY MODIFIED VERSIONS THEREOF) AND ANY ACCOMPANYING WRITTEN MATERIALS. To the maximum extent permitted by applicable law, IN NO EVENT SHALL MOTOROLA BE LIABLE FOR ANY DAMAGES WHATSOEVER (INCLUDING WITHOUT LIMITATION, DAMAGES FOR LOSS OF BUSINESS PROFITS, BUSINESS INTERRUPTION, LOSS OF BUSINESS INFORMATION, OR OTHER PECUNIARY LOSS) ARISING OF THE USE OR INABILITY TO USE THE SOFTWARE. Motorola assumes no responsibility for the maintenance and support of the SOFTWARE. Copyright (C) 1997 - 2002, Makoto Matsumoto and Takuji Nishimura, All rights reserved. Redistribution and use in source and binary forms, with or without modification, are permitted provided that the following conditions are met: 1. Redistributions of source code must retain the above copyright notice, this list of conditions and the following disclaimer. 2. Redistributions in binary form must reproduce the above copyright notice, this list of conditions and the following disclaimer in the documentation and/or other materials provided with the distribution. Kaleidescape Part No. 101-0105-00 Rev 3 Page 147 Kaleidescape Installation Guide Notices 3. The names of its contributors may not be used to endorse or promote products derived from this software without specific prior written permission. THIS SOFTWARE IS PROVIDED BY THE COPYRIGHT HOLDERS AND CONTRIBUTORS "AS IS" AND ANY EXPRESS OR IMPLIED WARRANTIES, INCLUDING, BUT NOT LIMITED TO, THE IMPLIED WARRANTIES OF MERCHANTABILITY AND FITNESS FOR A PARTICULAR PURPOSE ARE DISCLAIMED. IN NO EVENT SHALL THE COPYRIGHT OWNER OR CONTRIBUTORS BE LIABLE FOR ANY DIRECT, INDIRECT, INCIDENTAL, SPECIAL, EXEMPLARY, OR CONSEQUENTIAL DAMAGES (INCLUDING, BUT NOT LIMITED TO, PROCUREMENT OF SUBSTITUTE GOODS OR SERVICES; LOSS OF USE, DATA, OR PROFITS; OR BUSINESS INTERRUPTION) HOWEVER CAUSED AND ON ANY THEORY OF LIABILITY, WHETHER IN CONTRACT, STRICT LIABILITY, OR TORT (INCLUDING NEGLIGENCE OR OTHERWISE) ARISING IN ANY WAY OUT OF THE USE OF THIS SOFTWARE, EVEN IF ADVISED OF THE POSSIBILITY OF SUCH DAMAGE. — This distribution includes software that is subject to the following Copyright Notice, Permission Notice, and Disclaimer. Copyright (C) 1998-2003 Daniel Veillard. All Rights Reserved. Permission is hereby granted, free of charge, to any person obtaining a copy of this software and associated documentation files (the "Software"), to deal in the Software without restriction, including without limitation the rights to use, copy, modify, merge, publish, distribute, sublicense, and/or sell copies of the Software, and to permit persons to whom the Software is furnished to do so, subject to the following conditions: The above copyright notice and this permission notice shall be included in all copies or substantial portions of the Software. THE SOFTWARE IS PROVIDED "AS IS", WITHOUT WARRANTY OF ANY KIND, EXPRESS OR IMPLIED, INCLUDING BUT NOT LIMITED TO THE WARRANTIES OF MERCHANTABILITY, FITNESS FOR A PARTICULAR PURPOSE AND NONINFRINGEMENT. IN NO EVENT SHALL THE DANIEL VEILLARD BE LIABLE FOR ANY CLAIM, DAMAGES OR OTHER LIABILITY, WHETHER IN AN ACTION OF CONTRACT, TORT OR OTHERWISE, ARISING FROM, OUT OF OR IN CONNECTION WITH THE SOFTWARE OR THE USE OR OTHER DEALINGS IN THE SOFTWARE. Except as contained in this notice, the name of Daniel Veillard shall not be used in advertising or otherwise to promote the sale, use or other dealings in this Software without prior written authorization from him. — This product includes software developed by the OpenSSL Project for use in the OpenSSL Toolkit (http://www.openssl.org/). Copyright (c) 1998-2002 The OpenSSL Project. All rights reserved. Redistribution and use in source and binary forms, with or without modification, are permitted provided that the following conditions are met: 1. Redistributions of source code must retain the above copyright notice, this list of conditions and the following disclaimer. 2. Redistributions in binary form must reproduce the above copyright notice, this list of conditions and the following disclaimer in the documentation and/or other materials provided with the distribution. 3. All advertising materials mentioning features or use of this software must display the following acknowledgment: "This product includes software developed by the OpenSSL Project for use in the OpenSSL Toolkit. (http://www.openssl.org/)" Kaleidescape Part No. 101-0105-00 Rev 3 Page 148 Kaleidescape Installation Guide Notices 4. The names "OpenSSL Toolkit" and "OpenSSL Project" must not be used to endorse or promote products derived from this software without prior written permission. For written permission, please contact [email protected]. 5. Products derived from this software may not be called "OpenSSL" nor may "OpenSSL" appear in their names without prior written permission of the OpenSSL Project. 6. Redistributions of any form whatsoever must retain the following acknowledgment: "This product includes software developed by the OpenSSL Project for use in the OpenSSL Toolkit (http://www.openssl.org/)" THIS SOFTWARE IS PROVIDED BY THE OpenSSL PROJECT "AS IS" AND ANY EXPRESSED OR IMPLIED WARRANTIES, INCLUDING, BUT NOT LIMITED TO, THE IMPLIED WARRANTIES OF MERCHANTABILITY AND FITNESS FOR A PARTICULAR PURPOSE ARE DISCLAIMED. IN NO EVENT SHALL THE OpenSSL PROJECT OR ITS CONTRIBUTORS BE LIABLE FOR ANY DIRECT, INDIRECT, INCIDENTAL, SPECIAL, EXEMPLARY, OR CONSEQUENTIAL DAMAGES (INCLUDING, BUT NOT LIMITED TO, PROCUREMENT OF SUBSTITUTE GOODS OR SERVICES; LOSS OF USE, DATA, OR PROFITS; OR BUSINESS INTERRUPTION) HOWEVER CAUSED AND ON ANY THEORY OF LIABILITY, WHETHER IN CONTRACT, STRICT LIABILITY, OR TORT (INCLUDING NEGLIGENCE OR OTHERWISE) ARISING IN ANY WAY OUT OF THE USE OF THIS SOFTWARE, EVEN IF ADVISED OF THE POSSIBILITY OF SUCH DAMAGE. This product includes cryptographic software written by Eric Young ([email protected]) Copyright (C) 1995-1998 Eric Young ([email protected]) All rights reserved. This package is an SSL implementation written by Eric Young ([email protected]). The implementation was written so as to conform with Netscapes SSL. This library is free for commercial and non-commercial use as long as the following conditions are adhered to. The following conditions apply to all code found in this distribution, be it the RC4, RSA, lhash, DES, etc., code; not just the SSL code. The SSL documentation included with this distribution is covered by the same copyright terms except that the holder is Tim Hudson ([email protected]). Copyright remains Eric Young's, and as such any Copyright notices in the code are not to be removed. If this package is used in a product, Eric Young should be given attribution as the author of the parts of the library used. This can be in the form of a textual message at program startup or in documentation (online or textual) provided with the package. Redistribution and use in source and binary forms, with or without modification, are permitted provided that the following conditions are met: 1. Redistributions of source code must retain the copyright notice, this list of conditions and the following disclaimer. 2. Redistributions in binary form must reproduce the above copyright notice, this list of conditions and the following disclaimer in the documentation and/or other materials provided with the distribution. 3. All advertising materials mentioning features or use of this software must display the following acknowledgement: "This product includes cryptographic software written by Eric Young ([email protected])" The word 'cryptographic' can be left out if the routines from the library being used are not cryptographic related. 4. If you include any Windows specific code (or a derivative thereof) from the apps directory (application code) you must include an acknowledgement: "This product includes software written by Tim Hudson ([email protected])" Kaleidescape Part No. 101-0105-00 Rev 3 Page 149 Kaleidescape Installation Guide Notices THIS SOFTWARE IS PROVIDED BY ERIC YOUNG "AS IS" AND ANY EXPRESS OR IMPLIED WARRANTIES, INCLUDING, BUT NOT LIMITED TO, THE IMPLIED WARRANTIES OF MERCHANTABILITY AND FITNESS FOR A PARTICULAR PURPOSE ARE DISCLAIMED. IN NO EVENT SHALL THE AUTHOR OR CONTRIBUTORS BE LIABLE FOR ANY DIRECT, INDIRECT, INCIDENTAL, SPECIAL, EXEMPLARY, OR CONSEQUENTIAL DAMAGES (INCLUDING, BUT NOT LIMITED TO, PROCUREMENT OF SUBSTITUTE GOODS OR SERVICES; LOSS OF USE, DATA, OR PROFITS; OR BUSINESS INTERRUPTION) HOWEVER CAUSED AND ON ANY THEORY OF LIABILITY, WHETHER IN CONTRACT, STRICT LIABILITY, OR TORT (INCLUDING NEGLIGENCE OR OTHERWISE) ARISING IN ANY WAY OUT OF THE USE OF THIS SOFTWARE, EVEN IF ADVISED OF THE POSSIBILITY OF SUCH DAMAGE. The licence and distribution terms for any publically available version or derivative of this code cannot be changed. i.e. this code cannot simply be copied and put under another distribution licence [including the GNU Public Licence.] — This distribution includes software that is subject to the following Copyright Notice and List of Conditions. Copyright 1994-2008 Purdue Research Foundation, West Lafayette, Indiana 47907. All rights reserved. Written by Victor A. Abell Permission is granted to anyone to use this software for any purpose on any computer system, and to alter it and redistribute it freely, subject to the following restrictions: 1. Neither the authors nor Purdue University are responsible for any consequences of the use of this software. 2. The origin of this software must not be misrepresented, either by explicit claim or by omission. Credit to the authors and Purdue University must appear in documentation and sources. 3. Altered versions must be plainly marked as such, and must not be misrepresented as being the original software. 4. This notice may not be removed or altered. — This distribution includes software that is subject to the following Copyright Notice, List of Conditions, and Disclaimer. Copyright (c) 1991, 1992 Paul Kranenburg [email protected] Copyright (c) 1993 Branko Lankester <[email protected]> Copyright (c) 1993 Ulrich Pegelow <[email protected]> Copyright (c) 1995, 1996 Michael Elizabeth Chastain <[email protected]> Copyright (c) 1993, 1994, 1995, 1996 Rick Sladkey <[email protected]> Copyright (C) 1998-2001 Wichert Akkerman <[email protected]> All rights reserved. Redistribution and use in source and binary forms, with or without modification, are permitted provided that the following conditions are met: 1. Redistributions of source code must retain the above copyright notice, this list of conditions and the following disclaimer. Kaleidescape Part No. 101-0105-00 Rev 3 Page 150 Kaleidescape Installation Guide Notices 2. Redistributions in binary form must reproduce the above copyright notice, this list of conditions and the following disclaimer in the documentation and/or other materials provided with the distribution. 3. The name of the author may not be used to endorse or promote products derived from this software without specific prior written permission. THIS SOFTWARE IS PROVIDED BY THE AUTHOR "AS IS" AND ANY EXPRESS OR IMPLIED WARRANTIES, INCLUDING, BUT NOT LIMITED TO, THE IMPLIED WARRANTIES OF MERCHANTABILITY AND FITNESS FOR A PARTICULAR PURPOSE ARE DISCLAIMED. IN NO EVENT SHALL THE AUTHOR BE LIABLE FOR ANY DIRECT, INDIRECT, INCIDENTAL, SPECIAL, EXEMPLARY, OR CONSEQUENTIAL DAMAGES (INCLUDING, BUT NOT LIMITED TO, PROCUREMENT OF SUBSTITUTE GOODS OR SERVICES; LOSS OF USE, DATA, OR PROFITS; OR BUSINESS INTERRUPTION) HOWEVER CAUSED AND ON ANY THEORY OF LIABILITY, WHETHER IN CONTRACT, STRICT LIABILITY, OR TORT (INCLUDING NEGLIGENCE OR OTHERWISE) ARISING IN ANY WAY OUT OF THE USE OF THIS SOFTWARE, EVEN IF ADVISED OF THE POSSIBILITY OF SUCH DAMAGE. — This distribution includes software that is subject to the following Copyright Notice. Copyright (C) 2009. Silicon Graphics, Inc. All Rights Reserved. This document is licensed under the SGI Free Software B License Version 2.0. See http://oss.sgi.com/projects/FreeB/. — This distribution includes software that is subject to the following Copyright Notice and Permission Notice. Copyright (c) 2007 The Khronos Group Inc. Permission is hereby granted, free of charge, to any person obtaining a copy of this software and /or associated documentation files (the "Materials"), to deal in the Materials without restriction, including without limitation the rights to use, copy, modify, merge, publish, distribute, sublicense, and/or sell copies of the Materials, and to permit persons to whom the Materials are furnished to do so, subject to the following conditions: The above copyright notice and this permission notice shall be included in all copies or substantial portions of the Materials. THE MATERIALS ARE PROVIDED "AS IS", WITHOUT WARRANTY OF ANY KIND, EXPRESS OR IMPLIED, INCLUDING BUT NOT LIMITED TO THE WARRANTIES OF MERCHANTABILITY, FITNESS FOR A PARTICULAR PURPOSE AND NONINFRINGEMENT. IN NO EVENT SHALL THE AUTHORS OR COPYRIGHT HOLDERS BE LIABLE FOR ANY CLAIM, DAMAGES OR OTHER LIABILITY, WHETHER IN AN ACTION OF CONTRACT, TORT OR OTHERWISE, ARISING FROM, OUT OF OR IN CONNECTION WITH THE MATERIALS OR THE USE OR OTHER DEALINGS IN THE MATERIALS. — This distribution includes software that is subject to the following Copyright Notice and Permission Notice. Copyright (c) 2007-2009 The Khronos Group Inc. Permission is hereby granted, free of charge, to any person obtaining a copy of this software and /or associated documentation files (the "Materials"), to deal in the Materials without restriction, including without limitation the rights to use, copy, Kaleidescape Part No. 101-0105-00 Rev 3 Page 151 Kaleidescape Installation Guide Notices modify, merge, publish, distribute, sublicense, and/or sell copies of the Materials, and to permit persons to whom the Materials are furnished to do so, subject to the following conditions: The above copyright notice and this permission notice shall be included in all copies or substantial portions of the Materials. THE MATERIALS ARE PROVIDED "AS IS", WITHOUT WARRANTY OF ANY KIND, EXPRESS OR IMPLIED, INCLUDING BUT NOT LIMITED TO THE WARRANTIES OF MERCHANTABILITY, FITNESS FOR A PARTICULAR PURPOSE AND NONINFRINGEMENT. IN NO EVENT SHALL THE AUTHORS OR COPYRIGHT HOLDERS BE LIABLE FOR ANY CLAIM, DAMAGES OR OTHER LIABILITY, WHETHER IN AN ACTION OF CONTRACT, TORT OR OTHERWISE, ARISING FROM, OUT OF OR IN CONNECTION WITH THE MATERIALS OR THE USE OR OTHER DEALINGS IN THE MATERIALS. Kaleidescape App for iPad Portions of this product may use the following third-party software, the use of which is hereby acknowledged. JSON Framework JSON.h, NSObject+SBJSON.h, NSObject+SBJSON.m, NSString+SBJSON.h, NSString+SBJSON.m, SBJsonBase.h, SBJson-Base.m, SBJsonParser.h, SBJsonParser.m, SBJsonWriter.h, SBJsonWriter.m Copyright (C) 2007-2010 Stig Brautaset. All rights reserved. Redistribution and use in source and binary forms, with or without modification, are permitted provided that the following conditions are met: 1. Redistributions of source code must retain the above copyright notice, this list of conditions and the following disclaimer. 2. Redistributions in binary form must reproduce the above copyright notice, this list of conditions and the following disclaimer in the documentation and/or other materials provided with the distribution. 3. Neither the name of the author nor the names of its contributors may be used to endorse or promote products derived from this software without specific prior written permission. THIS SOFTWARE IS PROVIDED BY THE COPYRIGHT HOLDERS AND CONTRIBUTORS "AS IS" AND ANY EXPRESS OR IMPLIED WARRANTIES, INCLUDING, BUT NOT LIMITED TO, THE IMPLIED WARRANTIES OF MERCHANTABILITY AND FITNESS FOR A PARTICULAR PURPOSE ARE DISCLAIMED. IN NO EVENT SHALL THE COPYRIGHT OWNER OR CONTRIBUTORS BE LIABLE FOR ANY DIRECT, INDIRECT, INCIDENTAL, SPECIAL, EXEMPLARY, OR CONSEQUENTIAL DAMAGES (INCLUDING, BUT NOT LIMITED TO, PROCUREMENT OF SUBSTITUTE GOODS OR SERVICES; LOSS OF USE, DATA, OR PROFITS; OR BUSINESS INTERRUPTION) HOWEVER CAUSED AND ON ANY THEORY OF LIABILITY, WHETHER IN CONTRACT, STRICT LIABILITY, OR TORT (INCLUDING NEGLIGENCE OR OTHERWISE) ARISING IN ANY WAY OUT OF THE USE OF THIS SOFTWARE, EVEN IF ADVISED OF THE POSSIBILITY OF SUCH DAMAGE. Kaleidescape Part No. 101-0105-00 Rev 3 Page 152 Kaleidescape Installation Guide iOS Frameworks CommonCrypto/CommonDigest.h, CommonCrypto/CommonCryptor.h, Security/ Security.h This product includes software from iOS frameworks available at http:// opensource.apple.com/source/ and licensed under the terms of the Apple Public Source License version 2.0, http://www.opensource.apple.com/license/apsl/. Berkeley Sockets This product includes third-party software included with the Xcode toolset. The included third-party software is licensed under the terms of the Apple Public Source License version 2.0, http://www.opensource.apple.com/license/apsl/. Xcode is available at http://developer.apple.com/xcode/. sys/socket.h Copyright (c) 1998, 1999 Apple Computer, Inc. All Rights Reserved. Copyright (c) 1995 NeXT Computer, Inc. All Rights Reserved. Copyright (c) 1982, 1985, 1986, 1988, 1993, 1994 The Regents of the University of California. All rights reserved. sys/ioctl.h Copyright (c) 1995 NeXT Computer, Inc. All Rights Reserved. Copyright (c) 1982, 1986, 1990, 1993, 1994 The Regents of the University of California. All rights reserved. (c) UNIX System Laboratories, Inc. All or some portions of this file are derived from material licensed to the University of California by American Telephone and Telegraph Co. or Unix System Laboratories, Inc. and are reproduced herein with the permission of UNIX System Laboratories, Inc. netinet/in.h Copyright (c) 1982, 1986, 1990, 1993 The Regents of the University of California. All rights reserved. net/if.h Copyright (c) 1982, 1986, 1989, 1993 The Regents of the University of California. All rights reserved. arpa/inet.h Copyright (c) 1983, 1993 The Regents of the University of California. All rights reserved. netdb.h Copyright (c) 1980, 1983, 1988, 1993 The Regents of the University of California. All rights reserved. Redistribution and use in source and binary forms, with or without modification, are permitted provided that the following conditions are met: 1. Redistributions of source code must retain the above copyright notice, this list of conditions and the following disclaimer. Kaleidescape Part No. 101-0105-00 Rev 3 Page 153 Kaleidescape Installation Guide 2. Redistributions in binary form must reproduce the above copyright notice, this list of conditions and the following disclaimer in the documentation and/or other materials provided with the distribution. 3. All advertising materials mentioning features or use of this software must display the following acknowledgement: This product includes software developed by the University of California, Berkeley and its contributors. 4. Neither the name of the University nor the names of its contributors may be used to endorse or promote products derived from this software without specific prior written permission. THIS SOFTWARE IS PROVIDED BY THE REGENTS AND CONTRIBUTORS ''AS IS'' AND ANY EXPRESS OR IMPLIED WARRANTIES, INCLUDING, BUT NOT LIMITED TO, THE IMPLIED WARRANTIES OF MERCHANTABILITY AND FITNESS FOR A PARTICULAR PURPOSE ARE DISCLAIMED. IN NO EVENT SHALL THE REGENTS OR CONTRIBUTORS BE LIABLE FOR ANY DIRECT, INDIRECT, INCIDENTAL, SPECIAL, EXEMPLARY, OR CONSEQUENTIAL DAMAGES (INCLUDING, BUT NOT LIMITED TO, PROCUREMENT OF SUBSTITUTE GOODS OR SERVICES; LOSS OF USE, DATA, OR PROFITS; OR BUSINESS INTERRUPTION) HOWEVER CAUSED AND ON ANY THEORY OF LIABILITY, WHETHER IN CONTRACT, STRICT LIABILITY, OR TORT (INCLUDING NEGLIGENCE OR OTHERWISE) ARISING IN ANY WAY OUT OF THE USE OF THIS SOFTWARE, EVEN IF ADVISED OF THE POSSIBILITY OF SUCH DAMAGE. Rovi Corporation Notice This product incorporates copyright protection technology that is protected by U.S. patents and other intellectual property rights. Use of this copyright protection technology must be authorized by Rovi Corporation, and is intended for home and other limited viewing uses only unless otherwise authorized by Rovi Corporation. Reverse engineering or disassembly is prohibited. CONSUMERS SHOULD NOTE THAT NOT ALL HIGH DEFINITION TELEVISION SETS ARE FULLY COMPATIBLE WITH THIS PRODUCT AND MAY CAUSE ARTIFACTS TO BE DISPLAYED IN THE PICTURE. IN CASE OF 525 OR 625 PROGRESSIVE SCAN PICTURE PROBLEMS, IT IS RECOMMENDED THAT THE USER SWITCH THE CONNECTION TO THE ‘STANDARD DEFINITION’ OUTPUT. IF THERE ARE QUESTIONS REGARDING OUR TV SET COMPATIBILITY WITH THIS MODEL 525p AND 625p DVD PLAYER, PLEASE CONTACT OUR CUSTOMER SERVICE CENTER. Cinavia Notice This product uses Cinavia technology to limit the use of unauthorized copies of some commercially-produced film and videos and their soundtracks. When a prohibited use of an unauthorized copy is detected, a message will be displayed and playback or copying will be interrupted. If playback or copying is interrupted and one of the messages shown below is displayed, the content is an unauthorized copy protected by Cinavia technology. Message Cinavia Message Code Cinavia stopped playback. 1 Cinavia muted the audio. 3 Kaleidescape Part No. 101-0105-00 Rev 3 Page 154 Kaleidescape Installation Guide More information about Cinavia technology is provided at the Cinavia Online Consumer Information Center at http://www.cinavia.com. To request additional information about Cinavia by mail, send a postcard with your mailing address to: Cinavia Consumer Information Center, P.O. Box 86851, San Diego, CA, 92138, USA. This product incorporates proprietary technology under license from Verance Corporation and is protected by U.S. Patent 7,369,677 and other U.S. and worldwide patents issued and pending as well as copyright and trade secret protection for certain aspects of such technology. Cinavia is a trademark of Verance Corporation. Copyright 2004–2010 Verance Corporation. All rights reserved by Verance. Reverse engineering or disassembly is prohibited. Kaleidescape Part No. 101-0105-00 Rev 3 Page 155 Kaleidescape Installation Guide Appendix C Network Requirements This appendix provides information on designing, troubleshooting and optimizing Ethernet networks used with Kaleidescape movie servers. The Browser Interface The browser interface is used to view and edit information about movies and music and configure a system. For Windows Use the following procedure to open the browser interface using Windows. 1. Open a web browser and enter http://my-kaleidescape. If the browser interface does not appear or is slow to appear, go to the next step. 2. Enter the browser interface IP address in the web browser. a. Press the MENU button on a remote control. b. Use the arrow buttons to select System. c. Select System Summary to see the browser interface (Web utility) IP address. d. Enter the Web utility IP address in the web browser. If access to the onscreen display of a Kaleidescape player is not readily available, or to avoid checking the IP address every time to access the browser interface, use the following procedure. 3. Enter http://my-kaleidescape.local. If the browser interface does not appear or is slow to appear, go to the next step. 4. If Kaleidescape Conductor is installed on the computer, right-click the Kaleidescape icon in the notification area of the task bar (system tray). Then select Manage Kaleidescape System... from the pop-up menu. If the browser interface does not appear or is slow to appear, go to the next step. Kaleidescape Part No. 101-0105-00 Rev 3 Page 156 Kaleidescape Installation Guide Network Requirements 5. Install Bonjour for Windows. Go to the Bonjour download page and click the DOWNLOAD button. 6. Enter http://my-kaleidescape.local again. For Mac Use the following procedure to open the browser interface using a Mac. 1. Open a web browser and enter http://my-kaleidescape.local. If the browser interface does not appear or is slow to appear, go to the next step. 2. Enter the browser interface IP address in the web browser. a. Press the MENU button on a remote control. b. Use the arrow buttons to select System. c. Select System Summary to see the browser interface IP address. d. Enter the browser interface IP address in the web browser. Special Cases Under special conditions, other methods are used to access the browser interface. 0 Using a link local address when the server has an unknown static IP address 0 Using a serial number when more than one Kaleidescape System is on the same network Link Local Address The link local address method is used in extreme cases under the following conditions: • The server has an unknown static IP address. • The server is on a different subnet than the computer. (Using the link local address is a somewhat complicated procedure requiring setting the computer to a static IP in the 169.254.xxx.xxx range). For detailed instructions on using the link local address, see Knowledge Base article at www.kaleidescape.com/go/link-local. Server Serial Numbers When more than one Kaleidescape System is on the same network, using http://my-kaleidescape accesses one of the servers. Kaleidescape Part No. 101-0105-00 Rev 3 Page 157 Kaleidescape Installation Guide Network Requirements To open the browser interface for a specific server, enter http://ks- followed by the twelve-digit serial number of the server. For example, for a server with the serial number 0000 0001 2345, enter http://ks-000000012345 for Windows or http://ks-000000012345.local for Mac. A dealer who has a demonstration system plus one or more customer systems on the dealer’s network can access the browser interface for each system using this method. Installer Pages The installer pages of the browser interface are used for configuring a system. To access the installer pages, add /installer to the address used to access the browser interface. For example, http://my-kaleidescape/installer (Windows) http://my-kaleidescape.local/installer (Mac) Network Switches Gigabit Switch A Gigabit switch is recommended for any M-Class installation, and is required to watch more than one Blu-ray movie from the same server at the same time. Both server and player require a 1000Base-T connection for 1000Base-T throughput. All-in-one devices that combine the functions of a router and a switch are generally less effective and not recommended. Kaleidescape does not recommend a particular network switch, because there are several quality network switches on the market; however the following switches were tested and worked successfully: • Dell PowerConnect Series Gigabit Ethernet switches (27xx, 28xx) • Cisco Small Business Managed Gigabit Switches (SRWxxxx) • Pakedge Gigabit Switches Multiple Switches If more than one 1000Base-T switch is on the network, make sure all switches are interconnected using only 1000Base-T switches. • Do not use 100Base-TX switches. • Do not use a router as a switch. Kaleidescape Part No. 101-0105-00 Rev 3 Page 158 Kaleidescape Installation Guide Network Requirements Network Connections Cat5, Cat5e and Cat6 network cabling can be used. Network cabling must have all four pairs of the cable terminated at each connector for 1000Base-T speed. Kaleidescape strongly recommends the use of wired Ethernet network connections between servers and players. Wireless and powerline connections work well for providing Internet access to the Kaleidescape System, for connecting control systems, and for accessing the browser interface from a computer; however, a wired Ethernet network must be used for connecting the Kaleidescape components because there is little tolerance for latency while streaming movies or music. Up to 54 megabits per second of network bandwidth is used while streaming a Blu-ray movie. Blu-ray Discs are not compressed when imported. Full audio and video fidelity are maintained. 1U and 3U Servers and 5U Servers (Model KSERVER-2500) can stream up to 5 Blu-ray movies over a well-designed 1000Base-T network at the same time. 5U Servers (Model KSERVER-2000) can stream one Blu-ray movie at a time because the network interface is limited to 100Base-TX. Network Speed Test Kaleidescape provides a network diagnostic tool to check the bandwidth between each player and the server. To run the Network Speed Test, go to http://my-kaleidescape/speedtest.html. The results are sent to Kaleidescape and appear on the system dashboard found on the Kaleidescape Extranet. DHCP Reservations Assigning Fixed IP Addresses Using DHCP Reservations DHCP reservations provide a central point of management for all IP allocations at a site. With DHCP reservations, network parameters such as IP addresses, subnet mask, default gateway, and DNS servers are set in one place — at the DHCP server. If any of these parameters change, only the DHCP server has to be modified. For most installations, the DHCP server built into the router is perfectly adequate. The procedure to create DHCP reservations is device-specific. Refer to the router or DHCP server documentation for instructions. DHCP reservations are usually made using MAC addresses. To see MAC addresses for Kaleidescape Part No. 101-0105-00 Rev 3 Page 159 Kaleidescape Installation Guide Network Requirements Kaleidescape components, go to the COMPONENTS tab of the browser interface at http://my-kaleidescape/installer/components.html. Resetting an M-Class Player to Use a DHCP Address To remove a static IP configuration on an M-Class player, press the network RESET button on the back of the player to return the player to the factory default DHCP setting. The network RESET button is located just left of the analog audio connectors. (For non-M-Class players, the configuration must be changed on the browser interface NETWORK settings.) To activate the RESET button, insert a paperclip in the reset hole. Press until the indicator on the right side of the Network connector starts blinking, then release. The player restarts with the factory default DHCP setting. Assigning Static Network Addresses If the installation site does not have a DHCP server, or if DHCP cannot be used for Kaleidescape components, IP addresses can be assigned manually. See Network Settings on page 88. Add a DHCP server temporarily to the site network to access the installer pages of the browser interface and enter IP settings that are valid for the local site network. Kaleidescape Part No. 101-0105-00 Rev 3 Page 160 Kaleidescape Installation Guide Appendix D Installation Checklist This installation checklist helps clarify the information and equipment required for a Kaleidescape installation, and verify that the installation site meets basic requirements. Important First Steps Ask the customer to activate the system at www.kaleidescape.com/activate. Provide the serial number of one of the components, which is required for activation. The system can be installed and tested prior to activation. Verify that there is a working high-speed Internet connection at the site. Check that there is adequate power for all the devices being installed. The server requires a high-quality surge protector. A UPS is optional. Check that the planned locations for Kaleidescape components have adequate cooling. The operating temperature range for Kaleidescape components varies by component. See Appendix A on page 124. Create installation diagrams for the network and audio/video. Note the cable distances for all A/V, Ethernet, and control interfaces. Make sure these distances do not exceed specifications. For each Kaleidescape component, note the following information: • Device type • Device serial number • IP address • MAC address (listed on the COMPONENTS tab of the browser interface) • Control Protocol Device ID (if applicable) For the network, note the following information: • Subnet mask • Gateway address • DNS server addresses • DHCP address range • User name and password for router and switch Kaleidescape Part No. 101-0105-00 Rev 3 Page 161 Kaleidescape Installation Guide Installation Checklist Allow enough time to import the customer’s content. It takes about 1 hour to import a Blu-ray Disc, 30 minutes to import a DVD, and 15 minutes to import a CD. Tools and Supplies Having the following items on hand can help the installation go smoothly. • • • • • • • • • • • • • Extra Cat5e or Cat6 cables Extra HDMI cable Extra power cord Ethernet cable tester Cable ties Label maker Extra 4 port router Extra 8 or 16 port 1000Base-T switch Power strip Serial RS-232 cable (F-F DB-9 null modem cable) IR remote control (Kaleidescape Remote) Small television with appropriate inputs Screwdrivers, pliers, etc. Equipment A single router or other device capable of issuing DHCP addresses. If the home network uses static addresses, then a list of the IP addresses of the network nodes should be available. 1000Base-T or 100Base-TX switch with enough ports for all devices. A 1000Base-T switch is recommended for all systems, and required if more than one Blu-ray movie or more than seven DVD movies will be played from a server at the same time. Cat5e, Cat6 or higher grade network and patch cables from the equipment rack to all Kaleidescape components. Audio and video cables in the lengths specified in the installation diagram. A computer with an Ethernet port and a browser running an up-to-date version of the Java software (current version of Java software can be downloaded from www.java.com). Computer must also have a working serial port or a known good USB adapter in case a serial capture is required. Kaleidescape Part No. 101-0105-00 Rev 3 Page 162 Kaleidescape Installation Guide Installation Checklist Controls and Displays If using a control system (Crestron, AMX, etc.) to control the Kaleidescape System, determine if the control will be done over TCP/IP, Serial RS-232, or IR. If using control via TCP/IP, assign each Kaleidescape component a DHCP reservation on the DHCP server. Assign and document the following for all Kaleidescape components and the control system. Device (e.g., M500 Player Serial Number 000000001234 CPDID 3 IP Address 192.168.1.175 MAC Address 00:02:1E:34:21:6A) __________ ____________ ________ ______________ ______________ __________ ____________ ________ ______________ ______________ __________ ____________ ________ ______________ ______________ __________ ____________ ________ ______________ ______________ __________ ____________ ________ ______________ ______________ __________ ____________ ________ ______________ ______________ __________ ____________ ________ ______________ ______________ List all the display devices and audio equipment that will be connected to the Kaleidescape System. Document the native resolution of the display devices Players output in native format. This means the display must support both PAL and NTSC to view content in both video standards. Room (e.g., Theater Player SN 000000001234 Video Display Resolution Format Conn. Runco VX-4c 1080p 16×9 HDMI ___________ ____________ __________ _________ _____ ________ _________ _________ ___________ ____________ __________ _________ _____ ________ _________ _________ ___________ ____________ __________ _________ _____ ________ _________ _________ ___________ ____________ __________ _________ _____ ________ _________ _________ ___________ ____________ __________ _________ _____ ________ _________ _________ ___________ ____________ __________ _________ _____ ________ _________ _________ Audio Connection 4:3 Stretch HDMI No ) If using a control system, download the latest documentation, programs and templates from www.kaleidescape.com/support/control-systems. Kaleidescape Part No. 101-0105-00 Rev 3 Page 163