1
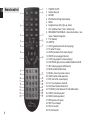
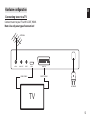
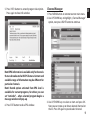
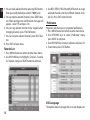
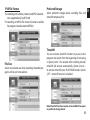
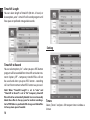
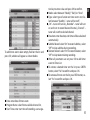
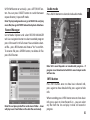
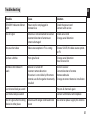
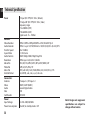
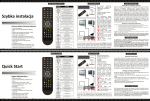
CINEMA HQ 2.0
HD MULTIMEDIA PLAYER & DVB-T TUNER IN ONE
MT4160
User Manual
EN Index
Index ................................................................................................2
Introduction ..................................................................................3
Front panel.....................................................................................3
Rear panel ......................................................................................3
Remote control ............................................................................4
Hardware configuration............................................................5
Connecting tuner to a TV .........................................................5
Software Configuration.............................................................6
Startup Menu ................................................................................6
Installation .....................................................................................6
Watching TV ..................................................................................8
Changing channels .....................................................................8
Using Electronic Program Guide (EPG) ................................8
Channel Manager ........................................................................9
Preference ....................................................................................10
PVR File Format ..........................................................................15
Setting ...........................................................................................16
AV menu .......................................................................................19
GAME .............................................................................................20
Using USB storage .....................................................................20
Recording .....................................................................................21
Using timeshift function .........................................................22
Exploring Media .........................................................................22
Playing Movies ...........................................................................23
2
Playing Music ..............................................................................24
Photo Slideshow ........................................................................24
Record Manager.........................................................................25
Audio mode.................................................................................25
INFO button.................................................................................25
Troubleshooting ........................................................................27
Technical Specification ............................................................28
Introduction
EN
Front panel
Open menu
On/Off
Rear panel
Enter button
Display
Channel
down/up
Volume
down/up
SD memory
card slot
USB Port
Coaxial Digital
Audio
TV aerial
RF Loop
HDMI
TV Scart
for an external TV aerial
through for an external device
output
for connection to the TV
AC Mains
3
EN Remote control
1.
2.
3.
4.
5.
6.
7.
8.
9.
10.
11.
12.
13.
14.
15.
16.
17.
18.
19.
20.
21.
22.
23.
24.
25.
26.
27.
28.
29.
30.
4
STANDBY On/Off
Number Key pad
RECORD
EPG (Electronic Programme Guide)
MENU
Navigation keys (left, right, up, down)
VOL- (Volume Down) / VOL+ (Volume Up)
RED/GREEN/YELLOW/BLUE – interactive buttons / submenu / Teletext Navigation
TTX (Teletext)
SUBTITLE
GOTO (goto desired mark when playing)
TV (enter TV menu)
ZOOM (set zoom in full-screen display)
DEVICE (access plugged devices)
STOP (stop program or movie playing)
PLAY/PAUSE (play movie or enable/disable timeshift)
INFO (display program information)
MUTE (enable/disable mute)
RECALL (return to previous menu)
AUDIO (audio mode operation)
EXIT (exit to full-screen display)
P+/P- (next/previous channel)
FAV (show favorite channel list)
TV/RADIO (switch between TV and Radio mode)
DIGEST (channel preview)
MEDIA (media operation)
PREV (previous chapter)
NEXT (next chapter)
FR (Fast rewind)
FF (fast forward)
Hardware configuration
EN
Connecting tuner to a TV
Connect tuner to your TV with SCART, HDMI.
Note: Use only one type of connection!
ANTENNA
ANT IN
LOOP UOT
SPDIF
HDMI
HDMI CABLE
SCART-TV
SCART CABLE
AC MAINS
TV
5
EN Software Configuration
Startup Menu
Wait until scanning is finished. Device now will automatically show first channel from the list. Now tuner is
ready to work.
If you first time turn on tuner there will be shown “Init
Install” menu. Then with navigation keys setup major
options: OSD LANGUAGE, COUNTRY, TIME ZONE, LCN
(select LCN ON if your antenna requires power supply), then select START SEARCH and press OK to enable
channel autoscanning procedure.
Installation
1. Press MENU button on the remote.
2. With UP/DOWN keys choose „Installation” menu,
press RIGHT to accept.
3. Use UP/DOWN to select proper submenu and press
OK.
4. Press EXIT to leave menu.
6
Manual Channel Scanning
EN
1. Choose „Manual Search” menu and press OK
2. Enter default password “0000” and press OK.
Auto Channel Scanning (AutoSearch)
1. Select „Auto Search” option and press OK.
2. Using navigation keys to choose “Yes” option and
press OK to confirm.
3. Select “Channel No.” to choose desired channel
number, next select “Frequency” – use key pad buttons to enter desired value. Next select “Bandwidth”
and then select “Start Search” and press OK to start
manual search.
7
EN
Channel filter
Choose „Channel Filter” to scan for all channels or only
for FTA channels.
3. Choose channel from channel list on the menu.
When in Full-screen mode press OK button, channel
list will pop up. Use LEFT/RIGHT navigation keys to
switch channel list and then use UP/DOWN navigation keys to select channel and then press OK again
to confirm.
Using Electronic Program Guide (EPG)
1. Press EPG button on remote.
2. Use UP/DOWN keys to explore list of available channels. Use LEFT/RIGHT keys to navigate program list.
3. Press GREEN button to start recording selected program, when prompted choose “Yes” to confirm .
4. Press RED button to switch list between “daily”,
”weekly”, “now/next” mode.
Country
Use navigation keys to select country where you are
receiving DVB-T signal.
Watching TV
Changing channels
You can select the channel you wish to watch in 3 ways:
1. By pressing CH- / CH+ buttons on remote.
2. Enter channel number manually using numeric keys
on remote.
8
5. Press INFO button to extend program description.
Press again to close info window.
Note! EPG information is available only for channels
that are broadcasted with EPG feature. Content and
available range of information may be different for
particular channels.
Note! Record option activated from EPG level is
available for current programs, for others you can
set “reminder” – when selected program begins a
message window will pop-up.
6. Press EXIT button to close EPG window.
Channel Manager
1. Press MENU button on remote to enter main menu.
2. Use UP/DOWN keys to highlight „Channel Manager”
option, next press RIGHT button to continue
3. Use UP/DOWN keys to select an item and press OK.
Now you can move up or down selected channel on
the list. Press OK again to put deselect channel.
9
EN
EN
4. You can lock selected channel pressing RED button.
Enter password (default password is “0000”) and.
5. You can delete selected channel, press GREEN button. When exiting menu confirmation message will
appear – select YES and press OK.
6. You can tag selected channel to be skipped when
changing channels, press YELLOW button.
7. You can rename selected channel, press BLUE button.
8. Press EXIT to leave menu.
Favorite List
3. Use RED, GREEN, YELLOW and BLUE button to assign
selected channels into four different favorite channels list. Press EXIT when finished.
Preference
Properties will allow you to set general preferences.
1. Press MENU button on remote to enter main menu.
2. Use UP/DOWN keys to select „Preference” menu,
press RIGHT to continue.
3. Use UP/DOWN keys to select submenu and press OK.
4. To exit menu press EXIT button.
1. Press MENU button on remote to enter main menu.
2. Use UP/DOWN keys to highlight „Channel – Favorite
List” option, next press RIGHT button to continue
OSD Language
This option allows to change the on-screen display lan10
guage menu. Use UP/DOWN button to select language
and then press OK to confirm.
Time On OSD
OSD Timeout
1st Preferred Subtitle
Select duration of displaying OSD messages (2-6 seconds).
Select first preffered subtitle (function dependent on
broadcasted program).
Switch “On” option if you want to activate constant display of actual time in the right corner. To disable this
function select “Off ”.
11
EN
EN
2nd Preferred Subtitle
1st Preferred Audio
Select second preffered subtitle (function dependent
on broadcasted program).
Select first preffered audio track (function dependent
on broadcasted program).
Hard Hearing
2nd Preferred Audio
To enable this function for hard hearing watchers select „On”. To disable select „Off ”.
Select second preffered audio track (function dependent on broadcasted program).
12
Multimedia
Music Slide Show
Multimedia settings are available only when USB mass
storage device is connected (pendrive or USB HDD).
You can choose between following options: play all
music files in selected directory repeatidly, reapeat
once, or do not repeat – repeat OFF.
Photo Slide Show
Movie Slide Show
You can choose between following options: show all
images in selected directory repeatidly (Repeat-Dir) or
do not repeat (Repeat-OFF).
You can choose between following options: play all
movie files in selected directory repeatidly, reapeat
once, or do not repeat – repeat OFF.
13
EN
EN
BGmusic
Effect
You can turn ON or OFF music play durning images
slideshow.
You can set transformation effect between slides in
slideshow mode.
SlideTime
You can choose duration between slides in slideshow
mode (3-15sec).
PVR Config
In preference menu select PVR Config and press OK.
Now you can modify settings regarding timeshift function and recording programs.
Note! To acces these setting you must connect USB mass
storage first.
14
PVR File Format
TS: recording with subtitles, teletext and EPG (video format supported only by MT4160)
PS: recording in MPEG2 file format (function available
for programs broadcasted in MPEG2)
Preferred Storage
Select preferred storage device recording files and
timeshift temporary files.
Timeshift
File Size
Select max volume size when recording. Recorded programs will be split into volumes.
You can activate timeshift function to pause on-line
program and watch from the beginning of activating
it. Option „Auto” – five seconds after switching channel
timeshift will activate automatically. Option „Pause” –
to activate timeshift press PLAY/PAUSE button. Option
„Off ” – timeshift function is disabled.
Note! Timeshift function requires at least 4GB of free space
on preferred storage device.
15
EN
EN
Timeshift Length
You can select length of timeshift (30 min -2 hours) or
leave option „auto” – timeshift will record program until
free space on prefered storage device ends.
Setting
Timeshift to Record
You can select option „On” – when you press REC button
program will be recorded from timeshift activation moment. Option „Off ” – temporary timeshift files will not
be saved and when you press REC button - recording
will start from moment when REC button was pressed.
Note! When “Timeshift Length” is set to “auto” and
“Timeshift to Record” is set to “On” temporary timeshift
files will not be automatically deleted. User must manually
delete these files to free up space for another recordings.
Go to PVR folder on preferred USB storage and delete files
to free up more space if needed.
16
Timers
Select „Timers” and press OK to open timers window as
shown.
To add timer event select empty field on the list and
press OK, window will appear as shown below:
tion key to enter value and press OK to confirm.
¯ Mode: select between “Weekly”, “Daily” or “Once”.
¯ Type: select type of action on timer event start. Select between “Standby” – tuner will turn off,
¯ „On” – tuner will turn on, „Recorder” – tuner will turn
on and start to record desired channel, „Channel” –
tuner will switch to desired channel.
¯ Duration: enter duration, end time will be calculated
automatically.
¯ Subtitle Record: select “On” to record subtitles, select
“Off ” to skip subtitles during recording.
¯ Teletext Record: select “On” to record teletext, select
“Off ” to skip teletext during recording.
¯ When all parameters are set press OK to add timer
event to Timer List.
¯ To remove selected timer on the list press GREEN
button, select “Yes” to confirm and press OK.
¯ To remove all timers on the list press RED button, select “Yes” to confirm and press OK.
¯ Date: enter date of timer event.
¯ Program Name: select from available channel list.
¯ Start Time: enter start time of recording, use naviga17
EN
EN
Child Lock
1. Select “Child Lock” in setting menu, enter default
password “0000” when prompted.
Factory Reset
2. Select “Parental rating” and enter age of child. Programs broadcasted with child lock will be blocked.
3. Select “Change Pin Code” if you want to change default password “0000”. In field “Old Password” enter
default or previous password (if you have change it
once at least) and enter new password in the fields
“New Password” and “Confirm Password”.
18
If you want to recover tuner to manufacture setting select “Factory Reset” and enter password when prompted.
Upgrade
Connect USB mass storage device with appropriate
firmware file in root folder. Select “Upgrade” in setting
menu and press OK. Enter password when prompted.
Locate firmware file and press OK.
Note! Unsuccessful firmware upgrade can damage your
tuner.
Version
Select “Version” in setting menu to show information
about firmware and software version.
Auto Standby
Tuner can automatically turn off when no input is done
by user. Select between 1-3 hour or disable this function – set option to “Off ”.
AV menu
EN
Here you can adjust all parameters regarding video and
audio output. Adjust Contrast, Brightness, Saturation,
HUE. If you connected Hi-Fi amplifier to SPDIF you can
select PCM, Bitstream or Mute – to disable this output.
Select aspect ratio appropriate to your TV set. For oldfashioned 4:3 TV set choose “4:3 LetterBox” - programs
broadcasted in 16:9 would have black strap at top and
bottom of TV screen. “4:3 PanScan” – programs broadcasted in 16:9 would have cut left and right side to fit
TV screen.
If you have modern 16:9 LCD TV set choose “16:9 LetterBox” – then programs broadcasted in 16:9 would
stretch image to fit TV screen. Choose “16:9 PanScan” –
then programs broadcasted in 4:3 will have black strap
on the right and left side”.
If your tuner is connected via SCART cable you can select video format output: CVBS, RGB, YUV.
If your tuner is connected to TV set via HDMI cable you
can select Video Resolution as shown.
For HDMI connection you can also choose HDMI Color
Space and HDMI Deep Color.
19
EN
Using USB storage
GAME
In this menu you can select game, press OK to enter
game.
20
1. Plug USB mass storage device (pendrive or USB
HDD) to USB port of MT4160.
When device is successfully
installed message will pop-up.
2. Press DEVICE button to open
active device list. Here you can set partition for recording (press RED button on selected item), format
partition in FAT32 (press GREEN button), format partition in NTFS (press YELLOW button) or show information (press BLUE button).
Recording
EN
Note! Before recording programs or using timeshift function it is necessary to set partition for that purpose.
Note! It is recommended to use partition with speed level
marked as green.
Removing USB storage
To safely remove USB mass storage/ flashcard it is recommended to turn off the tuner. If you unplug device
when recording program or timeshift mode in progress
you can damage file system – then you will have to format device before using it again.
21
EN
1. Press REC button on remote to start recording.
2. Red dot in the upper left corner will flash few times,
program is recorded on preferred USB storage.
3. To stop recording press STOP button.
4. Choose “Yes” and press OK to confirm.
When recording is in progress you can switch to watch
another channel. You can also press INFO button to
see previously recorded programs, you can play them
while record is still in progress.
Note! Recording and watching another program is available for channels broadcasted at the same frequency.
22
Using timeshift function
When watching TV press PLAY/PAUSE button to activate timeshift function. Real time program will paused
and recorded to temporary file. To resume watching
press PLAY/PAUSE button again. You can use FR or
FF button to navigate between buffered program. To
exit timeshift mode and go back to real time watching
press STOP button.
Exploring Media
Press MEDIA button to open media explorer window
as shown.
Playing Movies
Go to Media Explorer and select MOVIE tab. Use navigation button to select desired movie file and press OK.
Movie will be played in full screen mode.
¯ To play music, preview images or play movies and
recorded programs select appropriate tab first.
¯ Use LEFT/RIGHT button to navigate between MOVIE,
MUSIC, PHOTO, Native32GAMES, RECORD MANAGER, DISK MANAGER, EBOOK.
¯ Next press DOWN button to navigate on folder list.
To open folder press RIGHT button on selected item,
to go one level up press LEFT button, to open or play
selected file press OK button.
¯ To close Media Explorer and go back to TV mode
press MEDIA button.
Note! File list is showing files according to selected media
type, i.e. in MOVIE tab only movie files are shown on the
list.
You can jump to desired time in movie, press GOTO
button. You can rewind or fast forward movie – use FR
and FF button accordingly. For movies with subtitles
you can show subtitles or hide them – press SUBTITLE
button and select desired language.
23
EN
EN
Note! For Divx/XviD files subtitle file must have identical
prefix name to be recognized.
Note! Rewind/Fast Forward/GOTO function may not work
for particular movie files due to difference in codec versions.
Playing Music
Go to Media Explorer and select MUSIC tab. Use navigation button to select desired music file and press OK.
During playback press GOTO button to activate/deactivate shuffle mode, you can also press DIGEST button
once to switch between repeat one/repeat directory/
repeat off mode.
Note! Do not place photo files inside music folder – tuner
will play music from folders with audio files exclusively.
24
Photo Slideshow
Go to Media Explorer and select PHOTO tab. Use navigation button to select desired photo file and press OK.
Slideshow will switch to full screen and begin from selected image. You can pause slideshow – press PLAY/
PAUSE button. You can flip image horizontally – press
UP/DOWN button or vertically – press LEFT/RIGHT button. You can press DIGEST button to switch between
repeat directory /repeat off mode.
Audio mode
Press AUDIO button to select desired audio mode.
Note! To play background music go to MUSIC tab and play
music file, then go to PHOTO tab and start photo slideshow.
Record Manager
Go to Media Explorer and select RECORD MANAGER
tab. Use navigation button to select recorded program
press OK to watch it in full screen. You can delete selected file – press RED button and choose “Yes” to confirm.
To rename file press GREEN button, to delete all files
press BLUE button.
Note! AC3 sound depends on broadcasted program – if
program is not broadcasted with AC3 sound output audio
will be mute.
INFO button
Press INFO button once to show basic channel info,
press again to show detailed info, press again to hide
info.
Note! Do not place photo files inside music folder – tuner
will play music from folders with audio files exclusively.
When recording press INFO button once to show basic
info, press again to show Record List – you can select
any file from the list and play it while still record in
progress.
25
EN
EN
26
Troubleshooting
EN
Trouble
Cause
Solution
STANDBY indicator did not
light
Power cord is not plugged in
Burnout fuse
Check the power cord
Contact with service
Out of signal
Antenna is not connected to receiver
Incorrect direction of antenna or
antenna damaged
Check aerial cord
Change aerial direction
No sound or video
Video source option in TV is wrong
Choose SCART/AV video source option
on TV
Unclear subtitles
Poor signal level
Change aerial direction
Reset channel list
Remote control doesn’t
work
Receiver is turned off
Incorrect remote direction
IR receiver is not visible by IR remote
Batteries are discharged or incorrectly
installed
Turn on receiver
Correct direction of remote
Remove obstacle
Change or correct batteries installation
Lost channel lock password
Prescan all channels again
Lost menu lock password
Contact with Media-Tech helpdesk
Out of signal after installing
device in other place
Antenna with longer cord need more
power
Use external power supply for antenna
27
EN Technical Specification
Tuner
RF Input (IEC-TYPE, IEC 169-2, female)
RF Output RF (IEC-TYPE, IEC 169-2, male)
Frequency range:
174~230MHz (VHF)
470~862MHz (UHF)
Signal Level: -15~ -70dbm
Decoder:
Video Decoder
Audio Decoder
Transfer Speed
Aspect Ratio
Audio Formats
Resolution
Movie file
Photo file
Music file
Subtitle format
MPEG-1/MPEG-2 MP@ML/MPEG-4 AVC/H.264 [email protected]
MPEG-1 Layer 1.2/PCM/HE-AAC v.1.0/DD (AC3)/DD+ (E-AC3)/DTS
Max 15 Mbit/s
4:3/16:9/auto
HDMI: 1080p/1080i/720p/576p/576i
MPEG Layer I & II, 32/44.1/48 kHz
MKV, AVI, FLV, MP4, M2TS, MPG, MOV, WMV, DAT
BMP, GIF, JPG, PNG, TIF
MP3 (with LRC), FLAC, WAV, WMA, AC3, EAC3 (DD+), DTS
txt (mDVD), sub, smi, ssa, srt, idx+sub
Connectors:
Antenna
Video
Audio
Data
Card Reader
RF output x 1, RF input x 1
HDMI, SCART (EURO)
Coaxial Digital Audio
USB
SD/SDHC
Power:
Input Voltage
Power Consumption
AC 220~240V, 50/60Hz
Max 8W; in standby mode <1W
28
Note! Design and equipment
specifications are subject to
change without notice.