1
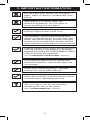
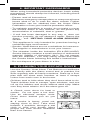
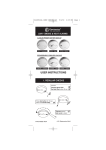
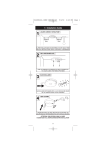
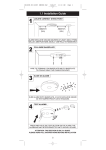
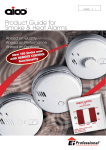
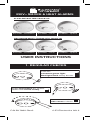
230V~ SMOKE & HEAT ALARMS ALKALINE BATTERY BACK-UP Ei141RC - Ionisation Ei144RC - Heat Ei146RC - Optical RECHARGEABLE LITHIUM CELL BACK-UP Ei161RC - Ionisation Ei164RC - Heat Ei166RC - Optical USER INSTRUCTIONS 1. REGULAR CHECKS Look for: Constant green light Red light flash every 40 sec. Press test button for 10 sec. Alarm will sound loudly. Vacuum around side vents to clean. P/N B17682 Rev0 © Ei Electronics 2013 2. ALARM REMOVAL LOCATE REMOVAL SLOT SH TO RE M SCREW OVE PU DRIV & PUS ER I H CO NTO VER A SLOT WAY LOCATE THE ARROW ON THE FRONT FACE OF THE ALARM. THE SLOT IS LOCATED DIRECTLY ABOVE THE ARROW. INSERT SCREWDRIVER INSERT A FLAT-BLADED SCREWDRIVER HORIZONTALLY APPROX. 1cm INTO THE CENTRE OF THE REMOVAL SLOT SLIDE ALARM OFF BASE WITH THE SCREWDRIVER STILL INSERTED, PUSH THE LOWER HALF OF THE ALARM AWAY FROM THE SCREWDRIVER, IN THE DIRECTION OF THE ARROW ON THE COVER REMOVE ALARM HOLD THE LOWER HALF OF THE ALARM AND REMOVE FROM THE BASE PLATE BY MOVING IT VERTICALLY DOWNWARDS, TOWARDS THE FLOOR. 2 3. IMPORTANT INFORMATION Do not paint your alarm. Do not allow paint, water or dust to contaminate your alarm. Your alarm is a mains 230V AC electrical appliance. Do not open or insert anything into the alarm. Regularly check that the green mains indicator light on the cover is lit. Test weekly - press and hold the test button on the alarm for 10 seconds. The alarm will sound loudly and the red light on the cover should flash rapidly. All the other interconnected alarms should sound. If alarm beeps once every 40 seconds for over 20 minutes, the battery is probably depleted (models Ei141RC/144RC/146RC only) and must be replaced. (see "CHANGING THE BATTERY" section). If a nuisance alarm occurs, press the test/hush button to silence the alarm for 10 minutes. Clean your alarm regularly. This will reduce the risk of false alarms. Remove or completely cover your alarm when decorating to prevent dust or other contamination damaging the unit. If your alarm sounds for no reason and will not reset, it can be removed by releasing the clip on the base. (see "ALARM REMOVAL" section). 3 ONLY) 4. CHANGING THE BATTERY (Models Ei141RC / 144RC / 146RC only) 1. Switch off mains power to alarm (green light on cover should go out). 2. Remove unit as shown in “ALARM REMOVAL” section on page 2. 3. Locate battery slot in base of alarm as shown below. 4. Unclip battery from battery snap connectors. 5. Connect new battery by clipping back on to battery snap connectors. Use only 9V Alkaline batteries Duracell MN1604, Energizer 522. Other batteries can cause problems. We recommend that the “use by date” on the battery should still have at least 2 years to go. Older batteries will give beeps prematurely. 6. Slide unit back on to the base. A click should be heard as the alarm engages. (The unit cannot be replaced on the base unless a battery is installed). 7. Press and hold the test button - horn should sound loudly. 8. Reinstate mains power to alarm (green light on cover should come on). (Ei141RC/144RC /146RC ONLY) We recommend that the battery is replaced at least every three years for optimum performance. 5. TESTING & MAINTAINING YOUR ALARM INSPECTION &TESTING PROCEDURE Check all your alarms weekly, especially after initial installation or after re-occupation (e.g. following a holiday): (i) Check that the green mains indicator light is on. (If it is off check circuit breakers, fuses and wiring etc.) Check that the red led on the cover flashes once every 40 seconds to indicate normal operation. If the memory has been set indicating that the Alarm has been activated in the last 24 hours, the red light will flash twice every 40 seconds. After 24 hours the memory will be cleared. 4 (ii) Press the test button for up to 10 seconds to ensure the sensor chamber, electronics and sounder are working. A red light on the cover, will flash while horn is sounding. The alarm will stop when the button is released. Pressing the test button simulates the effect of smoke or heat during a real fire and is the best way to ensure the Alarm is operating correctly. This action will also clear the memory. WARNING: DO NOT TEST WITH FLAME This can set fire to the Alarm and damage the house We do not recommend testing with smoke or heat as the results can be misleading unless special apparatus is used. (iii) Check for any sign of contamination such as cobwebs or dust and clean the alarm as described in the “CLEANING YOUR ALARM” section, if necessary. (iv) Interconnected Alarms only - Test the first unit by pressing the button for 10 seconds. All the units should alarm within 10 seconds of the first horn sounding. The red light on the first unit only will flash about once a second. On releasing the button the local Alarm will stop sounding immediately and the remote Alarms will stop sounding approximately 3 seconds later. This will verify that the interconnect is working. Check all the other units similarly. (v) Check the functioning of the mains battery back-up directly after installation and then at least yearly as follows: - Turn off the mains power at the distribution board and check that the green indicator light is extinguished. - Press the test button and ensure the horn sounds loudly for 10 seconds. Turn on the mains supply at the distribution board only if the unit passes the above test. Note: If the mains is disconnected and the battery is almost depleted the unit will beep every 40 seconds for at least 30 days. (vi) Monitor the alarm over a short period of time for any beeps. Switching off Mains for long periods If the premises are regularly being left without mains power for long periods the smoke/heat alarms should be removed from their mounting plates to prevent the batteries becoming fully depleted. (This is sometimes done with holiday homes which are only occupied in the Summer). The alarms must be re-attached to the mounting plates when the premises are re-occupied. 5 (Long term storage (over 1 year) can damage the batteries such that they will not recharge when the units are re-connected to the mains supply). 5.1 If the unit is beeping The Alarm automatically monitors the battery every 40 seconds. If it is depleted it will give a short beep every 40 seconds. Models Ei141RC, Ei144RC & Ei146RC only Before replacing the battery, check that the beeps are not due to one of the following: (i) battery snaps not connected properly. (ii) On the Optical Smoke Alarm only (Ei146RC) if the unit beeps and the red light does not flash at the same time it indicates a problem with the smoke chamber - see “CLEANING YOUR ALARM” section. (iii) If the beeps have continued for over 20 minutes (and the other causes of beeps have been ruled out - see “TROUBLESHOOTING” section) the battery must be replaced. See “CHANGING THE BATTERY” section. Models Ei161RC, Ei164RC & Ei166RC only (i) Check that the green mains power light is on. If it is off the Alarm is not receiving mains power and is being powered from its internal back-up cells. The beeps indicate that they are depleted. The cells are not replaceable. Re-connect the mains, check fuse, circuit breakers and wiring. If in doubt contact a qualified electrician. The beeps should cease within 2 hours as the cells charge up. Fully charged, the cells will provide up to 6 months back-up without mains power. (ii) On the Optical Smoke Alarm only (Ei166RC) if the unit beeps and the red light does not flash at the same time it indicates a problem with the smoke chamber - see “CLEANING YOUR ALARM” section. If all of the above possible causes of beeps have been ruled out, but the beeping has still persisted for over 2 hours with the green light on - the rechargeable cells may be defective. The Smoke / Heat Alarm must be returned to the manufacturer for repair or replacement - see “GETTING YOUR ALARM SERVICED” section. 6 A unit will operate from the mains alone, even with a fully depleted or a defective battery (and give beeps every minute), though it may not give sufficient warning of fire if the mains supply is disconnected for any reason. If there are any problems get a qualified electrician to inspect the house wiring and connections to the alarms. If there are still problems the unit must be returned for examination - see “GETTING YOUR ALARM SERVICED” section. 6. CLEANING YOUR ALARM WARNING: Electrical shock hazard. Disconnect the AC mains at the fuse box or circuit breaker powering the Alarm before following the cleaning instructions. Clean your Alarm regularly, particularly in dusty areas. Use the narrow nozzle attachment of your vacuum cleaner to remove dust, insects and cobwebs from the sides and cover slots where the smoke or heat enters. To clean the cover, wipe with a damp cloth. Dry cover thoroughly with a lint free cloth. WARNING: Do not paint your Alarm. Other than the cleaning described above, no other customer servicing of this product is required. Repairs, when needed, must be performed by the manufacturer. All Alarms are prone to dust and insect ingress which can cause nuisance/false alarms or failure to alarm. The latest design, materials and manufacturing techniques have been used in the construction of our Alarms to minimize the effects of contamination. However it is impossible to completely eliminate the effect of dust and insect contamination, and therefore, to prolong the life of the Alarm you must ensure that it is kept clean so that excess dust does not build up. Any insects or cobwebs in the vicinity of the Alarm should be promptly removed. In certain circumstances even with regular cleaning, contamination can build up in the smoke sensing chamber causing the alarm to sound or fail. If this happens the alarm must be returned to us for servicing or replacement. Contamination is beyond our control, it is totally unpredictable and is considered normal wear and tear. For this reason, contamination is not covered by the guarantee and a charge is made for servicing such units. If you experience persistent nuisance/false alarms it may mean that the environment may not be suitable for your particular alarm type. If, for example it is due to dust contamination or exposure to steam you should be using an ionisation Alarm. If the false alarm is due to cooking fumes an optical Alarm should be fitted. 7 7. NUISANCE/FALSE ALARMS When sure that it is just a nuisance/false alarm, simply press the test/silence button briefly on the Alarm to silence the unit for 10 minutes. If, when the alarm goes off, there is no sign of smoke, heat or noise to indicate that there is a fire, you should get your family into a safe place, before you start investigating. Check the house carefully in case there is a small fire smouldering somewhere. Check whether there is some source of smoke or fumes, for example cooking fumes being drawn past the Smoke Alarm by an extractor. If there are frequent nuisance/false alarms it may be necessary to re-locate the device away from the source of the fumes or replace an Ionisation Alarm with an Optical Alarm. If for some reason the alarm continues to sound without smoke or heat being present (due to insect infestation or contamination build-up for example) the units can be silenced by disconnecting the mains power and removing the unit - see “ALARM REMOVAL” section. If cleaning the Alarm does not correct the problem it can be returned to the manufacturer for repair or replacement - see “GETTING YOUR ALARM SERVICED” section. Silence Feature All the Smoke/Heat Alarms have a combined Test/ Silence Button to help you control nuisance/false alarms. 1. To silence a nuisance/false alarm, press the Test/ Silence Button located on the cover. The Alarm will automatically switch to a reduced sensitivity condition for a 10 minute period (very large levels of smoke from a nearby fire will override the Silence period). The unit will flash the red light every 10 seconds (instead of the normal 40 seconds) to indicate the sensitivity is reduced. On interconnected Alarms, pressing the Test/Silence Button on the one sensing smoke (i.e. the one with the red light flashing every second) will silence all alarms. Pressing the Silence Button on any other Alarm will not silence the alarm. 2. The unit will reset to normal sensitivity at the end of the silenced period. 8 8. IMPORTANT SAFEGUARDS When using household protective devices, basic safety precautions should always be followed, including those listed below: • Please read all instructions. • Rehearse emergency escape plans so everyone at home knows what to do in case the alarm sounds. Further information can be obtained from the Home Office Publication or from your local fire prevention officer. • To maintain sensitivity to smoke, do not paint or cover the Smoke Alarm in any manner; do not permit any accumulation of cobwebs, dust or grease. • If unit has been damaged in any way or does not function properly, do not attempt a repair. Return the Alarm - see “GETTING YOUR ALARM SERVICED” section. • This appliance is only intended for premises having a residential type environment. • Smoke / Heat Alarms are not a substitute for insurance. The supplier or manufacturer is not your insurer. • The chamber inside the Ionisation (Ei141RC/161RC) Smoke Alarms contains a small amount of radioactive material (33kBq of Amercium 241). Do not tamper with the chamber. You may safely install and clean the Smoke Alarm following this leaflet’s instructions. • Do not dispose of your Alarm in a fire. 9. PLANNING YOUR ESCAPE ROUTE Use the Smoke / Heat Alarm Test Buttons to familiarise your family with the Alarm sound and to practice fire drills regularly with all family members. Draw up a floor plan that will show each member at least 2 escape routes from each room in the house. Children tend to hide when they don’t know what to do. Teach children how to escape, open windows, and use roll up fire ladders and stools without adult help. Make sure they know what to do if the alarm goes off. 1. Check room doors for heat or smoke. Do not open a hot door. Use an alternate escape route. Close doors behind you as you leave. 2. If smoke is heavy, crawl out, staying close to floor. Take short breaths, if possible, through a wet cloth or hold your breath. More people die from smoke inhalation than from flames. 9 3. Get out as fast as you can. Do not stop for packing. Have a prearranged meeting place outside for all family members. Check everybody is there. 4. Call the Fire Brigade immediately on a mobile phone or from a neighbour’s house. Make sure to call the Brigade for all fires no matter how small - fires can suddenly spread. Also call the Brigade even if the alarm is automatically transmitted to a remote manned centre - the link may have failed. 5. NEVER re-enter a burning house. Limitations of Smoke / Heat Alarms Smoke / Heat Alarms have significantly helped to reduce the number of fire fatalities in countries where they are widely installed. However independent authorities have stated that they may be ineffective in some circumstances. There are a number of reasons for this: • The Alarms will not work if the mains power is off and the battery is depleted. On the Ei141RC/144RC/146RC alarms the batteries should be replaced every three years as a precaution or if the unit gives a low battery beep. • NOTE: Constant exposure to high or low temperatures or high humidity may reduce the life of the Alkaline battery. • Smoke / Heat Alarms will not detect fire if sufficient smoke / heat does not reach the alarm. Smoke / heat may be prevented from reaching the Alarm if the fire is too far away, for example, if the fire is on another floor, behind a closed door, in a chimney, in a wall cavity, or if the prevailing air draughts carry the smoke / heat away. Installing Smoke / Heat Alarms on both sides of closed doors and installing more than one Smoke / Heat Alarm as recommended in the ‘INSTALLER INSTRUCTIONS’ booklet significantly improves the probability of early detection. • The Alarm may not be heard. • A Smoke / Heat Alarm may not wake a person who has taken drugs or alcohol. • Smoke / Heat Alarms may not detect every type of fire to give sufficient early warning. • Optical and Ionisation Smoke Alarms should be fitted for the fastest response to all types of fires. 10 • Smoke / Heat Alarms don’t last indefinitely. For example if there is a build up of contamination, performance will be impaired. It is recommended that the Smoke / Heat Alarms are replaced after 10 years as a precaution. 10. ALARM CONTROL (OPTIONAL) A System Control Switch (Ei1529RC) is available as an optional accessory. It allows the user to perform the following functions from a remote location: LOCATE - If alarms sound press Locate to allow the source of alarm to be identified. SILENCE - Press to silence nuisance/false alarms. TEST - Operate weekly to Test the alarms. MAINS CHECK - Test will not work with mains absent. Note: for RadioLINK interconnect and Alarm control an Ei168RC Alarm Base and an Ei450 Alarm Controller are required. 11. GETTING YOUR ALARM SERVICED If your Alarm fails to work after you have carefully read all the instructions, checked the unit has been installed correctly, and is receiving AC power (green light on) contact Customer Assistance at the address given at the end of this leaflet. If it needs to be returned for repair or replacement put it in a padded box and send it to “Customer Assistance and Information” at the nearest address given on the Alarm or in this leaflet. Do not snap on to the mounting plate as this connects the battery and the unit may beep or alarm in the post. State the nature of the fault, where the Alarm was purchased and the date of purchase. 12. FIVE YEAR GUARANTEE Ei Electronics guarantees this Alarm (excluding battery in the Ei141RC/144RC/146RC models) for five years from date of purchase against any defects that are due to faulty materials or workmanship. This guarantee only applies to normal conditions of use and service, and does not include damage resulting from accident, neglect, misuse, unauthorised dismantling, or contamination howsoever caused. This guarantee excludes incidental and consequential damage. If this Alarm should become defective within the guarantee period, it must be returned to Ei Electronics, with proof of purchase, carefully packaged, with the problem clearly stated. (see “Getting Your Alarm Serviced”) We shall at our discretion repair or replace the faulty unit. Do not interfere with the Alarm or attempt to tamper with it. This will invalidate the guarantee, but more importantly may expose the user to shock or fire hazards. This guarantee is in addition to your statutory rights as a consumer. 11 13. TROUBLESHOOTING 1. FREQUENT NUISANCE/FALSE ALARMS OCCUR: (1) Close kitchen / bathroom door when in use. (2) Ensure that the alarm is sited at least 6m away from sources of fumes. (3) Contamination from insects, paint or paint fumes may have occurred. Clean the alarm - see “CLEANING YOUR ALARM” section. (4) If the problem persists, resiting of the unit should be considered. 2. ALARM SOUNDS FOR NO APPARENT REASON: (1) Identify the alarm source. On interconnected units, the red light on the cover will flash rapidly only on the unit which is the source of the alarm. If an optional Ei1529RC Control Switch is installed, press Locate when system is sounding to identify source of alarm. (2) Check for fumes, steam etc. from the kitchen or bathroom. Paint and other fumes can cause nuisance/ false alarms. (3) Press the test/silence button to silence the Smoke/ Heat Alarm for 10 minutes. (4) If alarm does not stop, switch off mains and remove unit - see “ALARM REMOVAL” section. (Only remove the alarm with the red light flashing, the others are probably satisfactory). 3. LOW BATTERY & OTHER BEEPS: (On Ei141RC/144RC/146RC only) If the battery is correctly connected and the unit has beeped for over 20 minutes the battery is probably depleted. Obtain a new battery, disconnect the mains, then remove the alarm and replace the depleted battery. (On Ei161RC/164RC/166RC only) Check the green mains power light is on. If not, check fuse, circuit breakers and wiring connections. If the green light is off, the Lithium cells will deplete after some months without mains and will need to be recharged. If turning on the mains fails to stop the beeps, a fault may exist. Switch off mains and remove the unit - see “ALARM REMOVAL” section. (All Alarms) (1) If the green mains light is on and replacing battery, recharging Lithium cells or cleaning unit has not stopped the beeps, a fault may exist. Disconnect the mains first and replace the unit - see “ALARM REMOVAL” section. 12 (2) If an Optical unit (Ei146RC/166RC) beeps without the red light flashing at the same time, the chamber is defective. Clean the chamber. 4. INTERCONNECTED ALARMS DO NOT ALL SOUND: (1) Hold test button for 10 seconds after first alarm has sounded to ensure signal is transmitted to all units. (2) One or more of the connections may not be correctly connected. We recommend you consult a qualified electrician. Aico Ltd. Mile End Business Park, Maesbury Rd, Oswestry, Shropshire SY10 8NN, U.K. Tel: 0870 758 4000 www.aico.co.uk Ei Electronics. Shannon, Co Clare, Ireland. Tel: 061 471277 www.eielectronics.com 13 Construction Product Type: Smoke Alarm Devices European Standard: EN14604:2005 Certificate of Conformity: 0086-CPD-537430 MODEL TYPE Ei141RC Ionisation 230V Smoke Alarm Ei146RC Optical 230V Smoke Alarm Ei161RC Ionisation 230V Smoke Alarm Ei166RC Optical 230V Smoke Alarm 0086 E1 Block 08 The crossed out wheelie bin symbol that is on your product indicates that this product should not be disposed of via the normal household waste stream. Proper disposal will prevent possible harm to the environment or to human health. When disposing of this product please separate it from other waste streams to ensure that it can be recycled in an environmentally sound manner. For more details on collection and proper disposal, please contact your local government office or the retailer where you purchased this product. INDEX 1. REGULAR CHECKS 1 2. ALARM REMOVAL 2 3. IMPORTANT INFORMATION 3 4. CHANGING THE BATTERY 4 5. TESTING & MAINTAINING YOUR ALARM 4 6. CLEANING YOUR ALARM 7 7. NUISANCE/FALSE ALARMS 8 8. IMPORTANT SAFEGUARDS 9 9. PLANNING YOUR ESCAPE ROUTE 9 10. ALARM CONTROL 11 11. GETTING YOUR ALARM SERVICED 11 12. FIVE YEAR GUARANTEE 11 13. TROUBLESHOOTING 12 14