1
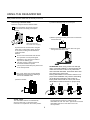
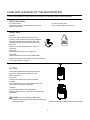
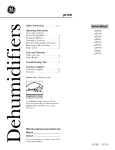
keeping your home safe and clean USER MANUAL Dehumidifier Model: ECO DC10 MK2 Read This Manual Inside you will find many helpful hints on how to use and maintain your dehumidifier properly. Just a little preventative care on your part can save you a great deal of time and money over the life of your dehumidifier. Youll find many answers to common problems in our troubleshooting section. Review the chart of Troubleshooting Tips before calling your service engineers. ECOAIR TECHNICAL SUPPORT UK TEL: +44 845 388 0007 EMAIL: [email protected] CONTENTS IMPORTANT INSTRUCTIONS ........................................................ 1 IMPORTANT SAFETY INFORMATION ........................................... 2 SAFETY PRECAUTIONS ........................................................ 3 THE CONTROLS ON THE DEHUMIDIFIER .................................... 4 USING THE DEHUMIDIFIER .......................................................... 5 How the dehumidifier Operates ............................................... 5 Automatic defrost ..................................................................... 5 Choosing a location .................................................................. 5 Removing collected Water ........................................................ 6 Water level ............................................................................... 6 CARE AND CLEANING OF THE DEHUMIDIFIER ......................... 7 Grille and Case ......................................................................... 7 Water tank ................................................................................ 7 Air filter ..................................................................................... 7 TROUBLESHOOTING .................................................................... 8 LONG TERM STORAGE ................................................................ 9 SPECIFICATIONS .......................................................................... 9 IMPORTANT INSTRUCTIONS Do not install and use your dehumidifier before reading these instructions in full. This will help you optimize the operation of your unit. The following advice and instructions are important from the start: 1.Your unit must always be used in an upright position, as it contains refrigerant. Failure to comply with 2.After unpacking your unit, place it upright to allow the these instructions may refrigerant agent to stabilize, and wait 4 hours before use. 3.This product must not be disposed of with the domestic waste. damage the unit and will This product must be disposed of at an authorized place for recycling of electrical and electronic appliances. 4.The appliance should not be installed in the bathroom. invalidate the warranty. 5.The appliance should be installed in accordance with national wiring regulations and must be positioned so that the plug is accessible. 6.If the power cord is damaged, it must be replaced by the manufacturer, service agent or a electrician. WEE/EC2601UR 7.Before the first operation: check if the float in the tank is at the correct position. If the position is not correct, correct this by hand. 1 BS PLUG WIRING Wiring Instructions: Should it be necessary to change the plug please note the wires in the mains lead are coloured in accordance with the following code: BLUE - NEUTRAL BROWN - LIVE GREEN AND YELLOW - EARTH As the colours of the wires in the mains lead of this appliance may not correspond with the coloured markings identifying the terminals in your plug, proceed as follows: 1. The BLUE wire is the NEUTRAL and must be connected to the terminal which is marked with the letter N or coloured BLACK. 2. The BROWN wire is the LIVE and must be connected to the terminal which is marked with the letter L or coloured RED. 3. The GREEN/YELLOW is the EARTH and must be connected to the terminal which is marked with the letter E or or coloured GREEN OR GREEN/YELLOW. 4. Always ensure that the cord grip is positioned and fastened correctly. If a 13A (BS 1363) fused plug is used it must be fitted with a 13A fuse. If in doubt consult a qualified electrician. Wiring for a 13 Amp Plug (BS1363) Please note. The Earth Terminal is marked with the letter E or 2 Earth Symbol. 32 IMPORTANT SAFETY INFORMATION. READ ALL INSTRUCTIONS BEFORE USING. WARNING! For your safety, the information in this manual must be followed to minimize the risk of fire, electric shock or personal injury. SAFETY PRECAUTIONS When using this dehumidifier, always follow basic safety precautions, including the following: Always operate the product from a power source of the same voltage, frequency and rating as indicated on the product identification plate. Close supervision is necessary when the unit is in use by or near children or invalids. Do not allow children to use it as a toy. Never unplug the dehumidifier while it is working, This could damage the electronic circuits. Never place anything on top of the unit and do not cover it with any kind of cloth while it is plugged in or in-use. Do not operate any product with a damaged cord or plug, or after the product malfunctions, or is dropped or appears damaged in any way. Return the complete product to the place of purchase for inspection, repair or replacement. Do not place objects on the product or allow objects to obstruct the inlet or outlet openings, or operate in close proximity to walls or curtains, etc. Never connect the unit to a defective socket. The use of attachments or accessories not recommended or sold by the product distributor may cause personal or property hazards or injuries. To avoid tripping the circuit, DO NOT USE AN EXTENSION CORD FOR THIS UNIT. Make sure that the unit is correctly connected before turning on the unit's power. Never lay down the unit while it is working. Always keep it in an upright position to avoid any damage to the unit. Switch off and unplug from socket when not in use or before cleaning. Keep the area around the warm air outlet sufficiently clean and make sure that it is not congested. This product is intended for normal domestic /household use only. Repairs should only be carried out by competent service department. This appliance is not intended for use by persons Do not place the power cord under a carpet. (including children) with reduced physical, sensory or mental capabilities, or lack of experience and Never install the unit in direct sunshine. knowledge, unless they have been given supervision or instruction concerning use of the appliance by a Prevent children from climbing on the unit. person responsible for their safety. To turn on your unit, always use the dial on the control panel. Children should be supervised to ensure that they do not play with the appliance. Avoid using heating appliance near this unit. 3 THE CONTROLS ON THE DEHUMIDIFIER Control Panel Operation indicator OFF CON Tank full light indicates - tank needs to be emptied or is not securely in place in the unit. Humidity control knob OFF Switch off. Continuous Dehumidifier continuously running. Other Features Tank full Light illuminates when the tank is ready to be emptied, or when the tank is removed or not securely in position. Auto shut off The Water Level Control Switch shuts off the dehumidifier when the tank is full, or when the tank is removed or not replaced securely. Auto defrost When frost builds up on the evaporator coils, the compressor will cycle off and the fan will continue to run until the frost disappears. Auto restart In the case of a power failure or interruption the unit will automatically restart, in the settings last used, when the power is restored. 4 USING THE DEHUMIDIFIER When first using the dehumidifier, operate the unit continuously 24 hours. How the Dehumidifier Operates Automatic Defrost Moist, humid air is drawn over a cold refrigerated dehumidifying coil. Moisture in the air condenses on this coil and drains into a tank (or through a hose for continuous drain). Dry, clean air is drawn through the condenser where it is heated and discharged through the top grille into the room. It is normal for the surrounding air to become slightly warmer as the dehumidifier operates. When frost builds up on the evaporator coils, the compressor will cycle off and the fan will continue to run until the frost disappears. In defrosting mode,the fan motor will run normally and the compressor stop running. Choosing a Location YES NO A dehumidifier operating in a basement will have little or no effect in drying an adjacent enclosed storage area, such as a closet, unless there is adequate circulation of air in and out of the area. Do not use outdoors. This dehumidifier is intended for indoor residential applications only. This dehumidifier should not be used for commercial or industrial applications. Place the dehumidifier on a smooth, level floor strong enough to support the unit with a full bucket of water. 40 inc he s 18 12- hes inc Allow at least 1218 inches of air space on all sides of the unit for good air circulation (The place with a draught leaves the distance of the wall as 40 inches). Place the dehumidifier in an area where the temperature will not fall below 5°C. Or the coils can become covered with frost, which may reduce performance. Use the dehumidifier to prevent moisture damage for stored items. NOTE: The dehumidifier has rollers to aid placement, but it should only be rolled on smooth, flat surfaces. Do not attempt to roll the dehumidifier on carpet or over objects. Use the dehumidifier in a basement to help prevent moisture damage. The dehumidifier must be operated in an enclosed area to be most effective. Close all external doors, windows and other outside openings of the room. When the dehumidifier operates please do not cover the top grille. 5 USING THE DEHUMIDIFIER Always make sure the water tank is securely in the unit. Removing Collected Water 2) Insert the drainage hose into drain spout. There are 2 ways to remove collected water: Use the tank. When the tank is removed the unit will shut off. Empty and replace the tank. 3) Before replacing the tank, please remove the drain lid from the tank. NOTE: Hold tank with both hands when emptying. Important: Do not use the hose if using the water tank to collect water. When the hose is connected, it will bypass the basket for continuous drain. NOTES: Do not remove the bucket while the unit is in operation or it has just stopped. Otherwise it may cause some water to drip from the draining pan. The tank must be in place and secure for the dehumidifier to operate. 4) Replace the tank. Make sure the drain hose goes through the tank's drain hole. This is just the schematic plan, please refer to the actual product. ATTENTION: When using continuous drainage option, place dehumidifier on a level surface and make sure the hose is clear of any obstruction and is directed downward. Press down drain door so it rests on top of the hose. Placing dehumidifier on an uneven surface or improper hose installation may result in water filling up the tank and causing the unit to shut off. Empty water tank if shut off occurs, then check dehumidifier location and hose for proper setup. Use a hose. Water can be automatically emptied into a floor drain by attaching a 14mm inner diameter hose. 1) Remove the tank. × × × Place on Even Surfaces Water Level The tank must be securely in position for the dehumidifier to work. The FULL light will be on and the dehumidifier will not run if the tank is not in the correct position. The dehumidifier will turn off automatically when the tank is full, or when the tank is removed or not replaced in the correct position. 6 CARE AND CLEANING OF THE DEHUMIDIFIER Turn the dehumidifier off and remove the plug from the wall socket before cleaning. Grille and case To clean the case: Use damp cloth and a mild detergent. Do not use bleach or abrasives. To clean the front grille: Use a vacuum attachment or brush. Water tank To clean: Every few weeks, clean the tank to prevent growth of mold, mildew and bacteria. Partially fill the tank with clean water and add a little mild detergent. Swish it around in the bucket, empty and rinse. NOTE: Do not use a dishwasher to clean the water tank. To remove: Remove the tank and pour any water out. To replace: Slide and secure the tank into the dehumidifier. NOTE: The tank must be in place and securely seated for the dehumidifier to operate. bottons Air filter The air filter should be checked and cleaned at least every 250 hours of operation or more often if necessary. To remove: Press the two buttons, then pull out the filter. To clean: Clean the filter with warm, soapy water. Rinse and let the filter air dry before replacing it. To install: Push the filter back into the dehumidifier NOTE: DO NOT rinse or put the filter in an automatic dishwasher. Caution: Do not operate the dehumidifier without a filter because dirt will gather and affect the units performance. NOTE: Avoid using a dishwasher to clean the filter. 7 TROUBLESHOOTING Problem Dehumidifier does not start Dehumidifier does not dry the air as it should Possible Causes What To Do Dehumidifier has reached its preset level or tank is full. The dehumidifier automatically turns off when either condition occurs. Change to a lower humidity setting or empty the tank and replace properly. Tank is not in the proper position. The tank must be in place and securely seated for the dehumidifier to operate. Power failure. There is a protective time delay (up to 3 minutes) to prevent tripping of the compressor overload. For this reason, the unit may not start normal dehumidifying for 3 minutes after it is turned back on. Did not allow enough time to remove the moisture. When first installed, allow at least 24 hours to maintain the desired dryness. Airflow is restricted. Make sure there are no curtains, blinds or furniture blocking the front or back of the dehumidifier. See the Choosing a Location section. See the Care and Cleaning section. Dirty filter. For drier air, turn the dial and set to a lower percent value (%) or at CON (continuous) for maximum dehumidification. Check all doors, windows and other openings are securely closed. The Humidity Control may not be set low enough. Doors and windows may not be closed tightly. Tumble dryer may be blowing moisture-laden air into the room. Install the dehumidifier away from the tumble dryer The tumble dryer should be vented to the outside. Room temperature is too low. Moisture removal is best at higher room temperatures. Lower room temperatures will reduce the moisture removal rate. Models are designed to be operated at temperatures above 5°C. Area to be dehumidified is too large. The capacity of your dehumidifier may not be adequate. Doors and windows are open. Close all doors and windows to the outside. Frost appears on the coils Dehumidifier has been recently turned on, or room temperature is below 5°C. This is normal. Frost will usually disappear within 60 minutes. See the Automatic Defrost section. Controls cannot be set The compressor will turn off and the fan will automatically continue to run for approximately 3 minutes at a fixed setting. This is normal. Wait approximately 3 minutes and set the fan as desired. Fan noise There is a sound created when the This is normal. fan runs that sounds like the wind. Dehumidifier runs too much Water on floor Hose connection may be loose. Check the hose connection. See the Removing Collected Watersection. Disconnect the hose if using the tank to collect water. See the Removing Collected Water section. Intend to use the tank to collect water, but a hose is attached. 8 LONG TERM STORAGE When you do not use the unit for a long period, we suggest you to take following steps to store the unit in good condition; Make sure there is no water left in the water tank or take off the draining hose. Unplug from the wall socket and wind up power cord. Clean the unit and packed it well to keep it from dust. SPECIFICATIONS Please refer to nameplates for further details. Model Rated Voltage ECO DC10 MK2 220-240 V~ Rated Frequency 50H z Rated Power 280W 10L/DAY Moisture Removal (at 30℃ RH80%) 5℃-35 ℃ Operating Temperature 10kg Weight Tank Capacity 2.1L (Automaticstop at about 2.0L) 9 SERVICE AND WARRANTY TWO (2) YEAR LIMITED WARRANTY Save This Warranty Information Eco Air guarantees this product free from defects in materials and workmanship for a period of Two (2) years from the date of purchase. Coverage is valid only with proof of purchase. This unit must be operated in the conditions recommended and at the voltage indicated . Misuse or use in a dusty environment, along with attempts to service or alter the unit, will render this WARRANTY VOID. The actual product may differ slightly from illustration. This warranty is in addition to, and does not affect your statutory rights. For further information, please contact +44 845 388 0007. This product has been manufactured to comply with the EC Directives 2006/95/EC and 2004/108/EC. ments keeping your home safe and clean WEE/EC2601UR Copyright Reserved C130 66129914687