1
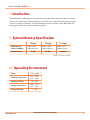
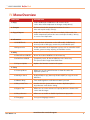
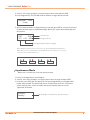
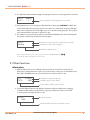
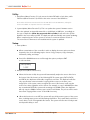
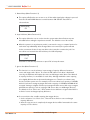
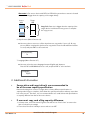
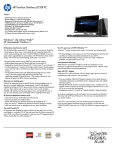
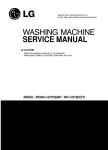
t ReflexFlash USER GUIDE 1.0 High-speed USB duplication made easy. Table of Contents I. Introduction ………………………………….……….…............................p. 2 II. System Memory Specification ………………………………….………....p. 2 III. Operating Environment ………………………………….………………..p. 2 IV. Menu Overview ………………………………….…………………………p. 3 V. Functions ………………………………….………………………………....p. 4 Synchronous v. Asynchronous ………………………………….……….…...p. 4 Synchronous Mode ………………………………….……………………….. p. 4 Asynchronous Mode ………………………………….………………..……..p. 5 USBInfo ………………………………….………………………………..........p. 6 System Info ………………………………….………………………………....p. 6 Quick Erase and Full Erase ………………………………….…………….....p. 7 System Update ………………………………….……………………….…….p. 7 Start-up Menu ………………………………….………………………………p. 7 Analyze Source ………………………………….……………………………..p. 7 Button Beep ………………………………….………………………………...p. 8 Asyn Hold Time …………………………….……….…………………………p. 8 Ignore Size ………………………………….……………………………….....p. 8 Asynchronous …………………………….……………………………...........p. 10 Language ………………………………….…………………………….......... p. 10 Additional Information ………………………………….………………….... p. 10 I.Troubleshooting ………………………………….………………………..... p. 13 t ReflexFlash I. Introduction The ReflexFlash line of USB duplicators conveniently copy portable USB storage drives without a computer. Thanks to their advanced asynchronous duplication, each channel can independently load, unload, and copy, so there’s no waiting or interruption. This manual will assist in the basic operation of your Reflex Flash unit, showing you how fast, easy, accurate and intuitive it really is. II. System Memory Specification USB Duplicator Supported Media System Memory 3-Target 7-Target 11-Target USB 1.1 and USB 2.0 Devices USB 1.1 and USB 2.0 Devices USB 1.1 and USB 2.0 Devices 64 MB 256 MB 256 MB *Adapter is required (not included). III. Operating Environment Power 115V or 230V Working Temperature 5ºC ~ 50ºC 41ºF ~ 122ºF Working Humidity Storage Temperature Storage Humidity User Guide 1.0 20 ~ 80% -20ºC ~ 85ºC -4ºF ~ 185ºF 5 ~ 95% www.discmakers.com/techsupport 2 t ReflexFlash IV. Menu Overview Function Description 1. Copy Copies USB Cards or USB Drives. All contents of the source drive will be duplicated to all target card(s)/drive(s) 2. Compare Performs a bit-for-bit comparison between the source drive and copied card(s) / drive(s) 3. Copy+Compare Copies the source drive, and then immediately follows with a bitfor-bit comparison between the source and copied card(s) / drive(s) to ensure exact duplication 4. Information 4.1 USB/SD Info Shows the basic information on the USB card(s) / USB Drive(s) inserted, such as flash type, content size, and available space 4.2 System Info Shows information of the duplicator system, such as controller model number, system memory capacity, and software version 5. Utility 5.1 Quick Erase USB/SD Erases the index of USB Drive in the writer tray 5.2 Full Erase USB/SD Completely erases all data of USB Drive in the writer tray. This process takes longer than Quick Erase 5.3 System Update Updates the firmware version in the system 6. Setup 6.1 Start-up Menu Allows user to select which function is shown first when the duplicator powers on 6.2 Analyze Source Enabled (ON) to copy data only. Disabled (OFF) to copy the entire USB Drive 6.3 Button Beep Turns audio signal on or off when a button is pressed 6.4 Asyn Hold Time Sets the time the system waits to continue duplication jobs in Asynchronous mode before exiting 6.5 Ignore Size Allows user to set the tolerance of capacity difference between the source and the target 6.6 Asynchronous Allows user to enable or disable Asynchronous copy mode 6.7 Language Sets system language interface. User Guide 1.0 www.discmakers.com/techsupport 3 t ReflexFlash V. Functions 1.Copy/Compare/Copy+Compare The Reflex USB Duplicator can autoatically detect and support two different copy modes: Synchronous Asynchronous After the system is powered on and the source drive is inserted, scroll to Copy, Compare, or Copy+Compare and press the ENT key. The system will start to scan the source to check the content size. If the source content is less than the system’s memory, then the system will automatically select and start Asynchronous copying. If the source content size is larger than the system’s memory, the system will select and start Synchronous copy. Synchronous v. Asynchronous: Synchronous Copy Mode: All drives must be inserted and execute the copy or compare function at the same time. All target drives will have the same progress simultaneously. In this mode, the system will start the copy or compare function when the ENT button is pressed or automatically when writer trays are all loaded. Asynchronous Copy Mode: This mode will take effect if the data size is no larger than 256 MB (the physical buffer size of the unit) and the file format is one of the following; FAT12, FAT16 or FAT32. All other formats will copy in Synchronous mode. The Data is transferred to the system’s buffer and the copy process is started as soon as the target card is plugged into a slot. Each card will be at a different point of the copy process. The cards can be removed and another inserted into the vacant slot and that card will begin its copy cycle. Note: The duplicator will format the target cards/ drives to be the same as the source drive. All data left on the target cards/ drives will be overwritten (erased) after duplication. The contents of target cards/ drives will be exactly the same as the source drive. How to Copy in Synchronous and Asynchronous mode Synchronous Mode - When source content size is larger than system memory 1. Power on the duplicator, if not already on. 2. Insert source drive. USB(963M) 450M 0 ready User Guide 1.0 www.discmakers.com/techsupport 4 t ReflexFlash 3. Scroll to select Copy, Compare, or Copy+Compare from menu and press ENT. 4. Insert target drive(s). The LCD will show the number of target drive(s) inserted. USB(963M) 450M 3 ready 5. After the desired number of target drive(s) are inserted, press ENT to execute the function. Or when all writer trays are loaded with target drive(s), the system will automatically start the function. COPY 450M 15% 0:32 68M Content size Progressed size Progressed time and percentage Note: When the system is busy in a process, the green LED light will be blinking. When the process is completed, the green LED will become steady. In case of error occurrence, the red LED will turn on. Asynchronous Mode - When source content size is less than system memory 1. Power on the duplicator, if not already on. 2. Scroll to select Copy, Compare, or Copy+Compare from the menu and press ENT. 3. Insert the source drive into the upper left most port designated by a rectangular white border and press ENT. The system will start to read and copy the source content into system memory if the content is smaller than system memory and in one of the supported file formats. USB(58M) Reading .... User Guide 1.0 Reading source data into system memory www.discmakers.com/techsupport 5 t ReflexFlash 4. The duplicator will immediately begin executing the function as each target drive is inserted. Pass: 0 Fail: 0 Working 3 Start copying as each target drive is inserted 5. During the process, each slot’s green LED will blink continuously. CAUTION: Do NOT take out the drive while the system is busy. Once the process is completed, the green LED light will become steady. Once the LED light comes to a constant steady green the drive may be removed and another inserted to continue the job. 6. The number of successful copies will be accumulated and displayed on the LCD along with the number of failed copies and jobs still in progress. Pass: 5 Working: Number of copies that are completed successfully Number of copies still in progress Number of failed copies Note: In Asynchronous mode, user may press the UP and DOWN buttons to check the status and progress of each drive. 2.Other Functions Information 1. USB Info (Menu Function 4.1) displays information about each drive inserted into the duplicator, including flash device type, file system format, content size, and available space. Press UP or DOWN buttons to select and view each tray. Press ESC to exit. [01] FAT16 SD 982M 209M Flash device type and capacity Available space on the device Tray number and file system format 2. System Info (Menu Function 4.2) displays information about the duplicator, including controller model number, system memory capacity, and firmware version. Press ENT to view System Info and press ESC to exit. SD7007 256M System memory Model number and current firmware version User Guide 1.0 www.discmakers.com/techsupport 6 t ReflexFlash Utility 1. Quick Erase (Menu Function 5.1) only erases the index FAT table of each drive, while Full Erase (Menu Function 5.2) will erase the entire content of the USB Drive. Note: Either of the Erase Functions will clear the FAT table in the SD USB Drive, making the device unreadable on computers until it is re-formatted. 2.System Update (Menu Function 5.3): This is to update the system’s firmware version. Place the updated, un-zipped firmware file on a USB Card or USB Drive, accordingly to the type of duplicator. (Note: Do not put the file in a folder.) Scroll and select System Update in the menu and press ENT. The duplicator will automatically start system updating. When completed, power off the system for at least 5 seconds and power it back on. The new version of firmware is now installed and the system is updated. Setup 1. Start-up Menu n Allows customization of the controller in order to display the menu option used most frequently. One of the following may be chosen: Copy, Compare, Copy+Compare, Information, Utility, and Setup. n Press UP or DOWN buttons to scroll through the options, and press ENT to select and exit [Start-up Menu] 1. COPY 2. Analyze Source (Menu Function 6.2) n When this function is ON, the system will automatically analyze the source drive for its file format. If the file format is of the following FAT file system types; FAT12, FAT16, and FAT32, the duplicator will be able recognize its structure. The duplicator will then only copy the data content instead of copying all the sectors on the drive, even empty space. If the system cannot recognize the source’s file format, it will copy the entire source drive regardless of the content. For example, to copy a 2GB USB drive that was created with FAT32 file system and containing only 50 MB of data, the duplicator will only copy the 50MB of memory space used for actual data. The process will be much faster than copying all the sectors on the 2GB of memory. n When this function is set to OFF, the system will copy all the memory space of the source User Guide 1.0 drive, including empty spaces and formatting information. This is particularly useful if the source drive is of an unrecognizable file format. The system will save time in analysis and avoid possible delay or error. www.discmakers.com/techsupport 7 t ReflexFlash 3. Button Beep (Menu Function 6.3) n This option will allow the user to turn on or off the audio signal when a button is pressed. Press the UP and DOWN buttons to switch between ON and OFF. Press ENT to select and exit. [Button Beep] ON 4. Asyn Hold time (Menu Function 6.4) n This option allows the user to set the time the system waits when all writer trays are unloaded before exiting the asynchronous mode. The default is set to 30 seconds. n When the system is in asynchronous mode, it executes the copy or compare function for each writer tray individually. After all target drives are removed, the system will wait for the set amount of time for any new drive to be inserted to continue the job. If no more drives are inserted after the hold time, the LCD will prompt: Wait too long Exit? Press ENT to exit this Asynchronous or press ESC to keep this status. 5. Ignore Size (Menu Function 6.5) n This function is to set the tolerance in percentage of capacity difference between source and target cards / drives. To ensure the FAT table of each drive is duplicated correctly, the duplicator will require the source and all target cards/ drive to be identical in capacity. However, it is inevitable for each drive, although marked the same capacity, to be slightly different due to the manufacturing process. Therefore, a tolerance may be set to avoid a system error. For example, if the source drive has a capacity of 1919MB, with a 3% tolerance setting any target drive with a capacity of 1976MB to1861MB will be accepted. Setting to a higher tolerance percentage will allow source flash copy to targets with different capacity’s, such as copying a 1GB source device to 2GB target device(s). The default is set to “Don’t care,” which means the size difference is ignored and there is no limit of source and target capacity difference. n If a source device has a smaller capacity than target devices: 1. Set the tolerance % to “Don’t care”. There will be no limit on source and target capacity difference. 2. After the copy process is completed, the target devices will be formatted to the same capacity as source device. User Guide 1.0 www.discmakers.com/techsupport 8 t ReflexFlash Example: Source 1GB Target 2GB FAT FAT Copy OK n If a source device has a bigger capacity than target devices: 1. Set the tolerance % higher or set to “Don’t care” (no limit). 2. Data stored on flash devices such as USB cards and USB drives are located randomly instead of sequentially. The success of this type of duplication depends on the data size as well as the data location on the source device. There are three outcomes that could be resulted from this type of copy. Illustration 1 For source device with FAT16 or FAT32 file system whose content is located within the capacity of target drive(s) and the content size is within the capacity of the target drive(s): Source 2GB Target 1GB Copy OK. The data size is less than 1GB and the data location is within the first 1GB of the memory space. Illustration 2 For source device with FAT16 or FAT32 file system whose content is located beyond the capacity of target card(s)/ drive(s) while the content size is still within the capacity of the target drive(s) : Source 2GB Target 1GB Copy Fails. Data is stored beyond the first 1GB memory space of the target device, even though the data size is still smaller than 1GB. User Guide 1.0 www.discmakers.com/techsupport 9 t ReflexFlash Illustration 3 For source device with FAT16 or FAT32 file system whose content is located content size is bigger than the capacity of the target drive(s) : Source 2GB Target 1GB Copy Fails. Data size is bigger than the capacity of the target device. Insufficient memory space to complete the copy process. 6. Asynchronous (Menu Function 6.6) n User may select to turn on or off the Asynchronous copy mode. If set to off, all copy process will be completed in Synchronous copy mode. Press the UP and Down buttons to scroll, and press ENT to select and exit. [Asynchronous] On 7. Language (Menu Function 6.7) n User may select the menu language between English and Japanese. Press the UP and DOWN buttons to scroll, and press ENT to select and exit. [Language] English 3.Additional Information • Source drive and target drive(s) are recommended to be of the same capacity specification Data transforming from a source to target drives of many different specifications or capacity takes longer to complete, slows down the system performance and may cause data loss in the process. Therefore, it is not recommended to use cards/ drives with specifications or capacity different from that of the source device. • If user must copy card of big capacity difference: 1.In Setup menu, select Function 6.5 Ignore Size and set it to “Don’t Care” to remove the limit on tolerance percentage 2.Then select Function 6.2 Analyze source and set it to OFF User Guide 1.0 www.discmakers.com/techsupport 10 t ReflexFlash • Do NOT remove any drive that has blinking green light When a drive is in a process, the green LED light located above the writer tray will be flashing. Never remove any drive with blinking green LED light. This may very likely damage the drive itself, cause data loss, or damage the system hardware circuit. • Do NOT use USB converters with USB duplicators USB converters allow compatibility among different types of flash cards such as CompactFlash, MemoryStick, and so on. The quality and stability of each USB converter in the market is very different. A poor quality USB converter may cause damage to the duplicator and/or USB drives/ SD cards. The performance and the quality of duplication are also affected. VI. Basic Troubleshooting 1. Power does not turn on or unit receives no power a. Check power cord and outlet to make sure power connections are secured. b. Check voltage switch on the back of the duplicator to make sure power supply is set for correct outlet rating. c. Test with another power cord (same as a PC power cord) to eliminate cable failure. 2. Source drive cannot be read a. Check the source drive. The source drive may be with error(s) or contain corrupted file(s) that can make duplication difficult or impossible. b. Turn off the function Analyze Source to avoid unrecognizable file system that could interfere with the duplicator’s process. 3. Machine locks up during the copy process a. Hold down the ESC button to abort the copy process. The copy process will cancel and menu goes back to the last function executed. b. If the button cancel does not work, power cycle the unit (power the unit off, leave off for five seconds and power the unit back on). c. Change the source drive. A source drive with error(s) or of poor quality may cause duplication to lock up at particular points during the copy process. 4. Button(s) do not function on the unit. a. The duplicator may be busy. Buttons pressed while the duplicator is processing will not perform functions unless otherwise specified. b. Possible faulty button. Contact your technical support department for further information. User Guide 1.0 www.discmakers.com/techsupport 11 t ReflexFlash 5. Red LED light turns on a. Press UP and DOWN buttons to check each drive for error messages. b. If error message “Not FAT format” is displayed, the file system on the source drive is not of the FAT format. Exit current job and select the “Analyze Source” function from the menu and set it to OFF. c. If error message “Not correct size” is displayed, the capacity difference between source and target drive is larger than the tolerance setting. Exit current job and select “Ignore Size” from the menu. Set the tolerance to a higher percentage or “Don’t care” and start the job again. 6. The target drive is not recognized in the writer tray a. Test the target drive in another writer tray. b. Change the target drive to another one. A defective drive will not be recognized by the duplicator. User Guide 1.0 www.discmakers.com/techsupport 12