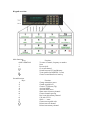
1
User manual
Condor 3000
Transceiver
Keypad overview:
Main functions:
Keys:
0123456789
*
#
S
Second function:
Keys:
1
2
3
4
5
6
8
*
0
#
S
Function:
To enter a Channel, frequency or number.
Scan
Reverse shift
Go to call-channel
Switch between VFO and Memory
Toon squelch On/Off(DTSS / 5-toon)
Choose second function of next key
Function:
Change transmitter power
Chanhe squelch level
Choose CTCSS tone (TQ)
Activate MENU
Activate status menu
Show name of memory channel
Choose channel spaceing
Don’t scan this memory channel
Call with 5-TVO
Shift + / - / none
Choose tone-squelch code
Delete/store call channel
Delete/store memory channel
After switching on the transceiver, the selected frequency or channel will be shown at the
upper line of the display. After receiving a 5-TVO code, the code will be printed at the
second line of the display. The selected memorybank is indicated at the right of the
second line.
To use the second function of the keys, press the button. The text ‘Kies funktie’ will
appear on the second line of the display. Now the second function of the next key will be
activated. To go back to the normal situation, press again.
1 Choose frequency
The transceiver has three frequency modes, with the S button can be changed from VCO
to Memory. The thirth mode is the call channel, this one can be selected with the key.
-
VCO mode
At VCO mode all frequencies at the choosen channel space (4) can be entered
with the keypad. The transceiver will fit the frequency to a legal value. For the
frequency 435.012.500, by a channelspace of 12,5kHz, you have to enter
‘501’:
435.−−−.−−−
435.012.500
435.0−−.−−−
1
1
1
Is the channelspace in this situation 25kHz, the tranceiver will change the
frequency to 435.000.000.
-
Memory mode
The Condor has the posibility to store 100 memory channels in one memory
bank, it has 7 memory banks §5. These channels are available in the memory
mode. In this mode, each channel can have its own name of max. 23
characters. If the selected channel number is empty, the Condor will generate
an error beep and ignores the selected channel.
-
Callchannel mode
If the callchannel is programmed (§6), this frequency can be selected very
quickly. The advantage of the call channel is, it can be selected by only
pressing the
key.
2 Choose CTCSS tone
Some transceivers and repeaters are using CTCSS, only transmitters which send a low
frequency of 67 - 250Hz trough the modulation will be heard. All others are ignored.
The frequency of this low tone can be selected as follows:
Display:
- Press
- Press 3
( Kies Functie )
**)
(CTCSS:
The lowest frequency is 67Hz en the highest 250.3Hz, between those values stands
‘Geen’ it means none. Select this one to switch off the CTCSS tone.
Switching on or off the CTCSS for the receiver, press the
button.
3 Tone squelch
The squelch can be closed until receiving a selected 5-tone code, and the transmitter can
send a selectable 5-tone code for the opposite station.
Activate:
De tonesquelch can be activated by the key, for the receiver the yellow key will light on
and for the transmitter, a T will appear in the display.
Selecting code:
This code can be selected as follows:
Display:
- Press
- Press
( Kies Functie )
(RX:
)
Now select the tonecode for the receiver. The code must be entered with the keys 0-9,
when the number are flashing, its a DTMF tone.
- Press
(TX:
Now select the tonecode for the receiver
A tone burst will be generated by pressing the squelch-open key while transmitting. The
tone-burst frequency is selectable in the menu.
)
4 Choosen channelspace
Display:
- Press
- Press 8
( Kies Functie )
(Raster: **
)
The channelspace can be changed by pressing the keys 0 en #. Acknowledge with another
key.
5 Storing memory channels
It is posible to store 100 channels in each bank. Store channels as follows:
Display:
- Go to the VCO mode (key S).
- Choose the frequency and, if nescesairy,
select SHIFT and CTCSS.
- Press .
- Press S
- Choose a number to store the channel.
When an arrow appears, the choosen
number is already used, the old values
will be overwritten
- Press
- If you want, give a name for this channel
See for entering text §11.
- Press again
(43*.***.***
)
( Kies Functie )
(Opslaan in: xx)
(Opslaan in: >xx)
(Naam:
See §8 to display the name when selected.
6 Memory banks.
The Condor has 7 memory banks, each memory bank has its own 100 memory channels.
The advantage is that only channels in the selected bank will be scaned.
Select a higher bank:
- Press
If the selected bank contains only empty memory channels, the VCO mode will be
activated, otherwise, the Condor switches over to the memory channels. ode.
)
7 Storing the callchannel
It may be easy to activate the most used frequency by only pressing the
frequency has to be programmed as follows:
button. This
Display:
- Go to the VCO mode (key S).
- Choose the frequency and, if nescesairy
select SHIFT and CTCSS.
- Press .
- Press .
- Press .
- If you want, give the call channel a name
See for entering text §11.
- Press again.
(43*.***.***
)
( Kies Functie )
(Aanroep freq? )
(Naam:
)
See §8 to enable the channel name.
8 Enable channel-name
Every memorychannel can have its own name, the displaying of the name can be enabled
or disabled as follows:
Display:
- Press
( Kies Functie )
- Press 6
9 Erase a memory channel
Display:
- Go to the momory mode (key S)
- Enter the channel to be erased
- Press
- Press S
- Press
(** ******
)
( Kies functie )
(Kanaal wissen?)
10 Erase the callchannel
Display:
- Go to the callchannel (key
- Press
- Press
- Press
)
(A ******
)
( Kies functie )
(Aanroep wissen?)
11 Entering text
Text has to be entered the same way as entering text on a phone. Entering the A, B or the
C, has to be done by pressing the 2 a several times.
The C button is for eraseing a character, the remaining characters are shifting back, just
like the DEL key in a wordprocessor. The key is used to insert a space. The characters
behind every key are listed below. With the arrow-keys up and down are used to
step through the character group of the selected key. The cursor has to be moved by
pressing the arrow-keys left
and right .
Give an acknowledge by pressing the
key.
12 Scanning
It’s possible to scan in VFO mode and Memory mode:
Scanning all frequencies:
- Go to VFO mode with the key S
- Press *
Scanning the memorychannels:
- Go to the memory mode with the key S
- Press *
Press any other key to stop scanning. The red light
indicates scanning.
If the transceiver has found a signal, the scanning can be continued bu pressing * again.n.
13 Lock out memory channels
Scanning the memory channels will scan all channels in the selected bank. With the lockout function, each channel can be disabled for scanning.
It’s posible to skip several memory channels while scanning.
- Go to the memory (key S)
- Choose the channel
- Press
- Press *
The red light
Display:
(** 43***
)
( Kies Functie )
indicates the lock out function.
To undo this, repeat this.
14 Transmitter power
The output power of the transmitter depends on four conditions:
- The value selected in software
- The potentiometer on the front of the transceiver
- VSWR
- Temperature
Changing power setting in software:
Display:
- Press
- Press 1
The power can be changed by pressing the buttons 0 and #.
Acknowledge with any other key.
( Kies Functie )
15 Selecting repeater-shift
The value of the repeater-shift on the 70cm version in usualy 1.6MHz and for the 2m
version 600kHz. This can be changed in the NEMU (See 1.9)
Switching on and off the shift:
Display:
- Press
- Press #
( Kies functie )
It is possible to:
- Switch off the shift
- Negative shift (Transmitter 1.6MHz lower)
- Shift positief (Transmitter 1.6MHz higher)
(43*.***.***
(43*.***.***
(43*.***.***
)
S)
+
S)
-
16 Reverse shift
The reverse shift can be used to temporary listen at the transmitter frequency and
transmit at the receiver frequency. With this function, the input of relais stations can be
monitored.
The reverse shift can be switched on and off by pressing the # key only, without
first pressing the key . When reverse shift is switched on, the ‘S’ inthe display will
be replaced by an ‘R’. Als de reverse shift ingeschakeld is, wordt de ‘S’ in het display
17 Changing squelch level
Display:
- Press
- Press 2
( Kies Functie )
The squelch level can be changed by pressing the keys 0 and #.
The squelch has four levels:
----
Most sensitive
Squelch level is 5dB higher
Squelch is normal, but the receiver less sensitive
Squelch level +5dB, less sensitive
18 The MENU
It is impossible to give every function another button, so the functions which are not used
very often are placed in a MENU. In this menu, all items can be selected by pressing the
keys 0 en #.
The items can be changed by pressing the
will light.
button. In this situation the yellow led
The menu can be selected as follows:
- Press
- Press 4
( Kies functie )
(xxxxxxx MENU)
To prevent a mess in this menu, some items are listed in submenus. This submenu’s can be found in this main menu,
press to step through this items. To end this submenu,
press an unused key.
These are the menu items:
The possibilities:
- Shift
This is the value of the repeater shift.
****** kHz
- TX bij SQ
At 'onmogelijk' the transmitter can’t be activated when
receiving a signal.
Mogelijk
Onmogelijk
- TX STOP
TX-time limiter. When entering zero, the TX STOP is
disabled.
/
**** sec
- Bereik
VCO range. (For 2 meter 144-146 / 100-200)
430-440
300-500
- Scan mode
This is how the Condor acts when receiving a signal
while scanning. 1=Wait for silence 2=Wait a while
3=Stop at busy
Wacht op rust1/
Wacht even 2/
Scan tot busy 3
- Audio
Submenu !
- TX mode
This is a filter in the LF-circuit
FM
PM
/
/
- RX mode
This is a filter in the LF-circuit
FM
PM
/
- Onderdruk
Surpress ZVEI tones.
ZVEI tonen /
Nooit
- Piep
Keypad beep on / off.
Aan /
Uit
- Piep
Keypad beep volume.
Volume: ---
- Rogerpiep
Transmits a beeptone before switching off the
Aan
Uit
/
- DTMF tonen
This is the length of the DTMF tones.
*** mS
- ZVEI tonen
This is the length of the ZVEI tones.
*** mS
- Toon burst
This is the frequency of the repeater tone burst.
*** Hz
- Gebruiker
Submenu !
- Mijn nummer
This is the personal 5-tone code of the user. The
condor gives alarm when receiving this code.
***
- Antwoord
At receiving the personal code, another code can be
transmitted. This is the code to be returned.
***
- Beantwoord
This is to switch on and off the 5-tone answering.
Wel
Niet
/
- Stappen
This is the accelleration of the up- and down key.
The longer this key is pressed, the faster the
the steps willl be.
Versnel: X
- Toetsen
When holding a key for a while, the can be repeated
Autoatically.
Herhalen /
Eenmalig
- Instelling
At 'bijwerken', all settings will be stored. At ‘vast’
the settings can be stored manually by the next
item When switching on the condor, the last stored
settings will be used.
Bijwerken /
Vast
- Instelling
The settings can be stored here .
Opslaan
- Instelling
All settings can be reset, useing default settings.
Alles wissen
- IF
This is the first IF.
21.855MHz /
20.945MHz
- LP filters
This is the width of the LP filter for the receiver.
>20kHz raster/
- Status
When the red error light burns, the problem can be
shown here by pressing the key.
Diagnose
19 Select call
It is possible to store 10 names with corresponding tone code. This tone-codes can be
transmitted with select call.
Select call:
Display:
- Press
- Press 0
- Choose the name to call.
- Press #
( Kies Functie )
(Oproepen:
)
Changing and storing names or codes:
Display:
- Press
- Press 0
- Choose the name or code to change.
- Press
- Enter or change the name, see §11
- Press to acknowledge
- Enter or change the code.
- Press to acknowledge
The key
is used to acknowledge, any other key to cancel.
( Kies Functie )
(Oproepen:
)
(Naam:
)
(Nr.
)