1
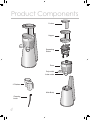
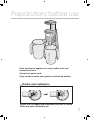
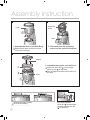
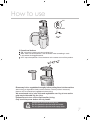
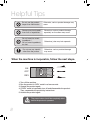
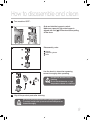
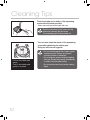
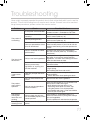
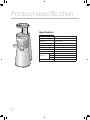
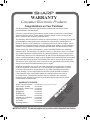
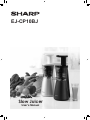
EJ-CP10BJ
Slow Juicer
User's Manual
Contents
3 page
Safety Precautions
8 page
Helpful Tips
page
4 Product
Components
page
9 How
to disassemble
and clean
page
5 page
10
Cleaning Tips
Preparations before use
2
6 page
Assembly instruction
11 page
Troubleshooting
page
7 How
to use
page
12 Product
specification
Safety Precautions
Please read all safety warnings carefully before use.
• This appliance is not intended for use by persons (including children) with
reduced physical sensory or mental capabilities, or lack of experience
and knowledge, unless they have been given supervision or instruction
concerning use of the appliance by a person responsible for their safety.
Children should be supervised to ensure that the do not play with
appliance.
• To avoid electric shock;
Do not plug or unplug the unit into a power point with wet hands,
Only plug the unit into a correctly grounded power point,
Hold the power plug firmly when plugging or unplugging the unit, do not
pull on the power cord when unplugging,
Do not submerge or hold the unit under running water when cleaning,
Never use the appliance if the power cord or power plug is damaged,
To avoid damage to the power cord, avoid severe twists and bends in the
power cord.
• If the unit jams and stops during use, switch the unit into reverse for around
3 seconds, then back to “on” this should dislodge the food causing the
jam.
• To avoid injury and damage, never disassemble the machine during use.
• Do not block the pulp outlet while the unit is operating.
• Use both hands when moving or lifting the unit, it weighs around 5kg.
• Keep out of reach of children.
• Never operate the machine when it is disassembled, it should only be used
when it is fully assembled.
• Never put your fingers or any body parts into the unit when it is operating,
only use the “pusher” assist foods as required.
• Do not use the product for more than 20 minutes at a time, excessive use
can cause overheating which can lead to motor failure.
• Always operate the unit on a flat firm surface suitable for kitchen
appliances.
• Do not operate the unit if;
There are any unusual odours, heat or smoke,
The unit has been dropped or has any signs of damage,
The “squeezing” screw has been damaged
• Do not attempt to make any repairs to the unit yourself, repairs should be
carried out by a qualified person.
• Do not operate the unit without fruit or vegetables for more than a few
seconds, some parts can become damaged due to lack of lubrication.
• Clean the product thoroughly after use.
3
Product Components
Pusher
Hopper
Squeezing
Screw
Drum
Pulp outlet
Juice outlet
2 Pitchers
Main Body
Cleaning
brush
4
Preparations before use
Place and use the appliance on a dry, stable, level, and
horizontal surface.
Connect the power cord.
Place container under each ejections (Juice/Pulp outlets).
Rubber pad installation
Place the rubber pad until it reaches the line inside.
Ensure that the rubber pad underneath the drum is closed
all the way each time before use.
5
Assembly instruction
1
2
Squeezing
Screw
Drum
Drum
1. Assemble the drum on the Main Body.
M
ake sure the drum all the way into the
shaft of the main body.
2. P
lace and push the squeezing
screw into the centre of the drum.
3
Hopper
3. Assemble the hopper onto the Drum.
Drum
M
ake sure ‘open dot’ ( ) on the hopper
points to ‘dot’ ( ) on the drum.
T
urn the hopper clockwise until it clicks into
the drum.
IMPORTANT
Reverse the steps carefully
when disassembling.
6
For proper operation,
‘close dot’ ( ) on the hopper
should be aligned with ‘dot’
( ) on the drum.
How to use
ON
ON
REV
REV
ON
O
N
REV
OFF
3 Operational buttons
“ON” activates the motor and starts making juice.
“REV” means reverse operation. Use this button when something is stuck.
It will remove the clogged material.
“OFF” stops the operation. Place the button at the centre to turn off the product.
Rinse every fruit or vegetables thoroughly before putting them into the machine.
After rinsing, put ingredients slowly into the machine. Use the pusher if necessary.
Remove any hard seeds from ingredients before juicing.
We recommend not to juice fruits and vegetables over 1kg at once as the
pulp may be blended into the juice.
Please ensure to turn off the machine after juicing.
Only touch the power button with dry hands.
Refrigerate the unused leftover juice.
Do not operate the product with wet hands.
Do not operate the product with empty drum.
7
Helpful Tips
Do not use the product
longer than 20 minutes.
Otherwise, serious product damage may
occur.
Remove any hard seeds
from fruit or vegetables.
Otherwise, serious product damage
especially on the screw may occur.
Do not insert too much
ingredients./
Do not insert ingredients
too fast.
Otherwise, juice may leak upwards.
Do not use any utensils
other than the pusher.
Otherwise, serious product damage
may occur.
When the machine is inoperable, follow the next steps.
ON
ON
OFF
OFF
REV
REV
1. Turn off the machine.
2. Run the product in “REV” mode for a few seconds.
3. Operate the product again.
4. If “REV” mode is inoperable, turn off and disassemble the product.
Then, reassemble the product by instructions.
5. Activate the product again.
The power button should be completely dried
before the product is operated.
8
How to disassemble and clean
1
Turn machine “OFF”.
Grab and twist the hopper to unlock.
Make sure ‘open dot’ ( ) on the hopper is
aligned with ‘dot’ ( ) on the drum before pulling
off the drum.
2
REV
3
Disassembly order
Hopper
Squeezing Screw
Drum
4
Use the brush to clean the squeezing
screw thoroughly after operating.
Use smooth and wet towel for
cleaning.
Do not use dishwasher or hightemperature cleaner for cleaning.
5
Dry all the product parts after cleaning.
Do not dry the product parts with heating appliance.
To reduce mould build up ensure all removale parts are
cleaned throughly.
9
Cleaning Tips
Clean the inside and outside of the squeezing
screw with the brush provided.
- Clean and wash the product right after use.
Tip
Rinse the squeezing screw under running
water after cleaning with the brush. The remaining pulp will be washed out.
You can also clean the inside of the squeezing
screw after detaching the rubber pad.
Doing so will be more hygienic.
Tip
Pull out the rubber pad
gently.
Push in the rubber pad
gently in its place.
10
-D
o not use detergents that contain organic
solvents (solvent, thinner, etc), bleach,
chlorine, benzene or abrasives.
-D
o not keep the product without cleaning
after use. Please remove pulp immediately
or within 5 minutes after juicing.
-D
o not rinse the main body under running
water.
Troubleshooting
Users might improperly operate the product due to their unfamiliarity with how to use the
product. Check the following items to resolve such issues. If issues cannot be resolved
using these procedures, please contact the service centre.
Problem
The product is
not working.
The juice is too
thick or thin.
Check
• Is the power cord connected?
• Is the Juicer assembled
correctly?
Assemble the product as described in this
user’s manual (refer to p. 6).
• Has the power gone off?
Assemble the product as described in this
user's manual (refer to p. 6).
• Have you operated the Juicer
for over 20 minutes?
Turn off the product. Wait for a while and
reactivate the product. If you want to use the
product continuously, pause the operation for
1 hour.
• Did you assemble the rubber
pad correctly?
Assemble the rubber pad as described in
this user’s manual (refer to p. 5 ‘Rubber pad
installation’).
• Did you use fresh ingredients?
Overripe fruits or vegetables may clog in
the motor. If you want to use the overripe
ingredients, use them after soaking in mineral
water for 10 minutes or more.
• Did you put too many
ingredients or anything else
into the machine?
The Drum cover
is too hard to
open.
The product
stops while in
operation.
The motor is
running with
loud noise and
shaking.
Possible Solutions
Check whether the power cord is plugged into
a 230 V to 240 V~, 50 Hz/60 Hz wall outlet.
Do not put too many ingredients or any liquids
into the machine.
We recommend you to clean the machine after
1 kg of juicing.
Disassemble the Drum and wash it.
• How did you open the Drum
cover?
Press the REV button and open the Drum
toward “OPEN”.
* Check directions when opening the drum.
• Did you force food into the
juicer?
Do not insert too much ingredients.
• Did you put the ingredients
with hard seeds?
Press the REV button for 2 to 3 seconds and
then press the ON button again.
* After following the step above, if the
Squeezing Screw does not rotate, stop
using the product. Turn off the product,
disassemble and clean it. Then reassemble
and use your Juicer again.
• Did you check that all parts
are assembled properly and in
correct position?
If the product is assembled properly, it is
normal to make noise in juicing from overripe
fruit and vegetables.
Turn the product off and clean the receptacle.
The receptacle is • This is normal to make juice. If the product overheats, contact the local service
vibrating in use.
centre.
11
Product specification
Specification
Model Name
EJ-CP10BJ
Voltage
230 V ~ 240 V
Frequency
50 Hz ~ 60 Hz
Power Consumption
150 W
RPM
32 Rpm
Elecrtical cord length
1400 mm
Motor
DC Motor
Weight
4.8 kg
Width
Dimensions
Height
Standard usage time
12
150 mm
Length 194 mm
435 mm
Less than 20 minutes continuously
Important safeguards
When using electrical appliances, basic safety precautions should always
be followed including the following:
• Read all instructions in this manual.
• Only use the product when you are familiar with all instruction and
operating procedures.
• This appliance is intended for household use, do not put anything
other than foods recommended in this book into the appliance.
• Unplug the unit from the power outlet when not in use and before
cleaning.
• Only use the attachments provided with the product.
• Do not use outdoors, the unit is designed for indoor use only.
• Do not use the product next to a heater or heating device.
13
WARRANTY
Consumer Electronic Products
Congratulations on Your Purchase!
This Sharp product is warranted against faults in material and manufacture for the
period as stated in the table below.
If service is required during the warranty period, please contact your nearest Sharp
Approved Service Centre. These repairs would be carried out at no charge to the
owner, subject to the conditions specified herein.
This warranty does not extend to defects or injuries caused by or resulting from causes
not attributable to faulty parts or the manufacture of the product, including but not
limited to, defect or injury caused by or resulting from misuse, abuse, neglect, lack of
maintenance, accidental damage, improper voltage, liquid spillage, vermin infestation,
software, or any alterations made to the product which are not authorised by Sharp.
Please retain your sales documentation, as this should be produced to validate a
warranty claim. This warranty is in addition to and in no way limits, varies or excludes
any implied rights and remedies under any relevant legislation in the country of sale.
This warranty does not cover transportation to and from the Sharp Approved Service
Centre. Goods presented for repair may be replaced by refurbished goods of the same
type rather than being repaired. Refurbished parts may be used to repair the goods.
The repair of your goods may result in the loss of user generated data, please ensure
that you have saved this data elsewhere prior to repair.
Australian customers: Our goods come with guarantees that cannot be excluded
under the Australian Consumer Law. You are entitled to a replacement or refund
for a major failure and for compensation for any other reasonably foreseeable
loss or damage. You are also entitled to have the goods repaired or replaced
if the goods fail to be of acceptable quality and the failure does not amount
to a major failure. The criteria of a major failure is defined in the Australian
Consumer Law. Should you require any assistance with a major failure please
contact Sharp Customer Care.
WARRANTY PERIODS
12 months (excluding lamps and air filters)
12 months
12 months
12 months
24 months
12 months
60 months
12 months
36 months
12 months
24 months
S
A HA
AB UST RP
1 N RA CO
Hu Hun 40 LIA RP
nt tin 003 P OR
in g
gw wo 03 TY. ATI
oo od 9 4 LIM ON
0
d
O
NS Driv 5 ITE F
D
W e
S
21
N HAR
48
59 EW P C
Pe Hu ZEA OR
nr go L PO
os J AN R
e, oh D A
Au ns LI TIO
ck ton MIT N
lan D E OF
d riv D
e
Home Theatre Projector
Audio/Home Theatre
Microwave / Steam Oven
Slow Juicer
Refrigerator
DVD/Blu-ray
Air Conditioner
Portable Air Conditioner
LCD Television
Air Purifier
Washing Machine
SPform 040 (JUNE 2013)
IMPORTANT NOTICE: This warranty applies only to products sold in Australia & New Zealand
SHARP
FOR LOCATION ENQUIRIES WITHIN
AUSTRALIA
REGARDING YOUR LOCAL
SHARP APPROVED SERVICE CENTRE
VISIT OUR WEBSITE AT
www.sharp.net.au
OR CALL SHARP CUSTOMER CARE
1300 135 022
(LOCAL CALL COST6 APPLY WITHIN AUSTRALIA)
SHARP CORPORATION OF AUSTRALIA PTY LTD
SHARP
FOR LOCATION ENQUIRIES WITHIN
NEW ZEALAND
REGARDING YOUR LOCAL
SHARP APPROVED SERVICE CENTRE
VISIT OUR WEBSITE AT
www.sharp.net.nz
CONTACT YOUR SELLING DEALER/RETAILER
OR CALL
SHARP CUSTOMER SERVICES
TELEPHONE: 09 573 0111
FACSIMILE: 09 573 0113
SHARP CORPORATION OF NEW ZEALAND LIMITED
SPform019(AUGUST 2011)
OM-EJCP10B-J31