1
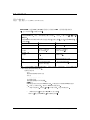
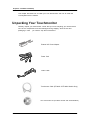
Elo Entuitive触摸显示器 用户指南 18” LCD触摸显示器 版本 1.0 P/N 80-8025-01-A 1800L系列 ET1825L-8SWA-1 ET1825L-7SWA-1 ET1866L-8SNA-1 ET1866L-7SNA-1 ET1886L-8SNA-1 ET1886L-7SNA-1 Elo触摸系统有限公司 1-800-ELOTOUCH www.elotouch.com 版权®2000 Elo触摸系统有限公司 版权所有 未经Elo触摸系统公司书面认可 任何人不得以任何方式或方法如电子方法 磁方法 光学方法 化学方法 手册形 式或其他方式方法对本出版物的任何部分进行复制 传播 转录 存于检索系统内或译成其他语言或计算机语言 否认的声明 本文所含信息可能会在没有通知的情况下发生变更 Elo触摸系统公司对此处所含内容不作任何陈述或保证 对用于 特殊目的商销性或适合性尤其不存在任何暗示引申保证 Elo触摸系统公司对本出版物保留修改权 随时会对此处出 版物的内容作出修改 Elo触摸系统公司并无义务将这些修改或变更通知任何人 商标声明 IntelliTouch SecureTouch AccuTouch Entuitive和MonitorMouse为Elo触摸系统有限公司的商标 此处提及的其他产品名称为相应公司的商标或注册商标 除本公司的商标外 Elo触摸系统公司并无意于其他公司 的商标 Elo LCD触摸显示器用户指南 - 2 目 录 第 一 章 介 绍 ........................................4 提示 ....................................... ........................4 关于本产品 .....................................................4 第 二 章 安 装 及 设 置 . . . . . . . . . . . . . . . . . . . . . . 5 触 摸 显 示 器 拆 箱 . . . . . . . . . . . . . . . . . . . . . . . . . . . . . . . . . 5 触摸接口连接 . . . . . . . . . . . . . . . . . . . . . . . . . . . . . . . . . . . . . . 6 优化 LCD显示 . . . . . . . . . . . . . . . . . . . . . . . . . . . . . . . . . . . . . 6 触 摸 显 示 器 V E S A 安 装 . . . . . . . . . . . . . . . . . . . . . . . . 6 安 装 驱 动 程 序 . . . . . . . . . . . . . . . . . . . . . . . . . . . . . . . . . . . 7 安 装 W i n d o w s 2 0 0 0 , 9 X , N T 4 . 0 驱 动 程 序 等 ..7 安 装 M S - D O S 及 W i n d o w s 3 . 1 驱 动 程 序 . . . 8 第 三 章 操 作............................................9 关 于 触 摸 显 示 器 调 整 . . . . . . . . . . . . . . . . . . . . . . . . . . . . 9 使 用 屏 幕 显 示 菜 单 . . . . . . . . . . . . . . . . . . . . . . 9 自动调整 ........................................................10 第 一 OSD菜单 . . . . . . . . . . . . . . . . . . . . . . . . . . . . . . . . . . . . . . . . . . . . . . . . . . . . . . . . 1 0 对比度.....................................................................10 水平位置..................................................11 垂直位置 ........................................................11 水平尺寸 ...........................................................11 跟踪 . . . . . . . . . . . . . . . . . . . . . . . . . . . . . . . . . . . . . . . . . . . . . . . . . . . . . . . . . . . . . . . . . . . . . . 1 1 重设 ..........................................................................11 第 四 章 故 障 发 现 及 修 理 ...............................12 第 五 章 保 养 及 处 理 . . . . . . . . . . . . . . . . . . . . . . . . . . . . 1 3 清 洁 触 摸 显 示 器 ....................................14 屏........................................... .............................14 箱.......................................................................14 安全 ..........................................................................14 附 录 A . 附 录 B. 规 定 分 辨 率 . . . . . . . . . . . . . . . . . . . . . . . . . . 1 5 技 术 规 范 附 录 C . 保证 机 械 规 范 ............16 . . 1 7 ..................................................................18 Elo 联 系 方 法 .......................................................19 Elo LCD 触摸显示器用户指南 - 3 第一章 - 介绍 祝贺您购买了一台Elo触摸系统公司生产的Entuitive LCD触摸显示器 这台高分辨率的触摸显示器 结合了Elo触摸技术的可靠运行性与LCD显示器最先进的设计 这一完美组合使用户与触摸显示器 实现自然的信息交互 提示 谨遵本用户手册中的所有警告 提示和保养要求 以便最大程度的延长机器寿命 参见第五章 触摸显 示器保养及处理 相关触摸显示器安全信息 关于本产品 本LCD触摸显示器是一台18.1”模拟TFT/有效矩阵LCD彩色显示器 具有以下特征 双路输入(BNC/D-Sub) 18.1” 屏幕尺寸 无限色彩 1280 x 1024 分辨率 XGA/ SVGA/ VGA/ VESA/ Mac/ NEC PC-98 兼容 24~80kHz 水平扫描 56~76z 高刷新率 自动调整功能 高质全屏比例重调 VESA DPMS节能 VESA平板显示器物理安装接口(100mm) 技术规范完全内容参见附录B. 机械规范完全内容参见附录C. Elo LCD 触摸显示器用户指南 - 4 第二章 - 安装及设置 本章论述了LCD触摸显示器和Elo触摸系统驱动程序的安装方法 触摸显示器拆箱 触摸显示器拆箱务必小心谨慎 检查所有组件是否齐备 是否有组件在运输过程中损坏 妥善保 存原包装箱壳 以备将来搬运触摸显示器之用 外置AC电源适配器 电源线 视频电缆 触摸屏电缆 (仅限ET1866L & ET1886L型号) Elo触摸工具CD (含驱动程序及文件) Elo LCD触摸显示器用户指南 - 5 第二章 - 安装和设置(接上页 ) 触摸接口连接 备注: 接口电缆一般工厂已预接 1. 在连接触摸显示器及计算机电缆前 务必确保触摸显示器已关闭 2. 将视频电缆的铁氧体端与计算机相连 将视频电缆的另一端口与触摸显示器相连 妥善固定电缆 拧紧接口上的螺丝 3. 将串行电缆 RS-232 的插口端与计算机背后的串口相连 将电缆的插头端与显示 器的触摸屏接口相连 4. 打开计算机然后打开触摸显示器 在一简短的停顿后 将出现画面 5. 按相关资料及随附驱动盘上的顺序进行驱动程序安装 优化LCD显示器 为确保LCD显示器与计算机兼容 对显卡的显示模式进行配置 使其分辨率不大于1280*1024 并 确保显示模式的定时与LCD显示器兼容 参见附录A 查阅更多分辨率相关信息 附录B中列出了所 有与本触摸显示器兼容的视频模式 触摸显示器VESA安装 仅限台式 台式触摸显示器自带一个VESA标准安装孔 以备增加安装选项 本触摸显示器符合VESA平板显示 器物理安装接口 FPMPMI 标准 限定了平板显示器安装接口和相应平板显示器安装装置如墙和台 臂等 以下公司提供与本触摸显示器兼容的VESA安装装置 Ergotron 800-888-8458 651-681-7600 www.ergotron.com Innovative Office Products 800-524-2744 800-524-2744 www.innov-office-prod.com GCX 800-228-2555 707-773-1100 www.gcx.com Elo LCD 触摸显示器用户指南 - 6 第二章 – 安装及设置(接上页 ) 安装驱动程序 Elo触摸 系统公司提供驱动程序使本触摸显示器与计算机兼容 驱动程序存在随附CD-ROM上 含 以下操作系统的驱动程序 Windows 2000 Windows 98 Windows 95 Windows NT 4.0 Windows 3.x MS-DOS 2.x 或以上 其他操作系统 包括OS/2, Macintosh和Linux www.elotouch.com获得 的驱动程序和相关信息亦可在Elo触摸系统网站 本Elo触摸显示器为即插即用适配件 本触摸显示器的视频功能相关信息在启动Windows便被发送 至视频显示适配器中 Windows监测到触摸显示器后 根据屏幕提示安装普通即插即用显示器 h 安装Windows 2000 95/98及 NT 4.0串行触摸驱动程序 注意: 在Windows2000及NT4.0操作平台上安装驱动程序 用户必须拥有管理员登录权 1. 将Elo CD-ROM插入计算机光驱中. 2. 如果光驱自动启动功能打开的话 则系统自动监测到CD并启动设置程序 根据屏幕命令提示完成驱动程序设置 使其与Windows版本相符 3. 如果未打开光驱自动启动功能的话 则按下列步骤进行设置 点击开始 > 运行. 点击浏览按钮 到CD-ROM上查找touch.exe程序 点击打开 然后OK 运行touch.exe程序. 按屏幕命令提示完成驱动程序设置 使其与Windows版本相符 Elo LCD 触摸显示器用户指南 - 7 第二章 – 安装及设置 (接上页 ) 安装MS-DOS及 Windows 3.1串行触摸驱动程序 1. 2. 将Elo CD-ROM插入计算机光驱. 在DOS下输入d:\EloDW进入CD-ROM上的相关目录 被映射不同的驱动盘符 3. 输入 install 4. 调整触摸屏 不同光驱可能会 安装 然后按回车开始安装 在继续安装前必须完成第一和第二步骤 参见Elo提供的DOS及Windows驱动指南第二章 查阅相关附加安装信息 1. 在DOS提示符下在驱动安装文件所在目录中输入INSTALL 安装 命令 2. INSTALL 安装 命令会要求安装者选择所需安装的软件 接着 从所显示的 清单中选择 d:\EloDW 3. INSTALL 安装 命令还会要求安装者指定安装过程中所使用的路径 或可使 用默认路径 必要时INSTALL 安装 命令创建目录 如果目录已存在的话 会 给出警告提示 4. 若是软件升级 用户有可能需指定一个包含老版本的路径 然后覆盖没用的文件 所有执行程序均向下兼容 针对各老版本的驱动程序的所有差异列单 切记在安 装过程中选择 与以前版本的各项差异 选项 5. INSTALL 安装 命令用安装者选择的驱动程序对AUTOEXEC.BAT文件进行更 新 INSTALL(安装)命令拷贝原AUTOEXC.BAT文件 命名为AUTOEXEC.OLD 如果AUTOEXEC.BAT文件中已含Elo驱动程序命令 这些命令则会被标注出来 6. 当(INSTALL)安装结束后 在安装者指定的子目录中会留下一个文件GO.BAT GO命令载入触摸屏驱动程序 运行校准程序ELOCALIB并向用户发出最终指示 7. 如果应用Windows3.1的话 用户还需在触摸屏控制面板中对触摸屏进行调整使 其与Windows3.1要求相符 Elo LCD 触摸显示器用户指南 - 8 第三章 – 操作 关于触摸显示器调整 触摸显示器通常要求进行调整 当视频输出和应用发生变更时 就需要对触摸显示器进行调整 优化 显示质量 为达到最佳效果 显示器应按其规定分辨率1280*1024 @ 60 Hz.进行操作 在Windows下利用显示 器控制面板选择1280*1024分辨率 在其他分辨率下操作会减弱视频性能 详细信息参见附录A 系统自动记忆用户对控制面板所作的所有调整 该特征使用户无需在每次拔开插头或开关触摸显示器 电源后进行重设 如果电源发生问题 触摸显示器设置不会返回工厂默认设置 使用屏幕显示菜单 可使用屏幕显示菜单进行所有调整 可使用边框按钮进行所有菜单选择 用户控制有标识 在所有台式机器上 用户控制安装在触摸显示器正面 面板安装和底盘安装式触摸显示器的用户控制有标识并位于机器背面 Elo LCD 触摸显示器用户指南 - 9 第三章 – 操作 (接上页 ) 用户控制 (以下内容为NEC用户手册 10-12页内容摘录) BNC/D-SUB: 可进行BNC与D-SUB信号输入方式切换. OSM 钮 位于显示器正面 其功能如下所示 TM (屏幕管理器) 控制按 要切换到OSM菜单 按任一控制按钮 (左键头,右箭头 上箭头 下箭头)或 继续 或 退 出 按钮 如欲将OSM 菜单在横向和纵向版式间进行旋转 按复位按钮 注意 旋转OSM 菜单 需 先关闭菜单 主菜单 子菜单 退出 退出OSM控制 退到OSM主菜单 控制按钮 上箭 头/下箭头 将加亮区上下移动 选 择某一控制选项 控制按钮 左箭 头/右箭头 将加亮区左右移动 选择控制 菜单 左右移动横道 大或减少调整 继续 不起作用 激活自动调整和全复位功能 复位 将加亮选中的控制菜单 复位到工厂默认设置 注意 :当在主菜单或子菜单中按复位键时 口显示的退出按钮来取消复位命令 亮度/对比度控制 亮度 将加亮区上下移动 选 择某一控制选项 来增 将加亮选中的控制菜单 复位到工厂默认设置 屏幕上会出现一个提示窗口 用户可按提示窗 调整所有图像和背景屏幕亮度 对比度 调整图像亮度与背景的对比 AUTO 自动调整对比度 调整非标视频输入显示的图像 OSM 锁定 OSM锁定控制完全锁定所有OSM控制功能 在锁定模式下试图激活OSM控制选项 时 屏幕上会出现对话框 提示用户OSM控制功能已锁定 . • • 要进入锁定模式 同时按 继续 和下箭头按钮 则会出现锁定窗口 要激活锁定功能 同时按下 继续 和上箭头按钮 数秒中内 则会出现OSM窗口 激活被锁定的功能 Elo LCD触摸显示器用户指南- 10 第三章 – 操作(接上页 ) 用户控制(接上页) 欲退出锁定模式 同时按 • AUTO 继续 和上箭头 自动调整 自动调整图像位置 横向大小和微调 位置控制 水平位置 在LCD显示区内控制图像水平位置 V. POSITION 在LCD显示区内控制图像垂直位置 AUTO 自动 在LCD显示区域内自动设置图像水平和垂直位置 . 图像调整控制 横向尺寸 通过增大或减小本设置选项来调整横向大小 微调 通过增大或减小本设置选项来改善焦距 清晰度和图像稳定性 自动调整横向大小设置 AccuColor 控制系统 五色预设选择所需色彩设置 每种颜色设置均为工厂设置 R,G,B: 根据颜色选择 分别增强或降低红 绿或兰色 屏幕色彩将发生变化 而且其变化 降低或增强 程度通过小横道的多 少表现出来 工具 OSM H POS. OSM V POS. 您可以根据您的需要 选择将OSM控制窗口放在屏幕的任何地方 选择OSM 位置选项 用户可手动调整将OSM控制菜单放在屏幕上方 下方 左边或右边 全复位 在选择D-SUB 输入方式时选择全复位 用户可将D-SUB输入的所有OSM控制设置 复位为工厂设置 选择BNC输入时选择全复位 用户可将BNC输入的所有OSM控 制设置复位为工厂设置 单独设置可通过加亮区选择控制选项并按复位按钮进行 信息 表明显示器当前采用的显示分辨率 频率设置和同步信号类型等信息 注意: 只有在显示器无法辩识分辨率时方可进行模式变更 用户可通过 选择 模式 信息并选择相关选项 增大或减小 切换至恰当 的分辨率 注意: 如在加亮 TYPE 类型 ”选项时按左箭头或右箭头可在单独同步和 实时同步类型中进行切换 Elo LCD触摸显示器用户指南 - 11 第四章 –故障发现及修理 如果您碰到触摸显示器视频故障 请参见以下除第17页外的NEC用户手册原文 如果问题仍然存在 请与当地经销商或我们的服务中心联系 故障发现及修理 无图像 • • • • 信号电缆应与显卡/计算机完全接好 显卡应完全位于插槽内 电源按钮及计算机电源开关应处于打开位置 确保显卡选择了支持模式或支持系统 请参考显卡或系统手册改变图像模式 • 检查显示器和显卡看是否兼容并采用建议设置 . • • 检查信号电缆接头是否有弯曲或断针. 检查BNC/D-SUB按钮是否处于正确位置 电源按钮没反应 • 从插座上拔出显示器电源线并关闭机器 重新设置显示器或同时按重设及电源按钮 图像停留 • 图像停留是指显示器关闭后某一图像的影子仍然留在屏幕上 与CRT显示器不同 LCD显示 器图像停留不是永久性的 要减轻图像停留现象 图像显示多长时间则将显示器关闭多长时间 如果图像在显示器上持续显示一个小时并留下了图影 则显示器应关闭一小时以便消除图影 注意: 对所有个人显示设备来讲 NEC技术建议在屏幕空闲时按一定间隔使用屏幕保护程序 图像不稳定 不集中或明显目眩 • 信号电缆应与计算机完全接好 • 采用OSM? 图像调整控制增大或降低微调来聚焦和调整显示效果 当显示模式发生变化时 OSM图像调整设置也应重新调整 • 检查显示器与显卡的兼容性和建议信号定时 • 如果显示文本混淆不清 则尝试将视频模式改为非-隔行扫描并采用60HZ刷新率 I 显示器的LED指示灯不亮 (看不到绿灯或黄色灯光) • • 电源按钮应处于开的状态且电源线应连接好妥 确保计算机未处于节能模式(触摸键盘或鼠标) 显示图像有一层绿影 • 在OSM信息菜单中选择 类型 选项按钮并按 或者 按钮 显示图像尺寸不对 • • 用OSM图像调整控制来增大或减小水平尺寸 确保采用了显卡或系统支持模式和信号定时 (请参考显卡或系统手册 改变图形模式或刷新率) 显示分辨率与所选分辨率不同 • 在OSM信息菜单中选择 显示分辨率 选项 则按左箭头和右箭头控制按钮选择相关选项 确保选择正确的分辨率 如果选择不当 to confirm that the 如果您的触摸显示器的触摸屏出现问题 应首先查看触摸屏电缆是否连接正确稳妥 如果问题仍然存 在 请与当地经销商或我们的服务中心联系 您还到我们的网站www.elotouch.com.可以寻求在线支 持 Elo LCD 触摸显示器用户指南 - 12 第五章 – 触摸显示器保养及维护 触摸显示器保养及维护 遵守下列提示可令触摸控制器保持最佳性能 谨防过高温或过低温 参见附录C:技术规范 保持干燥 切勿用湿布清洗或倾倒液体 检查触摸显示器是否发生冷凝现象 直至冷凝蒸发 一旦发生 关闭触摸显示器电源 切勿碰撞. 谨防灰 砂 尘. 谨防潮湿. Elo LCD 触摸显示器用户指南 - 13 第五章 – 触摸显示器保养及维护 接上页 LCD触摸显示器清洁 在对触摸显示器进行清洁前先关闭计算机系统并断开电源以便保护触摸显示器 和计算机 清洁完成后 在重新连接电缆和电源前应确保触摸屏完全干透 不要直接用液体或气雾剂直 接喷射触摸屏或机箱 切勿使用研磨纸 碱性清洁剂 洗涤粉或溶剂 如酒精或汽油 来清 洁触摸显示器 避免水进入触摸显示器内部 如果水真的进了触摸显示器 在再次通电前请 专业服务人员检查 屏幕 用不起毛的洁净软布揩拭触摸屏清除灰尘 用软布沾氨基玻璃清洁剂擦去手指印和 污迹 机箱 用微湿软布沾温和清洁剂对机箱进行清洁 用洁净水漂洗抹布 拧干后揩拭机箱清除余留清 洁剂 安全 本手册包含了设置和维修触摸显示器相关的重要信息 在安装和对新触摸显示器通电前 应 通篇阅读本手册 尤其是第二章 安装 和第三章 操作 内容 为减少触电危险 请遵守所有安全警告 切勿打开触摸显示器箱盖 进行产品清洁前先断电 . 本触摸显示器配备3线接地线 接地线插头只可插入3孔安全接地插座 勿试图将插头插入非 专用插座 切勿使用破损电线 只使用Elo触摸显示器自带的电线电缆 使用非授权电线可 能会令产品保证无效 触摸显示器箱侧和箱顶的槽口作通风用 不要堵塞通风槽口或插入异物 触摸显示器务必保持干燥 切勿浇入或溅上液体 如果触摸显示器受潮 切勿试图自行 修理 Elo LCD触摸显示器用户指南- 14 附录A – 最佳/规定分辨率 显示器的规定分辨率是指LCD显示屏设计的最佳分辨率 Elo LCD18.1”触摸显示器的最佳分 辨率为1280 x 1024 @ 60Hz 在通常情况下 采用规定分辨率屏幕图像效果最好 用户可 降低分辨率设置但不可提高分辨率设置 LCD显示器的规定分辨率是LCD显示器上的水平像素数实际数量乘垂直像素数 LCD显示器 分辨率通常用以下符号表示 比如 LCD显示器SVGA 分辨率为800水平像素*600垂直像素 输入视频也用同样格式表示 XGA输入视频分辨率表示格式为1024水平像素*768垂直像素 当视频输入格式中包含的输入 像素与面板的规定分辨率相符时 则输入视频像素与LCD像素一一映射 比如 输入视频的 45列*26行像素与LCD的45列*26行像素相对应 如输入视频分辨率低于LCD最佳分辨率 则 视频像素与LCD像素的一一对应消失 LCD控制器可用所含的运算法则在视频像素与LCD像 素间进行计算 运算法则的准确度决定了视频像素与LCD像素转换的保真度 失真转换会导 致LCD图像显示效果差比如宽度不一等 Elo LCD 触摸显示器用户指南 - 15 附录B – 技术规范 ET1825L-8SWA-1 ET1825L-7SWA-1 显示尺寸及类型 有效显示区 最佳 规定 分辨率 其他支持分辨率 色彩 视角 对比度 亮度 输入视频信号 输入电源 水平 垂直 ET1866L-8SNA-1 ET1866L-7SNA-1 ET1886L-8SNA-1 ET1886L-7SNA-1 18.1” (46.3 cm) 对角有效矩阵彩色 TFT LCD 14.4” (359 mm) x 11.3” (287mm) 1280 x 1024 @ 60Hz 720 x 400*: VGA 文本 640 x 480 @ 60Hz-76Hz 800 x 600* @ 56Hz- 76Hz 832 x 624* @ 75Hz 1024 x 768* @ 60Hz-76Hz 1152 x 900* @ 66Hz (SUN) 1280 x 960 @ 60Hz-76Hz 无限 (取决于显卡) + 85 ° 或 170° 150: 1 AccuTouch 150 cd/m2: Intellitouch 185 cd/m2 模拟 0.7 Vp-p/75 Ohms 独立同步. TTL级 水平同步. 正/负 垂直同步. 正/负 复合同步 (正/负) (TTL级) Green视频(正) 0.7 Vp-p 及同步 负0.3 Vp-p 外置式国际通用AC/DC电源适配器 12Vdc 0.9A @ 100 - 120 V/0.5A @ 220 - 240 V 24-80 kHz自动 56-76 Hz 自动 环境 工作温度 储存温度 湿度 高度 触摸屏接口 宽 高 深 重 (近似) 实际 运输 5° C- 35° C, 41° F -95° F -10° C-60° C, 14 ° F-140° F 80% 最大. 0~ 10,000’ DB9 附带电缆 串行DB9 串行 DB9 17.80” (452 mm) 15” (382 mm) 10.3” (262 mm) 19.0” (483 mm) 17” (432 mm) 3.00” (76 mm) 17.23” (437 mm) 14.6” (371 mm) 2.9” (74 mm) 24 lbs (10.9 kg) 26 lbs (11.8 kg) 14 lbs (6.35 kg) 16 lbs (7.3 kg) 12 lbs (5.4 kg) 14 lbs (6.35 kg) * 内插值替换分辨率: 当分辨率比LCD模型像素值低时 显示文本可能会扭曲且直线粗细不一 这对目前所有平板技术产品在全屏显示放大图 像时都是正常和必须的 在平板技术中 屏幕上的每个点就是一个实际的像素 所以将分辨率扩展到全屏 就必须进行分辨率内插值替换 当 内插值替换分辨率不刚好是原分辨率的整倍数时 插补值可能会使一些线看起来比其他线粗 注:技术规范可能在不通知的情况下发生变更 Elo LCD 触摸显示器用户指南 - 16 附录C- 机械规范 ET1825L型号 ET1866L型号 ET1886L型号 Elo LCD 触摸显示器用户指南 - 17 保证 除非本文或发送给买方的订购确认书中另有规定外 卖方应向买方保证所售产品无 材质和工艺缺陷 触摸显示器和组件的保证期为 触摸计算机 3年 IntelliTouch 触摸屏 10年 触摸控制器 5年 卖方对组件的模型寿命不作任何保证 卖方的供货商有可能随时或时不时的对作为 产品或组件出售的组件进行修改 买方在发现任何符合以上保证要求的产品有缺陷时应立即书面通知卖方 从发现日期起 不得超过30天 通知上应合理详细描述此类缺陷症状 同时 在可能的情况下应给卖 方提供机会检查已安装好的产品 通知应在保证期内送交至卖方 除非卖方另外直接书 面指示外 在提交通知30天内 买方必须将其认为有缺陷的产品用原箱或同等功效包 装并自费且自担风险运送至卖方 卖方在收到买方认定为缺陷的产品并确认其不能满足上述质量保证后 应根据其意愿 在适当的时间内 或者 I 修补产品 或 II 调换产品 此类整改 修补或调换费 用及返程运输及买方最小险费用应由卖方承担 买方应承担产品在运输中的丢失及损坏 风险并可对产品进行保险 如果卖方发现退回的产品并非缺陷产品的话 买方须将运输 费用补贴给卖方 产品的整改或修补可根据卖方意愿在卖方工厂进行或在买方基地进行 如卖方不能整改 修补或调换产品以满足上述质量保证承诺的话 依据卖方意愿 卖方 应将按产品购买价格扣除保证期直线偿还方式下的折旧费退款或将此笔价款打回买方帐 户 上述质量保证补救措施为买方在遇卖方违约时可享受的唯一措施除上述保证外 卖方对产品 精度 质量 销路 无损害性等不作其他任何形式的保证 阐述或暗示 卖方的员工或任何第 三方无权对产品作出除上述保证外的其他保证 卖方的产品保证责任是有限的 至退还产品购 买价格为止 任何情况下 卖方对产品采购费用或买方安装的相关产品或任何特定的 相因而 生的 间接的或意外损坏不负任何责任 买方承担风险并同意赔偿卖方所负以下或使卖方免受以下责任引起的损失 (i) 评定产品 是否满足买方的用途要求 包括任何系统设计或图纸 (ii) 决定买方所用产品是否符合相 关法律 规定 规范及标准 买方的产品中包含或综合了卖方生产或提供的产品 买方应 负责并接受所有与之相关或因此而生的保证和其他代理 买方独立对任何及所有与由买方 制造或授权的产品相关的声明及保证负责任 买方应赔偿卖方或使卖方免受任何与买方产 品或相关产品代理或保证相关的责任 索赔 损失 费用或耗费 包括合理的律师费 Elo LCD触摸显示器用户指南 - 18 Elo联系方式 Elo联系方式 Elo TouchSystems, Inc. 6500 Kaiser Drive Fremont, CA 94555 USA Elo TouchSystems GmbH & Co. KG. Dr.- von Daller-Str. 35 D-85356 Freising Germany www.elotouch.com 客户服务 声讯: FAX: (800) 356-8682 (US境内免费) (510) 651-2340 (美国西部标准时间) +49 (1) 8161/ 670 42 (除德国外德所有欧洲国家) 0180/ 530 41 70 (德国) (510) 651-3511 +49 (1) 8161/ 660 43 (欧洲) 技术支持 声讯: (423) 220-4299 (美国西部标准时间;标准时间外为语音邮件 +49 8161/ 670 42 (除德国外德所有欧洲国家) 0180/ 530 41 70 (德国) FAX: (800) 489-9935 (US境内免费) +49 (1) 8161/ 660 43 (欧洲) E-mail: [email protected] BBS: (510) 651-1224 Elo LCD 触摸显示器用户指南 - 19 Elo Entuitive Touchmonitor User Guide For 18” LCD Touchmonitor Version 1.0 P/N 80-8025-01-A 1800L Series Models ET1825L-8SWA-1 ET1825L-7SWA-1 ET1866L-8SNA-1 ET1866L-7SNA-1 ET1886L-8SNA-1 ET1886L-7SNA-1 Elo TouchSystems, Inc. 1-800-ELOTOUCH www.elotouch.com Copyright © 2000 Elo TouchSystems Inc. All Rights Reserved. No part of this publication may be reproduced, transmitted, transcribed, stored in a retrieval system, or translated into any language or computer language, in any form or by any means, including, but not limited to, electronic, magnetic, optical, chemical, manual, or otherwise without prior written permission of Elo TouchSystems. Disclaimer The information in this document is subject to change without notice. Elo TouchSystems makes no representations or warranties with respect to the contents hereof, and specifically disclaims any implied warranties of merchantability or fitness for a particular purpose. Elo TouchSystems reserves the right to revise this publication and to make changes from time to time in the content hereof without obligation of Elo TouchSystems to notify any person of such revisions or changes. Trademark Acknowledgments IntelliTouch, SecureTouch, AccuTouch, Entuitive, and MonitorMouse are trademarks of Elo TouchSystems, Inc. Other product names mentioned herein may be trademarks or registered trademarks of their respective companies. Elo TouchSystems claims no interest in trademarks other than its own. Elo LCD Touchmonitor User Guide- 2 Table of Contents Chapter 1. Introduction........................................4 Precautions ................................................................4 About the Product......................................................4 Chapter 2. Installation and Setup......................5 Unpacking Your Touchmonitor.................................5 Touch Interface Connection......................................6 Optimizing the LCD Display.....................................6 VESA Mount on Your Touchmonitor........................6 Installing the Driver Software....................................7 Installing Windows 2000, 9X, NT 4.0 Drivers.…..7 Installing MS-DOS and Windows 3.1 Drivers…...8 Chapter 3. Operation ............................................9 About Touchmonitor Adjustments............................9 Using the On-Screen Display Menus ......................9 Auto Adjustment ........................................................10 First OSD Menu.........................................................10 Contrast......................................................................10 Horizontal Position....................................................11 Vertical Position........................................................11 Horizontal Size...........................................................11 Tracking......................................................................11 Reset ..........................................................................11 Chapter 4. Troubleshooting ...............................12 Chapter 5. Care and Handling............................13 Cleaning Your Touchmonitor....................................14 Screen........................................................................14 Cabinet.......................................................................14 Safety..........................................................................14 Appendix A. Native Resolution..........................15 Appendix B. Technical Specifications.............16 Appendix C. Mechanical Specifications……..17 Warranty ..................................................................18 Contacting Elo .......................................................19 Elo LCD Touchmonitor User Guide- 3 Chapter 1 – Introduction Congratulations on your purchase of an Elo TouchSystems Entuitive LCD touchmonitor. Your new high-resolution touchmonitor combines the reliable performance of Elo’s touch technology with the latest advances in LCD display design. This combination of features creates a natural flow of information between a user and your touchmonitor. Precautions Follow all warnings, precautions and maintenance as recommended in this user’s manual to maximize the life of your unit. See Chapter 5 “Care and Handling of your Touchmonitor” for more information on touchmonitor safety. About the Product Your LCD Touchmonitor is a 18.1” Analog TFT/ Active matrix LCD color display with the following features: Dual Inputs (BNC/D-Sub) 18.1” diagonal screen size Unlimited number of displayable colors 1280 x 1024 resolution XGA/ SVGA/ VGA/ VESA/ Mac/ NEC PC-98 compatible 24~80kHz horizontal scan 56~76z high refresh rate Auto adjustment capability High quality full screen re-scaling VESA DPMS power saving VESA flat panel monitor physical mounting interface (100mm) For full Technical Specifications refer to Appendix B. For full Mechanical Specifications refer to Appendix C. Elo LCD Touchmonitor User Guide- 4 Chapter 2 – Installation and Setup This chapter discusses how to install your LCD touchmonitor and how to install Elo TouchSystems driver software. Unpacking Your Touchmonitor Carefully unpack your touchmonitor. Check that you have everything you need and that none of the components have been damaged during shipping. Save the box and packaging in case you need to ship the touchmonitor..f External AC Power Adaptor Power Cord Video Cable Touchscreen Cable (ET1866L & ET1886L Models Only) Elo TouchTools CD (Contains drivers and documentation) Elo LCD Touchmonitor User Guide- 5 Chapter 2 – Installation and Setup (Continued) Touch Interface Connection Note: Your interface cables may have been pre-connected to your monitor at the factory. 1. Before connecting the cables to your touchmonitor and PC, be sure that the computer and the touchmonitor are turned off. 2. Connect the ferrite end of the video cable to the video connector on your PC. Connect the other end of the video cable to the touchmonitor. Secure the cable to your touchmonitor and PC by turning the screws on the connector. 3. Connect the female end of the serial (RS-232) cable to the serial port on the back of your PC. Connect the male end of the cable to the touchscreen connector on your touchmonitor. 4. Power on your PC then your touchmonitor. After a brief pause the picture should appear. 5. Install the driver software using the procedure described in the documentation accompanying the driver disk. Optimizing the LCD Display To ensure the LCD display works well with your computer, configure the display mode of your graphic card to make it less than or equal to 1280 x 1024 resolution, and make sure the timing of the display mode is compatible with the LCD display. Refer to Appendix A for more information about resolution. Compatible video modes for your touchmonitor are listed in Appendix B. VESA Mount on Your Touchmonitor (Desktops Only) Your desktop touchmonitor comes with a VESA standard mounting holes for additional mounting options. Your touchmonitor conforms to the VESA Flat Panel Monitor Physical Mounting Interface (FPMPMI™) Standard, which defines a physical mounting interface for flat panel monitors, and corresponding standards for flat panel monitor mounting devices, such as wall and table arms. The following companies provide VESA mounting devices compatible with your touchmonitor Ergotron 800-888-8458 651-681-7600 www.ergotron.com Innovative Office Products 800-524-2744 800-524-2744 www.innov-office-prod.com GCX 800-228-2555 707-773-1100 www.gcx.com Elo LCD Touchmonitor User Guide- 6 Chapter 2 – Installation and Setup (Continued) Installing the Driver Software Elo TouchSystems provides driver software that allows your touchmonitor to work with your computer. Drivers are located on the enclosed CD-ROM for the following operating systems: Windows 2000 Windows 98 Windows 95 Windows NT 4.0 Windows 3.x MS-DOS 2.x or later Additional drivers and driver information for other operating systems (including OS/2, Macintosh and Linux) are available on the Elo TouchSystems web site at www.elotouch.com. Your Elo touchmonitor is plug-and-play compliant. Information on the video capabilities of your touchmonitor is sent to your video display adapter when Windows starts. If Windows detects your touchmonitor, follow the instructions on the screen to install a generic plugand-play monitor. Installing the Serial Touch Driver for Windows 2000, 95/98 and NT 4.0 Note: For Windows 2000 and NT 4.0 you must have administrator access rights to install the driver. 1. Insert the Elo CD-ROM in your computer’s CD-ROM drive. 2. If the AutoStart feature for your CD-ROM drive is active, the system automatically detects the CD and starts the setup program. Follow the directions on the screen to complete the driver setup for your version of Windows. 3. If the AutoStart feature is not active: Click Start > Run. Click the Browse button to locate the touch.exe program on the CD-ROM. Click Open, then OK to run touch.exe. Follow the directions on the screen to complete the driver setup for your version of Windows. Elo LCD Touchmonitor User Guide- 7 Chapter 2 – Installation and Setup (Continued) Installing the Serial Touch Driver for MS-DOS and Windows 3.1 1. Insert the Elo CD-ROM in your computer’s CD-ROM drive. 2. From DOS, type d:\EloDW to change to the correct directory on the CDROM (your CD-ROM drive may be mapped to a different drive letter). 3. Type install and press Enter to start the installation. 4. Align the touchscreen. You must have already completed Steps 1 and 2 before proceeding. Refer to Chapter 2 of the Elo DOS and Windows Driver Guide as necessary for additional installation information. 1. Type INSTALL at the DOS prompt in the directory containing the driver install files. 2. INSTALL asks you to select the software to install. Then choose d:\EloDW from the displayed list. 3. INSTALL also asks you for the paths to use during installation, or you may use its defaults. INSTALL creates directories as necessary, and warns you if they exist. 4. If you are updating your software, you may wish to specify the paths containing the earlier versions, and overwrite the obsolete files. All executable programs are upward compatible. For a list of differences from each previous version of the drivers, be sure to select "Differences from Previous Versions" during the installation process. 5. INSTALL updates your AUTOEXEC.BAT file with the drivers you select. INSTALL makes a copy of your original AUTOEXEC.BAT file, called AUTOEXEC.OLD. If you already have Elo driver commands in your AUTOEXEC.BAT file, they will be commented out. 6. When INSTALL is finished, it leaves a file called GO.BAT in the subdirectory you specified. GO loads the touchscreen driver, runs the calibration program ELOCALIB, and gives you some final instructions. 7. If you are using Windows 3.1, you will also align the touchscreen within Windows 3.1 with the Touchscreen Control Panel. Elo LCD Touchmonitor User Guide- 8 Chapter 3 – Operation About Touchmonitor Adjustments Your touchmonitor will likely require adjustment. Variations in video output and application will require you to adjust your touchmonitor to optimize the quality of the display. For best performance, your monitor should be operating in native resolution, that is 1280 x 1024 @ 60 Hz. Use the Display control panel in Windows to choose 1280 x 1024 resolution. Operating in other resolutions will degrade video performance. For further information, please refer to Appendix A. All adjustments you make to the controls are automatically memorized. This feature saves you from having to reset your choices every time you unplug or power your touchmonitor off and on. If there is a power failure your touchmonitor settings will not default to the factory specifications. Using the On-Screen Display Menus All adjustments are made by using the on-screen display (OSD) menus. All menu items can be selected by using the buttons on the side bezel. The user controls are labeled and are mounted on the front of the touchmonitor for all Desktop models. Panel Mount and Chassis Mount touchmonitors have user controls that are labeled and located at the rear of the unit. Elo LCD Touchmonitor User Guide- 9 Chapter 3 – Operation (Continued) User Controls (The following is an excerpt taken from pages 10 – 12 of the NEC user manual) BNC/D-SUB: Allows you to change between the BNC and D-SUB signal inputs. OSM™ (On-Screen Manager) control buttons on the front of the monitor function as follows: To access OSM menu, press any of the control buttons ( , , , ) or the PROCEED or EXIT button. To rotate OSM between Landscape and Portrait modes, press the RESET button. NOTE: OSM menu must be closed in order to rotate. EXIT Main Menu Sub-Menu Exits the OSM controls. Exits to the OSM main menu. CONTROL / Moves the highlighted area up/down to select one of the controls. Moves the highlighted area up/down to select one of the controls. CONTROL / Moves the highlighted area left/right to select control menus. Moves the bar left/ right to increase or decrease the adjustment. PROCEED Has no function Activates Auto Adjust and ALL RESET functions. RESET Resets the highlighted control menu to the factory setting. Resets the highlighted control to the factory setting. NOTE: When RESET is pressed in the main and sub-menu, a warning window will appear allowing you to cancel the RESET function by pressing the EXIT button. Brightness/Contrast Controls BRIGHTNESS Adjusts the overall image and background screen brightness. CONTRAST Adjusts the image brightness in relation to the background. AUTO AUTO ADJUST CONTRAST Adjusts the image displayed for non-standard video inputs. OSM LOCK OUT The OSM LOCK OUT control completely locks out access to all OSM control functions. When attempting to activate OSM controls while in the LOCK OUT mode, a screen will appear indicating that OSM controls are locked out. • To enter the LOCK OUT mode, simultaneously press the PROCEED and button. The LOCK OUT window will appear. • To activate the LOCK OUT function, simultaneously press and hold down the PROCEED and button. The OSM window will disappear within seconds and the LOCK OUT function will be activated. Elo LCD Touchmonitor User Guide- 10 Chapter 3 – Operation (Continued) User Controls (Continued) • To deactivate the LOCK OUT mode, simultaneously press the PROCEED and button. AUTO Auto Adjust Automatically adjusts the Image Position, H. Size and Fine settings. Position Controls H. POSITION Controls Horizontal Image Position within the display area of the LCD. V. POSITION Controls Vertical Image Position within the display area of the LCD. AUTO AUTO Automatically sets the Horizontal and Vertical Image Position within the display area of the LCD. Image Adjust Controls H. SIZE Adjusts the horizontal size by increasing or decreasing this setting. FINE Improves focus, clarity and image stability by increasing or decreasing this setting. Automatically adjusts the H Size settings. AccuColor´® Control System Five color presets select the desired color setting. Each color setting is adjusted at the factory. R,G,B: Increases or decreases Red, Green or Blue color depending upon which is selected. The change in color will appear on screen and the direction (increase or decrease) will be shown by the bars. Tools OSM H POS. OSM V POS. You can choose where you would like the OSM™ control window to appear on your screen. Selecting OSM Location allows you to manually adjust the position of the OSM control menu left, right, up or down. ALL RESET Selecting ALL RESET when D-SUB input is selected allows you to reset all OSM control settings for the D-SUB input back to the factory settings. Selecting ALL RESET when BNC input is selected allows you to reset all OSM control settings for the BNC input back to the factory settings. Individual settings can be reset by highlighting the control to be used and pressing the RESET button. Information Indicates the current display resolution, frequency setting and type of Sync signal the monitor is using. NOTE: Mode Change should only be used if a resolution is not recognized by the monitor. The user can change to the appropriate resolution by selecting the Mode information and selecting (increase or decrease) the corresponding option. NOTE: If the or button is pressed while TYPE is highlighted, then Sync Type is switched between Separate Sync and Sync On Green. Elo LCD Touchmonitor User Guide- 11 Chapter 4 – Troubleshooting If you are experiencing trouble with the video of your touchmonitor, refer to the following excerpt from page 17 of the original NEC users manual. If the problem persists, please contact your local dealer or our service center. Troubleshooting No picture • • • • The signal cable should be completely connected to the display card/computer. The display card should be completely seated in its slot. Power Button and computer power switch should be in the ON position. Check to make sure that a supported mode has been selected on the display card or system being used. (Please consult display card or system manual to change graphics mode.) • Check the monitor and your display card with respect to compatibility and recommended settings. • Check the signal cable connector for bent or pushed-in pins. • Check that the BNC/D-SUB button is in the correct position. Power Button does not respond • Unplug the power cord of the monitor from the AC outlet to turn off and reset the monitor, or simultaneously press the RESET and Power buttons. Image persistence • Image persistence is when a “ghost” of an image remains on the screen even after the monitor has been turned off. Unlike CRT monitors, LCD monitors’ image persistence is not permanent. To alleviate image persistence, turn the monitor off for as long as an image was displayed. If an image was on the monitor for one hour and a ”ghost” of that image remains, the monitor should be turned off for one hour to erase the image. NOTE: As with all personal display devices, NEC Technologies recommends using a screen saver at regular intervals whenever the screen is idle. Image is unstable, unfocused or swimming is apparent • Signal cable should be completely attached to the computer. • Use the OSM™ Image Adjust controls to focus and adjust display by increasing or decreasing the Fine control. When the display mode is changed, the OSM Image Adjust settings may need to be re-adjusted. • Check the monitor and your display card with respect to compatibility and recommended signal timings. • If your text is garbled, change the video mode to non-interlace and use 60Hz refresh rate. LED on monitor is not lit (no green or amber color can be seen) • Power Button should be in the ON position and power cord should be connected. • Make certain the computer is not in a power-saving mode (touch the keyboard or mouse). Display image has a green cast to it • Select “TYPE” in the OSM Information menu button. and press the or Control Display image is not sized properly • Use the OSM Image Adjust controls to increase or decrease the H. Size. • Check to make sure that a supported mode and signal timing has been selected on the display card or system being used. (Please consult display card or system manual to change graphics mode or refresh rate.) Selected resolution is not displayed properly • Select the Display Resolution in the OSM Information menu to confirm that the appropriate resolution has been selected. If not, select corresponding option by pressing the or Control button. If you are experiencing trouble with the touch screen of your touchmonitor, ensure that the touch screen cable is properly attached. If the problem persists, please contact your local dealer or our service center. You may also seek online support at our website: www.elotouch.com. Elo LCD Touchmonitor User Guide- 12 Chapter 5 – Care and Handling of your Touchmonitor Care and Handling Of Your Touchmonitor The following tips will help you keep your Touchmonitor functioning at the optimal level: Protect your touchmonitor from extremely low or high temperatures (see Appendix C, Technical Specifications). Keep your touchmonitor dry. Do not wash it with a wet cloth or pour fluid into it. Check your touchmonitor for condensation. If condensation develops, do not power your touchmonitor on until the condensation evaporates. Protect your touchmonitor from being bumped or dropped. Keep your touchmonitor away from dust, sand and dirt. Keep your touchmonitor away from humid environments. Elo LCD Touchmonitor User Guide- 13 Chapter 5 – Care and Handling of your Touchmonitor (Continued) Cleaning Your LCD Touchmonitor Prevent damage to your touchmonitor (and PC) by powering off the computer system and disconnecting the touchmonitor from the AC out-let before you clean it. After you finish cleaning, make sure the touch-monitor is completely dry before you reconnect the cables and power it on. Do not apply liquid or aerosol spray cleaners directly on the screen or cabinet. Do not use any type of abrasive pad, alkaline cleaner, scouring powder or solvent (such as alcohol or benzine) to clean your touch-monitor. Avoid getting liquids inside your touchmonitor. If liquid does get inside, have a qualified service technician check it before you power it on again. Screen Remove dust and dirt by wiping the touch screen with a soft, clean, lint-free cloth. Moisten a soft cloth with an ammonia-based glass cleaner and use it to remove fingerprints and smudges. Case Clean the touchmonitor cabinet with a soft cloth slightly moistened with a mild detergent solution. Rinse the cloth with clear water, wring it dry, and wipe the cabinet to remove any detergent residue. Safety This manual contains information that is important for the proper setup and maintenance of your touchmonitor. Before setting up and powering on your new touchmonitor, read through this manual, especially Chapter 2 (Installation), and Chapter 3 (Operation). To reduce the risk of electric shock, follow all safety notices and never open the touchmonitor case. Turn off the product before cleaning. Your new touchmonitor is equipped with a 3-wire, grounding power cord. The power cord plug will only fit into a three-prong safety ground outlet. Do not attempt to fit the plug into an outlet that has not been configured for this purpose. Do not use a damaged power cord. Use only the power cord that comes with your Elo TouchSystems Touchmonitor. Use of an unauthorized power cord may invalidate your warranty. The slots located on the sides and top of the touchmonitor case are for ventilation. Do not block or insert anything inside the ventilation slots. It is important that your touchmonitor remains dry. Do not pour liquid into or onto your touchmonitor. If your touchmonitor becomes wet do not attempt to repair it yourself. Elo LCD Touchmonitor User Guide- 14 Appendix A – Native Resolution The native resolution of a monitor is the resolution level at which the LCD panel is designed to perform best. For the Elo LCD touchmonitor, the native resolution is 1280 x 1024 @ 60Hz for the 18.1” inch size. In almost all cases, screen images look best when viewed at their native resolution. You can lower the resolution setting of a monitor but not increase it. The native resolution of an LCD is the actual number of pixels horizontally in the LCD by the number of pixels vertically in the LCD. LCD resolution is usually represented by the following symbols: As an example, a SVGA resolution LCD panel has 800 pixels horizontally by 600 pixels vertically. Input video is also represented by the same terms. XGA input video has a format of 1024 pixels horizontally by 768 pixels vertically. When the input pixels contained in the video input format match the native resolution of the panel, there is a one to one correspondence of mapping of input video pixels to LCD pixels. As an example, the pixel in 45 column and 26 row of the input video is in 45 column and 26 row of the LCD. For the case when the input video is at a lower resolution than the native resolution of the LCD, the direct correspondence between the video pixels and the LCD pixels is lost. The LCD controller can compute the correspondence between video pixels and LCD pixels using algorithms contained in the controller. The accuracy of the algorithms determines the fidelity of conversion of video pixels to LCD pixels. Poor fidelity conversion can result in artifacts in the LCD displayed image such as varying width characters. Elo LCD Touchmonitor User Guide- 15 Appendix B – Technical Specifications Model Technical Specifications Display Size & Type Useable Screen Area Optimal (Native) Resolution Other Supported Resolutions Colors Viewing Angle Contrast Ratio Brightness Input Video Signal Input Power Source Scanning Frequency Horizontal Vertical Environmental Operating Temperature Storage Temperature Humidity Altitude Touchscreen Connector ET1825L-8SWA-1 ET1825L-7SWA-1 ET1866L-8SNA-1 ET1866L-7SNA-1 ET1886L-8SNA-1 ET1886L-7SNA-1 18.1” (46.3 cm) diagonal active matrix color TFT LCD 14.4” (359 mm) x 11.3” (287mm) 1280 x 1024 @ 60Hz 720 x 400*: VGA text 640 x 480 @ 60Hz to 76Hz 800 x 600* @ 56Hz to 76Hz 832 x 624* @ 75Hz 1024 x 768* @ 60Hz to 76Hz 1152 x 900* @ 66Hz (SUN) 1280 x 960 @ 60Hz to 76Hz Unlimited (Depends on Display Card) + 85? or 170? total 150: 1 AccuTouch 150 cd/m2: Intellitouch 185 cd/m2 ANALOG 0.7 Vp-p/75 Ohms Separate sync. TTL Level Horizontal sync. Positive/Negative Vertical sync. Positive/Negative Composite sync. (Positive/Negative) (TTL Level) Sync on Green video (Positive) 0.7 Vp-p and sync. Negative 0.3 Vp-p External Universal AC/DC power adaptor. 12Vdc 0.9A @ 100 – 120 V/0.5A @ 220 – 240 V 24-80 kHz Automatically 56-76 Hz Automatically 5?C to 35?C, 41?F to 95?F -10?C to 60?C, 14?F to 140?F 80% max. 0 to 10,000’ DB9 Attached Serial DB9 Cable Serial DB9 Physical Dimensions Width Height Depth 17.80” (452 mm) 15” (382 mm) 10.3” (262 mm) 19.0” (483 mm) 17” (432 mm) 3.00” (76 mm) 17.23” (437 mm) 14.6” (371 mm) 2.9” (74 mm) 24 lbs (10.9 kg) 26 lbs (11.8 kg) 14 lbs (6.35 kg) 16 lbs (7.3 kg) 12 lbs (5.4 kg) 14 lbs (6.35 kg) Weight (Approximate) Actual Shipping * Interpolated Resolutions: When resolutions are shown that are lower than the pixel count of the LCD module, text may appear choppy or lines may appear to be bold. This is normal and necessary for all current flat panel technologies when displaying non-native resolutions full screen. In flat panel technologies, each dot on the screen is actually one pixel, so to expand resolutions to full screen, an interpolation of the resolution must be done. When the interpolated resolution is not an exact multiple of the native resolution, the mathematical interpolation necessary may cause some lines to appear thicker than others. NOTE: Technical specifications are subject to change without notice. Elo LCD Touchmonitor User Guide- 16 Appendix C – Mechanical Specifications ET1825LModels ET1866LModels ET1886LModels Elo LCD Touchmonitor User Guide- 17 Warranty Except as otherwise stated herein or in an order acknowledgment delivered to Buyer, Seller warrants to Buyer that the Product shall be free of defects in materials and workmanship. The warranty for the touchmonitors and components of the product are: 3 years monitor, 10 years IntelliTouch screen, 5 years Accu- Touch screen, 5 years Controller. Seller makes no warranty regarding the model life of components. Seller’s suppliers may at any time and from time to time make changes in the components delivered as Products or components. Buyer shall notify Seller in writing promptly (and in no case later than thirty (30) days after discovery) of the failure of any Product to conform to the warranty set forth above; shall describe in commercially reasonable detail in such notice the symptoms associated with such failure; and shall provide to Seller the opportunity to inspect such Products as installed, if possible. The notice must be received by Seller during the Warranty Period for such product, unless otherwise directed in writing by the Seller. Within thirty (30) days after submitting such notice, Buyer shall package the allegedly defective Product in its original shipping carton(s) or a functional equivalent and shall ship to Seller at Buyer’s expense and risk. Within a reasonable time after receipt of the allegedly defective Product and verification by Seller that the Product fails to meet the warranty set forth above, Seller shall correct such failure by, at Seller’s options, either (i) modifying or repairing the Product or (ii) replacing the Product. Such modification, repair, or replacement and the return shipment of the Product with minimum insurance to Buyer shall be at Seller’s expense. Buyer shall bear the risk of loss or damage in transit, and may insure the Product. Buyer shall reimburse Seller for transportation cost incurred for Product returned but not found by Seller to be defective. Modification or repair, of Products may, at Seller’s option, take place either at Seller’s facilities or at Buyer’s premises. If Seller is unable to modify, repair, or replace a Product to conform to the warranty set forth above, then Seller shall, at Seller’s option, either refund to Buyer or credit to Buyer’s account the purchase price of the Product less depreciation calculated on a straight-line basis over Seller’s stated Warranty Period. THESE REMEDIES SHALL BE THE BUYER’S EXCLUSIVE REMEDIES FOR BREACH OF WARRANTY. EXCEPT FOR THE EXPRESS WARRANTY SET FORTH ABOVE, SELLER GRANTS NO OTHER WARRANTIES, EXPRESS OR IMPLIED BY STATUTE OR OTHERWISE, REGARDING THE PRODUCTS, THEIR FITNESS FOR ANY PURPOSE, THEIR QUALITY, THEIR MERCHANTABILITY, THEIR NONINFRINGEMENT, OR OTHERWISE. NO EMPLOYEE OF SELLER OR ANY OTHER PARTY IS AUTHORIZED TO MAKE ANY WARRANTY FOR THE GOODS OTHER THAN THE WARRANTY SET FORTH HEREIN. SELLER’S LIABILITY UNDER THE WARRANTY SHALL BE LIMITED TO A REFUND OF THE PURCHASE PRICE OF THE PRODUCT. IN NO EVENT SHALL SELLER BE LIABLE FOR THE COST OF PROCUREMENT OR INSTALLATION OF SUBSTITUTE GOODS BY BUYER OR FOR ANY SPECIAL, CONSEQUENTIAL, INDIRECT, OR INCIDENTAL DAMAGES. Buyer assumes the risk and agrees to indemnify Seller against and hold Seller harmless from all liability relating to (i) assessing the suitability for Buyer’s intended use of the Products and of any system design or drawing and (ii) determining the compliance of Buyer’s use of the Products with applicable laws, regulations, codes, and standards. Buyer retains and accepts full responsibility for all warranty and other claims relating to or arising from Buyer’s products, which include or incorporate Products or components manufactured or supplied by Seller. Buyer is solely responsible for any and all representations and warranties regarding the Products made or authorized by Buyer. Buyer will indemnify Seller and hold Seller harmless from any liability, claims, loss, cost, or expenses (including reasonable a ttorney’s fees) attributable to Buyer’s products or repre sentations or warranties concerning same. Elo LCD Touchmonitor User Guide- 18 Contacting Elo Contacting Elo Elo TouchSystems, Inc. 6500 Kaiser Drive Fremont, CA 94555 USA Elo TouchSystems GmbH & Co. KG. Dr.- von Daller-Str. 35 D-85356 Freising Germany www.elotouch.com Customer Service Voice: (800) 356-8682 (Toll Free in United States) (510) 651-2340 (Pacific Time) +49 (1) 8161/ 670 42 (Europe excepting Germany) 0180/ 530 41 70 (Germany) FAX: (510) 651-3511 +49 (1) 8161/ 660 43 (Europe) Technical Support Voice: (423) 220-4299 (Pacific Time; voice mail after hours) +49 8161/ 670 42 (Europe excepting Germany) 0180/ 530 41 70 (Germany) FAX: (800) 489-9935 (toll free in United States) +49 (1) 8161/ 660 43 (Europe) E-mail: [email protected] BBS: (510) 651-1224 Elo LCD Touchmonitor User Guide- 19