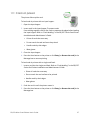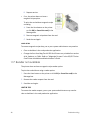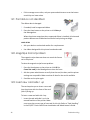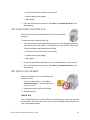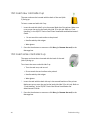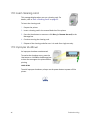
1
Datacard® SD/CD™ Series Card Printer User’s Guide June 2012 Part No. 527248-001, Rev A Notice Please do not attempt to operate or repair this equipment without adequate training. Any use, operation, or repair you perform that is not in accordance with the information contained in this documentation is at your own risk. Proprietary Notice All drawings and information herein are the property of DataCard Corporation. All unauthorized use and reproduction is prohibited. Trademark Acknowledgments Datacard is a registered trademark and service mark of DataCard Corporation in the United States and other countries. Windows is a registered trademark of Microsoft Corporation. All other product names are the property of their respective owners. Datacard Group 11111 Bren Road West Minnetonka, MN 55343-9015 Phone: 952-933-1223 Fax: 952-933-7971 www.datacard.com © 2012 DataCard Corporation. All rights reserved. Printed in the United States of America. ii Revision Log Datacard® SD/CD™ Series Card Printer User’s Guide Revision Date A June, 2012 Description of Changes First release of this document. iii iv Contents Chapter 1: Introduction ____________________________________________________________ About this Manual______________________________________________________________ Intended Audience ____________________________________________________________ Technical Support ______________________________________________________________ 1 1 1 1 Chapter 2: About the Printer ________________________________________________________ About the SD and CD Series Card Printers________________________________________ Printer Components ________________________________________________________ Printer With Input Hopper ________________________________________________ Printer With Duplex Option_______________________________________________ Inside a Printer With a Duplex Option_____________________________________ System Label _______________________________________________________________ 3 3 4 5 6 6 7 Chapter 3: Using the System ________________________________________________________ 9 How the Card Travels___________________________________________________________ 9 Card Printer System Overview___________________________________________________ 9 Tasks and Users ____________________________________________________________ 10 Printer Controls________________________________________________________________ 10 Power Button______________________________________________________________ 10 LCD Panel ________________________________________________________________ 11 Menus_________________________________________________________________ 11 User Button and Light ______________________________________________________ 11 Down Arrow, Up Arrow, and Enter Key ______________________________________ 12 Ribbon Light ______________________________________________________________ 12 Card Light ________________________________________________________________ 13 Retrieve the Printer IP Address _________________________________________________ 14 Print a Test Card_______________________________________________________________ 15 Load and Replace Supplies____________________________________________________ 16 Loading Cards ____________________________________________________________ 16 Loading the Print Ribbon ___________________________________________________ 17 Loading the Cleaning Sleeve ______________________________________________ 18 Installing the Ribbon Cartridge _____________________________________________ 18 Chapter 4: System Maintenance___________________________________________________ 19 Clean the Printer ______________________________________________________________ 19 Clean the Printhead ___________________________________________________________ 20 Run a Cleaning Card __________________________________________________________ 22 Chapter 5: Troubleshooting _______________________________________________________ 25 Card Appearance ____________________________________________________________ 25 Something did not print ____________________________________________________ 25 Printing includes unexpected data _________________________________________ 26 The color printing has flaws_________________________________________________ 26 The printing is too light _____________________________________________________ 27 Magnetic Stripe _______________________________________________________________ 28 Card Jam_____________________________________________________________________ 29 Messages and Conditions _____________________________________________________ 30 v Messages on the Printer LCD _______________________________________________ 30 Messages from the XPS Card Printer Driver on the PC ________________________ 30 Messages From Printer Manager____________________________________________ 31 Other Messages ___________________________________________________________ 31 Respond to Messages _________________________________________________________ 32 100: Request not supported ________________________________________________ 32 101: Job could not complete ______________________________________________ 32 102: Card not in position ___________________________________________________ 33 103: Printer problem _______________________________________________________ 33 104: Critical problem_______________________________________________________ 33 105: Magstripe data error __________________________________________________ 34 106: Magstripe data not found _____________________________________________ 34 107: Magstripe read data error _____________________________________________ 35 108: Magstripe read no data _______________________________________________ 35 109: Print ribbon problem __________________________________________________ 36 110: Print ribbon out or missing______________________________________________ 36 111: Card not picked ______________________________________________________ 37 112: Card hopper empty___________________________________________________ 38 113: Close cover to continue ______________________________________________ 38 114: Cover opened during job _____________________________________________ 39 115: Wait for print temperature ____________________________________________ 39 116: Magstripe not available _______________________________________________ 39 117: Reader not available__________________________________________________ 40 118: Print ribbon type problem _____________________________________________ 41 119: Print ribbon not supported ____________________________________________ 41 120: User paused the printer _______________________________________________ 41 121: Print ribbon not identified ______________________________________________ 42 122: Magstripe format problem ____________________________________________ 42 123: Insert new card side 1 up ______________________________________________ 42 124: Insert same card side 2 up _____________________________________________ 43 149: Option not installed ___________________________________________________ 43 152: Insert new card side 2 up ______________________________________________ 44 153: Insert same card side 2 up _____________________________________________ 44 170: Insert new card side 1 up ______________________________________________ 45 171: Insert same card side 1 up _____________________________________________ 45 172: Insert cleaning card ___________________________________________________ 46 173: Improper shutdown ___________________________________________________ 46 Chapter 6: Supplies and Parts _____________________________________________________ 47 Cards ________________________________________________________________________ 47 Card Size _________________________________________________________________ 47 Card Material _____________________________________________________________ 47 Pre-Punched Cards _______________________________________________________ 48 New Cards for Color Printing _______________________________________________ 48 Adhesive-Backed Cards ___________________________________________________ 48 Card Quality Guidelines ___________________________________________________ 48 Card Surface __________________________________________________________ 48 vi Card Handling_________________________________________________________ 49 Card Storage __________________________________________________________ 49 Supplies ______________________________________________________________________ 50 Print Ribbon _______________________________________________________________ 50 Color Print Ribbon______________________________________________________ 50 Full-Panel Color Print Ribbon ____________________________________________ 50 Short-Panel Color Print Ribbon __________________________________________ 50 Color Print Ribbon Kits __________________________________________________ 50 Monochrome Print Ribbon______________________________________________ 50 Monochrome Print Ribbon Kits __________________________________________ 50 Print Ribbon Storage Guidelines_________________________________________ 51 Cable Lock Option ________________________________________________________ 51 Cleaning Supplies _________________________________________________________ 51 Hopper Options _______________________________________________________________ 51 200-Card Input Hopper ____________________________________________________ 51 Large Output Hopper _____________________________________________________ 51 Power Supply, Cables, and Cords ______________________________________________ 52 Power Supply _____________________________________________________________ 52 Data Cables and Power Cord______________________________________________ 52 Data Cable ___________________________________________________________ 52 USB Cable _____________________________________________________________ 52 Network Cable ________________________________________________________ 52 Smart Card Cable _____________________________________________________ 52 Power Cord ___________________________________________________________ 52 Replacement Parts ____________________________________________________________ 54 Printhead Cartridge _______________________________________________________ 54 Print Ribbon Cartridge _____________________________________________________ 54 Cleaning Roller Spindle ____________________________________________________ 54 Chapter 7: Legal and Compliance_________________________________________________ 55 Regulatory Compliance _______________________________________________________ 55 Notice for USA (FCC notice)________________________________________________ 55 Notice for Canada ________________________________________________________ 55 Notice for Europe _________________________________________________________ 55 Notice for Taiwan _________________________________________________________ 56 Notice for Japan __________________________________________________________ 56 Notice to All Users _________________________________________________________ 56 Liability Statement_____________________________________________________________ 56 Safety ________________________________________________________________________ 57 Safe environment _________________________________________________________ 57 Safe human interface _____________________________________________________ 57 Acknowledgments ____________________________________________________________ 58 Fonts______________________________________________________________________ 58 Disclaimer ____________________________________________________________________ 59 Proprietary Notice_____________________________________________________________ 59 vii viii Chapter 1: Introduction About this Manual This manual provides user information for the SD and CD Series Card Printers. The manual includes: • An overview of printer components and options, and a description of the system label. • How to use the printer, including how to power the printer on and off, how to use the front panel and LCD menus, card processing basics, how to print a test card, and how to load and replace supplies. • How to perform routine maintenance and troubleshooting tasks. An additional SD/CD Installation and Administrator’s Guide is available for use by administrators or other professionals responsible for printing cards. Refer to the SD and CD Series Card Printers Owner’s Library CD. Intended Audience The manual is intended for the printer operator responsible for printing cards, loading and replacing supplies, printer maintenance, and troubleshooting. Technical Support Contact Datacard Technical Phone Support at 1‐800‐328‐3996. SD/CD Series Card Printers User’s Guide 1 2 Introduction Chapter 2: About the Printer About the SD and CD Series Card Printers The card printer applies images, text, and encoded data to plastic cards. It can print full‐color and monochrome images, depending on the type of print ribbon installed. A busy issuance site might issue up to 10,000 cards a month. During these busy times, the site might use more than one printer to keep up with demand. The printer issues cards either one at a time or in batches — up to 100 cards at a time. An optional 200‐card input hopper is available for some printers. Options available for the card printer include magnetic stripe, smart card, automatic duplex, and reject hopper. The configuration label on the printer shows the options installed. Refer to “System Label” on page 7 for more information about recognizing the factory‐installed options on your card printer. Refer to the following to view the printer components and the different options: • Printer Components on page 4 • Printer With Input Hopper on page 5 • Printer With Duplex Option on page 6 SD/CD Series Card Printers User’s Guide 3 Printer Components Printhead: Transfers images to cards using the print ribbon. Printer information label: Shows location, date of manufacture, and options installed. Manual advance knob: Use the knob to move a card in the track. Security lock: Insert the security plate before attaching the lock. Printer information label Printhead Manual advance Security lock Printer connections: • Power receptacle • USB connection Printer connections • Network connection Printer ribbon cartridge: Holds ribbon for printing. Print ribbon cartridge Print ribbon: Roll of material to apply images to cards. Replaceable cleaning sleeve: Removes dust and other particles from cards to maintain print quality. Print ribbon Replaceable cleaning sleeve 4 About the Printer Printer With Input Hopper SD/CD Series Card Printers User’s Guide 5 Printer With Duplex Option Inside a Printer With a Duplex Option 6 About the Printer System Label The printer configuration label on the side of the cover arm shows the components installed. It provides information that is useful when requesting service. The label shows: • Printer name, which also appears on the model label. • Configuration, which includes options in the printer. • Date and country of assembly. • The MAC address to use when the printer is connected via an Ethernet network. Some components might be installed by the dealer or sales group. The information for those items is hand‐written on the label. SD/CD Series Card Printers User’s Guide 7 8 About the Printer Chapter 3: Using the System This section provides information on how a card travels through the printer, the printer as part of a card production system, printer controls, printing a test card, loading and replacing supplies, and cleaning the printer. How the Card Travels The card is verified and sent to print from the PC. The hopper pick mechanism picks a card and moves the card into the printer component for processing. Optionally, the card moves to the magnetic stripe encode area or to the smart card park station, depending on the type of card selected. The encrypted data is decrypted and written to the card. The finished card exits the printer through the card output hopper. Card Printer System Overview The card printer is used with other equipment and software to create a card production system. The system produces cards for a specific purpose and the cards must meet requirements. The system can include: 1. A PC, with software to support the printer, such as: • The Datacard XPS Card Printer Driver for Windows. • ID software designed specifically to capture, format, and save the data for cards. • A retail application such as Microsoft® Word or Adobe® Photoshop®. SD/CD Series Card Printers User’s Guide 9 2. Capture devices, such as: • A digital camera connected to the PC to take photos for ID badges and other cards. • A signature capture pad or fingerprint reader. 3. The printer with supplies and a facility power source. 4. A data connection between the printer and PC, which can be a USB connection or a network connection. (Do not use both with one printer.) Tasks and Users Typical roles in a card production system include: • The operator makes cards, loads supplies, and handles minor problems such as card jams. • The system administrator sets up the card printer and other hardware, sets up card designs, configures card production software, and identifies the best use of the card printer in the organization. Printer Controls The front panel of the printer provides the controls for operating the printer. It includes the following: Power Button Use this button to power off and power on the printer. All lights show steady amber while the printer powers on. To power off the printer, press the switch for 1 to 2 seconds until the printer powers off. If the printer is processing cards, press the button for 2 or more seconds to power off the printer immediately. Card jobs in the printer are not completed. 10 Using the System LCD Panel The LCD panel shows the printer’s menus and displays printer messages or conditions. Refer to “Respond to Messages” on page 32 for more information. Menus The menu system has three major branches: • Use the Maintenance menu to run a cleaning card or a test card. • Use the Status menu to see settings and data about the printer. • Use the Configuration menu to change settings. HINTS & TIPS • The menu system can be accessed when Ready displays on Line 1 of the LCD panel. • The printer returns to the Ready status after two minutes of no activity. Changes not applied are lost. • To leave a selection without changing the value, press the E NTER key repeatedly until Ready displays. User Button and Light The printer has a USER button with a ring of light. Its uses are: • To suspend printer activity, press the USER button when it displays Ready. • To clear a message, press the USER button once. • To clear all messages, press the USER button for 2 seconds or more. • To clear all cards currently printing, press and hold the USER button again for two or more seconds. (Make sure that this action is allowed in your card system.) SD/CD Series Card Printers User’s Guide 11 • To show whether the printer is ready, busy printing, or not available: Off Printer is off. Green Printer is ready. Blinking green Printer is busy. Amber The printer is not ready. The POWER button was pressed to turn the printer off. Blinking Amber The printer has an error. Down Arrow, Up Arrow, and Enter Key Use the arrow keys to move through the printer menu system, and the E NTER key to make a selection. Ribbon Light The ribbon light glows green when the print ribbon is low. It glows amber when there is a problem with the ribbon. 12 Off Ribbon is okay. Green Ribbon is low - less than 10% remains. Amber Ribbon is out or broken. Blinking Amber The printer problem applies to ribbon. Using the System Card Light The card light indicates the status of cards in the printer. Off Cards are okay. Green Ribbon is low - less than 10% remains. Blinking Green Insert cleaning card. Rapid Blinking Green Insert card for printing. Blinking Amber and Green The printer is equipped with an optional card present sensor and no card is detected. Blinking Amber The printer problem applies to cards. SD/CD Series Card Printers User’s Guide 13 Retrieve the Printer IP Address The printer can display the network IP address it uses when connected to the network. It also displays the Subnet Mask, Gateway Address, and MAC Address. Begin with the printer power connected, and the printer connected to the network. 1. Press the POWER button (if needed) to power on the printer. 2. Access the Network Status menu in the LCD menu: A. Press the USER button to suspend the printer. B. Press the E NTER key to enter the menu system. C. Press the down arrow to display Status on line 2. D. Press E NTER to enter the Status menu. E. Press the down arrow key to display Network Status on line 2. F. Press E NTER to display the Network Status menu. 3. Press the down arrow key to display IP Address on line 2. 4. Press E NTER to display the IP address. Record the IP address. 5. Press E NTER to return to the Network menu. Subnet Mask displays on line 2. 6. Do one of the following: • To exit the LCD menu system, skip to step 9. • To get the Gateway Address value, press the ENTER key. a. Press the E NTER key to return to the Network menu. Gateway Addr displays on line 2. b. Press the E NTER key to display the Gateway Address (if any). 7. Press E NTER to return to the Network menu. 14 Using the System 8. Press the down arrow key to scroll to Exit on line 2. 9. Press E NTER repeatedly until Ready displays on line one and the USER button glows green. Print a Test Card The printer includes a test card that runs without using a driver or other source of card data. Use it to verify that the printer is working. 1. Begin with the printer “Ready”. The USER button shows steady green. 2. Press the USER button to display “Suspended” on Line 1 of the LCD panel. 3. Press the ENTER button to enter the menu system. 4. Press the ENTER button to enter the Maintenance menu. 5. Press the down arrow button to display “Test Card” on line 2. 6. With Test Card displayed on Line 2, press the ENTER button to display “Start” on Line 2. 7. After the card prints, press the USER button to return the printer to Ready. SD/CD Series Card Printers User’s Guide 15 Load and Replace Supplies To prepare the printer to print cards you load blank card stock into the input hopper (optional), and load print ribbon and a cleaning sleeve into the print cartridge. Loading Cards Do one of the following: • If you are using a manual feed printer, skip this step and keep a supply of blank cards close to the printer. • For printers with an input hopper, continue with these steps: 1. Open the input hopper. 2. Fan cards before placing them into the input hopper. 3. Insert magnetic stripe cards with the stripe down and toward the right side of the input hopper. 4. Close the input hopper. 16 Using the System Loading the Print Ribbon Load the print ribbon when you install the printer and when the ribbon runs out. 1. Open the printer’s top cover. 2. Remove the print ribbon cartridge. 3. Load a full roll of print ribbon onto the spindle closest to the cartridge handle. 4. Place the empty spool on the spindle with the black gear. 5. Wind the empty spool counter‐ clockwise one full turn. 6. Close the printer’s top cover. SD/CD Series Card Printers User’s Guide 17 Loading the Cleaning Sleeve Load a new cleaning sleeve with each new roll of print ribbon. The printer ships with the cleaning roller spindle installed on the print ribbon cartridge. 1. Remove the cleaning roller spindle from the ribbon cartridge and slide the continuous cleaning sleeve onto the spindle (a). 2. Snap the spindle with sleeve installed onto the ribbon cartridge (b). 3. Remove the protective wrapper from the cleaning sleeve (c). Installing the Ribbon Cartridge Install the assembled print ribbon cartridge into the printer. 1. Open the printer’s top cover. 2. Hold the print ribbon cartridge by the handle and lower into the printer with the handle toward the front of the printer. 3. Make sure that the ribbon cartridge is correctly positioned in the guides. 18 Using the System Chapter 4: System Maintenance Clean the Printer The printer performs best when it is cleaned on a regular basis. Follow the cleaning guidelines for your site to keep the printer in good working condition, cleaning the printer when: • The printer displays a message for which cleaning is a solution. • There is debris on completed cards. • There is a new roll of print ribbon installed. You can perform the following cleaning tasks: • “Clean the Printhead” on page 20 • “Run a Cleaning Card” on page 22 SD/CD Series Card Printers User’s Guide 19 Clean the Printhead Clean the printhead when: • The printhead is replaced. • There are unprinted lines on the finished card. This usually indicates dirt or contamination on the printhead. • The printhead is accidentally touched. Oils from hands may affect print quality. 1. Power off the printer. 2. Open the printer cover and remove the print ribbon cartridge. 3. Open the cleaning pen. 4. Using gentle pressure, move the cleaning pen back and forth along the full length of the printhead edge until it is completely clean. 5. Replace the print ribbon cartridge and close the printer cover. Avoid bumping the printhead when installing the print ribbon cartridge. 6. Power on the printer. 20 System Maintenance 7. Print a sample card to verify the quality of printing. Refer to “Print a Test Card” on page 15 for more information. HINTS & TIPS • Avoid touching the printhead edge with your fingers. • Avoid touching the printing edge of the printhead cartridge with any sharp objects that can permanently damage the printhead. • Use only the cleaning pen to clean the printhead. Other materials can stick to the printhead and cause damage. • Use the cleaning pen up to 8 times, and then replace it. SD/CD Series Card Printers User’s Guide 21 Run a Cleaning Card Run a printer cleaning card to clean debris from the inside of the printer. The cleaning card can remove most contaminants from the printer. 1. Prepare the printer. A. Power on the printer. B. Open the printer cover and remove the print ribbon cartridge. C. Close the cover. The ribbon light blinks rapidly. D. If necessary, open the input hopper and remove unprinted cards. The card light blinks rapidly if the printer has the Card Present option. 2. Access the LCD menu. A. Begin when the printer displays Ready and the USER button shows steady green. B. Press the USER button to display Suspended on Line 1 of the LCD panel. C. Press the E NTER button to enter the menu system. D. Press the E NTER button to enter the Maintenance menu. E. Press the E NTER button to display Cleaning Card. F. When Cleaning Card displays on Line 2, press the E NTER key to display Start on Line 2. G. Press the E NTER key to display Insert Cleaning Card in the LCD panel. The USER button and the card light blink. 3. Insert the cleaning card. A. Open the cleaning card package and remove the cleaning card. 22 System Maintenance B. Place the cleaning card in the input hopper or in the manual feed. C. Press the USER button to resume or click Retry (or Resume the card) in the Message box to start the cleaning cycle. The printer moves the card through the printer several times and ejects it in the output stacker. 4. Remove the used cleaning card. Wait a few minutes for the rollers to dry. 5. Prepare the printer for use. A. Replace the cards in the input hopper. B. Replace the cleaning sleeve on the ribbon cartridge with a new sleeve, and remove the protective cover. Refer to “Loading the Cleaning Sleeve” on page 18 for the steps to follow. C. Replace the ribbon cartridge and close the printer. The printer is ready to print cards again. D. Discard the used cleaning card and cleaning sleeve. HINTS & TIPS • Use the cleaning card and cleaning sleeve one time only. • Change the cleaning sleeve each time you clean the printer or change the print ribbon. SD/CD Series Card Printers User’s Guide 23 24 System Maintenance Chapter 5: Troubleshooting Card Appearance Card appearance problems can be caused by many different factors. Click the link below that best describes the card appearance issue seen on the printed card. • Something did not print on page 25 • Printing includes unexpected data on page 26 • The printing is too light on page 27 Something did not print Problem Solution Nothing is printed on the card. The Print Ribbon is loaded incorrectly. Remove the print ribbon and install it correctly. Refer to the SD/ CD™ Series Card Printer Installation and Administrator’s Guide. SD/CD Series Card Printers User’s Guide 25 Printing includes unexpected data Problem Probable Cause Solution Text intended for the magnetic stripe printed on the card. The text to encode was longer than one line. Reduce the font size to keep all text on one line. For more information, refer to the SD/CD™ Series Card Printer Installation and Administrator’s Guide. Several blank cards are ejected before the full card prints. The application can use the page size in effect when a document is created, and you set the page size after creating the document and before printing. For more information on using the page setup feature to set the page size before creating the document, refer to the SD/ CD™ Series Card Printer Installation and Administrator’s Guide. Consider using a template for cards that opens at the correct page size. The color printing has flaws Problem Probable Cause Solution One or more unprinted lines appear on the card. The printhead is dirty or damaged. Clean the printhead. Refer to “Clean the Printhead” on page 20. One color panel is not aligned correctly with other color panels. The cards are slipping in the track. Run a cleaning card. Refer to “Run a Cleaning Card” on page 22. The cards are not the correct size for the printer. Use cards that meet the size requirement for the printer. If you must use the cards you have, ask your system administrator for help. Refer to “Cards” in the SD/CD™ Series Card Printer Installation and Administrator’s Guide. The cards have a matte, not glossy, finish. Use cards that meet the requirements for the printer. Refer to “Cards” in the SD/ CD™ Series Card Printer Installation and Administrator’s Guide for specifications. The rollers are dirty. Run a cleaning card. Refer to “Run a Cleaning Card” on page 22. The printhead is dirty. Clean the printhead. Refer to “Clean the Printhead” on page 20. Printing is blurred. 26 Troubleshooting Problem Probable Cause Solution The printed card has small unprinted areas. Unprinted cards have scratches. Handle cards carefully. Refer to “Card Quality Guidelines” in the SD/CD™ Series Card Printer Installation and Administrator’s Guide. The printed card has small unprinted areas. Cards have embedded particles, an uneven surface, or the card edge has burrs. Use cards that meet the requirements for the printer. Refer to “Cards” in the SD/ CD™ Series Card Printer Installation and Administrator’s Guide. The rollers are dirty or the card packaging contains debris. Run a cleaning card. Refer to “Run a Cleaning Card” on page 22. Cards might have fingerprints or other dirt on them. Handle cards carefully. Refer to “Card Quality Guidelines” in the SD/CD™ Series Card Printer Installation and Administrator’s Guide. The rollers are dirty or the card packaging contains contamination. Run a cleaning card. Refer to “Run a Cleaning Card” on page 22. Use cards that meet the requirements for the printer. Refer to “Cards” in the SD/CD™ Series Card Printer Installation and Administrator’s Guide. Part of the printed image is discolored. The printing is too light Problem Probable Cause Solution Photos look faded. The image capture system needs adjustment. Color settings might not be optimal. For more information on adjusting the color settings, refer to the XPS Card Printer Driver Guide. The printing is very light. The ribbon is loaded incorrectly. Load the print ribbon correctly. Refer to “Loading the Print Ribbon” on page 17. The card was previously printed and has topcoat on it. Print only new cards. Refer to “Cards” in the SD/CD™ Series Card Printer Installation and Administrator’s Guide. The printhead is not installed correctly. Contact your service provider for instructions on installing the printhead correctly. SD/CD Series Card Printers User’s Guide 27 Magnetic Stripe To begin troubleshooting a magnetic stripe problem, first print a magnetic stripe sample card from the driver. Refer to “Printing a Driver Sample Card” in the XPS Card Printer Driver Guide. The printer uses the coercivity set using the LCD panel or Printer Manager, and uses the data format set using the Printer Manager. 28 Problem Solution Cards are not loaded correctly. Load cards with the magnetic stripe down and toward the right side of the printer. Refer to “Loading Cards” on page 16. Cards do not have a magnetic stripe. Load magnetic stripe cards in the card cartridge. If the cards have a magnetic stripe, check the quality of the cards. Change card stock if needed. The card has dirt or damage on the magnetic stripe. Encode and print the card again. If the message appears again, run a cleaning card to clean the magnetic stripe head. Refer to “Run a Cleaning Card” on page 22. Troubleshooting Card Jam The card did not reach the position for the next action, such as printing or ejecting the card. 1. Open the printer and remove the ribbon cartridge. 2. Turn the knob to move the card. 3. Remove the card. 4. Replace the ribbon cartridge and close the printer. 5. Press the USER button on the printer or click Retry in the Message box. HINTS & TIPS Check the ribbon to make sure that it is not torn. Refer to “110: Print ribbon out or missing” on page 36 to fix the ribbon if needed. SD/CD Series Card Printers User’s Guide 29 Messages and Conditions When the printer cannot process the card sent, it issues a condition. The LCD panel on the front panel shows these conditions. If your system uses the XPS Card Printer Driver, the printer driver also displays the condition as a message on the PC. In a shared printer environment, messages may be slightly different from the messages and conditions described in this section. You view: • Messages on the Printer LCD on page 30. • Messages from the XPS Card Printer Driver on the PC on page 30. • Messages From Printer Manager on page 31. • Other Messages on page 31. Messages on the Printer LCD All messages are associated with a print job. The printer issues messages that focus on recovering from problems. • The printer displays a short description and a message number for each message. • If more than one message was issued, the next message displays after you correct the problem and press the USER button. • If you cancel a job at the printer, the message is removed from the PC. Any additional messages for the canceled job, such as for a broken ribbon, do not display on the PC. Messages from the XPS Card Printer Driver on the PC 30 • Messages the printer driver displays are similar to those on the printer LCD panel. • Messages display on the PC sending the card. • Messages might be in the background, behind the application sending the card. On some operating systems, the message might appear in the status bar. Click the icon in the status bar to open the message. • If more than one message was issued, the next message displays after you close the current message. Troubleshooting • If there is more than one card printer installed on the PC, messages are displayed one at a time. The title bar of each message shows the printer name. • If there is more than one card printer installed on the PC and each has issued errors, the printer driver displays the messages received even if you cleared the error at the printer. • The driver can issue messages that are not displayed on the printer LCD panel. Messages From Printer Manager The Printer Manager issues messages that display in a Web browser window. Click Continue in Printer Manager to continue working with the printer. Refer to “Printer Manager” in the SD/CD™ Series Card Printer Installation and Administrator’s Guide. Other Messages • The card production application you use may display messages. • Other printers can cause messages if more than one model of card printer is installed. SD/CD Series Card Printers User’s Guide 31 Respond to Messages You can respond to printer messages using the printer front panel buttons or, if your system uses the XPS Card Printer Driver, by selecting buttons in the Message box displayed in Windows. Names of Message box buttons on the PC are worded slightly differently depending on the installed operating system. 100: Request not supported The print request or other action failed. To print the card: 1. Change the data to match the system’s features and settings. 2. Press the User button on the printer or click OK (or Cancel the card) in the Message box to clear the error. 3. Send the new card to print again, making sure that you choose the correct printer in the card production application. Ask your system administrator for assistance, if needed. 4. Discard any incomplete cards. 101: Job could not complete The card took too much time. To print the card again: 1. Make sure that data, such as a photo, is on the PC before printing. If you are connected to a database, verify the connection. 2. Press the User button on the printer or click OK in the Message box to clear the error. 3. Send the card to print again. 4. Discard any incomplete cards. 32 Troubleshooting 102: Card not in position The card did not reach the position for the next action, such as printing or ejecting the card. 1. Open the printer and remove the ribbon cartridge. A. Check the ribbon to make sure that it is not torn. Refer to “110: Print ribbon out or missing” on page 36 to fix the ribbon if needed. B. Remove any debris from the print area. 2. Turn the knob to move the card. 3. Remove the card. 4. Replace the ribbon cartridge and close the printer. 5. Press the USER button on the printer or click Retry in the Message box. 103: Printer problem The printer has a problem that prevents it from completing the card. 1. Press the printer POWER button to power it off. 2. Press the printer POWER button to power it on again. 104: Critical problem 1. Press the printer POWER button or click OK (or Cancel the Card) in the Message box to power the printer off. 2. Request service. The printer needs to remain off due to an internal problem. SD/CD Series Card Printers User’s Guide 33 105: Magstripe data error The printer encoded data on the card but could not verify all of the written data. To print the card again: 1. Insert a magnetic stripe card that matches the printer settings, positioning the card with the magnetic stripe down and to the right side of the printer 2. Press the USER button on the printer or click Retry in the Message box. HINTS & TIPS • The card might have been turned the wrong way. • The card might not have a magnetic stripe. 106: Magstripe data not found The printer could not find magnetic stripe written data on the card. To print the card again: 1. Insert a magnetic stripe card with data, positioning the card with the magnetic stripe down and to the right side of the printer 2. Press the USER button on the printer or click Retry in the Message box. HINTS & TIPS 34 • The card might not match printer settings or the data sent. • Ask the system administrator to verify that the card, the data, and the printer settings match. Troubleshooting 107: Magstripe read data error The printer could not read the magnetic stripe data on the card. To read the card successfully: 1. Press the USER button on the printer or click OK in the Message box to clear the error. 2. Insert a magnetic stripe card with data, positioning the card with the magnetic stripe down and to the right side of the printer. 3. Send the new card to the printer. HINTS & TIPS • The data might use a different format than the current printer setting. • Ask the system administrator to verify that the card, data, and printer settings match. 108: Magstripe read no data The printer did not find any magnetic stripe data on the card. To read the card: 1. Press the USER button on the printer or click OK (or Cancel the card) in the Message box to clear the error. 2. Insert a magnetic stripe card with data, positioning the card with the magnetic stripe down and to the right side of the printer. 3. Send the new card to the printer. HINTS & TIPS • The card might have been turned the wrong way. • The card might not have a magnetic stripe. SD/CD Series Card Printers User’s Guide 35 109: Print ribbon problem The print ribbon is not moving properly. To fix the ribbon: 1. Open the printer and remove the ribbon cartridge. 2. Cut and tape the damaged ribbon to the take‐up spindle, and move the repaired area one full turn. 3. Remove any debris from the print area. 4. If the card is in the printer, turn the knob to move the card so the printer can eject it. 5. Replace the ribbon cartridge and close the printer. 6. Press the USER button on the printer or click Retry in the Message box. 110: Print ribbon out or missing The printer does not have usable ribbon. To load new print ribbon: 1. Open the printer and remove the ribbon cartridge. 2. Remove the existing ribbon and cleaning roller, if present. 3. Install the ribbon. Replace the cleaning roller. 4. Replace the ribbon cartridge and close the printer. 5. Press the USER button on the printer or click Retry (or Resume the card) in the Message box. HINTS & TIPS Used ribbon has negative images of printed data. To keep the data confidential, follow your company policy to discard used ribbon. 36 Troubleshooting 111: Card not picked The printer did not pick a card. To load cards in printers with an input hopper: 1. Open the input hopper. 2. Insert cards in the input hopper. To prevent cards from sticking together, slide or fan cards to separate the edges before loading the input hopper. Refer to “Card Handling” in the SD/CD™ Series Card Printer Installation and Administrator’s Guide. • Orient all cards the same way. • Do not touch the card surface to be printed. • Handle cards by their edges. • Wear gloves. 3. Close the input hopper 4. Press the USER button on the printer or click Retry (or Resume the card) in the Message box to resume printing. To load cards in printers with a single‐card feed: 1. Insert a card into the single‐card feed. Refer to “Card Handling” in the SD/CD™ Series Card Printer Installation and Administrator’s Guide. • Orient all cards the same way. • Do not touch the card surface to be printed. • Handle cards by their edges. • Wear gloves. 2. Push the card in until the printer moves it. 3. Press the USER button on the printer or click Retry (or Resume the card) in the Message box. SD/CD Series Card Printers User’s Guide 37 112: Card hopper empty The printer does not detect cards in the input hopper. 1. Open the input hopper. 2. Insert cards in the input hopper. To prevent cards from sticking together, slide or fan cards to separate the edges before loading the input hopper. Refer to “Card Handling” in the SD/CD™ Series Card Printer Installation and Administrator’s Guide. • Orient all cards in the same direction. • Do not touch the card surface to be printed. • Handle cards by their edges. • Wear gloves. 3. Close the input hopper. 4. Press the USER button on the printer or click Retry (or Resume the card) in the Message box to resume printing. 113: Close cover to continue The printer cover must be closed to print. 1. Close the cover. 2. Push down on the cover to latch it. 3. Press the USER button on the printer or click Retry (or Resume the card) in the Message box. HINTS & TIPS Make sure that the ribbon cartridge is installed with the cartridge handle even with the edges of the printer. 38 Troubleshooting 114: Cover opened during job The printer cover must be closed to print. 1. Close the cover. 2. Push down on the corners of the cover to latch it. 3. Press the USER button on the printer or click Retry in the Message box. 4. Discard any incomplete cards. HINTS & TIPS Make sure that the ribbon cartridge is installed with the handle even with the edges of the printer. 115: Wait for print temperature The printer is not at the correct temperature to print the card. 1. Printing the card may resume on its own OR Press the USER button on the printer or click Retry (or Resume the card) in the Message box. 2. Discard any incomplete cards. HINTS & TIPS Make sure that you have chosen the correct printer in the application. Ask the system administrator for assistance if needed. 116: Magstripe not available Open the printer cover and look at the config area of the label inside. Does the label show M or J? • If yes, the printer has a magnetic stripe option that is not working. A. Press the USER button on the printer or click OK (or Cancel the card) in the Message box. SD/CD Series Card Printers User’s Guide 39 B. Request service. • If no, the printer does not have a magnetic stripe option. To print the card without magnetic stripe encoding: A. Press the USER button on the printer or click OK (or Cancel the card) in the Message box. B. Remove magnetic stripe data from the card. C. Send the card again. HINTS & TIPS To remove magnetic stripe data, you or your system administrator may need to: • Clear a checkbox in the card production application. • Change the font from Mag Track X XPS Card Printer to a printable font such as Arial, Verdana, or Calibri. Refer to “Magstripe Formats” in the SD/CD™ Series Card Printer Installation and Administrator’s Guide. 117: Reader not available The printer does not have a magnetic stripe reader option. To print the card without using a reader option: 1. Press the USER button on the printer or click OK (or Cancel the card) in the Message box. 2. Remove the reader request from the card. 3. Send the card again. HINTS & TIPS To remove the reader request, you or your system administrator may need to clear a checkbox in the card production application. 40 Troubleshooting 118: Print ribbon type problem The printer cannot use the ribbon installed. Press the USER button on the printer or click OK (or Cancel the card) in the Message box. When the printer recognizes that a supported ribbon is installed, all enhanced product features are enabled and successful card printing can begin. HINTS & TIPS • Use ribbon designed for this printer brand and model. • Check the website for newer firmware that supports new ribbon types. 119: Print ribbon not supported The printer cannot use the ribbon installed. Press the USER button on the printer or click OK (or Cancel the card) in the Message box. When the printer recognizes that a supported ribbon is installed, all enhanced product features are enabled and successful card printing can begin. HINTS & TIPS • Purchase ribbon from your dealer or authorized reseller. • Use ribbon designed for this printer brand and model. 120: User paused the printer The user pressed the USER button on the printer when a card was in process. Press the USER button to resume or click Retry (or Resume) in the Message box. The card continues processing without damage. HINTS & TIPS • If the user pressed the button for several seconds, the card has been canceled. SD/CD Series Card Printers User’s Guide 41 • If this message occurs often, ask your system administrator to set the button sensitivity to a lower value. 121: Print ribbon not identified The ribbon data is damaged. 1. If needed, install a supported ribbon. 2. Press the USER button on the printer or click Retry in the Message box. When the printer recognizes that a supported ribbon is installed, all enhanced product features are enabled and successful card printing can begin. HINTS & TIPS • Ask your dealer or authorized reseller for a replacement. • Use ribbon designed for this printer brand and model. 122: Magstripe format problem The magnetic stripe data sent does not match the format set in the printer. To solve the magnetic stripe format problem: 1. Press the USER button on the printer or click OK (or Cancel the card) in the Message box to clear the error. 2. Ask the system administrator to verify that the card, the data, and the printer settings are compatible. Make sure that all data for the card is available. 3. Send the card to print again. 123: Insert new card side 1 up The card requires you to insert a new card into the printer with the front of the card (side 1) facing up. To insert a new card with side 1 up: 1. Insert the card with side 1 up in the manual feed slot of the printer. Make sure to use the correct type of new card for this job. Refer to “Card Handling” in the SD/CD™ Series Card Printer Installation and Administrator’s Guide. 42 Troubleshooting • Do not touch the card surface to be printed. • Handle cards by their edges. • Wear gloves. 2. Press the USER button to resume or click Retry (or Resume the card) in the Message box. 124: Insert same card side 2 up The card must be re‐inserted with the back of the card (side 2) facing up. To insert the same card with side 2 up: 1. Turn the card over, end to end. Make sure to turn over the card to the back side (side 2) for this job. Refer to “Card Handling” in the SD/CD™ Series Card Printer Installation and Administrator’s Guide. • Do not touch the card surface to be printed. • Handle cards by their edges. • Wear gloves. 2. Insert the card with the back side up in the manual feed slot of the printer. 3. Press the USER button to resume or click Retry (or Resume the card) in the Message box. 149: Option not installed Data for hardware that is not included in the system was sent. 1. Press the USER button or click OK (or Cancel the card) in the Message box to cancel the error. 2. Remove the data from the card design. 3. Resend the card. HINTS & TIPS Don’t include references in the card format to hardware that cannot be accessed by the system. For more information, refer to your ID software documentation or your system administrator. SD/CD Series Card Printers User’s Guide 43 152: Insert new card side 2 up The new card must be inserted with the back of the card (side 2) facing up. To insert a new card with side 2 up: 1. Insert the card with side 2 up in the manual feed slot of the printer. Make sure to turn over the card to the back side (side 2) for this job. Refer to “Card Handling” in the SD/CD™ Series Card Printer Installation and Administrator’s Guide. • Do not touch the card surface to be printed. • Handle cards by their edges. • Wear gloves. 2. Press the USER button to resume or click Retry (or Resume the card) in the Message box. 153: Insert same card side 2 up The same card must be re‐inserted with the back of the card (side 2) facing up. To re‐insert the same card with side 2 up: • Turn the card over, end to end. • Do not touch the card surface to be printed. • Handle cards by their edges. • Wear gloves. 1. Insert the card with the back side up in the manual feed slot of the printer. Make sure to turn over the card to the back side (side 2) for this job. Refer to “Card Handling” in the SD/CD™ Series Card Printer Installation and Administrator’s Guide. 2. Press the USER button to resume or click Retry (or Resume the card) in the Message box. 44 Troubleshooting 170: Insert new card side 1 up The card requires you to insert a new card into the printer with the front of the card (side 1) facing up. To insert a new card with side 1 up: 1. Insert the card with side 1 up in the manual feed slot of the printer. Make sure to use the correct type of new card for this job. Refer to “Card Handling” in the SD/CD™ Series Card Printer Installation and Administrator’s Guide. • Do not touch the card surface to be printed. • Handle cards by their edges. • Wear gloves. 2. Press the USER button to resume or click Retry (or Resume the card) in the Message box. 171: Insert same card side 1 up The card must be re‐inserted with the front of the card (side 1) facing up. To insert the same card with side 1 up: • Turn the card over, end to end. • Do not touch the card surface to be printed. • Handle cards by their edges. • Wear gloves. 1. Insert the card with the front side up in the manual feed slot of the printer. Make sure to turn over the card to the front side (side 1) for this job. Refer to “Card Handling” in the SD/CD™ Series Card Printer Installation and Administrator’s Guide. 2. Press the USER button to resume or click Retry (or Resume the card) in the Message box. SD/CD Series Card Printers User’s Guide 45 172: Insert cleaning card This message displays when you run a cleaning card. For details, refer to “Run a Cleaning Card” on page 22. To insert the cleaning card: 1. Prepare the printer. 2. Insert a cleaning card in the manual feed slot of the printer. 3. Press the USER button to resume or click Retry (or Resume the card) in the Message box. 4. Continue running the cleaning card. 5. Dispose of the cleaning card after use. It is made for a single use only. 173: Improper shutdown An improper shutdown was detected. To resolve the shutdown error, press the USER button or click OK in the Message box to clear the message at the printer before printing. HINTS & TIPS To avoid improper shutdowns, always use the power button to power off the printer. 46 Troubleshooting Chapter 6: Supplies and Parts This section includes card specifications and information on card handling and storage, and describes the supplies and replacement parts used with the printer. Cards For best results, use high‐quality cards that meet the specifications and recommendations described in this section. Card Size Use ISO ID‐1 size cards, also called CR80 cards. Such cards have the following dimensions: • 3.37 inches long by 2.125 inches wide (85.60mm long x 53.98mm wide). • 0.010 to 0.030 inches thick (0.254 to 0.762mm thick). For encoding magnetic stripe, use cards: • 3.37 inches long by 2.125 inches wide (85.60mm long x 53.98mm wide). • 0.010 to 0.030 inches thick (0.508mm to 0.762mm thick). Actual card thickness can vary by up to ten percent from the sizes listed. Typically, card bow must be less than the thickness of the card. Card Material Use cards with a glossy PVC surface, either 100% PVC cards or composite cards with a PVC surface. Cards can have a magnetic stripe on one side of the card. SD/CD Series Card Printers User’s Guide 47 Pre-Punched Cards The cards can have a punched area within 1 inch (25mm) of the left edge, as the cards are loaded in the printer. If the card has a magnetic stripe, the card must not be punched anywhere in the stripe. New Cards for Color Printing The printer is designed to print on new card stock. If you print on cards twice, be careful to avoid getting dirt, fingerprints, or other contaminants on cards before the second printing. Previous printing can interfere with printing and result in cards that do not have the appearance you want. Printing on cards that have been issued might introduce substances that interfere with card printing or damage the printer. If a previously printed card has been printed with topcoat, the card cannot be printed a second time. Adhesive-Backed Cards Adhesive‐backed cards are printed, and then adhered to proximity cards when the card surface is not flat enough to print. Use only Datacard adhesive‐backed cards with the printer. Follow these guidelines: • Store cards in a cool place (such as a refrigerator) to avoid adhesive migration. • Clean the printer’s card tracks to remove any adhesive residue. Use the printhead cleaning pen or isopropanol and a swab to remove the residue. • Use a print margin of at least 0.05 inch when using adhesive‐backed cards. Card Quality Guidelines Cards must meet the following card quality guidelines for the printer to print high‐quality graphics successfully. Card Surface The card must be smooth and even, and free of irregularities such as raised burrs or particles embedded in the surface. Surface irregularities can cause printing voids, especially when printing edge to edge. 48 Supplies and Parts Card Handling These guidelines apply to unprinted cards. • Any debris or particles on an unprinted card’s surface can reduce print quality and damage the printhead. • Grease or oils, such as oils from your fingers, also reduce print quality. Keep cards completely clean. Do not touch the print surface of a card with your fingers or hands. • Do not use a rubber band to bind blank cards together. • If you drop a card on the floor, do not insert it into the printer. Card Storage These guidelines apply to both printed and unprinted cards. • Cards must be stacked so that they do not shift and rub against each other. • When storing cards, make sure that no two cards contain images or blocks of color that come in contact with each other. • Make sure that the magnetic stripe on one card does not come in contact with the magnetic stripe on another card. • Make sure that cards with magnetic stripes are stored away from magnets and other magnetic objects. • Store cards in a cool, dry, and dark place. Excessive light can cause yellowing of cards on exposed edges. • Keep cards in their original packaging. • Cards should be at room temperature when they are used. If cards are stored in a cooler environment than the printer, allow them to reach room temperature before using. SD/CD Series Card Printers User’s Guide 49 Supplies Print Ribbon Print ribbon kits are available from your dealer. Kits include a print ribbon, a cleaning card, and a replaceable cleaning sleeve. For best results, run a cleaning card and replace the cleaning sleeve with each new print ribbon. Color Print Ribbon Color print ribbon is available in either full‐panel or short‐panel options. Both full‐ panel and short‐panel print ribbons use the following color panels: Y (yellow), M (magenta), C (cyan/blue), K (black), and T (topcoat). Full-Panel Color Print Ribbon Use full‐panel print ribbon when the card design calls for color printing on the entire card. Short-Panel Color Print Ribbon Short‐panel print ribbon is for use when only a portion of the card design calls for color. For example, a card design may have a color photo on the top or left of the card, and black text on the bottom of the card. The color area for short‐panel ribbon is 1.57 inches (40mm). The YMC panels of short‐panel ribbon are approximately half the length of a full card. For more information, refer to the Datacard® SD/CD™ Series Card Printer Installation and Administrator’s Guide. Color Print Ribbon Kits For more information, refer to the Datacard® SD/CD™ Series Card Printer Installation and Administrator’s Guide. Monochrome Print Ribbon For more information, refer to the Datacard® SD/CD™ Series Card Printer Installation and Administrator’s Guide. Monochrome Print Ribbon Kits For more information, refer to the Datacard® SD/CD™ Series Card Printer Installation and Administrator’s Guide. 50 Supplies and Parts Print Ribbon Storage Guidelines • Store print ribbon in the original package until you load it in the printer and keep the original packaging closed. • The print ribbon maintains its quality for about one year. For optimum card quality, purchase and store quantities that can be used within one year. • The print ribbon and card stock might require secure storage and tracking. Follow your policy for storing and tracking the supplies used to make cards. • Choose a location away from direct sunlight, with a temperature between 32° and 77°F (0° and 25°C). A range of 40% to 60% non‐condensing humidity is recommended. • Install supply rolls at room temperature. If supplies are stored in an environment that is cooler than the printer environment, allow supplies to reach room temperature before using. • If the printer will not be used for an extended period, remove supplies from the printer and store them with new supplies. Cable Lock Option For more information, refer to the Datacard® SD/CD™ Series Card Printer Installation and Administrator’s Guide. Cleaning Supplies For more information, refer to the Datacard® SD/CD™ Series Card Printer Installation and Administrator’s Guide. Hopper Options 200-Card Input Hopper The 200‐card input hopper kit includes the larger hopper with cover attached. The standard hopper is easily removed, and the 200‐card hopper can be installed without using tools. Large Output Hopper The printer can use a large output hopper, which holds about 100 cards. The user can replace the small, standard hopper with the large hopper without using tools. SD/CD Series Card Printers User’s Guide 51 Power Supply, Cables, and Cords Power Supply The power supply is rated at 100‐240 VAC, 50‐60Hz and uses up to 3 amps. It is self‐adjusting within the rated input voltage. Data Cables and Power Cord The printer uses a data cable and a power cord. Data Cable The data cable connects the printer to the network or PC sending cards. The data cable can be: • a USB cable. • a network cable. Use only one data cable with a printer. If you need to connect more than one PC to a printer, use a network connection. USB Cable Use a 6‐ft. USB data cable to connect the printer to the PC. Be sure to use a cable rated for USB 2.0 data transmission. Network Cable Use a standard network cable, sometimes called a Category 5 or Cat 5 cable, to connect the printer to a network port. Smart Card Cable Use a USB cable up to a maximum of 6 feet (2 meters) long to connect the smart card port to the PC. Power Cord The power cord connects to facility power and the printer power supply. Be sure to use a cord that grounds to the facility power source. The printer can use one of the following power cords: 52 • USA power cord • European power cord Supplies and Parts • Australian power cord • United Kingdom power cord • Danish power cord • Indian power cord • Israeli power cord • Italian power cord • Swiss power cord • Chinese power cord • Japanese power cord SD/CD Series Card Printers User’s Guide 53 Replacement Parts The following printer replacement parts are available. Printhead Cartridge The printer has a replaceable printhead cartridge. The printhead is subject to wear or damage and has a direct impact on print quality. Do not touch the printing edge of the printhead in the printhead cartridge. Clean the printhead following the steps in “Clean the Printhead” on page 27. Print Ribbon Cartridge The ribbon cartridge holds the print ribbon and the replaceable cleaning sleeve in the printer. Cleaning Roller Spindle The cleaning roller spindle holds the replaceable cleaning sleeve. 54 Supplies and Parts Chapter 7: Legal and Compliance Please note and heed the WARNING and CAUTION labels that have been placed on the equipment for your safety. Please do not attempt to operate or repair this equipment without adequate training. Regulatory Compliance Notice for USA (FCC notice) This equipment has been tested and found to be within the limits for Class A computing devices, pursuant to Subpart J of Part 15 of FCC rules, designed to provide reasonable protection against radio interference in a commercial environment. This equipment generates, uses, and can radiate radio frequency energy. If it is not installed and used in accordance with this instruction manual, it may interfere with radio communications. Operation of this equipment in a residential area is likely to cause harmful interference in which case the user will be required to correct the interference at their own expense. Changes or modifications not expressly approved by the party responsible for compliance could void the user's authority to operate the equipment. Notice for Canada This digital apparatus does not exceed the Class A limits for radio noise for digital apparatus set out in the Radio Interference Regulations of the Canadian Department of Communications. Le présent appareil numérique n'émet pas de bruits radioélectriques dépassant les limites applicables aux classe A prescrites dans le Règlement sur le brouillage radioélectrique édicté par le ministère des Communications du Canada. The term “IC:” before the radio certification number only signifies that Industry Canada Technical specifications were met. Notice for Europe We hereby certify that this printer complies with EMC Directive 89/336/EEC, R&TTE Directive 1999/5/EC, and the EU RoHS Directive EU Directive 2002/95/EG. SD/CD Series Card Printers User’s Guide 55 This printer conforms to Class A of EN 55022 and to EN 301 489‐5. Operation of this equipment in a residential environment may possibly cause interference. In the event of interference, the user, at their own expense, will be required to take whatever measures are necessary to correct the problem. Notice for Taiwan Notice for Japan This equipment is in the Class A category of information technology equipment based on the rules of the Voluntary Control Council for Interference by Information Technology Equipment (VCCI). When used in a residential area, radio interference may be caused. In this case, the user may be required to take appropriate corrective actions. Notice to All Users The printer emits radio‐frequency waves and must be used as installed and recommended by the printer manufacturer. You may not modify the printer or how it is used without written permission. You may not operate the printer after modifying it or its method of operation. Liability Statement This product has been built to the high standards of Datacard. Please note and heed the WARNING and CAUTION labels that have been placed on the equipment for your safety. Please do not attempt to operate or repair this equipment without adequate training. Any use, operation or repair in contravention of this document is at your own risk. By acceptance of this system you hereby assume all liability consequent to your use or misuse of this equipment. Datacard assumes no liability for incidental, special, or consequential damage of any kind. Equipment specifications, applications and options are subject to change at the sole discretion of Datacard without notice. 56 Legal and Compliance Safety All Datacard brand products are built to strict safety and reliability specifications in accordance with UL60950 and Canadian requirements, and the Low Voltage Directive 73/23/EEC. Therefore, safety issues pertaining to operation and repair of Datacard brand equipment are primarily environmental and human interface. The following basic safety tips are given to ensure safe installation, operation and maintenance of Datacard brand equipment and are not to be considered as comprehensive on all matters of safety. Safe environment Connect equipment to a grounded power source. Do not defeat or bypass the ground lead. Place the equipment on a stable surface (table) and ensure floors in the work area are dry and non‐slip. Know the location of equipment branch circuit interrupters or circuit breakers and how to turn them on and off in case of emergency. Know the location of fire extinguishers and how to use them. ABC type extinguishers may be used on electrical fires. Know local procedures for first aid and emergency assistance at the customer facility. Use adequate lighting at the equipment location. Maintain the recommended temperature and humidity range in the equipment area. Safe human interface Use proper lifting techniques when moving or installing the equipment. Use standard electrostatic discharge (ESD) precautions when working on or near electrical circuits. Do not disconnect safety interlocks on covers. Operate the printer with the cover closed. SD/CD Series Card Printers User’s Guide 57 Acknowledgments Polaroid and Polaroid & Pixel are trademarks of PLR IP Holdings, LLC, used under license. All other trademarks are the property of the respective owner who has not sponsored, endorsed or approved this product. PLR IP Holdings, LLC does not manufacture this product or provide any Manufacturer's Warranty or support.Datacard is a registered trademark of DataCard Corporation in the United States and/or other countries. PartnerPage is a service mark of DataCard Corporation in the United States and/or other countries. The Color Blue with Platinum Flecks mark is a registered trademark of DataCard Corporation in the European Union and other countries. Microsoft, Windows, and Windows Vista are trademarks or registered trademarks of Microsoft Corporation. Photoshop is a registered trademark of Adobe Systems Incorporated. TrueType, Apple, and Bonjour are registered trademarks of Apple Computer, Inc. Mifare is a registered trademark of Philips Semiconductors Gratkorn GMBH. Gemplus is a registered trademark and GemPC is a trademark of Gemplus S.C.A. Corporation. iCLASS and HID are registered trademarks of HID Corporation. All other trademarks are the property of their respective owners. Fonts Portions of the software are copyrighted by Red Hat. To access magnetic stripe fonts, download the Windows fonts (liberation‐fonts.zip) from www.redhat.com/ promo/fonts. The Katakana font used in magnetic stripe fonts is copyright 1990‐2003 Wada Laboratory, the University of Tokyo. All rights reserved. Copyright (c) 2003‐2004 Electronic Font Open Laboratory (/efont/). All rights reserved. This font is provided by WADA Laboratory, the University of Tokyo and contributors “AS IS” and any express or implied warranties, including, but not limited to, the implied warranties of merchantability and fitness for a particular purpose are disclaimed. In no event shall the laboratory or contributors be liable for any direct, indirect, incidental, special, exemplary, or consequential damages (including, but not limited to, procurement of substitute goods or services; loss of use, data, or profits; or business interruption) however caused and on any theory 58 Legal and Compliance of liability, whether in contract, strict liability, or tort (including negligence or otherwise) arising in any way out of the use of this software, even if advised of the possibility of such damage. Disclaimer Names and logos on sample cards are fictitious. Any similarity to actual names, trademarks, or trade names is coincidental. Proprietary Notice All drawings and information herein are the property of DataCard Corporation. SD/CD Series Card Printers User’s Guide 59 60 Legal and Compliance