1
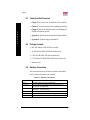
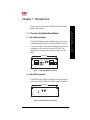
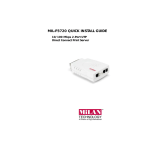
MIL-4650 and MIL-4655
Master/Slave Modules
User’s Guide
with
FastManage™-Specific Information
Sunnyvale, California
Minnetonka, Minnesota
LEGAL
Trademark Rights
© 2000 MiLAN, the MiLAN logo, and MiLAN Technology are either trademarks or registered trademarks of Digi
International, Inc. in the United States and/or other countries. All other trademarks are the property of their respective
holders.
Information in this document is subject to change without notice and does not represent a commitment on the part of
MiLAN Technology.
MiLAN Technology provides this document “as is,” without warranty of any kind, either expressed or implied, including,
but not limited to, the implied warranty of fitness or merchantability for a particular purpose. MiLAN Technology may
make improvements and/or changes in this manual or in the product(s) and/or the program(s) described in this manual at
any time.
This document could include technical inaccuracies or typographical errors. Changes are periodically made to the
information herein; these changes may be incorporated in new editions of the publication.
The MiLAN Technology Five-Year Limited Warranty
MiLAN Technology warrants to the original consumer or purchaser that each of its products, and all components thereof,
will be free from defects in material and/or workmanship for a period of five years from the original factory shipment
date. Any warranty hereunder is extended to the original consumer or purchaser and is not assignable. MiLAN
Technology makes no express or implied warranties including, but not limited to, any implied warranty of
merchantability or fitness for a particular purpose, except as expressly set forth in this warranty. In no event shall MiLAN
Technology be liable for incidental or consequential damages, costs, or expenses arising out of or in connection with the
performance of the product delivered hereunder. MiLAN Technology will in no case cover damages arising out of the
product being used in a negligent fashion or manner.
Regulatory Approvals
•
•
•
•
•
FCC Class A
UL 1950
CSA 22 No. 950
EN60950
CE, EN55022 Class A, EN55024
Canadian EMI Notice
This Class A digital apparatus meets all the requirements of the Canadian Interference-Causing Equipment Regulations.
Cet appareil numérique de la classe A respecte toutes les exigences du Règlement sur le matériel brouilleur du Canada.
European Notice
Products with the CE Marking comply with both the EMC Directive (89/336/EEC) and the Low Voltage Directive (73/23/
EEC) issued by the commission of the European Community. Compliance with these directives implies conformity to the
following European Norms:
•
•
•
EN55022 (CISPR 22) - Radio Frequency Interference
EN61000-X - Electromagnetic Immunity
EN60950 (IEC950) - Product Safety
Year 2000 Compliance
MiLAN Technology warrants that the MIL-4650 and MIL-4655 series are year 2000 compliant. See www.milan.com for
additional information on other products.
To Contact Technical Support
For prompt response when calling for technical support, have the following information ready: product serial number,
date of purchase, vendor or place of purchase.
Contact one of the following:
• In North America: call +1.408.744.2751 or email: [email protected]
International: call +49.231.97.47.780 or email: [email protected]
Doc #:90000088 Rev. B
Table of Contents
Preface
About this Manual ............................................................................................... P-1
Master/Slave Documentation............................................................................ P-1
Contents of this Document................................................................................. P-2
Package Contents................................................................................................. P-2
Notation Conventions ......................................................................................... P-2
T
O
C
Chapter 1: Introduction
Overview of the Master/Slave Modules .......................................................... 1-1
MIL-4650 Master Module ............................................................................ 1-1
MIL-4655 Slave Module............................................................................... 1-1
Features ................................................................................................................. 1-2
Common Features for Both Modules......................................................... 1-2
Features of the MIL-4650 Master Module ................................................. 1-2
Utilities .................................................................................................................. 1-2
The Next Step ....................................................................................................... 1-2
Chapter 2: Installation
Installation Requirements................................................................................... 2-1
Installation ............................................................................................................ 2-1
DIP Switch Settings ............................................................................................. 2-2
Troubleshooting ................................................................................................... 2-2
JP1: Jumper Settings ..................................................................................... 2-2
Chapter 3: FastManage for the Media Conversion System
Overview of FastManage.................................................................................... 3-1
Starting FastManage............................................................................................ 3-1
Hot Spots and System Information ................................................................... 3-3
Configure Pull-down Menu ............................................................................... 3-4
Appendix A:Specifications
Hardware Features for the MIL-4650................................................................ A-1
System LEDs for the MIL-4650 .......................................................................... A-1
System LEDs for the MIL-4655 .......................................................................... A-1
Connectors ............................................................................................................ A-2
RS-232, RJ-45 Connector .............................................................................. A-2
RJ-45 Pinouts ................................................................................................. A-2
Environmental Operating Conditions .............................................................. A-2
Power Supply ....................................................................................................... A-2
MIL-4650/MIL-4655 Master/Slave Modules
iii
Appendix B:Technical Support Services
World Wide Web Server..................................................................................... B-1
Internet FTP Server.............................................................................................. B-1
Contacting Technical Support ........................................................................... B-1
Expediting Technical Support Service.............................................................. B-1
Returning Procedures ......................................................................................... B-2
T
O
C
Index
iv
MIL-4650/MIL-4655 Master/Slave Modules
P ref ac e
P.1
About this Manual
P
This guide covers both the MIL-4650 and the MIL-4655
Master/Slave modules. These modules were designed to be
installed into MiLAN’s Media Conversion System.
The terms “Master/Slave module” and just “module” are used
throughout this document to describe these devices. This
manual assumes that you are familiar with the tasks of a
system administrator.
P.2
Master/Slave Documentation
A LAN Products CD-ROM is included with each MIL-4650
Master module. Use the CD-ROM to access the following
manuals:
• MIL-4650/MIL-4655 Master/Slave Hardware User’s Guide,
with FastManage-specific Information. This document has the
following information:
– Instructions on how to physically install a module
– Information on the FastManage suite of software and
how it affects a specific MIL-4650 and other modules
– Specifications for both modules
This document is unique to the Master/Slave modules.
• FastManage User’s Guide: Use this guide to setup the
FastManage software for MIL-4650 Master module.
This document is generic for all MiLAN products that
implement FastManage.
MIL-4650/MIL-4655 Master/Slave Modules
P-1
R
E
F
A
C
E
Preface
P.3
Contents of this Document
• Chapter 1: Has an overview of the Master/Slave modules
• Chapter 2: Provides instructions for installing the modules
• Chapter 3: This section has information on FastManage for
the MIL-4650 Master module
P
R
E
F
A
C
E
• Appendix A: Specifications information for both modules
• Appendix B: Technical support information
P.4
Package Contents
• MIL-4650 Master or MIL-4655 Slave module
• 18" RS-422 cable (MIL-4650 Master module only)
• 6" RS-422 cable (MIL-4655 Slave module only)
• LAN Products CD-ROM (MIL 4650 Master module only)
• Warranty card
P.5
Notation Conventions
This document has certain notation conventions that make it
easier to follow instructions and examples.
Table P-1: Notation Conventions
Conventions
[return]
Courier bold
“+” sign
Italics
“Quick Reference”
CAPS
P-2
Description
Brackets indicate a key to be pressed ([tab]).
Courier boldface font indicates a system message, options, or
instructions to be implemented.
The “+” sign is used to indicate holding down one key while pressing
another (e.g., “press [shift]+[C]”).
Italics designate variables and titles of other documents.
Quotes refer to important information or a specific name.
Caps indicates abbreviations, specific directory, or product markings
MIL-4650/MIL-4655 Master/Slave Modules
Ch ap te r 1 : In tro d u c tio n
Chapter 1 gives a description of the MIL-4650 and MIL-4655
Master/Slave modules.
1.1 Overview of the Master/Slave Modules
1.1.1 MIL-4650 Master Module
The MIL-4650 Master module is designed to provide two-way
communication between a host device and MiLAN’s media
conversion modules. Communication between these devices is
performed via the network or a serial (RS-232) link. The
module uses auto-negotiation to perform in either 10/100
Mbps.
Thumbscrews
MANAGEMENT
INTERCONNECT
TP 10/
ACT 100 SYS
MIL4650
OUT
10/100BASE-TX TP HDX/ACT
ON
IN
RS-232
LINK FDX
12
Figure 1-1. MIL-4650 Master Front Panel
1.1.2 MIL-4655 Slave Module
The MIL-4655 Slave module is designed to send commands to
and receive status from MiLAN’s media conversion modules.
Thumbscrews
SYS
IN
OUT
MIL4655
Figure 1-2. MIL-4655 Slave Front Panel
MIL-4650/MIL-4655 Master/Slave Modules
1-1
I
N
T
R
O
D
U
C
T
I
O
N
Chapter 1
1.2 Features
One MIL-4650 Master module can support (in a daisy-chain
configuration via the serial RS-422 interface) up to seven MIL4655 Slave modules, for a total of eight media devices.
I
N
T
R
O
D
U
C
T
I
O
N
1.2.1 Common Features for Both Modules
• Hot-swappable
• Diagnostic LED(s)
1.2.2 Features of the MIL-4650 Master Module
• 10/100BASE-TX, RJ-45 connector for in-band management
• RS-232 serial port for out-of-band management
• SNMP management over TCP/IP, IPX or NETBeui
• RARP, BOOTP, DHCP and telnet support
• Two-position DIP switch for hand-set configuration
1.3 Utilities
To make the MIL-4650 Master module easier to manage,
MiLAN supplies the FastManage suite of software.
FastManage is a Windows-based menu software application.
Firmware upgrades of the flash EPROMs can be done via
network connections. Refer to the Section 2.4.1 (Chapter 2) and
Appendix B for more information on the Flash ROM upgrade.
1.4 The Next Step
Use this guide to install the modules. Refer to the FastManage
User’s Guide section of theLAN Products CD-ROM to configure
it to work with the FastManage software. Chapter 3 does not
have any specific instructions on the FastManage suite of
software (refer to the FastManage User’s Guide).
1-2
MIL-4650/MIL-4655 Master/Slave Modules
Ch ap te r 2 : In s ta lla tio n
Chapter 2 gives installation information for the modules.
2.1 Installation Requirements
I
N
S
T
A
L
L
A
T
I
O
N
Before installing a module, you will need the following (most
items sold separately):
• A MIL-9100X Media Conversion System
• Ethernet cabling (CAT 5 for in-band management)
• RS-232 Serial cabling (for out-of-band management)
• Female RS-232 to female DB9 connector (if necessary)
2.2 Installation
Do the following to install a module into a rack mount chassis:
1. For the MIL-4650, make any configuration changes to the
module (i.e., jumper settings).
2. Remove the faceplate from the chassis.
3. Slide the module into the slot through the guide rails.
4. Insert the module into the card-edge connector (port bay).
Make sure it is seated firmly. The module works in any of
the slots.
5. Secure the module with the two thumbscrews located on
the faceplate of the unit.
6. Make all your network connections.
Note:
Do not plug a phone cable (RJ-11) into the RS-232 and/or RJ-45 connectors.
MIL-4650/MIL-4655 Master/Slave Modules
2-1
Chapter 2
2.3 DIP Switch Settings
On the front panel of the MIL-4650 module is a two-position
DIP switch. Use Table 2-1 to configure this DIP switch.
Table 2-1: DIP Switch Settings
D1
I
N
S
T
A
L
L
A
T
I
O
N
Up
Up
Down
Down
D2
Up
Down
Up
Down
Note:
Mode/Description
Network mode. Telnet not allowed
Telnet and network mode (Default setting)
Diagnostic mode (only serial port active) or ascii test page
Diagnostic mode (only serial port active) or ascii test page
If D1 is “down” and a serial printer is attached, the printer will print a manufacturing test page. This
test page printed represents exactly what a user would see if a terminal was attached to the serial port.
Also, when D1 is “down,” the module is in serial configuration mode. Network traffic is not allowed.
2.4 Troubleshooting
2.4.1 JP1: Jumper Settings
Located on inside of the MIL-4650 module is a 3-pin jumper.
This jumper is used to select either bank 0 or bank 1 of the
flash memory. Normally, this jumper should not be touched.
Note:
If the module system fails to boot, it is possible that the flash memory was somehow corrupted. To
remedy a corrupt flash file:
1. First, remove the module from the bay.
2. Locate jumper JP1.
3. Remove the jumper block from pins 1 and 2.
4. Place the jumper block back onto the jumper; this time,
place it on pins 2 and 3.
5. Re-install the device back into the media converter.
The MIL-4650 now operates out of the duplicate code in the
upper bank. Contact technical support for more information.
2-2
MIL-4650/MIL-4655 Master/Slave Modules
Ch ap t e r 3 : Fa s tMa n ag e fo r th e Media
Co nve rs io n Sy s te m
Chapter 3 discusses FastManage-specific software as it applies
to the media conversion system, including the MIL-4650
Master module. This chapter does not have detailed
FastManage instructions (refer to the FastManage User’s Guide
section of the LAN Products CD-ROM).
3.1
F
A
S
T
M
A
N
A
G
E
Overview of FastManage
FastManage configures and manages most SNMP-types of
devices over the subnet; including print servers and stackable
hubs. Icons appears on a “Map” that represents each SNMP
device found on the network. This section describes the icons
for the media conversion system, including:
• MIL-9100X media conversion system (stacks)
• MIL-4650 Master module
• * MIL-XXXXX module
Note:
3.2
* The Media Conversion System (MCS) devices all have identical FastManage features and
functions.
Starting FastManage
There are two ways to start the FastManage suite of software:
• Discovery Application icon:
a. Start by double-clicking on the Discovery
Application icon. The software discovers all SNMP
managed devices on the subnet.
b. Icons will now appear on Map 1 as “thumbnails,” each
represent an SNMP device.
c. Double-click on the media conversion device’s icon to
MIL-4650/MIL-4655 Master/Slave Modules
3-1
Chapter 3
display its “stack” of device(s) (Figure 3-1).
• Media Conversion System Mgr. Icon:
a. Also start the software by double-clicking on the Media
Conversion System Mgr. icon.
b. Enter the IP Address of a specific device that you want
to manage.
c. A “stack” of SNMP managed device(s) appear. One to
eight devices may be displayed (Figure 3-1).
F
A
S
T
M
A
N
A
G
E
Figure 3-1. MIL-4650 Graphical Icon
d. To launch a device in the stack, double-click on that
particular unit. Figure 3-2 may appear (depending on
the device that was selected):
3-2
MIL-4650/MIL-4655 Master/Slave Modules
Chapter 3
Figure 3-2. First Device of a Stack
e. Double-click on a module to launch it. Figure 3-3 may
appear (depending on the module selected).
Note:
MiLAN offers many different modules to configure, including the MIL-4650 (shown in Figure 33). All modules, except the MIL-4655 slave module, have hot spots where the user can gain
information.
Figure 3-3. MIL-4650 Master Module
3.3
Hot Spots and System Information
Hot spots on the graphic (Figure 3-1 and 3-3) are used to gain
information on the device. Use the mouse to highlight the
selection (a block around the area appears), and click on it to
obtain information.
MIL-4650/MIL-4655 Master/Slave Modules
3-3
F
A
S
T
M
A
N
A
G
E
Chapter 3
The following describes the hot spots for the MIL-4650 and the
MIL-9100X redundant rack mount chassis. For more
information and detailed descriptions of these hot spots, refer
to the FastManage User’s Guide.
• Traps (Figure 3-1): This selection alerts the user to any
problem associated with the device (e.g., a power failure).
• System Information (Figure 3-1): This selection describes
the device chosen, including its Location and Up Time.
• Reset RM Master Module (Figure 3-1): When this is
clicked on, a warning message appears asking whether or
not the user want to reset the rack mount’s Master module.
Select Yes to continue, No to stop.
F
A
S
T
M
A
N
A
G
E
• Reset this Module (Figure 3-3): Functions the same as the
“Reset RM Master Module” (above) hot spot.
• Device speed/Duplex: This is the RJ-45 portion of the
graphic (Figure 3-3). When it is clicked on, the software
displays the device’s operating speed (either 10 or 100
Mbps), and if the device is in half- or full-duplex mode.
3.4
Configure Pull-down Menu
There are many different options available from the pull-down
menus, including IP, IPX, and NetBIOS configurations. Refer
to the FastManage User’s Guide for more information on these
options.
Figure 3-4. Configuration Pull-down Menu
3-4
MIL-4650/MIL-4655 Master/Slave Modules
Appendix A: Specifications
A.1 Hardware Features for the MIL-4650
• CPU: An 80186 processor, with a 25 MHz clock
• Memory: 256 RAM
• Flash: Flash devices are 29F040 @ 90 ns. Each device is 4
Mbps and arranged in 2 × 256k × 8 format
• MAC chipsets: Ethernet controller is 10/100 Mbps, with its
own memory management
• 10/100BASE-TX, RJ-45 (unshielded twisted pair) connector
A.2 System LEDs for the MIL-4650
LED
TP/ACT
10/100
Functioned
Twisted-pair is active and receiving data
Indicates if the device is operating at:
–10 Mbps: LED is off
–100 Mbps: LED is illuminated
Flash ROM is okay
Link is active
Indicates if the device is operating in:
–Half-duplex: LED is off
–Full-duplex: LED is illuminated
Activity between management cards on RS-422
SYS
TP/LNK
HDX/FDX
ACT
Color
Yellow
Yellow
Yellow
Green
Green
Green
A.3 System LEDs for the MIL-4655
LED
SYS
Functioned
Flash ROM is okay. Blinks once per second if it boots
correctly.
MIL-4650/MIL-4655 Master/Slave Modules
Color
Yellow
A-1
S
P
E
C
I
F
I
C
A
T
I
O
N
S
Appendix A
A.4 Connectors
A.4.1 RS-232, RJ-45 Connector
Use a standard null-modem for communication when
connecting “straight-through” to a DB9 connector.
PIN Number
1
2
3
4
5
S
P
E
C
I
F
I
C
A
T
I
O
N
S
Signal
PIN Number
NC
RXD
TXD
DTR/RTS
GND
6
7
8
9 (for DB9)
Signal
NC
RTS/DTR
CTS
NC
A.4.2 RJ-45 Pinouts
3 4
1 2
• Pin 1: Transmit data +
5 6 7 8
• Pin 2: Transmit data • Pin 3: Receive data +
• Pin 6: Receive data Note:
For a workstation/PC port, use a swap cable. Pins are connected: 1 to 3, 2 to 6, 3 to 1, and 6 to 2.
A.5 Environmental Operating Conditions
Parameters
Operating Temperature
Humidity: Non-condensing
Altitude test
Temperature test (Operating)
Temperature test (Packaged)
Minimum
+5° C
10%
NA
5° C
-25° C
Maximum
40° C
95%
40,000 ft. (at 40° C)
50° C
70° C
A.6 Power Supply
Both modules are powered via the backplane of the media
conversion system. The power consists of +5VDC +/-10%
@10A.
A-2
MIL-4650/MIL-4655 Master/Slave Modules
Appendix B: Technical Support Services
B.1
World Wide Web Server
Product information, manuals, new product announcements,
programs, applications stories and more can be obtained
through the world wide web. Our address is:
http://www.milan.com
B.2
Internet FTP Server
MiLAN has set up an anonymous FTP server for those with
access to the internet. The address is ftp.milan.com.
Drivers and installation tips are located in the /pub/
rackmount directory.
Note:
B.3
T
E
C
H
To ensure binary transfer of files, switch to binary mode by entering bin or binary before
downloading.
S
U
P
P
O
R
T
Contacting Technical Support
To contact MiLAN Technology Technical Support:
B.4
• By Phone:
1.408.744.2751
• By Fax:
1.408.744.2771
• By email:
[email protected]
Expediting Technical Support Service
For faster service when calling our technical support
department:
• Be in a position where the computer and the Media
Conversion System are accessible
• Know the type and versions of software you are using
• Know your hardware specification, including memory and
MIL-4650/MIL-4655 Master/Slave Modules
B-1
Appendix B
disk space
• Note any and all error messages
• Be specific about the problem(s)
B.5
RMA Procedures
To return a unit to MiLAN for repair:
1. Call technical support at 408/744-2751
2. Technical support engineers will work with users to find
the problem. If technical support determines that the unit is
defective, a return materials authorization (RMA) will be
issued by our RMA administrator who will also provide
shipping instructions.
T
E
C
H
Note:
S
U
P
P
O
R
T
B-2
It is required that any return has an RMA number, or it will be rejected and returned to the
sender.
MIL-4650/MIL-4655 Master/Slave Modules
Index
MIL-4650 Master Module 1-2
Flash device A-1
Flash EPROMs 1-2
ftp.milan.com B-1
H
Numerics
10 Mbps 3-4, A-1
10/100BASE-TX 1-2, A-1
100 Mbps 3-4, A-1
25 MHz clock A-1
256 RAM A-1
29F040 A-1
80186 processor A-1
A
About this manual P-1
Hardware features A-1
Hot spots 3-3
http
//www.milan.com B-1
I
Installation 2-1
Requirements 2-1
Internet access B-1
Internet FTP server B-1
IP configuration 3-4
IPX configuration 3-4
C
L
CAT 5 2-1
Configuration options 3-4
Contents of this document P-2
LEDs A-1
M
D
Daisy-chain configuration 1-2
Device speed 3-4
DIP switch settings 2-2
Discovery application 3-1
E
Environmental operating conditions A-2
Ethernet A-1
F
FastManage 3-1
Overview 3-1
Traps 3-4
FastManage User’s Guide P-1, 1-2, 3-1
Features 1-2
For both Modules 1-2
MIL-4650/MIL-4655 Master/Slave Modules
I
N
D
E
X
MAC chipsets A-1
Master/Slave documentation P-1
Media conversion system mgr. 3-2
MIL-4650 P-1, 1-1, 2-1
Front panel 1-1
MIL-4655 P-1, 1-1
Front panel 1-1
N
NetBIOS configuration 3-4
Notation conventions P-2
P
Parallel port connector A-2
Power supply A-2
I-1
R
Reset
Rack mount power supply 3-4
This Module 3-4
Return materials authorization (RMA) B-2
RJ-45 1-2, A-2
RS-232 serial 1-1, 1-2, 2-1
S
SNMP 3-1
Specifications
Hardware features A-1
System LEDs
MIL-4655 A-1
T
I
N
D
E
X
Technical support B-1
Thumbnail 3-1
Troubleshooting 2-2
U
Utilities 1-2
W
World wide web server B-1
I-2
MIL-4650/MIL-4655 Master/Slave Modules
1299 Orleans Dr.
Sunnyvale, CA 94089
Part Number: 90000088 Rev. B
Printed in the USA