1
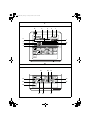
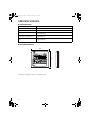
3P107422-26M_1.fm Page 1 Tuesday, October 16, 2007 3:22 PM
OPERATION MANUAL
SET BACK TIME CLOCK
MODEL:
BRC15A61
Thank you for purchasing Daikin’s SET BACK TIME CLOCK.
For proper usage, read this manual carefully before using this unit.
This manual will help you with anything you can not understand or should anything go
wrong with the unit during use.
Keep this manual handy for the future reference.
3P107422-26M_2.fm Page 1 Tuesday, October 16, 2007 3:28 PM
SAFETY CONSIDERATIONS
We recommend that you read this instruction
manual carefully before use to gain full
advantage of the function of the air conditioner,
and to avoid malfunction due to mishandling.
● The precautions described below are WARNING and CAUTION. These are very important precautions
concerning safety. Be sure to observe all of them without fail.
WARNING. . . . . . These are the matters with possibilities leading to serious consequences such as death or
serious injury due to erroneous handling.
CAUTION . . . . . . These are the matters with possibilities leading to injury or material damage due to erroneous
handling including probabilities leading to serious consequences in some cases.
● After reading, keep this manual at a place where any user can read at any time. Furthermore, make certain
that this operation manual is handed to a new user when he takes over the operation.
WARNING
● When the air conditioner is in abnormal conditions (smell of something burning, etc.), turn off the power
supply, and contact the dealer where you purchased the air conditioner.
Continued operation under such circumstances may result in a failure, electric shock, and fire.
● Ask your dealer for installation of the air conditioner.
Incomplete installation performed by yourself may result in a water leakage, electric shock, and fire.
● Ask your dealer for improvement, repair, and maintenance.
Incomplete improvement, repair, and maintenance may result in a water leakage, electric shock, and fire.
● Ask your dealer to move and reinstall the air conditioner.
Incomplete installation may result in a water leakage, electric shock, and fire.
CAUTION
● Neither place a flammable spray bottle near the air conditioner nor perform spraying.
Doing so may result in a fire.
● To clean the air conditioner, stop operation, and turn off the power supply.
Otherwise, an electric shock and injury may result.
● Do not operate the air conditioner with a wet hand.
An electric shock may result.
● Do not wash the remote controller with water.
An electric shock may result.
● Do not install the air conditioner at any place where flammable gas may leak out.
If the gas leaks out and stays around the air conditioner, a fire may break out.
CAUTION DURING USE
● Do not tamper with the inner mechanism.
Do not remove the front panel. Tampering the inner mechanism is dangerous and may damage equipment. For
inspection and adjustment, ask your DAIKIN dealer.
● Avoid places where the unit may be contacted by water.
Water penetrating the inner mechanism may cause electrical leakage, or render electric parts defective.
● Do not press the button on the Set Back Time Clock with a pointed hard tool.
This may damage the Set Back Time Clock.
● Avoid direct exposure to sunlight.
Direct sunlight may discolor the LCD and obscure the image.
● Do not wipe the surface of the operation panel with benzene, thinner or chemically treated dust cloth, etc.
This may cause discoloring or peeling. To clean, moisten a cloth with a neutral cleanser diluted in water, rinse and
wipe. Blot adhering water with a dry cloth.
● Never pull or twist the electric wire of the Set Back Time Clock.
It can cause the unit to malfunction.
● Never inspect or service the Set Back Time Clock by yourself.
Ask a qualified service person to perform this work.
1
3P107422-26M_3.fm Page 2 Tuesday, October 16, 2007 3:29 PM
CONTENTS
BEFORE USE
SAFETY CONSIDERATIONS . . . . . . . . . . . . . . . . . . . . . . . . . . . . . . . . . . . . . . . . . . . . . .1
CAUTION DURING USE . . . . . . . . . . . . . . . . . . . . . . . . . . . . . . . . . . . . . . . . . . . . . . . . . .1
FEATURES AND FUNCTIONS . . . . . . . . . . . . . . . . . . . . . . . . . . . . . . . . . . . . . . . . . . . . .4
NAMES AND FUNCTIONS OF OPERATING SECTION . . . . . . . . . . . . . . . . . . . . . . . . . .5
OPERATION
SETTING THE PRESENT DAY AND TIME . . . . . . . . . . . . . . . . . . . . . . . . . . . . . . . . . . . .6
SETTING TIME AND TEMPERATURE SET BACK SCHEDULES . . . . . . . . . . . . . . . . . . . 6
SETTING OPERATING TIME SCHEDULE . . . . . . . . . . . . . . . . . . . . . . . . . . . . . . . . . . . .7
SETTING DAYS OFF . . . . . . . . . . . . . . . . . . . . . . . . . . . . . . . . . . . . . . . . . . . . . . . . . . . . .8
SETTING SET BACK TIME . . . . . . . . . . . . . . . . . . . . . . . . . . . . . . . . . . . . . . . . . . . . . . . .8
SETTING NORMAL SET TEMPERATURES . . . . . . . . . . . . . . . . . . . . . . . . . . . . . . . . .10
SETTING SET BACK TEMPERATURES. . . . . . . . . . . . . . . . . . . . . . . . . . . . . . . . . . . . .10
CANCELLATION AND CHANGE OF PROGRAMMED ON/OFF SCHEDULES . . . . . . .11
CANCELLATION AND CHANGE OF SET BACK TIME SCHEDULES . . . . . . . . . . . . . .11
ACTIVATING OR DEACTIVATING THE TIME CLOCK . . . . . . . . . . . . . . . . . . . . . . . . . .11
SPECIFICATIONS
SPECIFICATIONS . . . . . . . . . . . . . . . . . . . . . . . . . . . . . . . . . . . . . . . . . . . . . . . . . . . . . .12
OUTLINE DRAWINGS. . . . . . . . . . . . . . . . . . . . . . . . . . . . . . . . . . . . . . . . . . . . . . . . . . .12
Fig. 1, 2 . . . . . . . . . . . . . . . . . . . . . . . . . . . . . . . . . . . . . . . . . . . . . . . . . . . . . . . . . . . . . . .3
Fig. 3, 4, 5, 6, 7, 8, 9 . . . . . . . . . . . . . . . . . . . . . . . . . . . . . . . . . . . . . . . . . . . . . . . . . . . .16
2
3P107422-26M_3.fm Page 3 Tuesday, October 16, 2007 3:29 PM
1
12
6
7
8
5
4
2
1
MON TUE WED THU FRI SAT SUN
PROGRAM
SUMMER TIME AM
MON TUE WED THU FRI SAT SUN CLOCK
PM
0 2 4 6 8 10 12 14 16 18 20 22 24
ON/OFF
OFF OFF OFF OFF OFF OFF OFF
˚C
SET BACK
3
10
11
˚C 0 2 4 6 8 10 12 14 16 18 20 22 24
9
PROGRAM
ON/OFF
SET BACK
OK
DAY OF
THE WEEK
SUMMER
TIME
DAY OFF
CLOCK
CLEAR
2
15
20
17
DAY OF
THE WEEK
PROGRAM
SUMMER
TIME
19
14
ON/OFF
SET BACK
OK
DAY OFF
21
13
CLEAR
23
16
3
CLOCK
22
18
3P107422-26M_4.fm Page 4 Tuesday, October 16, 2007 3:30 PM
FEATURES AND FUNCTIONS
■ Operation Controlled By Programmed Time
Operation times of the air conditioner can be set for
each day of the week to suit weekly schedules.
Furthermore, up to two time schedules can be set per
day.
■ Temperature Set Back
Temperatures can be “set back” when periods of
precise cooling or heating is not necessary.
This function reduces running costs.
■ Override (bypass) Function
The set back time clock can also be bypassed for
periods when automatic start/stop and temperature set
back is not required (such as extended vacations). By
using this feature, programmed schedules are retained
in the memory of the time clock for easy resumption of
the schedules when required by simply pressing the
ON/OFF button (1).
4
See page 6-10.
See page 10-11.
See page 11.
3P107422-26M_4.fm Page 5 Tuesday, October 16, 2007 3:30 PM
NAMES AND FUNCTIONS OF OPERATING
SECTION (Fig. 1, 2)
ON/OFF (BYPASS) BUTTON
1
DISPLAY “
Press this button to activate the time clock and the
programmed settings. Press this button again to
deactivate the programmed schedules.
11
DISPLAY “ ” (UNDER
CENTRALISED CONTROL)
This light turns on when the set back time clock and
the programmed schedules are activated.
DISPLAY “
MON TUE WED THU FRI SAT SUN
AM
PM
CLOCK
3
12
” (PRESENT
13
TIME)
4
SUMMER TIME
14
”
This display indicates that the time clock has been
adjusted for summer time (daylight saving).
This display indicates that the time clock is in the
programming mode.
DISPLAY “
6
OFF
16
17
This display is indicated above the day(s) of the
week that have been programmed as day(s) off
when schedules are to be inactive.
18
7
˚C
Press this button to set the present time
Press this button to enter and exit the programming
mode.
Press this button to adjust the present time and to
set the schedule times.
PROGRAM REGISTER BUTTON
” (DAY OFF SETTING)
DISPLAY “ ON/OFF
TEMPERATURE)
CLOCK ADJUST BUTTON
TIME ADJUST BUTTON
15
DISPLAY “ PROGRAM ”
5
Indicates that the system is under centralised
control or external control. In this case, some SET
BACK TIME CLOCK functions may not work.
PROGRAMMING BUTTON
Displays the current time and day of the week.
DISPLAY “
”
Indicates the schedules for temperature set back
periods.
OPERATION LIGHT (RED)
2
0 2 4 6 8 10 12 14 16 18 20 22 24
(SET BACK TIME SCHEDULE)
” (NORMAL SET
Press this button in the programming mode to
register the set schedules and current time settings
in the memory of the time clock.
DAY OF THE WEEK
Press this button to select the day of the week.
DAY OFF BUTTON
Press this button to set days off
SUMMER TIME BUTTON
19
This display indicates the set temperature during
periods of normal operation.
Press this button to adjust the time clock for
daylight savings (if applicable in your area).
TEMPERATURE SET BUTTONS
DISPLAY “
TEMPERATURE)
SET BACK
8
˚C
” (SET BACK
20
ON/OFF OR SET BACK MODE
SELECT BUTTON
This display indicates the set back temperature.
DISPLAY “
MODE)
9
” (COOLING/HEATING
21
Displays the current operating mode. Individual set
back temperatures can be set for the cooling and
heating modes.
DISPLAY “
10
”
(OPERATION TIME SCHEDULE)
Indicates the time clock schedules for automatic
ON/OFF control.
When in the programming mode, press this button
to select either the ON/OFF or TEMPEATURE SET
BACK mode to set programmed times and
temperatures
COOL/HEAT SELECT BUTTON
22
0 2 4 6 8 10 12 14 16 18 20 22 24
Press these button to adjust the normal set
temperature and the set back temperature
Press this button to select the cooling or heating
mode in order to set the normal set temperature
and the set back temperatures for each
PROGRAM CLEAR BUTTON
23
Press this button to clear programmed times for
each day.
5
3P107422-26M_4.fm Page 6 Tuesday, October 16, 2007 3:30 PM
OPERATION
SETTING THE PRESENT
DAY AND TIME
(Fig 3 Page 16)
THE CLOCK TO THE SECOND,
PRESS THE BUTTON WHEN THE
SIGNAL FROM THE RADIO,
TELEVISION, TELEPHONE MARKS
00 SECONDS.
(Example in case of setting Friday 5:30pm)
The time needs to be set when the time clock is first
switched on or after power supply to the unit is interrupted
for over an hour.
1
Press the CLOCK ADJUST
BUTTON (13)
The present time and day of the
week flashes.
MON
CLOCK
2
AM
Press the DAY OF THE WEEK
BUTTON (17)
Each time the button is pressed, the
day display shifts to the right and
advances by one day.
(Set the day to Friday)
FRI
CLOCK
PM
Notes)
● The time format used is 12 hour type
● When power supply is turned on, the system may
display “
” for about one minute and not start to
operate until after all the other displays appear.
● If the clock adjust button is pressed by mistake, press it
again to return to the original state. As the clock does
not stop, the time indicated by the clock is kept
accurate.
● In case power is interrupted for less than one hour, the
clock keeps operating by utilising an in built battery.
This battery is self charging and does not need
replacing.
● In case the time is incorrectly set, press the CLOCK
ADJUST button (13) before pressing the PROGRAM
REGISTER button (16). This will go back to the original
time.
● Press the SUMMER TIME button (19) to change clock
to summer time/daylight saving time (if applicable in
your area). This advances the time by one hour.
Pressing this button again changes the clock back to
normal time.
FRI
CLOCK
3
AM
Set the time with the TIME
ADJUST BUTTON (15)
Each time the button is pressed, the
displayed time increases or
decreases by one minute. When the
button is kept pressed the displayed
time increases or decreases rapidly
in increments of 10 minutes.
(set to 5:30pm)
FRI
CLOCK
4
6
PM
PRESS THE PROGRAM
REGISTER BUTTON (16)
ONCE THIS BUTTON IS PRESSED,
THE CLOCK STARTS AT THE SET
TIME FROM 00 SECONDS.
THEREFORE TO SYNCHRONISE
SETTING TIME AND
TEMPERATURE SET BACK
SCHEDULES
(Example)
Monday to Friday
Operating Time
From 4:00am to 11:00am and
From 2:00pm to 11:00pm
Temperature Set Back Times
From 4:00am to 7:00am
From 9:00pm to 11:00pm
Normal operating temperatures
Cooling:
25°C
Heating:
20°C
Set Back Temperatures
Cooling:
27°C
Heating:
17°C
Saturday and Sunday
Days off (no time schedule)
3P107422-26M_4.fm Page 7 Tuesday, October 16, 2007 3:30 PM
“cell’ and the preceding cells are
blacked out indicating the operation
period. Move the flashing cursor to
the time required to stop the air
conditioner.
SETTING OPERATING TIME
SCHEDULE
(Fig 4 Page 16)
(set it to 11:00am)
1
2
Press the PROGRAMMING
BUTTON (14) to enter the
programming mode
The display “ PROGRAM ” appears
and the current day of the week and
the display ON/OFF starts flashing.
Press the DAY OF THE WEEK
BUTTON (17)
Each time the button is pressed in
the programming mode, the day of
the week flashing advances
ON/OFF
6
Press the PROGRAM REGISTER
BUTTON (16)
The cursor stops flashing and the
first operation schedule is now
displayed and set.
(in this example the first operation period
is 4:00am to 11:00am)
ON/OFF
(set the day to Monday)
PROGRAM
7
MON TUE WED THU FRI SAT SUN
3
Press the TIME ADJUST BUTTON
Each time the button is pressed, the
flashing cursor in the operating time
schedule display (10) shifts in 30
minute increments.
Move the flashing cursor to the time
that the air conditioning unit is
required to turn on
(set it to 4:00am)
ON/OFF
4
(move it to 2:00pm)
ON/OFF
8
0 2 4 6 8 10 12 14 16 18 20 22 24
0 2 4 6 8 10 12 14 16 18 20 22 24
˚C
Set the start time in the same
manner as 4
(set to 2:00pm)
(the time clock is set to turn the air
conditioner on at 4:00am)
5
0 2 4 6 8 10 12 14 16 18 20 22 24
˚C
Press the TIME ADJUST
BUTTON (15)
Each time the button is pressed, the
flashing cursor in the operating time
schedule display (10) shifts in 30
minute increments to the start time
for the second operating schedule.
˚C
Press the PROGRAM REGISTER
BUTTON (16)
The time to start the air conditioning
unit is now registered in the memory
of the time clock
ON/OFF
0 2 4 6 8 10 12 14 16 18 20 22 24
˚C
0 2 4 6 8 10 12 14 16 18 20 22 24
˚C
9
Set the second operation period
in the same manner as 5 and 6
(set to operate from 2:00pm to 11:00pm)
10
Press DAY OF THE WEEK
BUTTON (17)
Press this button to select the next day
11
Repeat steps 3 to 10 to set the
operating schedules for other days
of the week.
Press the TIME ADJUST
BUTTON (15)
Each time the button is pressed, the
flashing cursor shifts to the next
7
3P107422-26M_4.fm Page 8 Tuesday, October 16, 2007 3:30 PM
12
Press the PROGRAMMING
BUTTON to exit the programming
mode.
The two operation schedules are
now memorised and displayed.
Notes)
●
●
If an error is made while programming, press
the PROGRAM CLEAR button (23) to delete
the time schedule(s) for that day.
Different operating schedules can be set for
each day of the week if required.
5
(set to Sunday)
6
Additional day(s) off may be set as
required by repeating steps 2 and 3.
7
Press PROGRAMMING BUTTON
(14) to exit the programming mode.
The display“ PROGRAM ” disappears
SETTING DAYS OFF
(fig 5 page 16)
1
2
Press the PROGRAMMING
BUTTON (14)
Press this button to enter the
programming mode. The display
“ PROGRAM ” appears in the display
and the current day of the week
flashes.
Press the DAY OF THE WEEK
BUTTON (17)
Each time the button is pressed in
the programming mode, the day of
the week advances. Select the day
of the week required to be set as the
day off.
(move it to Saturday)
OFF OFF
MON TUE WED THU FRI SAT SUN
Notes)
● Although time schedules can be set on a day (or days)
off, the schedules although displayed, remain inactive
and the air conditioning unit will not stop or start
automatically according to the schedules.
SETTING SET BACK TIME
(fig 6 page 16)
1
Press the ON/OFF OR SET
BACK MODE SELECT BUTTON (21)
The display SET BACK flashes.
Each press of the button toggles
between the ON/OFF setting mode
or SET BACK mode.
3
Press the DAY OF THE WEEK
(17) BUTTON
Each time the button is pressed in
the programming mode, the day of
the week advances.
MON TUE WED THU FRI SAT SUN
Press the DAY OFF BUTTON (18)
The display “ OFF ” appears above
the day of the week flashing. If the
DAY OFF button is pressed again,
the day off is deselected.
(set to Saturday)
PROGRAM
OFF
MON TUE WED THU FRI SAT SUN
Press the PROGRAMMING
BUTTON (14) to enter the
programming mode.
The display “ PROGRAM ” appears
and the current day of the week and
the display ON/OFF starts flashing.
2
PROGRAM
3
Press the DAY OFF BUTTON to
set as day off.
(select Monday)
PROGRAM
4
Press the DAY OF THE WEEK
BUTTON (17) again to select an
additional day required to be set as
day off.
(move it to Sunday)
8
MON TUE WED THU FRI SAT SUN
3P107422-26M_4.fm Page 9 Tuesday, October 16, 2007 3:30 PM
4
Press the TIME ADJUST BUTTON (15)
Each time the button is pressed, the
flashing cursor in the set back time
schedule display (11) shifts in 30
minute increments.
Move the flashing cursor to the
required start time for temperature
set back
8
Press the TIME ADJUST BUTTON (15)
Each time the button is pressed, the
flashing cursor in the set back time
schedule display (11) shifts in 30
minute increments.
Move the flashing cursor to the
required start time for the second
temperature set back period
(set it to 9:00pm)
(set it to 4:00am)
SET BACK
SET BACK
˚C 0 2 4 6 8 10 12 14 16 18 20 22 24
˚C 0 2 4 6 8 10 12 14 16 18 20 22 24
5
Press the PROGRAM REGISTER
BUTTON (16)
The time to start the first
temperature set back period is now
set and is registered in the memory
of the set back time clock.
9
Press the PROGRAM REGISTER
BUTTON (16)
The time to start the second
temperature set back period is now
set and is registered in the memory
of the set back time clock.
(the temperature set back start time is
now set to 9:00pm).
(the temperature set back start time is
now set to 4:00am)
10
SET BACK
˚C 0 2 4 6 8 10 12 14 16 18 20 22 24
6
Press the TIME ADJUST BUTTON (15)
Each time the button is pressed, the
flashing cursor shifts to the next
“cell’ and the preceding cells are
blacked out indicating the first
temperature set back period. Move
the flashing cursor to the time
required to end the temperature set
back operation.
(set it to 7:00am)
SET BACK
Press the TIME ADJUST BUTTON (15)
Each time the button is pressed, the
flashing cursor shifts to the next
“cell’ and the cells are blacked out
indicating the second temperature
set back period. Move the flashing
cursor to the time required to end the
temperature set back operation.
(set it to 11:00pm).
11
Press the PROGRAM REGISTER
BUTTON (16)
The blacked out cells stop flashing
and the second temperature set
back period is now set.
˚C 0 2 4 6 8 10 12 14 16 18 20 22 24
7
Press the PROGRAM REGISTER
BUTTON (16)
The blacked out cells stop flashing
and the first temperature set back
period is now set.
(set back period is set from 4:00am to
7:00am)
SET BACK
˚C 0 2 4 6 8 10 12 14 16 18 20 22 24
(the second temperature set back period
is set from 9:00pm to 11:00pm).
12
Repeat steps 3 to 11 to set the
set back periods for other days of
the week.
In this example set back periods are
as above for Monday to Friday)
13
Press PROGRAMMING BUTTON
(14) to exit the programming mode.
The display “ PROGRAM ” disappears.
9
3P107422-26M_4.fm Page 10 Tuesday, October 16, 2007 3:30 PM
Notes)
● Different set back periods can be set for each day of the
week if required.
● When the air conditioning unit is in the automatic cool/
heat changeover, fan and dry mode,the set back timer
function becomes inactive.
(set it to 20°C)
ON/OFF
7
SETTING NORMAL SET
TEMPERATURES
(fig 7 page 16)
Normal set temperatures can be individually set for the
cooling and heating modes. The operating temperature
can be temporarily changed by using the air conditioning
unit’s controller. However, when the set back time clock
starts or stops the air conditioning unit according to the
programmed time schedules or initialises a set back
period, the set temperature on the units controller reverts
to the set back temperature.
1
Press the PROGRAMMING
BUTTON (14)
The display “ PROGRAM ” appears
and the current day of the week and
the display ON/OFF starts flashing.
2
Press the COOL/HEAT SELECT
BUTTON (22)
Each press of the button toggles
between the cooling and heating
settings.
3
Select COOLING to set the
cooling normal set temperature
4
Press the TEMPERATURE SET
BUTTON (20)
Set the required Normal set
temperature for the cooling mode.
5
6
10
If set back temperatures need to
be set, then follow the instructions
below, otherwise press the
PROGRAMMING BUTTON (14) exit
the programming mode.
SETTING SET BACK
TEMPERATURES
(fig 8 page 16)
Set back temperatures can be individually set for the
cooling and heating modes. Cooling “set back”
temperatures should be higher than the normal set
temperatures and heating set back temperatures should
be lower than the normal set temperatures.
When the air conditioning unit is in the automatic cool/
heat changeover mode, the set back timer function
becomes inactive.
1
If set back controller is not in the
PROGRAMMING mode, follow steps
1 above. If continuing from above,
follow steps below.
2
Press the ON/OFF or SET BACK
MODE BUTTON (21)
The display SET BACK flashes.
Each press of the button toggles
BETWEEN the ON/OFF setting mode
and SET BACK mode.
3
Press the COOL/HEAT SELECT
BUTTON (22)
Select COOLING “
” to set the
cooling set back temperature
4
Press the TEMPERATURE SET
BUTTON (20)
Set the required set back
temperature for the cooling mode.
(set it to 25°C)
ON/OFF
0 2 4 6 8 10 12 14 16 18 20 22 24
˚C
0 2 4 6 8 10 12 14 16 18 20 22 24
˚C
Press the COOL/HEAT SELECT
BUTTON (22)
Select heating to set the Normal set
temperature for the heating mode.
Press the TEMPERATURE SET
BUTTON (20)
Set the required Normal set
temperature for the heating mode.
(set it to 27°C)
SET BACK
˚C 0 2 4 6 8 10 12 14 16 18 20 22 24
5
Press the COOL/HEAT SELECT
BUTTON (22)
Select heating “
” to set the set
3P107422-26M_4.fm Page 11 Tuesday, October 16, 2007 3:30 PM
back temperature for the heating
mode.
6
Press the TEMPERATURE SET
BUTTON (20)
Set the required set back
temperature for the heating mode.
(set it to 17°C)
SET BACK
˚C 0 2 4 6 8 10 12 14 16 18 20 22 24
7
Press the PROGRAMMING
BUTTON (14) to exit the
programming mode.
The display “ PROGRAM ” disappears.
5
Press the PROGRAMMING
BUTTON (14) to exit the
programming mode.
The display “ PROGRAM ” disappears.
CANCELLATION AND
CHANGE OF SET BACK
TIME SCHEDULES
(fig 10)
1
Press the PROGRAMMING
BUTTON (14) to enter the
programming mode.
The display “ PROGRAM ” appears
and the current day of the week and
the display ON/OFF starts flashing.
CANCELLATION AND
CHANGE OF
PROGRAMMED ON/OFF
SCHEDULES
(fig 9 page 16)
2
Press the ON/OFF OR SET
BACK MODE SELECT BUTTON (21)
to select the temperature SET BACK
mode settings.
Follow these instructions if any of the programmed
schedules need to be changed or cancelled.
3
Follow steps 2 to 5 as above.
1
Press the PROGRAMMING
BUTTON (14) to enter the
programming mode.
The display “ PROGRAM ” appears
and the current day of the week and
the display ON/OFF starts flashing.
2
Press the DAY OF THE WEEK
BUTTON (17) to select the day on
which the programmed schedule
needs to be cancelled or changed.
3
Press the PROGRAM CLEAR
BUTTON (23) to delete the
programmed schedule
The blacked out cells on the
OPERATION TIME SCHEDULE
display are cleared.
4
If an alternative time schedule
needs to be set, then follow the
steps 2 to 12 under “SETTING
OPERATING TIME SCHEDULES”
on page 7.
ACTIVATING OR
DEACTIVATING THE TIME
CLOCK
1
2
To activate the set back time
clock press ON/OFF (BYPASS)
BUTTON (1)
The red indicator light turns on.
This indicates that the time
schedules and set back periods are
now active.
To deactivate the set back time
clock, press the ON/OFF BUTTON (1)
The red indicator light turns off. This
indicates that the time schedules
and set back periods are now
inactive.
11
3P107422-26M_4.fm Page 12 Tuesday, October 16, 2007 3:30 PM
SPECIFICATIONS
■ SPECIFICATIONS
Display of time
12-hour degital dIsplay
Clock cycle type
Quartz clock type
Clock accuracy
Within ±30 sec./month (environmental temperature from 15°C to 35°C)
Timer programming
Two pairs of programmed time for both system start and system off can be set
in units of 30 minutes.
Power failure compensation time
Approximately 1 hour for a single occurrence of power failure (clock with No. of
programmed time)
Size
120(W) × 120(H) × 17(D) mm
(Width/Height/Depth)
■ OUTLINE DRAWINGS
120
MON TUE WED THU FRI SAT SUN
PROGRAM
OFF OFF OFF OFF OFF OFF OFF
SUMMER TIME
MON TUE WED THU FRI SAT SUN CLOCK
AM
PM
0 2 4 6 8 10 12 14 16 18 20 22 24
ON/OFF
˚C
˚C 0 2 4 6 8 10 12 14 16 18 20 22 24
PROGRAM
ON/OFF
SET BACK
OK
DAY OF
THE WEEK
SUMMER
TIME
DAY OFF
CLOCK
CLEAR
Specifications and appearance subject to change without notice.
12
120
SET BACK
3P107422-26M_5.fm Page 13 Tuesday, October 16, 2007 3:33 PM
13
3P107422-26M_5.fm Page 14 Tuesday, October 16, 2007 3:33 PM
14
3P107422-26M_5.fm Page 15 Tuesday, October 16, 2007 3:33 PM
15
3P107422-26M_6.fm Page 16 Tuesday, October 16, 2007 3:34 PM
3 3
35
79
PROGRAM
3
ON/OFF
SET BACK
OK
CLEAR
17
5
DAY OF
THE WEEK
SUMMER
TIME
DAY OFF
CLOCK
2
DAY OF
THE WEEK
ON/OFF
SET BACK
OK
DAY OFF
CLEAR
4
CLEAR
CLOCK
OK
1 13
6
35
6
2
CLEAR
7
PROGRAM
ON/OFF
SET BACK
OK
CLEAR
15
9
25
DAY OFF
CLOCK
3
OK
DAY OF
THE WEEK
SUMMER
TIME
DAY OFF
CLOCK
DAY OF
THE WEEK
SUMMER
TIME
DAY OFF
CLOCK
57
9 11
46
17
SUMMER
TIME
46
8 10
PROGRAM
ON/OFF
SET BACK
DAY OF
THE WEEK
46
89
46
8 10
24
6
SUMMER
TIME
210
PROGRAM
ON/OFF
SET BACK
1
4
PROGRAM
1 12
35
79
46
DAY OF
THE WEEK
SUMMER
TIME
DAY OFF
CLOCK
17
8
ON/OFF
SET BACK
2
46
PROGRAM
OK
CLEAR
35
46
2
PROGRAM
ON/OFF
SET BACK
OK
CLEAR
DAY OF
THE WEEK
SUMMER
TIME
DAY OFF
CLOCK
1
10
PROGRAM
ON/OFF
SET BACK
2
OK
DAY OF
THE WEEK
SUMMER
TIME
DAY OFF
CLOCK
CLEAR
3
16
3P107422-26M_1.fm Page 2 Tuesday, October 16, 2007 3:22 PM
3P107422-26M EM00A021B (0801)
HT