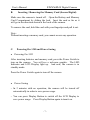
1
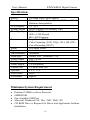
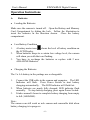
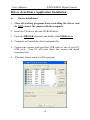
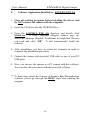
UNI CAM 3.1
3.1 Mega Pixel Digital Camera
User’s Manual
Version 1.0
User’s Manual
UNI CAM 3.1 Digital Camera
Overview and Acknowledgments
Thank you for purchasing UNI CAM 3.1 Digital Camera. It is with
1.5’ TFT LCD Display, built-in Flash Light and 3X Digital Zoom.
Maximum resolution is 2048 x 1536. Supports Snap Shoot, Video
Recording and Voice Recording. It is also bundling with powerful
photo editing and capturing software – Lover’s Eye 2.0.
Disclaimer
The manufacturer makes no representations or warranties, expressed,
statutory or implied, regarding the fitness or merchantability of this
product for any particular purpose. Further, the manufacturer is not
liable for any damages, including but not limited to, lost profits, lost
savings, or other incidental or consequential damages arising out of
the use of this product. The manufacturer also reserves the right to
make any improvements or modifications to the product described in
this manual at any time, without notice of these changes.
Trademark Acknowledgments / Copyright
Windows 98 / Me / 2000 / XP are trademarks or registered
trademarks of Microsoft Corporation in the United States and / or
other countries.
© Copyright Boly Media Communications (Shenzhen) Co., Ltd.
2001-2002
This manual may not be copied, photocopied, transmitted, or
translated into language or computer language, in any form, or by any
means, in whole or in part, without the prior written consent by the
Manufacturer.
© Copyright 2003. All rights reserved.
Manual Version 1.0
Information in this manual is subject to change without notice.
-2-
User’s Manual
UNI CAM 3.1 Digital Camera
Inside the Package
l
l
l
l
l
l
l
l
l
1 x UNI CAM 3.1 Digital Camera
2 x AA Re-chargeable Battery
1 x Tripod
1 x Video Cable
1 x USB Cable
1 x CD ROM with Driver and Application Software
1 x User Manual
1 x Traveler Bag
1 x Strap
Product Features
l
l
l
l
l
l
l
l
l
l
l
l
l
l
l
Maximum 3.1 Mega Pixel (2045 x 1536) Hardware Interpolation
Supports Secure Digital (SD) Memory Card
1.5” TFT LCD Display
3X Digital Zoom
Video Recording (AVI)
Voice Recording (WAV)
Web Camera
Self-Timer
20cm Macro Mode
NTSC / PAL Video Output
Auto Exposure
Auto White Balance
Removable Disk (SD Memory Card)
Bundle with 2 x AA Re-chargeable Battery via USB Connection
USB 1.1 Standard Interface
-3-
User’s Manual
UNI CAM 3.1 Digital Camera
Specification
Sensor
Resolution
LCD Display
Storage Media
Photo Quality
Format
Zoom
Exposure
White Balance
Flash-light
Video Output
Interface
Power Supply
Camera Len
Aperture
Filed Depth
Viewfinder
2.0 Mega Pixel CMOS Sensor
Maximum 3.1 Mega Pixel (2048 x 1536)
Hardware Interpolation
1.5” TFT
Secure Digital (SD) Memory Card
2048 x 1536 Fine
1600 x 1200 Normal
640 x 480 Economy
Snap Shoot (JPEG)
Video Capturing (AVI), 25fps, 320 x 240 (CIF)
Voice Recording (WAV)
3X Digital Zoom
Automatic
Automatic
Always Fire / Automatic / Off
PAL / NTSC
USB 1.1
2 x AA Battery
1/2 Inch Fixed Len
F 8.5 / f 2.8
50cm - ∞
Optical
Minimum System Requirement
l
l
l
l
l
Pentium 233MHz or above Processor
64MB RAM
One Available USB Port
Microsoft WindowsÒ 98 / 98se / ME / 2000 / XP
CD-ROM Drive is Required for Driver and Application Software
Installation
-4-
User’s Manual
UNI CAM 3.1 Digital Camera
Digital Camera Illustrations
1.
2.
3.
4.
5.
6.
7.
8.
9.
10.
11.
Front View
Shutter Button
Flashlight
View-Finder
Self-Timer Indicator
Camera Len
Macro Mode
Microphone
Normal Mode
Tripod Fix
Strap Hole
Battery & Memory Card
Compartment
1.
2.
3.
4.
5.
6.
View Finder
LED Indicator
Power Switch
Display Button
Menu Button
Flash Mode Button /
Delete Mode Button
7. Zoom-In / Previous Button
8. OK / Playback Button
9. Speaker
10. Zoom-Out / Next Button
11. Menu Exit Button
12. TFT LCD Display
Back View
1. USB Port
2. Video Output Port
Side View
-5-
User’s Manual
UNI CAM 3.1 Digital Camera
Operation Instructions
A.
l
Batteries
Loading the Batteries
Make sure the camera is turned off. Open the Battery and Memory
Card Compartment by sliding the lock. Follow the illustration to
insert the batteries in the direction shown. Close the battery
compartment.
l
1.
2.
3.
l
Low Battery Condition
shows the level of battery condition on
A battery meter icon
the LCD Display.
When batteries drops to a certain low voltage level, the camera
will alarm you with the icon flashing.
You have to re-charge the batteries or replace with 2 new
ALKALINE Batteries.
Charging the Batteries
The 2 x AA battery in the package are re-chargeable.
1.
2.
3.
Connect the USB cable to the camera and computer. The LED
Indicator will flash. Press Power Switch to start battery
charging automatically. The LED Indicator will flash fast.
When batteries are nearly fully charged, LED indicator flash
normally. To stop battery charging, press again Power Switch.
It takes around 6 hours to complete battery charging from empty
to full (1600MAH).
Note :
The camera can still work as web camera and removable disk when
battery charging is in progress.
-6-
User’s Manual
B.
UNI CAM 3.1 Digital Camera
Inserting / Removing the Memory Card (Secure Digital)
Make sure the camera is turned off. Open the Battery and Memory
Card Compartment by sliding the lock. Inset the card as far as it
will go in the direction shown at the back of the camera.
To remove the card, hold the card with your fingertips and pull it out.
Note :
Without inserting a memory card, you cannot access any operation.
C.
l
Powering On / Off and Power Saving
Powering On / Off
After inserting batteries and memory card, press the Power Switch to
turn on the camera. You will see a welcome graphic. The LED
Indicator and LCD Display light up. And now, the camera is in
standby mode.
Press the Power Switch again to turn off the camera.
l
Power Saving
~ In 2 minutes with no operation, the camera will be turned off
automatically in order to save power usage.
~ You can press Display Button to switch off the LCD Display to
save power usage. Press Display Button again to turn it on.
-7-
User’s Manual
D.
l
UNI CAM 3.1 Digital Camera
Taking Still Pictures
Shooting Photos
1.
Point the camera towards a subject while viewing through the
Viewfinder or the LCD Display.
2.
Press the Shutter Button gently to take a picture.
3.
The picture will remain on the LCD Display until it is stored in
the memory card as JPEG format. When the LCD Display
resumes to standby mode, you can take next picture.
l
Image Quality Setting
1.
Press Menu Button and go to Image Quality by pressing
Previous Button / Next Button. Press OK Button to set image
quality.
2.
Select your desired image quality and press OK Button to
confirm your selection. Afterwards, the camera would return
to standby mode.
This camera has 3 image quality options as below.
1.
2.
3.
Image Quality
2048 x 1536
Fine Quality
1600 x 1200
Normal Quality
640 x 480
Economic Quality
No. of Photo Taking
46 Images
LCD Display
★★★
86 Images
★★
216 Images
★
** The number of photo taking is accumulated by using a 32MB
Secure Digital (SD) memory card.
-8-
User’s Manual
l
UNI CAM 3.1 Digital Camera
Flashlight Setting
Press the Flash Button to select one of the 3 flashlight options as
below.
Flashlight Off
Automatic
Flashlight Off : Default flashlight setting is at off
flashlight is available.
Always Fires
condition.
No
on the LCD
Automatic : The flashlight icon will change to
Display. The flashlight will fire only when taking
photos in low-light or backlight conditions.
Always Fires : When you select Always Fires
, the flashlight will
fire every time while taking photos.
The flashlight needs to have power charging before using. When
you select Automatic or Always Fires, the flashlight will be charged
automatically. During power charging, the LED Indicator will flash.
When it is completed, the LED Indicator will light off. And now,
you can take photo with flashlight.
After taking one photo with flashlight, the flashlight will be
re-charged by itself.
Note :
If the battery level is too low, flashlight may not be able to work
properly. If flashlight charging procedure cannot be completed and
the icon resumes off
condition, you have to charge the batteries
or replace new batteries to use flashlight (please read Section A –
Batteries).
-9-
User’s Manual
l
1.
2.
l
UNI CAM 3.1 Digital Camera
Macro Mode
Slide the Macro Mode Switch to Macro Mode. It allows you
to take pictures at a closer range (around 20cm).
To take pictures, follow the steps in Shooting Photos.
Digital Zoom
While focusing a subject, press Zoom-In / Zoom-Out Button to access
Zoom feature. You will see the Zoom Lever to show the level of
zooming. The framed image can be zoomed between 1.0X – 3.0X.
l
1.
2.
3.
4.
Self-Timer Setting
5.
Press Menu Button and go to Self Timer. Press OK Button.
shown on the LCD Display.
You will see an icon
To start Self-Timer photo taking, press Shutter Button.
The Self-Timer Indicator in the front side of the camera under
the Viewfinder will flash. After 10 seconds, the camera will
take the picture automatically.
The camera will then return to standby mode.
E.
Video Recording (with Voice)
1.
2.
Press Menu Button and go to AVI Movies. Press OK Button.
To start video recording, press Shutter Button. Timer starts
counting recording time.
To stop, press again the Shutter Button. The video will be
saved as AVI format in the memory card.
You can also use Digital Zoom feature having video recording.
3.
4.
Note : In using a 32MB SD memory card, it can record around 7
minutes.
- 10 -
User’s Manual
UNI CAM 3.1 Digital Camera
F.
Viewing Still Pictures / Playing Back Video
1.
Press Menu Button and go to Preview Image. Press OK
Button.
In preview mode, you will see a 3x2 photo album. Select your
desired viewing picture / playing back video by pressing
Previous Button / Next Button.
To view picture, press Playback Button. To play back movie,
press the Playback Button twice.
To view / playback previous or next picture / video, just press
Previous Button / Next Button.
After viewing / playing back, press Menu Exit Button to return
to standby mode.
2.
3.
4.
5.
Note :
In standby mode, you can press Playback Button to take a shortcut to
preview mode.
G.
Erasing Pictures / Video
1.
While viewing picture / playing back video, press Delete Mode
Button.
2.
There are 3 options for your selection.
~ Yes : Delete current picture / video
~ No (default) : Cancel erasing and return to preview mode
~ All Images : Delete all pictures and video in the memory card
3.
After erasing pictures / video, it will remain in preview stage.
You can continue to view / playback other pictures / video or
press Menu Exit Button to return to standby mode.
Note :
All erased pictures / video cannot be restored. Please perform
back-up procedure if necessary before delete any picture / video.
- 11 -
User’s Manual
H.
l
1.
2.
3.
UNI CAM 3.1 Digital Camera
Voice Recording
Start Recording Voice
Press Menu Button and go to Digital Voice. Press OK Button.
To start voice recording, press Shutter Button. Timer starts
counting recording time.
To stop, press again the Shutter Button. The recorded voice
will be saved as WAV format in the memory card.
Note :
In using a 32MB SD memory card, it can record around 64 minutes.
l
1.
2.
3.
4.
l
1.
2.
3.
Voice Playback
Press Menu Button and go to Sound Replay. Press OK Button.
Press Playback Button to start playing back the last recorded
voice.
To playback previous or next recorded voice, just press
Previous Button / Next Button.
To return to standby mode, press Menu Exit Button.
Erase Recorded Voice
While playing back recorded voice, press Erase Mode Button.
There are 3 options for your selection.
~ Yes : Delete current playing back recorded voice
~ No (default) : Cancel erasing and return to playback mode
~ All Audios : Delete all recorded voice in the memory card
After erasing, it will remain in playback mode. You can
continue to playback other recorded voice or press Menu Exit
Button to return to standby mode.
Note :
All erased recorded voice cannot be restored.
back-up procedure if necessary before any erasing.
- 12 -
Please perform
User’s Manual
I.
1.
2.
3.
4.
5.
UNI CAM 3.1 Digital Camera
Connecting with Your TV / VCR
Connect the black plug of the Video Output Cable into the
Video Output Port on the camera.
Connect the yellow plug of the Video Output Cable to the
Video-in Plug on your TV / VCR.
Press Menu Button and go to TV Out Mode. Press OK
Button.
Select either NTSC or PAL to match your TV / VCR system.
And now, you can view photos or playback video in your TV
with larger view.
J.
Format Memory Card
1.
2.
Press Menu Button and go to Card Format. Press OK Button.
Select Yes to start formatting the SD memory card in the
camera.
After that, it will return to standby mode.
3.
Note :
When format completed, it would erase all pictures, video and
recorded voice in the SD memory card. Please perform back-up
procedure if necessary before formatting the memory card.
K.
Check Memory Capacity
1.
Press Menu Button and go to Memory Status. Press OK
Button.
It will show the remaining memory capacity and % used of the
SD memory card.
2.
Note :
In standby mode, an icon
capacity.
also shows the status of memory
- 13 -
User’s Manual
UNI CAM 3.1 Digital Camera
Driver & Software Application Installation
A.
Driver Installation
1. Close all working programs before installing the driver, and
do NOT connect the camera with the computer.
2. Insert the CD driver into the CD-ROM drive.
3. Open the DRIVER directory and double click STK014.exe.
4. Computer will install the driver automatically.
5. Connect the camera with provided USB cable to one of your PC
USB ports. Your PC will auto detect the camera and install
necessary files.
6. After that, below window will be pop-up.
- 14 -
User’s Manual
B.
l
UNI CAM 3.1 Digital Camera
Transferring Files
Downloading Files from Camera
1.
Connect the camera with the computer through USB cable.
2.
A Image Download Utility window (as above) will be pop-up.
3.
You can download the files from the camera to the computer by
using this utility.
l
Downloading Files from SD Memory Card
You can remove the SD memory card and use a SD memory card
reader to transfer files from the SD memory card to computer.
l
Removable Disk
Connecting the camera to the computer and it will switch the camera
to mass storage mode automatically.
You can find a new
Removable Disk icon in My Computer. You can transfer files
between the computer and the SD memory card.
- 15 -
User’s Manual
C.
UNI CAM 3.1 Digital Camera
Software Application Installation : LOVER’S EYE 2.0
1. Close all working programs before installing the driver, and
do NOT connect the camera with the computer.
2. Insert the CD driver into the CD-ROM Drive.
3. Open the LOVER’S EYE 2.0 directory and double click
Install.exe. A Select language dialogue window pops up.
Select the language (English, Traditional & Simplified Chinese)
you need and click “OK”. It will automatically install the
software.
4. After installation, you have to restart the computer in order to
complete the installation procedure.
5. Connect the camera with provided USB cable to one of your PC
USB ports.
6. Now, you can use the camera as a PC camera with this software.
You can also edit your photo with this powerful software.
** To learn more about the features of Lover’s Eye 2.0 application
software, please go through the HELP topic after running the
program.
- 16 -