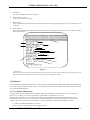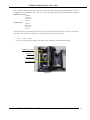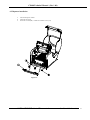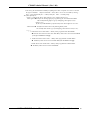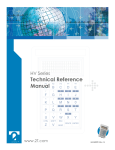
1
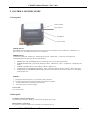
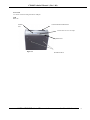
CX400 Technical Manual (Rev 1.00)
CX400 Technical Manual
Rev 1.00
Except as may otherwise be provided by contract, this document contains proprietary technical information which is
the property of BARCODE SATO INTERNATIONAL PTE Ltd.& ARGOX Information Co., Ltd and is strictly
confidential and shall not be disclosed to others in whole or in part, reproduced, copied or used as a basis for design,
manufacturing, or sale of apparatus without the written permission of BARCODE SATO INTERNATIONAL PTE
Ltd or ARGOX Information Co.,Ltd.
SATO /ARGOX Technical Documentation
Confidential Information 1
CX400 Technical Manual (Rev 1.00)
1. GENERAL INTRODUCTION................................................................................................................. 3
2.PRINTER SPECIFICATION.................................................................................................................... 3
2.1 Electronic .......................................................................................................................................................................................................... 3
2.2 Printing .............................................................................................................................................................................................................. 3
2.3 Fonts.................................................................................................................................................................................................................. 3
2.4 Bar code............................................................................................................................................................................................................ 3
2.5 Graphic ............................................................................................................................................................................................................... 4
2.6 Media ................................................................................................................................................................................................................. 4
2.7 Operating environment.................................................................................................................................................................................. 4
2.8 Physical dimension ......................................................................................................................................................................................... 4
2.9 Communication specifications...................................................................................................................................................................... 4
3. CONTROLS AND INDICATORS........................................................................................................... 7
3.1 Front panel ........................................................................................................................................................................................................ 7
3.2 Rear panel .......................................................................................................................................................................................................... 7
4.OPTIONAL ACCESSORIES..................................................................................................................... 9
4.1 Cutter mechanism ............................................................................................................................................................................................ 9
4.2. FONT module................................................................................................................................................................................................. 9
4.3. Dispenser........................................................................................................................................................................................................... 9
5. SELF-DIAGNOSIS AND CALIBRATION......................................................................................... 10
5.1 Self Diagnosis .................................................................................................................................................................................................10
5.2
Calibration ................................................................................................................................................................................................11
6. OPTIONAL PARTS INSTALLATIONS............................................................................................. 14
6.1 Cutter Installation..........................................................................................................................................................................................14
6.2 Dispenser installation....................................................................................................................................................................................17
7. FIRMWARE UPGRADING.................................................................................................................. 19
7.1 Unzip Firmware File ..................................................................................................................................................................................19
7.2 Upgrade F irmware in Normal Case..........................................................................................................................................................19
7.3 Upgrade Firmware in Corrupted Case....................................................................................................................................................19
8. MAINTENANCE AND TROUBLE SHOOTING................................................................................ 21
8.1 Printer status indication................................................................................................................................................................................21
8.2 Trouble Shooting............................................................................................................................................................................................22
8.3 Clearance ........................................................................................................................................................................................................26
8.4 Replacement ...................................................................................................................................................................................................27
9. OPERATIONAL THEOREM................................................................................................................. 34
9.1
9.2
9.3
9.4
9.5
9.6
9.7
System block diagram...................................................................................................................................................................................34
Block Diagram of Main Control Board ..................................................................................................................................................36
Schematic of Main Control Board ...........................................................................................................................................................38
Schematic of Panel Board ...........................................................................................................................................................................40
Schematic of Various Sensor Boards.....................................................................................................................................................40
Wiring Diagram.............................................................................................................................................................................................41
Exploded Drawing ........................................................................................................................................................................................42
10. “MAJOR” & “RECOMMENDED SPARE” PARTS ........................................................................ 45
SATO /ARGOX Technical Documentation
Confidential Information
2
CX400 Technical Manual (Rev 1.00)
1. GENERAL INTRODUCTION
Scope:
This Technical manual covers the information for properly maintaining SATO CX 400 Label Printer,
such as, “ Printer specification”,“Trouble Shooting Guide”, “Option Accessory Installation “,” Spare Parts List”,
“Set up & Diagnosis“, “working theorem” and so on. For the issues related to soft ware, please refer to “Programmer
Manual”
Related manuals:
n
n
User’s manual
Programmer’s manual
2.Printer Specification
2.1 Electronic
CPU …………………………………………………... Hitachi SH7034
C LOCK ……………………………………………… 20 M Hz ( 26 MIPS )
Panel ………………………………………………… 1 Green LED for Power & 1 Red LED for Error Indication, 1 Feed Button
DRAM……………………………………………….. 1 M word
Flash ROM …………………………………………. 1 M word ( 2 x 1 M byte )
Sensors……………………………………………… 1. I-mark( Reflective ) and Gap(See-Through) Sensor for detecting the index
on media
2. Ribbon, Dispenser Sensor
3. Printer Head Open Sensor
Power Input…………………………………………. RMS 19V AC Input to the Power Jack on Printer
Power Consumption in printing …………………. 70 Watt .
Power Consumption in Standby…………………… Less than 2 Watt
Regulatory Approvals……………………………….. FCC Class B,CE, TUV,CCC,UL
Additional Memory …………………………………. 2 M or 4 M byte Flash ROM
2.2 Printing
Method
Resolution
Max print width
Max print length
Print speed
:
:
:
:
:
Thermal Transfer and Direct thermal
203 dots/inch (8 dots/mm)
4.1”(104mm)
1270 mm ( 50 inches )
1,2,3,4 inches per second specified by SATO printer command .
This Printer might slow down the printing speed to 3~2 IPS or pause printing upon Stepping
Motor or Print Head is over-he at. Printing will be resumed to the specified speed when Motor or Print
Head is cooled down again. Normally the mechanism for over-heat protection will be NOT activated
before 2 rolls of labels (more than 150 meters l ong.) are printed out consecutively in 4 IPS mode.
2.3 Fonts
Text fonts:
Rotation:
Compatible with all SATO CL printers Code Page 858,
Others available. U;S; M; WB; WL; XU; XS; XM; XB; XL; OCR-A/B;
Outline Font (50 ~ 999 dots)
0, 90, 180, 270 degree, 4 direction rotation
2.4 Bar code
UPC A/E, EAN8/13, EAN128, Code39, Code93, MSI, I25, M25, Postnet
Bookland, Code 128, UCC 128, Codabar, MaxiCode, PDF417
SATO /ARGOX Technical Documentation
Confidential Information
3
CX400 Technical Manual (Rev 1.00)
2.5 Graphic
Formats:
Rotation:
SATO Hex/Binary
0o; 90 o; 180 o; 270 o
2.6 Media
Media type :
Direct Thermal - direct thermal paper or vinyl, visible light and infrared scannable label, tag stock, with various
adhesives.
Thermal transfer - all above media, plus thermal transfer paper
Max Label Roll Diameter :
127mm ( 5” )
Label Roll Core Diameter : 19.05 mm ( 0.75” )
Min. Inter-Label Gap :
2 mm ( 0.08” )
Max. Inter-label Gap :
25.4 mm ( 1“ )
Media Sensor:
1. Either “Reflective Sensor” or “Gap/I-mark Sensor” can be selected by user.
2. Located in the left side of Label Guide. In other words, the sensors are moved with the label width.
3. Gap/I-mark Sensor is for the Labels with Die-Cut gap or Notched Index .
Reflective Sensor is for the Labels with Eye-Mark, Die-Cut gap.
2.7 Operating environment
Electrical: AC 90VAC to 250VAC 50-60 Hz
Operating: +5 ~ 38oC ( 25 ~ 85 RH, non condensing )
Storage:
-20 ~60oC( 25 ~ 85 RH, non condensing )
2.8 Physical dimension
Weight :
Size :
3.67kg ( Transformer Adaptor Included )
197mm (7.76”) x 257mm (10.2”) x 164mm (6.5”)
2.9 Communication specifications
SATO CX-400 Label printers send and receive messages through either serial or parallel communication interface.
Printer will automatically monitor these two ports for receiving commands/data from Host.
SATO /ARGOX Technical Documentation
Confidential Information
4
CX400 Technical Manual (Rev 1.00)
2.9.1 Serial interface specification
The serial interface of CX400 printer is a RS-232C port with standard 9- pin (DB9-S) connector located at the rear of the printer.
CX400 printers employed “Flow Control” mechanism with either RTS/CTS or X-on/X-off (control characters are DC2
and DC4).
The parameters can be set by printer are as followings,
Speed:
9600, 19200 or 38400 baud
Parity:
Odd, Even, or None
Data Bits:
7 or 8 bits
Stop Bit(s)
1 or 2 bits
Default parameters: 9600 bauds, no parity, 8 data bits, 1 stop bit
Pin
Signal
Description
1
Carrier Detection
“Shorted with Pin 9” ( RI ) or” Open” count on R94 existed or not
0 Ohm on R94 è Shorted with Pin 9 (+5 V )
No Resistor on R94 è Pin 1 is N.C.
2
Received Data, RxD
Input. Serial “Received Data”
3
Transmitted Data, TxD
Output. Serial “Transmitted Data”.
4
Data Terminal Ready, DTR
Always maintai n at high state ( +10 V )
5
GND
Signal Ground
6
Data Set Ready, DSR
Shorted with Pin 4 (DTR)
7
Request to Send ,RTS
Output. Used as the control signal for “H/W Flow Control “
8
Clear to Send , CTS
Input. Used as the control signal for “H/W Flow Control”
9
Ring Indicator, RI
“5 Volt” or “N.C. selected by JP1 on board
“0 ohm “ puts on JP1 è “5 V”
No resistor on JP1
è NC
Table 2.1
Note:
CX400 printers require a “null modem” cable (pin 2-3 and 7-8 crossed wiring) while connecting to another DTE
Device, like PC.
SATO /ARGOX Technical Documentation
Confidential Information
5
CX400 Technical Manual (Rev 1.00)
2.9.2 Parallel interface specification
This port complies with IEEE-1284 Compatibility mode( Also named as Standard Parallel or Centronic Port ).
2.9.3 Pin assignment and descriptio n
Pin
Signal
Description
1
/STROBE
Input. Active low pulse used to transfer data into the printer.
D1~D8
Pin 2 à D1..
Pin 9 à D8
Data Input
10
Acknowledge,
/ACK
Output.
Active low pulse indicates that data has been received and the printer is
ready to accept more
11
BUSY
Output.
A high signal indicates that the printer cannot receive data.
12
Paper End, PE
Output. A high signal indicates that the printer is out of paper
13
Select (high)
Always maintain at +5 V
14
Supply Ground
N.C.
15
Oscillator
Transmit
N.C.
16
Logical Ground
GND
17
Chassis Ground
GND
18
+5 Vdc
N.C.
2~9
19~30
GND
31
Input Prime (low)
N.C.
32
/FAULT
Output.
A low signal indicates that the printer is in error state
33~36
-
N.C.
Table 2.2
SATO /ARGOX Technical Documentation
Confidential Information
6
CX400 Technical Manual (Rev 1.00)
3. CONTROLS AND INDICATORS
3.1 Front panel
Power indicator
Error indicator
Feed Button
Power Switch
Figure 3.1
POWER indicator
The POWER indicator remains ON when the AC power switch is in ON position except “ Ribbon O ut”, “Media Out” , or
other errors occur. It will blink when those errors are detected.
ERROR indicator
It will start to blink while “M edia Out“, “Media Gap Not Found”, “Ribbon Out “ or other errors being detected.
The followings list the meaning for diverse LED indication,
1.
2.
3.
4.
5.
ERROR LED is OFF and POWER LED is ON while there are no errors detected by Printer.
“ERROR &POWER LED synchronously blinking” indicate “Media Error”, either “No Media”or “ Media Index not
Found”
“ERROR & POWER LED reversely blinking“ indicates “Ribbon Out”.
“POWER LED ON and ERROR LED blinking , longer OFF period than ON period” indicates “Print-head Open”.
“POWER LED ON and ERROR LED blinking at the same ON and OFF period” stands for other errors , like RS232
communication error.
FEED Key
1.
2.
3.
4.
Pressing the button during start -up, a test label will be printed out.
Pressing the button during printing will cause the printing to be paused.
To feed a blank label or print the last printed label.
To reset this printer to factory settings.
Power switch
Turn on/off printer.
3.2 Rear panel
Centronics connector (parallel port)
For parallel port connection . Mostly it is connected to the printer port of a PC .
RS232 connector (serial port)
For serial port connection . Mostly it is connected to the COM port of a PC .
SATO /ARGOX Technical Documentation
Confidential Information
7
CX400 Technical Manual (Rev 1.00)
Power Jack
To connect the Power Plug from Power Adaptor
USB
Reserved
Parallel
Port
External Media Feed Knockout
Power Jack for 19 V AC Input
RS232 Port
Figure 3.2
Wall Mount Slots
SATO /ARGOX Technical Documentation
Confidential Information
8
CX400 Technical Manual (Rev 1.00)
4.Optional Accessories
4.1 Cutter mechanism
Optional cutter for cutting labels, tags or tickets . Back feed is included for cutting .
4.2. FONT module
Font module, which is used to store special font such as Chinese, Korean, Japanese characters.
The total size of Font Module could be 4 M or 2 M bytes.
4.3. Dispenser
Dispenser provides the automatic peel-off function .
SATO /ARGOX Technical Documentation
Confidential Information
9
CX400 Technical Manual (Rev 1.00)
5. Self-Diagnosis and Calibration
5.1 Self Diagnosis
A simple Self-Diagnosis could be activated by either a group of Printer Commands or Feed Button.
A.
By Commands
1.
Edit a text file that includes the following commands.
<ESC>A
<ESC>CT
<ESC>Z
2.
B.
Send the file to printer. Then a “ Self Test Label” will be printed out.
By FEED Button
1.
2.
3.
Press and hold the FEED button till the printer starting to print “Self Teest Label” shown on Fig. 5.1.
Release the FEED button.
Cycle printer power to resume this printer to normal mode.
( It is necessary to cycle Printer Power since the printer will be in “HEX dump mode” After the test label is printed
out )
The Contents and Information in “Self Test Label” are as followings,
1.
Image Pattern
Used to check the print head, motor, roller and related mechanical parts.
2.
Version Information
This includes date code, firmware version and check sum value. Note that the check sum value should be 0000 otherwise it
implies there are error bits in the onboard flash memory.
3.
RS232 Protocols
It contains baud rate, parity, data bit number and stop bit number.
4.
Darkness
Default darkness. It can be overwritten by a darkness command.
5.
Accumulated Print length
It keeps the length printed in inches. By this you may check the print head warranty. But it cannot be reset when you
replace the print head or any components.
6.
Print Speed
Default print speed in IPS. The factory default is 3 IPS.
7.
Media Sensor Used
It specifies the sensor type used for media, I-mark( Reflective), Gap ( See-Through ) or disabled. Select the proper one for
your media by command or through the application software.
8.
Print Mode
It is either TT (Thermal Transfer with ribbon) mode or DT (Direct Thermal without ribbon) mode.
9.
Tear-Off Option
It indicates whether “back feed” is taken for tearing off the printed labels.
10.
Control Code Definition
It shows the control code set. The control codes affect the commands and special controls.
SATO /ARGOX Technical Documentation
Confidential Information
10
CX400 Technical Manual (Rev 1.00)
11.
Pitch Offset
The offset value affects the start print position.
12.
Accumulated Cut Count
This is used to check the cutter life.
13.
Memory Slot I
This is the onboard non-volatile memory, flash memory used to store the graphic, font objects. The size of memory slot I is
512K bytes.
14.
Memory Slot II
This is the optional non-volatile memory, flash memory used to store the graphic, font objects. The size of memory slot II is
either 2M or 4M bytes.
2
1
3
4
5
6
7
8
9
10
12
11
13
14
Figure 5.1
< Important !>
The printer will be in hex dump mode after printing the self-test label. It cannot print normal labels in hex dump mode. The
printer will return to normal operation only you cycle power for restarting this printer.
5.2 Calibration
CX400 unit had been calibrated at the factory for using with SATO standard ribbon and media. Other ribbon/media combinations
may or may not index properly with these settings. You might need to perform various calibrations to adapt the variance caused
by the particular Media & Ribbon.
5.2.1 To Calibrate Media Sensor
You might need to perform “Media Sensor Calibration” if Printer frequently skips a blank label, the variance for “Printing
position” in every label is too obvious, or the image on printed label is not located as what you set.
The Calibration for media sensor can be done by clicking the Calibration Buttons in the Label Wizard CX software or the
Windows Printer Driver. If it is not convenient for you to calibrate Media Sensor with those application software, this sensor
calibration also can be performed by directly sending “ Printer Commands for Media Sensor Calibration” to printer.
1. Install well the Media and Ribbon ( TT mode )
2. You can calibrate the Media Sensor with Application S/W.
SATO /ARGOX Technical Documentation
Confidential Information
11
CX400 Technical Manual (Rev 1.00)
Or you are also able to directly send out a group of commands to printer for calibrating the media sensors in either Imark(Reflective )or Gap(See-Through ) mode. Two groups of commands for Bar & Gap mode sensor are listed below,
<In Reflective mode >
<ESC>A
<ESC >CI1
<ESC>CA
<ESC>Z
< In Gap mode >
<ESC>A
<ESC>CI2
<ESC>CA
<ESC>Z
3. Once the Media sensor calibration is activated in step 2, the printer will feed several labels ( 6 inches) to perform this
calibration. After this printer completely stops feeding label, this calibration had been well.
< note 1 > < ESC> = 0x1B,
< note 2 > The ribbon must be installed in the printer when calibrating in the thermal transfer mode.
Printhead Open Sensor
Media Sensor
Ribbon Sensor
Print Head(TPH)
Figure 5.2
SATO /ARGOX Technical Documentation
Confidential Information
12
CX400 Technical Manual (Rev 1.00)
5.2.2 Calibration for Ribbon Sensor
The calibration for Ribbon sensor might need to be performed while the particular Ribbon & Media you installed makes this
printer fails to detect ribbon out or the end of ribbon. Actually it is not necessary to perform this calibration except the installed
Ribbon & Media are very particular.
The calibration for ribbon sensor is used for the printer to keep the characteristics of ribbon sensor, ribbon and media. The printer
always checks the ribbon existence during printing under TT (thermal transfer) mode. Once the printer mis-detects the ribbon you
must make a ribbon calibration for them. Two steps are required to do it.
Step 1 è To Install both Ribbon and Media , then
1. Send a group of commands to the printer.
<ESC>A
<ESC>&I1
<ESC>Z
2. Wait for five seconds to make sure the printer to finish checking.
Step 2 è Remove the Ribbon and Install the Media,then
1. Send a group of commands to the printer.
<ESC>A
<ESC>&I0
<ESC>Z
2. Wait for five seconds to make sure the printer to finish checking.
After Step1&2 have been done the calibration ribbon sensor is completed.
<Note>You can also put the end-mark ribbon (in general it is in silver color) under the ribbon sensor (right under print
head) at step B.
5.2.3 Calibration for Dispenser Sensor
The calibration for dispensor sensor is used for the printer to keep the characteristics of dispensor sensor and media. The printer
checks the label existence after printing, when the printed label is removed the printer continues printing for the next label
automatically. Once the printer mis-detects the label you must make a calibration for them. Two steps are required to do it.
Step 1 è Putting a label on the plastic plain under the dispenser sensor, then
1. Send a group of commands to the printer.
<ESC>A
<ESC>&P1
<ESC>Z
2. Wait for five seconds to make sure the printer to finish checking.
Step 2 è Removing the label from the dispenser sensor, then
1. Send a group of commands to the printer.
<ESC>A
<ESC>&P0
<ESC>Z
2. Wait for five seconds to make sure the printer to finish checking.
After both above steps 1&2 have been done the calibration for dispenser is completed.
SATO /ARGOX Technical Documentation
Confidential Information
13
CX400 Technical Manual (Rev 1.00)
6. OPTIONAL PARTS INSTALLATIONS
CAUTION
The printer electronics are susceptible to static discharge . Wear
an anti-static wrist and attach it to the printer chassis
6.1 Cutter Installation
1.
2.
3.
4.
Turn off the power switch
Loose the 2 screws( B ) to take off “Peeler Cover”(75).
Loose the screw ( E) which screwed “ANG-PEELER” (28) to “Printer Chassis”(30).
Push “ANG-PEELER”(28) to right then take it out.
Figure 6. 1
SATO /ARGOX Technical Documentation
Confidential Information
14
CX400 Technical Manual (Rev 1.00)
5.
6.
7.
8.
Loose the 2 screws( I ) on Printer Bottom
Pull out the front side of “Middle Cover” ( 96 ) then remove it from “Bottom”(39)
Unplug “Power Switch” from “Power Cords” then take out “Middle Cover”(96)
Put “Baby Board” to JP29 on the main board
Figure 6.2
SATO /ARGOX Technical Documentation
Confidential Information
15
CX400 Technical Manual (Rev 1.00)
9.
10.
11.
12.
13.
Let the 2 Power Cords go through the switch hole on “Middle Cover”, then plug “Power Cord” to Power Switch.
Pull the front side of “ middle cover” to put it back on “Bottom” (39).
Screw up the 2 screws(I) on Printer Bottom.
Plug the cutter cable to “External Connector” as shown on Figure 6-3.
Insert “Cutter Module” into the slot on “Printer Chassis”(30) where you took off “ANG-PEELER”(28)
in “step 4”.
14. Screw “Cutter Module “ on “Printer Chassis”(30) wit h screw (B).
15. Click back “Print Head” and Click back “Top Cover”
16. After cutter had been installed well with the above steps, you still need to set the E2PROM through commands.
<esc>A
<esc>CK1
<esc>Z
Once the cutter is uninstalled you also need change the setting by commands or make a reset from panel.
<esc>A
<esc>CK0
<esc>Z
Figure 6-3
SATO /ARGOX Technical Documentation
Confidential Information
16
CX400 Technical Manual (Rev 1.00)
6.2 Dispenser installation
1.
2.
3.
Turn off the power switch.
Loose the screw (E).
Loose the 2 screws( B ) to take off “Peeler Cover”(75).
Figure 6.4
SATO /ARGOX Technical Documentation
Confidential Information
17
CX400 Technical Manual (Rev 1.00)
4.
5.
6.
7.
8.
Plug “Sensor cable” of Dispensor Module into “External Connector”
Screw Dispensor Module on “Printer Chassis” with 2 Screw(B )
Screw “Sensor Cable” on “Printer Chassis ” with the screw (E )
Click back “Dispensor Module”.
Click back “Printer Head “ & “Top Cover”
Figure 6. 5
SATO /ARGOX Technical Documentation
Confidential Information
18
CX400 Technical Manual (Rev 1.00)
7. FIRMWARE UPGRADING
The firmware in Printer CX400 is able to be upgraded through the Centronic port on printer. The following sub-section
describe how to upgrade firmware in normal and corrupted case
7.1 Unzip Firmware File
This diskette(ZIP file) contains the related files and data that you may change or upgrade the firmware.
Before changing the firmware decompress the file first.
1.
2.
3.
4.
C:\>MD SATO
C:\>CD SATO
C:\SATO >COPY A:README.TXT
C:\SATO >A:PKUNZIP A:CX400_Vx.xx.ZIP
è Decompress all the files for upgrading F/W
( Where “x.xx” is version number ,e.g. 1.01 )
7.2 Upgrade Firmware in Normal Case
1.
2.
3.
4.
5.
6.
Turn on the printer and wait for 3 seconds.
Set PC to MS-DOS .
CD C:\SATO ( Change the Directory you made in 8.1 section )
Enter “SATO” on the DOS prompt “c:\SATO”
Wait a moment ( 2~3 minutes ) till “Power & Error LED” are synchronously blinking for completing F/W
upgrade. Then cycle the printer power to restart this printer.
When up date successfully, please follow the reset procedure listed in section 5.1 to reset this printer and
verify if this upgrade is successful or not. Specially the check sum in the label, which were printed out
during reset, should be 0000.
7.3 Upgrade Firmware in Corrupted Case
In very abnormal case, the Boot -Up program located at BOOT sector of Flash ROM in CX400 might be
corrupted(Supposedly it is impossible to happen. ). This will cause Printer to be unable to perform F/W upgrade with the
above normal way. In this case you might need to refer below to upgrade the Firmware.
1.
Refer to step 1~2 and Step 5~8 in section 8.4.3 to disassemble this Printer till the expansion slot ( JP11)&
JP5 is accessible.
2. All the jumpers on JP5 (Located beside Expansion slot,J P11, and U8,U9) should be put on
BOOTER side.
3. Put “Booter Module“( It is the normal Font Card with “Booter Firm Ware” but not with Fonts. ) on JP11.
4. Turn on the printer and wait till POWER LED lights up.
5.. Set PC to MS-DOS.
6. CD C:\SATO ( Change the Directory you made in 7.1 section )
7. Enter “SatoBoot” on DOS Prompt “c:\SATO” .
8. Wait around 1 minute till Power” & “Error” LEDs are synchronously & slowly blinking.
Then turn off this printer.
9. Put all the jumpers on JP5 to be at NORMAL side again.
10. Remove “Booter Module” from JP11.
11. Refer to section step 19~21 and step 24~25 in section 8.4.3 to assembly this printer.
12. Follow the reset procedure listed in section 5.1 to reset this printer and verify if this upgrad being successful
or not. Specially the check sum in the label, which printed out during reset, should be 0000.
Note:
1. It is prohibited to run under Windows DOS for upgrading F/w in the above 2 modes
2. DO NOT TURN OFF the printer during changing the firmware till “POWER and ERROR LED”
are synchronously blinking. Otherwise unpredictable results may occur.
SATO /ARGOX Technical Documentation
Confidential Information
19
CX400 Technical Manual (Rev 1.00)
3. The binary file downloaded to CX400 for updating the F/W in corrupted case must be led with
the prefix commands. “Prefixed commands + binary data” can be sent to CX400 by entering “
Copy <prefix Commands file>+< Binary Data file> LPT1: “ in DOS prompt.
The syntax of Prefix is :
<Prefix >: 0x1B+0x24+0x33+"Start offset(1 byte)"+"Data Count(1 byte)"
"Start offset" èTo Define the Starting offset for programming the On-Board Flash ROM.
The actually Starting Offset is got by multiplying "Start offset(1 byte)"
with (2** 16 ).
By the way CHIP ERASE is performed only when "Start Offset"is set to zero.
"Data Count" è To Define the Data Count in the following Binary Data.
The actually Data Count is got by multiplying "Data Count" with (2** 14 ).
< e.g. >
1. 0x1B+0x24+0x33+0x00+0x04 + " Binary Data programmed on Flash ROM"
è Send the above data to Printer, then thhe Binary Data will be stored on Flash ROM
from offset 0x000000 to 0x00ffff.
2. 0x1B+0x24+0x33+0x20+0x40 + " Binary Data programmed on Flash ROM"
è The Binary Data will be stored on Flash ROM from 0x200000 to 0x2fffff.
3. 0x1B+0x24+0x33+0x00+0x80 + "Binary Data programmed on Flash ROM".
è The Binary Data will be stored on Flash ROM
SATO /ARGOX Technical Documentation
Confidential Information
20
CX400 Technical Manual (Rev 1.00)
8. Maintenance and Trouble Shooting
8.1 Printer status indication
The printer has built -in monitors for the status. The status and error indications will be displayed on the front panel LED
indicators. Generally, when a malfunction or an abnormal condition being detected, the ERROR LED will blink.
Tab. 8.1 below shows the LED indications corresponding to various errors.
LED Indication
Description
ERROR LED are synchronously blinking
Indicate “ Fail to detect Media Index or Media out“.
with POWER LED ( on & off in the same time )
ERROR LED is Blinking in the opposite way Ribbon Error
with POWER LED
ERROR LED is ON and OFF alternatively Print Head Open..
and the OFF period is longer than ON, when
POWER LED being ON.
“POWER LED ON and ERROR LED
RS232 error.
blinking at 50 % duty cycle
Table 8.1
CAUTION
The printer electronics are susceptible to static discharge . Wear
an anti-static wrist and attach it to the printer chassis
SATO /ARGOX Technical Documentation
Confidential Information
21
CX400 Technical Manual (Rev 1.00)
8.2 Trouble Shooting
< I. Power Fail >
LED Indication
Both Power & Error are Off
Status
No Power
1.
2.
3.
4.
Cause
No Power Supplied
The fuse in Adaptor was burned out
Printer might be out of order.
“Main board “ or “ Panel Board “ Bad
Adaptor might be Bad
Turn Off Printer
Power Connected
or
AC Power on Outlet
?
No
Connect Power
Yes
Is
Power Switch
on?
No
Switch ON
Yes
Open the Cover of
Power Adaptor
Is
Fuse in Adaptor
Burned-out?
YES
Replace the fuse.
No
“Main Control Board” , “Panel Board”
or “Power Adaptor” is Out of Order
SATO /ARGOX Technical Documentation
Turn on Switch to Check if Problem being Fixe
Confidential Information
22
CX400 Technical Manual (Rev 1.00)
< II. Media Error >
LED Indication
ERROR LED is synchronously
blinking with POWER LED
Status
Media Error
1.
2.
3.
4.
Cause
Media out (No Media detected )
Media Jammed
Special Media. Need Calibration
Media Sensor might be out of order
Turn Off Printer
Out ofofmedia
?
Out
Media?
Load a new
media roll
Yes
No
Yes
Mediastuck
stuck
Media
or jammed
Jammed
Remove the Stuck
Or Jammed Media
No
Media Loaded
Correctly?
No
Reload Media
Yes
Is
Media Put Along the
Bound of Paper Guide
?
Yes
Using
Continuous
Media?
Yes
Disable Index
Detection
Yes
No
No
Put the Media Along the
Bound of Paper Guide
Calibrate Media Sensor
Still
Media Error?
No
Yes
1.
2.
Media Sensor might be Out of Order
Check the Mechanism regarding
Media Detection
SATO /ARGOX Technical Documentation
Turn On then Print
Print again
Confidential Information
23
CX400 Technical Manual (Rev 1.00)
< III. Ribbon Error >
LED Indication
ERROR LED is blinking in the
opposite way with POWER LED
Status
Ribbon Error
1.
2.
3.
4.
Cause
Ribbon out
Ribbon Stuck
Special Ribbon & Media. Need Calibration.
Ribbon Sensor might be out of order
Turn Off Printer
Out of Ribbon
?
Yes
Load a New Ribbon
No
Ribbon Stuck
or Jammed
?
Yes
Remove the stuck
or Jammed Ribbon
No
Calibrate Ribbon Sensor
Still
Ribbon Error
?
No
Yes
1. Ribbon Sensor might be Out of
Order
2. Check the Mechanism Regarding
Ribbon Detection
SATO /ARGOX Technical Documentation
Turn on Printer
Then Print again
Confidential Information
24
CX400 Technical Manual (Rev 1.00)
< III.. RS232 Error >
LED Signal
“POWER LED ON” and “ERROR
LED blinking at 50 % duty cycle “
Status
RS232 Error
1.
Cause
The Settings for RS232 between Host & Printer
are not consistent
Switch power off
Is baud rate
consistent in PC
& Printer?
No
Set the same Baud
Rate in PC & Printer
No
Set the same Data
? Printer
Bit in PC &
Yes
Is Data Bit
consistent in PC
& Printer?
Yes
Is Parity bit
consistent in PC
& Printer?
No
Set the same Parity
? Printer
Bit in PC &
Switch power on
then print
SATO /ARGOX Technical Documentation
Confidential Information
25
CX400 Technical Manual (Rev 1.00)
8.3 Clearance
CAUTION
The printer electronics are susceptible to static discharge. Wear
an anti-static wrist and attach it to the printer chassis
There are some components need to be clean-up occasionally :
Thermal print head
The debris of thermal paper or ribbon may be remained on the print head. This will cause the printed image
(Characters, Bar Code … )to appear light or faded . To clean the print head, wet a soft paper towel with “isopropyl
rubbing alcohol” and use the damp towel to rub off the dirt on the print head surface .
It is recommended to clean “Print Head” before a new ribbon being loaded.
Platen roller :
If the roller becomes contaminated with grit, label adhesive, or ink, the printing quality may be adversely affected. To
clean the roller , using a clean cloth and alcohol, wipe off any accumulated debris .
Note : Switch off the power before cleaning !
SATO /ARGOX Technical Documentation
Confidential Information
26
CX400 Technical Manual (Rev 1.00)
8.4 Replacement
8.4.1 Printing Head( TPH ) Replacement
CAUTION
The printer electronics are susceptible to static discharge. Wear
an anti-static wrist and attach it to the printer chassis
1.
2.
3.
Turn Off Printer
Push “Print Head module” and pull it down as the 2 arrows shown in Fig. 9.1 to release “Print Head
module” from “Printer Chassis”(30).
Loose the 4 screws( C ) to take out Print Head from “Print Head Module “(12 ,13).
Figure 8.1
SATO /ARGOX Technical Documentation
Confidential Information
27
CX400 Technical Manual (Rev 1.00)
4.
5.
6.
7.
Unplug the 2 Print Head cables from the connectors on Print Head to take off the old Print Head.
Plug the 2 Print Head cable to the new Print Head.
Screw the new Print Head on “Print Head module”(12,13) .
Put back new “Print Head module” on “Printer Chassis”(30) with the same way which you released it from “Printer Chassis”
Figure 8.2
8.4.2 Main-Board Replacement
1.
2.
Turn off Printer
Loose the 2 screws( B ) to take off “Peeler Cover”(75).
Figure 8.3
SATO /ARGOX Technical Documentation
Confidential Information
28
CX400 Technical Manual (Rev 1.00)
3.
4.
5.
6.
Loose 2 screws( I ) on Printer Bottom( 39 ).
Pull out the front side of “Middle Cover“ (96), then remove it from “Printer Bottom” ( 39 ).
Use a proper screw driver (I type, as sharp as possible ) to loose “Power Switch” which is locked on “Middle Cover”(96).
Unplug “Power Switch” from “Power Cords” then take out “Middle Cover” (96 ).
Figure 8.4
SATO /ARGOX Technical Documentation
Confidential Information
29
CX400 Technical Manual (Rev 1.00)
7.
8.
9.
10.
11.
12.
13.
14.
15.
16.
17.
18.
Loose 4 screws ( E ).
Unplug all the connectors which connected on Main Board . Then take out the “Printer Chassis” ( 30 ) .
Loose those 4 screws ( B ) which fixed Main-Board (80) on Bottom ( 39 ). Then take out the Bad Main-Board.
Put the new main on Bottom(39). Then Screw up those 4 screws ( B ) on Printer Bottom ( 39).
Plug the female connectors, which attached on “P rinter Chassis”( 30 ) with cables, into the corresponding male connectors
( Its color & Pin Count are identical with the female connector ) on Main Board.
Put “Printer Chassis”(30) on Bottom(39).
Screw up 4 screws (E ) to fix “Printer Chassis” (30 ) on Bottom(39).
Let the 2 Power Cords go through the switch hole on “Middle Cover”(96), then plug “Power Cord” to Power Switch.
Pull the front side of “middle cover ” to put it back on “Bottom” (39).
Screw up the 2 screws(I) on Printer Bottom .
Screw up the 2 screws( B ) to install “Peeler Cover”(75) on “Printer Chassis”(30).
Press and click “Power Switch” into the switch hole on “Middle Cover”(96).
Figure 8.5
SATO /ARGOX Technical Documentation
Confidential Information
30
CX400 Technical Manual (Rev 1.00)
8.4.3 Roller Replacement
1.
2.
3.
4.
Turn off Printer
Loose the 2 screws( B ) to take off “Peeler Cover”(75).
Loose the screw ( E) which screwed “ANG-PEELER” (28) to “Printer Chassis”(30).
Push “ANG-PEELER”(28) to right then take it out.
Fig. 8.6
SATO /ARGOX Technical Documentation
Confidential Information
31
CX400 Technical Manual (Rev 1.00)
5.
6.
7.
8.
Loose 2 screws( I ) on ‘Printer Bottom’( 39 ).
Pull out the front side of “Middle Cover“ (96), then remove it from “Printer Bottom” ( 39 ).
Use a proper screw driver ( I type, as sharp as possible ) to loose “Power Switch” which is locked on “Middle Cover”(96).
Unplug “Power Switch” from “Power Cords” then take out “Middle Cover” (96 ).
Fig. 8.7
SATO /ARGOX Technical Documentation
Confidential Information
32
CX400 Technical Manual (Rev 1.00)
9.
10.
11.
12.
13.
14.
15.
16.
17.
18.
19.
20.
21.
22.
23.
24.
Take out “ E Ring ( X )” to remove Gear (67) .
Loose Screw ( B ).
Take out the 2 “BUSH -ROOLER” ( 26 ) which ringed the ROLLER (27 ) shaft .
Move ROLLER ( 27 ) to the most left side then pull it out. Then take out the BUSH-ROLLER (26) which is adhered to the
Right Shaft of ROLLER(27).
Put the BUSH -ROLLER, which take out from step 11,into the right shaft ( Shorter one ) of new ROLLER.
Put the Left Shaft of new ROLLER (27)( Longer shaft ) into the Roller Hole at the left side of “Printer Chassis”, then push
the right Shaft( Shorter Shaft ) into the Roller Hole at the right side of “Printer Chassis”(30).
Put 2 BUSH-ROLLER (26 ) into the left Shaft of New ROLLER ( 27 )
Fix New “ROLLER”(27) in “Printer Chassis”(30) with Screw (B ).
Put back Gear ( 67 ) then fix it with “E ring “.
Let the 2 Power Cords go through the switch hole on “Middle Cover”(96), then plug “Power Cord” to “Power Switch”.
Pull the front side of “ middle cover” to put it back on “Bottom” (39).
Screw up 2 screws(I) on Printer Bottom.
Push righ “ANG-PEELER”(28) to put it into “Printer Chassis”(30).
Fix “ANG-PEELER” to “Printer Chassis”(30) with “SCREW (E )” .
Screw up 2 screws( B ) to fix “Peeler Cover”(75) on “Printer Chassis”(30).
Press and click “Power Switch” into the switch hole on “Middle Cover”(96).
Fig. 8.8
SATO /ARGOX Technical Documentation
Confidential Information
33
CX400 Technical Manual (Rev 1.00)
9. OPERATIONAL THEOREM
9.1 System block diagram
Panel Board
Ribbon Sensor
IEEE 1284
SPP
Main Board
Dispensor sensor
Thermal Print Head
RS232
( 9 pin )
Cutter
Media sensor
Roller
Stepping Motor
Printer Head
Open Sensor
External
ACAdaptor
Figure 9.1
CX400 System Block Diagram
The major modules in CX400 are,
Main board :
A four layers PCBA ,which consists of a micro-controller ,Flash ROM ,EEPROM , DRAM …… components
required for the printing functions.
Panel board :
A 2 layers PCBA consists of one push button switches and two LED indicators.
Ribbon sensor :
A 2 layer PCBA , consists of a reflective type object sensor designate for ribbon detection.
Media sensor
A 2 layer PCBA, which consists of a reflective and see-through object sensor designates for media/gap detection.
SATO /ARGOX Technical Documentation
Confidential Information
34
CX400 Technical Manual (Rev 1.00)
Thermal print head (TPH)
This Print Head is consisted of 864 heat elements( 800 Ohm for each element) in the printing width of 4 inches.
Stepping Motor :
The motor for feeding label and ribbon is a stepping motor with Bipolar winding & PM type. Its rotary angles
in one full step is 7.5 degree.
Dispenser Sensor (option)
An two layer PCBA , consist of a reflective type object sensor designate to detect the printed label is removed or still
exist .
Cutter assembly (option)
Consisting of a DC motor, relay ,gears and a rotary cutter . This cutter is able to be applied in cutting the printed
label automatically.
SATO /ARGOX Technical Documentation
Confidential Information
35
CX400 Technical Manual (Rev 1.00)
9.2 Block Diagram of Main Control Board
CS7
Input Port
74374 ( U13)
Flash ROM
( U8,U 9 )
SYSTEM
SLOT
( JP11 )
BUS
BUS
EXPANSION
CPU (SH7034 ,U6 )
DRAM
( U10 )
SYSTEM
RAS,CAS
Data
IEEE1284 SPP( P1 )
PE/Fault
CS4
D15~8
74374 (U11 )
D7~0
Cutter Baby
Board (JP29)
Output
Port-High
Driver,
3717
(U16,17 )
Output
Port -Low
74374
(U15 )
MOTOR
( JP17)
LED ( JP16 )
Paper Sensor Control ( JP2,JP15)
24 V Relay (RY2)
RS232
RS232 T
Tranceiver
SP232ACT
? ( U2 )
(P2)
Feed Key ( JP16)
EEPROM
( U7 )
Booter/
Normal
( JP5 )
Paper Sensor (JP15)
Ribbon Sensor (JP14 )
Dispensor Sensor (JP12 )
Config. Jumper
( JP7 )
Cutter Sensor ( JP13 )
Motor T.M. ( JP4 )
Strobe
Data/CLK
TPH ( JP18 )
Figure 9.2
The major Components in Main Controller are:
Micro-controller (U6)
SH7034 ( External 16 Bit & Internal 32 Bit in Data Bus) is based on Hitachi SH1 as its CPU Kernel and
integrated with lots of on-chip peripherals which are required to build a system like this Label Printer. These rich
on-chip Peripherals, Timer, DMA controller, Interrupt Controller, DRAM Controller, A/D convert , Serial
communication interface, Pattern generator and I/O ports make the Electrical H/W for this printer be compact and
high performance.
SATO /ARGOX Technical Documentation
Confidential Information
36
CX400 Technical Manual (Rev 1.00)
FLASH memory (U8,U9)
Two ”one M bytes FLASH ROM” ( SMD Type, Total size is 1 M x 16 bit )are put on the main board to store the
firmware, character and bar code fonts.
DRAM (U10)
An one M word EDO DRAM( 1 M x16 bits) is put on the Main Board. Normally the volatile data, like working
buffers and Parameters, are allocated here. The controlling signals for EDO DRAM are provided by the DRAM
controller built in SH-7034.
EEPROM (U7)
EEPROM is the memory device to save the parameters, which could be set by user and should be permanently
retained. The total size of EEPROM on board is 1024 bit ( 128Byte ).
RS232 Tranceiver (U4)
To convert the serial port signal to/from micro-controller to RS232 voltage level .
CENTRONICS interface (U13)
The data come from the Host (LPT Port On PC) are latched in U13(74374) then read out by the Micro-controller.
Output Ports (U11,15)
These output ports in U11& U15 are for controlling Motor, LED, Media Sensor, 24 V Relay and PE & Fault of
Centronic.
DC/DC converter (U20,L1,D2)
A regulator to convert 24 V DC to 5 V DC as the Vcc source for the most of components on main board.
Motor Driver (U16,17 )
These 2 ICs on U16,17 provide the mechanism to control and drive a bipolar stepping motor with chopper
control of the phase current. Stepping Motor can be smoothly and properly driven forward/backward rotation by
controlling “the Current levels & Driving Phase” in these 2 Driver IC.
Relay (RY2)
In order to prevent the Print Head from being damaged by the unknown state in Strobe, Data-In, Clock. … of Print
Head, when the printer is switched on , 24 V DC should be definitely disconnected from Print Head. RY2 provides
the mechanism to disconnect “24V” with Print Head during the transient period while power being on .
For printing. image, 24 V must be applied to Print Head by controlling this Relay.
Extension slot (JP11)
This slot is designate for the connection of all the optional extension modules.
Config. Jumper ( JP 7 )
System Configuration Jumper
Booter/Normal (JP5 )
If JP5 being set at “Normal” position, the program on the FLASH ROM(U8,U9) will be executed after power reset. On the
other hand, the Program on Expansion Board will be executed firstly after power on when JP5 being set at “BOOTER” position.
In case the program & data on Flash ROM (U8,U9 ) are corrupted completely( even the data in boot sector are corrupted too) ,
the program on expansion board can be executed by CPU to upgrade a new program into on-board Flash ROM while JP5
being “BOOTER” position.
Normally JP5should be set at NORMAL position to run the program fetched from On-Board Flash ROM.
SATO /ARGOX Technical Documentation
Confidential Information
37
CX400 Technical Manual (Rev 1.00)
9.3 Schematic of Main Control Board
SATO /ARGOX Technical Documentation
Confidential Information
38
CX400 Technical Manual (Rev 1.00)
C9
3
R1 100R
C11
0.1uF
U5
+5V
VCC
IN
GND
OUT
15pF
47K
-CS7
+5V
74245
18V
112
-IRQ5
R9 1K
87
88
89
90
+24V
MEDIA
RIBBON
TM
R11 1K
R10 1K
R7
C13 C12
1K
R8
3
12
22
31
40
52
61
72
96
106
0.1uF
0.1uF
+5V
5
3
6
1.0uF
C20
1
3
ON_24V
CINTR
TCLKA
-KCLK
CUT_P
LT1281_0
V+
C19
1.0 uF
C65
1.0 uF
KEY1
C48
0.1uF
1K
R15
1K
R90
1K
D11
D10
D9
D8
D12
D13
D14
D15
PEELER
-LWR
/RAS
R19
A1
A2
A3
A4
SDA
1
2
3
4
5
6
7
8
9
10
11
12
13
14
15
16
17
18
19
20
21
D8
D9
D10
D11
D12
D13
D14
D15
D0
D1
D2
D3
D4
D5
D6
D7
VCC
D0
D1
D2
D3
VCC
D4
D5
D6
D7
NC
NC
-LWR
-RD
NC
NC
A0
A1
A2
A3
VCC
4
-CS2
7
R31 220R
BD-CS0
+5V
/RESET
12
7
2200P
9
10
11
PR
4
CEXT
12
D
REXT/CEXT
A
B
CLR
Q
12
Q
74132
9
8
74LS74
5
Q
Q
CLK
CENAB
+STB
CK
A
-A
C38
R23
820pF
56K
D6
1N4148
U16
1
2
3
4
5
6
7
8
9
CBUSY
8
C39
WAIT
10
JP17
7432
A
-A
B
-B
U3B
4
6
IA1
PHA
1
2
3
4
5
6
+STB
5
0.015uF
MB
T
VMM
GND
GND
VCC
I1
Phase
E
MA
VMM
GND
GND
VR
C
I0
D5
16
15
14
13
12
11
10
9
R24
1N4148
R25
1K 0.5R
C40
3770A
820pF
IA0
+24V
HEADER 6
B
-B
R40
VSS
D15
D14
D13
D12
VSS
D11
D10
D9
D8
NC
-LCAS
-UCAS
-OE
A9
A8
A7
A6
A5
A4
VSS
42
41
40
39
38
37
36
35
34
33
32
31
30
29
28
27
26
25
24
23
22
+5V
1K
JP13
D4
D5
D6
D7
R77
R78
47K
47K
Y
X
CUTTER
CASL
CASH
+5V
2
4
6
8
10
12
14
16
18
20
JP24
1N4148
ULN2003
1
2 I1
3 I2
I3
4
5 I4
6 I5
7 I6
I7
LED1
LED2
ON_SEEX
LED3
ON_24V
SEE_EN
CT_SR
JP15
1
2
3
4
+5V
16
15
14
13
12
11
10
O1
O2
O3
O4
O5
O6
O7
R76
220R
R75
220R
ON_SEEX
+5V
1
2
3
4
5
6
+5V
JP21
1
2
3
4
5
6
7
8
9
PAPER SENSOR
R94
SEE_ENX ON_SEEX
5K
JP20
VCC
+24V
RY2
JP2S
+5V
JP1
1
2
3
4
5
6
7
8
9
10
11
12
13
14
15
16
17
18
KEYPAD 9
KEYPAD
1
3
5
7
9
11
13
15
17
19
DI
CLK
/LATCH
BEO
/STB1
/STB3
/CON4
+24VS
CT_SG
1
6
2
7
3
8
4
9
5
V+
RXD
RTS
TXD
CTS
JP18
HEADER 6
P2
JP2
R93
820pF
+24VS
R89 220R
0R
R87
1
2
1K 0.5R
C43
1
2
3
4
5
6
+5V
IR LED
R28
R27
1N4148
3770A
JP16
220R
D7
16
15
14
13
12
11
10
9
IB0
R-Platen Sensor
KEY1
KEY2
KEY3
+24VS
0R
E
MA
VMM
GND
GND
VR
C
I0
JP10
Baby_cutter
220R
IB1
PHB
MB
T
VMM
GND
GND
VCC
I1
Phase
1
2
L-Platen Sensor
Y
CT_SG
1
2
3
4
5
6
7
8
0.015uF
JP23
1
2
U18
RIBBON SENSOR
56K
C42
1
3
5
7
9
11
13
15
17
19
/RD
A9
A8
A7
A6
A5
A10
3.3K
R26
820pF
JP29
1
2
3
4
X
R35
C41
D8
CUT_P
+5V
D0
D1
D2
D3
U17
SEE_ENX
R41 R43 R45 R47
R42 R44 R46 R48
+5V
2
4
6
8
10
12
14
16
18
20
/STB1
/STB2
/CON3
/CON5
TM
+24VS
GND
+5V
TM
DO
/STB2
/STB1
CLK
/LATCH
/STB3
DI
HEADER 18
HEADER 10X2
3.3KX8
P1
EX-CS
BD-CS0
R38
1
2
3
4
220R
0R
JP11
1
2
3
4
2200uF/35V
2200uF/35V
C1
C3
2200uF/35V
+24V
C2
C4
2200uF/35V
C5
ZD2
47V/1W
2200uF/35V
P_GND
U20
L1
Vin
SW
-ON
FB
GND
5
U14B
74AHCT123
/RD
27
46
47
+5V
AC SWITCH
TCLKA
CENAB
7432
0R
JP22
1
13
U12C
37
PEELER SENSOR
SW1
TXD0
11
11
13
VCC
3.3 K
8A/600V
12
JP12
+24V
+
SCK0
RS232
19V AC
-
U3D
CD0
CD1
CD2
CD3
CD4
CD5
CD6
CD7
IR LED
D1
B2
3
4
7
8
13
14
17
18
1
11
1
2
R37
1
2
3
4
T1
47K
4.7K
74HC374
EX-CS
R39
B1
D1
D2
D3
D4
D5
D6
D7
D8
OC
CK
-CS7
1
2
3
4
R33
3.3K
JP27
AC JACK
Q1
Q2
Q3
Q4
Q5
Q6
Q7
Q8
6
74LS74
R29
U19B
6
Q
5
+5V
+5V
+5V
Q
CLK
U12D
JP14
RIBBON
PEELER
JP3
2
5
6
9
12
15
16
19
12
MEDIA
+5V
+5V
1
74AHCT123
11
29
31
33
35
38
40
42
44
D
4
Q
R82
7432
+5V
R32
4
Q
10
R81
R34
3
8
6
C67
7
1
2
3
WC
A0
A1
A2
47K
-CS0
A
B
CLR
-IRQ5
27
46
47
/STROBE
U7
R92
2
8
3
CK
13
74132
R36
9
REXT/CEXT
5
DRAM 1MX16
1K
5
U3C
2.7K
VSS
/WE
VSS
/CE
#BYTE
/OE
29F800
X24C02
6
2
15
9
12
+5V
MODE
U14A
CEXT
CL
AVSS
VREF
1K
14
2200P
1
2
3
U13
D0
D1
D2
D3
D4
D5
D6
D7
CINTR
CBUSY
U19A
C66
6.8K
KINTR
+5V
SCL
+5V
R80
1
-LWR
37
PHA
PHB
IA1
IA0
LED1
LED2
ON_SEEX
SEE_EN
74HC374
4
-CS4
VSS
VSS
#BYTE
2
5
6
9
12
15
16
19
Q1
Q2
Q3
Q4
Q5
Q6
Q7
Q8
10
VCC
/RESET
D1
D2
D3
D4
D5
D6
D7
D8
OC
CK
U12B
JP4
C49
0.1uF
3
4
7
8
13
14
17
18
1
11
74HC374
7432
+5V
U10
47K
5
JP5
IB0
IB1
CT_SR
D0
D1
D2
D3
D4
D5
D6
D7
PR
73
74
91
CASL
CASH
+5V
6
SJP2
LED3
-PE
/FAULT
+5V
2.7K
+5V
R68
2
5
6
9
12
15
16
19
74132
47K
C21
47K
3
2
Q1
Q2
Q3
Q4
Q5
Q6
Q7
Q8
R21 1K
SJP2
SJP1
R74
1
U15
D1
D2
D3
D4
D5
D6
D7
D8
OC
CK
29F800
A-1
A0
A1
A2
A3
A4
A5
A6
A7
A8
A9
A10
A11
A12
A13
A14
A15
A16
A17
A18
-LWR
R22
R18
0.1uF
R12
C22
0.1uF
C68
R13
47K
R91
220K
0.1uF
22K
R67
R14
U12A
-CS4
-CS2
ETYPE
6.8K
KEY3
47K
R66
SJP1
/RAS
0.1uF
R17
45
25
24
23
22
21
20
19
18
8
7
6
5
4
3
2
1
48
17
16
11
26
28
-CS0
R20 1K
KEY2
220R
47K 47K 47K
C24
JP7
R65
R71
1.0uF
C18
1.0uF
R73 R30
48
59 /RD
54 /RAS
58 -HWR
57 -LWR
53 -CS4
50 -CS2
95
49
51
CASH
CASL
-CS0
-RD
-CS5
-HWR
-LWR
-CS4
-CS2
AN7
CASH
CASL
VSS
VSS
VSS
VSS
VSS
VSS
VSS
VSS
VSS
VSS
A1
A2
A3
A4
A5
A6
A7
A8
A9
A10
A11
A12
A13
A14
A15
A16
A17
A18
A19
A20
+5V
69
68
67
66
65
64
63
60
62
92
93
94
5
6
T5
1
15
T4
4
11
12
10
9
2
4
T10
R10
T2O
R2O
VSS
C17
T1I
R1I
T2I
R2I
2
14
13
7
8
TXD
RXD
RTS
CTS
VCC
16
U4
T3
TXD1
RXD1
PB14
PB15
0.1uF
10uF
0.1uF
T2
AN0
AN1
AN2
AN3
110
109
1
2
C15 C14 C16
22K
VREF
IRQ5
8
R6 2.7K
D0
D1
D2
D3
D4
D5
D6
D7
D8
D9
D10
D11
D12
D13
D14
D15
SH7034
U9
4 D0
5 D1
6 D2
7 D3
8 D4
9 D5
10 D6
11 D7
13 D8
14 D9
16 D10
17 D11
18 D12
19 D13
20 D14
21 D15
VCC
ZD1
-CS6
-CS7
VCC
VCC
VCC
VCC
VCC
VCC
VCC
VCC
-HWR
3
4
7
8
13
14
17
18
1
11
13
55
56
77
15
43
70
83
84
75
99
/WE
/CE
/OE
D15
D14
D13
D12
D11
D10
D9
D8
220R
-CS6
R79
BD-CS0
D0
D1
D2
D3
D4
D5
D6
D7
1K
DO
WAIT
CK
+5V
TXD0
SCK0
RXD0
GND
+5V
TXD0 108
SCK0 111
107
C23
20
A1
A2
A3
A4
A5
A6
A7
A8
GND
VCC G
DIR
0.1uF
BUSY
/ACK
2
3
4
5
6
7
8
9
10
19
1
B1
B2
B3
B4
B5
B6
B7
B8
11
26
28
29
31
33
35
38
40
42
44
R64
MODE
18
17
16
15
14
13
12
11
DI
CLK
NMI
MD2
MD1
MD0
D0
D1
D2
D3
D4
D5
D6
D7
R49
47K
47K
A0
A1
A2
A3
A4
A5
A6
A7
A8
A9
A10
A11
A12
A13
A14
A15
A16
A17
A18
A19
A20
A21
U11
A-1
A0
A1
A2
A3
A4
A5
A6
A7
A8
A9
A10
A11
A12
A13
A14
A15
A16
A17
A18
9
R4
74245
U2
76
82
81
80
23
24
25
26
27
28
29
30
32
33
34
35
36
37
38
39
41
42
44
45
46
47
A0
A1
A2
A3
A4
A5
A6
A7
A8
A9
A10
A11
A12
A13
A14
A15
A16
A17
A18
A19
A20
A21
PA15
-KCLK
IRQ1
IRQ0
PA11
PA10
PA9
PA7
PA8
AN4
AN5
AN6
+5V
R3
TP0
TP1
TP2
TP3
TP4
TP5
TP6
PB7
X1
X2
97
98
100
101
102
103
104
105
R16
+5V
A1
A2
A3
A4
A5
A6
A7
A8
GND
VCC G
DIR
22K
20
2
3
4
5
6
7
8
9
10
19
1
B1
B2
B3
B4
B5
B6
B7
B8
AVCC
VREF
RES
U6
U1
18
17
16
15
14
13
12
11
/STB1
/STB2
/STB3
/CON3
/CON4
/CON5
BEO
/LATCH
85
86
79
VREF
45
25
24
23
22
21
20
19
18
8
7
6
5
4
3
2
1
48
17
16
CL
U8
A1
A2
A3
A4
A5
A6
A7
A8
A9
A10
A11
A12
A13
A14
A15
A16
A17
A18
A19
A20
20MHZ
591C
VCC
1K
1
GND
C7
0.1uF
8
4
C8
10uF
15pF
X1
R2
+5V
C10
2
2
4
+5V
D2
470uF
1N5819
C6
470uF
-LWR
A20
A18
A16
A14
A12
A10
A8
A6
A4
A2
A0
D6
D4
D2
A21
D0
ETYPE
1
3
5
7
9
11
13
15
17
19
21
23
25
27
29
31
33
35
37
39
2
4
6
8
10
12
14
16
18
20
22
24
26
28
30
32
34
36
38
40
/RD
A19
A17
A15
A13
A11
A9
A7
A5
A3
A1
D7
D5
D3
D1
/EX-CS
/STROBE
CD0
CD1
CD2
CD3
CD4
CD5
CD6
CD7
/ACK
BUSY
PE
5.6
5.6
5.6
5.6
3
33R
5.6
5.6
5.6
5.6
5.6
5.6
5.6
JP19
D0
D1
D2
D3
D4
D5
D6
D7
A1
A2
-RD
-LWR
-CS6
KINTR
+5V
CENTRONICS
5.6
C26 C27 C28
C30 C31 C32 C33 C34 C35 C36 C37 C44
6.8KX9
ZD22
5.6
2200pF
2200pF
2200pF
C29
47pFX8
33R
Confidential Information 39
470pF
1
3
5
7
9
11
13
15
17
19
21
23
25
27
29
2
4
6
8
10
12
14
16
18
20
22
24
26
28
30
-KCLK
HEADER 15X2
2200pF R72
/FAULT
LM2575-5
SATO /ARGOX Technical Documentation
33R
33R
R63
19
20
21
22
23
24
25
26
27
28
29
30
31
32
33
34
35
36
ZD10 ZD11 ZD12 ZD13 ZD14 ZD15 ZD16 ZD17 ZD18 ZD19 ZD20 ZD21
External Slot
ROCKET SWITCH 250V/10A
R62
R61
1
2
3
4
5
6
7
8
9
10
11
12
13
14
15
16
17
18
R50 R53 R56 R58 R60
R51 R54 R57 R59
Size
Document Number
A200 MAIN BOARD 48-A2001-001
Date:
Tuesday, October 22, 2002
Rev
0.2
Sheet
1
of
1
CX400 Technical Manual (Rev 1.00)
9.4 Schematic of Panel Board
HEADER 6
1
2
3
4
5
6
S1
KEY1
power
+5V
GND
error
J1
9.5 Schematic of Various Sensor Boards
The circuit of all the sensor board (Media sensor board, Ribbon sensor board and Dispensor board ) are identical but only
being different in lay out
JP1
OC1
1
3
2
4
1
2
3
4
R359F
48-A2003-001
Paper Sensor
JP1
OC1
1
3
2
4
1
2
3
4
R359F
48-A2005-001
Dispenser
Sensor
JP1
OC1
1
3
2
4
1
2
3
4
R359F
48-A2004-001
Ribbon Sensor
SATO /ARGOX Technical Documentation
Confidential Information 40
CX400 Technical Manual (Rev 1.00)
9.6 Wiring Diagram
Motor Thermal
Sensor
Panel Board
MOTOR
JP16
JP3
AC Adaptor
( 19 VAC )
JP17
Main Board
JP15
JP2-1
Media sensor IR LED
Board
JP14
JP4
JP12
JP18
Thermal Print Head
JP24
Print Head
Open Sensor
JP13
Ribbon sensor Connect sensor
Board
Board(JP1)
Dispensor sensor
Board
SATO /ARGOX Technical Documentation
Cutter Module
Confidential Information 41
CX400 Technical Manual (Rev 1.00)
9.7 Exploded Drawing
SATO/ARGOX Technical Documentation
Confidential Information
42
CX400 Technical Manual (Rev 1.00)
SATO /ARGOX Technical Documentation
Confidential Information 44
CX400 Technical Manual (Rev 1.00)
10. “Major” & “Recommended Spare” Parts
Major Parts
part number
55-A2001-001
55-A2002-001
55-A2003-001
55-A2004-001
71-07034-165
23.80013.001
50.A2002.001
50-A2003.001
50-A2002-001
98-21402-101
98-21401-051
98-20402-103
98-A2002-001
22-80024-002
39-A2001-001
39-A2003-001
39-A2004-001
39-A2002-001
39-A2006-001
35.A2011.001
description
CX400 Main board
CX400 Panel board
CX400 Paper sensor board
CX400 Ribbon sensor board
Hitachi HD6437034F20,20MHz
Thermal print head
Set of CX400 IR LED Cable
Set of Motor Thermister for cx400
Set of Platen Switch Cable for CX400
Power Adaptor ,110 V
Power Adaptor, 230 V ,CE
Power Adaptor for UK
Power Adaptor,230 V , TUV
Stepping motor, 7.5 degree
TOP COVER
BOTTOM
TOP COVER WINDOW
MID-COVER
CHASSIS
Roller
RECOMMENDED SPARE PA RTS:
part number
23.80013.001
47.A2001.001
35.A2011.001
description
200 DPI Thermal Print Head
Unwoven Fabric
Roller
SATO /ARGOX Technical Documentation
Confidential Information 45