1
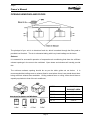
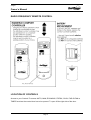
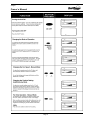
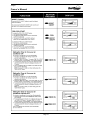
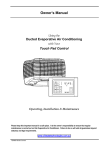
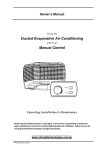
Owner Manual
Integra
Owner’s Manual
Table of Contents
General Information
3
Key Operational Points
4
Opening Windows and Doors
5
Radio Frequency Remote Control
6
Battery replacement
6
Operation Modes
8
Control Functions
9
Turning the Unit ON
Turning the) unit OFF
Changing the Mode of Operation
Changing Comfort Setting
Fan Only Operation
Cleaning the pads
Setting the Timer
Setting the Automatic Operating Periods
Automatic Operation
Overriding the Automatic Operation
Power Supply Interruption
11
Configuring your Comfort Control
11
Unit Maintenance
12
Problem Solving
14
Warranty Statement
15
Manufactured by:
ABN 13 001 418 042
26 Nylex Avenue, Salisbury, SA 5108. Phone (08) 8307 5100 Fax: (08) 82830401
In the interest of continued improvement, Bonaire reserves the right to alter specifications without notice. E.&O.E.
Page 2
Integra
Owner’s Manual
CONGRATULATIONS ON YOUR
We're delighted you've chosen a Bonaire Fresh Air Conditioner to cool your home. It is an air
conditioner we are very proud of. Designed and made in Australia by Climate Technologies,
an 100% Australian owned company, it embodies the latest advances in fresh air conditioning
technology in a stylish, compact cabinet. Your air conditioner includes the worId's first radio
frequency remote control allowing you to control your air conditioner without the need for
special wiring. This allows you the flexibility to move the comfort controller from room to room
to suit your needs. If you have more than one Bonaire Envirotech Series air conditioner it is
possible to operate all air conditioners from the one comfort controller.
COMFORT
Comfort is a combination of four major factors; air temperature, air quality and cleanliness, air
speed and humidity. Bonaire fresh air conditioning cools the air by a process of evaporation,
which is controlled by the humidity in the air, therefore your Bonaire will cool the air differently
every day of the year. Your Bonaire uses only 100% fresh outside air which is filtered, and
when cooling is also washed. You will immediately appreciate the benefit of this constant flow
of fresh air - with or without cooling. '(our Bonaire installer will have placed the outlets in such
a position that you will feel the air flow. These outlets are adjustable and you may wish to
change or redirect the air to suit yourself. There may be a few days per year when the
humidity is very high and the cooling effect of your Bonaire fresh air conditioner is reduced, on
these days experiment with the cooling, you may find it more comfortable to turn the cooling
off and leave the fan running.
INFORMATION
The information contained in the following pages has been prepared to ensure you enjoy
trouble free operation of your Bonaire Fresh Air Conditioner.
For additional sales assistance call your nearest Bonaire Branch on
131257
‘Due to Bonaire’s policy of continuous product improvement, design and technical
specifications are subject to change without notice.’
E.&O.E.
Page 3
Integra
Owner’s Manual
KEY OPERATIONAL POINTS
Normally during the first 10 days of operation resins are washed from new
filter material. A slight odour may be present during this period. Performance
of your Bonaire Air-conditioner will improve during this process.
1.
BUILDING VENTILATION: Always ensure that adequate windows and doors are open
(to allow hot stale air to be expelled from the building). See page (4).
2.
TURNING THE UNIT ON: Press the ON/OFF button. Your air conditioner will operate
on your previous settings. If your previous setting was cooling there may be a three
minute pre-cool delay.
3.
COOLING: Press the "COOL` button to switch on or off the cooling.
4.
BOOST ON/OFF: Press the "BOOST” button to go to high fan immediately. Press
again and the fan will return to the original setting.
5.
TURNING THE UNIT OFF: Press the "ON/OFF" button.
6.
COMFORT CONTROLLER LOCATION: Due to the construction of some buildings
there may be some locations within the building where the comfort controller operation
is not effective.
Page 4
Integra
Owner’s Manual
OPENING WINDOWS AND DOORS
The principal of your unit is to introduce fresh air, which is washed through the filter pads to
provided cool fresh air. The air is exhausted taking with it any heat loadings on the home.
Exhaust
It is essential for successful operation of evaporative air-conditioning that there be sufficient
exhaust openings in the area to be ventilated. Open doors and windows will usually provide
this.
The minimum exhaust opening should be as per the table guide set out below.
It is
recommended that ceiling vents or exhaust fans be used where there is any doubt about there
being sufficient exhaust area available. Ceiling exhaust fans or ceiling vents should have a
capacity equivalent to that of the air conditioner.
MODEL
MINIMUM
EXHAUST AREA
Page 5
VSS 50
0.85 m²
VSS 60
1.19 m²
VSM 65
1.48 m²
VSL 75
2.02 m²
Integra
Owner’s Manual
RADIO FREQUENCY REMOTE CONTROL
LOCATION OF CONTROLS
Access to your Controls To access AUTO, MAN, ECONOMY, FRESH, COOL, PAD CLEAN or
TIMER functions the control door has to be opened. To open lift the right side of the door.
Page 6
Integra
Owner’s Manual
RADIO FREQUENCY REMOTE CONTROL
Page 7
Integra
Owner’s Manual
OPERATION MODE - MANUAL, AUTO & ECONOMY
Your air conditioner can be operated in three different modes either manual, automatic or
economy.
MANUAL MODE
In this mode, you can control the tan and pump settings manually. To select the manual
operation press the "MANUAL/AUTO/ECO" button until 'MANUAL' is shown in the display. In
manual mode, you can select your desired comfort level by controlling fan speed (12
graduated bars-from LO SPEED to HI SPEED) and pump (FRESH or COOL). To select fan
speed press and hold the UP or DOWN button until your desired fan speed is reached. To
turn on the pump, press the "COOL" button until "COOL" is shown in the display. To turn off
the pump (fan only), press the "COOL" button until "FRESH is indicated.
AUTO MODE
In this mode, the air conditioner automatically controls the fan and pump settings. All you need
to set 'IS your desired comfort level. To select the automatic operation press the
"MANUAL/AUTO/ECO" button until "AUTO" is shown in the display. In auto mode you can
select your desired comfort level. (12 graduated bars - from LO TEMP to Hi TEMP). To adjust
the desired comfort level press and hold the UP or DOWN button until your desired comfort
level is reached.
ECONOMY MODE
As per Auto mode but uses less power. To select the automatic economy operation press the
"MANUAL/AUTO/ECO" button until "AUTO" and "ECONOMY" are shown in the display. In
economy mode, you can select your desired comfort level by pressing the UP or DOWN
button.
NOTE: There may be a short delay before the fan and the pump start in AUTO or ECONOMY
mode.
Page 8
Integra
Owner’s Manual
Page 9
Integra
Owner’s Manual
Page 10
Integra
Owner’s Manual
Power Supply Interruption
•
The unit will not operate if power supply is interrupted (due to supply failure). In such a
case it is possible that the display will still indicate the air conditioner is operating.
•
When power is restored the air conditioner will be in the OFF mode.
•
To regain full control of your air conditioner press any button on the hand held Comfort
Controller. Your air conditioner will commence operation on the settings indicated on the
display
CONFIGURING YOUR COMFORT CONTROL
The "pre-cool start" feature has to be configured before you operate your air conditioner. This
feature may never need to be altered if you are happy with the factory settings.
PRE-COOL STARTS
Your Comfort Controller is supplied with "pre-cool start" disabled. The "pre-cool start" features
ensures the filter pads are wet prior to starting the fan. This means that after starting your air
conditioner there may be a delay of up to 3 minutes before the fan starts. During a "pre-cool
start" cycle the word "PRE-COOL" flash.
•
In manual or economy mode operation, if you have recently run your air conditioner on
cooling or you start your air conditioner on "FRESH" there will not be a "pre-cool start"
cycle.
•
In automatic mode operation, if you start your air conditioner on "COOL" or "FRESH",
there will be a "pre-cool start" cycle.
To enable the "PRE-COOL START feature:
1. Turn on the comfort controller
2. Simultaneously hold down the COOL and PAD CLEAN buttons for 5 seconds
3. The words "PRE-COOL" and START will flash when you have enabled "PRE-COOL
START".
To disable the "PRE-COOL START feature:
turn on the comfort controller simultaneously hold down the COOL and PAD CLEAN buttons
for 5 seconds The words "PRE-COOL" and "STOP" will flash when you have disabled
"PRE-COOL START
Page 11
Integra
Owner’s Manual
UNIT MAINTENANCE
Warning: Before commencing any maintenance work on your unit, isolate the
power at the supply (Fuse Box).
Note:
It is essential that your evaporative air conditioner is maintained in
accordance with this manual. Failure to do so will effect the life of the product
and reduce the level of efficiency.
Filter Pads
Visually check CELDEK pads for damage or blockage. Hose down pads from both
sides to remove any build up of salts, dust and pollen. In dusty areas more regular
cleaning is recommended. Check the water distributor, making sure it is clear and
free from blockage. Failure to do so may lead to uneven water distribution and
therefore less efficient operation.
Water Tank
It is important to keep the water tank clean and free from sediment and algae
growth. To clean the tank, use a soft brush or similar. Wipe all surfaces in the tank
while it is full of water (DO NOT FORGET THE PUMP STRAINER). Turn off the
water inlet to the unit (an Isolation Valve should be fitted to the water inlet before the
Float Valve). Drain the tank by removing the 40mm standpipe. It may be necessary
to repeat this procedure if the tank is very dirty.
SAFETY: Wet roofs are dangerous – Take Care When Draining Tank.
Water Level / Float Valve
The water level should be set at nominal 65-70mm from the top of the overflow
before filter pads are saturated. After run off from operating filters the level from the
top of the overflow fitting should be 25 – 30mm. The float valve is a mechanical type
and is factory set. If it requires adjustment keep bends tight. If the valve is leaking
the seal may require cleaning or replacing. Remove the split pin and then float arm.
Remove piston and clean or turn seal. Flush system and replace piston, float arm
and split pin.
Note:
Water supply line to float valve must be flushed before connecting.
Note:
Some discharge from the overflow may be experienced after shut
down due to water draining back from the Celdek pads. This is normal.
Page 12
Integra
Owner’s Manual
Motor and Fan
Check that the fan spins freely and that there is no build up on the blades.
Electrical
No general maintenance is required to the electrical system.
A Qualified Electrician should only carry out electrical connections and maintenance.
Bleed Off
The bleed rate should be checked to ensure it is adequate and that there is no build
up of mineral deposits in or on your air conditioner. White deposits indicate high
mineral content and the Bleed Rate should be increased. If it is at maximum and the
deposits are still forming, then more regular maintenance is required.
Pump
Check the pump spins freely and that the strainer is clean.
Water Distribution
Check the water distribution system for blockage. Check the delivery tube for kinks
or holes. Check that the clamps are secure and in place.
Page 13
Integra
Owner’s Manual
PROBLEM SOLVING
PROBLEM
Unit fails to start
PROBABLE CAUSE
a Black – out
b Tripped Circuit Breaker
c Blown Fuse
d Electrical Fault
a
Pump Seized
b
Pump Burnt Out
Pump fails to
start
REMEDY
a Wait
b Reset
c Replace
d Call Bonaire Service
Agent
a Isolate power and then
take off top of pump and
try to free it. Some
lubricant may help.
b Call Bonaire Service
Agent
a Check adjustment or
replace seal
b Normal Operation
a
Float Valve Leaking
Water leaking
from overflow
b
Drain from Celdek Pads
Water Droplets
in air stream
a
b
c
a
Loose Delivery Tube
Break in tubing
Pump Delivers Excessive
Water to Pads
Inadequate Exhaust
a
b
a
b
Outside humidity high
Dirty Filters
Dry Filters
b
a
b
c
Dialflo not set correctly
c
a
Unit located near odour
source
a
a
b
c
Excessive
humidity
Inadequate
Cooling
Unpleasant
Odour
Rapid formation
of white
deposits on
pads
High Mineral Content
Check and tighten
Replace as necessary
Adjust the Dialflo to
reduce the flow
Provide more open area
to exhaust stale air
Turn pump off.
Clean
Check water delivery
system. Adjust if
necessary.
Adjust dialflo so that the
pads have even
saturation.
Remove source
Bleed off should be set
at maximum. More
regular maintenance
may be required.
THIS TROUBLE SHOOTING GUIDE IS A REFERENCE ONLY.
FOR SERVICE OR WARRANTY REQUIREMENTS PLEASE RING
131052
OR
YOUR NEAREST BONAIRE SERVICE PROVIDER
Page 14
Integra
Owner’s Manual
WARRANTY STATEMENT
Subject to the following conditions we provide, from the date of purchase,
the following warranty:
Any part found to be defective in workmanship or material within the period of warranty
will be replaced free of charge.
The structural warranty covers any structural components within the unit, which fail to
perform their intended function due to faulty manufacture or deterioration within the
warranty period.
CONDITIONS AND EXCLUSIONS
•
Travelling time and mileage are included within the metropolitan areas of capital cities
(those areas not on STD phone numbers) or within 25km of the retailer’s premises in
other cases. Customers in areas other than the above are responsible for any
travelling time and mileage required to carry out warranty repairs.
•
The product must have been installed in the manner prescribed by local statutory
regulations and to the manufacturer’s specifications by a qualified person.
•
Service within the terms of this warranty will be recognised where we are satisfied that
the appliance or part was supplied within the relevant time limits. Documents of
purchase and Dealer/Installer information will assist in this process.
•
A charge will be made for work or a service call where there is nothing wrong with the
appliance or where the defective operation of the appliance is due to failure of
electricity or water supply, or where defects are caused by neglect, incorrect
application, abuse or by accidental damage of the appliance, or by an unauthorised
person attempting to repair the appliance.
•
No responsibility will accepted for any loss or damage, direct or indirect, arising from
the incorrect installation or operation of the unit. This does not preclude you from your
statutory rights as a customer.
NOTE: In addition to this warrant, the Trade Practices Act and similar laws in each state
provide the owner, under certain circumstances, with minimum statutory rights in
relation to the product.
This warranty must be read subject to that legislation and nothing in this warranty has
the effect of excluding, restricting or modifying those rights.
WARRANTY ON RPLACEMENTS PARTS.
Parts replace under warranty are warranted for the balance of the original warranty
period.
PERIODS OF WARRANTY – YEARS
Unit Components
Cabinet Structure
RESIDENTIAL
Parts
Labour
COMMERCIAL
Parts
Labo
10
3
2
2
Cabinet Corrosion
25
3
2
2
All Electrical
3
3
1
1
All other components
3
3
1
1
Page 15
Integra
Owner’s Manual
Page 16