1
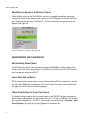
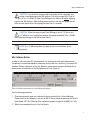
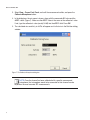
WHAT'S NEW / SOFTWARE INSTALLATION PROCEDURE
SIM® 3 V1.6.42
SIM 3 V1.6.42 Update Procedure ........................................................................ 2
SIM 3 Screen Features ........................................................................................ 4
Set Graph Background to White ...................................................................4
On-Screen Horizontal Zoom Buttons .............................................................5
Keyboard Control of Graph Cursor.................................................................5
Safe Status on Speakers & Switchers Panels ................................................6
Measurement and Calibration ............................................................................. 6
Mic Sensitivity Default Value ...........................................................................6
Linear Volts Unit on Meters ............................................................................6
Higher Peak Voltage for Front-Panel Inputs ...................................................6
Mic Calibrate Button .......................................................................................7
DataGroup Features ............................................................................................ 9
Edit Notes of Previously Stored DataGroups .................................................9
Select Multiple DataGroups for Deletion ........................................................9
Adjacent DataGroups............................................................................9
Non-Adjacent DataGroups....................................................................9
New International Date Format .......................................................................9
Graphics and Printing ........................................................................................ 10
Exporting Screen Shots ................................................................................10
Printing from the SIM 3 DataViewer..............................................................10
New Content in Help Menu ..........................................................................11
Significant Bug Fixes ......................................................................................... 11
SIM 3 v1.6.42: What's New
A number of new features have been added to the SIM® 3 software in version 1.6.42. In addition, some significant bug fixes have been implemented since version 1.6.0. This document
describes the new features. Use the following SIM 3 V1.6.42 Update Procedure to install this
update.
SIM 3 V1.6.42 ANALYZER UPDATE PROCEDURE
The following procedure is used to update the SIM 3 machine to Version 1.6.42 software. To
achieve a successful update, please follow all of the steps in order.
CAUTION: Do not attempt to copy or install any of the files on this CD-ROM to
your Windows PC. In addition, under no circumstances should this CD-ROM
be used to boot your Windows PC, as this may compromise both the PC’s operating
system and data files.
1. To begin the procedure, the machine must be off and no other CD must be in the
machine. To make sure that no other CD is present, either press the CD eject button on
the left side of the CD tray, or from the main SIM 3 operating window (on the display
monitor) select File > Eject CD. Note that if the machine is on when you are planning to
update, you can insert the update CD, shut down the machine, and then restart it to boot
from the CD; go to step 4 below to complete the procedure.
NOTE: To turn off the SIM 3 machine, select File > Shutdown (this is the
recommended method). Alternately, press and hold the on/off button on the
right-hand side of the front panel for approximately five seconds. The front-panel
LED’s will go off when the machine is off.
2. Slide the Version 1.6.42 Update CD approximately halfway into the slot above the CD
tray.
3. With the CD in place in the slot, turn the SIM 3 machine on by pressing and releasing the
on/off button, and then immediately push the CD the rest of the way into the slot. The CD
will load into the machine.
4. You will hear the CD spin, and after approximately 10 to 15 seconds the SIM 3 splash
screen will appear on the display monitor. This screen will be followed by a series of
messages as the data on the CD loads; ignore all of these messages. Soon a menu titled
“Install SIM” will appear.
2
SIM 3 v1.6.42: What's New
Figure 1. SIM 3 installation menu
5. Using the up and down arrow keys on the computer keyboard, select from the three
presented options; the selected option appears with a highlight. Those three options are:
■ Install SIM 3 V1.6.42 (User Data Preserved)
■ Reformat Disk and Install SIM 3 V1.6.42 (User Data Deleted)
■ Cancel and Reboot
NOTE: If Option 2 (Reformat Disk) is selected, a confirm-or-abort screen will
be displayed to prevent the accidental erasure of user data.
Figure 2. Confirmation menu for reformatting the disk
3
SIM 3 v1.6.42: What's New
6. When the desired option is highlighted, press the Enter key on the computer keyboard.
The program will begin to load, and the Uncompressing Files screen appears. It will take
a few minutes to complete loading.
7. After the files are uncompressed, the program installs. A small outlined X icon will appear
in the center of the display monitor as this is occurring. This procedure will again take a
few minutes, after which the CD will be ejected from the SIM 3 machine. Remove the CD.
8. To complete the procedure, the machine must be rebooted. Press Enter to reboot.
This may take a few minutes. You may see messages appearing on the display monitor
screen; again, ignore them until rebooting is completed.
9. An instruction box will then appear on the monitor display screen. Follow the instructions
on the screen to complete the installation.
SIM 3 SCREEN FEATURES
Set Graph Background to White
For situations where the standard black graph background with lighter colored traces is more
difficult to see (such as in sunlight), SIM 3 can be set to show the graph background in white,
with darker traces. Select View > Graph Background White. While the graph background
changes, the rest of the screen stays the same (Figure 3).
Figure 3. Graph Background White, with traces
TIP: This feature is also useful to print graphics from the Setup and
DataViewer.
4
SIM 3 v1.6.42: What's New
On-Screen Horizontal Zoom Buttons
Horizontal zoom is available for the Band Spectrum, Line Spectrum, and Frequency Response graphs. A set of plus, minus, and arrow buttons are located at the bottom left of the
graphs.
Click on the plus [+] button to zoom in, and use the right and left arrow buttons to scroll
through the following ranges:
■ 8 Hz to 200 Hz
■ 60 Hz to 600 Hz
■ 200 Hz to 2 kHz
■ 600 Hz to 6 kHz
■ 2 kHz to 24 kHz
Click the [–] button to zoom out to full spectrum.
Figure 4. Horizontal zoom control buttons (on left)
Keyboard Control of Graph Cursor
In addition to being able to be clicked and dragged using the mouse, the graph cursor can
now be controlled with the keyboard. Hold the Shift key while pressing the [<] and [>] keys.
Move the cursor slowly by continually clicking one of the keys, or faster by holding it down.
5
SIM 3 v1.6.42: What's New
Safe Status on Speakers & Switchers Panels
When the Safe switch on the SIM-3088 line switcher is engaged (up position), preventing
muting, that status will be shown for the switcher in both the Speaker tab and the Switchers
tab. The green status bar says “Safe Switch”, and the mute buttons are grayed out on the
Speakers tab (Figure 5).
Figure 5. Safe Switch message in Speakers tab
MEASUREMENT AND CALIBRATION
Mic Sensitivity Default Value
The Mic Sensitivity default value has been changed to 2.5 mV/Pa in the Mic section of the
Switcher and Front Panel setup dialogs. This sensitivity is correct for the DPA 4007 measurement microphone offered with SIM 3.
Linear Volts Unit on Meters
SIM 3 measurements can be shown in Linear Volts as well as dBV (rms and peak). In the Meters tab, select Volts from the dropdown list for each meter. The scale in volts and millivolts
will appear on the left side of the selected graphs.
Higher Peak Voltage for Front-Panel Inputs
The highest voltage range for the front-panel inputs on the SIM-3022 analyzer has been enabled, allowing measurement of signals with peaks up to 113 Vpk (+41 dBVpk). This includes
the connectors labeled Mic 1 and Mic 2. These ranges are selected either in Settings > Input
Panel Settings or by using the [+] and [–] buttons in the Meters tab.
6
SIM 3 v1.6.42: What's New
CAUTION: If you intend to measure high-level signals of this magnitude, use
caution to avoid damaging the SIM analyzer. First set the range to 35.9 Vpk or
113 Vpk (+31 or +41 dBVpk) in Input Panel Settings or the Meters tab before applying
signal to the SIM analyzer. While making measurements in the top two ranges, do not
drive the front-panel inputs into clipping for more than 0.5 seconds.
CAUTION: When the range in Input Panel Settings is set to 11.3 Vpk or less
(+21 dBVpk or less), continuous voltages should not exceed 28 Vrms (+29 dBV
sine) to prevent damage to the SIM analyzer inputs.
NOTE: The +41 dB setting does not apply to line or mic switchers, and is
grayed out.
Mic Calibrate Button
In order to make accurate SPL measurements, the channels to which each measurement
microphone is connected should be calibrated, setting each mic’s sensitivity to a known SPL
standard. Perform calibration in the Line Spectrum measurement using the Calibrate Microphone button at the bottom of the Microphone or All view (Figure 6).
Figure 6. Calibrate measurement mics with Calibrate Microphone
Use the following procedure:
1. Place a professional-grade mic calibrator at the mic element that is to be calibrated.
Please note that this calibrator is not part of SIM 3. Meyer Sound recommends the Bruel &
Kjaer Model 4231 Mic Calibrator. Most calibrators produce a signal of 94 dBSPL at 1 kHz.
2. Select the microphone that is in the Live Branch.
7
SIM 3 v1.6.42: What's New
3. Select View > Cursor Peak Track, wait until the measurement settles, and press the
Calibrate Microphone button.
4. In the dialog box, the mic name is shown, along with the measured dBV value and the
dBSPL value (Figure 7). Make sure the dBSPL value is the same as the calibrator’s value.
If not, type the calibrator’s value (usually 94 dB) into the dBSPL field. Press OK.
5. The calculated mic sensitivity is mV/Pa will appear next to that mic in the Switcher dialog
window.
Figure 7. The Calibrate Microphone dialog box
NOTE: Once the channel has been calibrated with a specific measurement
microphone, that microphone needs to be connected to that channel in order
to perform the most accurate SPL measurements.
8
SIM 3 v1.6.42: What's New
DATAGROUP FEATURES
Edit Notes of Previously Stored DataGroups
A previously stored DataGroup, either from a current or a saved session, can have existing
notes edited or new notes added. Select Data > Recall DataGroup and click on the name of
the desired DataGroup. Edit or add to the information in the Notepad field. The information
will be stored with the DataGroup when the window is closed, and saved when the Project is
saved.
Select Multiple DataGroups for Deletion
As many stored DataGroups as desired can be deleted at one time, rather than one-by-one.
Use one of the two methods below to delete adjacent or non-adjacent DataGroups from the
Recall DataGroups dialog window.
Adjacent DataGroups
Hold the Shift key, click on the top name field in the section to be deleted, and then click on
the bottom name field. All of the DataGroups between those two points will be highlighted for
deletion. Alternately, holding Shift and using the up and down arrow keys will select adjacent
DataGroups one at a time. Click the Delete button, and then click OK for each DataGroup in
the Confirm dialog.
Non-Adjacent DataGroups
Hold the Control key and click on selected DataGroup name fields to highlight. A second
click on a group will de-select it. Click the Delete button, and then click OK for each DataGroup in the Confirm dialog.
New International Date Format
DataGroups are now saved with a time stamp that is in the international date format, so that
sorting by date will place the groups in the correct order as they were measured. The date
format is YYYY/MM/DD HH:MM:SS (year, month, day, hour in the 24-hour format, minute,
and second).
9
SIM 3 v1.6.42: What's New
GRAPHICS AND PRINTING
Exporting Screen Shots
Screen shots of the SIM 3 screen can be captured and saved for later viewing or presentations in bitmap (.bmp) format. Select File > Export. A Save Screen as Bitmap dialog box
opens. Type in any file name, and add the ending “.bmp” to the file name. Press Save, and
the image file of the screen at the moment the button is pressed will be saved to the userdata
directory. The screen shots can be exported for later use by burning them to CD, using File >
Copy Directory to CDR.
NOTE: Be sure to add the .bmp when saving, or the file will be saved as a
generic file and will not be seen in the directory. However, adding the .bmp
ending to such a file if it is later exported to another computer will allow it to be
opened as a bitmap image file.
Printing from the SIM 3 DataViewer
A condensed image of the current screen in the SIM 3 DataViewer can be printed by selecting File > Print. The DataViewer calls up whatever printer dialog is used by the host computer, and prints the image in the upper right corner of the paper, in landscape format.
TIP: To capture and print screens from the DataViewer that can be sized or
used as images in computer presentations, use File > Export as described
above. Save the file to a desired location on the computer, remembering to add the
.bmp to the file name. Alternately, use the computer’s Print Screen capabilities and
import the file into a graphics processing program..
TIP: Use features such as setting the screen background to white and
horizontal zoom to create customized graphs for reports.
10
SIM 3 v1.6.42: What's New
New Content in Help Menu
Help > Contents contains drawings and explanations to help set up and connect line-level
and mic switchers to the SIM 3 analyzer. This includes wiring the bus cables for 4 x 12, 8 x 8,
and 0 x 16 switcher configurations. Setups for measurements using the front-panel connectors are also shown.
SIGNIFICANT BUG FIXES
With SIM 3 version 1.6.42, many small bugs and operational issues have been addressed
and corrected. Of these, several significant bug fixes are in the new version:
■ DSP Driver Bug: On rare occasions, some SIM 3 machines would freeze at startup during
the splash screen. Install and Recovery v1.6.42 installs a new DSP driver to fix this
problem.
■ DSP Firmware Bug: A small number of early SIM 3 machines were shipped with DSP
firmware that was incompatible with v1.6.0. Install and Recovery v1.6.42 now checks and
updates the DSP firmware if necessary.
■ The Switcher tab configuration anomalies have been solved.
■ A capital letter M (Shift + M) can now be entered without difficulties.
■ Meter gains will now track Branch 0 FP Mic 1.
11
Meyer Sound Laboratories Inc.
2832 San Pablo Avenue
Berkeley, CA 94702
www.meyersound.com
T: +1 510 486.1166
F: +1 510 486.8356
© 2005
Meyer Sound Laboratories Inc.
05.136.060.08 A