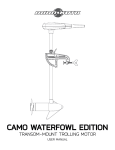
1
INTELLITROLL SPEED-N-TEMP MONITOR Owner’s Manual Serial Number: _____________________________________ Purchase Date: _____________________________________ Store Where Purchased: ______________________________ INTRODUCTION Congratulations on your purchase of the Cannon® IntelliTroll Depth, Temperature and Speed monitoring system. The probe unit and display use Cannon’s advanced underwater sensing technology to give you the most complete trolling information ever. Included in the Probe and Monitor package: – IntelliTroll display unit with mounting bracket – Power cable – Antenna cable – IntelliTroll probe – Safety lanyard stop – 200 feet of nylon coated downrigger cable with crimp sleeve Precautions: • • • Do not remove the protective screen on the top side of the IntelliTroll probe. Doing so could result in damage to the depth probe. Do not over tighten the battery cap, or it will be difficult to remove after submersion. Always use the safety harness when attaching the IntelliTroll probe to the down rigger cable. DISPLAY INSTALLATION Proper installation is essential to the best performance from your IntelliTroll Monitor. Please read these directions carefully. If you do not feel comfortable performing the installation yourself, contact a Cannon Authorized Service Center or dealer for a professional installation. Order of Installation Step 1: Step 2: Step 3: Step 4: Step 5: Mount the display Mount the Spring Antenna Route the Power and Antenna cable Connect the Power and Antenna cable Install the coated downrigger cable (optional) Step 1: Mount the Display Your IntelliTroll Monitor has been designed to mount on a flat surface using the gimbal bracket provided. Four holes in the base of the gimbal bracket allow for wood screws or through-bolt mounting. 1 DISPLAY INSTALLATION (cont.) Here are a few tips: • Avoid mounting the display near 2 way radios and antennas as this can cause interference with probe operation. • If the mounting surface is made from thin fiberglass, a piece of wood underneath the fiberglass will help secure the bracket. • Before drilling any holes for the bracket be sure to double check that no cables or hoses are near the exit point of the drill bit. • When mounting the monitor to the boat consider rough water conditions. Step 2: Mounting the Spring Antenna The antenna cable provided with this IntelliTroll Monitor is a high grade shielded cable with a helix coil spring antenna on the end. For proper operation the downrigger cable must pass through the inner diameter of the helix coils. Secure the antenna cable to the downrigger boom with either plastic electrical tape or tie-straps where the coil spring splices into the cable. If using tie-straps do not over tighten as this could crush the antenna cable and cause permanent damage. Locate the spring coil antenna as far away as practical from the downrigger motor. Also, avoid having the antenna in close proximity to other sources of electrical interference such as SONARs and radios. 2 DISPLAY INSTALLATION (cont.) To add an inline connector to your IntelliTroll system follow this procedure: You will need one each of the following Cannon components: • p/n 3397505 antenna cable (included with IntelliTroll system) • p/n 3887510 antenna extension cable • p/n 3882710 replacement antenna kit NOTE: Be sure to read and understand all instructions before cutting any wires. 1. Disconnect the existing p/n 3397505 antenna cable from the IntelliTroll monitor and connect the p/n 3887510 antenna extension cable in its place. Route the extension cale to position the inline connection in the location you prefer. (Note: the inline connection is not waterproof. A good location would be a convenient spot under the gunwale of the boat.) 2. Connect the antenna extension cable to the p/n 3397505 antenna cable and route the antenna cable to the downrigger. If the downrigger is mounted on a swivel base be sure to leave adequate slack in the cable to allow for movement. Fasten teh antenna cable to the downrigger and boom. After determing the location for the antenna as per the instructions included with the replacement antenna kit. This completes the installation of the inline connector. Step 3: Route the Power and Antenna Cable Route the antenna cable and power cables up to the display unit. For best operation: • Route the cable away from high traffic areas and clear of any area where they might be cut or damaged. • In order to reduce electrical interference, route the cable away from other wiring or electronic equipment. • Do not coil the cable to take up slack. Instead, use a “figure 8” pattern, which is less prone to electrical noise and interference. Step 4: Connect the Power and Antenna Cable Complete the installation by routing the power cable as necessary to reach the battery, keeping the routing suggestions above in mind. The IntelliTroll Monitor requires a 12-Volt battery system and draws 1/4 amp during use (1-amp peak). Connect fuse to the positive or red lead of the display. If you connect the monitor directly to a 12-Volt battery, obtain and install an inline fuse holder (not included) for the protection of the unit. Cannon is not responsible for over voltage or over- 3 DISPLAY INSTALLATION (cont.) current failures. You can attach the power cable to the boat accessory panel, however you may experience undesirable electrical interference if you do so. Connect the cable to the battery as follows: Red wire to positive (+) terminal. Black wire to negative (-) terminal. • Connecting the monitor to the same circuit as other devices such as tachometers, radios, or trim switches may cause electrical interference. • To protect both the cable and the display unit, Cannon highly recommends an in-line 1-amp fast-blow fuse in series with the red wire at the battery. • For best performance of the IntelliTroll the Monitor should be connected to a 12V battery that has the negative (battery–) terminal connected to the water. If the receiver/monitor ground (battery–) is not connected to the water the system will be prone to intermittent operation. Power 12V DC Antenna Connector 4 DISPLAY INSTALLATION (cont.) Step 5: Install the Coated Downrigger Cable NOTE: The coated cable may make certain spool-mounted cable counters inaccurate due to the difference in cable diameters. The supplied cable may produce up to a 30% error on your counter. For example, if your counter reads 100 feet the actual amount of cable out would be approximately 130 feet. With the IntelliTroll, however, you still have the benefit of knowing the true depth of the ball and bait. For Cannon Downriggers with PIC or Shortstop features, before respooling with the coated cable you’ll need to strip off the coating for the first 6 wraps around the spool arbor. Make sure that the bare cable contacts the shaft set screw protruding from the reel as you wind it on. To remove the coating from the cable scrape one side of the cable and peel off the remaining coating. Be careful not to cut into the strands of the cable and weaken it. After spooling the coated cable on the reel, feed the cable through the spring antenna and then the pulley. Attach the terminator to the cable leaving the coating on the cable. The coating on the cable will need to be removed from the area where the probe will be attached. Remove a 2 inch section of the coating above the terminator large enough for the probe connector. This is necessary for the probe to send it’s signal through the cable and for short stop and PIC operation. (In order to obtain optimum performance in saltwater applications, it is important to keep te amount of exposed cable to a minmum. Stripping te cable just enough to make electrical contact to the probe will help ensure that the communications signal is not lost.) Note: It is recommended that the probe be a least 6 inches above the terminator. During normal use the cable coating may wear. Excessive wear will reduce the strength of the signal to the monitor and decrease the maximum depth of operation. If needed, contact Cannon or an Authorized Service Center to purchase replacement cable. Cannon Consumer & Technical Service (800) 227-6433 On the web cannondownriggers.com DISPLAY MAINTENANCE To ensure years of trouble-free operation we recommend the following: When cleaning the acrylic display lens, do not use ammonia or alcohol-based cleaners. In harsh environments consider using commonly available corrosion inhibitors on the back-panel connectors. 5 PROBE INSTALLATION (When using the IntelliTroll Monitor) Installing the Battery Unscrew the back cover of the probe module and remove the plastic battery pack holder. Install 4 high quality Alkaline AA batteries into the battery pack. When inserting the battery pack into the probe be sure that the snap terminals on the battery pack align with the spring contact inside the probe. The battery pack will fit in the probe in 2 different positions and it will fail to operate when installed with the terminals and contacts misaligned. When installing the battery cover back onto the probe make sure that both o-rings, one in the housing and one on the battery cap are in place and are in good condition. Using a lubricant (such as petroleum grease) on the o-rings will improve the seal. Tighten the battery cap until the cap meets the body of the probe at the fin. At this point the cap will stop. The probe is designed to work for over 200 hours before changing batteries is required; however, several factors such as temperature and frequency of use will affect battery life. If you will be storing the IntelliTroll Probe for several months, you should remove the batteries in order to prevent acid leakage and terminal corrosion. 6 PROBE INSTALLATION (cont.) Installing Probe on the Downrigger cable To prevent losing the probe overboard it is recommended that the safety lanyard clasp be installed first. Open the clasp hook and place around the downrigger wire. Next loosen the thumb screw at the front end of the probe assembly so the cap slides back enough to slip the uncoated portions of the cable under the cover. Adjust the location of the probe on the downrigger line and tighten the thumb screw. There is no need to over tighten, the fit should be hand tight. The last step is to install the safety lanyard stop bolt. Remove the nylon wing nut and washer from the assembly. Slide the cable into the split portion of the bolt. Place Nylon washer and Nylon wing nut back onto assembly and tighten. The lanyard stop should be placed on the cable between the probe and the lanyard clasp. 7 PROBE INSTALLATION (cont.) 8 PROBE INSTALLATION (cont.) 9 PROBE INSTALLATION (When NOT using the IntelliTroll Monitor) Both the Digi-Troll 5 and Digi-Troll 10 downriggers are compatible with the IntelliTroll accessory. The Digi-Troll 5 receives the IntelliTroll data and displays it on your Humminbird fish finder through Cannonlink* or the Intellitroll monitor. The Digi-Troll 10 displays IntelliTroll data directly on the LCD screen on the downrigger. To install the Intellitroll on the Digi-Troll follow the steps below: 1. Install battery (see page 5) 2. Install probe on downrigger cable (see page 7) 3. Locate the antenna mounting bolt in the location shown. 10 PROBE INSTALLATION (cont.) 4. With a 1/4” wrench, loosen the bolt and remove. 5. Install the antenna spring that came with the Intellitroll sensor kit. Insert bolt into the closed loop on the spring. 11 PROBE INSTALLATION (cont.) 6. Tighten bolt. Caution: Do not over tighten as the stainless steel bolt head may shear with too much torque. 7. Once the antenna is installed, run downrigger cable through center of spring. 12 PROBE INSTALLATION (cont.) 8. Terminate cable as previously described. Your Digi-Troll is now Intellitroll compatible. Once you attach your Intellitroll to the cable per the instructions included, your Digi-Troll 10 will display the data on it’s screen. The Digi-Troll 5 will pass this data on to the Cannonlink for display on your Humminbird fish finder. 13 SYSTEM OPERATION On / Off of Probe There is no on / off switch for the IntelliTroll Probe. The probe automatically turns on when placed in the water. The probe will automatically turn off when 2 conditions exist: The probe is removed from the water and the speed wheel stops spinning for 60 seconds. Once the Probe is placed in the water and the display is turned on data will become visible on the monitor. MONITOR OPERATION The best way to get familiar with your IntelliTroll Monitor is to power-up in simulator mode and start pressing buttons. You won’t hurt anything by doing so. Your IntelliTroll Monitor will not save the changes made to the settings while in the simulator mode Power on and off, simulator mode POWER ON - press and release the POWER-MENU button. The first screen will be a menu that allows you to select the mode of operation. You can choose between simulator and start-up. Simulation will show data on the screen and allows you the opportunity to view the menus without having to attach the monitor and probe to a downrigger. Note: IntelliTroll remembers your previous settings every time you power it on again (this does not happen in simulator mode). Selecting the startup option will put the monitor in run mode and data will not be display until the probe has been activated. POWER OFF - press and hold the POWER-MENU button until power down window is displayed. Set and adjust features After power-up, features can be adjusted using this button sequence: Press the POWER-MENU button to display the first setup feature. Press the POWER-MENU button to continue scrolling through the features. Press the W and X buttons to change the feature setting. 14 When you have completed making the changes do not press any buttons for 3 seconds and the display will revert back to normal run mode and your changes will be saved. SYSTEM OPERATION (cont.) Setup Items 1. Back Light (default off) • The back light will help make the display information visible in low light conditions. 2. Display Contrast (default 3) • Contrast is the darkness or brightness of the display. Both your viewing angle and the ambient temperature affect the desired contrast level. 3. Depth Alarm (default 250ft) • The depth alarm can be used to signal you that the probe has exceeded the maximum depth. The default is 250ft. This feature can be turned off by setting that value to 0ft. When the max depth is reached you will hear an audible alarm. 4. Supply Battery Alarm (default off) • The monitor has the ability to notify you when the battery system voltage is low. If this feature is enabled and the battery is low you will see a system battery low message displayed on the screen. This will be in the same location as the probe battery low. 5. Depth Units (default feet) • You are able to select feet, meters or fathoms 6. Temperature Units (default F°) • You are able to select F° or C° 7. Speed Units (mph) • You are able to select mph (miles per hour), kph (kilometers per hour) or knots (nautical miles per hour) 8. Temperature Adjust F° • The IntelliTroll uses the highest quality electronic components and the system is built to have very low error in temperature measurements. However you may see slight differences between the Monitor and other console electronics. • You are able to adjust the offset of the temperature. This can be used to make sure that other electronics and IntelliTroll display the same information. 9. Speed Adjust Percent • The IntelliTroll sensor has been calibrated using GPS technology. However you may see slight differences between the Monitor and other console electronics. • Speed can also be adjusted to compensate for error between units. 10. Adjust Depth Percent • The depth can be adjusted to account for different water densities. Most salt water application should work well with a setting of 2.5. 15 SYSTEM OPERATION (cont.) On / Off of Display As mentioned previously, the display can be turned on by pressing the POWER/ MENU button. Once the display is on select the REAL mode and press POWER/MENU. At this point data from the probe can now be received. To turn off the display push and hold the POWER/MENU button for 4 seconds. Normal Operation Once the system is powered data will be shown on the display. As Depth, Speed or Temp of the probe changes the display will automatically update the data. With the large display the number can easily be viewed from anywhere inside the boat. The system will continue to run until the probe is removed from the water and the speed wheel is stopped for 30 seconds. 16 If the batteries in the probe are low the PROBE BATTERY LOW indicator will flash on and off. If the system battery is low the SYSTEM BATTERY LOW indicator will flash on and off. If both batteries are low the messages will alternate back and forth. SPECIFICATIONS Monitor diagonal: Monitor resolution: Monitor power consumption: Monitor Voltage requirements: Probe battery requirements: Probe battery life: 4 inches 160V x 128H 25mA with backlight off 55mA with backlight on 9-14VDC 4AA Greater than 200 hours of run time FAQ Display will not turn on: 1. Verify that power is connected to the display and that the fuse is good. 2. Verify source voltage. The display will function on 9VDC to 14VDC. If the voltage is out side this range the unit will not function. 3. The screen may be black and too hot to function. In this case immediately cover the screen or turn it away from the sun. Unit beeps but the screen stays blank or black: 1. LCD displays can turn black if they are operated in extreme temperatures. Make sure that the display is allowed to cool down if it has been sitting in the sun on a hot day. 2. Verify the contrast setting. If you cannot read the display at all press the menu button twice and attempt to adjust the contrast with the arrow keys. Display power on but no data is displayed: 1. Verify that the batteries in the probe are in good working order. 2. Verify that the probe is connected to the uncoated portion of the downrigger cable. 3. Verify that the battery pack is installed in the probe correctly. 1. Battery polarity is marked on the plastic battery pack. 2. The battery pack can be installed in 2 different positions. If the battery pack is positioned incorrectly the snap terminals will not align with the spring contacts in the probe. 4. The probe will turn on after it is placed in the water. 5. Verify boat ground. The system will work best if the ground (battery–) connected to the monitor display is also in contact with the water. If this ground connection is not in place you may not see data or the data may be inconsistent. 17 FAQ (cont.) Water in transmitter: 1. Water should not be in the transmitter. The O-ring seal design has been tested well beyond the limits of practical fishing. If you find water in the probe follow these steps or you risk permanent damage to the probe. 1. Remove the batteries from the probe and discard them in the appropriate manner. If the probe leaked due to high pressure water may have penetrated the batteries and will cause them to leak acid in a short amount of time. 2. If battery acid has leaked it must be cleaned out of the probe immediately. It is best to us isopropyl alcohol, if none is available flush with clean fresh water until you have the opportunity to clean the acid properly. 3. Verify that the plastic battery pack holder has been cleaned as well. 4. Verify that both O-Rings are installed and are not damaged. 5. Apply petroleum grease or lubricant to the O-rings and battery compartment threads. 6. Install fresh batteries and tighten the battery cap until it meets the body of the probe at the fin. No speeds 0 – 2 mph: 1. At very slow speed the probe will not properly display speed. The flow of water over the speed wheel is not enough to over come the friction of the magnetic wheel. Display power on – updates are intermittent: 1. Verify boat ground. The system will work the best if the ground (battery–) connected to the monitor display is also in contact with the water. If this ground connection is not in place you may not see data or the data may be inconsistent. No data below 100 feet: 1. Verify boat ground. The system will work best if the ground (battery–) connected to the monitor display is also in contact with the water. If this ground connection is not in place you may not see data or the data may be inconsistent. Depth of probe does not match reel counter on the down rigger: 1. Downrigger manufactures set the gear ratio of the counters to match uncoated cable. Coated cable has a slightly larger diameter and will alter the results of the counter. 2. The probe will also transmit actual depth not line out. If you are trolling you need to consider blow back and how this affects the depth of the cannon ball. 18 FAQ (cont.) No data is displayed when the trolling motor is turned on: 1. All electronic devices transmit unwanted signals. The receiver (monitor display) is a sensitive electronic radio system. Strong RF signals can interfere with the operation of the IntelliTroll. 2. Verify that the antenna and antenna cable are not in close proximity to larger motors or other radio communication equipment. 3. Verify that the power wire to the receiver (monitor display) has a good connection and is separated from other sources of electrical noise. How do I know if my boat is grounded properly – test method? 1. When on the water, use a volt meter and measure from battery ground (battery–) to any metal that is electrically connected to the water. This reading should be less than 0.7V. Using an ohm meter to check continuity may give you inaccurate results. REPLACEMENT SERVICE ITEMS 388600 3887510 3397505 4900060-1SV 3394030 3882710 Replacement sensor (full sensor) Antenna extension cable Replacement Antenna Cable Replacement power cable for monitor Replacement Monitor will also include an antenna cable and power cable Replacement Antenna kit for antenna cable (this is also used on legacy product) 19 20 60 90 100 70 40 80 95 110 120 50 10 135 140 20 30 5 260 200 130 250 270 280 210 290 PARTS DIAGRAM PARTS LIST In the U.S.A., replacement parts may be ordered directly from CANNON Parts Dept., 121 Power Dr., Mankato, MN 56661. In Canada, parts may be ordered from any of the Canadian Authorized Service Centers. Visit cannondownriggers.com for a current listing. Be sure to provide the MODEL and SERIAL numbers of your downrigger when ordering parts. Please use the correct part numbers from the parts list. Payment for any parts ordered from the CANNON parts department may be by cash, personal check, Discover Card, Master Card or VISA. To order call 1-800-227-6433 or FAX 1-800-527-4464. Item Part Number Description Qty Req’d 10 3990220 (includes 20-30) ASSEMBLY, SNT SENSOR 1 20 802003 HDW PAD WHEEL 1 30 802014 HDW SHAFT .875”x’ 1 3884804 (includes 40-50) 40 2344004 ASY FISH RF SAFETY HARNESS 1 50 2373401 SCREW-#6 X .375 SS HI-LO 1 3884805 (not shown) LANYARD STOP KIT 1 SAFETY LANYARD ASSEMBLY 3880223 (includes 60-120) 60 3990223 FRONT END SUB-ASSEMBLY 1 70 3390310 JUMPER WIRE 1 80 3391736 WASHER, #4 FLAT 2 90 3393428 SCREW-#6-32 X 1/4 1 95 3393425 #4 SS MACHINE SCREW 3/16 1 ASSEMBLY - FRONT END 100 3393463 SCREW-#4-40X.875 PPH MCH S 1 110 3397310 BUSHING-PIVOT, NOSE 1 120 3393122 NUT 4-40 NYLOCK 1 3880311 (includes 130-140) GROUND WIRE ASSEMBLY 130 3390311 GROUND WIRE 1 135 3391736 WASHER, #4 FLAT 1 140 3393425 SCREW-#4-40X.188 1 3884600 (includes 200-210) 200 3394600 O-RING - 218 1 210 3394601 O-RING - 222 1 O-RING KIT 3886520 (includes 250-260) 250 3396520 BATTERY HOLDER 1 260 3390700 BATTERY STUD, 9V 1 3880222 (includes 270-290) 270 2373401 SCREW-#6 X .375 SS HI-LO 1 280 3392026 BATTERY SPRING,C&D CELL 1 290 3390222 COVER, BATTERY 1 BATTERY PACK BATTERY COVER ASSY 21 LIMITED WARRANTY Johnson Outdoors Marine Electronics, Inc. warrants to the original purchaser that if the accompanying product (see exclusions below) proves to be defective in material or workmanship within the following warranty periods, Johnson Outdoors Marine Electronics, Inc. will, at its option, either repair or replace same without charge (but no cash refunds will be made): 1) The boom, motor, and reels, plus all Lexan®* parts, including but not limited to frames and bases, will be free from defects in materials and workmanship, subject to normal wear and tear, for the original purchaser’s lifetime. 2) All other items will have 1-year limited warranties from the date of original retail purchase, except THE FOLLOWING ITEMS THAT HAVE NO WARRANTY WHATSOEVER: boot covers, clothing, Dacron line, rubber bands, swivel lock pin, weights, and wire cable. This limited warranty may be enforced only by the original purchaser; all subsequent purchasers acquire the product “as is” without any benefit of this limited warranty. Repair or replacement of the product as set forth in this limited warranty shall be the original purchaser’s sole and exclusive remedy and Johnson Outdoors Marine Electronics, Inc.’s sole and exclusive liability for breach of this warranty. EXCLUSIONS This warranty does not apply in the following circumstances: • When the product has been connected, installed, combined, altered, adjusted, serviced, repaired, or handled in a manner other than according to the instructions furnished with the product • When the motor housing is opened by anyone other than Cannon® Authorized service repair personnel. • When any defect, problem, loss, or damage has resulted from any accident, misuse, negligence, carelessness, or abnormal use, or from any failure to provide reasonable and necessary maintenance in accordance with the instructions of the owner’s manual LIMITATION AND EXCLUSION OF IMPLIED WARRANTIES AND CERTAIN DAMAGES THERE ARE NO EXPRESS WARRANTIES OTHER THAN THESE LIMITED WARRANTIES. JOHNSON OUTDOORS MARINE ELECTRONICS, INC. DISCLAIMS LIABILITY FOR INCIDENTAL AND CONSEQUENTIAL DAMAGES, AND IN NO EVENT SHALL ANY IMPLIED WARRANTIES (EXCEPT ON THE BOOM, MOTOR, REELS, AND ALL LEXAN®* PARTS), INCLUDING ANY IMPLIED WARRANTY OF MERCHANTABILITY OR FITNESS FOR PARTICULAR PURPOSE, EXTEND BEYOND ONE YEAR FROM THE DATE OF PURCHASE (AND IN THE CASE OF THE BOOT COVERS, CLOTHING, DACRON LINE, RUBBER BANDS, SWIVEL LOCK PIN, WEIGHTS, AND WIRE CABLE, JOHNSON OUTDOORS MARINE ELECTRONICS, INC. DISCLAIMS ALL IMPLIED WARRANTIES). THIS WRITING CONSTITUTES THE ENTIRE AGREEMENT OF THE PARTIES WITH RESPECT TO THE SUBJECT MATTER HEREOF; NO WAIVER OR AMENDMENT SHALL BE VALID UNLESS IN WRITING SIGNED BY JOHNSON OUTDOORS MARINE ELECTRONICS, INC. Some states do not allow limitations on how long an implied warranty lasts or the exclusion or limitation of consequential damages, so the above limitation or exclusion may not apply to you. This warranty gives you specific legal rights, and you may also have other rights that vary from state to state. 22 Lexan is a registered trademark of General Electric. SERVICE POLICY AFTER THE APPLICABLE WARRANTY PERIOD After the applicable warranty period, or, if one of the above exclusions applies, Cannon® products will be repaired for a charge of parts plus labor. All factory repairs, after the applicable warranty period, carry a 90-Day Limited Warranty, subject to the exclusions and limitations stated above. TO ENFORCE WARRANTY OR TO OBTAIN REPAIRS AFTER WARRANTY To obtain warranty service in the U.S., the downrigger or part believed to be defective and the proof of original purchase (including the date of purchase) must be presented to a Cannon® Authorized Service Center or to Cannon®’s factory service center in Mankato, MN. Except as noted below, any charges incurred for service calls, transportation or shipping/freight to/from the Cannon® Authorized Service Center or Cannon®’s factory, labor to haul out, remove, re-install or re-rig products for warranty service, or any similar items are the sole and exclusive responsibility of the purchaser. Downriggers purchased outside of the U.S. (or parts of such downriggers) must be returned prepaid with proof of purchase (including the date of purchase and serial number) to any Authorized Cannon® Service Center in the country of purchase. Warranty service can be arranged by contacting a Cannon® Authorized Service Center listed on the enclosed sheet, or by contacting the factory at 1-800-227-6433 or Fax 1-800-5274464. If the necessary repairs are covered by the warranty, we will pay the return shipping charges to any destination within the United States. DO NOT return your Cannon® downrigger or parts to your retailer. Your retailer is not authorized to repair or replace them. Major parts, such as the motor and main frame, must be returned to Johnson Outdoors Marine Electronics, Inc. in Mankato, Minnesota, or a Cannon® Authorized Service Center, for repair or replacement. To reduce shipping costs, we suggest removal of loose parts such as the boom and rod holders. Small parts that can be easily removed such as the handle and/or the counter, may be removed from the downrigger and returned for repair or replacement. Retain your sales receipt! Proof of purchase must accompany product when returned. Return Address: Cannon 121 Power Drive Mankato, MN 56001 All CANNON Downriggers are covered by US Pat.D-269, 992. ENVIRONMENTAL COMPLIANCE STATEMENT It is the intention of Johnson Outdoors Marine Electronics, Inc. to be a responsible corporate citizen, operating in compliance with known and applicable environmental regulations, and a good neighbor in the communities where we make or sell our products. WEEE Directive: EU Directive 2002/96/EC “Waste of Electrical and Electronic Equipment Directive (WEEE)” impacts 23 ENVIRONMENTAL COMPLIANCE STATEMENT (cont.) most distributors, sellers, and manufacturers of consumer electronics in the European Union. The WEEE Directive requires the producer of consumer electronics to take responsibility for the management of waste from their products to achieve environmentally responsible disposal during the product life cycle. WEEE compliance may not be required in your location for electrical & electronic equipment (EEE), nor may it be required for EEE designed and intended as fixed or temporary installation in transportation vehicles such as automobiles, aircraft, and boats. In some European Union member states, these vehicles are considered outside of the scope of the Directive, and EEE for those applications can be considered excluded from the WEEE Directive requirement. This symbol (WEEE wheelie bin) on product indicates the product must not be disposed of with other household refuse. It must be disposed of and collected for recycling and recovery of waste EEE. Johnson Outdoors Marine Electronics, Inc. will mark all EEE products in accordance with the WEEE Directive. It is our goal to comply in the collection, treatment, recovery, and environmentally sound disposal of those products; however, these requirement do vary within European Union member states. For more information about where you should dispose of your waste equipment for recycling and recovery and/or your European Union member state requirements, please contact your dealer or distributor from which your product was purchased. 24 Consumer & Technical Service Johnson Outdoors Marine Electronics, Inc. PO Box 8129 121 Power Drive Mankato, MN 56001 Phone (800) 227-6433 Fax (800) 527-4464 cannondownriggers.com Copyright 2009 Johnson Outdoors Marine Electroincs, Inc. All rights reserved. Conforms to 89/336/EEC (EMC) under standards EN 55022A, EN 50082-2 since 1996 LN V9677264 WARNING: This product contains chemical(s) known to the state of California to cause cancer and/or reproductive toxicity. 3397128 Rev D