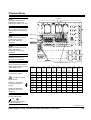
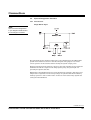
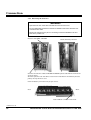
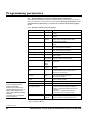
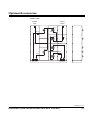
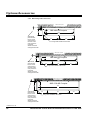
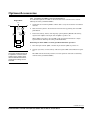
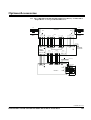
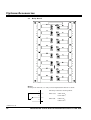
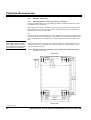
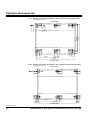
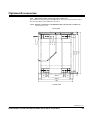
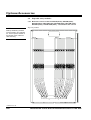
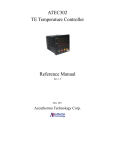
1
Silcon DP300E
208V/480V 10-80kVA
Installation Guide
Copyright © 1999 APC Denmark A/S
Due to continuous product development information
given in this guide is subject to change without notice.
7OY0002 US rev. 04
Installation Guide Silcon DP300E 208V/480V 10-80 kVA
7OY0002 US rev. 04
1
IMPORTANT SAFETY INSTRUCTIONS
SAVE THESE INSTRUCTIONS
This guide contains important instructions for your Silcon DP300E
UPS that should be followed during installation and maintenance of
the UPS and batteries.
The installation and use of this product must comply with all national, federal, state,
municipal or local codes that apply. If you need help, please call APC’s toll free
technical support at: 1-877-287-7835 (1-877-2UPS-TEK).
WARNING!
UPS units contain hazardous AC and DC voltages. A qualified electrician must install
the UPS, AC line service, and external batteries according to local and national codes
and must be familiar with batteries and battery installation.
Before installing, maintaining, or servicing the UPS, shut off the UPS and disconnect
all sources of AC and DC power.
This UPS system has no built-in disconnecting devices for the external AC and DC
input power sources. Disconnecting devices must be provided as external parts in
connection with the installation!
The installer must provide each external disconnecting device for this UPS system
with labels having the following wording:
“Isolate the Uninterruptible Power Supply (UPS) as instructed in this guide before
working on the circuit”.
Whenever AC and/or DC voltage is applied, there may be AC voltage at the UPS
output; this is true because the UPS can supply output power from mains or from its
batteries. To avoid equipment damage or personal injury, always assume that there
may be voltage at the UPS output.
This system is equipped with an auto-start function. If activated the system may start
without warning. Please refer to chapter 6: “Programming parameters” in this guide to
ensure de-activation.
TEST BEFORE TOUCHING!
To reduce the risk of fire or electric shock, install the UPS and external batteries in a
temperature and humidity controlled indoor area, free of conductive contaminants.
UPS batteries are high current sources. Shorting battery terminals or DC terminal
strips can cause severe arcing, equipment damage and injury. A short circuit can
cause a battery to explode. Always wear protective clothing and eye protection and
use insulated tools when working near batteries.
This unit contains components that are sensitive to electrostatic discharge (ESD). If you do not follow proper ESD procedures, you may
cause severe damage to electronic components.
7OY0002 US rev. 04
2
Installation Guide Silcon DP300E 208V/480V 10-80 kVA
Contents
1.0
Introduction
2.0
Unpacking
3.0
Placing
3.1
3.2
3.3
4.0
Connection
4.1
4.2
4.3
4.4
4.5
4.6
4.7
5.0
Switching off Silcon DP310E-DP380E
Options/Accessories
8.1
8.2
8.3
8.4
8.5
8.6
8.7
8.8
8.9
8.10
9.0
General
Parameters
Programming of system configuration parameters
Programming of battery monitor
Switching off
7.1
8.0
Starting up Silcon DP310E-DP380E
Programming parameters
6.1
6.2
6.3
6.4
7.0
Connecting the Silcon DP300E
System Integration Interface
Communication interface - ComInterface
Triple chassis for SmartSlot
External DC connection
Installation of battery drawers
Battery replacement
Starting up
5.1
6.0
Requirements on the installation site
Dimensions
Foot prints
Parallel/Redundant Operation
Service Bypass Panel for Parallel Redundant Operation,
Single Mains, SBP-00A-SR
Service Bypass Panel for Single Operation,
Single Mains, SBP-00A-SS
Relay Board
Seismic anchoring
IP31 cover
Remote display
Isolation Transformer Module
Top cable entry modules
MCCB-box for external batteries
Alarms
9.1
9.2
9.3
9.4
Introduction
Displaying the alarm stack
Displaying the events stack
Possible Alarms
10.0 System specifications
10.1
10.2
Technical data
Back-up time, dimensions, and weight Silcon DP310E-DP380E
11.0 How to contact APC
7OY0002 US rev. 04
Installation Guide Silcon DP300E 208V/480V 10-80 kVA
3
Introduction – Unpacking
1.0 Introduction
The information given in this installation guide is of general nature for the local
authorized electrical installer. For the installation, please refer to national and
local electrical codes.
2.0 Unpacking
WARNING!
The UPS and related equipment are very heavy. To prevent
personal injury or equipment
damage, use extreme care
when handling and transporting
the UPS cabinet and related
equipment.
WARNING!
Do never lift or transport the
system without the internal front
cover plate mounted and
fastened with screws.
1.
2.
3.
4.
Unpack the system by removing the screws on the top and bottom part of the
packaging side plates and lift up the side plates as a whole.
Check that the type sign placed inside on the front door corresponds to the ordered
system, especially with respect to input / output voltages.
To simplify later identification of the installed system – please transfer the data
from the type sign to the below blank copy.
Transport the system to the installation site by lifting underneath by means of a
fork lift.
Copy of type sign (without battery):
Copy of type sign (with battery):
7OY0002 US rev. 04
4
Installation Guide Silcon DP300E 208V/480V 10-80 kVA
Placing
3.0 Placing
3.1
Requirements on the installation site
The system is designed with all parts accessible from front or top, and cable entries
from bottom. The system can be placed close to walls, only free space for front door
opening has to be ensured.
Sufficient cooling and service clearance have to be ensured by a free space of min. 3
feet above and in front of the system.
Avoid placing the system in direct sunlight.
3.2
Dimensions
3.2.1 Dimensions Silcon DP310E-DP380E
Cubicle Dimensions HxWxD - 55.12/1400* x W x 31.50/800 [in./mm].
W [in./mm] as in below table.
Built-in Batteries
System
For External
Batteries
W:23.62/600 W:39.37/1000W:39.37/1000
DP310E/208V
2 x 32 x 7Ah
DP310E/480V
1 x 64 x 7Ah
DP315E/208V
DP315E/480V
4 x 32 x 7Ah
1 x 64 x 7Ah
DP320E/208V
DP320E/480V
4 x 32 x 7Ah
1 x 64 x 7Ah
DP330E/208V
4 x 32 x 7Ah
DP330E/480V
2 x 64 x 7Ah
DP340E/208V
4 x 32 x 7Ah
DP340E/480V
2 x 64 x 7Ah
DP360E/208V*
X
DP360E/480V
X
DP380E/208V*
X
DP380E/480V
X
Cubicles:
39.37/1000 in./mm wide
55.12/1400 in./mm*
23.62/600 in./mm wide
DP310E [208V]
DP310E/DP315E/
DP320E [480V]
DP315E/DP320E/
DP330E/DP340E/ [208V]
DP330E/DP340E [480V]
DP360E/DP380E/ [208V]
DP360E/DP380E [480V]
* DP360E/DP380E [208V], H = 59.06/1500 in./mm.
7OY0002 US rev. 04
Installation Guide Silcon DP300E 208V/480V 10-80 kVA
5
Placing
3.3
Foot prints
3.3.1 23.62/600 in./mm cubicle
DP310E [208/480V] - DP315E [480V] - DP320E [480V]
REAR
Parallel
control
cable entry
FRONT
Power Cable Entry
265
290.25
387.25
DC
193.25
96.25
0
0
Mains 1
Output
Recommended cable routing.
7OY0002 US rev. 04
6
Installation Guide Silcon DP300E 208V/480V 10-80 kVA
Placing
REAR
Parallel
control
cable entry
FRONT
41.5±1
54.5±1
Parallel Control Cable Entry
54.5±1
41.5±1
Com. Cable Entry
7OY0002 US rev. 04
Installation Guide Silcon DP300E 208V/480V 10-80 kVA
7
Placing
3.3.2 39.37/1000 in./mm cubicle
DP315E [208V] - DP320E [208V] - DP330E [208V/480V] DP340E [208V/480V] - DP360E [480V] - DP380E [480V]
5.51/140
REAR
1.57
/40
15.15/385
2.17 1.57
/55 /40
1.97
/50
3.15
/80
3.35/85
15.15/385
8.13/206.5
5.90/150
2.72/69
Parr. control
cable entry.
Com. cable
entry.
7.78/195
15.75/400
Power cable entry
21.46/545
31.50/800
3.15 1.77
/80 /45
2.17/55
1.57 2.17
/40 /55
31.89/810
39.37/1000
FRONT
Power Cable Entry
68.5
290.25
387.25
DC
193.25
96.25
0
0
Mains 1
Output
Recommended cable routing.
7OY0002 US rev. 04
8
Installation Guide Silcon DP300E 208V/480V 10-80 kVA
Placing
5.51/140
REAR
15.15/385
2.17 1.57
/55 /40
1.57
/40
1.97
/50
3.15
/80
3.35/85
15.15/385
31.89/810
39.37/1000
8.13/206.5
5.90/150
2.72/69
Parr. control
cable entry.
Com. cable
entry.
7.78/195
15.75/400
Power cable entry
21.46/545
31.50/800
3.15 1.77
/80 /45
2.17/55
1.57 2.17
/40 /55
FRONT
7OY0002 US rev. 04
Installation Guide Silcon DP300E 208V/480V 10-80 kVA
9
Placing
3.3.3 39.37/1000 in./mm cubicle
DP360E [208V] - DP380E [208V]
REAR
3.43/87
21.46/545
31.50/800
3.93/100
1.57
/40
15.15/385
2.17 1.57
/55 /40
1.97
/50
3.15
/80
3.46
/85
2.60/66
15.15/385
8.31/211
Parr. control
cable entry.
Com. cable
entry.
7.78/195
15.75/400
Power cable entry
3.15 1.77
/80 /45
2.17/55
1.57 2.17
/40 /55
31.89/810
39.37/1000
FRONT
Power Cable Entry
40.75
DC
387.5
175
Output
282.5
70
0
0
Mains 1
Recommended cable routing.
7OY0002 US rev. 04
10
Installation Guide Silcon DP300E 208V/480V 10-80 kVA
Placing
REAR
3.43/87
21.46/545
31.50/800
Power cable entry
15.15/385
2.17 1.57
/55 /40
31.89/810
39.37/1000
3.46
/85
15.15/385
8.31/211
1.57
/40
3.93/100
2.60/66
1.97 3.15
/50 /80
Parr. control
cable entry.
Com. cable
entry.
7.78/195
15.75/400
3.15 1.77
/80 /45
2.17/55
1.57 2.17
/40 /55
FRONT
7OY0002 US rev. 04
Installation Guide Silcon DP300E 208V/480V 10-80 kVA
11
Connection
4.0 Connection
WARNING!
Before continuing, read the
warnings on page 2 of this
manual.
4.1
Connecting the Silcon DP300E
4.1.1 Connecting DP310E [208/480V] - DP315E [480V] - DP320E [480V]
To get access to the cable terminals open the front door, remove the screws and lift
off the front cover (Remember earth wire on rear side).
Front cover
23.62/600 in./mm cubicle front view open door
Remember to remount the front cover (and earth wire) before start up of the system.
7OY0002 US rev. 04
12
Installation Guide Silcon DP300E 208V/480V 10-80 kVA
Connection
Conduit box 23.62/600 in./mm cubicle.
REAR
FRONT
The conduit box is placed under the UPS, always with the solid plate facing to the
rear and the perforated plate facing to the front.
Conduits can be attached to the rear side of the conduit box, which contains cable
channels in order to separate AC, DC, and communication cables.
7OY0002 US rev. 04
Installation Guide Silcon DP300E 208V/480V 10-80 kVA
13
Connection
Ext. DC
NOTE:
This UPS is intended to be
supplied from a grounded
WYE-service, either 3 or 4 wire.
NOTE:
With 3 wire input, the UPS can
only be loaded 3 wire (phase to
phase.
NOTE:
Ensure correct phase rotation
of mains input voltage!!
Max. power cable size: 2 AWG.
NOTE:
All external cable dimensions
are recommended.
Please refer to local legal
provisions.
NOTE:
Glandplate in bottom of
system must be mounted.
WARNING:
At 100% switch mode load the
neutral shall be rated for 173%
output phase current.
Mains 1
Output
Bonding jumper (See sec. 4.1.5.1)
NOTE:
φ is symbol for “phase”.
SYSTEM
is symbol for “risk of
electric shock”.
Terminal for Equipment
Grounding Conductor is
marked
Terminal for Grounding
Electrode Conductor is
marked “E”.
a) EXT.
INPUT
FUSES
[A]
b) c) EXT.
INPUT
PHASE
CONDUC.
[AWG]
a) EXT.
OUTPUT
FUSES
[A]
b) d) EXT. b) e) EXT.
EXT.
EXT.
g) EXT.
OUTPUT NEUTRAL
EQUIP.
GROUND. BATTERY
PHASE
CONDUC. GROUND. ELECTRO.
MCCB
CONDUC.
[AWG]
CONDUC. CONDUC.
[A]
[AWG]
[AWG]
[AWG]
b) EXT.
DC
CONDUC.
[AWG]
DP310E
[208V]
40
6
30
8
4
10
8
50
6
DP310E
[480V]
20
12
15
14
10
12
8
30
10
DP315E
[480V]
25
10
20
10
8
10
8
50
6
DP320E
[480V]
35
8
25
10
6
10
8
50
6
NOTE:
The terminals marked
and
are electrically connected to
the teminal marked „E“.
7OY0002 US rev. 04
14
Installation Guide Silcon DP300E 208V/480V 10-80 kVA
Connection
NOTE:
Grounding, please refer to local
legal provisions.
a) Class J-fast acting in accordance with UL248-8.
b) Cable sizes refer to US National Electric Code, Table 310-16, Copper material, cables rated
75˚C/167˚F at max. 40˚C/104˚F ambient in conjunction with “Notes to Ampacity Tables of 0
to 2000 Volts” point 8. Input, output and DC cables are routed in separate conduits.
All AC cables rated 600V.
DC cables for 208V systems rated 600V.
DC cables for 480V systems rated 1000V unless stated otherwise.
As regards recommended cable lugs and crimping tool, see section 4.1.4.
c) Input phase cable dimensioned for max. UPS input current. (Please refer to Quick
Reference DP300E Series UL for current values).
d) Output phase cable dimensioned for rated UPS output current. (Please refer to Quick
Reference DP300E Series UL for current values).
e) Output neutral cable dimensioned for max. non-linear load. (INEUTRAL = √3 * ILOAD PHASE).
Input neutral cable dimensioned for max. non-linear load in bypass mode.
(INEUTRAL = √3 * ILOAD PHASE).
For linear load neutral cable can be rated as output phase cables.
f)
DC cables dimensioned for maximum discharge current. (Please refer to Quick Reference
DP300E Series UL for current values).
g) Alternate suppliers of battery cubicle must be Listed by Unterwriters Laboratory.
When APC battery cubicle is not used, the appropriate APC MCCB-box is mandatory.
7OY0002 US rev. 04
Installation Guide Silcon DP300E 208V/480V 10-80 kVA
15
Connection
WARNING!
Before continuing, read the
warnings on page 2 of this
manual.
4.1.2 Connecting DP315E [208V] - DP320E [208V] - DP330E [208V/480V]
- DP340E [208V/480V]
To get access to the cable terminals open the front door, remove the screws and lift
off the front cover (Remember earth wire on rear side).
Front
cover
39.37/1000 in./mm cubicle front view open door
Remember to remount the front cover (and earth wire) before start up of the system.
7OY0002 US rev. 04
16
Installation Guide Silcon DP300E 208V/480V 10-80 kVA
Connection
4.1.2.1 Connecting DP360E [480V] - DP380E [480V]
WARNING!
Before continuing, read the
warnings on page 2 of this
manual.
To get access to the cable terminals open the front door, remove the screws and lift
off the front cover (Remember earth wire on rear side).
Front
cover
39.37/1000 in./mm cubicle front view open door
Remember to remount the front cover (and earth wire) before start up of the system.
7OY0002 US rev. 04
Installation Guide Silcon DP300E 208V/480V 10-80 kVA
17
Connection
Conduit box 39.37/1000 in./mm cubicle.
REAR
FRONT
The conduit box is placed under the UPS, always with the solid plate facing to the
rear and the perforated plate facing to the front.
Conduits can be attached to the rear side of the conduit box, which contains cable
channels in order to separate AC, DC, and communication cables.
7OY0002 US rev. 04
18
Installation Guide Silcon DP300E 208V/480V 10-80 kVA
Connection
Output
NOTE:
This UPS is intended to be
supplied from a grounded
WYE-service, either 3 or 4 wire.
NOTE:
With 3 wire input, the UPS can
only be loaded 3 wire (phase to
phase.
Ext. DC
NOTE:
Ensure correct phase rotation
of mains input voltage!!
Max. power cable size:
250 kcmil.
Mains 1
NOTE:
All external cable dimensions
are recommended.
Please refer to local legal
provisions.
NOTE:
Glandplate in bottom of
system must be mounted.
WARNING:
At 100% switch mode load the
neutral shall be rated for 173%
output phase current.
Bonding jumper (See sec. 4.1.5.1)
a) EXT.
INPUT
FUSES
[A]
b) c) EXT.
INPUT
PHASE
CONDUC.
[AWG]
a) EXT.
OUTPUT
FUSES
[A]
b) d) EXT.
OUTPUT
PHASE
CONDUC.
[AWG]
DP315E
[208V]
60
4
45
6
2
10
8
100
2
DP320E
[208V]
80
2
60
4
1/0
8
8
100
2
is symbol for “risk of
electric shock”.
DP330E
[208V]
125
2/0
90
1
4/0
6
6
125
1/0
DP330E
[480V]
50
4
40
6
3
10
8
100
2
Terminal for Equipment
Grounding Conductor is
marked
DP340E
[208V]
150
4/0
125
2/0
250
kcmil
6
6
125
1/0
DP340E
[480V]
70
3
50
4
1
8
8
100
2
DP360E
[480V]
100
1/0
80
2
3/0
8
6
100
2
1/0
250
kcmil
6
6
125
1/0
NOTE:
φ is symbol for “phase”.
Terminal for Grounding
Electrode Conductor is
marked “E”.
SYSTEM
DP380E
[480V]
125
3/0
100
b) e) EXT.
EXT.
EXT.
g) EXT.
NEUTRAL
EQUIP.
GROUND. BATTERY
CONDUC. GROUND. ELECTRO.
MCCB
[AWG]
CONDUC. CONDUC.
[A]
[AWG]
[AWG]
b) EXT.
DC
CONDUC.
[AWG]
NOTE:
The terminals marked
and
are electrically connected to
the teminal marked „E“.
7OY0002 US rev. 04
Installation Guide Silcon DP300E 208V/480V 10-80 kVA
19
Connection
NOTE:
Grounding, please refer to local
legal provisions.
a) Class J-fast acting in accordance with UL248-8.
b) Cable sizes refer to US National Electric Code, Table 310-16, Copper material, cables rated
75˚C/167˚F at max. 40˚C/104˚F ambient in conjunction with “Notes to Ampacity Tables of 0
to 2000 Volts” point 8. Input, output and DC cables are routed in separate conduits.
All AC cables rated 600V.
DC cables for 208V systems rated 600V.
DC cables for 480V systems rated 1000V unless stated otherwise.
As regards recommended cable lugs and crimping tool, see section 4.1.4.
c) Input phase cable dimensioned for max. UPS input current. (Please refer to Quick
Reference DP300E Series UL for current values).
d) Output phase cable dimensioned for rated UPS output current. (Please refer to Quick
Reference DP300E Series UL for current values).
e) Output neutral cable dimensioned for max. non-linear load. (INEUTRAL = √3 * ILOAD PHASE).
Input neutral cable dimensioned for max. non-linear load in bypass mode.
(INEUTRAL = √3 * ILOAD PHASE).
For linear load neutral cable can be rated as output phase cables.
f)
DC cables dimensioned for maximum discharge current. (Please refer to Quick Reference
DP300E Series UL for current values).
g) Alternate suppliers of battery cubicle must be Listed by Unterwriters Laboratory.
When APC battery cubicle is not used, the appropriate APC MCCB-box is mandatory.
7OY0002 US rev. 04
20
Installation Guide Silcon DP300E 208V/480V 10-80 kVA
Connection
4.1.3 Connecting DP360E [208V] - DP380E [208V]
WARNING!
Before continuing, read the
warnings on page 2 of this
manual.
The cable terminals are located at the left side of the unit. To get access to the cable
terminals, remove the screws at the bottom and lift off the side cover (Remember
earth wire on rear side).
39.37/1000 in./mm cubicle left side view without side cover
Remember to remount the side cover (and earth wire) before start up of the system.
7OY0002 US rev. 04
Installation Guide Silcon DP300E 208V/480V 10-80 kVA
21
Connection
Conduit box 39.37/1000 in./mm cubicle.
REAR
FRONT
The conduit box is placed under the UPS, always with the solid plate facing to the
rear and the perforated plate facing to the front..
Conduits can be attached to the rear side of the conduit box, which contains cable
channels in order to separate AC, DC, and communication cables.
7OY0002 US rev. 04
22
Installation Guide Silcon DP300E 208V/480V 10-80 kVA
Connection
NOTE:
This UPS is intended to be
supplied from a grounded
WYE-service, either 3 or 4 wire.
Side view (left)
NOTE:
With 3 wire input, the UPS can
only be loaded 3 wire (phase to
phase.
NOTE:
Ensure correct phase rotation
of mains input voltage!!
Max. power cable size:
500 kcmil.
NOTE:
All external cable dimensions
are recommended.
Please refer to local legal
provisions.
NOTE:
Glandplate in bottom of
system must be mounted.
WARNING:
At 100% switch mode load the
neutral shall be rated for 173%
output phase current.
NOTE:
φ is symbol for “phase”.
Output
Mains 1
is symbol for “risk of
electric shock”.
Terminal for Equipment
Grounding Conductor is
marked
Ext. DC
Terminal for Grounding
Electrode Conductor is
marked “E”.
NOTE:
The terminals marked
and
are electrically connected to
the teminal marked „E“.
Bonding jumper (See sec. 4.1.5.1)
7OY0002 US rev. 04
Installation Guide Silcon DP300E 208V/480V 10-80 kVA
23
Connection
NOTE:
Grounding, please refer to local
legal provisions.
SYSTEM
a) EXT.
INPUT
FUSES
[A]
b) c) EXT.
INPUT
PHASE
CONDUC.
[AWG]
a) EXT.
OUTPUT
FUSES
[A]
b) d) EXT. b) e) EXT.
EXT.
EXT.
g) EXT.
OUTPUT NEUTRAL
EQUIP.
GROUND. BATTERY
PHASE
CONDUC. GROUND. ELECTRO.
MCCB
CONDUC.
[AWG]
CONDUC. CONDUC.
[A]
[AWG]
[AWG]
[AWG]
b) EXT.
DC
CONDUC.
[AWG]
DP360E
[208V]
225
2 * 3/0
175
2 * 1/0
2 * 250
kcmil
4
2
200
4/0
DP380E
[208V]
300
2 * 250
kcmil
250
2 * 3/0
2 * 400
kcmil
4
2
250
350
kcmil
a) Class J-fast acting in accordance with UL248-8.
b) Cable sizes refer to US National Electric Code, Table 310-16, Copper material, cables rated
75˚C/167˚F at max. 40˚C/104˚F ambient in conjunction with “Notes to Ampacity Tables of 0
to 2000 Volts” point 8. Input, output and DC cables are routed in separate conduits.
All AC cables rated 600V.
DC cables for 208V systems rated 600V.
DC cables for 480V systems rated 1000V unless stated otherwise.
As regards recommended cable lugs and crimping tool, see section 4.1.4.
c) Input phase cable dimensioned for max. UPS input current. (Please refer to Quick
Reference DP300E Series UL for current values).
d) Output phase cable dimensioned for rated UPS output current. (Please refer to Quick
Reference DP300E Series UL for current values).
e) Output neutral cable dimensioned for max. non-linear load. (INEUTRAL = √3 * ILOAD PHASE).
Input neutral cable dimensioned for max. non-linear load in bypass mode.
(INEUTRAL = √3 * ILOAD PHASE).
For linear load neutral cable can be rated as output phase cables.
f)
DC cables dimensioned for maximum discharge current. (Please refer to Quick Reference
DP300E Series UL for current values).
g) Alternate suppliers of battery cubicle must be Listed by Unterwriters Laboratory.
When APC battery cubicle is not used, the appropriate APC MCCB-box is mandaroty.
7OY0002 US rev. 04
24
Installation Guide Silcon DP300E 208V/480V 10-80 kVA
Connection
4.1.4 Recommended cable lugs and crimping tools, manufacturer
FRAMATOME CONNECTORS INTERNATIONAL (FCI)
Cable Size
[AWG]
Terminal bolt
diameter 6mm
Cable lug
Type
Crimping tool
Tool
Die
14
YAV10-2TC14
Y8MRB-1
Groove 2
12
YAV10-2TC14
Y8MRB-1
Groove 2
10
YAV102TC14
Y8MRB-1
Groove 2
8
YA8CL2TC14
Y8MRB-1
Groove 2
6
YA6CL2TC14
Y2MR
Blue Die
Cable Size
[AWG]
Terminal bolt
diameter 8mm
Cable lug
Type
Crimping tool
Tool
Die
8
YA8CL2TC38
MD7-34R
W8CVT
6
YA6CL2TC38
MD7-34R
W5CVT
4
YA4CL2TC38
MD7-34R
W4CVT
3
YA3CL2TC38
Y35
U3CRT
2
YA2CL2TC38
MD7-34R
W2CVT
1
YA1CL2TC38
MD7-34R
W1CVT
1/0
YA25L2TC38
MD7-34R
W25VT
2/0
YA26L2TC38
MD7-34R
W26VT
3/0
YA27L2TC38
MD7-34R
W27VT
4/0
YA28L2TC38
MD7-34R
W28VT
250kcmil
YA29L2TC38
MD7-34R
W29VT
Cable Size
[AWG]
Terminal bolt
diameter 12mm
Cable lug
Type
Crimping tool
Tool
Die
3/0
YA272LN
MD7-34R
W26VT
4/0
YA282LN
MD7-34R
W28VT
250kcmil
YA292LN
MD7-34R
W29VT
300kcmil
YA302LN
MD7-34R
W30VT
350kcmil
YA312LN
MD7-34R
W31VT
400kcmil
YA322LN
MD7-34R
W32VT
7OY0002 US rev. 04
Installation Guide Silcon DP300E 208V/480V 10-80 kVA
25
Connection
4.1.5
Grounding
4.1.5.1 System grounding
If none of the UPS neutral inputs are connected to a grounded service neutral
conductor per NEC 250-23, provisions have to be made as follows:
a.
The bonding jumper is mounted between output terminals X005:N and
X005:E.
b.
The output terminal X005:E, also marked “Grounding electrode terminal”,
is connected by the grounding electrode conductor to a local grounding
electrode per NEC 250-26.
4.1.5.2 Equipment grounding
Terminals marked
are intended for equipment grounding.
Provisions have to be made as followed:
• The input equipment ground terminal(s) shall be connected to the grounding
electrode(s) provided for the service entrance(s).
7OY0002 US rev. 04
26
Installation Guide Silcon DP300E 208V/480V 10-80 kVA
Connection
4.2
System Integration Interface
4.2.1 Introduction
Single Mains Input
NOTE:
Use of the same designations
in your diagrams make information exchange much easier.
The system Integration Interface (SII) is the control link between the UPS and the
system main switches as shown in the above diagram. The purpose is to ensure
correct operation of the switches without loosing the system output power.
Position information from auxiliary contacts on the main switches are the inputs for
the SII-board and the outputs are the lamp signals giving “the green light” for
operating the specific switches.
Besides above the SII-board also have input facilities for emergency shut down and
temperature compensation of the charge voltage for systems with external battery.
“Battery operation” and “Common fault” are the two main status relay signals also
coming from the SII-board.
7OY0002 US rev. 04
Installation Guide Silcon DP300E 208V/480V 10-80 kVA
27
Connection
4.2.2 Connections
white
black
NOTE:
When installing UPS systems
with Emergency Power Off
(EPO) all input sources must be
provided with disconnecting
device when activating EPO.
Remarks:
X003 and X004, auxiliary contacts:
When switching Q001, Q002, MCCB1, and MCCB2 from “ON” to “OFF” the auxiliary
contacts have to give a signal before the corresponding mains switch is opened.
When switching from “OFF” to “ON” the auxiliary contact has to be activated with
max. 0.5 sec. delay from the corresponding main switch.
When switching Q003 from “OFF” to “ON” the auxilliary contact has to give a signal
before Q003 is closed. When switching from “ON” to “OFF” the auxilliary contact has
to be activated with max. 0.5 sec. delay.
7OY0002 US rev. 04
28
Installation Guide Silcon DP300E 208V/480V 10-80 kVA
Connection
NOTE:
All alarm and signal circuit field
wiring shall be rated 300V
minimum.
X005, output relays:
The battery operation signal is 30 secs. delayed, but inhibited during battery tests.
The common fault relay is delayed. Standard factory setting is 10 secs. but other
periods can be programmed as described in 6.3.
Same phase as power source for the output relays is mandatory for voltages above
170V.
Terminals X001, X003, X005, X004, X012:
Cable size AWG18 to AWG14, use solid copper conductors only.
4.3
Communication interface – ComInterface
4.3.1 Introduction
The ComInterface having 3 ports - is used when an interaction between UPS and
e.g. a computer system has to be established. The main purpose is to ensure a
controlled shut down of the computer in case of failures
in the mains supply.
4.3.2 Connections
1
7OY0002 US rev. 04
Installation Guide Silcon DP300E 208V/480V 10-80 kVA
29
Connection
4.4
Triple Chassis for Smart Slot
23.62/600 in./mm cubicle
24V supply for Triple
chassis.
Must ONLY be used for this
purpose.
NOT suitable for telephone
equipment.
X50
39.37/1000 in./mm cubicle
7OY0002 US rev. 04
30
Installation Guide Silcon DP300E 208V/480V 10-80 kVA
Connection
4.5
External DC connection
4.5.1 External DC connection Silcon DP310E [208V], DP310E [480V],
DP315E [480V], and DP320E [480V]
Top entry
7OY0002 US rev. 04
Installation Guide Silcon DP300E 208V/480V 10-80 kVA
31
Connection
Bottom entry
Please refer to section 4.1.1 regards cable sizes.
7OY0002 US rev. 04
32
Installation Guide Silcon DP300E 208V/480V 10-80 kVA
Connection
4.5.2 External DC connection Silcon DP315E [208V], DP320E [208V],
DP330E [208V], DP330E [480V], DP340E [208V], DP340E [480V]
DP360E [480V], and DP380E [480V]
Bottom entry
Please refer to section 4.1.2 regards cable sizes.
For top entry please refer to section 8.9.
7OY0002 US rev. 04
Installation Guide Silcon DP300E 208V/480V 10-80 kVA
33
Connection
4.6 Installation of battery drawers
Important Safety Instructions
a) Installation of battery drawers in the UPS cubicle should be performed or supervised by personnel knowledgeable of batteries and the required precautions.
Keep unauthorized personnel away from batteries.
b) When replacing batteries, replace with the same number and type as installed.
c)
CAUTION - Do not dispose of battery or batteries in a fire. The battery may
explode.
d) CAUTION - Do not open or mutilate the battery or batteries. Released electrolyte
is harmful to the skin and eyes. It may be toxic.
e) CAUTION - A battery can present a risk of electrical shock and high short circuit
current. The following precautions should be observed when working on batteries:
1) Remove watches, rings, or other metal objects.
2) User tools with insulated handles.
3) Wear rubber gloves and boots.
4) Do not lay tools or metal parts on top of batteries.
5) Disconnect charging source prior to connecting .
The installation and use of this product must comply with all national, federal, state,
municipal or local codes that apply. If you need assistance, please have your UPS
model and serial number available and call APC’s toll free technical support at:
1-877-287-7835 (1-877-2UPS-TEK).
You can find additional product information on the APC World Wide Web site at
http://www.appc.com. See also Section 11.0: How to contact APC.
7OY0002 US rev. 04
34
Installation Guide Silcon DP300E 208V/480V 10-80 kVA
Connection
4.6.1 DP300E cubicle
WARNINGS
The total system contains HAZARDOUS AC/DC VOLTAGES and is supplied
from more power sources. Some terminals and components are live even when the
system is switched off!
ONLY qualified electricians are allowed to perform the installation according to
national and local codes!
NO Silcon DP300E types are allowed to have built-in batteries when connected to
external batteries!
Do NOT install other batteries that do not follow the specification indicated by APC,
otherwise the installer takes over the full responsibility!
Do NEVER lift or transport the batteries when connected and installed.
4.6.2
Preparing the batteries
WARNINGS
Battery drawer weighs approx. 48 lbs.
The 12V, 7.2 Ah batteries are glued to the drawer plate.
Battery drawer constitutes a risk of electrical shock and an energy hazard. Before
installing the battery drawer, remove conductive jewellery such as chains, wristwatches and rings. High short circuit current through conductive materials may
cause severe burns.
Do not install battery drawers into the Silcon DP300E frame before all AC/DC disconnections are made.
If battery drawers are to be stored for an extended time, store them in a dry, cool
environment.
Keep the battery drawer upside according to labels.
Do not stack more than 3 battery drawers wrapped in cardboard on top of each
other.
Cardboard part no. SL9800167.
7OY0002 US rev. 04
Installation Guide Silcon DP300E 208V/480V 10-80 kVA
35
Connection
The battery drawer comes on a pallet, and the battery drawer is wrapped in cardboard.
Unpack the battery drawer, check that the type, no., and size are corresponding to
the ordered.
Connect the wire according to below picture.
7OY0002 US rev. 04
36
Installation Guide Silcon DP300E 208V/480V 10-80 kVA
Connection
4.6.3 Placing
Silcon DP300E in 23,62/600 in./mm cubicle
1 column for 1xBPI
8 drawers with a total of 64 batteries
Silcon DP300E in 39,37/1000 in./mm cubicle
2 columns for 2xBPI
16 drawers with a total
of 128 batteries
7OY0002 US rev. 04
Installation Guide Silcon DP300E 208V/480V 10-80 kVA
37
Connection
4.6.4 Mounting the batteries
WARNINGS
Open the front door of the Silcon DP300E and unscrew front cover.
Do not install battery drawers into the Silcon DP300E frame before all AC/DC disconnections are made.
Disconnect charging source prior to connecting. Ensure that breakers F001 and
F002 are in position “off”.
Position of the F001 and F002
Insert all battery drawers
Unscrew front frame on Silcon DP300E 10-20kVA systems and slide the frame down
as shown above.
All other systems come with direct access for the installation of the battery drawer,
just by moving the front cover.
Check all battery connections for proper contact.
Rear
Front
Red and black connector in the front
7OY0002 US rev. 04
38
Installation Guide Silcon DP300E 208V/480V 10-80 kVA
Connection
Insert battery drawers in
Silcon DP300E
Connect all battery drawers to the
terminal on the left side of the column
4.6.5 Before starting-up
WARNINGS
1.
Ensure that no electric power supply source has been connected to the Silcon
DP300E for at least 5 min.
2.
Ensure that F001 and F002 are in position “off”.
3.
Follow the described “starting-up procedure” in the Guides provided with the
system.
7OY0002 US rev. 04
Installation Guide Silcon DP300E 208V/480V 10-80 kVA
39
Connection
4.7 Battery replacement
a.
Servicing of batteries should be performed or supervised by personnel knowledgeable of batteries and the required precautions. Keep unauthorized personnel away from batteries.
b.
When replacing the batteries in a system having internal batteries, it is demanded that the batteries are R/C (BAZR2).
Max. length each battery:
Max. width each battery:
152mm
67mm
When the batteries are to be mounted, there must be at least 0,5mm space
between the batteries and between the batteries and the battery shelf.
c.
CAUTION - Do not dispose of battery or batteries in a fire. The battery may
explode.
d.
CAUTION - Do not open or mutilate the battery or batteries. Released electrolyte is harmful to the skin an eyes. It may be toxic.
e.
CAUTION - A battery can present a risk of electrical shock and high short
circuit current. The following precautions should be observed when working on
batteries:
1.
Remove watches, rings, or other metal objects.
2.
Use tools with insulated handles.
3.
Wear rubber gloves and boots.
4.
Do not lay tools or metal parts on top of batteries.
5.
Disconnect charging source prior to connecting or disconnecting battery
terminals.
6.
Determine if the battery is inadvertently grounded. If inadvertently
grounded, remove source of ground. Contact with any part of a grounded
battery can result in electrical shock. The likelihood of such shock will be
reduced if such grounds are removed during installation and maintenance
(applicable to a UPS and a remote battery supply not having a grounded
supply circuit).
7OY0002 US rev. 04
40
Installation Guide Silcon DP300E 208V/480V 10-80 kVA
Starting up
5.0. Starting up
5.1
NOTE:
If the starting up procedure for
any reason is interrupted –
wait until the display shows the
step 4 picture and repeat from
this step.
WARNING:
Do not insert F020 or F021 or
external battery MCCB’s without the display showing “Close
MCCB” – otherwise you may
damage the UPS.
If there is a fault in the charge
circuit the display will show:
“DC capacitor charge error”.
Do not insert F020 or F21 or
close MCCB, but call for
assistance.
WARNING:
If “Autostart” is active (please
refer to 6.2) the UPS will start
up automatically after step 9
with a delay of 1 minute.
Starting up Silcon DP310E - DP380E
1.
Ensure that the system has been at stable environment for at least 12 hours to
ensure any condensation has been evaporated before starting up.
2.
Prepare the system by opening the front door(s).
Display shows
3.
Switch on the mains power supply
System type XXX
XXX kVA - XXX
4.
Wait about 10 seconds
Stop charge DC
capacitors : YES
5.
Press
on the keyboard
Start charge DC
capacitors : YES
6.
Press
on the keyboard
Data stored
7.
Wait about 1 second
Start charge DC
capacitors : YES
8.
Wait about 1 minute
Insert fuse or
close MCB
9.
a) Systems with built-in batteries (only possible with
Silcon DP310E/DP340E). Insert F020 and F021.
** System OFF **
b) Systems with external batteries.
Close battery MCCB’s in MCCB box or battery
cubicle.
Please refer to LED indication and labeling in
MCCB box or battery cubicle.
10. Press the green “ON“ push-button.
Normal operation
load power XX%
11. Close the front door.
The system is now started up and ready for use.
7OY0002 US rev. 04
Installation Guide Silcon DP300E 208V/480V 10-80 kVA
41
Programming parameters
6.0
Programming parameters
6.1
General
Below listed parameters can be programmed directly from the keyboard during the
commissioning.
Parameters are programmed as shown in the example 6.2.3.
6.2
Parameters
6.2.1
NOTE:
The system must not run in
bypass mode for longer periods
of time as the batteries will not
be recharged.
Parameter
Setting*
Comments
Bypass
YES, NO
“YES” will switch the system into
bypass mode
Language
GB, D, F,
DK, S, SF
NL, PL, CZ
E, P, SK, H
Language of text in display
Autostart
YES, NO
Automatic restart by mains return (1 min.
delay). Ensures quick battery recharge.
Remote shutdown
active
YES, NO
Shutdown of UPS by remote signal when in
battery operation. Saves battery energy.
Remote shutdown
polarity
HIGH, LOW Nature of remote shutdown signal polarity
Remote shutdown time
0, 1, 2, 3, 4
5, 6, 7, 8, 9
10 min.
Time delay on remote shutdown of UPS
Battery capacity test
–
Initiates check of back-up time. The
measured time is from start until it reaches
low DC warning level (Se section 8.4)
Battery monitor test**
–
Initiates checks of battery condition by
25% discharging.
Auto battery test**
3, 6 months
OFF
Activates the battery monitor test in cyclic
intervals (standard 3 months)
Battery monitor reset**
–
Pressing the
and
key after
selecting this parameter resets alarms and
flushes messages in the alarm stack
Boost charge
YES, NO
“YES” results in boost charge (10 hours)
Autoboost charge
YES, NO
“YES” results in boost charge after battery
operation. (10 hours)
Enter new date
YYMMDD
Local date can be entered
Enter new time
HHMMSS
Local time can be entered
* Text in bold letters are the factory standard setting
** Only for systems with Battery Monitor active
7OY0002 US rev. 04
42
Installation Guide Silcon DP300E 208V/480V 10-80 kVA
Programming parameters
6.2.2
Keys used for programming
6.2.3
Programming example - switch to bypass operation
NOTE:
The display accuracy is ±2%,
±1 digit.
Action
Display shows
1. Press
to enter parameter stack
2. Press
or
3. Press
until
4. Press
to store
5. Press
to exit
until
Bypass operation
: NO
Bypass operation
: YES
Bypass operation
load power xx%
To return to normal operation
Action
Display shows
6. Press
to enter parameter stack
7. Press
or
8. Press
until
9. Press
to store
10. Press
to exit
until
Bypass operation
: YES
Bypass operation
: NO
Normal operation
load power xx%
Programming of the other parameters can be performed in exactly the same way.
7OY0002 US rev. 04
Installation Guide Silcon DP300E 208V/480V 10-80 kVA
43
Programming parameters
6.3
Programming of system configuration parameters
The system configuration parameters are protected by a password because most of
them are critical for correct operation of the system. Wrong programming can for
example destroy the battery or cause loss of output voltage during operation!!
6.3.1 System configuration parameters
Parameter
Setting*
Comments
Isolation trafo mains
YES, NO
YES if optional input isolation transformer is
present
Isolation trafo output
YES, NO
YES if optional output isolation transformer is
present
Delta soft start time
1, 10, 20,
40 secs.
Input current switching in ramp function.
Higher values used together with smaller/
unstable diesel generators
External SSW present
YES, NO
YES for systems with external static bypass
switch
Normal charge voltage
Setting of float charge voltage at 20°C /68°F
(Aut. compensation for deviations)
Boost charge voltage
Setting of boost charge voltage at 20°C /68°F
(Aut. compensation for deviations)
Low battery warning
Warning for discharged battery
Low battery shut down
Switches off the system at min. permissible
battery voltage
Synchronization
0.25, 0.5, 1
2, 4 Hz/sec
Synchronisation speed. Higher values used
with very unstable mains frequencies
High battery temperature
15-40°C
/59-104°F
35°C
/95°F
Alarm for too high battery ambient
temperature
Common fault delay
0, 10, 20
30 secs.
Delay before the common fault alarm relay is
activated
Reset operation mode
lock
YES, NO
YES resets system locked in bypass or battery
operation mode caused by system failures
(Only for service personnel)
Expected back-up
time [min.]
0,1-999,9
5,0
Expected back-up time for UPS in minutes,
when running at 100% ohmic load.
Time used by the ABM**
Battery capacity
in [Ah]
NOTE:
Common battery pack is a
technical possibility.
However, APC recommend
separate battery pack due to a
higher safety degree in connection with redundant/parallel
operation.
The UPS system is prepared
for both solutions.
0,1-999,9
7,0
Total battery capacity in Ah.
Setting used by the ABM**
Highest station address
2-9
Highest station address in parallel system
Station address
1-9
Station address in parallel system
Advanced power
management (APM)
None
Only used in parallel system.
Off: Advanced power management disabled.
Parallel +1: Redundant operation with all units
in operation.
Redundant +1: Redundant operation with
one unit being inactive in parallel system
APM test mode active
YES, NO
YES, if APM test mode is active
Battery connection
Common,
Separate
Common if common battery is used in parallel
system. Separate if separate battery is used
* Text in bold letters are the factory standard setting
** Advanced Battery Monitor
7OY0002 US rev. 04
44
Installation Guide Silcon DP300E 208V/480V 10-80 kVA
Programming parameters
6.3.2 Programming example – change charge voltage to 446V*
Action
WARNING:
If not complete sure about the
consequences of changing a
parameter – please contact
your local dealer!
NOTE:
The level used in the programming example 6.3.2 is only
valid for 480V versions.
For 208V versions the level is
223V.
1.
Press
Display shows
and
simultaneously to open
for password input
2.
Key in password
:
Enter password 28 28 28 by pressing
Last selected
parameter
3.
Press
or
4.
Press
5.
Press
6.
Wait about 1 second
7.
Press
until
Normal charge voltage
: 438
Normal charge voltage
: 446
to store
to exit
Data stored
Normal charge voltage
: 446
Normal operation
load power XX%
7OY0002 US rev. 04
Installation Guide Silcon DP300E 208V/480V 10-80 kVA
45
Programming parameters
6.3.3 Programming example - change to output isolation transformer
present*
Action
1.
Press
Display shows
and
simultaneously to open
Key in password
:
for password input
2.
Enter password 28 28 28 by pressing
Last selected
parameter
3.
Press
or
4.
Press
for change
5.
Press
to store
6.
Wait about 1 second
7.
Press
to exit
until
Isolation trafo output
: NO
Isolation trafo output
: YES
Data stored
Isolation trafo output
: YES
Normal operation
load power XX%
*For charge voltages, battery warnings and shut down voltages and high battery
temperature the parameter is changed by entering the actual value like example
key as step 4 in example
6.3.2. The other parameters are selected by pressing the
6.3.3. - one or more times.
7OY0002 US rev. 04
46
Installation Guide Silcon DP300E 208V/480V 10-80 kVA
Programming parameters
6.4
Programming of battery monitor
Action
1.
Press
Display shows
and
simultaneously to open
for password input
2.
Key in password
:
Enter password 28 28 28 by pressing
Last selected
parameter
3.
Press
or
until
4.
Enter the expected back-up time in min. at
100% ohmic (pf = 1) load, when the inverter
has a mean efficiency of approx. 94%
Expected back-up
time [min.]: XXX.X
Expected back-up
time [min.]: 14.0
Press
Data for DP310E: A-Pack (7Ah) = 14.0 min.
5.
Press
to store data
6.
Press
or
7
Press
8.
Press
to store data
9.
Press
to exit
until
to set Ah = 7.0 for battery
Data stored
Battery capacity
in [Ah]: XX.X
Battery capacity
in [Ah]: 7.0
Data stored
Normal operation
load power XX%
Installation of new batteries:
When installing new batteries the procedure in 6.4 MUST be carried out, otherwise
the monitor may give false alarms.
7OY0002 US rev. 04
Installation Guide Silcon DP300E 208V/480V 10-80 kVA
47
Switching off
WARNING:
This UPS system contains a
special design feature, which
guarantees output voltage in
the form of bypass operation.
This function comes into
operation in case of failure in
internal power supply or in
controller circuit.
Even if the UPS system is
assumed to be switched off,
there may be voltage at the
UPS output because of the
special bypass feature.
Switching off by pressing the
red “OFF”-button.
TEST BEFORE TOUCHING!
WARNING:
Batteries out of service could
be damaged if not recharged
every 3rd month.
WARNING:
Internal DC-capacitor may
contain energy even after the
UPS has been switched off.
On account of the automatic
discharging, wait at least 5
minutes after that the UPS has
been switched off until working
on the system is commenced.
7.0
Switching off
7.1
Switching off Silcon DP310E-DP380E
1.
Prepare the system by opening the front door(s).
2.
Continue with the next point (3) and observe that this next step will interrupt the
system output voltage!!!
Display shows
3.
** System OFF **
Press the red “OFF“ push-button.
The acoustic alarm sounds for 30 sec.*
4.
5.
Switch off the mains power supply
The red alarm LED below the display ligths.
The acoustic alarm sounds for 30 sec.
** System OFF **
a) Systems with built-in batteries (only possible for
Silcon DP310E/DP340E). Open F020 and F021.
b) Systems with external batteries.
Switch off battery MCCB’s in MCCB box or battery
cubicle.
Please refer to LED indication and labeling in MCCB
box or battery cubicle.
Blank
The acoustic alarm sounds shortly.
*The acoustic alarm can be reset by the
key.
The UPS is now isolated. Maintenance/repair work can take place or the UPS can be
disconnected and removed.
7OY0002 US rev. 04
48
Installation Guide Silcon DP300E 208V/480V 10-80 kVA
Options/Accessories
NOTE:
Do only use the original control
cable delivered with the parallel
board.
8.0
Options/Accessories
8.1
Parallel/Redundant operation
The parallel board.
NOTE:
The control cables must be
separated from the AC and DC
power cables.
Introduction.
The parallel board establishes the possibility to connect two or more systems in
parallel - either to obtain increased security or to obtain higher total output power.
Among other functions the parallel board ensures a correct load sharing between the
parallel connected systems.
Control cables.
The external multicable is terminated with a 15 pin SUB-D plug in both ends. Pin 1
to pin 1, pin 2 to pin 2, and so on up to pin 15 - except pin 8, which is not connected.
Shield is connected to plug cover in both ends.
The terminals X020 and X021 for the control cables are situated on the parallel
board. X020 in UPS1 is connected to X021 in UPS2, X020 in UPS2 is connected to
X021 in UPS3 and so on. X020 in last UPS is connected to X021 in UPS1.
Power cables.
To optimize load sharing in parallel operation the external power circuits must be
“symmetrical”, i.e. power input cables must have same lengths and cross-sections
and the same for output cables.
7OY0002 US rev. 04
Installation Guide Silcon DP300E 208V/480V 10-80 kVA
49
Options/Accessories
General programming/operation.
Programming parameters for advanced parallel operation.
To use the advanced parallel functions the following parameters must be programmed:
1.
2.
3.
4.
5.
NOTE:
Common battery pack is a
technical possibility.
However, APC recommend
separate battery pack due to a
higher safety degree in connection with redundant/parallel
operation.
The UPS system is prepared
for both solutions.
“Station number”
“Highest station address”
“Advanced power management”
“APM test mode active”
“Battery connection”
Description of settings.
1. “Station number”
• Valid station numbers: 1-9 stating the UPS parallel address in the system.
2. “Highest station number”
• Valid station numbers: 2-9 stating the number of UPS’s in the system.
3. “Advanced power management”
• “Disabled”: Advanced power management is inactive.
• “PARALLEL+1”: Advanced power management is activated when the system
operates as PARALLEL+1, meaning that one system can be isolated without
overloading the remaining systems (N systems/UPS).
• “REDUNDANT+1”: Advanced power management is activated when the
system operates as REDUNDANT+1, meaning that one system can be
isolated without overloading the remaining systems (N systems/UPS) with
one spare system.
4. “APM test mode active”
• “No”: Stand-by time will be 24 hours - on-line time will be 48 hours * N
systems.
• “Yes”: Stand-by time will be 1 min. - on-line time will be 2 min. * N systems.
5. “Battery connection”
• “Separate”: Separate battery for this UPS.
• “Common”: Common battery in a parallel system. When this setting is
chosen, the highest battery temperature that can be found in the parallelled
systems is used (for charge voltage compensating).
Programming guide.
Example with 4 systems in parallel with separate batteries.
• Programme the station addresses 1-4: 1 for UPS 1, 2 for UPS 2, 3 for UPS 3, and
4 for UPS 4.
• All UPS systems have to be programmed to “Highest station address” = 4.
• If AMP should not be tested, “APM test mode active” must be “NO”.
• If a system is isolated due to service the station numbers must be reprogrammed
for the remaining active systems starting with number 1 and ending with max.
number of active systems. No numbers must be left out in this sequence. Furthermore “Highest station address” must be changed to number of active UPS’s
in parallel.
7OY0002 US rev. 04
50
Installation Guide Silcon DP300E 208V/480V 10-80 kVA
Options/Accessories
Parallel operation alarms.
General.
If alarms concerning the parallel operation communication arise all parallel operation functions being controlled by the advanced management will be inactive. If the
advanced parallel operation functions are inactive, “only” the simple hardware
control of parallel operation, which controls load sharing, operation mode, etc., is
left.
Alarm texts conc. parallel operation.
In case of fault in parallel operation the following alarm will be active in the alarm
stack:
• “Communication to parallel IF lost”.
Other reasons for parallel operation alarm.
• When a system is isolated (PSU OFF) due to service this fault will as well arise
on the systems still operating. The reason is that the isolated system is no longer
to be found (active) in the parallel system. The fault can only be deleted by
turning on the PSU or by reprogramming the station addresses on all systems so
that the sequence is: 1 to max_number_system.
7OY0002 US rev. 04
Installation Guide Silcon DP300E 208V/480V 10-80 kVA
51
Options/Accessories
8.2
Service Bypass Panel for Parallel Redundant Operation,
Single Mains, SBP-00A-SR
The SBP-00A-SR series contains 3 models, SBP-40A-SR, SBP-80A-SR and
SBP-175A-SR, covering the range 10 to 40kVA, 208V and 10 to 80kVA, 480V.
8.2.1 General arrangement
SBP-00A-SR
Q003
System
Input
Q004
System
Output
Q002b Q002a
Q001a Q001b
X020
X021
Control
cables
Silcon
DP300E
MCCB-box Battery
X020
X021
Silcon
DP300E
7OY0002 US rev. 04
52
Installation Guide Silcon DP300E 208V/480V 10-80 kVA
Options/Accessories
FRONT VIEW
System
Input
System
Output
Q003
Q001a
H003
F001a
Q004
F007
H004
F002a
Q002a
H002a
Q001b
F002b
F001b
Q002b
H002b
UPS-A UPS-B
Input Input
UPS-A UPS-B
Output Output
7OY0002 US rev. 04
Installation Guide Silcon DP300E 208V/480V 10-80 kVA
53
Options/Accessories
INTERNAL FRONT VIEW
Q001a
L3
X002a: L2
UPS-A
L1
Input
F001a
X004:
System
Output
Q003
N
N
Q004
X001:
System
Input
L1 L2 L3
L3
L2
L1
N
F007
F010
X010a X010b X011
1
14
1
14
1 4
F002a
Q002a
T010
X002b: L2
UPS-B
L1
Input
L2 X003a:
UPS-A
L1 Output
N
Q001b
L3
L3
F002b
F001b
Q002b
L3
N
L2 X003b:
UPS-B
L1 Output
7OY0002 US rev. 04
54
Installation Guide Silcon DP300E 208V/480V 10-80 kVA
Installation Guide Silcon DP300E 208V/480V 10-80 kVA
1
4
UPS-A INPUT
X002a: N L1 L2 L3 G
0 1
Q001/
F001a
L2
L3
N
L1
X001: N L1 L2 L3 G
SYSTEM INPUT
1
1
4
7
X011
3
4
13 21 22 14
0
1
Q003
H002a
R002a
X010b
TO UPS-B SYSTEM INTEGRATION INTERFACE
X010a
H004
UPS-A OUTPUT
14
13
0 1
Q004
X003a: N L1 L2 L3 G
0 1
Q002/
F002a
OUTPUT
PARALLEL
BUS
R004
1 2 3 4 5 6 7 8 9 10 11 12 13 14
H003
TO UPS-A SYSTEM INTEGRATION INTERFACE
1 2 3 4 5 6 7 8 9 10 11 12 13 14
INPUT
BUS
F010
5
T010
UPS-B INPUT
X002b: N L1 L2 L3 G
0 1
Q001/
F001b
Link for 200/208/220V
system. Open for
480V system.
2
X011:1
R003
SYSTEM OUTPUT
R002b
H002b
14
13
N
L1
L2
L3
UPS-B OUTPUT
X003b: N L1 L2 L3 G
0 1
Q002/
F002b
21
13
14
22
F007
X004: N L1 L2 L3 G
Options/Accessories
8.2.2 Diagram
7OY0002 US rev. 04
55
56
1 2 3 4
5
X010a
6 7 8
9 10 11 12 13 14
+ - + - G
X001 X002
X003 X004
+ - + - G
Silcon
DP300E
X001
L1 L2 L3 N G
1 2 3 4 5
X005
6
MCCB-Box
X009
X010
X003
X004
X011
1 2 3 4
5
X010b
6 7 8
9 10 11 12 13 14
Battery 1
MCCB-Box
+
X003
+
+
G
-
+
-
G
G
-
X011
X004
X010
Battery 1
Battery 2
Temp. sensor
Battery 2
X009
X020 X021
Parallel board
X005
L1 L2 L3 N G E
Temp. sensor
+ - + - G
X001 X002
6
MCCB trip
X003 X004
+ - + - G
1 2 3 4 5
X005
System Integration Interface
X012
X001
X004
1 2 6 7 8
1 2 3 4
1 2 3 4
1 2 3 4 5 6 7 8
X003
X003b
L1 L2 L3 N G
MCCB trip
X020 X021
Parallel board
Silcon
DP300E
X001
L1 L2 L3 N G
X005
L1 L2 L3 N G E
-
G
System Integration Interface
X012
X001
X004
1 2 3 4
1 2 3 4
1 2 6 7 8
1 2 3 4 5 6 7 8
X003
X002b
L1 L2 L3 N G
X003a
L1 L2 L3 N G
SYSTEM
OUTPUT
N
G
X002a
L1 L2 L3 N G
L3
N
G
N
G
N
G
SYSTEM
INPUT
L2
X004 L3
SBP-00A-SR
L3
L3
X001
L2
L2
L1
L1
L1
L2
FM
L1
Options/Accessories
8.2.3 Parallel/Redundant Silcon DP300E with SBP-00A-SR and External
Battery via MCCB Box - Single Mains - 4 wire grounded WYE service
7OY0002 US rev. 04
Installation Guide Silcon DP300E 208V/480V 10-80 kVA
1 2 3 4
5
X010a
6 7 8
Installation Guide Silcon DP300E 208V/480V 10-80 kVA
+ - + - G
X001 X002
X003 X004
+ - + - G
Silcon
DP300E
X001
L1 L2 L3 N G
X002a
L1 L2 L3 N G
9 10 11 12 13 14
1 2 3 4 5
X005
6
MCCB-Box
X009
X010
X003
X004
X011
1 2 3 4
5
X010b
6 7 8
9 10 11 12 13 14
MCCB-Box
X009
X010
X004
X011
-
G
X003
+
+
+ - + - G
X001 X002
G
-
Battery 1
Battery 2
Battery 1
Battery 2
Temp. sensor
X020 X021
Parallel board
X005
L1 L2 L3 N G E
Temp. sensor
+
+
6
MCCB trip
X003 X004
+ - + - G
1 2 3 4 5
X005
System Integration Interface
X004
X012
X001
1 2 6 7 8
1 2 3 4
1 2 3 4
1 2 3 4 5 6 7 8
X003
X003b
L1 L2 L3 N G
MCCB trip
X020 X021
Parallel board
Silcon
DP300E
X001
L1 L2 L3 N G
X005
L1 L2 L3 N G E
G
-
-
G
System Integration Interface
X012
X001
X004
1 2 3 4
1 2 3 4
1 2 6 7 8
1 2 3 4 5 6 7 8
X003
X002b
L1 L2 L3 N G
X003a
L1 L2 L3 N G
GROUNDING
ELECTRODE
SYSTEM
OUTPUT
G
SYSTEM
INPUT
G
L3
N
G
N
G
L2
X004 L3
L3
L3
SBP-00A-SR
L2
L2
X001
L1
L1
L1
L2
FM
L1
Options/Accessories
8.2.4 Parallel/Redundant Silcon DP300E with SBP-00A-SR and External
Battery via MCCB Box - Single Mains - 3 wire grounded WYE service
7OY0002 US rev. 04
57
Options/Accessories
8.2.5 Mounting and Connection
Wall at rear of panel
5
20
112
152
SBP-40A-SR Footprint
688
Gap behind
plinth to allow
for the covers
and screws at
the back of the
main part of the
enclosure.
Similar at the left
and right hand ends.
364
364
Fixing holes suitable for M10 bolts
Wall at rear of panel
5
152
20
112
SBP-80A-SR Footprint
1072
Gap behind
plinth to allow
for the covers
and screws at
the back of the
main part of the
enclosure.
Similar at the left
and right hand ends.
364
384
364
Fixing holes suitable for M10 bolts
Wall at rear of panel
5
20
40
344
Gap behind
plinth to allow
for the covers
and screws at
the back of the
main part of the
enclosure.
Similar at the left
and right hand ends.
SBP-175A-SR Footprint
304
1456
364
768
364
Fixing holes suitable for M10 bolts
7OY0002 US rev. 04
58
Installation Guide Silcon DP300E 208V/480V 10-80 kVA
Options/Accessories
NOTE:
All external cable dimensions
are recommended.
Please refer to local legal
provisions.
WARNING:
At 100% switch mode load the
neutral conductor shall be rated
for 173% output phase current.
Type
For
System
SBP-40A-SR
DP310E
- 480V
DP315E
- 480V
DP320E
- 480V
DP310E
- 208V
DP330E
- 480V
DP340E
- 480V
DP315E
- 208V
DP320E
- 208V
DP360E
- 480V
DP380E
- 480V
DP330E
- 208V
DP340E
- 208V
SBP-80A-SR
NOTE:
φ is symbol for “phase”.
SBP-175A-SR
is symbol for “Risk of
Electric Shock”.
Terminal for Equipment
Grounding Conductor is
marked
Dimensions HxWxD* [mm]
Weight [kg]
1250 x 770 x 216
90
1632 x 1155 x 216
150
1632 x 1540 x 408
250
* Depth of enclosure including switch handles stated in brackets.
NOTE:
Grounding, please refer to local
legal provisions.
NOTE:
Ensure correct phase
connection of inputs and
outputs.
7OY0002 US rev. 04
Installation Guide Silcon DP300E 208V/480V 10-80 kVA
59
Options/Accessories
d)
a)
a)
b)
a)
b)
INT.
EXT.
INT.
EXT. b+c) EXT.
EXT.
INPUT
INPUT OUTPUT OUTPUT NEUTRAL EQU.
FUSES PHASE FUSES PHASE CONDU. GND.
[A]
CONDU.
[A]
CONDU. [AWG] CONDU.
[AWG]
[AWG]
[AWG]
TYPE
FOR
SYSTEM
EXT.
INPUT
FUSES
[A]
SBP40A-SR
DP310E
- 480V
DP315E
- 480V
DP320E
- 480V
DP310E
208V
25
20
10
15
14
10
10
30
25
8
20
10
8
10
40
35
8
25
10
6
10
45
40
6
30
8
4
10
60
50
4
40
6
3
10
80
70
3
50
4
1
8
70
60
3
45
6
2
8
90
80
1
60
4
1/0
8
110
100
1/0
80
2
3/0
8
150
125
3/0
100
1/0
6
150
125
3/0
90
1
250
kcmil
4/0
175
150
250
kcmil
125
2/0
250
kcmil
6
SBP80A-SR
SBP175A-SR
DP330E
- 480V
DP340E
- 480V
DP315E
- 208V
DP320E
208V
DP360E
- 480V
DP380E
- 480V
DP330E
- 208V
DP340E
- 208V
6
a) Class J-fast acting in accordance with UL248-8.
b) Cable sizes refer to US National Electric Code, Table 310-16, cables rated 75˚C/167˚F at max.
40˚C/104˚F ambient.
All cables rated 600V.
As regards recommended cable lugs and crimping tool, see section 4.1.4.
c) Dimensioned for switch mode load. (INEUTRAL = √3*ILOAD PHASE)
For linear load neutral cable can be rated as output phase cables.
d) The internal input and output fuses have to be configured for the appropriate DP300E types.
7OY0002 US rev. 04
60
Installation Guide Silcon DP300E 208V/480V 10-80 kVA
Options/Accessories
8.2.6
Operating the external service bypass switch for parallel systems
Single Mains
8.2.6.1 Bypassing the parallel UPS system
H003
Mains
Load
Q003
Service
bypass
switch
Q004
H004
Display shows
H002a
Q002a
Q002b
Q001b
Q001a
H002b
Action
Point 1-4 can be carried out with any of the parallel systems, however this will switch all
systems into bypass operation.
1.
Press
on the keyboard
2.
Press
or
3.
Press
on the keyboard
4.
Press
on the keyboard
on the keyboard until
DP300E
DP300E
All systems will transfer to bypass operation
WARNING!
If the UPS is out of service for
more than 8 days the
connected batteries might be
damaged. Refer to total
“Switching off“ as described in
Chapter 7.0.
Do not switch off any of the UPS systems until
point 5-8 has been carried out
Bypass operation
: NO
Bypass operation
: YES
Bypass operation
Lamp indication
on bypass panel
5.
Check lamp indication on the bypass panel
The green lamp (H003)
above the bypass switch
handle (Q003) lights
6.
Turn the external bypass switch (Q003)
to position “1“
The green lamp (H004)
above the output switch
(Q004) and the green lamps
(H002) above the output
switch handles (Q002) light
7.
Turn the output switch (Q004) to position “0”
The green lamps (H002)
above the output switch
(Q002) light and the green
lamp (H004) above the output switch (Q004) lights
8.
Turn all output switches (Q002) to position “0“
Now the lamps (H002) above
the output switch handles
(Q002) light and the green
lamp (H004) above the output switch (Q004) lights
7OY0002 US rev. 04
Installation Guide Silcon DP300E 208V/480V 10-80 kVA
61
Options/Accessories
Display shows
9.
Open the front door and press the red “OFF”
push-button in any of the systems.
The acoustic alarm sounds for 30 secs.*
**System OFF**
Repeat for (all) other system(s)
10. Turn all input switches (Q001) to position “0“
The red alarm LED below the display lights and
the acoustic alarm sounds for 30 secs.
* The acoustic alarm can be reset by the
key
EMERGENCY (UPS not alive)
1.
2.
3.
4.
5.
Turn the input switches (Q001) to position “0“.
Turn the output switches (Q002) to position “0“.
Turn the output switch (Q004) to position “0”.
Change any released system input fuse(s).
Turn the bypass switch (Q003) to position “1“.
7OY0002 US rev. 04
62
Installation Guide Silcon DP300E 208V/480V 10-80 kVA
Options/Accessories
8.2.6.2 Switching the parallel system from external bypass into normal
UPS operation
Single Mains
Action
H003
Mains
Display shows
Load
Q003
Service
bypass
switch
Check that the output switch (Q004) is in
position “0”
2.
Check that all output switches (Q002) are
in position “0”
3.
Turn input switches (Q001) to position “1”
4.
Open the UPS front door and press the
green “ON” push-button
5.
Press
on the keyboard
6.
Press
or
7.
Press
on the keyboard
8.
Press
on the keyboard
H002a
Q002a
Q002b
Q001b
H002b
Q001a
1.
Q004
H004
DP300E
DP300E
NOTE:
If battery has been disconnected please refer to
“Starting Up” in Chapter 5.0 to
connect battery(-ies) again.
on the keyboard until
All systems will transfer to bypass operation
**System OFF**
Normal operation
load power 0%
Bypass operation
: NO
Bypass operation
: YES
Bypass operation
Lamp indication
on bypass panel
9.
Check that all output switches (Q002) are in
position “0”
The green lamps (H002)
above all the output switch
handles (Q002) lights. The
green lamp (H004) above
the output switch (Q004)
handle also lights.
10. Turn all output switches (Q002) to position “1”
11. Turn the output switch (Q004) to position “1”
The green lamps (H002)
above all the output switch
handles (Q002) light. The
green lamp (H004) above the
output switch (Q004) handle
and the green lamp (H003)
above the bypass switch
also light.
12. Turn the bypass switch (Q003) to position “0”
The green lamps (H002) and
(H004) do not light any longer,
but (H003) will light until
normal operation.
7OY0002 US rev. 04
Installation Guide Silcon DP300E 208V/480V 10-80 kVA
63
Options/Accessories
The following can be carried out on any UPS
13. Press
on the keyboard
14. Press
or
15. Press
on the keyboard
16. Press
on the keyboard
on the keyboard until
All the systems will transfer to normal
operation.
Display shows
Bypass operation
: YES
Bypass operation
: NO
Normal operation
load power xx%
No lamps on the bypass
panel light any longer
7OY0002 US rev. 04
64
Installation Guide Silcon DP300E 208V/480V 10-80 kVA
Options/Accessories
8.2.7 Isolating one UPS for service/maintenance
In a redundant system one UPS can be isolated for service/maintenance without
affecting the other parallelled UPS(s).
Single Mains
H003
Mains
Load
Q003
Service
bypass
switch
2.
Switch off the system to be isolated for maintenance by pushing the red “OFF”
push-button.
3.
Disconnect battery, mains, and output by opening battery MCCB and turning
input switch (Q001) and output switch (Q002) to position “0”.
Q004
H002a
Q002a
Q002b
Q001b
Check that the remaining UPS(s) will be able to carry the load when one UPS is
isolated.
H004
H002b
Q001a
1.
When Q002 is in position “0” the UPS can be operated and tested as a single
system without affecting the other parallelled UPS(s).
DP300E
Switching back the UPS to normal parallel/redundant operation
DP300E
WARNING!
The system will discharge builtin capacitors. However, before
working on the system check
with a multimeter that there is
no dangerous voltage on the
terminals .
1.
Turn the input switch (Q001) and the output switch (Q002) to position “1”.
2.
Charge capacitors, connect battery and start up the UPS as described in chapter
5.0.
The UPS will automatically switch to normal operation and start load sharing
with the other parallelled UPS(s).
7OY0002 US rev. 04
Installation Guide Silcon DP300E 208V/480V 10-80 kVA
65
Options/Accessories
8.3
Service Bypass Panel for Single Operation, Single Mains,
SBP-00A-SS
The SBP-00A-SS series contains 3 models, SBP-40A-SS, SBP-80A-SS and
SBP-175A-SS, covering the range 10 to 40kVA, 208V and 10 to 80kVA, 480V.
8.3.1 General arrangement
SBP-00A-SS
Q003
System
Input
System
Output
Q002
Internal
output
fuse
Q001
Silcon
DP300E
MCCB-box Battery
7OY0002 US rev. 04
66
Installation Guide Silcon DP300E 208V/480V 10-80 kVA
Options/Accessories
FRONT VIEW
UPS SERVICE BYPASS
SYSTEM
INPUT
SBP-40A-SS
SYSTEM
OUTPUT
CAUTION
FOR USE IN A CONTROLLED ENVIRONMENT. REFER TO MANUAL
FOR ENVIRONMENTAL CONDITIONS AND OPERATION INSTRUCTIONS.
H003
Q001
Q003
L1
L2
20X5mm
500mA
SBP-40A-SS. Tightening torque
X001/X004: 4.5Nm/39lb.in
X002: 3Nm/27lb.in
X003: See F002 fuse base
X001
F010 250V-T
INTERNAL
FRONT VIEW
BYPASS
H002
Q002
CAUTION: Risk of electric shock. This unit receives power from more than one
source. Disconnection of all AC sources is required to de-energise
this unit before service.
UPS INPUT
N
OPERATE Q002/Q003 ONLY
WHEN H002/H003 IS ON.
X011 1 2
200/
208/
220V
SYSTEM
UPS OUTPUT
X011 1 2
X004
480V
SYSTEM
L3
N
L1
L2
L3
X011
1 2 3
Q001
Q003
Q002
T010
N
L1
L2
L3
N
F002: ______ A
Class J - Fast acting
in accordance with
UL248-8
X002
F002
X010 1 2 3 4 5 6 7 8 9 10
L1
L2
L3
X003
7OY0002 US rev. 04
Installation Guide Silcon DP300E 208V/480V 10-80 kVA
67
68
N L1 L2 L3
UPS INPUT
X002: N L1 L2 L3
0 1
Q001
X001: N L1 L2 L3
SYSTEM INPUT
G
14
13
Link for 200/208/220V
system.
Open for 480V system.
G
2
X011:1
1
X010: 1
F010
5
T010
3
4
5
6
7
8
R002
H003
9 10
TO UPS SYSTEM INTEGRATION INTERFACE
2
7
X011:3
R003
22
L3
H002
21
N
L1
L2
0
1
Q003
N L1 L2 L3
G
G
F002
UPS OUTPUT
X003: N L1 L2 L3
0 1
Q002
X004: N L1 L2 L3
SYSTEM OUTPUT
14
13
Options/Accessories
8.3.2 Diagram
7OY0002 US rev. 04
Installation Guide Silcon DP300E 208V/480V 10-80 kVA
Options/Accessories
8.3.3 Silcon DP300E with SBP-00A-SS and External Battery via MCCB Box
- Single Mains - 3 wire grounded WYE-service
FM
F0
L1
L1
L2
L3
L2
SBP-00A-SS
X001
X004 L3
N
N
G
G
SYSTEM
INPUT
X002
L1 L2 L3 N G
X010
1 2
3
4
5
6
7
8
9 10
1 2
3
4 5
X003
6
1 2
3 4
X005
L1 L2 L3 N G E
L1 L2 L3 N G
X001
Silcon
DP300E
X003 X004
+ – + – G
SYSTEM
OUTPUT
X003
L1 L2 L3 N G
GROUNDING
ELECTRODE
X005
System Integration Interface
X004
X012
X001
1 2 6 7 8
1 2 3 4
1 2 3 4
MCCB trip
Temp. sensor
+ – + – G
X001 X002
X009
X010
X011
G
X004 +
MCCB-Box
Battery 2
G
X003 +
Battery 1
7OY0002 US rev. 04
Installation Guide Silcon DP300E 208V/480V 10-80 kVA
69
Options/Accessories
8.3.4 Silcon DP300E with SBP-00A-SS and External Battery via MCCB Box
- Single Mains - 4 wire grounded WYE-service
FM
F0
L1
L1
L2
L3
L2
SBP-00A-SS
X001
X004 L3
N
N
G
G
SYSTEM
INPUT
X002
L1 L2 L3 N G
X010
1 2
3
4
5
6
7
8
9 10
1 2
3
4 5
X003
6
1 2
3 4
X005
Silcon
DP300E
X003 X004
+ – + – G
SYSTEM
OUTPUT
L1 L2 L3 N G E
L1 L2 L3 N G
X001
X003
L1 L2 L3 N G
X005
System Integration Interface
X004
X012
X001
1 2 6 7 8
1 2 3 4
1 2 3 4
MCCB trip
Temp. sensor
+ – + – G
X001 X002
X009
X010
X011
G
X004 +
MCCB-Box
Battery 2
G
X003 +
Battery 1
7OY0002 US rev. 04
70
Installation Guide Silcon DP300E 208V/480V 10-80 kVA
Options/Accessories
8.3.5 Mounting & Connection
Type
NOTE:
All external cable dimensions
are recommended.
Please refer to local legal
provisions.
WARNING:
At 100% switch mode load the
neutral conductor shall be rated
for 173% output phase current.
NOTE:
φ is symbol for “phase”.
is symbol for “Risk of
Electric Shock”.
For System
System
400 x
380x330
460 x
125(175)
d)
FOR
SYSTEM
a)
EXT.
INPUT
FUSES
[A]
DP310E
- 480V
DP315E
- 480V
DP320E
- 480V
DP310E
208V
20
12
15
14
10
12
25
10
20
10
8
10
35
8
25
10
6
10
40
6
30
8
4
10
50
4
40
6
3
10
70
3
50
4
1
8
60
4
45
6
2
10
80
2
60
4
1/0
8
DP360E
- 480V
DP380E
- 480V
DP330E
- 208V
DP340E
- 208V
100
1/0
80
2
3/0
8
125
3/0
100
1/0
6
125
2/0
90
1
250
kcmil
4/0
150
4/0
125
2/0
250
kcmil
6
DP360E
- 208V
DP380E
- 208V
225
2 x 3/0
175
2 x 1/0
4
300
2 x 250
kcmil
250
2 x 3/0
2 x 250
kcmil
2 x 400
kcmil
TYPE
SBP-40A-SS
NOTE:
Grounding, please refer to local
legal provisions.
SBP-80A-SS
SBP-175A-SS
SBP-300A-SS
a)
b)
* Depth of enclosure
including switch
handles stated in
brackets.
Fixing
centres
AxB
[mm2]
SBPDP310E – 480V
40A-SS DP315E – 480V
DP320E – 480V
DP310E – 208V
SBPDP330E – 480V
80A-SS DP340E – 480V
DP315E – 208V
DP320E – 208V
SBPDP360E – 480V
175ADP380E – 480V
SS
DP330E – 208V
DP340E – 208V
SBPDP360E – 208V
300ADP380E – 208V
SS
Terminal for Equipment
Grounding Conductor is
marked
NOTE:
Ensure correct phase
connection of inputs and
outputs.
Dimension
HxWxD*
[mm]
DP330E
- 480V
DP340E
- 480V
DP315E
- 208V
DP320E
208V
B
560 x
460x660
750 x
175(235)
A
Centres for fixing holes
in rear of enclosure
960 x
860x660
750 x
175(235)
1250 x
For floor
1155 x
mounting
410(470)
4 x ø 6.5mm: SBP-40A-SS
4 x ø 8.5mm: SBP-80A-SS & SBP-175A-SS
b)
a)
b)
b+c)
EXT.
EXT. &
EXT.
EXT.
EXT.
INPUT
INT.
OUTPUT NEUTRAL EQU.
PHASE OUTPUT PHASE CONDU.
GND.
CONDU. FUSES CONDU.
[AWG]
CONDU.
[AWG]
[A]
[AWG]
[AWG]
c)
Class J-fast acting in accordance with UL248-8.
Cable sizes refer to US National Electric Code, Table 310-16, cables rated 75˚C/167˚F at max.
40˚C/104˚F ambient.
All cables rated 600V.
As regards recommended cable lugs and crimping tool, see section 4.1.4.
Dimensioned for switch mode load. (INEUTRAL = √3*ILOAD PHASE)
d)
For linear load neutral cable can be rated as output phase cables.
The internal output fuses have to be configured for the appropriate DP300E type.
6
4
7OY0002 US rev. 04
Installation Guide Silcon DP300E 208V/480V 10-80 kVA
71
Options/Accessories
8.3.6
Single Mains
Operating the external service bypass switch
8.3.6.1 Bypassing the UPS
Action
H003
Mains
Display shows
Load
Q003
Service
bypass
switch
1.
Press
on the keyboard
2.
Press
or
3.
Press
on the keyboard
4.
Press
on the keyboard
on the keyboard until
Bypass operation
: NO
Q002
Q001
H002
Bypass operation
: YES
The system will transfer to bypass operation.
Bypass operation
DP300E
Lamp indication
on bypass panel
WARNING!
If the UPS is out of service for
more than 8 days the
connected batteries might be
damaged. Refer to total
“Switching off“ as described in
Chapter 7.0.
5.
Check lamp indication on the bypass panel
The Green lamp (H003)
above the bypass switch
handle (Q003) lights
6.
Turn the external bypass switch (Q003)
to position „1“
The Green lamp (H002)
above the output switch
handle (Q002) lights
7.
Turn the output switch (Q002) to position „0“
Now only the lamp (H002)
above the output switch
handle (Q002) lights
Display shows
8.
Open the front door and press the red “OFF”
key.
**System OFF**
The acoustic alarm sounds for 30 secs.*
9.
Turn input switch (Q001) to position „0“
The red alarm LED below the display lights and
the acoustic alarm sounds for 30 secs.
* The acoustic alarm can be reset by the
key
EMERGENCY (UPS not alive)
1.
2.
3.
4.
Turn the input switch (Q001) to position „0“.
Turn the output switch (Q002) to position „0“.
Change any released system input fuse(s).
Turn the bypass switch (Q003) to position „1“.
7OY0002 US rev. 04
72
Installation Guide Silcon DP300E 208V/480V 10-80 kVA
Options/Accessories
8.3.6.2 Switching the system from external bypass into normal
UPS operation
Single Mains
Action
Display shows
H003
Mains
Load
Q003
Service
bypass
switch
Q002
Q001
H002
1.
Check that the output switch (Q002) is in
position “0”
2.
Turn the input switch (Q001) to position “1”
3.
Open the UPS front door and press the
green “ON” push-button
4.
Press
on the keyboard
5.
Press
or
6.
Press
on the keyboard
7.
Press
on the keyboard
on the keyboard until
DP300E
NOTE:
If the battery has been disconnected please refer to
“Starting up” in chapter 5.0 to
connect battery(ies) again.
The system will transfer to bypass operation
**System OFF**
Normal operation
load power 0%
Bypass operation
: NO
Bypass operation
: YES
Bypass operation
Lamp indication
on bypass panel
8.
Check that output switch (Q002) is in
position “0”
The green lamps (H002)
above the output switch
handle (Q002) lights.
9.
Turn the output switch (Q002) to position “1”
Now also the green lamp
(H003) above the bypass
switch handle (Q003) lights.
10. Turn the bypass switch (Q003) to position “0”
11. Press
on the keyboard
12. Press
or
13. Press
on the keyboard
14. Press
on the keyboard
on the keyboard until
The system will transfer to normal operation.
Only the green lamp (H003)
above the bypass switch
handle (Q003) lights.
Bypass operation
: YES
Bypass operation
: NO
Normal operation
load power xx%
No lamps on the bypass panel light any longer.
7OY0002 US rev. 04
Installation Guide Silcon DP300E 208V/480V 10-80 kVA
73
Options/Accessories
8.4
Relay Board
Relays.
All relays are “fail safe”, i.e. relay coil is energized when there is no alarm.
1
The relay is shown in alarm position.
Max. load:
8.0A - 277VAC
0.3A - 60VDC
Min. load:
0.05A - 6VAC
0.05A - 6VDC
2
3
7OY0002 US rev. 04
74
Installation Guide Silcon DP300E 208V/480V 10-80 kVA
Options/Accessories
8.4.1 Relay Board, relay functions
NOTE:
If “Communication to controller
lost” alarm is active, ALL relays
will indicate failure.
Relay No.
Name
Events that will trigger the alarm
1 ##
(X002)
Mains Outside Limits
Mains voltage RMS value is outside limits
Mains wave form (fast detector) is outside limits
Mains frequency is outside limits
2 ##
(X003)
Bypass Outside Limits
Bypass voltage RMS value is outside limits
Bypass wave form (fast detector) is outside limits
Bypass frequency is outside limits
3 ##
(X004)
Output Outside Limits
Output voltage RMS value is outside limits
Output wave form (fast detector) is outside limits
Output frequency is outside limits
4
(X005)
System overload
Output load is over 100%
Delta inverter current limiter is active
Main inverter current limiter is active
5
(X006)
Fan fault
Blocked or faulty fan
6
(X007)
Equipment high
temperature
Too high temperature on static switch
Too high temperature on main inverter
Too high temperature on delta inverter
Too high temperature on magnetics
Too high temperature on isolation transformer
(option)
Too high battery temperature
7
(X008)
Battery MCB OFF
Battery MCB is off
8
(X009)
Normal operation
UPS is running in normal operation (Status)
9 ##
(X010)
Battery operation
UPS is running in battery operation (Status)
10 ##
(X011)
Bypass operation
UPS is running in bypass operation (Status)
11 ##
(X012)
Stand-by operation
UPS is in stand-by (Hot stand-by, parallel
systems only)
12
(X013)
Maintenance bypass
operation
The maintenance bypass switch is active
13 ##
(X014)
Boost charge operation
UPS is boost charging on the battery
14
(X015)
Battery voltage
outside limits
Too high DC voltage (shut down)
DC voltage under warning level
Too low DC voltage (shut down)
15
(X016)
Battery condition fault
The ABM has detected that the battery is week
The ABM has detected that the battery is
defective
(ABM = Advanced Battery Monitor)
16 ##
(X017)
Common fault
All alarms as mentioned above
(Not relay 8+9+10+11)
Internal power supply fault
System locked in operation mode
Fault in internal memory
Fault in internal communication
##
Delay programmable in 282828 stack under “Common fault delay”.
Settings: 0, 10, 20, 30 seconds.
8.4.2 Relay Board, cable sizes
Cable sizes 24 AWG to 12 AWG are suitable. Use copper conductors only.
Cable size depends on current demand and ambient temperature.
7OY0002 US rev. 04
Installation Guide Silcon DP300E 208V/480V 10-80 kVA
75
Options/Accessories
8.5
Seismic anchoring
8.5.1
Mounting seismic anchoring without conduit box
8 holes for Ø10mm bolts have to be drilled according to dimensioned sketch, where
the UPS is going to be placed.
The 4 squares for seismic anchoring can be loosely tightened in the holes before the
UPS-system is placed. The system is placed, and then the squares are tightened in
the holes and in the feet of the UPS.
Or:
the system is placed after drilling the holes, and then the 4 squares are tightened in
the holes and the feet of the UPS. At a 39.37/1000 in./mm cubicle the seismic anchoring can be bolted in the 4 outside feet or in the 2 middle feet and the 2 right or left
feet.
IMPORTANT!
Remember to tighten all bolts in
the 4 squares, both in the floor
and in the feet of the UPS. Bolts
for the floor are not enclosed.
The square for seismic anchoring is placed towards the foot and bolted with bolt (1)
and plain washer (2) towards the foot and plain washer (2), string washer (3) and
nut (4) towards the square.
8.5.1.1 Seismic anchoring 23.62/600 in./mm cubicle mounted under frame
(measurements in mm)
40
REAR SIDE
40
625 ±2
3 4
705 ±2
2
1 2
75
40
260±2
490±2
40
75
FRONT SIDE
7OY0002 US rev. 04
76
Installation Guide Silcon DP300E 208V/480V 10-80 kVA
Options/Accessories
8.5.1.2 Seismic anchoring 23.62/600 in./mm cubicle mounted outside frame
(measurements in mm)
REAR SIDE
40 35
490±2
35 40
FRONT SIDE
7OY0002 US rev. 04
Installation Guide Silcon DP300E 208V/480V 10-80 kVA
77
Options/Accessories
8.5.1.3 Seismic anchoring 39.37/1000 in./mm cubicle mounted under frame
(measurements in mm)
40
REAR SIDE
2 3 4
40
625 ±2
705 ±2
1 2
75 40
40
425±2
75
75 40
890±2
FRONT SIDE
8.5.1.4 Seismic anchoring 39.37/1000 in./mm cubicle mounted outside frame
(measurements in mm)
REAR SIDE
425±2
40 35
75
890±2
40
35 40
FRONT SIDE
7OY0002 US rev. 04
78
Installation Guide Silcon DP300E 208V/480V 10-80 kVA
Options/Accessories
8.5.2 Mounting seismic anchoring with conduit box
The conduit box is placed where the UPS-system is going to be placed. Then follow
the same procedure as described in section 8.3.1.
8.5.2.1 Seismic anchoring for 23.62/600 in./mm cubicle with conduit box
(measurements in mm)
40
43±1
REAR SIDE
75
53±2
40
260±2
490±2
40
771
23±1
40
705 ±2
2 3 4
625 ±2
1 2
75
53±2
596
FRONT SIDE
7OY0002 US rev. 04
Installation Guide Silcon DP300E 208V/480V 10-80 kVA
79
Options/Accessories
8.5.2.2 Seismic anchoring for 39.37/1000 in./mm cubicle with conduit box
(measurements in mm)
40
43 ±1
REAR SIDE
2 3 4
40 75
75 40
425±2
53±2
23.01±1
40
625 ±2
705 ±2
771
12
75 40
890±2
53±2
996
FRONT SIDE
7OY0002 US rev. 04
80
Installation Guide Silcon DP300E 208V/480V 10-80 kVA
Options/Accessories
8.6
IP31 cover
8.6.1 Mounting IP31 cover
• Demount the front cover as described in section 4.1.1 for 23.62/600 in./mm
cubicle and as described in section 4.1.2 for 39.37/1000 in./mm cubicle.
• Demount the top covers. The covers are fixed with screws from below, placed
near the cubicle front.
• Replace the locking screw and the metal locking washer for top entry with
locking screw (1) and metal locking washer (2) for narrow top cover (3).
• Mount the earth cable from top entry and clips (4) on the narrow top cover.
• Demount the 2 screws in the wide top cover (3).
• Mount 2 distance stays (5) with plastic locking washer (6), plain washer (7),
spring washer (8) and nut (9) on narrow and wide top cover.
• Mount both top covers on the system, mount both earth cables and lock both top
covers with the locking screws*).
• Mount the IP31 cover with plain washer (10), spring washer (11) and screw (12)
on the 4 distance stays.
*)
On the 39.37/1000 in./mm cubicle there is no top entry to be replaced. The 4
distance stays has to be mounted on the top cover. Otherwise it is same procedure as described above.
7OY0002 US rev. 04
Installation Guide Silcon DP300E 208V/480V 10-80 kVA
81
Options/Accessories
8.6.1.1 Front view with IP31-cover, 23.62/600 in./mm cubicle
(measurements in mm)
640 ±2
20 ±2
1406 ±2
175 ±2
20 ±2
8.6.1.2 Front view with IP31-cover, 39.37/1000 in./mm cubicle
(measurements in mm)
640 ±2
20 ±2
(Please see table
3.2.1 on page 5)
175 ±2
20 ±2
8.6.1.3 Side view with IP31-cover, 23.62/600 and 39.37/1000 in./mm cubicle
(measurements in mm)
840 ±2
22 ±2
18 ±2
7OY0002 US rev. 04
82
Installation Guide Silcon DP300E 208V/480V 10-80 kVA
Options/Accessories
8.7
Remote display
8.7.1 Introduction
The remote display unit provides the Silcon DP300E series with the possibility to
display condition data at remote sites of up to 25 meters away from the Silcon
DP300E unit. For extension of communication distance, see section 8.7.1.1 below.
The remote display can easily be connected to the Silcon DP300E series via the serial
communication ports on the communication interface.
To obtain a transmission distance of 3.2 km the normal RS232C signal levels of the
serial in/out port must be converted to a 20mA current loop. The RS232C/20mA
converter must be placed outside the Silcon DP300E cubicle.
8.7.1.1 Extension of communication distance for remote display
The remote display communicates with the UPS through a 3 wire RS232 interface.
The remote display is a DTE (Data Terminal Equipment) employing a SUB-D 9 pole
female connector. The communication speed is 9,600 bps.
The communication distance is rather limited, see Table I. If a longer distance is
necessary or if the communication cable goes through magnetic noisy areas, it is
necessary to insert converters. Table 1 gives examples of three ways of increasing the
communication distance. All converters must be locally purchased.
Table 1: Examples of communication extension to remote display.
Standard
(RS232)
RS485
Current Loop
Optic fibre
Max. distance
25 meters
1,200 meters
3,200 meters
2,000 meters
Converter
Manufacture
Art. code
No converter
BLACK BOX
IC 109A-E
BLACK BOX
ME 800A-E
BLACK BOX
ME540AE-ST
Sub-D 25 pole
female
Sub-D 25 pole
female
Sub-D 9 pole
female
4-screw
terminal
4-screw
terminal
ST fibre
terminal
RS232 connector on
black box
Interconnector
of black boxes
Connections - without converter:
A 3 wire shield cable with a 25 pole female Sub-D and a 9 pole male Sub-D must be
made. Connect the cables as shown in Table 2. Do only connect the shield in one end.
Table 2: Pin connection for interconnection without converter.
25 pole female
9 pole male
Pin no.
Pin no.
2 (TXD)
2 (RXD)
3 (RXD)
3 (TXD)
7 (GND)
5 (GND)
House
No connection
7OY0002 US rev. 04
Installation Guide Silcon DP300E 208V/480V 10-80 kVA
83
Options/Accessories
Connections - with converter:
When buying a converter solution, the enclosed manual will explain how the connections must be made. Please follow this manual carefully.
As an example, the connection of the Black box: ME 800A-E (current loop) will be
described in the following by Table 3.
Table 3: Pin connections from host to ME 800A-E and from ME 800A-E to
Remote display
Host
(DTE)
ME 800A-E
(DCT)
Pin no.
Pin no.
Interconnection
ME 800A-E
(DCT)
Remote display
(DTE)
Pin. no.
Pin no.
2 (TXD)
2
3
2 (RXD)
3 (RXD)
3
2
3 (TXD)
7 (GND)
7
House (Shield) No connection
7
5 (GND)
No connection
House (Shield)
The ME 800A-E must be set up as a DCT with no RTS/DTR control.
The interconnection cable is a 4 wire twisted pair telephone cable with or without
shield. The shield improves noise immunity but reduces the maximum communication distance.
8.7.2
Installation of remote display
8.7.2.1 Connecting RS232C and mains adapter
Back view
1. Loosen the bolts
by turning 180°
2. Remove front cover
7OY0002 US rev. 04
84
Installation Guide Silcon DP300E 208V/480V 10-80 kVA
Options/Accessories
Front view
DB9P
Power
Mains
adapter
DB25S
or
X007
X008
Communication
interface DP300E
3. Remount the front cover.
8.7.2.2 Remote display power supply
The remote display power supply is a normal AC power supply with no battery backup. This means that if data transmission with the Silcon DP300E has to continue
during break down of the commercial mains, the remote display has to be supplied
from the Silcon DP300E or another uninterruptible power source.
7OY0002 US rev. 04
Installation Guide Silcon DP300E 208V/480V 10-80 kVA
85
Options/Accessories
NOTE:
All alarm and signal circuit field
wiring shall be rated 300V
minimum.
8.7.2.3 Mounting remote display
Back view
7mm
197mm
R2mm
R4mm
8.7.2.4 Cables for remote display
RS232C to RS232C cable:
DP300E, DB25S
Remote Display, DB9P
2 TxD
3 RxD
3 TxD
2 RxD
7 GND
5 GND
Connect shield at one end only!
Rating: Cable must be rated 600V minimum.
7OY0002 US rev. 04
86
Installation Guide Silcon DP300E 208V/480V 10-80 kVA
Options/Accessories
8.7.3
Using the remote display
The remote display is an inactive unit that is unable to influence the operation of the
Silcon DP300E. It is impossible to adjust or otherwise influence the function of the
DP300E. The alarms available on remote display are a subset of the alarms, which
can be shown on the internal display. Available alarms are described in section
8.7.3.6.
8.7.3.1 Starting up the remote display
After having connected the supply the display will show:
“Remote display: DP300E UPS”
8.7.3.2 Fault in communication
A fault in the communication between UPS and remote display will be shown in the
display as follows:
“Datatransmission interrupted”
8.7.3.3 Setting remote display
Through the #-stack it is possible to set language and to which type of UPS the
remote display has been connected.
Parameter
Setting
Comments
Language
GB, D, F, DK, S, SF, NL,
PL, CZ, E, P, SK, H
Language of text in
display
Host
SDC charger, DP300E,
300E
The type of UPS to which
the remote display has
been connected
8.7.3.4 Operation
As described in section 3.0 Operation (User Guide, 7OY0001).
8.7.3.5 Reading out measurements
As described in section 5.0 Reading out measurements (User Guide, 7OY0001).
However, reading out of time and mains 2 current is not possible from remote
display.
7OY0002 US rev. 04
Installation Guide Silcon DP300E 208V/480V 10-80 kVA
87
Options/Accessories
8.7.3.6 Alarms
As described in section 6.0 Alarms - What to do (User Guide, 7OY0001).
It is possible to show the following alarms:
Possible alarm
Output is out of tolerance
Battery voltage low, shutdown
Common fault
Overload. Load is over 100%
High temperature static switch
Synchronization error
Battery MCB is off
High temp. isolation transformer
Battery voltage high
Description
Output voltage outside limits
The battery has been discharged to
minimum permissible level
An alarm is detected by the UPS
Overload on UPS
Temperature on input or bypass static
switch to high
The UPS cannot synchronize to the input
frequency
Battery MCB/fuse switch not closed or
released
Temperature on isolation input/output
transformer too high
Battery voltage outside limits
High inverter temperature
Temperature on main or delta inverter
too high
Battery voltage low, warning
The battery is nearly discharged
Inverter current limiter active
Peak current limiter has been activated
and UPS switched to bypass operation.
System overload
Overload. Load is over 150%
Overload on UPS
Bypass is out of tolerance
Bypass input voltage outside limits
Mains is out of tolerance
Mains input voltage outside limits
8.7.3.7 Adjusting contrast
As described in section 1.0 Introduction (User Guide, 7OY0001).
7OY0002 US rev. 04
88
Installation Guide Silcon DP300E 208V/480V 10-80 kVA
Options/Accessories
8.8
Isolation Transformer Module
Introduction.
The isolation transformer module is used in following mentioned configurations:
1.
Between mains supply and UPS input, when a 3-phase Delta-service, phase
or midpoint of 2 phases grounded, is available.
2.
Between mains supply and UPS input, when galvanic isolation is required.
3.
Between UPS output and load, when galvanic isolation is required.
The isolation transformer is configured as Delta-WYE with accessibel neutral
(Dyn11).
Isolation
Transformer Type
For UPS System
10kVA - 480V
15kVA - 480V
20kVA - 480V
30kVA - 480V
40kVA - 480V
60kVA - 480V
80kVA - 480V
10kVA - 208V
15kVA - 208V
20kVA - 208V
30kVA - 208V
40kVA - 208V
60kVA - 208V
80kVA - 208V
DP310E - 480V
DP315E - 480V
DP320E - 480V
DP330E - 480V
DP340E - 480V
DP360E - 480V
DP380E - 480V
DP310E - 208V
DP315E - 208V
DP320E - 208V
DP330E - 208V
DP340E - 208V
DP360E - 208V
DP380E - 208V
8.8.1 Requirement on the installation site
The isolation transformer is designed with all parts accessible from front or top, and
cable entries from bottom. The isolation transformer can be placed close to walls,
only free space for front door opening has to be ensured. Sufficient cooling has to be
ensured by a free space of min. 19.68 in./500mm above the ventilation slots in the
top cover. Avoid placing the isolation transformer in direct sunlight.
7OY0002 US rev. 04
Installation Guide Silcon DP300E 208V/480V 10-80 kVA
89
Options/Accessories
8.8.2 Cubicles and dimensions
Isolation
Transformer
Type
10kVA - 480V
15kVA - 480V
20kVA - 480V
30kVA - 480V
40kVA - 480V
60kVA - 480V
80kVA - 480V
10kVA - 208V
15kVA - 208V
20kVA - 208V
30kVA - 208V
40kVA - 208V
60kVA - 208V
80kVA - 208V
Dimensions WxDxH [in./mm]
W
D
H
Weight
approx.
[Kg]
23.62/600
23.62/600
23.62/600
23.62/600
23.62/600
23.62/600
23.62/600
23.62/600
23.62/600
23.62/600
23.62/600
23.62/600
23.62/600
23.62/600
31.50/800
31.50/800
31.50/800
31.50/800
31.50/800
31.50/800
31.50/800
31.50/800
31.50/800
31.50/800
31.50/800
31.50/800
31.50/800
31.50/800
55.13/1400
55.13/1400
55.13/1400
55.13/1400
55.13/1400
55.13/1400
55.13/1400
55.13/1400
55.13/1400
55.13/1400
55.13/1400
55.13/1400
55.13/1400
55.13/1400
190
250
250
335
335
630
630
190
250
250
335
335
570
570
For foot prints please refer to section 8.8.3.
Cubicle
55.13/1400 in./mm
23.62/600 in./mm wide
7OY0002 US rev. 04
90
Installation Guide Silcon DP300E 208V/480V 10-80 kVA
8.8.3 Foot prints
REAR
FRONT
Power Cable Entry
60
50
150
290
0
0
Temp.
Sense
Input
Output
Recommended cable routing.
7OY0002 US rev. 04
Installation Guide Silcon DP300E 208V/480V 10-80 kVA
91
Options/Accessories
8.8.4 Connecting the isolation transformer
To get access to the cable terminals open the front door, remove the screws and lift
off the front cover (Remember earth wire on rear side).
Front cover
23.62/600 in./mm cubicle front view open door
Remember to remount the front cover (and earth wire) before start up of the system.
7OY0002 US rev. 04
92
Installation Guide Silcon DP300E 208V/480V 10-80 kVA
Options/Accessories
Conduit box 23.62/600 in./mm cubicle.
REAR
FRONT
The conduit box is placed under the UPS, always with the solid plate facing to the
rear and the perforated plate facing to the front.
Conduits can be attached to the rear side of the conduit box, which contains cable
channels in order to separate AC, DC, and communication cables.
7OY0002 US rev. 04
Installation Guide Silcon DP300E 208V/480V 10-80 kVA
93
Options/Accessories
NOTE:
This transformer is intended to be
supplied from a 3 wire Delta or
WYE-service.
Input/output field 10 to 80kVA – 480V, 10 to 40kVA – 208V.
NOTE:
Ensure correct phase con-nection
of inputs and outputs.
Max. power cable size: 250kcmil,
excl. 60 to 80kVA, 208V.
NOTE:
All external cable dimensions are
recommended.
Please refer to local legal provisions.
NOTE:
Glandplate in bottom of
system must be mounted.
WARNING:
At 100% switch mode load the
neutral shall be rated for 173%
output phase current.
Temp.
Alarm
Mains
TYPE
FOR
SYSTEM
a)
EXT.
INPUT
FUSES
[A]
ISO-310E-480
DP310E
- 480V
DP315E
- 480V
DP320E
- 480V
DP330E
- 480V
DP340E
- 480V
DP360E
- 480V
DP380E
- 480V
DP310E
- 208V
DP315E
- 208V
DP320E
- 208V
DP330E
- 208V
DP340E
- 208V
DP360E
- 208V
DP380E
- 208V
25
10
25
10
8
10
30
8
30
8
8
10
40
8
40
6
8
10
60
4
60
3
8
10
80
3
80
1
8
8
110
1/0
110
3/0
6
6
150
3/0
150
6
6
45
6
45
250
kcmil
4
8
10
70
3
70
2
8
8
90
1
90
1/0
8
8
150
3/0
150
4/0
4
6
175
250
kcmil
2 x 3/0
175
6
6
2
4
2 x 300
kcmil
350
250
kcmil
2 x 250
kcmil
2 x 400
kcmil
1/0
3
ISO-315E-480
Terminal for Equipment
Grounding Conductor
is marked:
ISO-320E-480
Terminal for Grounding
Electrode Conductor is
marked “E”.
ISO-340E-480
ISO-330E-480
ISO-360E-480
ISO-380E-480
NOTE:
Grounding, please refer to local
legal provisions.
NOTE:
The terminals marked
and
are electrically connected to the
terminal marked “E”.
Output fuses
Bonding jumper
(See sec.
8.8.7.1)
Isolation transformer mounted upstream with respect to Service Bypass Panel
NOTE:
φ is symbol for “phase”.
is symbol for “risk of
electric shock”.
Output
ISO-310E-208
ISO-315E-208
ISO-320E-208
ISO-330E-208
ISO-340E-208
ISO-360E-208
ISO-380E-208
250
350
b)
a)
b+c)
EXT.
INT.
EXT.
EXT.
EXT.
PHASE OUTPUT NEUTRAL GND.
EQU.
CONDU. FUSES CONDU. ELECT.
GND.
[AWG]
[A]
[AWG]
CONDU. CONDU.
[AWG]
[AWG]
250
7OY0002 US rev. 04
94
Installation Guide Silcon DP300E 208V/480V 10-80 kVA
Options/Accessories
Isolation transformer mounted downstream with respect to Service Bypass Panel
TYPE
FOR
SYSTEM
ISO-310E-480
DP310E
- 480V
DP315E
- 480V
DP320E
- 480V
DP330E
- 480V
DP340E
- 480V
DP360E
- 480V
DP380E
- 480V
DP310E
- 208V
DP315E
- 208V
DP320E
208V
DP330E
- 208V
DP340E
- 208V
DP360E
- 208V
DP380E
- 208V
ISO-315E-480
ISO-320E-480
ISO-330E-480
ISO-340E-480
ISO-360E-480
ISO-380E-480
ISO-310E-208
ISO-315E-208
ISO-320E-208
ISO-330E-208
ISO-340E-208
ISO-360E-208
ISO-380E-208
a+e)
EXT.
INPUT
FUSES
[A]
b)
a+d)
b+c)
EXT.
INT.
EXT.
EXT.
EXT.
PHASE OUTPUT NEUTRAL GND.
EQU.
CONDU. FUSES CONDU. ELECT.
GND.
[AWG]
[A]
[AWG] CONDU. CONDU.
[AWG]
[AWG]
15
14
15
10
8
12
20
10
20
8
8
12
25
10
25
6
8
10
40
6
40
3
8
10
50
4
50
1
8
10
80
2
80
3/0
8
8
100
1/0
100
6
8
30
8
30
250
kcmil
4
8
10
45
6
45
2
8
10
60
4
60
1/0
8
10
90
1
90
4/0
8
8
125
2/0
125
6
6
175
2 x 1/0
175
4
6
250
2 x 3/0
250
250
kcmil
2 x 250
kcmil
2 x 400
kcmil
2
4
a) Class J-fast acting in accordance with UL248-8.
b) Cable sizes refer to US National Electric Code, Table 310-16, cables rated 75˚C/167˚F at max.
40˚C/104˚F ambient.
All cables rated 600V.
As regards recommended cable lugs and crimping tool, see section 4.1.4.
c) Dimensioned for switch mode load. (INEUTRAL = √3*ILOAD PHASE)
For linear load neutral cable can be rated as output phase cables.
d) The isolation transformer is delivered with internal output fuses for upstream mounting with
respect to Service Bypass Panel. For downstream mounting, fuses have to be replaced with
types as indicated in column.
e) Not recommended when Redundant Service Bypass Panel, SBP-00A-SR, is used.
8.8.4.1 External temperature alarm cable
Voltage rating must be 600V. Cable size can be 18 to 14 AWG.
7OY0002 US rev. 04
Installation Guide Silcon DP300E 208V/480V 10-80 kVA
95
Options/Accessories
8.8.5 Recommended cable lugs and crimping tool types
See section 4.1.4.
8.8.6
Input
X001
Isolation transformer - Diagram Delta-WYE configuration (Dyn11)
L1
L1
L2
L2
L3
L3
Output
X002
N
E
G
G
1
155˚C
2
8.8.7
Temp.
Alarm
X003
Grounding the isolation transformer
8.8.7.1 System grounding
Provisions have to be made as follows:
a.
If not mounted, the bonding jumper is mounted between output terminal X002:N
and X002:E.
No bonding jumper is required on the Silcon DP360E and DP380E, 208V insolation transformer since the X002:N and X002:E is a common terminal.
b.
The output terminal X002:E, also marked “Grounding Electrode Terminal” is
connected by a grounding electrode conductor to a local grounding electrode per
NEC 250-26.
8.8.7.2 Equipment grounding
a.
Terminal marked
is intended for equipment grounding.
7OY0002 US rev. 04
96
Installation Guide Silcon DP300E 208V/480V 10-80 kVA
Options/Accessories
8.8.8
Wiring up the DP300E with optional Dyn11 isolation transformer
System Integration Interface
X003
11
12
L1 L2 L3 N G E
X005
Silcon
DP300E
X001
L1 L2 L3 N G
N
G
L3
X002
L1 L2 L3 N G
SYSTEM
INPUT
FM
X001
1 2 3 4
1 2 3 4
X003
5
6
X010
5 6
SBP-00A-SS
7 8
1 2 3 4
X005
9 10
X003
L1 L2 L3 N G
N
G
L2
L2
X004 L3
L1
L1
SYSTEM
OUTPUT
GROUNDING
ELECTRODE
G
X003
1 2
ISOTRAFO
X001
L1
L2
L3
The Dyn11 isolation transformer
is a phaseshifting element,
which ensures galvanic isolation between the mains supply
and the load. To avoid damaging circulation currents and to
prevent the load from loosing
the galvanic isolation do not
bypass the isolation transformer.
X002
L1
L2
L3
N
E
G
WARNING!
Grounding
electrode
Load
8.8.8.1 DP300E with SBP-00A-SS and isolation transformer module at
output - single mains - 3 wire grounded WYE-service
7OY0002 US rev. 04
Installation Guide Silcon DP300E 208V/480V 10-80 kVA
97
98
FM
Mains supply
G
L1
L2
L3
G
X001
L1
L2
L3
X003
1 2
ISOTRAFO
X002
L1
L2
L3
N
E
G
Grounding
electrode
X001
Silcon
DP300E
X001
L1 L2 L3 N G
X002
L1 L2 L3 N G
G
N
L3
L2
L1
X003
11
12
5
6
X010
5 6
1
7
9 10
2 3 4
X005
8
System Integration Interface
1 2 3 4
X003
1 2 3 4
SBP-00A-SS
X005
L1 L2 L3 N G E
X003
L1 L2 L3 N G
N
G
X004 L3
L2
L1
SYSTEM
OUTPUT
Options/Accessories
8.8.8.2 DP300E with SBP-00A-SS and isolation transformer module at input
- single mains - 3 wire grounded WYE-service
7OY0002 US rev. 04
Installation Guide Silcon DP300E 208V/480V 10-80 kVA
SYSTEM
INPUT
FM
X010
1 2 3 4 5 6
SBP-00A-SS
Installation Guide Silcon DP300E 208V/480V 10-80 kVA
Silcon
DP300E
X001
L1 L2 L3 N G
X002
L1 L2 L3 N G
N
G
X003
11
12
1 2 3 4
X003
8 9 10
6
1 2 3 4
X005
System Integration Interface
5
7
X005
L1 L2 L3 N G E
X003
L1 L2 L3 N G
N
G
X004 L3
L2
X001
L2
L3
L1
L1
SYSTEM
OUTPUT
G
X001
L1
L2
L3
X003
1 2
ISOTRAFO
X002
L1
L2
L3
N
E
G
Grounding
electrode
Load
Options/Accessories
8.8.8.3 DP300E with SBP-00A-SS and isolation transformer module at
output - single mains - 4 wire grounded WYE-service
7OY0002 US rev. 04
99
Options/Accessories
8.9
Top cable entry modules
8.9.1 External connection Silcon DP315E [208V], DP320E [208V],
DP330E [208V], DP330E [480V], DP340E [208V], DP340E [480V],
DP360E [480V], and DP380E [480V], - 39.37/1000 in./mm cubicle
NOTE!
With top cable entry modules
for 39.37/1000 in./mm cubicles
3 ft. of free space is needed on
the left side of the cubicle for
cable mounting.
Top entry module
Output
Mains 1
Ext. DC
7OY0002 US rev. 04
100
Installation Guide Silcon DP300E 208V/480V 10-80 kVA
Options/Accessories
Top entry modules ....continued....
Top cable entry
Output 26.54/674 in./mm
Mains 1 13.74/349 in./mm
Ext. DC 8.15/207 in./mm
Ext. DC 3.82/97 in./mm
0
119
0
FRONT
7OY0002 US rev. 04
Installation Guide Silcon DP300E 208V/480V 10-80 kVA
101
Options/Accessories
Top entry modules ....continued....
Ext. DC through top entry
7OY0002 US rev. 04
102
Installation Guide Silcon DP300E 208V/480V 10-80 kVA
Options/Accessories
DC cabling with top entry module.
7OY0002 US rev. 04
Installation Guide Silcon DP300E 208V/480V 10-80 kVA
103
Options/Accessories
8.9.2 External connection Silcon DP360E [208V] and DP380E [208V], –
39.37/1000 in./mm cubicle
NOTE!
Top entry module
With top cable entry modules
for 39.37/1000 in./mm cubicles
3 ft. of free space is needed on
the left side of the cubicle for
cable mounting.
7OY0002 US rev. 04
104
Installation Guide Silcon DP300E 208V/480V 10-80 kVA
Options/Accessories
Top entry modules ....continued....
Top cable entry
Output 26.54/674 in./mm
Mains 1 13.74/349 in./mm
Ext. DC 8.15/207 in./mm
Ext. DC 3.82/97 in./mm
0
119
0
FRONT
7OY0002 US rev. 04
Installation Guide Silcon DP300E 208V/480V 10-80 kVA
105
Options/Accessories
8.9.3 Top cable entry module for 23.62/600 in./mm cubicle
Output
15.35/390 in./mm
Mains 1
8.66/220 in./mm
DC
5.31/135 in./mm
DC
2.76/70 in./mm
37
0
0
7OY0002 US rev. 04
106
Installation Guide Silcon DP300E 208V/480V 10-80 kVA
Options/Accessories
8.9.4 Top cable entry module for Isolation Transformer Module
Output
18.11/460 in./mm
Input
11.02/280 in./mm
Temp. sense
6.30/160 in./mm
100
0
0
7OY0002 US rev. 04
Installation Guide Silcon DP300E 208V/480V 10-80 kVA
107
Options/Accessories
8.10 MCCB-box for external batteries
The MCCB-box is used for overcurrent and shortcircuit protection when the Silcon
DP300E is installed with an external battery.
8.10.1 General arrangement
Silcon DP300E
MCCBbox
Battery
8.10.2 Front view / Front view (open door)
Front view
7OY0002 US rev. 04
108
Installation Guide Silcon DP300E 208V/480V 10-80 kVA
Options/Accessories
Front view (Open door)
7OY0002 US rev. 04
Installation Guide Silcon DP300E 208V/480V 10-80 kVA
109
Options/Accessories
8.10.3 Mounting and Connection
B
NOTE:
All external cable dimensions
are recommended.
Please refer to local legal
provisions.
4 x Ø 10mm on 720 x 650
A
Centres for fixing holes
in rear of enclosure
NOTE:
Ensure correct polarity at
connection of DC cables.
NOTE:
Terminal for Equipment
Grounding Conductor is
marked
NOTE:
Grounding, please refer to local
legal provisions.
Type
For
System
a)
Ext. DC
Ext.
Conduc- Equipment
tor
Grounding
[AWG]
Conductor
[AWG]
Dimensions
HxWxD
[mm]
Fixing
Centres
AxB
[mm2]
Weight
[kg/lbs]
MCCB310E-480
10kVA 480V
10
10
450x400
x125
350x285
13/28.6
MCCB320E-480
15kVA 480V
20kVA 480V
6
10
450x400
x125
350x285
13/28.6
MCCB340E-480
30kVA 480V
40kVA 480V
2
8
450x400
x125
350x285
13/28.6
MCCB360E-480
60kVA 480V
2
8
450x400
x125
350x285
13/28.6
MCCB380E-480
80kVA 480V
1/0
6
750x550
x175
648x448
24/52.8
MCCB310E-208
10kVA 208V
6
10
450x400
x125
350x285
13/28.6
MCCB320E-208
15kVA 208V
20kVA 208V
2
8
450x400
x125
350x285
13/28.6
MCCB340E-208
30kVA 208V
40kVA 208V
1/0
6
750x550
x175
648x448
24/52.8
MCCB360E-208
60kVA 208V
4/0
6
750x550
x175
648x448
24/52.8
300
kcmil
4
750x550
x175
648x448
24/52.8
MCCB80kVA 208V
380E-208V
a) Cable sizes refer to US National Electric Code, Table 310-16, cables rated 75˚C/167˚F at max.
40˚C/104˚F ambient.
As regards recommended cable lugs and crimping tool, see section 4.1.4.
8.10.3.1
Mounting and Connection
DC-cables rated 600V, unless otherwise stated.
DC-cables rated 1000V on 480V systems from MCCB-box to UPS.
7OY0002 US rev. 04
110
Installation Guide Silcon DP300E 208V/480V 10-80 kVA
Options/Accessories
8.10.4 Diagram
Blue/Yellow
Yellow
Blue/Yellow
Yellow
Black wire
Black wire
Black wire
Black wire
7OY0002 US rev. 04
Installation Guide Silcon DP300E 208V/480V 10-80 kVA
111
Options/Accessories
8.10.5 Silcon DP300E with external battery via MCCB-box
L1 L2 L3 N G E
L1 L2 L3 N G
X001
Silcon
DP300E
X003 X004
+ – + – G
1 2 3 4 5 6 7 8
X003
1 2 3 4 5
X005
6
X005
System Integration Interface
X004
X012
X001
1 2 6 7 8
1 2 3 4
1 2 3 4
MCCB trip
Temp. sensor
+ – + – G
X001 X002
X009
X010
X011
G
X004 +
MCCB-Box
Battery 2
G
X003 +
Battery 1
7OY0002 US rev. 04
112
Installation Guide Silcon DP300E 208V/480V 10-80 kVA
Alarms
9.0 Alarms
9.1
Introduction
Alarms are indicated by the red lamp (above the left corner of the keyboard) and a
30 seconds acoustic signal. An alarm is registered in an alarm stack as long as it is
present, and if more in the same order as they arise.
All alarms are also registered in an events logger and remains there in a stack with
room for 250 events. The events are stored in the same order as they arose – showing the latest first.
Besides the alarms the following operational modes are also stored in the events
logger.
Mode
MPU is reset
Stand-by
Comments
UPS has been totally switched off
UPS has been in stand-by mode by parallel
system
UPS has been in normal operation
UPS has been in battery operation
UPS has been in bypass operation
UPS has been off
Normal operation
Battery operation
Bypass operation
System off
9.2
Displaying the alarm stack:
Action
Description
1. Press
Access to the alarm stack
2. Press
or
Exits the alarm stack. If not operated the system
will exit the alarm stack automatically
after 30 seconds.
3. Press
9.3
Scroll up or down through the alarm stack messages.
Last message is “No (further) alarm”.
Displaying the events stack:
Action
Description
1. Press
and
Press the two keys simultaneously to get
access to the events stack
2. Press
or
Scroll up or down through the events stack
(last message is “No (further) event”)
3. Press
4. Press
Displays the time where the event happened
Exits the events stack. If not operated the
system will exit the events stack automatically
after 30 seconds
7OY0002 US rev. 04
Installation Guide Silcon DP300E 208V/480V 10-80 kVA
113
Alarms
9.4
Possible alarms
Possible alarm
Description
Action
1.
Peak current limiter active
Check for blown
fuses in your
installation
2.
Bypass power supply fault
3.
Delta current limiter active
4.
Fan fault
Peak current limiter has been
activated and UPS switched
to bypass operation. System
overloaded
Fault in redundant PSU
for bypass. UPS has still
100% performance and can
operate in all modes.
Input current limiter has been
activated and UPS switched
to bypass operation
Blocked or faulty fan
5.
High DC warning
Switching off big output load
6.
7.
High DC shutdown
Off button pushed
8.
Synchronization error
Fault in UPS
Off button or emergency
power down activated
The UPS can’t synchronize
to the input frequency
9.
Inverter voltage error
10. Parallel sync. error
11. Inverter current limiter
active
12. Overload Load is over
100%
13. Second power supply fault
14. Internal power supply fault
15. Battery MCB is off
Call for assistance
Check for overload.
If repetitiv – call for
assistence
Remove blocking or
exchange fan
If repetitive reduce the
load change
Call for assistance
–
Check if phase
rotation of main input
voltage is correct – if
OK call for assistance
–
Inverter average voltage out
of limits (normal message
during starting up/switching
off the system)
Parallel UPS’s are not able to Check external
parallel cables
synchronize
Call for assistance
Reduce UPS output
Overload on inverter
load
Reduce UPS output
Overload on UPS
load
Call for assistance
Fault in UPS
(Only in systems >160kW)
Call for assistance
Fault in UPS. Only bypass
operation possible
Close MCB/insert new
Battery MCCB/fuse switch
fuse. If released again
not closed or released
– call for assistance
7OY0002 US rev. 04
114
Installation Guide Silcon DP300E 208V/480V 10-80 kVA
Alarms
Possible alarm
Description
16. ** Q004 off **
Position of output switch for
UPS in parallel
Position of external bypass
switch
Position of UPS output switch
Position of UPS input switch
Temperature on isolation
input/output transformer to
high
Temperature on static input
switch too high
Temperature on static bypass
switch too high
Temperature on main inverter
too high
Temperature on delta inverter
too high
The battery has been
discharged to minimum
permissionable level
The battery is nearly
decharged
Short disturbances on the
mains supply (1 ms transients)
Mains input voltage r.m.s.
value outside limits
Mains input frequency
outside limits
Short disturbances on the
bypass voltage
Bypass input voltage outside
limit
Bypass input frequency
outside limits
Short disturbances on the
output voltages
(inrush current)
Output voltage outside limits
17. ** Q003 on **
18. ** Q002 off **
19. ** Q001 or Q010 off **
20. High temp. isolation trans
former
21. High temp. mains static
switch
22. High temp. bypass static
switch
23. High temperature main
inverter
24. High temperature delta
inverter
25. Low DC shutdown
26. Low DC warning
27. Mains is moment. out of
tolerance
28. Mains is out of tolerance
29. Mains freq. is out of
tolerance
30. Bypass is moment out of
tolerance
31. Bypass is out of tolerance
32. Bypass freq. is out of
tolerance
33. Output is moment. out of
tolerance
34. Output is out of tolerance
Action
–
–
–
–
Check fan, check for
airflow obstructions,
check for overload
As no. 20
As no. 20
As no. 20
As no. 20
Ensure battery
recharging
Save your data now
–
–
–
–
–
–
If repetitive call for
assistance
Call for assistance
7OY0002 US rev. 04
Installation Guide Silcon DP300E 208V/480V 10-80 kVA
115
Alarms
Possible alarm
Description
Action
35. Output freq. is out of
tolerance
36. High battery temperature
Output frequency outside
limits
To high battery ambient
temperature
Call for assistance
Fault in UPS
Call for assistance
Fault in UPS
Call for assistance
Fault in UPS. Display will
show invalid data for UPS
Fault in UPS
Call for assistance
37. Battery week
38. Battery defective
39. System is locked in oper.
mode
40 RAM1 memory write error
41. Memory write error
42. Communication to VQ
bypass lost
43. Communication to VQ
output lost
44. Communication to DMU
lost
45. Communication to controller lost
46. Communication to parallel
IF lost
47. External shutdown
accepted
48. DC capacitor charge error
49. Communication to VQ
mains lost
50. Bypass sync error
Check system
ambient temp., check
fan, check for airflow
obstructions
Perform a battery
Battery capacity below 75%
or battery MCB/fuse switched capacity test
off
Insufficient battery capacity or Call for assistance
battery MCB/fuse switched
off
UPS has attempted 10 times If the system is locked
in bypass operation
within 1 min. to switch from
bypass to battery operation or and the alarm “Inverter voltage error”
“High DC warning” has
appeared 10-20 times within exists in the alarm
stack do not try to
1 min.
unlock the operations
mode lock but - call
for assistance!
Call for assistance
Fault in UPS
Call for assistance
Fault in UPS
Call for assistance
Fault in UPS
Remote signal for switching
off the UPS accepted – UPS
switches off itself
Fault in DC charge circuit
Fault in UPS
Call for assistance
–
Do NOT insert fuse
F020 and F021 (or
close ext. MCCB) to
prevent damage of
UPS.
Call for assistance
Call for assistance
The UPS cannot synchronize Check if phase rotation of bypass voltage
to the bypass mains
is correct - if OK, call
for assistance
7OY0002 US rev. 04
116
Installation Guide Silcon DP300E 208V/480V 10-80 kVA
System specifications
10.0 System specifications
10.1 Technical data
Input
Voltage
Voltage tolerance
Normal operation
Bypass operation
Frequency
Input PF
Output
Current distortion
Voltage
Voltage tolerance
Voltage distortion
Load power factor
Frequency
Overload capacity
Mains operation
Mains operation
Battery operation
Bypass operation
Bypass operation
General
Ambient temperature
Humidity
Protection class
Safety
Emission and Immunity
Static bypass switch
Auto restart
Economy mode
3x208V / 3x480V
±15%
±10% (standard)
±4, 6, 8% (programmable)
60Hz
±6% standard
±0,5-8% (programmable)
Load 25% min. 0,97
Load 100% min. 0,99
Max. 5%
3x208V / 3x480V
±1% static, sym. load
±3% static, asym. load
±5% 0-100% load step
Max. 3%, linear load
Max. 5%, non-linear load
(Silcon DP310E-DP380E)
0,9 lead to 0,8 lag
60Hz (mains synchronized)
±0,1% free running
200% - 60 secs.
125% - 10 min.
150% - 30 secs.
125% - cont.
1000% - 500 ms.
(Silcon DP310E-DP380E)
0-40°C/32-104°F
(Above 25°C/77°F the battery life
time is reduced)
Max. 95%, non condensing
IP30
EN50091-1
UL 1778
EN50091-2
Built-in
Programmable
Programmable
7OY0002 US rev. 04
Installation Guide Silcon DP300E 208V/480V 10-80 kVA
117
System specifications
10.2 Back-up time, dimensions, and weight Silcon DP310E-DP380E
Type
*
Back-up time*
with built-in
batteries
Height
inch/mm
Width
inch/mm
Depth
inch/mm
Weight
lbs/kg
DP310E/208V
22 min
55.12/1400
23.62/600
31.50/800
803/365
DP310E/480V
22 min.
55.12/1400
23.62/600
31.50/800
869/395
DP315E/208V
13 min.
55.12/1400
39.37/1000
31.50/800
902/410
DP315E/208V
31 min.
55.12/1400
39.37/1000
31.50/800
1287/585
DP315E/480V
13 min.
55.12/1400
23.62/600
31.50/800
990/450
DP320E/208V
8 min.
55.12/1400
39.37/1000
31.50/800
902/410
DP320E/208V
22 min.
55.12/1400
39.37/1000
31.50/800
1287/585
DP320E/480V
8 min.
55.12/1400
23.62/600
31.50/800
990/450
DP330E/208V
13 min.
55.12/1400
39.37/1000
31.50/800
1430/650
DP330E/480V
13 min.
55.12/1400
39.37/1000
31.50/800
1606/730
DP340E/208V
8 min.
55.12/1400
39.37/1000
31.50/800
1430/650
DP340E/480V
8 min.
55.12/1400
39.37/1000
31.50/800
1606/730
DP360E/208V
N/A
55.12/1400
39.37/1000
31.50/800
1155/525**
DP360E/480V
N/A
55.12/1400
39.37/1000
31.50/800
1122/510
DP380E/208V
N/A
55.12/1400
39.37/1000
31.50/800
1210/550**
DP380E/480V
N/A
55.12/1400
39.37/1000
31.50/800
1166/530
Back-up time at PF = 0.7
** Estimated
7OY0002 US rev. 04
118
Installation Guide Silcon DP300E 208V/480V 10-80 kVA
How to Contact APC
11.0 How to contact APC
For more information call:
Tel: (800) 800-4APC - US & Canada
Tel: (401) 789-0204 - Worldwide
APC Corporate
132 Fairgrounds Road
West Kingston, RI 02892
USA
Tel:
(401)789-0204
Fax:
(401)789-3710
Internet:
[email protected]
PowerFax™:
(800) 347 - FAXX
APC Web site: www.apcc.com
APC Denmark A/S
Silcon Allé
DK-6000 Kolding
Tel:
(+45) 75 54 22 55
Fax:
(+45) 75 54 27 89
Product Support
E-mail:
[email protected]
Pre-sales Technical Support
1-877-474-5266 (1-877-4Silcon)
Post-sales Technical Support
1-877-287-7835 (1-877-2UPS-TEK)
Fax:
Web:
1-401-438-7761
www.apcc.com/support/contact/contact_support.cfm
7OY0002 US rev. 04
Installation Guide Silcon DP300E 208V/480V 10-80 kVA
119