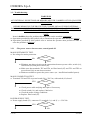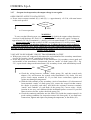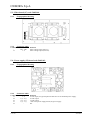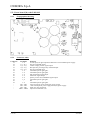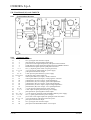
1
CEBORA S.p.A. 1 SOUND MIG 2035/M Pulse POWER SOURCE art. 285 SERVICE MANUAL 3.302.161 24/03/2004 CEBORA S.p.A. 2 CONTENTS 1 - GENERAL INFORMATION.......................................................................................................................... 4 - Introduction. ................................................................................................................................................. 4 - General service policy. ................................................................................................................................. 4 - Safety information. ....................................................................................................................................... 4 - Electromagnetic compatibility...................................................................................................................... 4 2 - SYSTEM DESCRIPTION .............................................................................................................................. 5 2.1 - Introduction. ................................................................................................................................................. 5 2.2 - Technical specifications................................................................................................................................ 5 2.3 - Description of power source art. 285............................................................................................................ 5 2.4 - Programming power source art. 285 (firmware upgrade)............................................................................. 7 2.5 - Restoring the factory setting......................................................................................................................... 7 2.6 - Customized synergic curves. ........................................................................................................................ 7 2.7 - Back-up procedure........................................................................................................................................ 7 2.8 - Programs tables............................................................................................................................................. 8 2.8.1 - Conventional non synergic programs (ver. H06). ...................................................................................... 8 2.8.2 - Conventional synergic programs (ver. H06).............................................................................................. 8 2.8.3 - Pulsed synergic programs (ver. P03). ........................................................................................................ 9 2.9 - Set-up mode diagram.................................................................................................................................. 10 3 - MAINTENANCE.......................................................................................................................................... 11 3.1 - Periodic inspection, cleaning. ..................................................................................................................... 11 3.2 - Operating sequence..................................................................................................................................... 11 3.2.1 - Power source commands and signals....................................................................................................... 11 3.2.2 - Power source operation............................................................................................................................ 12 3.3 - Troubleshooting.......................................................................................................................................... 14 3.3.1 - The power source does not start, control panel off. ................................................................................. 14 3.3.2 - Power source powered, control panel on, fan (24) stopped. .................................................................... 16 3.3.3 - Power source powered, display and signals does not indicate the correct values. ................................... 17 3.3.4 - The start button produces no effect.......................................................................................................... 18 3.3.5 - Power source powered, no gas flows from the torch. .............................................................................. 19 3.3.6 - Power source powered, the wire feeder motor does not work. ................................................................ 19 3.3.7 - In open circuit operation, the output voltage is not regular. .................................................................... 22 3.3.8 - In resistive load operation, the output voltage is not regular. .................................................................. 24 3.3.9 - Arc difficult to strike, the arc goes out immediately after lighting. ......................................................... 26 3.3.10 - When start button is released, the wire sticks to the workpiece (ineffective motor braking)................... 26 3.3.11 - In synergic mode, the welding quality is not satisfactory, the wire speed is not suited to the output current. .................................................................................................................................................... 27 1.1 1.2 1.3 1.4 3.302.161 24/03/2004 CEBORA S.p.A. 3 3.4 - Error codes and alarm signals..................................................................................................................... 28 3.4.1 - 01 - Internal RAM error........................................................................................................................... 28 3.4.2 - 02 - EEPROM error. ................................................................................................................................ 28 3.4.3 - 10 - Malfunction in the circuit to detect short-circuits at the output........................................................ 28 3.4.4 - 14 - Microprocessor supply voltage error on control board (27). ............................................................ 28 3.4.5 - 20 - Absence of interlock signal on power board (26)............................................................................. 28 3.4.6 - 25 - Malfunction on the EPLD bus in the control board (27). ................................................................. 28 3.4.7 - 30 - Incorrect setting of the minimum current threshold on the control board (27)................................. 29 3.4.8 - 42 - Error in the signal of the motor encoder (401). ................................................................................ 29 3.4.9 - 52 - Start button pressed during start-up.................................................................................................. 29 3.4.10 - 53 - Start button pressed while resetting from stop due to temperature beyond allowable limits or open wire coil cover......................................................................................................................................... 29 3.4.11 - 54 - Short-circuit between torch and workpiece upon start-up. ............................................................... 29 3.4.12 - 56 - Short-circuit at the output lasts too long (max. allowable duration = 1 sec.).................................... 30 3.4.13 - 60 - Current too high beyond the maximum allowable limits (250 A). ................................................... 30 3.4.14 - 73 - Display (G) indicates OPn = diode group (56) high temperature. .................................................... 30 3.4.15 - 80 - Display (G) indicates OPn = wire coil cover open. .......................................................................... 30 3.4.16 - 74 - Display (G) indicates tH = igbt high temperature............................................................................. 31 3.4.17 - 99 - Display (G) shows OFF = incorrect mains voltage signal. ............................................................... 31 4 - COMPONENTS LIST................................................................................................................................... 32 4.1 - Power source art. 285 : see file ESP285.pdf enclosed at the end of the manual......................................... 32 4.2 - Components table: see file ESP285.pdf enclosed at the end of the manual................................................ 32 4.3 - Spare parts list. ........................................................................................................................................... 32 5 - ELECTRICAL DIAGRAMS ........................................................................................................................ 33 5.1 - Power source art. 285 : see file SCHE285.pdf enclosed at the end of the manual...................................... 33 5.2 - Waveforms. ................................................................................................................................................ 33 5.2.1 - Transformer (30) secondary open-circuit voltage (par. 3.3.7). ................................................................ 33 5.2.2 - PWM1 and PWM2 signals for igbt command on power board (26) (par. 3.3.7). .................................... 33 5.2.3 - Wire feeder motor (401) voltage during correct braking (par. 3.3.10)..................................................... 34 5.2.4 - Wire feeder motor (401) voltage during incorrect braking (par. 3.3.10). ................................................ 34 5.2.5 - Mains voltage present signal (par. 3.4.17). .............................................................................................. 34 5.3 - Filter board (47) code 5.602.164. ............................................................................................................... 35 5.4 - Power supply (25) board code 5.602.163. .................................................................................................. 35 5.5 - Power board (26) code 5.602.162............................................................................................................... 36 5.6 - Driver-igbt board code 5.600.757............................................................................................................... 37 5.7 - Control board (27) code 5.602.157............................................................................................................. 37 5.8 - Panel board (41) code 5.602.178. ............................................................................................................... 39 5.9 - Push-pull board (43) code 5.602.171.......................................................................................................... 40 5.10 - Snubber board (58) code 5.602.166............................................................................................................ 41 5.11 - Programming board (21) code 5.602.174. .................................................................................................. 41 3.302.161 24/03/2004 CEBORA S.p.A. 4 1 - GENERAL INFORMATION 1.1 - Introduction. The purpose of this manual is to train personnel assigned to carry out maintenance on the power source art. 285 for MIG/MAG welding systems. 1.2 - General service policy. It is the responsibility of the customer and/or operator to use the equipment appropriately, in accordance with the instructions in the Instruction Manual, as well as to maintain the equipment and related accessories in good working condition, in compliance with the instructions provided in the Service Manual. Any internal inspection or repairs must be carried out by qualified personnel who are responsible for any intervention on the equipment. It is forbidden to attempt to repair damaged electronic boards or modules; replace them with original Cebora spare parts. 1.3 - Safety information. The safety notes provided in this manual are an integral part of those given in the Instruction Manual. Therefore, before working on the machine, please read the paragraph on safety instructions in the aforementioned manual. Always disconnect the power cord from the mains, and wait for the internal capacitors to discharge (1 minutes) before accessing the interior of the equipment. Some internal parts, such as terminals and dissipaters, may be connected to mains or otherwise hazardous potentials. It is therefore forbidden to work with the safety guards removed from the machine unless strictly necessary. In this case, take special precautions such as wearing insulating gloves and footwear, and working in a perfectly dry environment with dry clothing. 1.4 - Electromagnetic compatibility. Please read and observe the instructions provided in the paragraph “Electromagnetic compatibility” of the Instruction Manual. 3.302.161 24/03/2004 CEBORA S.p.A. 5 2 - SYSTEM DESCRIPTION 2.1 - Introduction. The SOUND MIG 2035/M Pulse is a system for MIG/MAG pulsed synergic, MIG/MAG nonpulsed synergic and MIG/MAG conventional welding. It is made up of an electronic power source (art. 285), and a set of accessories to adapt to various types of applications (see list in Sales Catalogue). The power source is controlled by a microprocessor circuit, which manages the operative functions of the welding system and operator interface. The working programs may be defined by the operator or respond to pre-programmed synergic curves. 2.2 - Technical specifications. To verify the technical specifications, see the machine plate, Instruction Manual, and Sales Catalogue. 2.3 - Description of power source art. 285. Art. 285 is a direct current power source with controlled current, consisting of a single-phase rectifier bridge and a DC/AC converter (inverter), as well as an additional rectifier bridge. Referring to the electrical diagram in par. 5.1, drawing 4.1 and table 4.2, we can identify the main blocks that make up the power source. The main switch (16) powers the filter board (47), which contains the filter to reduce conducted interference reflected in the mains. At its output is connected the power board (26) which contains: − the power rectifier bridge, which generates the 320 Vdc voltage to power the power supply board (25) and the igbt inverter; − the DC-capacitors to level this direct current; − the igbt inverter, which generates the square-wave alternating voltage for transformer (30); − the driver-igbt board, to drive the igbt of the inverter; − the TA to detect the current at the primary circuit of the transformer (30). The inductor-DC (50) connected to terminals TP5 and TP6 of the power board (26) contributes to the direct current leveling at the igbt inverter input. The rectifier bridge is equipped with a DC-capacitors pre-charge circuit, controlled by the control board (27). The fan (24) to cool the power elements of the power source, and connected to the power board (26), is also controlled directly by the control board (27). The 320-Vdc voltage present at the output of the rectifier bridge is applied to the power supply board (25), which acts as the main power pack and generates the service voltages for the various power source circuits. The igbt inverter is made up of four igbt connected in an “H-bridge” configuration, driven by the driver-igbt board permanently mounted on the power board (26). This board performs the isolated commands for the igbt, based on the PWM signals generated by the control board (27). The welding current is adjusted in the igbt inverter, by modulating the PWM1 and PWM2, signals, generated by control board (27) and sent to the igbt-driver board. The TA mounted on the power board (26) provides the control board (27) with the signal of the transformer (30) primary current, to verify correct operation of the inverter; this signal does not normally affect the welding current adjustment. The transformer (30), powered by the igbt inverter, provides the secondary circuit with voltage and current values suitable for welding. Its secondary circuit is a central socket type, and is connected to the choke (29) which levels the welding current, and the diode group (56), which rectifies the alternating current generated by the inverter to make it available at the power source output. 3.302.161 24/03/2004 CEBORA S.p.A. 6 The diode group (56) is made up of two diodes connected to a shared cathode, and provides a positive output voltage with regard to the central socket of the transformer. Actually, each diode in the group is in turn made up of two diodes parallel connected together. The Hall-effect current transducer (33), inserted at the diode group (56) output, sends the feed-back signal of the secondary current to the control board (27) to regulate welding current. The choke (29) and diode group (56) outputs, are connected to the power source output terminals, from which is taken the power source output voltage signal. This signal is used by the control board (27) to detect short-circuits of the wire on the workpiece during welding, and consequently adjust the welding current, as well as stop the power source if the short-circuit lasts too long. The control board (27) contains the main power source microprocessor. It supervises management of the other boards, more specialized in their functions, regulates the welding current and communicates with the panel board (41), which acts as a control panel for the entire welding system. The following controls and indicators are present on the panel board (41) (see Instruction Manual for more information): − the potentiometers to adjust the output voltage, wire speed, working times and operating pauses in “spot” or “pulse” mode, and the choke for more or less hot and penetrating welding; − a set of leds to indicate the operating status; − a 3-digit display to show material type (in synergic programs), services functions, wire speed, welding current and error codes; − a 2-digit display to show the working program selected or the value for the service function shown by display (G). Near the output terminals, mounted on the panel board (41), is the push-pull board (43), which contains the control circuit of the push-pull torch motor, and the signal interface connector for the push-pull torch. These signals include: − Start power source (from push-pull torch button). − External adjustment of the welding current (UP/DOWN buttons on push-pull torch). − Inputs for push-pull torch recognition. − Power supply output for push-pull torch motor. The power source power outputs are gathered together on the front panel. A central adapter (38) is set up for the torch, with a built-in power socket, two contacts for the start command, and a pneumatic socket for gas. The start signal of the central adapter (38) is similar to the one present in the connector (J1) of the push-pull board (43) (the connector (S) of the power source); these are alternately enabled based on the type of torch connected to the power source. With standard torch, the connector (J1) on push-pull board (43) remains free; the start command must be applied to the start terminals of the central adapter (38). With push-pull torch, the start input on central adapter (38) is deactivated, and the start command must be applied to the start terminals of the connector (J1) on push-pull board (43). The signals processed by the electronic boards and present at their connectors are listed in the table in chapter five of this manual. 3.302.161 24/03/2004 CEBORA S.p.A. 7 2.4 - Programming power source art. 285 (firmware upgrade). The control board (27) contains the main microprocessor of the power source and the memory to set up the parameters of the work programs and synergic curve charts. Programs and synergic curves are defined based on the experience earned by Cebora, and may be upgraded thanks to a programming system that uses the programming board (21) (connector J1) and a RS232 serial communication line. The upgraded programs are available, together with the “Cebora Downloader” programming software and the relevant instructions, in a single programming file available at the web site www.cebora.it. 2.5 - Restoring the factory setting. Work programs may be changed by altering the parameter set-up available from the control panel. These customizations may be saved in the memory of the control board (27), and be called up thereafter using the “Save” and “Recall” procedures described in the Instruction Manual. The following procedure makes it possible to restore the parameter set-up to the standard values assigned when the power source leaves the factory. With the power source off, press and hold down the keys (O) and (R) simultaneously, and switch on the power switch (U) (16). Hold the keys down until “dFL” (default) appears on the display (G). Release the keys (O) and (R) and wait for the parameters upgrade to be completed, after which time the normal start-up sequence will begin automatically. 2.6 - Customized synergic curves. The power source 285 may operate with standard synergic curves, contained in the memory of the control board (27), or with customized synergic curves developed by Cebora on request by the customer. The customized curves are released in the form of 2 programmed EEPROM memories (one with the curves of the conventional programs (Hxx) and the other with the curves of the pulsed programs (Pxx)), to be inserted in slots A and B of the programming board (21). The EPROM may also be installed in the slots individually and without having to observe a particular position. Upon start-up the power source checks for the presence of the EEPROM, and automatically activates the following operating modes: − with EEPROM not installed the power source operates according to the synergic curves resident in the memory of the control board (27). − with EEPROM installed in the slots, the power source operates according to the synergic curves stored in the EEPROM. This mode is indicated by the led (A) “HOLD” on the control panel, which lights while display (G) shows the codes of the curves, “Hxx” and “Pxx”, during start-up. 2.7 - Back-up procedure. The following procedure copies the synergic curves resident in the memory of the control board (27) to the EEPROM installed in the slots of the programming board (21). With power source powered, press and hold down simultaneously the (O) and (R) keys and the start button on the torch, until the codes of the curves being copied (Pxx or Hxx) appear on display (G) (P = pulsed, H = short, xx = progressive number of the curve). Release the keys (O) and (R) and wait for the parameters upgrade to be completed for both EEPROM, after which time the normal start-up sequence will begin automatically. NOTE The back-up procedure always also resets the parameters to the factory values. 3.302.161 24/03/2004 CEBORA S.p.A. 8 2.8 - Programs tables. 2.8.1 - Conventional non synergic programs (ver. H06). Materiale / Material Ferro / Iron Alluminio / Aluminium Acciaio Inox / Stainless Steel ∅filo ∅wire 0,6/0,8/(1) 0,6/0,8/1 0,8/(1) Filo Rame-Silicio3%/CopperSilico3% 2.8.2 0,8/1 Gas Torch Art. 1242 Torch Art. 2003 Prg. N° Argon / 18%CO2 Argon 100% Argon / O2 2% Argon / CO2 2% Argon 100% Argon / He 15% • • • • • • 1 2 3 • • 5 - Conventional synergic programs (ver. H06). ∅filo ∅wire Gas Torch Art. 1242 Torch Art. 2003 Prg. N° Ferro / Iron - Puntatura / Spot Ferro / Iron Ferro / Iron Ferro / Iron Ferro / Iron Ferro / Iron 0,6 0,6 0,8 0,6 0,8 1 Argon/ CO2 18% Argon/CO2 18% Argon/CO2 18% CO2 100% CO2 100% Argon/CO2 18% • • • • • • • • • • • • 18 6 7 8 9 28 Acciaio inox / Stainless steel Acciaio inox / Stainless steel Acciaio inox / Stainless steel Acciaio inox / Stainless steel 0,8 1 0,8 1 Argon/ O2 2% Argon/ O2 2% Argon/ CO2 2% Argon/ CO2 2% • • • • • • • • 10 16 26 27 Aluminium Al Si 12 (4047) Aluminium Al Si 12 (4047) Aluminium Al Si 12 (4047) 0,6 0,8 1 Argon 100% Argon 100% Argon 100% • • • • 11 12 15 Aluminium Al Mg 5 (5356) Aluminium Al Mg 5 (5356) 0,8 1 Argon 100% Argon 100% • • • • 13 14 Rame-Silicio 3% / Copper-Silicon 3% Rame-Silicio 3% / Copper-Silicon 3% Rame-Silicio 3% / Copper-Silicon 3% Rame-Silicio 3% / Copper-Silicon 3% 0,8 1 0,8 1 Argon 100% Argon 100% Argon / He 15% Argon / He 15% • • • • • • • • 17 23 19 20 CuAl8 CuAl8 CuAl8 CuAl8 0,8 1 0,8 1 Argon / He 15% Argon / He 15% Argon 100% Argon 100% • • • • • • • • 21 22 24 25 Materiale / Material 3.302.161 24/03/2004 CEBORA S.p.A. 2.8.3 9 - Pulsed synergic programs (ver. P03). ∅filo ∅wire 0,6 0,8 1 Gas Torch Art. 1242 Torch Art. 2003 Prg. N° Argon/CO2 18% Argon/CO2 18% Argon/CO2 18% • • • • • • 69 64 55 Acciaio inox / Stainless steel 308L-Si Acciaio inox / Stainless steel 308L-Si Acciaio inox / Stainless steel 308L-Si Acciaio inox / Stainless steel 308L-Si Acciaio inox / Stainless steel 308L-Si 0,6 0,8 1 0,8 1 Argon / CO2 2% Argon / CO2 2% Argon / CO2 2% Argon / O2 2% Argon / O2 2% • • • • • • • • • • 57 56 54 63 50 Acciaio inox / Stainless steel 316L-Si Acciaio inox / Stainless steel 316L-Si 0,8 1 Argon / CO2 2% Argon / CO2 2% • • • • 58 60 Aluminium Al Si 12 (4047) Aluminium Al Si 12 (4047) Aluminium Al Si 5 (4043) 0,8 1 1,2 Argon 100% Argon 100% Argon 100% • • • • 61 52 65 Aluminium Al Mg 5 (5356) Aluminium Al Mg 5 (5356) Aluminium Al Mg 5 (5356) 0,8 1 1,2 Argon Argon Argon • • • • • 59 53 66 Rame-Silicio 3% / Copper-Silicon 3% Rame-Silicio 3% / Copper-Silicon 3% 0,8 1 Argon Argon • • • • 51 67 CuAl8 CuAl8 0,8 1 Argon Argon • • • • 62 68 Materiale / Material Ferro / Iron Ferro / Iron Ferro / Iron 3.302.161 24/03/2004 CEBORA S.p.A. 10 2.9 - Set-up mode diagram. OPERATING MODE SET-UP MODE NO WELD OFF switch U=on START-UP O+R long = default O+R O+R dSp O R SP (display G = speed). A (display G = current) (default). O R 2 Spot (led C=on, leds L–M=off). 1 Intermittent (led L=off, leds C–M=on). 0 Continue (led L=on , leds C–M=off ) (default). O R 4 times, automatic. 2 times, manual (default). torch O+R Job torch O+R 2-4 W E L D I N G M O D E torch O+R HSA (default = OF). R=OF (3L select) O = on (3L off) SC O R Start current 1 – 20 (10-200%). (default = 13 = 130 %). torch Len O R Length 0,1 – 10 sec.. (default = 0,7 sec.). Slo O R Slope 0,1 – 10 sec.. (default = 0,5 sec.). SC O R Start current 1 – 20 (10-200%). (default = 13 = 130 %). Slo O R Slope 0,1 – 10 sec.. (default = 0,5 sec.). CrC O R Crater filler cur. 0,1–20 (10-200%). (default = 6 = 60%). torch O+R 3L (default = OF). R=OF (HSA select) O = on (HSA off) torch torch O+R PrF O R Pre-Flow time 0,0 – 9,9 sec. (default = 0,1 sec.). O R Post-Flow time 0,0 – 9,9 sec. (default=3,0 sec.). O R Soft Start 1 – 99 %. (default = Au = Automatic). torch O+R PoF torch O+R O+R Acc torch bb O R Burn-back time 00 – 99 (default = Au = automatic). torch O+R PPF O R Push-Pull Force 9 / -9 (default = 0). torch 3.302.161 24/03/2004 CEBORA S.p.A. 11 3 - MAINTENANCE WARNINGS ANY INTERNAL INSPECTIONS OR REPAIRS MUST BE CARRIED OUT BY QUALIFIED PERSONNEL. BEFORE BEGINNING MAINTENANCE OPERATIONS, UNPLUG THE MACHINE FROM THE MAINS AND WAIT FOR THE INTERNAL CAPACITORS TO DISCHARGE (1 MINUTE) 3.1 - Periodic inspection, cleaning. Periodically open the power source grids and check inside the aeration tunnel. Remove any dirt or dust to ensure smooth air flow, and thus adequate cooling of the internal parts of the power source. Remove any dirt or metal dust from the wire feed liner and gearmotor unit, also making sure that they are not worn to the point of needing replacement. Check the condition of the output terminals, output and power supply cables of the power source; replace if damaged. Check the condition of the internal power connections and connectors on the electronic boards; if you find “loose” connections, tighten or replace the connectors. 3.2 - Operating sequence. The following sequence represents correct functioning of the machine. It may be used as a guiding procedure for troubleshooting. It must be carried out after each repair without any errors. 3.2.1 3.302.161 - Power source commands and signals. 24/03/2004 CEBORA S.p.A. 3.2.2 12 - Power source operation. NOTE Operations preceded by this symbol refer to operator actions. ♦ Operations preceded by this symbol refer to machine responses that must occur following an operator action. System shut off and disconnected from the mains. Connect the gas intake to the fitting (T) on the rear panel. Connect the torch to the central adapter (E) of the power source (with push-pull torch also connect the patch connector of the torch to the connector (S) of the power source). Connect the negative pole cable (F) of the power source to the workpiece. Connect the power source to the mains. Close the switch (U). ♦ System supplied, on control panel leds and displays lit (lamp test). ♦ After one second, display (G) indicates “Hxx” (H = conventional, synergic and non synergic programs tables; xx = the version of the programs (see tables 2.8.1 and 2.8.2)). Display (Q) indicates the version of the “firmware 285 Cebora”. ♦ After one second, display (G) indicates “Pxx” (P = pulsed synergic programs table; xx = the version of the programs (see table 2.8.3)). Display (Q) indicates the version of the “firmware 285 Cebora”. ♦ After one second, display (Q) indicates the selected working program, and display (G) indicates the corresponding material type. Some indicator leds remain lit; all as they were set before the last time the unit was shut off. ♦ Fan (24) working. ♦ After two seconds, display (Q) indicates the selected working program, and display (G) indicates the wire speed if a “conventional non-synergic” program is selected, or the programmed current or wire speed (depending of the “dSp” function set-up) if a “synergic” program is selected. Correct? YES Press the button (O) several times; the “Program” selection is repeated in sequence. Press the button (R) several times; the “Program” selection is repeated in sequence. ♦ Each time the button (O) is pressed, the number indicated by display Q increases. ♦ Each time the button (R) is pressed, the number indicated by display Q decreases. ♦ Each time the buttons (O) or (R) is pressed, display (G) indicates the type of material set in the program shown on display (Q). After two seconds display (G) indicates the wire speed if a “conventional non-synergic” program is selected, or the programmed current or wire speed (depending of the “dSp” function set-up) if a “synergic” program is selected. Correct? NO (see 3.3.1, 3.3.2, 3.3.3). NO (see 3.3.3). YES Press the button (O) and (R) simultaneously to enter in set-up mode. Press the torch start button several times; set-up functions selections is repeated in sequence. 3.302.161 24/03/2004 CEBORA S.p.A. 13 ♦ Display (G) indicates “dSp” if is the first time you enter in set-up mode, or the function code present last time you exit the set-up mode. ♦ By pressing the torch start button is possible to select all set-up functions available for the program selected, indicated by display Q, during operative mode (see diagram 2.9). Correct? NO (see 3.3.3). YES WARNING DURING THE FOLLOWING TESTS DO NOT AIM THE TORCH AT PEOPLE OR PARTS OF THE BODY, BUT ONLY TOWARDS AN OPEN SPACE OR THE WORKPIECE. Press the torch start button to select the function “Job” in the set-up menu. Use the button (R) to select the mode continuous, led (L) lit. Press the buttons (O) or (R) simultaneously to exit the set-up mode. Press the buttons (O) or (R) to select a work program compatible with the torch being used and the material available (see tables 2.8) (i.e.: program 1). Hold down the torch start button for 5 seconds approximately. ♦ Gas begins to flow from the torch, for as long as the button is held down and the pre-gas and post-gas time selected. ♦ Wire begins to feed from the torch, or at least the wire feeder motors begin running, for as long as the button is held down. ♦ Open-circuit output voltage is generated for as long as the button is held down. Correct? NO (see 3.3.4, 3.3.5) 3.3.6, 3.3.7). YES Move the torch near the workpiece and press the torch trigger. ♦ Begin welding. Turn the knobs (B) and (I) (with traditional torch and manual programs) to attain the current level and wire speed suited to the welding to be carried out. ♦ Display (G) indicates the welding current. Correct? NO (see 3.3.8, 3.3.9). YES Release the torch start button. ♦ Arc shuts off immediately, wire stops feeding from the torch, and gas flow is interrupted. Correct? NO (see 3.3.10). YES REGULAR OPERATION. 3.302.161 24/03/2004 CEBORA S.p.A. 14 3.3 - Troubleshooting. WARNINGS ANY INTERNAL INSPECTIONS OR REPAIRS MUST BE CARRIED OUT BY QUALIFIED PERSONNEL. BEFORE REMOVING THE PROTECTIVE GUARDS AND ACCESSING INTERNAL PARTS, DISCONNECT THE POWER SOURCE FROM THE MAINS AND WAIT FOR THE INTERNAL CAPACITORS TO DISCHARGE (1 MINUTE). NOTE Items in boldface describe problems that may occur on the machine (symptoms). Operations preceded by this symbol refer to situations the operator must determine (causes). ♦ Operations preceded by this symbol refer to actions the operator must perform in order to solve the problems (solutions). 3.3.1 - The power source does not start, control panel off. MAINS SUITABILITY TEST. No voltage for mains protection. NO Correct? YES ♦ Eliminate any short-circuits on the connections between power cable, switch (16), filter board (47) and power board (26). ♦ Make sure that terminals TP5 and TP6 on filter board (47) and TP1 and TP2 on power board (26) are not short-circuited. ♦ Mains not suitable to power the power source (ex.: insufficient installed power). MAINS CONNECTION TEST. Terminals TP1 and TP2 on power board (26) = 230 Vac, with switch (16) closed. YES ♦ ♦ ♦ ♦ Correct? NO Check power cable and plug and replace if necessary. Check switch (16), and replace if defective. Check the mains voltage conditions. Replace filter board (47). POWER SUPPLY TEST. Power supply board (25), connector J3, terminals 1(+) and 2(-) = +320 Vdc. YES Correct? NO 3.302.161 24/03/2004 CEBORA S.p.A. 15 ♦ Check the wiring between J3 power supply board (25) and terminals TP3(+) and TP4(-) of power board (26). ♦ With the power source off, temporarily disconnect the power supply board (25) from the power board (26) and check the resistance between terminals 1 and 2 of J3 on power supply board (25). If short-circuited, replace the power supply board (25) and power board (26). ♦ Replace the power board (26). CONTROL BOARD (27) POWER SUPPLY TEST. Control board (27), connector J10, terminals 1(+) - 2(-) = +27 Vdc; Control board (27), connector J10, terminals 3(+) - 4(-) = +14 Vdc; Control board (27), connector J3, terminals 3(+) - 1(-) = +5 Vdc. YES Correct? NO ♦ Check the wiring between J10 control board (27) and J2 power supply board (25). ♦ With the power source off, temporarily disconnect the connector J10 on control board (27) and check the resistance between terminals 1 - 2 of J10 on control board (27), and the resistance between terminals 3 - 4 of J10 on control board (27). If short-circuited, replace control board (27) and power supply board (25). ♦ Replace power supply (25) and control (27) boards. CONTROL PANEL POWER SUPPLY TEST. Push-pull board (43), connector J1, terminals 4(+) – 5(-) = +24 Vdc. Push-pull board (43), connector J1, terminals 10(+) – 3(-) = +5 Vdc. YES Correct? NO ♦ Check the wiring between J12 control board (27) and J1 panel board (41). ♦ Make sure the push-pull board (43) is correctly mounted on the panel board (41). ♦ With the power source off, temporarily disconnect the connector J12 on control board (27) and check the resistance between terminals 12 and 9 (+24 Vdc line), and the resistance between terminals 12 and 26 (+5 Vdc line), on the patch connector left free by J12. If short-circuited, replace panel (41) and/or push-pull (43) and control (27) boards. ♦ Replace the control board (27). ♦ Replace the panel board (41) and/or push-pull board (43). ♦ Replace the panel board (41) and/or push-pull board (43). ♦ Replace the control board (27). 3.302.161 24/03/2004 CEBORA S.p.A. 3.3.2 16 - Power source powered, control panel on, fan (24) stopped. FAN (24) TEST. Power board (26), connector J2, terminals 1(-) – 2(+) = +27 Vdc. NO Correct? YES ♦ Check the wiring between fan (24) and connector J2 on power board (26). ♦ Make sure that there are no mechanical impediments blocking the fan. ♦ Replace the fan (24). FAN (24) COMMAND TEST. Control board (27), connector J11, terminals 7(+) – 8(-) = +27 Vdc. NO Correct? YES ♦ Check the wiring between J11 control board (27) and J3 power board (26). ♦ Replace the power board (26). ♦ With the power source off, temporarily disconnect the connector J11 on control board (27) and check the resistance between terminals 7 and 8 on the patch connector left free by J11. If short-circuited, replace power board (26) or fan (24) as well as the control board (27). ♦ Replace the control board (27). 3.302.161 24/03/2004 CEBORA S.p.A. 3.3.3 17 - Power source powered, display and signals does not indicate the correct values. ERROR CODE TEST. Upon start-up, after the lamp-test, the display (G) flashes and shows an error code. NO Correct? YES ♦ See Error codes and alarm signals, par. 3.4. INDICATOR TEST. Upon start-up, after the lamp-test, display (G) indicates “Hxx” (H = conventional, synergic and non synergic programs tables; xx = the version of the programs (see tables 2.8.1 and 2.8.2)). Display (Q) indicates the version of the “firmware 285 Cebora”. After one second, display (G) indicates “Pxx” (P = pulsed synergic program table; xx = the version of the programs (see table 2.8.3)). Display (Q) indicates the version of the “firmware 285 Cebora”. After one second, display (Q) indicates the selected working program, and display (G) indicates the corresponding material type. Some indicator leds remain lit; all as they were set before the last time the unit was shut off. After two seconds, display (Q) indicates the selected working program, and display (G) indicates the wire speed if a “conventional non-synergic” program is selected, or the programmed current or wire speed (depending of the “dSp” function set-up) if a “synergic” program is selected. With buttons (O), (R) and torch trigger are possible all passages relating to set-up menu functions (see diagram 2.9). YES Correct? NO ♦ Check the wiring between J12 control board (27) and J1 panel board (41). ♦ Make sure the push-pull board (43) is correctly mounted on the panel board (41). ♦ Carry out the CONTROL BOARD (27) POWER SUPPLY TEST and CONTROL PANEL POWER SUPPLY TEST, par. 3.3.1. ♦ Replace the control board (27). ♦ Replace the panel board (41). ♦ Regular operation of the control panel. 3.302.161 24/03/2004 CEBORA S.p.A. 3.3.4 18 - The start button produces no effect. TORCH TYPE RECOGNITION TEST. Control board (27), connector J12, terminal 11 (or R85 left side) and connector Jl4 (-) = 0 Vdc with push-pull torch inserted (+5 Vdc with other torches). YES ♦ ♦ ♦ ♦ ♦ ♦ Correct? NO Check the wiring between J12 control board (27) and J1 panel board (41). Make sure the push-pull board (43) is correctly mounted on the panel board (41). Make sure the push-pull torch is correctly inserted on the connector J1 of the push-pull board (43). Check for the presence of the jumper between terminals 3 and 7 in the push-pull torch connector. Replace the push-pull (43) and/or panel (41) boards. Replace the control board (27). START COMMAND TEST WITH TRADITIONAL TORCH. Control board (27), connector J1 terminals 2(+) – 1(-) = 0 Vdc with button on traditional torch pressed (+16 Vdc approx. with button released). YES Correct? NO ♦ Check the wiring between connector J1 control board (27), central adapter (38) and the torch trigger. ♦ Check torch button. If defective, replace. ♦ See CONTROL BOARD (27) POWER SUPPLY TEST, par. 3.3.1. ♦ Replace the control board (27). START COMMAND TEST WITH PUSH-PULL TORCH. Control board (27), connector J12, terminal 3 (or Z1 cathode, connector J9 side) and connector J14 (-) = approximately 1,2 Vdc, with button on push-pull torch pressed (+4,7 Vdc with button released). YES Correct? NO ♦ Check the wiring between J12 control board (27) and J1 panel board (41). ♦ Make sure the push-pull board (43) is correctly mounted on the panel board (41). ♦ Check the wiring between connector J1, terminals 4 and 5, on push-pull board (43), and the button on push-pull torch. ♦ Check torch button. If defective, replace. ♦ See CONTROL BOARD (27) POWER SUPPLY TEST, par. 3.3.1. ♦ Replace the push-pull (43) and/or panel (41) boards. ♦ Replace the control board (27). ♦ Replace the control board (27). 3.302.161 24/03/2004 CEBORA S.p.A. 3.3.5 19 - Power source powered, no gas flows from the torch. SOLENOID VALVE (12) TEST. Solenoid valve (12) terminals = 27 Vdc with torch button pressed and as long as the button is held down and the pre-gas and post-gas time set. NO ♦ ♦ ♦ ♦ Correct? YES ♦ Check for gas presence at the power supply fitting (T), and make sure that the pressure and flow in the intake line comply with the values specified for the SOUND MIG 2035/M Pulse. ♦ Make sure there are no occlusions in the gas hoses of the power source. ♦ With the power source off, check the resistance on solenoid valve (12) terminals = 56 ohm. If >Mohm (winding broken), replace the solenoid valve (12). ♦ Replace the solenoid valve (12). Check the wiring between terminals 5 and 6 of the connector J11 on control board (27) and solenoid valve (12). Check the resistance on solenoid valve (12) terminals = 56 ohm. If 0 ohm (short-circuit), replace solenoid valve (12) and control board (27). See CONTROL BOARD (27) POWER SUPPLY TEST, par. 3.3.1. Replace the control board (27). 3.3.6 - Power source powered, the wire feeder motor does not work. WITH TRADITIONAL TORCH WIRE FEEDER MOTOR TEST. Control board (27), connector J13, terminals 1(+) and 2(-) = approximately +1,5 / +25 Vdc, based on the program set, with start button pressed and adjustable by knob (B). NO ♦ ♦ ♦ ♦ ♦ 3.302.161 Correct? YES Check the wiring between J13 control board (27) and wire feeder motor (401). With the power source off, temporarily disconnect the terminals of the wire feeder motor (401) from the connector J13 control board (27), and make sure that the resistance between the terminals of the motor left free = approximately 1 ohm (motor winding resistance). If >Mohm (winding broken), replace wire feeder motor (401). Make sure there are no mechanical impediments blocking the motor. Check the motor rotation direction; if wrong, reverse the wires on the terminals of J13 on control board (27). Replace the wire feeder motor (401). 24/03/2004 CEBORA S.p.A. 20 MOTOR SPEED REFERENCE SIGNAL TEST WITH TRADITIONAL TORCH. Control board (27), connector J12 terminal 24 (+) (or C79 left side) and connector J14 (-) = 0 / +5 Vdc adjustable with knob (B). YES ♦ ♦ ♦ ♦ ♦ Correct? NO ♦ Check the wiring between connectors J12 on control board (27) and J1 on panel board (41), and make sure the push-pull board (43) is properly mounted on panel board (41). ♦ Replace the control (27) and/or panel (41) and/or push-pull (43) boards. With the power source off, temporarily disconnect the terminals of the wire feeder motor (401) from the connector J13 control board (27), and make sure that the resistance between the terminals of the motor left free = approximately 1 ohm (motor winding resistance). If 0 ohm (short-circuit), replace the wire feeder motor (401) and control board (27). Make sure the machine is set for the traditional torch by carrying out the TORCH TYPE RECOGNITION TEST, par. 3.3.4. Make sure the wire feeder motor command is present by carrying out the START COMMAND TEST WITH TRADITIONAL TORCH, par. 3.3.4. See CONTROL BOARD (27) POWER SUPPLY TEST, par. 3.3.1. Replace the control board (27). WITH PUSH-PULL TORCH WIRE FEEDER MOTORS TEST WITH PUSH-PULL TORCH. Control board (27), connector J13, terminals 1(+) and 2(-) = approximately +1,5 / +25 Vdc, according to the program set, with start button pressed and adjustable with knob (B). Push-pull board (43), connector J1, terminals 1(+) and 8(-) (or wire feeder motor on push-pull torch terminals) = approximately +3 / +25 Vdc, according to the program set, with start button pressed and adjustable with UP/DOWN buttons on the torch. NO Correct? YES ♦ Check the wiring between J13 control board (27) and wire feeder motor (401), and between J1 push-pull board (43) and torch motor. ♦ With the power source off, temporarily disconnect the terminals of the wire feeder motor (401) from the connector J13 control board (27), and make sure that the resistance between the terminals of the motor left free = approximately 1 ohm (motor winding resistance). If >Mohm (winding broken), replace wire feeder motor (401). ♦ With the power source off, temporarily disconnect the torch from the power source and check the resistance between terminals 1 and 8 of the patch connector on the torch. Correct value = approximately 4 / 40 ohm (motor winding resistance, depends on the rotor stopping point). If >Mohm (winding broken), check the wiring between connector and torch motor, or replace the torch motor. ♦ Make sure that there are no mechanical impediments blocking the motors. ♦ Check the motor rotation direction; if wrong, reverse the wires on the terminals of J13 on control board (27) and/or on the torch motor. 3.302.161 24/03/2004 CEBORA S.p.A. 21 ♦ Replace the wire feeder motor on the torch, or the entire torch. ♦ Replace the wire feeder motor (401). MOTOR SPEED REFERENCE SIGNAL TEST WITH PUSH-PULL TORCH. Control board (27), connector J12 terminal 4(+) (or C76 right side) and connector J14(-) = approximately 0 Vdc, with UP button on torch pressed; approximately +2.5 Vdc, with DOWN button on torch pressed; +4 Vdc with UP and DOWN buttons released. YES ♦ ♦ ♦ ♦ ♦ ♦ ♦ Correct? NO ♦ Check the wiring between connectors J12 on control board (27) and J1 on panel board (41), and make sure the push-pull board (43) is properly mounted on panel board (41). ♦ Check the wiring between connector J1 push-pull board (43) and UP/DOWN buttons on the torch. ♦ Make sure that the buttons on the torch are working properly, and replace if defective, or replace the entire torch. ♦ Replace the control (27) and/or panel (41) and/or push-pull (43) boards. Make sure the unit is set for push-pull torch, by carrying out the TORCH TYPE RECOGNITION TEST, par. 3.3.4. Make sure the wire feeder motor command is present by carrying out the START COMMAND TEST WITH PUSH-PULL TORCH, par. 3.3.4. Check the wiring between connector J12 on control board (27) and connector J1 on panel board (41), and make sure the push-pull board (43) is properly mounted on panel board (41). With the power source off, temporarily disconnect the terminals of the wire feeder motor (401) from the connector J13 control board (27), and make sure that the resistance between the terminals of the motor left free = approximately 1 ohm (motor winding resistance). If 0 ohm (short-circuit), replace the wire feeder motor (401) and control board (27). With the power source off, temporarily disconnect the torch from the power source and check the resistance between terminals 1 and 8 of the patch connector on the torch. Correct value = approximately 4 / 40 ohm (motor winding resistance, depends on the rotor stopping point). If 0 ohm (short-circuit), check the wiring between connector and torch motor, and replace torch motor, or the entire torch, and push-pull board (43) if necessary. See CONTROL BOARD (27) POWER SUPPLY TEST and CONTROL PANEL POWER SUPPLY TEST, par. 3.3.1. Replace the control (27) and/or panel (41) and/or push-pull (43) boards. 3.302.161 24/03/2004 CEBORA S.p.A. 3.3.7 22 - In open circuit operation, the output voltage is not regular. OPEN-CIRCUIT OUTPUT VOLTAGE TEST. Power source output terminals (F)(-) and (E)(+) = approximately +62 Vdc, with start button on the torch pressed. NO Correct? YES ♦ Correct operation. WARNING To carry out the following tests you must temporarily disable the output voltage detection circuit, to avoid blockage for “Error 10” (see par. 3.4.3). To achieve this, apply a voltage of approximately 50 Vdc on terminals 1(+) and 2(-) of J2 on control board (27), or switch (with power source off) the dip-switch 2 of SW1 on control board (27) in ON position. The latter (available from machine firmware rev. 5) allows the power source to deliver voltage and current in “test” mode, which cuts out some control and protection functions. For this reason, do not use this operating mode except for the test described in the present chapter of this manual. VOLTAGE TO SECONDARY CIRCUIT TRANSFORMER (30) TEST. With power source off, temporarily disconnect the end terminals of the secondary transformer circuit (30) from the “anode” terminals of the diode (56). Power the power source. Central terminal of the transformer (30) secondary circuit (gnd) and end terminal of the transformer, disconnected from an “anode” of diode group (56) = fig. 5.2.1, open-circuit voltage on the transformer (30) secondary circuit, with start button pressed. NO Correct? YES ♦ Check the wiring between “cathode” diode group (56), and the central torch adapter (38), and between the central socket transformer (30), choke (29) and power source output terminal (F). If you find loose connections, tighten and replace any damaged components. ♦ With the end terminals of the secondary circuit of transformer (30) disconnected from terminals “anode” of diode group (56), remove the cooper bar that connect the diodes in parallel each other, and check the resistance between terminals “anode” and “cathode” of each diode of the group (56). Correct value = diode junction in one way, and >Mohm with the instrument probes reversed. If you find short-circuits or breaks, replace the diode group (56). ♦ Check the continuity and make sure the choke (29) inside the aeration tunnel is in good working condition (for inspection remove the front grid). If you find loose connections, tighten and replace any damaged components, or the choke (29). 3.302.161 24/03/2004 CEBORA S.p.A. 23 CURRENT TO PRIMARY CIRCUIT OF TRANSFORMER (30) TEST. Control board (27), connector J4, terminals 3(+) – 4(-) = <0.1 Vdc, current to transformer (30) primary circuit, with start button pressed, and terminals of the secondary circuit disconnected from “anode” terminals of diodes (56). YES Correct? NO ♦ Check the wiring between J4 control board (27) and J6 power board (26). ♦ Make sure that there are no short-circuits in the connections between the primary circuit of the transformer (30) and terminals TRA1 and TRA2 on power board (26) (to inspect remove the front ventilation grid). ♦ Check the conditions of the transformer (30). If you notice burn signs or deformities, replace the transformer (30). ♦ Replace the control (27) and/or power (26) boards. ♦ Replace the transformer (30). IGBT-DRIVER BOARD COMMAND TEST. Driver-igbt board, connector J3, terminals 1 and 2 (gnd) = terminals 3 and 4(gnd) = fig. 5.2.2 igbt command signal, with start button pressed, and terminals of the secondary circuit disconnected from “anode” terminals of diodes (56). YES Correct? NO ♦ Check the wiring between J3 driver-igbt board and J8 control board (27). ♦ See CONTROL BOARD (27) POWER SUPPLY TEST, par. 3.3.1. ♦ See START COMMAND TEST WITH TRADITIONAL TORCH and START COMMAND TEST WITH PUSH-PULL TORCH, par. 3.3.4. ♦ Replace the control board (27) and/or driver-igbt board. ♦ Make sure the driver-igbt board is correctly mounted on power board (26). ♦ Check for the presence of 320 Vdc voltage on terminals TP3(+) and TP4(-) on power board (26). If absent, check for the presence of 230 Vac mains voltage at terminals TP1 and TP2 on power board (26); if necessary, replace power board (26). ♦ Check the connections between the primary circuit of the transformer (30) and terminals TRA1 and TRA2 on power board (26) (to inspect, remove the front ventilation grid). ♦ Check the voltage on power board (26), connector J3, terminals 3(+) and 4(-) = +13 Vdc approx. (end DC-capacitors pre-charge signal). If absent, check the wiring between J3 power board (26) and J11 control board (27), and check, with power source off and J11 on control board (27) disconnected, the resistance between the terminals 3 and 4 of J3 power board (26). Correct value = approximately 400 ohm. If 0 ohm (short-circuit), replace power (26) and control (27) boards. If >Mohm (circuit broken), replace power board (26). ♦ Check wiring between J2 control board (27) and power source terminals (E)(+) and (F)(-) (obviously, in the original operating conditions and not the current ones altered for the test). ♦ Replace the power (26) and/or control (27) and/or driver-igbt boards. ♦ Replace the transformer (30). NOTE With power source off reset the dip-switch 2 of SW1 in off position, on control board (27). 3.302.161 24/03/2004 CEBORA S.p.A. 3.3.8 24 - In resistive load operation, the output voltage is not regular. NOTE For the following tests set continuous “Mode” (led L lit) and the working program n° 1, (see table 2.8.1). Turn the knobs (B) and (I) all the way clockwise (to maximum) and set the other knobs to their central position. OPEN-CIRCUIT OPERATING TEST. Power source output terminal (F)(-) and (E)(+) = approximately +62 Vdc, with start button pressed, without output load. YES Correct? NO ♦ Carry out the test in par. 3.3.7. NOTE For the following tests use a resistive load capable of withstanding the maximum power source current. The appropriate values are shown in the table. Resistive load Maximum output Power source Condition resistance current output voltage 0.12 ohm 200 Adc +24 Vdc Start button pressed OUTPUT VOLTAGE TEST ON RESISTIVE LOAD. Power source output terminals (F)(-) and (E)(+) = values as shown in the table, with start button pressed. NO Correct? YES ♦ Correct operation. POWER BOARD (26) POWER SUPPLY TEST. Power board (26), terminals TP3(+) and TP4(-) = approximately +290 Vdc, with start button pressed and power source loaded (table conditions). YES Correct? NO ♦ Check for the presence of mains voltage at terminals TP1 and TP2 of power board (26). ♦ Check the voltage on power board (26), connector J3, terminals 3(+) and 4(-) = +13 Vdc (end DC-capacitors pre-charge signal). If absent, check the wiring between J3 power board (26) and J11 control board (27), and check, with power source off and J11 on control board (27) disconnected, the resistance between the terminals 3 and 4 of J3 power board (26). Correct value = approximately 400 ohms. If 0 ohm (short-circuit), replace power board (26) and control board (27). If >Mohm (circuit broken), replace power board (26). ♦ Replace the power board (26). 3.302.161 24/03/2004 CEBORA S.p.A. 25 CURRENT ANALOG REFERENCE SIGNAL TEST. Control board (27), connector J12, terminal 23(+) (or C86 left side) and connector J14 (-) = 0 / +5 Vdc adjustable with knob (I). YES Correct? NO ♦ Check the wiring between connectors J12 on control board (27) and J1 on panel board (41), and make sure the push-pull board (43) is properly mounted on panel board (41). ♦ Replace the control (27) and/or panel (41) and/or push-pull (43) boards. CURRENT TRANSDUCER (33) POWER SUPPLY TEST. Current transducer (33), terminals +(red wire)(+) and –(black wire)(-) = +27 Vdc. YES Correct? NO ♦ Check the wiring between J4 control board (27) and current transducer (33). ♦ With the power source off, temporarily disconnect the connector J4 from the control board (27) and make sure that the + and - terminals of the current transducer (33) are not short-circuited. If necessary, replace both the current transducer (33) and control board (27). ♦ Replace the current transducer (33) and/or control board (27). POWER SOURCE OUTPUT CURRENT FEEDBACK SIGNAL TEST. Control board (27), connector J4, terminals 7(+) – 8(-) = approximately +6 Vdc, with power source powered and start button not pressed; approximately +13 Vdc, with start button pressed and power source loaded (table conditions). YES Correct? NO ♦ Check the wiring between diode group (56), and the central torch adapter (38), and between choke (29) and power source output terminal (F). If you find shortcircuits or loose connections, restore the original connections and replace any damaged components. ♦ Make sure the current transducer (33) is correctly mounted on the cable between transformer (30) central socket and choke (29). ♦ Replace the control board (27) and/or current transducer (33). ♦ Make sure that the control board (27) is correctly set by carrying out the MINIMUM CURRENT THRESHOLD SETTING TEST in par. 3.4.7. ♦ Replace the control (27) and/or power (26) boards. ♦ Replace the transformer (30) and/or diode group (56) and/or choke (29). 3.302.161 24/03/2004 CEBORA S.p.A. 26 3.3.9 - Arc difficult to strike, the arc goes out immediately after lighting. “Hot-Start” and “Soft Start” functions are adjustable by set-up menu (see diagram 2.9 and Instruction Manual). Also “Impedance” function, adjustable using knob (P), can assist welding start. Therefore, when dealing with start-up problems and difficulty in maintaining the arc, we recommend: − Checking the “Impedance” function setting by performing the following test. − Carrying out welding tests, changing “Hot-Start” and “Soft Start” functions values and if necessary the working program with one similar to the one being used, if available, and adjusting the knob (P) to improve the welding conditions. − Checking the compatibility of the torch with the type of welding being carried out, and especially matching the torch nozzle with the wire being used. − Checking the wear status of the torch and its components, replacing them if necessary. − Replace the control board (27). IMPEDANCE ADJUSTMENT TEST. Control board (27), connector J12 terminal 20 (+) (or R79 right side) and connector J14 (-) = 0 / +5 Vdc adjustable with knob (P). YES Correct? NO ♦ Check the wiring between connectors J12 on control board (27) and J1 on panel board (41), and make sure the push-pull board (43) is properly mounted on panel board (41). ♦ Replace the control (27) and/or panel (41) and/or push-pull (43) boards. ♦ Correct operation. 3.3.10 - When start button is released, the wire sticks to the workpiece (ineffective motor braking). NOTE The torch motor does not have electric braking, but brakes through simple release (thus not powered), and the wire is automatically stopped by the motor (401) on the power source. WIRE FEEDER MOTOR (401) BRAKING TEST. Control board (27), connector J13 terminals 2 and 1 (gnd) = fig. 5.2.3, upon releasing the start button and with open-circuit power source. The wire feeder motor stops immediately. YES Correct? NO ♦ If fig. 5.2.4 is found (the motor slows from its own inertia), the braking circuit on the control board (27) does not work, replace control board (27). ♦ Make sure that there are no mechanical impediments preventing the wire coil from stopping despite the braking action of the motor (ex.: sliding by wire feeder rollers, improperly adjusted roller spring). ♦ Replace the control board (27) and/or motor (401). 3.302.161 24/03/2004 CEBORA S.p.A. 27 3.3.11 - In synergic mode, the welding quality is not satisfactory, the wire speed is not suited to the output current. NOTE The parameters entered into the synergic programs are drawn from experience, and thus some operators may find themselves working in ideal conditions, while others may need to make slight changes. For this reason the possibility remains to alter, to a small degree, the ratio between wire speed and welding current within the synergic programs. These changes are possible using the knob (I) (see Instruction Manual). SYNERGIC PROGRAM PARAMETERS TEST. In synergic mode, the parameters saved in the selected program reflect the actual welding conditions (see tables 2.8 and diagram 2.9). YES Correct? NO ♦ Select the program that best meets your needs, and set the proper parameters (see power source Instruction Manual). ♦ Carry out the MOTOR SPEED REFERENCE SIGNAL TEST WITH TRADITIONAL TORCH and MOTOR SPEED REFERENCE SIGNAL TEST WITH PUSH-PULL TORCH, par. 3.3.6. ♦ Make sure the control panel is working properly (see par. 3.3.3). ♦ Replace the control board (27). 3.302.161 24/03/2004 CEBORA S.p.A. 28 3.4 - Error codes and alarm signals. 3.4.1 - 01 - Internal RAM error. 3.4.2 - 02 - EEPROM error. Block due to software error. Replace the control board (27). 3.4.3 - 10 - Malfunction in the circuit to detect short-circuits at the output. Upon power source start-up this test checks the operating conditions by performing a brief test to generate the open-circuit output voltage. While this is taking place it is important that the torch not touch the workpiece or welding bench. The following conditions may be detected during this test: − Output voltage present and output current present = error 54; − Output voltage present and output current absent = correct operation; − Output voltage absent and output current present = error 54; − Output voltage absent and output current absent = error 10. Error 10 indicates that a low output voltage (<45 Vdc) has been detected, with no output current from the power source. This test is carried out only during the power source start-up. This may be caused by an interruption in the inverter command circuits, or in the power circuits, or in the connection between J2 control board (27) and power source output terminals (output voltage detection line). In case of “Error 10”, carry out the open circuit operation test in par. 3.3.7. If results are positive, replace control board (27). 3.4.4 - 14 - Microprocessor supply voltage error on control board (27). Perform the CONTROL BOARD (27) POWER SUPPLY TEST in par. 3.3.1, paying special attention to the +14 Vdc (alarm threshold = 11 Vdc). 3.4.5 - 20 - Absence of interlock signal on power board (26). The “interlock” signal is provided by a jumper between terminals 3 and 4 of J6 on power board (26), and is used to make sure that the power board (26) is connected to the control board (27) (current feedback signal line to the primary circuit of the transformer (30)). Check the wiring between terminals 3 and 4 of J6 on power board (26) and terminals 1 and 2 of J4 on control board (27). Make sure that there is a short-circuit between terminals 3 and 4 of J6 on power board (26). With power source off, temporarily disconnect connector J4 from control board (27). Power up the power source again and check the supply voltage on J4 of control board (27), terminals 2(+) and 1(-) = +5 Vdc. If incorrect, replace control board (27). Replace the control (27) and/or power boards (26). 3.4.6 - 25 - Malfunction on the EPLD bus in the control board (27). This code calls up various problems that may occur in controlling the igbt inverter on the power board (26). These are generally those defects that cause excessive current at the primary circuit of the transformer (30), due for example to a short-circuit at the output of the power board (26) or in the diode group (56). For an analysis of the problem, see “open circuit operation” par. 3.3.7 and “operation on resistive load” par. 3.3.8. 3.302.161 24/03/2004 CEBORA S.p.A. 29 3.4.7 - 30 - Incorrect setting of the minimum current threshold on the control board (27). MINIMUM THRESHOLD CURRENT SETTING. Control board (27), connector J4, terminal 4(-) and test-point TS4(+) = +360 mVdc, with power source powered. YES Correct? NO ♦ Adjust trimmer TR1 on control board (27) to have 360 mVdc +/- 10 mV. ♦ Replace the control board (27). ♦ Correct operation. 3.4.8 - 42 - Error in the signal of the motor encoder (401). The signal provided by the encoder built into the motor (401) is used as a speed feedback signal to adjust the motor speed. “Error 42” indicates that the signal provided by the encoder is lower than the reference signal generated by the control board (27), and thus the motor (401) speed is not correct. If the speed indicated by the encoder is greater than the speed corresponding to the reference signal generated by the control board (27), there is no “error 42” block, since this situation may be normally encountered while the wire is slowing or braking. Perform the “wire feeder motor operation” test in par. 3.3.6. 3.4.9 - 52 - Start button pressed during start-up. See START COMMAND TEST WITH TRADITIONAL TORCH and START COMMAND TEST WITH PUSH-PULL TORCH, par. 3.3.4. 3.4.10 - 53 - Start button pressed while resetting from stop due to temperature beyond allowable limits or open wire coil cover. The high temperature or open wire coil cover alarms stop the power source with indication “OPn” or “tH” on display (G), but they don’t remain in memory. It is automatically reset when the temperature falls within the allowed limits and the cover is properly closed. It may occur that the unit resets when the start command is present; therefore, to prevent the power source from starting suddenly due to a random reset, this situation is detected and causes a memory block in the power source, with “Error 53” indicated on display (G). To restore proper functioning, remove the start command, and if necessary carry out the START COMMAND TEST WITH TRADITIONAL TORCH and START COMMAND TEST WITH PUSH-PULL TORCH, par. 3.3.4. 3.4.11 - 54 - Short-circuit between torch and workpiece upon start-up. Upon power source start-up this test checks the operating conditions by performing a brief test to generate the open-circuit output voltage. While this is taking place it is important that the torch not touch the workpiece or welding bench. The following conditions may be detected during this test: − Output voltage present and output current present = error 54; − Output voltage present and output current absent = correct operation; − Output voltage absent and output current present = error 54; − Output voltage absent and output current absent = error 10. Error 54 indicates a possible short-circuit or isolation leak in the power circuit downstream of the diode group (56) and choke (29). 3.302.161 24/03/2004 CEBORA S.p.A. 30 Check the wiring between connector J4 of control board (27) and current transducer (33), and the power wiring between the “cathode” terminals of diode group (56) and the central adapter for torch (38), and between the central transformer (30) socket, choke (29) and output terminal (F) of the power source. If you find defective connections, fix and replace any damaged components. Carry out the CURRENT TRANSDUCER (33) POWER SUPPLY TEST and POWER SOURCE OUTPUT CURRENT FEEDBACK SIGNAL TEST in par. 3.3.8. Replace the control board (27) and/or current transducer (33). 3.4.12 - 56 - Short-circuit at the output lasts too long (max. allowable duration = 1 sec.). It is normal to detect short-circuits at the output during welding, as long as they do not last beyond a given interval. “Error 56” indicates that the short-circuit has exceeded this limit (1 second). Check the wiring between connector J2 of control board (27) and power source output terminals (E) and (F), and the power wiring between “cathode” terminal diode group (56) and central adapter for torch (38), and between transformer (30), choke (29) and power source output terminal (F). If you find defective connections, fix and replace any damaged components. Replace the control board (27). 3.4.13 - 60 - Current too high beyond the maximum allowable limits (250 A). In some situations, such as for example when using large-diameter wires for welding very thick work pieces, it may occur that the power source delivers a current greater than the rated. “Error 60” indicates that the power source is blocked because the average welding current value as exceeded 250 A for longer than 1 second (during the first 3 seconds of welding “error 60” detections is kept disabled for allow any welding start transient). To restore normal operation, shut off and restart the power source, using it in less severe conditions and which in any case meet the specification parameters (reduce wire speed and/or output voltage and/or arc length). 3.4.14 - 73 - Display (G) indicates OPn = diode group (56) high temperature. 3.4.15 - 80 - Display (G) indicates OPn = wire coil cover open. “OPn” on display (G) indicates that the temperature of the diode group (56) has risen beyond the allowed limits, or the safety cover of the wire coil is open. In the former instance we recommend not to shut off the power source, to keep the fan running and thus allow rapid cooling. Normal operation is restored automatically as soon as the temperature returns within the allowed limits. If the alarm occurs repeatedly, we recommend that you: − Make sure the fan (24) is operating correctly. − Make sure that air flows smoothly, and there is no dust or other impediments to cooling in the aeration tunnels. − Make sure that the working conditions comply with the specified values, especially observing the “duty cycle”. − Check the wiring between terminals 5 and 6 of J3 on control board (27), and J3 on snubber board (58), between snubber board (58) and switch (4) on the wire coil guard, and between J4 on snubber board (58) and thermostat on diode group (56). − Make sure the diode holding screws on the dissipater, in the diode group (56), are firmly tightened. − Check the conditions and make sure both the microswitch (4) and the wire coil cover are correctly assembled. If incorrectly positioned, correct the position; replace if defective. 3.302.161 24/03/2004 CEBORA S.p.A. 31 − Make sure that the thermostat mounted on the diode group (56) is properly assembled and functioning correctly; its contact must be closed at ambient temperature. − Replace the control board (27). 3.4.16 - 74 - Display (G) indicates tH = igbt high temperature. “tH” on display (G) indicates that power board (26) igbt temperature has risen beyond the allowed limits. With this alarm we recommend that you not shut off the power source, to keep the fan running and thus cool the unit more rapidly. Normal operation is restored automatically as soon as the temperature returns within the allowed limits. If the alarm occurs repeatedly, we recommend that you: − Make sure the fan (24) is operating correctly. − Make sure that air flows smoothly, and there is no dust or other impediments to cooling in the aeration tunnels. − Make sure that the working conditions comply with the specified values, especially observing the “duty cycle”. − Check the wiring between terminals 1 and 2 on J3 control board (27), and terminals 1 and 2 on J6 power board (26) (igbt temperature signal). This signal is PWM type, with duty cycle proportionate to the temperature, and thus difficult to check. − Check the supply voltage to the IGBT temperature measurement circuit = 5 Vdc, measured on the terminals of the zener diode Z2 on power board (26). If incorrect, check the wiring between J1 power board (26) and J1 power supply board (25). If incorrect, with power source off, temporarily disconnect J1 on power supply board (25) and check the resistance between the terminals of the patch connector disconnected from J1. Correct value = junction of one diode in one direction and >Mohm with the probes reversed. If incorrect replace the power board (26), and check the voltage again at the ends of Z2. If incorrect, also replace power supply board (25). − Replace the control board (27). 3.4.17 - 99 - Display (G) shows OFF = incorrect mains voltage signal. This signal normally appears whenever the power source is shut off. When mains voltage is missing, for example after opening the switch (16), the control circuit remains powered for a few seconds due to the effects of the DC-capacitor discharge on the power board (26); at such times it orders the power source to stop, with “OFF” signal, as it detects the missing mains voltage. If this signal is present with switch (16) closed and mains voltage present, carry out the following test. MAINS VOLTAGE PRESENCE SIGNAL TEST. Control board (27), connector J11, terminal 1 and 2 (gnd) = fig. 5.2.5, with power source powered. YES Correct? NO ♦ Check the wiring between connectors J3 power board (26) and J11 control board (27). ♦ Make sure 230 Vac mains voltage is present at terminals TP1 and TP2 of power board (26). ♦ Replace the power board (26). ♦ Replace the control board (27). 3.302.161 24/03/2004 CEBORA S.p.A. 32 4 - COMPONENTS LIST 4.1 - Power source art. 285 : see file ESP285.pdf enclosed at the end of the manual. 4.2 - Components table: see file ESP285.pdf enclosed at the end of the manual. 4.3 - Spare parts list. Essential spare parts. Ref. Code 25 26 27 41 43 56 5602163 5605570 5602157 5602178 5602171 3200200 Description power supply board power board control board panel board push-pull board diode Qty. 1 1 1 1 1 1 Recommended spare parts. Ref. Code 12 29 44 401 3160193 5605109 3060865 5750750 3.302.161 Description solenoid valve choke coil support wire guide group Qty. 1 1 1 1 24/03/2004 CEBORA S.p.A. 33 5 - ELECTRICAL DIAGRAMS 5.1 - Power source art. 285 : see file SCHE285.pdf enclosed at the end of the manual. 5.2 - Waveforms. 5.2.1 - Transformer (30) secondary open-circuit voltage (par. 3.3.7). 5.2.2 - PWM1 and PWM2 signals for igbt command on power board (26) (par. 3.3.7). 3.302.161 24/03/2004 CEBORA S.p.A. 5.2.3 - Wire feeder motor (401) voltage during correct braking (par. 3.3.10). 5.2.4 - Wire feeder motor (401) voltage during incorrect braking (par. 3.3.10). 5.2.5 - Mains voltage present signal (par. 3.4.17). 3.302.161 34 24/03/2004 CEBORA S.p.A. 35 5.3 - Filter board (47) code 5.602.164. 5.3.1 - Topographical drawing. 5.3.2 - Connector table. Connector J1 Terminals TP5 - TP6 1-2 Function mains voltage input (230 Vac) mains voltage output (230 Vac). 5.4 - Power supply (25) board code 5.602.163. 5.4.1 - Topographical drawing. 5.4.2 - Connector table. Connector J1 J2 J2 J3 J4 3.302.161 Terminals 1-2 1(+) - 2(-) 3(+) - 4(-) 1(+) - 3(-) - Function 27 Vac output, for igbt temperature detection circuit insulated power supply. 27 Vdc output. 14 Vdc output. +320 Vdc input for supply board (25) power supply. NU. 24/03/2004 CEBORA S.p.A. 36 5.5 - Power board (26) code 5.602.162. 5.5.1 - Topographical drawing. 5.5.2 - Connector table. Connector J1 J2 J3 J3 J3 J4 J5 J6 J6 J6 J7 J8 J9 - 3.302.161 Terminals 1-2 1(-) - 2(+) 1(+) - 2(-) 3(+) - 4(-) 5(+) - 6(-) 1-2 1-2 1-2 3-4 5-6 1-2 1-2 TP1 - TP2 TP3 - TP4 TP5 - TP6 TRA1 - TRA2 Function 27 Vac input, for igbt temperature detection circuit insulated power supply. fan (24) command output. “mains voltage present” signal output. DC-capacitor pre-charge relay command input. fan (24) command input. command input for gate igbt1. command input for gate igbt2. igbt temperature signal output. “interlock” signal output. primary circuit current feedback signal output. command input for gate igbt3. NU. command input for gate igbt4. 230 Vac input for power board (26) power supply. +320 Vdc output for power supply board (25) power supply. choke AC (50) connection. output for transformer (30). 24/03/2004 CEBORA S.p.A. 37 5.6 - Driver-igbt board code 5.600.757. 5.6.1 - Topographical drawing. 5.6.2 - Connector table. Connector J1 J2 J3 J3 J4 J5 Terminals 1-2 1-2 1-2 3-4 1-2 1-2 Function command output for igbt1 gate. command output for igbt2 gate. PWM1 input. PWM2 input. command output for igbt3 gate. command output for igbt4 gate. 5.7 - Control board (27) code 5.602.157. 5.7.1 3.302.161 - Topographical drawing. 24/03/2004 CEBORA S.p.A. 5.7.2 - Connector table. Conn. J1 J2 J3 J3 J4 J4 J4 J4 J4 J4 J5 Terminals 1-2 1(+) - 2(-) 3(+) - 1(-) 5-6 1 2 3(+) - 4(-) 5 6(+) - 8(-) 7 1(+) - 9(-) J5 J5 J5 J5 J5 J6 J7 J8 J8 J9 J10 J10 J11 J11 J11 J11 J12 J12 J12 J12 J12 J12 J12 J12 J12 J12 J12 J12 J12 J12 J12 J12 J12 J12 J13 J14 J15 J16 J17 J17 J18 3 5 7 8 10 1-2 3-4 1(+) - 2(-) 3(+) - 4(-) 1-2 3-4 5-6 7-8 1 2 3 4 5 6-7 8 - 9 - 10 11 12 - 13 14-15-16-17 18 19 20 21 22 23 24 25 - 26 1-2 1-4 2 - 3.302.161 38 Function start command input from traditional torch button. output voltage signal input. +5Vdc output for igbt temperature detection circuit power supply. safety signals input (diode group overtemperature or wire coil cover open). +5 Vdc output for “interlock” signal. “interlock” signal input. primary circuit current feedback signal input. NU. +27 Vdc output for current transducer (33) power supply. power source output current feedback signal input. +5 Vdc power supply for programming board (21) and serial communication line to outside. Tx signal for serial communication line to outside. Rx signal for serial communication line to outside. SDA signal for programming board (21). SCL signal for programming board (21). WP signal for programming board (21). board programming (microprocessor). NU. (board pre-selection). PWM1 output. PWM2 output. NU. (board pre-selection). +27 Vdc power supply input +14 Vdc power supply input. “mains voltage present” signal input. pre-charge relay command output. solenoid valve (12) command output. fan (24) command output. NU. (spool-gun torch selection input). push-pull motor speed regulator enable output. power source start signal input from push-pull torch start button. speed reference signal input from push-pull torch UP/DOWN buttons. PWM reference signal output for push-pull torch motor. NU. ((-) output for spool-gun torch power motor). +27 Vdc output for panel board (41) power supply. push-pull torch selection input. 0 Vdc output for panel board (41) power supply. signals bus with panel board (41). input from control panel button (O), “mode” selection. input from control panel button (R), “work programs” selection. input from potentiometer (P) cursor, “choke adjustment”. input from potentiometer (N) cursor, “pause time adjustment”. input from potentiometer (D) cursor, “peak time adjustment”. input from potentiometer (I) cursor, “output voltage adjustment”. input from potentiometer (B) cursor, “wire speed adjustment”. +5 Vdc output for panel board (41) power supply. output for motor (401). NU. NU. NU. +5 Vdc output for motor (401) encoder power supply. motor (401) encoder signal input. NU. (preselection board). 24/03/2004 CEBORA S.p.A. 39 5.8 - Panel board (41) code 5.602.178. 5.8.1 - Topographical drawing. 5.8.2 Conn. J1 J1 J1 J1 J1 J1 J1 J1 J1 J1 J1 J1 J1 J1 J1 J1 J1 J1 J2 J2 J2 J2 J2 J2 J2 J2 J2 - Connector table. Terminals 1 2 3 4 5 6-7 8 - 9 - 10 11 12 - 13 14-15-16-17 18 19 20 21 22 23 24 25 - 26 1-2-3 4 5(-) - 14(+) 6 - 8 - 10 7 - 12 15 - 17 - 19 16 18 20 3.302.161 Function. NU. (spool-gun torch selection output). push-pull motor speed regulator enable input. power source start signal output from push-pull torch start button. speed reference signal output from push-pull torch UP/DOWN buttons. PWM reference signal input for push-pull torch motor. NU. ((-) input for power motor on spool-gun torch). +27 Vdc input for panel board (41) power supply. push-pull torch selection output. 0 Vdc input for panel board (41) power supply. signals bus with control board (27). control panel button (O) output, “mode” selection. control panel button (R) output, “work programs” selection. potentiometer (P) cursor output, “choke adjustment”. potentiometer (N) cursor output, “pause time adjustment”. potentiometer (D) cursor output, “peak time adjustment”. potentiometer (I) cursor output, “output voltage adjustment”. potentiometer (B) cursor output, “wire speed adjustment”. +5 Vdc input for panel board (41) power supply. 0 Vdc output for push-pull board (43) power supply. push-pull motor speed regulator enable output. +5 Vdc output for push-pull torch UP/DOWN buttons power supply. NU. ((-) spool-gun torch motor power output). power source start signal input from push-pull torch start button. +27 Vdc output for push-pull torch motor power. push-pull torch selection input. NU. (spool-gun torch selection input). push-pull torch UP/DOWN buttons “cursor”input. 24/03/2004 CEBORA S.p.A. 40 5.9 - Push-pull board (43) code 5.602.171. 5.9.1 - Topographical drawing. 5.9.2 - Connector table. Conn. J1 J1 J1 J1 J1 J1 J1 J1 J1 J2 J2 J2 J2 J2 J2 J2 J2 J2 Terminals 1 2 3(-) - 10(+) 4(+) - 5(-) 6 7 8 9 10 1-2-3 4 5(-) - 14(+) 6 - 8 - 10 7 - 12 15 - 17 - 19 16 18 20 3.302.161 Function. push-pull torch motor (+) power output. push-pull torch UP/DOWN buttons “cursor” input. +5 Vdc output for push-pull torch UP/DOWN buttons power supply. power source start signal input from push-pull torch start button. NU. (spool-gun torch selection input). push-pull torch selection input. push-pull torch motor (-) power output. NU. ((-) output for spool-gun torch power motor). +5 Vdc output for push-pull torch UP/DOWN buttons power supply. 0 Vdc input for push-pull board (43) power supply. push-pull motor speed regulator enable input. +5 Vdc input for push-pull torch UP/DOWN buttons power supply. NU. ((-) input for spool-gun torch power motor). power source start signal output from push-pull torch start button. +27 Vdc input for push-pull torch power motor. push-pull torch selection output. NU. (spool-gun torch selection output). “cursor” output from push-pull torch UP/DOWN buttons. 24/03/2004 CEBORA S.p.A. 5.10 41 - Snubber board (58) code 5.602.166. 5.10.1 - Topographical drawing. 5.10.2 - Connector table. Conn. J1 J3 J4 - Terminals 1-2 1-2 1-2 TP1 - TP5 TP6 - TP10 TP2 - TP7 Function. wire coil cover open signal input. wire coil cover open or diode group (56) overtemperature signals output. diode group (56) overtemperature signal input. transformer (30) secondary circuit end terminal input. transformer (30) secondary circuit end terminal input. diode group (56) cathode terminals output. 5.11 - Programming board (21) code 5.602.174. 5.11.1 - Topographical drawing. 5.11.2 - Connector table. Conn. J1 J1 J1 J1 J1 J2 Terminals 2 3 5 4-6 7-8 1(+) - 9(-) J2 J2 J2 J2 J2 U1 U2 3 5 7 8 10 - 3.302.161 Function. Tx signal of serial communication line to outside (programming system). Rx signal of serial communication line to outside (programming system). GND for serial communication line signals (programming system). DTR/DSR signal of serial communication line to outside (programming system). RTS/CTS signal of serial communication line to outside (programming system) +5 Vdc input for programming board (21) and serial communication line to outside power supply. Tx signal for serial communication line. Rx signal for serial communication line. SDA signal for programming board (21). SCL signal for programming board (21). WP signal for programming board (21). connector for custom programs EEPROM. connector for custom programs EEPROM. 24/03/2004