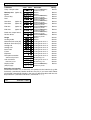
1
Operating instructions Multifunction measuring instrument ALMEMO® 2390-5 with data logger option V1.3 10.10.2005 ALMEMO 2390-5 1 Table of contents Operating instructions Multi-function measuring instrument ALMEMO® 2390-5 with data logger option With supplementary reference to the ALMEMO® Manual Table of contents Page 1 1.1 1.2 2 3 3.1 3.2 3.3 3.4 4 4.1 4.2 5 5.1 5.2 5.3 5.4 6 6.1 6.1.1 6.1.2 6.1.3 6.2 6.2.1 6.2.2 6.2.3 6.2.4 6.2.5 2 INTRODUCTION Functions Operating controls PUTTING INTO SERVICE POWER SUPPLY Battery / rechargeable battery operation External voltage supply Switching ON / OFF, retaining stored data, reinitialization Sensor supply CONNECTING THE TRANSDUCERS Transducers Measuring inputs and additional channels DISPLAY AND KEYPAD Display Function selection and activation Keypad Data input MEASURING OPERATIONS Measuring point scanning and measuring point display Selecting the measured value and the measuring point Differential measurement Maximum and minimum value memories Measured value correction and compensation Setting the measured value to zero Sensor adjustment, zero-point, and gain Entering a setpoint Cold junction compensation Atmospheric pressure compensation ALMEMO 2390-5 4 4 9 11 12 12 13 14 14 15 15 15 17 17 19 21 22 23 23 23 24 24 24 25 25 26 27 28 Table of contents 6.2.6 6.3 6.3.1 6.3.2 6.3.3 6.3.4 6.4 6.4.1 6.4.2 6.4.3 6.4.4 6.4.5 6.4.6 6.4.7 6.5 6.5.1 6.5.2 6.5.3 6.5.4 7 7.1 7.2 7.3 7.4 7.5 7.6 7.7 7.7.1 8 8.1 9 9.1 9.2 9.3 10 Temperature compensation Measuring point scans and data output Once-only measuring point scan Cyclic measuring point scan Output formats for measured value lists Manual data output Averaging Smoothing out measured values by means of a sliding average Averaging mode Averaging over the time from start to stop Averaging over single measurements Volume flow measurement Cyclic averaging Averaging over several measuring points Measured value memory (option S) Memory connector Measured value recording Measured value output Sleep mode SENSOR PROGRAMMING Selecting a measuring point Locking the sensor programming Limit values Correction values Scaling, decimal point setting Changing the units Selecting the measuring range Special meas. ranges, linearization, multi-point calibration ANALOG OUTPUT Scaling DEVICE PROGRAMMING Date and time-of-day Baud rate, data format Device address and networking trouble-shooting ALMEMO 2390-5 28 29 29 29 30 31 32 32 32 33 34 35 36 37 37 37 38 39 40 41 41 41 42 42 43 44 44 48 49 49 50 50 50 51 52 3 Functions 1. INTRODUCTION The multi-function measuring instrument ALMEMO® 2390-5 is a new member in our family of unique measuring devices - all equipped with Ahlborn GmbH’s patented ALMEMO® connector system. The intelligent ALMEMO® connector offers decisive advantages when connecting sensors and peripherals because all parameters are stored in an EEPROM on the connector itself; repeat programming is thus no longer necessary. All sensors and output modules can be connected to all ALMEMO® measuring instruments - all in the same way. Programming and functioning are identical for all units. The following points apply to all devices in the ALMEMO® measuring system and are described in detail in the ALMEMO® Manual supplied with each device. Detailed description of the ALMEMO® system (Manual, Chapter 1) Overview of the device functions and measuring ranges (Manual, Chap. 2) Basic principles, operating instructions, and technical data for all sensors (Manual, Chapter 3) Options for connecting your own existing sensors (Manual, Chapter 4) All analog and digital output modules (Manual, Section 5.1) Interface modules RS232, optic fiber, Ethernet, Bluetooth (Manual, Chap. 5.2) The entire ALMEMO® networking system (Manual, Section 5.3) All functions and their operation via the interface (Manual, Chapter 6) Complete list of interface commands with all the printouts (Manual, Chap. 7) The operating instructions you are now reading cover only those features and controls that are specific to this device. Sections dealing with operation via the keypad often refer to a more detailed explanation in the Manual (Manual, Section x.x.x). 1.1 Functions The multi-function measuring instrument ALMEMO® 2390-5 has three electrically isolated measuring inputs suitable for all ALMEMO® sensors. The measuring possibilities are virtually unlimited; there are 12 channels in the sensor connectors and 4 device-internal function channels - with over 70 measuring ranges and genuine differential measuring features. There are 2 output sockets which can be used to connect any ALMEMO® output modules, e.g. analog output, digital interface, trigger input, or alarm contacts. Several devices can be networked together by simply interconnecting them over network cables. The measuring instrument incorporates a keypad and an 8½-character LCD. The measuring instrument is also available with a data logger option with an internal 32-KB memory or external connectors with up to 256 KB capacity (50000 measured values). A wide range of functions can be activated either automatically or individually, e.g. for evaluating all sensors, for process control, and for universal data output. There is also a range of special functions accessible only via the interface. 4 ALMEMO 2390-5 Functions SENSOR PROGRAMMING The measuring channels are automatically programmed via the ALMEMO® sensor connectors. However, the user can easily supplement or modify this programming via the keypad or via the interface. Measuring ranges Appropriate measuring ranges are available for all sensors with a non-linear characteristic, e.g. 10 thermocouple types, Ntc and Pt100 sensors, infrared sensors, and flow sensors (rotating vanes, thermoanemometers, Pitot tubes). For humidity sensors additional function channels are available for calculating humidity variables such as dew point, mixture ratio, vapor pressure, and enthalpy. Even complex chemical sensors are supported. Measured values from other sensors can also be acquired using the voltage, current, and resistance ranges with individual scaling in the connector. Existing sensors can also be used - so long as the appropriate ALMEMO® connector is connected via its screw terminals. For digital input signals, frequencies, and pulses, adapter connectors are available with an integrated microcontroller. It is thus possible to connect virtually any sensor to any ALMEMO® measuring instrument and to change sensors without the need for any extra settings. Function channels Maximum, minimum, and average values, differential measured values, volume flow, and wet bulb globe temperature (WBGT) can be programmed as function channels and further processed and printed out just like normal measuring points. Units The 2-character units display can be adapted for each measuring channel so that both the display and the printout always indicate the correct units, e.g. when a transmitter is connected. Conversion between °C and °F is performed automatically. Measured value designation Each sensor is identified by means of a 10-character alphanumeric name. This name, entered via the interface, will subsequently appear in the printout or, if evaluated by computer, on the screen. Measured value correction The measured value on each measuring channel can be corrected both in terms of zero-point and gain; this means that even sensors usually requiring initial adjustment (expansion, force, pH) can be freely interchanged. Zero-point correction and, partly at least, gain adjustment can be performed at the touch of a button. Scaling The corrected measured value on each measuring channel can also be further scaled in terms of zero-point and gain - using the base value and factor. The decimal point position can be set by means of the exponent function. By setting to zero and entering the nominal value the scaling values can be calculated automatically. ALMEMO 2390-5 5 Functions Limit values and alarm Per measuring channel two limit values can be set (1 maximum and 1 minimum). In the event of one of these limit values being exceeded relay output modules actuate the appropriate alarm contacts. Hysteresis is set by default to 10 digits but can also be adjusted. The exceeding of a limit value can also be used to start or stop measured value recording and data logging. Sensor locking All sensor data stored in the connector EEPROM can be protected by means of a graduated locking function against undesired access. MEASUREMENT For each transducer up to four measuring channels are available; i.e. it is also possible to evaluate double sensors, individually scaled sensors, and sensors with function channels. It is possible using the keypad to move from one measuring channel to the next successively forwards or backwards. The selected measuring point is scanned at a conversion rate of 2.5 or 10 measuring operations per second; the measured value is calculated and output to the display and, if available, to an analog output. Measured value The measured value for the selected measuring point is shown continuously with auto zero and, optionally, with measured value correction or scaling. With most sensors, sensor breakage is detected automatically (except for connectors with shunt, dividers, or additional electronics). Measuring functions With some sensors, in order to achieve optimal measured value acquisition, certain special measuring functions are required. Cold junction compensation is provided for thermocouples; temperature compensation is provided for dynamic pressure, pH, and conductivity probes; and atmospheric pressure compensation is provided for humidity sensors, dynamic pressure sensors, and O2 sensors. On infrared sensors the parameters for zero-point correction and gain correction are used as the background temperature and the emissivity factor. Analog output and scaling The displayed measured value can, by means of analog start and analog end, be scaled in such a way that the measuring range thus defined covers the full analog output range (2 V, 10 V, or 20 mA). Maximum and minimum values For each measuring operation the maximum value and minimum value are acquired and saved to memory. These values can then be displayed, printed out, or deleted from memory. Average value of a channel Averaging can be performed per selected channel for the purposes of signal smoothing, either over a certain period or over single measurements. 6 ALMEMO 2390-5 Functions Volume flow measurement For all flow sensors not only the functions for averaging are provided but also functions for entering the cross-section and diameter of ventilating channels and for calculating the volume flow. The average flow velocity can be determined roughly by scanning the whole cross-section or exactly by means of network measurements according to DIN. For dynamic pressure probes both temperature compensation and atmospheric pressure compensation are provided. Under the appropriate environmental conditions these values can be either entered manually or measured automatically. PROCESS FLOW PROGRAMMING To record the measured values from all connected sensors in digital form a cyclic measuring point scan with a time-based process flow control is required. This feature involves the real-time clock, the print cycle, and, if high-speed processing is required, the conversion rate itself. The measuring operation can be started and stopped via the keypad, the interface, an external trigger signal, or by exceeding a specified limit value. Date and time-of-day Each measuring operation can be logged either using the real-time clock with the date and time-of-day function or purely in terms of the actual measuring time. Print cycle The print cycle can be programmed to any value between 00:00:01 (1 second) and 59:59:59 hh:mm:ss. This function permits cyclic saving and output of measured values to the interfaces and cyclic calculation of the average and sum of values. Print cycle factor The print cycle factor can be used to limit data output from particular channels; this may prove necessary in order to reduce excessive data flow. Averaging over measuring point scans The measured values obtained by scanning measuring points can be averaged either over a number of measuring points or over one particular measuring point either for the total measuring time or over the print cycle time. Function channels are provided for the cyclic output of such average values. Conversion rate With ALMEMO® devices all measuring points can be continuously scanned with a conversion rate of either 2.5 or 10 measuring operations per second. It is also possible to output all measured values to the interface. Measured value memory (option S) Measured values can be saved manually, cyclically, or at the selected conversion rate to an internal 32-KB EEPROM (with sufficient capacity for up to 6000 measured values). Each measuring operation can also be started and stopped ALMEMO 2390-5 7 Functions automatically according to date and time-of-day. The memory can be organized and configured in linear or ring form. As an alternative storage medium external ALMEMO® connectors are also available with an EEPROM of either 128 KB capacity (sufficient for 25000 measured values) or 256 KB capacity (sufficient for 50000 measured values). Data recordings can be easily and conveniently managed for each such connector and read out from the computer whenever needed via a separate read interface. Or alternatively each measuring operation can be assigned a number. For output via the interface it is possible to specify a selection according to either the time interval or the number assigned to the measuring operation. Control outputs It is possible via the interface to individually address up to four external output relays and one analog output. Output All measured values and programming parameters can be accessed via the LCD. Interfaces for RS232, RS422, Centronics, and Ethernet are provided via the appropriate interface cables. All data logs, saved measured values, and programming parameters can be output to any peripheral equipment. Measured data can be output in list, column, or table format. Files in table format can be processed directly using any standard spreadsheet software. The print header can be programmed specifically to the company or application. Networking All ALMEMO® devices are adressable and can be easily networked by simply linking them up via the appropriate network cables or, over longer distances, via RS422 network distributors. Software Each ALMEMO® device is accompanied by the AMR-Control software package, which can be used to configure the measuring instrument, to program the sensors, and to read out from the measured value memory. It is also possible using the integrated terminal to perform measuring operations online and to save the measured values to PC. The WIN-Control software package for WINDOWS® is provided for the purposes of measured value acquisition via networked devices, for graphical presentation, and for more complex data processing. 8 ALMEMO 2390-5 Operating controls 1.2 Operating controls (1) ON/OFF-switch (2) (1) up down (3) ON OFF (2) Measuring inputs M0, M1, M2 (4) M0, M1, M2 for all ALMEMO-sensors M3 Function channel differential M10 .. M33 Additional channels (5) (3) Output sockets A1, A2 A1 V24-interface (ZA 1909-DK5/DKL) Ethernet (ZA 1945-DK) RS 422 (ZA 5099-NVB) Relay-trigger-cable (ZA 1000-EAK) Analog output 1 (ZA 1601-RK) A2 Memory connector (ZA 1904-SS) Network cable (ZA1999-NK5) Trigger input (ZA 1000-ET) Relay output (ZA 1000-EGK) Analog output 2 (ZA 1601-RK) (6) (4) Socket DC Mains adapt. (ZB 2290-NA, 12V, 200mA) Cable electr. isolat. (ZB 2290-UK, 10-30V) (5) LCD display (see below) (6) Function keys (see below) (7) Battery compartment (rear of dev.) (7) 9-volt alkaline-manganese battery (6F22) (space for reserve battery) (5) LCD display (a) a CORR M START MEM COM ALARM F BAT 3 b 2 c Symbols for operating states BAT Battery voltage < 7 V ▲ CORR Measured value correct. ▲M Averaging ▲ START Measuring operat. started ▲ MEM Measured value memory ▲ COM Measured value output ▲ ALARM Limit value exceeded ▲F Function (b) 6½ x 7 segment display for: measuring point, measured value, measuring range, measured values, programming parameters, cycles, date, time-of-day (c) 2 x 16 segment display for: units for measured value, function abbreviations ALMEMO 2390-5 9 Operating controls (6) FUNCTION KEYS ▲ PROG, +/-, ▲ ▼, PROG, CLEAR PROG, ▼, PROG M▲ START/STOP MANU/PRINT FUNCTION Input of programming parameters Clear data, set measured value to zero Adjust measured value Select measured value, measuring point Start and stop a measuring operation Manual measuring point scan, data output Select function(s) Maximum value (Hi) MH Minimum value (Lo) ML Functions are activated by: All functions are activated by FUNKTION pressing and holding down the FUNCTION key; each function can be activated individually by interface command. Standard (switch ON with CLEAR key) # Option S data logger * Locking mode (not locked) + Averaging mode programmed ° Measuring range ´Flow´ ^ Infrared sensors (IR-flag) 10 ALMEMO 2390-5 Average value Number of average value Averaging mode Level of smoothing Diameter standardized Cross-section area Atmospheric pressure Temperature compensation Memory free Memory time Cycle Time-of-day Date Start time Start date End time End date Baud rate, output format Device adress Range Locking mode Maximum limit value (Hi) Minimum limit value (Lo) Analog output - start Analog output - end Base value Factor Exponent Zero piont correction Gaint correction Ambient temperature Emissivity factor Display mode (language) AV C AM DG DN CS mb TC MF MT CY TM DA ST SD ET ED BR A + + ° ° # # # # # # R LM LH LL AS AE BA FA EX ZC SC AT EF DM * * * * * * * * * ^ ^ Putting into service 2. PUTTING INTO SERVICE 1. Connect transducer to sockets M0 to M2 (2); (see Section 4). 2. Ensure that the power supply is provided via 9-volt battery or mains adapter; (see Sections 3.1, 3.2). 3. To switch ON, push slide switch (1) located on left side of device upwards; (see Section 3.3). 4. Displaying the measured values Select MEASURED VALUE function by pressing the key M▲ (6). Select measuring channels by pressing key M▲ and read out measured values; (see Section 6.1.1). 5. Connect the cyclic measured value output to the printer or to the computer. Connect the peripheral device via interface cable to socket A1; (s. Manual, Sec. 5.2). On the peripheral device set 9600 bauds, 8 data bits, 1 stop bit, no parity; (see Section 9.2). If necessary enter the current date and time-of-day; (see Section 9.1). Select CYCLE function ´ZY´ by pressing the FUNCTION key and program the cycle; (see Section 6.3.2). Select the output format in the BAUD RATE function ´BR´ by pressing keys PROG, ▲.., PROG, ESC; (see Section 6.3.3). Start and stop cyclic measuring point scanning by pressing the START/STOP key; (see Section 6.3.2). 6. Saving measured values (only possible with option S) Select CYCLE function ´ZY´ by pressing the FUNCTION key and program the cycle; (see Section 6.3.2). If necessary enter the current date and time-of-day; (see Section 9.1). Start and stop measured value recording by pressing the START/STOP key; (see Section 6.3.2). Output data from memory to the printer or to the computer. Connect the peripheral device via interface cable to socket A1; (see Manual, Section 5.2). On the peripheral device set 9600 bauds, 8 data bits, 1 stop bit, no parity; (see Section 9.2). Select the output format in the BAUD RATE function ´BR´ by pressing the keys PROG, ▲.., PROG, ESC; (see Section 6.3.3). In the function ´SF´ output measured values by pressing the MANU/PRINT key; (see Section 6.5.3). 7. Evaluating a measuring operation Select the function MAXWERT ´MH´ or MINWERT ´ML´ by pressing the FUNCTION key and call up the maximum and minimum values; (see Section 6.1.3). ALMEMO 2390-5 11 Power supply 3. POWER SUPPLY As power supply for the measuring instrument there are the following possibilities: 9-volt batteries IEC 6F22 ZB 2000-B9 9-volt rechargeable battery pack, same with charger integrated in the connector ZB 2000-A9, ZB 2000-LS mains adapter 12 V / 200 mA ZB 2290-NA external power supply, connecting cable ZB 2290-UK Our product spectrum includes all the appropriate accessories. 3.1 Battery / rechargeable battery operation Use only alkaline-manganese batteries, type IEC 6F22. At a current consumption of around 10 mA, these last for an operating time of approx. 35 hours. If sensors or modules also requiring power are connected, this operating time will be accordingly shorter. Inserting the batteries: The battery compartment (7) is located underneath the device. 1. Press on the spot marked with an arrow and at the same time pull in the direction the arrow indicates (as shown in the illustrations). 2. Connect the battery using one of the battery clips. Accidental reverse polarity is prevented by the shape of the connectors. 3. By adding a second battery you can double the available operating time. Battery check : If the battery symbol in the display lights up, this means that the battery will last for approximately another 4 hours only. (Supply voltage <7 V) In the event of the battery voltage falling below 6 volts, the display shows the message ‘LobAt’. In this event the battery must be removed immediately. This prevents the battery from leaking and thus damaging the device. You can check the current battery voltage and estimate the battery’s remaining useful life by applying a measuring channel specially to ‘Ubat’ (battery voltage). 12 ALMEMO 2390-5 Power supply Tips on how to handle batteries correctly: Never leave used dead batteries in the device ! If the device is likely to be unused for a relatively long time, remove the batteries ! A leaking battery represents a health hazard and may also destroy the device. Use only leak-proof batteries ! Spent batteries are classified as special waste and must be disposed of in an environmentally acceptable way. Take spent batteries back to your dealer or dispose of them in your local battery collection container ! Rechargeable battery operation: Instead of the standard batteries you can use rechargeable battery packs. Rechargeable batteries are of lower capacity, 110 mAh, and provide an operating time of only 16 hours. If sensors or modules also requiring power are connected, this operating time will be accordingly shorter. From our range of accessories we recommend the 9-volt rechargeable battery pack with a charger integrated in the connector (order no. ZB 2000-LS). Tips on how to handle rechargeable batteries correctly : Rechargeable batteries, when you first receive them, are not charged. You must first of all charge them to full capacity. Attempting to recharge NiCd cells that are only partly discharged will not restore them to full capacity. For this reason use the device until the rechargeable battery pack is nearly totally discharged and then recharge it completely. This will significantly prolong the useful life of your rechargeable batteries. Even fully charged batteries not being used or left in storage will slowly discharge; they should therefore be checked at least once per month and if necessary recharged in order to ensure that they are not damaged as a result of critically low discharge. 3.2 External voltage supply On the right side of the device there is a socket (4) for connecting an external power supply. In our range of accessories we offer a mains adapter (12 V / 200 mA) (order no. ZB 2290-NA). Or, alternatively, you can use some other DC power source (7 to 13 V). The power source is connected by means of a low-voltage connector (NES1 as per DIN 42323, center pin to minus). If, however, the power supply has to be electrically isolated from the transducers or if a larger input voltage range is required, then electrically isolated supply cable ZB 2290-UK must be used. It will then be possible to use the measuring instrument in a 12-volt or 24-volt on-board supply system. If a battery is connected, this will, in the event of a voltage drop below 9 volts, take over as power supply. ALMEMO 2390-5 13 Power supply 3.3 Switching ON / OFF, retaining stored data, reinitialization The ON / OFF slide switch (1) located on the left side of the device has two switch positions : To switch ON, push the slide switch (1) located on the left side of the device upwards. - up : ON To switch OFF, push the slide switch down - down : OFF Retaining stored data When the device is switched off, all sensor parameters and most device parameters remain stored in EEPROMs. The real-time clock continues to run and the device status is retained so long as the 9-volt battery remains charged with at least 6 volts. It is important when exchanging batteries to first connect the new battery to the 2nd battery clip and only then withdraw the old battery. If the old battery was already totally discharged, you will have to perform a reinitialization. Reinitialization The device should be reinitialized in the following circumstances : if the battery supply is interrupted, if interference (e.g. electrostatic or incorrectly connected peripherals) causes the device to behave abnormally, or if you need to cancel incorrect programming. You can activate this reset by pressing key CLEAR when switching ON. This has the effect of clearing or resetting to their default values all measured data, date, time-of-day, and also all internal setting data, e.g. cycles, conversion rate, atmospheric pressure, and function key assignment. However, this does not affect the programming of the sensors in the ALMEMO® connectors. The reset function is not the only one that can be activated when switching ON; other useful special functions can be activated at this stage by pressing the appropriate keys : Switching ON with various keys pressed: CLEAR: This activates a reset PROG und FUNCTION: This sets the locking mode for the selected measuring point to level 3; this applies only temporarily until you switch OFF again; (see Sections 6.2.1/2). MANU: This changes the meas. point numbering mode;(Sec. 4.2) START/STOP: This displays the device version 3.4 Sensor supply The battery voltage or external voltage needed to supply the sensors is provided at the + and - terminals in the ALMEMO® connector. There are also special connectors available for 12-volt, 15-volt, or 24-volt DC and for 5-volt and 2.5-volt reference voltages; (see Manual, sections 4.2.5/6). It is important to ensure that the total current consumed by the sensors does not exceed 70 mA! 14 ALMEMO 2390-5 Connecting the transducer 4. CONNECTING THE TRANSDUCERS Virtually any ALMEMO® sensor can be connected to any of the ALMEMO® input sockets M0 to M2 (2). To connect your own existing sensors you simply need the appropriate ALMEMO® connector. 4.1 Transducers The ALMEMO® Manual includes detailed descriptions of the comprehensive range of ALMEMO® sensors (see Manual, Chapter 3) and of how to connect your own existing sensors to ALMEMO® instruments (see Manual, Chapter 4). All standard sensors with an ALMEMO® connector usually have the measuring range and units already programmed and can thus be connected to any input socket without further adjustment. A mechanical coding system ensures that sensors and output modules can only be connected to the correct sockets. Each ALMEMO® connector also incorporates two snap-lock levers; these snap into position as soon as the connector is inserted into the socket, thus preventing unintended disconnection if the cable is accidentally pulled. To withdraw the connector, both these levers must be pressed in at the sides. 4.2 Measuring inputs and additional channels Measuring instrument ALMEMO 2390-5 has three input sockets M0, M1, M2 (2) to which initially measuring channels M0, M1, M2 are allocated. ALMEMO® sensors can, however, if necessary, provide up to four channels. The additional channels can be used in particular for humidity sensors with four measuring variables (temperature / humidity / dew point / mixture ratio) or for function channels. Each sensor can if necessary be programmed with several measuring ranges or scaling settings; and two or three sensors, if pin assignment so permits, can be combined in a single connector (e.g. rH / Ntc, mV / V, mA / V, etc.). Measuring point numbering Each additional measuring channel in a connector lies one level higher. In this new series the levels are now numbered in standard decimal form, i.e. the front digit indicates the level. The measuring point number (and thus also the programmed reference channels) for all devices with 1, 2, 3, 5, or 10 inputs thus always remains the same. This means, however, that, with effect from measuring channel number 20, the measured value resolution in the display is limited. If this proves to be a serious problem, it is possible, by holding down the MANU key when switching ON, to change to continuous sequencing (and, by means of the same key, to change back again). Device-internal channels A further innovation on this device is its four extra additional channels. The first of these is programmed by default as differential measuring channel M1 - M0. This only happens, however, if there are two sensors with the same units and ALMEMO 2390-5 15 Connecting the transducer same decimal point position connected at measuring points M0 and M1. However, all four channels can be programmed with any other function channels (e.g. U-Bat, VK, average, volume flow, etc.); (see Manual, Section 6.3.4). As reference channels for M3 by default Mb1=M1 and Mb2=M0 are always used; the others refer to M3 (see Section 7.7). If you want to program a volume flow channel on M3 (measuring range ´Flow´), the flow sensor must therefore be connected to M1 (assuming you do not want to specially program the reference channel via the interface). Advantage If several sensors are being used for the same application, they do not have to be reprogrammed and can be freely exchanged without losing their function channels. If, however, the whole application operates with just one sensor, then programming in the sensor itself makes more sense. On the measuring instrument this gives the following channel assignment: numbered in decimal form (default) continuous sequencing sensors sensors device internal device internal chann 4. 30 31 32 33 12 13 14 15 chann 3 20 21 22 23 8 9 10 11 chann 2 10 11 12 13 4 5 6 7 0 1 2 3 0 1 2 3 M0 M1 M2 M0 M1 M2 chann 1 difference M1-M0 A2 A1 2390-5 The three analog inputs on the ALMEMO 2390-5 are electrically isolated by means of photovoltaic relays; the maximum potential difference permitted between them is 50 V DC or 60 V AC. Sensors combined within one connector and sensors with their own power supply, however, are electrically interconnected and must therefore be operated in isolation. The voltage applied to the measuring inputs themselves must not exceed ±5 volts (between A, B, C, and D ). The cold junction compensation for thermocouple measurement is integrated in the device in socket M0. 16 ALMEMO 2390-5 Display and keypad 5. DISPLAY AND KEYPAD 5.1 Display The display (5) on measuring instrument ALMEMO 2390-5 comprises an LCD with 6½ x 7-segment characters, two 16-segment characters, a battery symbol, and seven arrows to indicate the operating status. CORR M START MEM COM ALARM F BAT 3 M MIN SEC 2 DIM/F Measured value display The first thing to appear after switching ON is the measured value display with measuring point (M) and units (DIM) as used for the channel most recently selected. Measuring point, measured value, units: 0: 2 3.4 °C 0: 2 9.7 MH Function display (see Section 5.2) Measuring point, function value, function: Double display for temperature and humidity If a double sensor for temperature and humidity is connected at socket M0, the display can be switched to a double display showing both variables. To obtain a double display, channel M10 must be selected for humidity and the PROG key must be pressed and held down for longer than one second. With the same key combination this function can also be changed back again. M▲ 10: Selecting the humidity channel: PROG Double display by key: 1s 3 4.5 %H 2 3.4 °C 3 4.5 % Even if other channels or function values are selected in standard format, the double display will continue to apply as and when you return to channel M10. ALMEMO 2390-5 17 Display and keypad Special operating states Segment test for display Voltage supply: This is performed automatically each time the device is switched ON. below 7 volts: BAT -Symbol lights up below 6 volts: 1:L o b A t Sensor supply power shorter than UMIN: 1:U - Lo Checksum error during device calibration: C A L E r r Non-connected sensors, deactivated measuring points, deleted programming values,: 1: - - - - X X Non-permitted measuring range: 1: Sensor correction or scaling Calibration resistance switched on Measuring operation started Averaging in progresst Measured value recording in progress Measuring point scan with output Function selected E r r CORR arrow lights up CORR arrow flashes START arrow lights up M arrow lights up MEM arrow lights up COM larrow lights up F arrow lights up If all functions are activated, then F arrow flashes Malfunctions Malfunctions are displayed as follows and trigger an alarm; (see Manual 6.3.9): 1: Sensor breakage: Limit value exceeded: Measuring range overshot: Measuring range undershot: ALARM arrow lights up Maximum value flashes Maximum value flashes Measuring range undershot for 1: cold junction compensation, or measuring without external cold junction compensation, or cold junction compensation breakage Values range overshot (>65000): 18 N i C r °C Abbreviation flashes C J 1:6 5 0 0 0 ALMEMO 2390-5 (Cold junction) flashes flashes Display and keypad 5.2 Function selection and activation Measuring instrument ALMEMO 2390-5 provides a wide variety of functions for controlling measuring sequences, for acquiring, averaging, monitoring, and saving measured values, for outputting data to various peripheral equipment, and for scaling, adjusting, and correcting sensors, etc.. Since these functions will not be needed by the normal user all at once, they can be activated in various ways on an application-specific basis. After reinitialization (see Section 3.3) the FUNCTION key will initially have only the following functions assigned : maximum value, minimum value, cycle, measuring range, locking mode, and averaging mode, plus (with option S) the memory. Appropriate additional functions will then be activated depending on the sensor programming (i.e. locking mode, averaging mode, etc., see below). Any further functions that you frequently require can be enabled via the interface. This approach is intended to maintain rapid access via the FUNCTION key and to minimize the risk of accidentally entering incorrect information. If it suddenly becomes necessary to have all functions activated for a limited period, then the first time you press the FUNCTION key you must hold it down for longer than 1 second. To verify that this has succeeded the ´F´ arrow in the display flashes. The active functions can be selected by repeat-pressing the FUNCTION key. To revert to the previous function arrangement press and hold down the FUNCTION key again. If a function is selected instead of a measured value, the ´F´ arrow in the display lights up. Functions are shown in the display as a function value followed in the units position by a two-character abbreviation (as listed in the following table); in the case of sensor parameters, the channel number will also be shown: Funktions Value Abbrev. Maximum value (Hi) Minimum value (Lo) Average value Count of averaged val. Averaging mode Smoothing 1: 1: 1: 1: 1: 127.3 MH 023.4 ML 13.24 AV 1234 C Cont AM 00 DG Diameter standardized Cross-section area Atmospheric pressure 1: 0150. DN 1: 0175. CS 1013 mb Activation Memory Default Device Device Device Device Sensor Sensor Default Averaging mode >0 Averaging mode >0 Default Hold down FUNCTION key first time it is pressed Measuring range ´Flow´ Measuring range ´Flow´ Hold down FUNCTION key first time it is pressed ALMEMO 2390-5 Sensor Device 19 Display and keypad Funktions Temp. compensation Value Abbrev. 1: 023.4 TC Memory free (option S) 01:113.2 MF Cycle 00:15:00 CY Time of day 12:34:56 TM 01.12.99 DA Date Start time (option S) 10:00:00 ST Start date (option S) End time (option S) 17:00:00 ET End date (option S) 02.10.03 ED Baud rate, output format Device adress Range Locking mode Maximum limit value (Hi) Minimum limit value (Lo) Analog end Analog start Base value Factor Exponent Zero-point correction Ambient temperature Gain correction Emissivity factor Display mode (Sleep/language) 02.10.03 SD Un 9600 BR 00 A 1: NiCr 1: 0005 1: 123.0 1: -010.0 1: 123.4 1: 000.0 1: ---1: ---1: 0 1: ---- R LM LH LL AE AS BA FA EX ZC AT SC EF DM 1: 250.0 1: ---1: 0.950 SLP d Activation Hold down FUNCTION key first time it is pressed Default Default Hold down FUNCTION key first time it is pressed Hold down FUNCTION key first time it is pressed Hold down FUNCTION key first time it is pressed Hold down FUNCTION key first time it is pressed Hold down FUNCTION key first time it is pressed Hold down FUNCTION key first time it is pressed Hold down FUNCTION key first time it is pressed Hold down FUNCTION key first time it is pressed Default Default Locking mode level <7 Locking mode level <7 Locking mode level <6 Locking mode level <6 Locking mode level <5 Locking mode level <5 Locking mode level <5 Locking mode level <4 Elementflag = IR Locking mode level <4 Element flag = IR Hold down FUNCTION key first time it is pressed Memory Device Device Device Device Device Device Device Device Device Device Device Sensor Sensor Sensor Sensor Sensor Sensor Sensor Sensor Sensor Sensor Sensor Sensor Sensor Device Activation via interface The default functions can, if necessary, be specified via the interface (e.g. AMR-Control); (see Manual, Section 6.10.13.3, key F2). If you want to do without all activated automatically functions, then you can deactivate these with the mode parameter 8. (see Manual 6.10.13.2, command: f6 k8 ). 20 ALMEMO 2390-5 Display and keypad Language setting The function abbreviations can be shown in any one of three languages. You can switch between languages in theDISPLAYMODE ´DM´ function, which can be activated as and when necessary by holding down the FUNCTION key the first time it is pressed; (see above). Display mode function: Enter with PROG, PROG, ▲▼.., PROG The letter indicates the language setting: - - - d DM Example: german d = German, E = English, F = French Function designations in the interface protocol are always in English; (see Section 6.3.4). 5.3 Keypad Each of the keys (6) initially has the normal function noted above it: Function Normal Input Programming PROG Selecting the measured value and the measuring point: M▲ CLEAR Start and stop measuring point scanning START / STOP ▲ Manual measuring point scanning, data output MANU / PRINT ▼ Function selection FUNCTION ± / ESC If you press the PROG key, a digit or an abbreviation flashes in the display; i.e. the device is in input mode and now the red lettering below the keys applies. In this mode the following keys are available :±, ▲, ▼ for changing the input digit, the key as cursor key, and CLEAR for deleting the parameters. Input is completed as soon as the last digit has been confirmed by means of the key or input has been cancelled by means of the ESC key. ALMEMO 2390-5 21 Display and keypad 5.4 Data input Numeric parameters are programmed as follows : FUNCTION Select the desired function by pressing the FUNCTION key Start programming by pressing the PROG key. The front digit flashes and can now be changed. PROG Increment the digit by pressing the ▲ key . If you overshoot the highest value, you start again at zero. Decrement the digit by pressing the ▼ key. If you go below zero, you start again at the highest value (9 or 5).. To change the arithmetic sign press the ± / ESC key at the first digit or cancel this input with effect from the second digit To move forwards to the next digit press the key. To move back to the previous digit, press the and hold down To terminate programming After setting the last digit press the ± / ESC key 1s key again PROG To delete measured values and reset the programming press the keys : 22 ALMEMO 2390-5 CLEAR Measuring operations 6. MEASURING OPERATIONS Measuring instrument ALMEMO 2390-5 provides the following options for measured data acquisition : 1. Semi-continuous measuring point scanning of all active measuring points (see Section 6.1) Representation of a selectable measuring point in the display Measured value output to an analog output (see Chapter 8). 2. Once-only measuring point scan and output (s. Sec. 6.3.1; Man., Sec. 6.5.1.1) 3. Cyclic measuring point scan and output;(see Sec. 6.3.2; Manual, Sec. 6.5.1.2) 4. Continuous measuring point scan and output (see Manual, Section 6.5.1.3). Completely delete all measured values With each new START of a measuring operation all maximum, minimum, and average values for all channels are deleted automatically. 6.1 Measuring point scanning and meas. point display The ALMEMO 2390-5, unlike previous instruments, is set by default to semicontinuous measuring point scanning; i.e. all measuring points are continuously scanned and the measured values thus acquired can be called up at any time, even if they depend on other channels (e.g. function channels and compensation processes). However, the measuring point selected is scanned additionally every second time so that it is always up-to-date even in cases involving analog output or smoothing, etc.. 6.1.1 Selecting the measured value and the measuring point After the device is switched on, the MEASURED VALUE function is set automatically and the measured value of the selected measuring point is displayed together with the appropriate units. After activating other functions by pressing the FUNCTION key, you can return to the measured value display by pressing the M▲ key. In the MEASURED VALUE function it is also possible, by pressingM▲ key, to successively select all other active measuring points and have the current measured value of each one displayed. If key M▲ is pressed and held down (for approx. 1 second), the previous channel is displayed again. When a measuring channel is selected the associated input channel is also selected at the same time . If, when switching channels, the measuring range changes, the abbreviation for the measuring range is displayed for a moment first; (see table in Section 7.7). M▲ Select the MEASURED VALUE function: 0: 2 3.4 5 °C 1: %H M▲ Increment the meas. channel by key: 5 1.8 M▲ Decrement the meas. channel by key: 1s and holding down (appr. 1s) ALMEMO 2390-5 23 Measuring operations 6.1.2 Differential measurement If there are two sensors with the same units and same decimal point position connected at measuring points M0 and M1, the difference M1 - M0 appears automatically below measuring point M3. The sensors are electrically isolated by means of photovoltaic relays. If the differential channel is not required, it must be deleted. If further differential channels are needed, these can be created via the interface using the appropriate reference channels; (see Manual, Section 6.3.4). 6.1.3 Maximum and minimum value memories From the measured values acquired per measuring point the highest and the lowest values are determined and saved for each. To display these extremes first the desired channel must be set and then the MAXIMUM VALUE or MINIMUM VALUE function selected by pressing the FUNCTION key. maximum VALUE function ´MH´ and minimum VALUE function ´ML´ FUNCTION Select by the FUNCTION... key ... 1: 1 2 3.4 MH , 1: - - - - MH PROG To delete the max./min. value: CLEAR As soon as the saved maximum / minimum value has been deleted, the current measured value appears again immediately. The maximum / minimum values are also automatically cleared with each start (see Chapter 6) or whenever the measuring range is changed (see Section 7.7). 6.2 Measured value correction and compensation For differential measuring operations based on a reference value, for measured value correction based on sensor errors, and for scaling processes, there are five programmable parameters available, namely zero-point correction ´ZC´, gain correction ´SC´, base value ´BA´, factor ´FA´, and decimal point setting ´EX´; (s. Manual, Sec. 6.3.10). These parameters can either be programmed (s. Sec. 7.4, 7.5) or be automatically calculated in a sub-menu in the MEASURED VALUE function including a few special functions (s. Sec. 6.2.1-3). Function Selection Display Execute Select meas. value and meas. point M▲ 1: 12.34 °C Set measured value to zero (s. 6.2.1) PROG 1: `00.00´ CL CLEAR Zero-point correction (s. 6.2.2) ▼ 1: `00.00´ AJ PROG or gain correction 1: `10.00´ AJ PROG Enter setpoint val. -> factor / gain (s. 6.2.3) ▼ 1: `12.34´ S4 PROG, ▲/▼.. Entering the units (s. 7.6) ▼ 1: 12.34 `°C´ PROG, ▲/▼.. 24 ALMEMO 2390-5 Measuring operations 6.2.1 Setting the measured value to zero, It is possible - a very useful function - to zero the measured value at certain locations or at certain times in order then to observe the deviation from this reference value. This function can be activated in the MEASURED VALUE function by means of the following key combination : PROG Zero-setting by pressing keys: 1: `0 0 0.0´CL , CLEAR When the PROG key is pressed in function ´CL´ the measured value 000.0 flashes; when the CLEAR key is then pressed, the measured value is saved as base value and set to zero. So long as the deviation from the base value is shown (rather than the actual measured value), the CORR arrow appears in the display. If only a ´C´ appears as function, this means that the base value function is locked at level 5 or above; (see Section 7.2). In this case the new base value is not saved to the connector’s EEPROM but only to the RAM; i.e. once the device is switched off, then the next time it is switched on, this will be restored to its original value. pH,- conductivity- and O2 probes cannot be zero-point setting, but to adjusted only permanently. If you prefer to have the new zero-point saved more permanently, then, before zero-setting, briefly and temporarily lower the locking mode to level 3 by switching on the device with the PROG and FUNCTION keys held down. When you switch off, the base value will then be retained; (the locking mode, however, will be restored to its original level). In order to obtain the actual measured value again the base value must be cleared. If the ´BA´ function is not currently activated, you need only to switch off and on again; (see above). If the ´BA´ function is available, it can be selected by pressing the FUNCTION key; the base value can then be cleared by pressing key combination PROG, CLEAR; (see Section 7.5). 6.2.2 Sensor adjustment, zero-point, and gain Many types of sensor need to be adjusted at least once or at regular intervals to compensate for various instabilities. There is, for this purpose, in addition to the above-mentioned procedure for “setting the measured value to zero”, a specific zero-point adjustment, which does not affect scaling with base value and factor (e.g. pH probes). This function does not save the zero-point error as base value but as a zero-point correction; (see Section 9.7). Zero-point adjustment is executed by pressing the following key combination: PROG Zero-point adjustment: PROG , , e.g. 1: `0 7.0 0´AJ ▼ ALMEMO 2390-5 25 Measuring operations In the ´AJ´ function the measured value appears in the display, initially flashing; this should be the measured value expected after adjustment, i.e. either the normal 0.0 or a scaled value, e.g. 7.00 for pH probes. So long as the corrected measured value is shown (rather than the actual measured value), the CORR arrow appears in the display. If only an ´A´ appears as function, this means that the zero-point correction function is locked at level 4 or above; (see Section 7.2). In this case the corrected value is not saved to the connector’s EEPROM but only to the RAM; i.e. once the device is switched off, then the next time it is switched on, this will be restored to its original value. pH,- conductivity- and O2 probes cannot be zero-point setting, but to adjusted only permanently. If you prefer to have the new zero-point saved more permanently, then, before zero-setting, briefly and temporarily lower the locking mode to level 3 by switching on the device with the PROG and FUNCTION keys held down. When you switch off, the corrected value will then be retained; (the locking mode, however, will be restored to its original level). In the case of dynamic pressure probes the zero-point error is generally saved to the calibration offset only temporarily (i.e. until you switch off) irrespective of whether locking applies. Gain adjustment can be performed for the following sensor types using the same function, assuming the appropriate calibration value is available : pH probe: ZA 9610-AKY 4.00 pH or 10.00 pH Conductivity: FY A641-LF: 2.77 mS/cm, FY A641-LF2: 147.0 uS/cm FY A641-LF3: 111.8 mS/cm O2 saturation: FY A640-O2: 101 % FY A600-O2 20,9 % O PROG PROG Gain adjustment, e.g. pH 10: , , 1: `1 0.0 0´AJ ▼ One especially simple procedure for sensor adjustment can be set up by locking the sensor in locking level 6. - It is then no longer necessary to pass via the adjustment menu with zero-setting. - To initiate sensor adjustment press and hold down the PROG key; then, as soon as the setpoint appears in function ´AJ´, you can perform sensor adjustment - without having to cancel the locking mode - by simply pressing the PROG key again. 26 ALMEMO 2390-5 Measuring operations 6.2.3 Entering a setpoint A setpoint can be entered in much the same way as gain adjustment (described in the previous section). If you save defined calibration values other than the zero-point, you can, by entering the setpoint, automatically correct or scale a measured value. On ALMEMO force transducers an appropriate calibration resistance can be selected for the purposes of final value correction. The factor or gain correction is calculated, depending on the locking state, and saved to the connector. To ensure that two-point adjustment is correct, the zero-point should have been adjusted previously. 1. Set the locking mode to level 4 or 3 (e.g. by switching on with the PROG and FUNCTION keys held down see below) 2. Select measured value and apply the calibration value (e.g. boiling water) 1: 0 9 8.7 °C 1: 0 9 8.7 S3 PROG 3. Select the setpoint function: , , ▼ Function ´S3´, if locking level 3: ▼ Correction factor is saved as gain correction Correction factor is saved as factor Function ´S4´, if locking level 3: 4. Enter setpoint (see Section 5.4) To perform final value adjustment on ALMEMO force transducers, select an integrated calibration resistance; in the MEASURED VALUE function, press and hold down the PROG key. If the ´CORR´ arrow flashes, this has succeeded. PROG Select calibration resistance by key: 1s 1: 0 9.8 7 Nm PROG Select setpoint function by key: and enter the setpoint (s. 5.4) M▲ Deactivate calibration resistance by : CORR arrow stops flashing 6.2.4 Cold junction compensation Cold junction compensation for thermocouples is normally performed automatically by means of an NTC sensor in measuring socket M0. This sensor can be substituted with an external measuring sensor; (see Manual, Section 6.7.3). For especially exacting requirements (e.g. for extreme temperature gradients in the device) special connectors are available each with its own integrated temperature sensor (ZA 9400- FSx) for cold junction compensation. These can be ALMEMO 2390-5 27 Measuring operations used for all thermocouple types; however, they require two measuring channels. ´#J´ is programmed in the comments; this ensures that the temperature sensor integrated in the connector is used for cold junction compensation. 6.2.5 Atmospheric pressure compensation Some measured variables depend on the ambient atmospheric pressure (see Section 7.7, measuring range list ´with PC´) with the effect that pronounced deviations from normal pressure (1013 mbar) may lead to measuring errors. e.g. error per 100 mbar: Compensation range: Rel. humidity psychrometer approx. 2% 500 to 1500 mbar Mixture ratio, capacitive approx. 10 % Vapor pressure VP up to 8 bar Dynamic pressure approx. 5% 800 to 1250 mbar (error < 2%) O2 saturation approx. 10% 500 to 1500 mbar Account should be taken, therefore, especially when working at significant heights above sea level, of the atmospheric pressure (approx. -11 mbar per 100 meters above mean sea level MSL). This can either be programmed or measured directly with a sensor (see Manual, Section 6.7.2). The ATMOSPHERIC PRESSURE function ´mb´ is only activated as and when necessary for sensors of the types mentioned above (see Section 5.2) by holding down the FUNCTION key the first time it is pressed. ATMOSPHERIC PRESSURE function ´mb´ FUNCTION Select by key ... and enter mba s. 5.4 1 0 1 3 mb With each reset the atmospheric pressure is set to 1013 mbar. It can be set to the current value by means of the usual data entry process; (see Section 5.4). 6.2.6 Temperature compensation Sensors whose measured values depend heavily on the temperature of the measuring medium usually incorporate their own temperature sensor; such devices perform temperature compensation automatically; (see Section 6.2, measuring range list ´with TC´). However, dynamic pressure probes and pH probes are also available without their own temperature sensor. If the temperature of the medium deviates from 25 °C the following measuring errors may occur : e.g. error per 10 °C : Compensation range : Sensor : Dynamic pressure app. 1.6% -50 to +700 °C NiCr-Ni pH probe approx. 3.3% 0 to +100 °C Ntc or Pt100 Temperature compensation can also be performed using the reference channel and external temperature sensors; or it can be performed manually by entering the temperature in the ´TC´ function (reference channel = measuring channel). TEMPERATURE COMPENSATION function ´TC´ 28 ALMEMO 2390-5 Measuring operations FUNCTION Select by pressing key ... 1: 1 8 0.0 Enter °C s. Sec. 5.4 TK 6.3 Measuring point scans and data output Measuring point scans can be used to acquire and then evaluate data from all active measuring points at particular times (for the purposes e.g. of averaging, outputting to the interface, or saving to memory). A measuring point scan can be initiated at any time-of-day either manually or automatically by a cycle. If a peripheral device (e.g. printer) is connected (see Manual, Section 5.2), each measured value is output to it via the interface in the output format set (see Section 6.3.3) (printout, see Section 6.6.1). In time-critical applications it may be preferable to activate continuous measuring point scanning (see Manual, Section 6.5.1.3); scanning all measuring points in continuous mode takes only half as long as in semi-continuous mode; (see Section 6.1, default setting ´continuous´ off). 6.3.1 Once-only measuring point scan (see Manual, Section 6.5.1.1) A once-only manual measuring point scan for acquiring instantaneous measured values from all active measuring points can only be initiated in the MEASURED VALUE function by pressing the MANU/PRINT key. The ´START´ arrow lights up briefly; and if the interface is connected, the ´COM´ arrow should also appear. With the “S” option the measured values are saved and the ´MEM´ arrow lights up. Each time the key is pressed again after this the measured values are processed accordingly. If the actual time-of-day is to be indicated as measuring time, this needs to be entered first; (see Section 9.1). MANU/ PRINT Once-only measuring point scan The MEASURED VALUE function by : 6.3.2 Cyclic measuring point scan (see also Manual, Section 6.5.1.2) For cyclic measuring point scans and outputs the output cycle can be set in the CYCLE function ´CY´. FUNCTION CYCLE function ´CY´ Select by pressing the FUNCTION key ...0 0:3 0:0 Enter the time in the 6-character format hh:mm:ss (see Section 5.4). Example : print cycle 30 minutes 0.ZY PROG Delete cycle by pressing the keys: , CLEAR This terminates any cyclic scan currently still running. ALMEMO 2390-5 29 Measuring operations The cyclic measuring operation is started by pressing theSTART/STOP key; the ´START´ arrow should light up continuously. If a peripheral device is connected, the measured values are output cyclically and the ´COM´ arrow should appear. There is a wide variety of output formats available (see Section 6.3.3). For the associated printouts please refer to the Manual Section 6.6.1. With the “S” option the measured values are saved and the ´MEM´ arrow lights up START/STOP To start a cyclic measuring point scan: key: (cycle programmed) To stop automatic measuring point scanning press the START/STOP key again. On the data logger (“S” option) the current measured values are saved again. The ´START´, ´COM´, and ´MEM´ lights go out again.. START/STOP To stop a cyclic measuring point scan : key: 6.3.3 Output formats for measured value lists Both for manual and for cyclic measuring point scans (see Sections 6.3.1/2) the measured values are output as measured value lists in a wide variety of output formats (see Manual, Sections 6.5.5, 6.6.1). There is the standard format in which all the measured values are listed one below the other; there is also the column format listing them next to one another; this printout is clear, easy-tounderstand, and space-saving. For this latter format the printer is switched over automatically to compressed character mode. There is also the table format which is intended for further processing using spreadsheet programs (see Manual, Section 6.1). The output format is indicated in the baud rate function ´BR´ by means of a letter placed between the output channel ´U´ and the baud rate. Format List Printout Display Measured values are listed one U 9 6 0 0 BR below the other "n" = next to one another Measured values are listed in ad- U n 9 6 0 0 B R jacent columns Measured values are listed in ta- U t 9 6 0 0 B R "t" = table ble format To change these settings the output format must first of all be selected by pressing the PROG key and then set, as usual, by pressing the keys ▲▼... Programming is terminated by pressing the keys PROG, ESC, or PROG, PROG 30 ALMEMO 2390-5 Measuring operations 6.3.4 Manual data output In all functions selected by pressing the FUNCTION key, the function values can, by pressing the MANU/PRINT key, be output to a printer or computer, partly as tables and with the following printout formats : Function Abb Printout MAXIMUM VALUE MH MAXIMUM: 01: +0020.0 °C MINIMUM VALUE ML MINIMUM: 01: -0010.0 °C AVERAGE VALUE AV AVERAGE VAL: 01: +0017.8 °C C CH MEAS.VAL MAXIMUM MINIMUM AVG.VAL COUNT COUNT 01: +0023.0 +0025.0 +0019.0 +0022.0 99999 s. Hb. 6.4.4 (all meas. values) AVERAG. MODE AM 01:NiCr +0123.4 -0012.0 +0000.0 °C 1.0000 E+0 CONT SMOOTHING DG TIME CONST: 01: 10 DIAMETER DN CROSS SECT: 01: 00078 cm2 DIAMETER: 00100 mm CROSS SECTION CS CROSS SECT: 01: 00078 cm2 DIAMETER: 00100 mm TEMP. COMP. TC COMPENSATION 01: 025.0 °C MEMORY s. 6.4.3 MF MEMORY: - - - CYCLE CY PRINT CYCLE: 00:06:00 TIME TM TIME: 12:34:00 DATE DA DATE: 01.02.99 s. Hb. 6.2.3 BAUD RATE BR AMR ALMEMO 2390-5 CH RANGE LIM-MAX LIM-MIN BASE D FACTOR EXP AVG COMMENT (Senor 01:Ntc +040.00 - - - - - - °C 1.0123 E+0 - - - Temperature programming) V24 P02 P03 P14 P18 G00 M11 A01 P03/11/00 mb MODULE: ATMOSPHERIC A.PRESSURE:+01013. mb PRESSURE DEVICE ADDRESS A CJ-TEMP: +0023.5 °C U-SENSOR: ! 12.5 V (Device HYSTERESIS:10 programming) CONFIG: -------- ---- P19 P00 P32 P26 P26 P44 P04 P11 P10 P13 P15 02:°o H +0060.0 +0020.0 - - - %H - - - E+0 - - - Humidity MEAS:CYCLE: 00:00:00 S0251.9 F0104.7 E W010 ----PRINT CYCLE: 00:10:00 Un 9600 bd RANGE LOCKING (extended sensor programming) LIMIT VALUE HI LIMIT VALUE LO ANALOG START ANALOG END BASE FACTOR EXPONENT ZERO CORRECT. SLOPE CORRECT ALARM: ---A1: DK0 Un A2: AK1 s. Hb. 6.2.5 R 01:NiCr +0123.4 -0012.0 +0000.0 °C 1.0000 E+0 - - - P00 f1 s. Hb. 6.10.1 P15 P08 P09 P16 P17 P06 P07 P07 f1 P06 f1 P07 LM CH ZERO SLOPE LM P FUNC CALOFS CALFA A-START A-END B1 MX EF AH AL ZF UMIN 01:+0000.0 +1.0000 5. 1 MESS +00000 32000 +0000.0 +1000.0-01 M1 -- S- E2 05 12.0 LH LL AS AE BA FA EX ZC SC LIMIT MAX: 01: LIMIT MIN: 01: ANALOG START:01: ANALOG END: 01: BASE: 01: FACTOR: 01: FACTOR: 01: ZERO CORR: 01: SLOPE CORR: 01: -0100.0 °C +0020.0 °C +0000.0 °C +0100.0 °C -0273.0 °C +1.0350E-1 +1.0350E-1 -0000.7 °C +1.0013 The column on the right lists the interface commands to initiate output. ALMEMO 2390-5 31 Measuring operations 6.4 Averaging The average value of the measured value is required for various applications : e.g. the average flow velocity in a ventilation channel smoothing of a widely fluctuating measured value (e.g. wind, pressure etc.) hourly or daily average values of weather data (temperature, wind etc.) as above, for consumption values (current, water, gas, etc.) The average value of a measured value M is obtained by adding together a series of measured values Mi and then dividing this sum by the number N of measured values in the series : Average value : M = (ΣM i )/N i 6.4.1 Smoothing out meas. val. by means of a sliding average When measuring values of an unstable or strongly fluctuating nature, e.g. particularly turbulent flows, it is an advantage to smooth the values by means of continuous averaging. The level of smoothing can be set, via the ´Smoothing level´ function ´DG´, within a range of 0 to 99 (see Section 5.2). This level specifies the number of measuring operations at the selected measuring point from which the sliding average is to be taken. The smoothed measured value can then be read out in the MEASURED VALUE function; this will also apply for all subsequent evaluation functions. Smoothing can thus also be used in conjunction with averaging (see Section 6.4.3) e.g. for network measurements. SMOOTHING LEVEL FUNCTION ´DG FUNCTION ... Select by pressing key: 1: 1 0 DG Enter as per Sec. 5.4. Meas. value smoothing is only possible for the selected channel. Continuous measuring point scanning should be switched off; if it is not switched off, the filter effect at many measuring points will be substantially restricted. 6.4.2 Averaging mode All averaging operations, except when smoothing a measured value, are specified via AVERAGING MODE ´AM´; the average value appears in the AVERAGE VALUE function ´AV´; the number of averaged values appears in the NUMBER function ´C´. As and when the averaging mode is programmed, these last two functions “AV” and “N” are activated automatically. Averaging mode is activated by default and is selected by pressing the FUNCTION key. AVERAGING mode function ´AM´ FUNCTION Select by pressing key: 32 ... ALMEMO 2390-5 1: C o n t AM Measuring operations If a sensor with an ALMEMO® connector is connected, the following modes can be set by pressing keys PROG, ▲ ▼, PROG : Function Display No averaging: - - - Continuous averaging from start to stop (see 6.4.3) or over single measurements, if not started (see 6.4.4): C o n t Averaging over each cycle (see 6.4.6): C Y C L Averaging has become much more straightforward and effective compared with previous models - thanks to the following measures. 1. Averaging is always performed by means of on-going semi-continuous or continuous measuring point scanning. A measuring cycle is thus no longer necessary for this purpose; if an averaging mode has been programmed then all measuring points will always be considered for all actions (start, stop, manual). 2. With semi-continuous measuring point scanning (default setting), the selected measuring point is always scanned at exactly half the measuring rate. 3. All function values used in averaging can be saved via the function channels for average value ´M(t)´, number ´n(t)´, and volume flow ´Flow´ (“S” option) or output via the interface. 4. For the function channels there are now also device-internal channels (e.g. M(t) or Flow on channel M3 with the flow sensor on reference channel M1). The advantage is that when using several sensors for the same application these sensors do not have to be reprogrammed and can be exchanged without losing the function channels. If, however, the whole application operates with only one sensor, then programming in the sensor itself still makes more sense (see Section 4.2). 5. It is now also possible for averaging purposes to start and stop measuring operations without a cycle; all measured values and function values at start and stop are acquired and saved (option “S”). 6. For all continuous averaging operations the averaging mode is ´Cont´. How this functions depends completely on the following : Start - Stop by pressing theSTART/STOP key Single measurements by pressing the MANU key. 7. The START/STOP key function is available in all functions. 8. The average val. for all channels are normally deleted with each new start. 6.4.3 Averaging over the time from start to stop To acquire the average of all measured values for a measuring channel over a certain period or for the surface area of a ventilating channel (see Manual, ALMEMO 2390-5 33 Measuring operations Section 3.5.5) or for a whole measuring operation (also with cyclic scanning), the averaging mode to be set is ´Cont´ (see Section 6.4.2). 1. Select the AVERAGE VALUE function ´MW´ by pressing the FUNCTION key. The averaging start and stop can if necessary also be selected in any other function (e.g. MEASURED VALUE)! 2. Start averaging by pressing the START/STOP key The average value is automatically deleted with 1: 1 1.5 6 AV each new start ! In the display the ´START´ and ´M ´ arrows light up. All measured data can be saved to memory or output 3. Stop averaging by pressing the START/STOP key again; the ´START´ and ´M ´ arrows go out. 1: 1 2.3 4 AV The average value can now be read out. All measured data can be saved to memory or output. 4. For further measuring operations repeat steps 2 and 3 only. CORR M 6.4.4 Averaging over single measurements To determine the average of single isolated measurements at certain locations or certain times (e.g. network measurements) the averaging mode ´Cont´ is used. Measured value smoothing can be programmed (see Section 6.4.1) 1. If the ´START´ arrow lights up, stop the current meas. operation by pressing the START/STOP key. 2. Select the AVERAGE VALUE function ´AV´ by pressing the FUNCTION key. 3. Delete the average value before starting each measuring series by pressing the keys PROG, 1: - - - - AV CLEAR; (this does not happen automatically) ! 4. Select MEASURED VALUE function by pressing M 1: 1 1.2 2 ms key. 5. Start manual single measurements by pressing the MANU key. In the display the M arrow appears briefly. All measured data can be saved to memory (option “S”) or output. 6. By pressing the FUNCTION key once, the average 1: 1 2.3 4 ms value can be displayed. 7. By pressing the FUNCTION key again, the count of values averaged in the function ´C´ can be dis- 1: 0 0 1 2 C played. 8. You can return to the average value display by pressing the FUNCTION key and holding it down for a while. 9. For further measuring series repeat steps 3 to 8. 34 ALMEMO 2390-5 Measuring operations 6.4.5 Volume flow measurement To determine the volume flow VF in ventilating channels multiply average flow velocity ¯v by cross-section area CS.: VF = v¯ . CS . 0.36 VF = m3/h, v¯ = m/s, CS = cm2 For approximate air volume measurements at air vents and gratings the average flow velocity can be determined by means of time-based averaging. Or alternatively the average flow velocity can also be determined by single network measurements as per VDI/VDE 2640 with manual single measurements at defined points (e.g. 13.24 m/s) (see 6.4.3 and Manual 3.5.5). Continuous volume flow measurement can also as a special case be performed by means of pure center point measurement. Averaging over several points can thus be omitted. Volume flow calculation is then based automatically on the measured value only. Measured value smoothing (see Section 6.4.1) is definitely advisable. The K factor for correcting the flow profile, as factor for the volume flow channel, should be set to 0.8; (see below). Volume flow function channel To show the volume flow data a function channel is required whose reference channel is aligned to the flow measuring point and / or to the appropriate average value channel M(t); (see Manual, Section 6.3.4). The easiest way to do this is to program the measuring range ´Flow´ on the 2nd or 3rd channel of the flow sensor. If this channel has not yet been activated, it must be selected in the RANGE function by pressing and holding down the M key and programming the measuring range ´Flow´ (see Section 7.7). The reference channel is automatically set to the 1st channel, Flow. Programming example for a rotating vane as flow sensor: 1st channel e.g. measuring point M01 Measuring range ´S220´ Averaging mode ´Cont´ 2nd channel e.g. measuring point M11 Measuring range “Flow” Cross-section 175 cm2 Or alternatively the function channel ´Flow´ can be programmed to internal channels M3 etc. The reference channel for this measuring point is M01; i.e. the flow sensor must be connected to M01; (see Section 7.7). The advantage of this variant is that any flow sensors can be used without the need for additional programming steps. ALMEMO 2390-5 35 Measuring operations Entering the cross-section The cross-section area CS can be entered in the ´Flow´ channel either directly in the ´CS´ function up to a maximum of 32000 cm2 or as diameter in the ´DN´ function up to a maximum of 2000 mm; (see Section 5.4). When the function channel ´Flow´ is selected both these functions are activated automatically. CROSS-SECTION AREA function ´CS´ Select the FUNCTION key .... Enter cm2 (s 5.4) 11: 0 1 7 5.CS DIAMETER function ´DN´ Select the FUNCTION key... 11: 0 1 5 0.DN Enter mm s. 5.4 With some cross-sections or arrangements (see Manual, Section 3.5.5) a correction factor K is necessary; this can be easily programmed as a factor in the ´Flow´ channel; (see Section 7.5). Displaying the volume flow The product obtained by multiplying average velocity v¯ by cross-section area CS is the air volume. This volume flow is calculated automatically in the function channel ´Flow´ and displayed as the measured value in m3/h. VOLUME FLOW in the function channel ´Flow´: Select by M▲ key Display in m3/hour: 11: 0 8 3 4.mh 6.4.6 Cyclic averaging If you require average values periodically always over the same periods of time (hours or days), set the cycle to this time (see Section 6.3.2) and set the averaging mode to ´CYCL´. In this mode average value AV is formed after the start of a measuring operation at the measuring rate; it is deleted internally each time cycle “Z” expires. However, average value MW for the last cycle completed remains in the display for the duration of the whole current cycle. AV(Z1) start cycle display Z1 AV(Z2) Z2 AV(Z1) AV(Z3) Z3 AV(Z2) AV(Z3) You can, with the aid of the print cycle factor, extend the period for particular measuring points; (see Section 6.10.6) 36 ALMEMO 2390-5 Measuring operations 6.4.7 Averaging over several measuring points To determine the average value over several measuring points from Mb2 to Mb1 at the same time, function channel ´M(n)´ is available. By programming this function channel (e.g. as 2nd channel in the 3rd connector, measuring point M12 in connector M2) one obtains the average value for all three measured values (from M00 to M02) because by default measuring point M00 is used as reference channel Mb2 and the first measuring point in the connector of the function channel is used as reference channel Mb1. For this purpose averaging mode is not necessary. 6.5 Measured value memory (option S) Measuring instrument ALMEMO 2390-5 is also available with the option “S” as a data logger. The basic information on saving data in ALMEMO® devices is provided in the Manual, Section 6.9. The internal data memory on the ALMEMO 2390-5 is a 32-KB EEPROM with capacity sufficient for 3700 to 6000 measured values (depending on the channel number). In the event of a failure in the supply voltage the measured data is retained; only the time-of-day is lost. The EEPROM can be configured either as linear memory or ring memory; (see Manual, Section 6.10.13.2). Memory capacity display If your measuring instrument has the data logger option (OA 2390-5S), you can, by pressing the FUNCTION key, select the Memory free function ´MF´ and see the remaining memory capacity in kilobytes. If the memory is full, the display will read 0.0; if the memory is configured in linear form, no further measured values will be saved; if it is configured as a ring memory, old values will be overwritten by new. 0 3 0.5 memory free function ´MF´: MF You can, by activating the memory time function ´MT´, display the time that the memory capacity (see above) has available for recording measured data. This time depends not only on the memory capacity but also on the number of measuring channels, on the cycle, and even, in certain operating modes, on the conversion rate. 0 3 0.5 memory time function ´MT´: MT 6.5.1 Memory connector With the ALMEMO 2390-5 it is also possible to connect external ALMEMO® EEPROM memory connectors ZA 1904-SS with capacities of 128 KB or 256 KB (25000 or 50000 measured values). These memories do not need a battery to ensure that data is retained; they can be unplugged, even dispatched elsewheALMEMO 2390-5 37 Measuring operations re, and evaluated by computer over a read interface (ZA 1409-SLG0) on a completely device-independent basis. Old read cable ZA 1409-SLK does not support operation with a ring memory configuration; i.e. it cannot be used to read out measured data saved to ring memory. If you wish to continue using this cable please be sure to have switched ring memory mode off. However, the new readers ZA1409-SLG / SLG0 with effect from version V2 can be used to evaluate all recorded data. Applications The memory connector is plugged into socket A2; it is detected automatically and, so long as it remains connected, it is used instead of the internal memory. This is also shown in the display indicating the amount of free memory. In this display the available memory capacity is preceded by an additional two-digit connector number. This two-digit number can be programmed from 00 and 99; it helps to identify the connector. When the PROG key is pressed first of all ´SCLr´ starts flashing; the next time the PROG key is pressed, the first digit in the number starts flashing; this can now be entered as per Section 5.4. Entering the connector number: PROG PROG PROG , , ... , PROG , ... , 0 1:1 2 8.5 MF When the memory connector is plugged in, the internal data memory is no longer deleted. Which memory is used depends on whether, at the start of the measuring operation, there is a memory connector plugged in or not. You must not, in the course of a measuring operation, either plug or unplug the connector; the change will not be considered until the measuring operation stops; i.e. if a connector is unplugged during a measuring operation, all subsequent data for that operation will be lost. 6.5.2 Measured value recording All once-only and all cyclic measuring point scans are generally saved to memory. A new feature is that all measured data is also saved whenever a measuring operation stops - even if no cycle has been programmed. It is thus possible e.g. to log the results of a simple start - stop - averaging operation including volume flow calculation. Manual starts and stops To start cyclic saving to memory press the START/STOP key. To show that measured values are indeed being saved, the ´MEM´ arrow lights up - continuously if scanning is cyclic (see Section 6.3.2) and just briefly if scanning is manual (see Section 6.3.1). To stop saving to memory press the START/STOP key again. 38 ALMEMO 2390-5 Measuring operations Starting and stopping with start date and time-of-day, and end date and time-of-day A measuring series can be started and stopped automatically at specified times. The start date and time-of-day and end date and time-of-day can be freely programmed - providing these functions have been activated (see Section 5.2). If no particular date has been programmed, the measuring operation will be performed every day within the set period. The current time-of-day must have been programmed. START time-of-day function ´ST´ Select by pressing the FUNCTION key Enter the time-of-day in the format hh:mm:ss (s. 5.4): 0 7:3 0:0 0 ST START daTE function ´SD´ Select by pressing the FUNCTION key Enter the date in the format tt:mm:jj (s. 5.4): 0 1.1 2.9 9 SD End time-of-day and end date are programmed in the same way in the End time-of-day function ´ET´ and End DATE function ´ED´ (see Section 5.4). Other ways of starting and stopping measured value recording, i.e. by means of limit values, external triggering, or interface command, are described in the Manual, Section 6.6. 6.5.3 Measured value output Memory content can be output to a printer or computer as often as required and in any output format from the range possible with online data output (see Section 9.2); (see also Manual, Section 6.6.1). In the memory freE function ´MF´ MANU/ PRINT 0 3 0.5 MF 0 1 3.5 MO Start measured value output by the key: During memory output the amount of memory still to be output is calculated and shown in the display in KB with function abbreviation ´MO´. Memory output function ´MO´: output in kB START/STOP To abort memory output press the key: ALMEMO 2390-5 39 Measuring operations Delete memory When the PROG key is pressed, the symbol ´SClr´ starts flashing. Only if you now press the Clear key will the memory content be deleted PROG delete memory by pressing the key: `S C L r´SF , CLEAR 6.5.4 Sleep mode For long-term monitoring with more prolonged cycles (i.e. longer than two minutes) the measuring instrument can be operated in sleep mode. In energy-saving sleep mode the measuring instrument is switched off after each measuring point scan (please note when using sensors with power supply !) and switched on again automatically after the cycle expires ready for the next measuring point scan. In this way with just one battery 10000 to 30000 measuring point scans can be performed (depending on the number of measuring points and the conversion rate); for a cycle lasting 15 minutes this represents a useful life of between 100 and 300 days. To perform data recording in sleep mode carry out the following steps: 1. Enter a cycle lasting at least two minutes (s.6.3.2): 2. In the DISPLAY MODE function ´DM´ activated sleep mode: DISPLAY MODE function ´DM´ - - - d DM Select by pressing the FUNCTION key (s. 5.2) The symbol with three lines means that sleep mode is switched off. To activate sleep mode the (s. 5.4) Press keys PROG, ▲, PROG, PROG or ESC: 3. To start the meas. operation press the: START/STOP The meas. instrument switches off with the display: S L P S L E E P 4. In the specified cycle the measuring instrument switches on automatically, performs one measuring point scan, and then switches off again. 5. Terminate sleep mode Switch the measuring instrument OFF by means of the slide switch (1) and then ON again; (measuring operation is still started). OFF - ON 6. To terminate the measuring operation press the START/STOP key 40 ALMEMO 2390-5 d DM Sensor programming 7. SENSOR PROGRAMMING Since on ALMEMO® devices all sensor programming is stored in the ALMEMO® connector, the user will not normally need to reprogram. Programming will only be necessary e.g. if sensor errors are corrected, if your own sensors are scaled, or if certain limit values are stipulated; in these circumstances there are comprehensive programming functions available. Please note that series sensors featuring the locking mode can be protected against unintended alteration and that if modification is required then the locking mode must first be lowered to an appropriate level; (see Section 7.2). All parameters can be entered and modified easily and conveniently via the keypad - providing this function is activated (see Section 5.2) and the appropriate sensor connector is plugged in. 7.1 Selecting a measuring point To view or to edit a sensor’s parameters, first of all in the MEASURED VALUE function select the appropriate measuring point by pressing the M▲ key. M▲ To increment the measuring channel press key: (applies to programmable channels only) To decrement the measuring channel press key: and hold down (for approx. 1 second) M▲ 1s 7.2 Locking the sensor programming (s. Hb. 6.3.12) The functional parameters for each measuring point are protected by means of the locking mode; this can be set to the desired locking level. Before programming the locking mode must be lowered to an appropriate level. You can briefly and temporarily lower the locking mode to level 3 by switching on the device with the PROG and FUNCTION keys held down; (after switching off it will be restored to the level programmed in the connector). If in the display you see a dot after the locking mode, this means that this cannot be modified. Locking level 0 1 2 3 4 5 6 7 Locked functions none Measuring range, element flags Measuring range, zero-point correction, gain correction Measuring range, units This plus zero-point correction, gain correction This plus base value, factor, exponent This plus analog output, start and end This plus limit values maximum and minimum ALMEMO 2390-5 41 Sensor programming Locking mode function ´LM´ FUNCTION Select by pressing key: ... Enter as per Sec. 5.4 1:0 0 0 5 LM In the display, in front of the locking mode, you should see output function, element flags and multiplexer position - assuming these have been programmed (see Manual, Section 6.10.2/3/4). These can be programmed by pressing and holding down the PROG key. 7.3 Limit values Two limit values (MAX and MIN) can be programmed per measuring channel. Exceeding one of these limit values is treated as a fault, i.e. in the same way as exceeding a measuring range limit or as sensor breakage. In the display the ´ALARM´ arrow appears and the alarm relays are triggered; (see Manual, Section 6.3.9). Activation of functions ´GH´ and ´GL´, see Section 5.2. limit value Max function ´LH´ and limit value Min function ´LL´. FUNCTION Select by pressing key: 1: 1 2 3.0 ... Programming: LH Enter as per Sec. 5.4 PROG Switch off by keys: 1: - - - - , LH CLEAR 7.4 Correction values Sensors can be corrected by means of the correction values ZERO-POINT and GAIN; (see Manual, Section 6.3.10). Corrected measured value = (measured value - zero-point) x gain. ZERO-POINT CORRECTION function ´ZC´ Select by key: FUNCTION... Enter as per Sec. 5.4 1: 0 0 3.2 ZC Delete by keys: PROG, CLEAR 1: - - - - ZC 1:1.5 0 0 0 SC GAIN correction function ´SC´ Select by key: FUNCTION... Enter as per Sec. 5.4 Once the correction values have been programmed and the measured value thus duly modified, the ´CORR´ arrow appears in the display. Sensor adjustment To simplify the correction of sensors for zero-point and if necessary also for gain, the MEASURED VALUE function includes a special function which performs this adjustment automatically (see also Section 6.2.2). 42 ALMEMO 2390-5 Sensor programming 7.5 Scaling, decimal point setting To display the electrical signal of a sensor as measured value in its physical size, it is nearly always necessary to perform decimal point shift, zero-point correction, and multiplication with a factor. To perform these steps the functions EXPONENT ´EX´, BASIS ´BA´, and FACTOR ´FA´ are provided. For a detailed description of scaling, with an example, please refer to the Manual, Section 6.3.11. Displayed value = (corrected measured value - BASIS) x FACTOR. Decimal point setting First of all the position of the decimal point should be checked and if necessary adapted, using the EXPONENT function, to the desired resolution and to the units appropriate to the sensor. Using the EXPONENT function ´EX´ the decimal point can be shifted as far to the left (-) or to the right (+) as the display and printer permit. EXPONENT function ´EX´ Select by key: FUNKTION... Enter as per Sec. 5.4 1: 3 EX Example: Force transducer with output 2.0000 V should indicate 1000.0 N. The decimal point must be shifted three positions to the right by means of exponent 3. From the new actual values 0.0 N and 2000.0 N it is now easy to calculate the necessary factor 0.5. The base value will probably only be needed for the purposes of zero-point correct. BASE VALUE function ´BA´ Select by key: FUNCTION... Enter as per Sec. 5.4 FACTOR function ´FA´ Select by key: FUNCTION... Enter as per Sec. 5.4 Once the scaling values have been programmed and the measured value thus duly modified, the ´CORR´ arrow appears in the display. 1: 0 0 1.2 BA The scaling values can also be specified automatically by means of two-point adjustment. First of all, in the MEASURED VALUE functi1:0.5 0 0 0 FA on, the measured value is set to its zero state (icy water, unpressurized, etc.) (see Sections 6.2.1/2) and then, with a defined value, the setpoint (boiling water) is entered (see Section 6.2.3). 7.6 Changing the units Per measuring channel the default units for the measuring range in question can be replaced with any two-character units; (see also Manual, Section 6.3.5). ALMEMO 2390-5 43 Sensor programming All upper-case and lower-case letters, special characters °, °, Ω, %, [, ], *, -, =, ~, and space (_) can be used. The units are shown as two 16-segment characters after the measured value or programming value. To modify the units go to the menu (see Section 6.2) in the MEASURED VALUE function and press the keys PROG and then ▲; this will only work if the lokking mode is set to lower than level 4 (see Section 7.2). The units currently set should then appear in the display and start flashing. If you press the PROG key again, the first character in the units starts flashing; this can now be changed by pressing the keys ▲ and ▼. To proceed to the second character press the key; you can change this in the same way (see Section 5.4). Select the MEASURED VALUE / measuring point function: PROG M▲ 0: 22 3.4 3.4 55 0: , Enter units function: ▲ PROG Enter units: PROG , ... , modify PROG , ... , ▲ ▲ Unit 1 `°C´ °C Unit 2 modify End If you enter ºF as units the temperature value will be converted automatically from degrees Celsius to degrees Fahrenheit (ºF). With character °-C or -°F cold junction compensation is disabled. The units “measuring operations per second” are displayed as “m/s”; the units “cubic meters per hour” are displayed as “ m3/h. 7.7 Selecting the measuring range If you want to program the connector yourself or if you often need to change the measuring range, then please note that the locking mode for the connector should be cleared (see Section 7.2) and that for some transducers a special connector is required (e.g. thermo, shunt, divider, etc., see table). To modify the measuring range you must first set the measuring point (see Section 7.1). To select the measuring range press the Function key and select the RANGE function ´R´. Ist If the desired measuring point has not yet been activated, then in the RANGE function ´R´ press and hold down the M▲ key. In this way you can select all channels (including unprogrammed ones). After pressing and holding down the PROG key for a short while the abbreviated designation for the measuring range appears in the display and starts flashing. Now, by pressing keys ▲ und ▼, all possible measuring ranges can be selected in the order listed in the table below. Once the desired measuring 44 ALMEMO 2390-5 Sensor programming range appears in the display, programming can be completed by pressing the PROG key again and this data is transferred and saved to the connector. All programming values for this measuring point are deleted. RANGE function ´R´ FUNCTION Select by pressing key: 1: N i C r ... Example : Channel M1, range NiCr-Ni PROG PROG modify the meas. range: , ... or ▲ Transducer Pt100-1 (ITS90) Pt100-2 (ITS90) Ni100 NiCr-Ni (K) (ITS90) NiCr-Ni (K) (ITS90) ++ NiCroSil-NiSil (N) (ITS90) Fe-CuNi (L) Fe-CuNi (J) (ITS90) Cu-CuNi (U) Cu-CuNi (T) (ITS90) PtRh10-Pt (S) (ITS90) PtRh13-Pt (R) (ITS90) PtRh30-PtRh6 (B) (ITS90) Au-FeCr W5Re-W26Re (C) ++ Ntc Typ N Ntc Typ N ++ Ptc Typ Kty84 ++ Millivolt 1 Millivolt Millivolt 2 Volt Difference - millivolt 1 Difference - millivolt Difference - millivolt 2 Difference - volt Sensor voltage Milliampere Percent (4-20 mA) R ... , ▼ Sensor / connector Measuring range Units ZA 9000-FS ZA 9000-FS ZA 9000-FS ZA 9020-FS ZA 9020-FS ZA 9020-FS ZA 9000-FS ZA 9000-FS ZA 9000-FS ZA 9000-FS ZA 9000-FS ZA 9000-FS ZA 9000-FS ZA 9000-FS ZA 9000-FS ZA 9000-FS ZA 9040-SS3 ZA 9040-SS4 ZA 9000-FS ZA 9000-FS ZA 9000-FS ZA 9000-FS ZA 9050-FS ZA 9050-FS ZA 9050-FS ZA 9050-FS ZA 9000-FS ZA 9601-FS ZA 9001-FS -200.0... +850.0 -200.00...+300.00 -60.0... +240.0 -200.0...+1370.0 -200.0...+1370.0 -200.0...+1300.0 -200.0... +900.0 -200.0...+1000.0 -200.0... +600.0 -200.0... +400.0 0.0...+1760.0 0.0...+1760.0 +400.0...+1800.0 -270.0... +60.0 -0.0...+2320.0 -50.00...+125.00 -0.000...+45.000 -0.0... +200.0 -26.000...+26.000 -10.000...+55.000 -260.00...+260.00 -2.0000...+2.6000 -26.000...+26.000 -10.000...+55.000 -260.00...+260.00 -2.0000...+2.6000 0.00...20.00 -32.000...+32.000 0.00... 100.00 ALMEMO 2390-5 °C °C °C °C °C °C °C °C °C °C °C °C °C °C °C °C °C °C mV mV mV V mV mV mV V V mA % Display P104 P204 N104 NiCr NiCr NiSil FECO IrCo CUCO CoCo Pt10 Pt13 EL18 AUFE Wr26 Ntc Ntc3 KTY U 26 U 55 U260 U2.60 d 26 d 55 d260 d2.60 UbAt I032 P420 45 Sensor programming Sensor / connector Measuring range Units Transducer Ohms Ohm ++ Frequency Pulses Digital input Digital interface Infrared 1 Infrared 2 Infrared 3 Infrared 4 Infrared 6 Snap-on head, normal 20 Snap-on head, normal 40 Snap-on head, micro 20 Snap-on head, micro 40 Macro Water micro Dyn. press., 40 m/s TC and PC Dyn. press., 90 m/s TC and PC Flow sensor SS20 ++ Rel. air humidity, capacitive Rel. air humidity, capacitive, TC Rel. air humidity, capacitive, TC Mixture ratio, with PC Dew-point temperature Partial vapor pressure. Enthalpy, with PC Humid temperature Rel. humidity, psychrom. PC Mixture ratio, with PC Dew-point temperature, with PC Partial vapor pressure, with PC Enthalpy, with PC Conductivity probe, with TC CO sensor O saturation, with TC and PC O concentration, with TC ZA 9000-FS 0.00... 500.00 Ω ZA 9003-SS3 0.000... 50.000 Ω ZA 9909-AK 0... 25000 Hz ZA 9909-AK 0... 65000 ZA 9000-EK2 0.0... 100.0 % ZA 9919-AKxx -65000... +65000 ZA 9000-FS 0.0... +200.0 °C ZA 9000-FS 0.0... +800.0 °C ZA 9000-FS -30.0... +70.0 °C ZA 9000-FS -30.0...+100.0 °C ZA 9000-FS 0.0... +500.0 °C FV A915-S120 0.30... 20.00 m/s FV A915-S140 0.40... 40.00 m/s FV A915-S220 0.50... 20.00 m/s FV A915-S240 0.60... 40.00 m/s FV A915-MA1 0.10... 20.00 m/s FV A915-WM1 0.00... 5.00 m/s FD A612-M1 0.50... 40.00 m/s FD A612-M6 1.00... 90.00 m/s ZA 9602-SSS 0.50... 20.00 m/s FH A646-x 0.0... 100.0 %H FH A646-Cx 0.0... 100.0 %H FH A646-R 0.0... 100.0 %H FH A646 0.0 ... 500.0 g/kg FH A646 -25.0... 100.0 °C FH A646 0.0 ...1050.0 mbar FH A646 0.0 ... 400.0 kJ/kg ZA 9000-FS -30.00 ... +125.00 °C ZA 9000-FS 0.0 ... 100.0 %H ZA 9000-FS 0.0 ... 500.0 g/kg ZA 9000-FS -25.0 ... +100.0 °C ZA 9000-FS 0.0 ...1050.0 mbar ZA 9000-FS 0.0 ... 400.0 kJ/kg FY A641-LF 0.0 ... 20.000 mS FY A600-CO2 0.0 ... 2.500 % FY A640-O2 0 ... 260 % FY A640-O2 0 ... 40.0 mg/l Function channels Differential channels Mb1-Mb2 Maximum value of channel Mb1 Minimum value of channel Mb1 Average val. M(t) over time of Mb1 any any any any 46 ALMEMO 2390-5 Display Ohn Ohn1 FrEq PULS Inp diGi Ir 1 Ir 2 Ir 3 Ir 4 Ir 6 S120 S140 S220 S240 L420 L605 L840 L890 L920 °orH HcrH H rH H AH H dt H UP H En P Ht P RH P AH P dt P UP P En LF CO2 O2-S O2-C diFF Hi Lo A[t] Sensor programming Transducer Average val. M(n) of Mb2 to Mb1 Sum S(n) of Mb2 to Mb1 Total pulses S(t) of Mb1 Pulses / print cycle of Mb1 Alarm value of channel Mb1 Therm. coeff. M(Mb1)/M(M03) Wet bulb globe temperature Measured value of Mb1 Cold junction temperature Number of averaged val. of Mb1 Volume flow m3/h M(Mb1) * Q Temp. for Refrigerant R22 ° Temp. for Refrigerant R23 ° Temp. for Refrigerant R134 ° Temp. for Refrigerant R404 ° Temp. for Refrigerant R407 ° Temp. for Refrigerant R410 ° Temp. for Refrigerant R417 ° Temp. for Refrigerant R507 ° Sensor / connector Measuring range Units any any ZA 9909-AK2 ZA 9909-AK2 beliebig ZA 9000-FS ZA 9000-FS any any any any FDA602Lx FDA602Lx FDA602Lx FDA602Lx FDA602Lx FDA602Lx FDA602Lx FDA602Lx 0... 65000 0... 65000 W/m2K °C °C mh °C °C °C °C °C °C °C °C -90.0...+79.0 -100.0...+26.0 -75.0...+101.0 -60.0...+65.0 -50.0...+86.0 -70.0...+70.0 -50.0...+70.0 -70.0...+70.0 Display A[n] S[n] S[t] S[P] Alrn q/dt UbGt MESS CJ n(t) FLou R22 R23 R134 R404 R407 R410 R417 R507 TC = Temp. compensation, PC = pressure compensation, Mb1/Mb2 = Reference channels ++ only via special connectors with internal characteristic, others available by reuest) (see 7.7.1) ° 8 measuring ranges for refrigerants - only with device option R (Mb1 = pressure in mbar) The use of function channels to output measured values and operands using the appropriate reference channels Mb1 (normally 1st channel in connector) and Mb2 (normally M0) is described in the Manual, Section 6.3.4. Device-internal channels M3, M13, M23, M33, by way of exception, all have reference channel Mb1 = M1 (e.g. M5 = difference M1 - M0). Overview of default reference channels Mb1 (in brackets) Mb2=0 Other reference channels can be programmed via the interface Sensor connector In the device Channel 4 30(0) 31(1) 32(2) 33(3) Channel 3 20(0) 21(1) 22(2) 23(3) Channel 2 10(0) 11(1) 12(2) 13(3) Channel 1 0 1 2 3(1) M0 M1 M2 M3 Switching off, i.e. deactivating a programmed measuring channel PROG Function: RANGE ´R´ keys : , CLEAR ALMEMO 2390-5 47 Analog output The measured value is then no longer displayed, scanned, and output but the programming is retained intact. Reactivating the measuring channel: PROG PROG Function: RANGE ´R´ keys : , If the channel was previously deactivated, then it is now reactivated with all programming values intact. However, if the channel is already active, then with this key combination all its programming values are deleted (i.e. as per selecting the measuring range). 7.7.1 Special meas. ranges, linearization, multi-point calibration Thanks to the new ALMEMO special connectors with extra memory for additional data (larger EEPROM, code E4) the following tasks can now for the first time be elegantly performed : 1. Provision of special measuring ranges with internal characteristic (s. 10.3.9) 2. Linearization of signals for voltage, current, resistance, or frequency set by the user 3. Multi-point calibration of all sensors The ALMEMO 2890-9 can as standard evaluate all appropriately programmed connectors. With the special KL variant it is also possible to convert measuring signals into appropriate display values in line with a characteristic of up t 35 support values. These support points are programmed to the EEPROM in the ALMEMO connector using the AMR-Control software. During a measuring operation the measured values are interpolated between these on a linear basis. When correcting non-linear sensors (e.g. with Pt100 or thermocouple sensors) initially the original characteristics are considered; then only the deviations are interpolated on a linear basis and inserted. If a channel with a characteristic is deactivated or programmed with a different range, the characteristic is subsequently reactivated by programming the special range ´Lin ´ by means of the keyboard or command “B99”. 48 ALMEMO 2390-5 Device programming 8. ANALOG OUTPUT For the analog registration of the selected measuring point you can, to sockets A1 or A2, connect either an analog output cable ZA 1601-RK (see Manual, Section 5.1.1) without electrical isolation or a relay trigger analog adapter ZA 8000-RTA (see Manual, Section 5.1.3) with electrically isolated analog output. 8.1 Scaling It is possible to spread any partial measuring range over the standard output signal in the three possible variants 0-2 V, 0-10 V, 0 / 4-20 mA, providing it comprises at least 100 digits (e.g. 0-20 mA for -10.0 to +50.0 °C). To do so, enter, in the functions ´AS´ and ´AE´, the analog output start and the analog output end of the desired measuring range (see also Manual, Section 6.10.7). If the start value is zero, this will simply be deleted. To activate the ´AA´ and ´AE´ functions see Section 5.2. Analog output start function ´AS´ Select by the FUNCTION key Enter as per Sec. 5.4 1: - 1 0.0 AS Analog output end function ´AE´ 1: 0 5 0.0 AE Select by the FUNCTION key Enter as per Sec. 5.4 Example: Measuring range -10.0 to +50.0 °C These two parameters, “analog output start” and “analog output end”, are also saved in the sensor EEPROM and can thus be individually programmed for each channel; i.e. when channels are switched through manually each measurable variable can be individually scaled. Thanks to continuous measuring point scanning it is even possible to connect two analog outputs at the same time. The output of A2 supplies the measured value of the selected channel; the output of A1 supplies the measured value of the 1st channel of the selected sensor (see also Manual, Section 6.10.7). Adjusting the measuring channel A2 on a certain channel about the interface (see also Manual) and keyboard: M▲ 1. Adjusting the measuring channel: 2. Select function Analog output start ´AA´: 1: 2 3.4 °C 1: - 1 0.0 AA -`0´0 1 0.0 AA PROG 3. Start Programming key: M▲ 4. The measuring chan. as a Analog chan.: and holding down (appr. 1s) ALMEMO 2390-5 49 Device programming 9. DEVICE PROGRAMMING All sensor parameters are saved in the sensor connector; certain other parameters are stored in the device itself. These include the real-time clock and date, scanning cycle and output format (see Sections 6.3.2/3), device address (see Section 9.3), atmospheric pressure (see Section 6.2.5), and user interface language (see Section 5.2); they also include the device designation (see Manual, Section 6.2.4), and hysteresis (see Manual, Section 6.2.7). The last two in this list are only accessible via the interface. The baud rate is saved in the data cable (see Section 9.2). 9.1 Date and time-of-day The ALMEMO 2390-5 incorporates an integrated real-time clock with date and time-of-day for logging measuring times. This real-time clock is buffered by means of the device battery with the effect that date and time-of-day are retained even after switching off. FUNCTION TIME function ´TM´ 1 2:3 4:5 Select by pressing key: .... Program the time in the 6-character format hh:mm:ss (see Section 5.4) The clock can be set to zero by pressing the keys PROG, CLEAR. 6 TM 3 DA 0 1:0 1:0 0 DA FUNCTION DATE function ´DA´ 0 1:0 5:0 Select by pressing key: ... Program the date in the 6-character format dd:mm:yy (see Section 5.4) e.g. date 1st May 2003. The date can be cleared by pressing the keys PROG, CLEAR 9.2 Baud rate, data format Via the serial interface you can program the device and sensors or view the current programming status (see Manual, Chapter 6). You can also (as described in Sections 6.2 and 6.3) output manual and cyclic measuring operations either online or after recording (see Section 6.4) offline to a printer or computer. The various interface modules are plugged into socket A1 (3). Connection to the devices is described in the Manual, Section 5.2. Modules for networking the devices are described in Manual, Section 5.3. The baud rate for all interface modules is programmed on leaving the factory to 9600 baud. In order to avoid unnecessary problems when networking several devices together, the baud rate should not be altered; rather the computer or printer should be set to match. If this is for some reason not possible, then in the BAUD RATE function ´BR´ (for activation, see Section 5.2), using the keypad, enter the values 150, 300, 600, 1200, 2400, 4800, 9600 baud, and 57.6 or 115.2 kbaud (paying attention not to exceed the maximum baud rate for the 50 ALMEMO 2390-5 Trouble shooting interface module !). BAUD RATE function ´BR´ U n 9 6 0 0 BR Select by pressing key FUNCTION.. Example: Output to interface ´U´, in ´side-by-side´ format, 9600 baud To enter this information press thePROG key twice, then set the baud rate by means of the ▲ and ▼ keys, and then program by pressing thePROG key once more. The baud rate is saved to the EEPROM in the interface module and thus applies whenever any other ALMEMO® device is used. The procedure for setting the output format is described in Section 6.3.3. Data format : 8 data bits, 1 stop bit, no parity (settings cannot be changed) 9.3 Device address and networking All ALMEMO® devices can be networked together very easily thus enabling the user to centrally acquire and record measured values from several measuring instruments - even if these are located far apart (see Manual, Section 5.3). To communicate with networked devices it is absolutely indispensable that each device should have its own dedicated address; this is because only one device should respond per command. Before starting network operation therefore ensure that all the measuring instruments involved are assigned different device numbers. This is the purpose of the DEVICE address function ´A´. This function is selected after activation (see Section 5.2) by pressing the FUNCTION key; the device number currently set should appear; the factory default setting is usually 00. This can now be modified as desired by means of the usual data entry procedure (see Section 5.4). DEVICE address function ´A´ Select by the FUNCTION key Enter as per Sec. 5.4 0 1 A Example: address 01 In network operation consecutive numbers between 01 and 99 should be entered; this ensures that device 00 is not addressed unnecessarily in the event of interruption to the power supply. ALMEMO 2390-5 51 Electromagnetic compatibility 10. TROUBLE - SHOOTING ALMEMO 2390-5 measuring instruments can be configured and programmed in many versatile ways. These measuring instruments are suitable for connecting a wide variety of very different sensors, additional measuring instruments, alarm signaling devices, and peripheral equipment. Given these numerous possibilities the devices may in certain circumstances not behave quite as expected. The cause of such unexpected behavior is only very rarely a device defect; more usually it is incorrect operation by the user, an invalid setting, or unsuitable cabling. In such event try to pinpoint and clear the problem with the aid of the following tests : Error : Either no display or all display segments light up continuously. Remedy : Check the power supply; charge the battery; switch off and then on again; if necessary re-initialize (see 3.3) ! Error : Measured values are incorrect. Remedy : Check the channel programming very carefully (especially the base value and zero point); check the entire programming using the AMRControl software or terminal and command P15 (see Manual, Section 6.2.3) and f1 P15 (see Manual, Section 6.10.1) ! Error : Fluctuating measured values or segment test or the system hangs in mid-operation. Remedy : Check the cabling for any inadmissible electrical connections; disconnect the external power supply and the output modules; unplug any suspicious sensors and replace with hand-held sensors in air or phantoms (for thermocouples short-circuit A-B, for Pt100 sensors use 100-Ω resistor) ! If these steps succeed in clearing the error, then check all wiring, if necessary, insulate the sensors, use an electrically isolated power supply, eliminate interference by using shielded or twisted wiring ! Error : Data transmission via the interface does not function. Remedy : Check interface module, connections, and settings : Are both devices set to the same baud rate and transmission mode (see Section 9.2) ? Is the correct COM interface on the computer being addressed ? Is the printer in the ONLINE status ? Are the handshake lines DTR and DSR active ? To check the data flow and the handshake lines a small interface tester with LEDs comes in very handy; (in ready-to-operate status the data lines TXD, RXD carry negative potential of approx. -9V and the LEDs light up green, whereas the handshake lines DSR, DTR, RTS, CTS carry approx. +9V positive voltage and the LEDs light up red. For the duration of data transmission the data line LEDs must flash red) 52 ALMEMO 2390-5 Technical data Test data transmission by means of a terminal (AMR-Control, WINControl, WINDOWS-Terminal) : Address the device using its assigned device number Gxy (see Manual, Section 6.2.1), Check the programming by means of P15 (see Manual, Section 6.2.3), Test the transmit line by entering a cycle with command ´Z123456´ and check in the display. Test the receive line by pressing the MANU/PRINT key and check in the display Error : Data transmission in the network does not function. Remedy : Check to ensure that all devices are set to different addresses; address devices individually via terminal and command Gxy; addressed device is OK if at least y CR LF is returned as echo; If transmission is still not possible, unplug the networked devices; check all devices individually on the data cable to the computer (see above); check the wiring for short-circuit or crossed wires. Are all network distributors supplied with power ? Network the devices again one at a time and check successively (see above) If, after performing the above-listed checks and remedial steps, the device still fails to behave as described in the operating instructions, it must be returned to our factory in Holzkirchen, accompanied by an explanatory note, error description, and if available test printouts. With the AMR-Control software you can save and / or print out the relevant screen displays with programming or the relevant terminal operations. 11. Electromagnetic compatibility (EMC) ALMEMO® measuring instrument 2390-5 complies in full with the safety requirements specified in the EU directive on the harmonization of laws in EU member states relating to electromagnetic compatibility (EMC) (89/336/EWG). The following standards have been applied in evaluating the product : IEC 61326:1997+A1:1998+A2:2000 IEC 61000-6-1:1997 IEC 61000-4-2: 1995+A1:1998+A2:2000 8kV IEC 61000-4-3: 1995+A1:1998+A2:2000 3V/m IEC 61000-6-3:1996 IEC 61000-4-4: 1995+A1:2000 2kV The following advisory notes must be observed when operating the device : 1. If the standard sensor is extended (1.5 meters) care must be taken to ensure that the measuring lines are not laid together with high-voltage power cables or that they are properly shielded so as to prevent spurious interference from being induced in the system. 2. Using the device in strong electromagnetic fields may aggravate measuring errors (<50 µV at 3 V/m and 1.5 meters thermocouple sensor). After exposure to such irradiation ceases, the device will again operate within its technical specifications. ALMEMO 2390-5 53 Product overview Technical data (s.a. Hb. 2.2) Measuring inputs : Channels : A/D converter : Sensor power supply : Outputs : Equipment Display : Keypad : Date and time-of-day : Memory (option S): Microprocessor : Power supply : Mains adapter : Three ALMEMO® sockets for ALMEMO® flat connectors 4 channels / sensor maximum (measuring and function channels, depending on sensor type) 4 function channels in device delta - sigma, 16-bit, 2.5 / 10 meas. per second Battery : 7 to 9 V, max. 70 mA Mains adapter : approx. 12 V, max. 100 mA Two ALMEMO® sockets for all output modules 6.5-digit 7-segment, 2-digit 16-segment, 12 mm 5 keys buffered with device battery 32-KB EEPROM (3700 to 6000 measured values) M16C62 7 to 13 V DC, not electrically isolated ZB 2290-NA, 230 V AC to 12 V DC, 200 mA, electrically isolated Adapter cable, electr. isol. : ZB 2290-UK, 10-30 V DC. to 12 V DC, 250 mA Current consumption active : approx. 10 mA (without input and output modules) standby: approx. 0.02 mA (real-time clock and sleep mode) Housing 180 x 85 x 33 mm, ABS (acrylonitrile butadiene styrene) high impact resistance (maximum 70 °C) Environmental conditions : Operating temperature -10 to +60 °C Storage temperature -30 to +60 °C Ambient relative humidity : 10 to 90 % (non-condensing) Delivery includes : Measuring instrument ALMEMO® 2390-5 Operating instructions ALMEMO® 2390-5 ALMEMO® Manual AMR-Control software 54 ALMEMO 2390-5 Index Product overview Order No. Multi-function measuring instrument ALMEMO 2390-5 3 inputs, maximum 16 channels, 5 keys, cascadable interface Option S : Measured value memory 32-KB, internal or external on memory connector Option R: 8 measuring ranges for refrigerants Option L: linearization,multi-point calibration Option H : Adapter for top-hat rail mounting Accessories ALMEMO® memory connector with 128-KB EEPROM (approx. 25000 measured values) ALMEMO® memory connector with 256-KB EEPROM (approx. 50000 measured values) V24 reader for reading from the memory connectors Mains adapter, 12 V DC, 200 mA DC adapter cable, 10 to 30 V DC, 12 V / 250 mA, electrically isolated ALMEMO® analog output cable, 1.25 to 2.00 V, 0.1 mV / digit ALMEMO® V24 data cable, electr. isol., maximum 115.2 kbaud, <1 mA ALMEMO® V24 optic-fiber data cable, maximum 115.2 kbaud, <4 mA ALMEMO® data cable, Ethernet interface (10/100 base-T), electr. isol. ALMEMO® network cable, current loop, maximum 115.2 kbaud, electr. isol. ALMEMO® input / output cable for triggering and limit value alarm ALMEMO 2390-5 MA 2390-5 MA 2390-5S OA 2390-R OA 2390-L OA 2290-HS ZA 1904-SS4 ZA 1904-SS8 ZA 1409-SLG0 ZB 2290-NA ZB 2290-UK ZA 1601-RK ZA 1909-DK5 ZA 1909-DKL ZA 1945-DK ZA 1999-NK5 ZA 1000-EGK 55 Index INDEX Keyword Additional channels Analog output - start / end Atmospheric pressure compensation Averaging Averaging mode Averaging over cyclic measuring point scans Averaging over manual single measurements Averaging over several measuring points Averaging over time Base value Baud rate Changing the units Clearing the memory Cold junction compensation CONNECTING THE TRANSDUCERS Contact partners Continuous measuring point scan Control characters Correction of measured values Correction values Cross-section Cycle Cyclic averaging Cyclic scanning / saving of all measuring points Data cable Data format Data input Data output Date Date and time-of-day Decimal point setting Device address DEVICE programming Device-internal channels Diameter Differential measurement DISPLAY Displaying a measuring point Double display Electromagnetic compatibility (EMC) 56 ALMEMO 2390-5 Section 4.2 8.1 6.2.5 6.4 6.4.2 6.4.6 6.4.4 6.4.7 6.4.3 7.5 9.2 7.6 6.5.3 6.2.4 4 6 5.1 6.2 7.4 6.4.5 6.3.2 6.4.6 6.3.2 9 9.2 5.4 6.3.4 9.1 9.1 7.5 9.3 9 4.2 6.4.5 6.1.2 5.1 6.1 5.01 11 Page 15 48 28 32 32 36 34 37 33 43 49 44 39 27 15 58 23 18 24 42 35 29 36 29 49 49 22 22 49 49 43 50 49 15 35 44 17 22 17 52 Index Keyword Element flags Exponent External voltage supply Factor Final value adjustment of force transducers Function abbreviations Function activation Function display Function keys Function printouts Function selection Functions Gain adjustment Gain correction Hysteresis INTRODUCTION KEYPAD Language setting Limit values Locking, sensor programming Mains operation Maximum and minimum value memories Measured value data memory Measured value output Measured value recording Measured value recording, end date and time-of-day Measured value recording, start date and time-of-day Measuring inputs MEASURING OPERATIONS Measuring point numbering Measuring point scans and output Measuring point selection Memory capacity Memory connector Memory output Multiplexer Networking Number of averaged values Once-only output / saving of all measuring points Operating controls Output format ALMEMO 2390-5 Section 7.2 7.5 3.2 7.5 6.2.3 1.2, 5.2 5.2 5.1, 5.2 1.2, 5.3 6.3.4 5.2 1.1 6.2.2 7.4 9 1 5.3 5.2 7.3 7.2 3.2 06.01.03 6.5 6.5.3 6.5.2 6.5.2 6.6.2 4.2 6 4.2 6.3 6.1.1 6.5 6.5.1 6.5.3 7.2 9.3 6.4.3 6.3.1 1.2 6.3.3 Page 42 43 13 43 26 10, 19 19 19 10, 21 31 19 4 26 42 49 4 21 20 42 41 13 24 37 39 38 38 38 15 23 15 23 22 37 37 39 42 50 34 23 9 30 57 Appendix Keyword Output function POWER SUPPLY Print cycle factor Product overview PUTTING INTO SERVICE Rechargeable battery operation : Reference channels Reinitialization Representatives Reset Retaining stored data Saving all measuring points, cyclic Saving all measuring points, manually, once-only Scaling, analog output Scaling, measured value Selecting the input channel Selecting the measuring point Selecting the measuring range Sensor adjustment SENSOR PROGRAMMING Sensor supply voltage Service address Setpoint entry Setting the measured value to zero Sleep mode Sliding average Smoothing of measured values Smoothing, measured value Start and stop a measuring operation Supply voltage monitoring Switching ON / OFF Table of contents Technical data Temperature compensation Transducers Trouble-shooting Volume flow measurement Zero-point adjustment Zero-point correction 58 ALMEMO 2390-5 Section 7.2 3 6.4.6 2 3.1 4.2, 7.7 3.3 3.3 3.3 6.3.2 6.3.1 8.1 7.5 7.1 6.1.1 7.7 6.2.2 7 3.4 6.2.3 6.2.1 6.5.4 6.4.1 6.4.1 6.4.1 6.3.2, 6.5.3 3.1 3.3 6.2.6 4.1 10 6.4.5 6.2.2 7.4 Page 42 12 36 54 11 48 16, 47 14 58 14 14 29 29 48 48 41 23 44 25 41 14 58 26 26 40 32 32 32 29, 39 12 14 4 53 28 15 51 35 25 42 Appendix Your contact partners ALMEMO 2390-5 59 Appendix 60 ALMEMO 2390-5