1
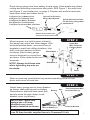
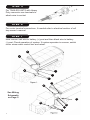
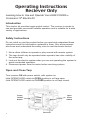
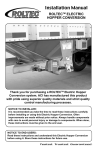
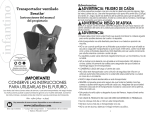
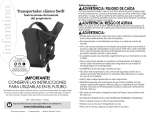
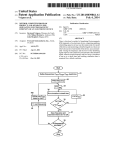
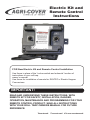
Electric Kit and
Remote Control
Instructions
FOR New Electric Kit and Remote Control Installation
Use these in place of the “rocker switch and solenoid “section of
instructions in your roll tarp
owner’s manual.
Use these for installation of remote for ROLTECTM Electric Hopper
Conversions.
IMPORTANT!
READ AND UNDERSTAND THESE INSTRUCTIONS, WITH
REMOTE KIT FOR SAFETY, INSTALLATION, DANGER,
OPERATION, MAINTENANCE AND PROGRAMMING FOR YOUR
REMOTE CONTROL PRODUCT. SAVE ALL INSTRUCTIONS
WITH YOUR ROLL TARP OWNERS MANUAL FOR FUTURE
REFERENCE.
Tested. Trusted. Guaranteed.
50 amp
Breaker
Dielectric
Grease
Packet
Control Box
Rubber
Boots
Heat Shrink
Remote
(wireless kit
only)
Terminals
Bolts, Washers
and Nuts
Parts Diagram
Parts included: The above diagram shows only parts that are included in the
Command-10® electric kit. All other parts shown in the following instructions
would be found in a new electric kit or would be already installed on an
existing electric system.
Wiring Instructions
STEP 1
Note: There is ample heavy gauge wire supplied with each kit for
standard installs. Before cutting wire, always preplan wire routing and
make necessary adjustments as needed.
Note: Use dielectric grease (packet included) at all electrical
connections throughout installation.
2
Route heavy gauge wire from battery to tarp motor. Allow ample wire where
cutting and mounting connections take place. SEE Figure 1, box with hoist
and Figure 2, semi-trailer box, on page 4. Prepare wire ends for terminals,
heat shrink tubes and rubber boots.
1/2 Eyelet For (+) Battery Post
3/8 Eyelet For (-) Battery Post
5/16 Eyelet For Motor Terminals
#10 Eyelet For Circuit Breaker
1/4 Eyelet For Control Box Terminals
Typical For All Heavy
Gauge Wire Eyelets
Typical Heat Shrink Tube
For All Heavy Gauge Wire
Connections
Rubber Terminal Boots For
Control Box Connections Only
STEP 2
Mount receiver to a rigid location at least 4
feet away from motor and other danger. With
terminals pointed down, use control box as
template to mark hole drilling locations. Use
bolts, nuts and washers to finish
Black Motor 1
mounting. Attach heavy gauge
wires to terminals on control box
as shown. Slide rubber boots over
terminals.
NOTE: Always hold base nuts
when tightening top nuts on
terminals.
Install Box
With Terminals
Pointing Down.
Black –
Red Motor 2
Red +
STEP 3
When on new tarp install attach tarp caution/operating decal to front
driver side corner of truck box.
Attach heavy gauge wire to circuit breaker
as shown near positive post on battery.
Remember to seal with heat shrink first
and slip wires through rubber circuit
breaker cover (not shown).
IMPORTANT: Make sure
system has a 50 amp
modified reset circuit
breaker installed as shown.
STEP 4
Battery
This Red Striped
Wire to Battery (+)
Aux.
This Red Striped Wire
to Control Box (+)
Circuit Breaker
NOTE: If kit came pre-wired with 40 Amp breaker, remove it and
use 50 Amp breaker supplied loose in Command-10® kit.
3
STEP 5
For TRAILER UNITS with Heavy
Duty connector use terminals to
attach wire to socket.
STEP 6
For motor terminal connections, if needed refer to electrical section of roll
tarp owner’s manual.
STEP 7
Now connect red wire to battery (+) post and then black wire to battery
(-) post. Check operation of system. If system operates in reverse, switch
motor wires under control box and retest.
6
1
4
3
2
7
6
1
See Wiring
Schematic
on Page 5
3
4
2
5
7
4
(M1)
DUAL POLE CONNECTOR
(USED IN SOME APPLICATIONS)
HEAVY GAGE WIRE
(M2)
Note: Use dielectric grease
(packet included) at all
ellectrical connections.
NOTE: This electric system requires a 50 amp modified reset circuit
breaker. If breaker trips and does not reset, it may have detected a
continuous short and will not reset until short is repaired. Disconnect
battery and repair short. The Receiver is also fitted with an internal
breaker designed to trip first. If this breaker trips the system will not
perform the same direction until the system has been reversed.
If installing this electric system on an existing unit, make sure there is a
circuit breaker installed and that it is operating properly. If breaker is missing
or malfunctioning, replace it with a correct new one. (50 amp modified reset
circuit breaker)
5
Operating Instructions
Reciever Only
Learning How to Use and Operate Your AGRI-COVERTM
Command-10® Electric Kit
Introduction
This electric kit provides toggle switch control. The reciever is simple to
use and provides convenient reliable operation and is suitable for a wide
variety of applications.
Safety Instructions
Do not install or use this product before you read and understand these
instructions and the information contained in them. Only allow persons
who know and understand the safety rules to use this remote control.
1. Never allow children to operate or play around with remote system.
2. The tarp should only be operated when operator has clear visibility of
the entire tarp.
3. Lock-out the electric system when you are not operating the system to
avoid unintended operation.
4. Disconnect power from the motor before servicing system.
Open and Close Tarp
Turn receiver ON with power switch, with system on:
Hold OPEN/CLOSE switch to OPEN position to roll tarp open.
Hold OPEN/CLOSE switch to CLOSED position to roll tarp closed.
Open
Close
Switch
Power
On/Off
Switch
6
Receiver
Instructions beyond this point
for Command-10 Wireless
Remote ONLY
7
8
Operating Instructions
Wireless Remote Only
Learning How to Use and Operate Your AGRI-COVERTM
Command-10® Wireless Remote
Introduction
This wireless controller provides push-button wireless control. The remote
is simple to use and provides convenient reliable operation and is suitable
for a wide variety of applications.
Safety Instructions
Do not install or use this product before you read and understand these
instructions and the information contained in them. Only allow persons
who know and understand the safety rules to use this remote control.
1. Never allow children to operate or play around with remote system.
2. The tarp should only be operated when operator has clear visibility of
the entire tarp.
3. Lock-out the wireless remote when you are not operating the system to
avoid unintended operation.
4. Disconnect power from the motor before servicing system.
9
Pre-Programmed Mode for Wireless
Systems Only
(how to use Remote’s pre-programmed mode to open and close tarp)
Your electric system can be operated wirelessly by the Remote. The Remote
is designed to provide safe and easy operation of the system and features an
auto-lock mode to help prevent unintended operation.
To Unlock and Lock Remote
The Remote will unlock automatically when lid is opened. Pre-programmed
Remote indicator light will slow flash green and the last channel used will be
a steady red light. To lock Remote close Lid. The Remote will turn itself off if
the lid is left open without any activity for 3 minutes.
Indicator
Light
Figure 3 – Remote Locked
Figure 4 – Remote Unlocked
STEP 2
Open and Close Tarp
Your system has been pre-programmed to operate the tarp in
Mode 1 which is indicated by the word “TARP” on the remote.
Press and hold the “OPEN” button to roll tarp open.
Press and hold the “CLOSED” button to roll tarp closed.
Note: Once installation is completed,
always verify your systems operation
before putting it to use to ensure that:
1. The remote’s selected mode
operates the intended motor.
2. When pushing the OPEN or
CLOSED button, it performs
the intended function.
10
Open
Button
Close
Button
Figure 5 – Operating Remote
Programming a Remote Control to
a Receiver
Your Remote and Receiver will come pre-programmed to each other.
If they are not, follow the procedure below.
STEP 1
Clear Receiver
Power on receiver. Press and hold the Programming button until the
indicator light turns steady green. Power off Receiver.
Indicator
Light
Open
Close
Switch
Power
On/Off
Switch
Programming
Button
Figure 6 – Receiver
STEP 2
Create Primary Remote
Clear Remote - open cover to unlock remote. Push and hold Select button
then push and hold Programming button while Select button is still being
held. Hold both buttons until indicator light flashes red. Release both buttons.
Press CLOSE button. Indicator light will fast flash red then turn steady
green. Close Lid to power down and lock remote. Remote is now cleared.
Open cover to unlock remote. Push and hold Select button then
push and hold Programming button
Indicator
while Select button is still being held.
Light
Hold both buttons until indicator light
flashes red. Release both buttons. Open Button
Press OPEN button. Indicator
Select
light will slow flash green.
Button
Primary Remote has been
Programming
created. Close lid to power
Button
down and lock remote.
Figure 7 – Remote
11
STEP 3
Program Primary Remote to Receiver
Power on both receiver and remote. On remote tap Programming button
once, indicator light will flash fast green. On receiver, press and hold
Programming button until both remote and receiver slow flash green at
the same rate. Remote and Receiver are now programmed. By default the
Remote will be programmed to the tarp setting.
Optional Instructions to Enable
and Program Additional Modes on
Remote Control
(adding additional Receiver)
STEP 1
Clear Additional Receiver
a. b.
c. Power on Receiver.
Press and hold the Programming button until the indicator light turns
steady green.
Power off Receiver.
STEP 2
Program Primary Remote to Additional Receiver
NOTE: Be sure that only the Remote that you are working with is
powered up.
a. Power on both Additional Receiver and Primary Remote
b. On Remote tap Program button once, indicator light will flash fast green.
c. Use the Select button to select one of the 10 programmable locations.
d. On Additional Receiver, press and hold Programming button until both
Remote and Additional Receiver slow flash green at the same rate.
e. Remote and Additional Receiver are now programmed.
Caution: If TARP function is selected the previous receiver will be
overwritten.
12
Optional Instructions to Program
Auxiliary Remotes
STEP 1
Create a Auxiliary Remote
Open cover to unlock remote. Push and hold Select button then push and
hold Programming button while Select button is still being held. Hold both
buttons until indicator light flashes red. Release both buttons. Press CLOSE
button. Indicator light will fast flash red, then be steady green. Auxiliary
Remote has been created. Close lid to power down and lock remote.
STEP 2
Sync Primary and Auxiliary Remotes
Place both remotes next to each other and open lids on both remotes.
Primary Remote will flash slow green, Auxiliary Remote will flash fast red
then switch to steady green. On Primary Remote tap Programming button.
On Auxiliary Remote press and hold Programming button until indicator
light flashes fast green. Release Programming button on Auxiliary Remote.
Indicator light will flash slow green and programed modes will be steady red.
Auxiliary Remote is now programmed to same functions as Primary Remote.
NOTE: Multiple remotes can be synced to the Primary Remote, but the
Primary Remote must be used to create all new remotes.
STEP 3
Automatically Update Previously Synced Transmitters
Once synced with the Primary Remotes, Auxiliary Remotes can automatically
be updated if there are any changes to the Primary Remote. Place both
remotes next to each other and open lids on both remotes. After 5 seconds
the Auxiliary Remote will be updated to all functions of the Primary Remote.
13
Battery Replacement
Your wireless remote is powered by two AAA 1.5V Alkaline Batteries. If
remote becomes unresponsive or if low battery indicator is flashing replace
batteries.
To change batteries, remove the battery cover exposing two batteries.
Replace both batteries with two of same brand and size. Reassemble battery
cover. Note: Use only new 1.5V AAA alkaline batteries. Since rechargeable
batteries run at 1.2-1.25V the system might mistakenly identify rechargeable
batteries as a low battery and might not work properly. Rechargeable
batteries are not recommended.
NOTE: Remote may need
to be reprogrammed after
batteries are changed.
Low Battery
Indicator
Figure 8 – Remote
AAA Alkaline
Batteries
Battery
Cover
Remote
14
Figure 9 – Changing Batteries
General Trouble Shooting
1. If system has a master control switch, make sure it is turned to “ON” position.
2. Check all of the wiring components:
a. Check (+) and (-) wire connections on Vehicle Battery.
b. Check all wiring connections retighten and re-crimp if loose, replace if corroded.
c. Check all wire for worn or bare spots.
3. Check Power Sources:
a. Check vehicle battery, charge or replace if required.
b. Check remote batteries replace with quality high capacity batteries, make sure batteries are loaded correctly in the remote and the terminals are clean.
4. Check for Physical damage to any equipment.
a. Repair or replace if required.
5. If system operates with toggle switch but not with remote (remote not communicating with receiver)
a. Make sure remote is set to the correct mode. If remote cannot be set to correct mode, reprogramming is needed, refer to reprogramming portion of this manual.
15
Trouble Shooting Receiver (Assuming Remote is working properly)
Problem Issue:
Check or Try...
1. System will not operate with
remote or toggle switch.
(Cannot hear a clicking noise
from receiver inside control
box.)
a. If system has a master control
switch, make sure it is turn to
“ON” position.
b. Verify correct wiring of system.
See wire schematic Page 5.
c.
2.
16
System will not operate
with remote or toggle switch.
(Can hear a clicking noise
from inside receiver control
box – but nothing happens.)
Auto circuit breaker may have
tripped. Wait several minutes
and try again. If it still does
not work circuit breaker may have
detected a continuous short and
short must be repaired. (Refer to
troubleshooting sequence on
Page 12.)
a. Verify there is a least 12 volts coming into receiver on battery hookup posts.
b.
Verify there is at least 12 volts
coming out of motor terminals
on box while on/off switch is
being activated. If there are 12
volts coming into receiver and not
12 volts coming out problems
may be in receiver.
c.
Verify there is at least 12 volts
at terminals on motor (use
caution around moving parts). If
there is 12 volts at the motor
and the motor still doesn’t turn,
the problem may be in the motor.
If there are 12 volts coming out
of receiver and not 12 volts going
into motor problem may be in
wire between receiver and motor.
Trouble Shooting Remote (Assuming Receiver is working properly)
Problem Issue:
Check or Try...
3. Remote transmitter doesn’t
work. None of the lights turn
on when remote is turned on.
a.
4.
a. Make sure remote is set to
correct mode. If remote cannot be
set to correct mode,
reprogramming is needed
(see reprogramming portion of
instructions.)
Remote transmitter doesn’t
work, batteries are good and transmitter lights are working. System operates with toggle switch but not with (remote not communicating with receiver.)
b.
Check remote for dead batteries,
if batteries are dead replace with
new quality high capacity
batteries. Make sure batteries
are loaded correctly in remote
and terminals are clean. If
replacing batteries does not work,
problem may be in remote.
Be sure to be within several feet
of receiver and try again. If
remote transmitter works at
short range by not long range,
replace batteries. If that doesn’t
work problem may be in remote.
17
Trouble Shooting System
Problem Issue:
Check or Try...
5.
The remote and toggle
switch will operate the motor,
but tarp motor turns freely
and tarp won’t move.
a.
Check pin connections in shaft
between motor and tarp tube. If
missing, replace sheared bolt or
pin with new clevis pin.
b. Check tarp system for damaged
or misaligned parts and correct
as needed.
c. Make sure tarp is free from
obstruction.
6.
18
System will not operate with
toggle switch or with remote
transmitter (both working
properly). Motor engages but
stalls and system does not turn.
a. Check conditions and alignment
of system, ensure no broken
components or obstructions.
Refer to system’s owner’s
manual.
Agri-Cover, Inc.
Customer Service Dept. 3000 Hwy. 281 SE, PO Box 508 Jamestown, ND 58402
701-251-1427 • 8:00 a.m. - 5:00 p.m., Central Time
Monday through Friday, except holidays.
Part No. 80500_E
© 2015 AGRI-COVER, INC. ALL RIGHTS RESERVED
031815