1
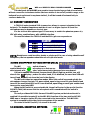
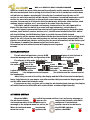
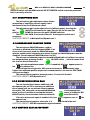
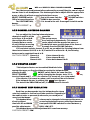
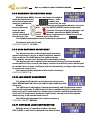
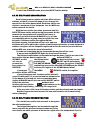
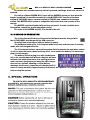
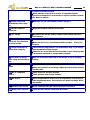
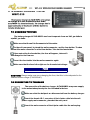
WBP-212 WIRELESS DUAL CHANNEL MANAGER BELTPACK WB-200 SERIES WIRELESS INTERCOM SYSTEM OWNERS MANUAL ISSUE 29J10 WBP-212 WIRELESS DUAL CHANNEL MANAGER 2 AUDIO ELECTRONICS DESIGN EQUIPOS EUROPEOS ELECTRÓNICOS, S.A.L Avda. de la Industria, 50. 28760 TRES CANTOS-MADRID (SPAIN). 34-91-761 65 80 34-91-804 43 58 www.altairaudio.com [email protected] WBP-212 WIRELESS DUAL CHANNEL MANAGER 3 1. INTRODUCTION.......................................................................................................3 2. SWITCHES, CONTROLS, ADJUSTMENTS AND CONNECTORS................................4 2.1 UPPER PANEL................................................................................................................4 2.2 FRONT PANEL................................................................................................................4 2.3 REAR PANEL..................................................................................................................4 3. OPERATION..............................................................................................................5 3.1 HEADSET CONNECTION................................................................................................5 3.2 MIC ON/OFF/PUSH TO TALK SWITCH (TALK)................................................................6 3.3 CHANNEL SELECTION SWITCHES.................................................................................6 3.4 STAGE ANOUNCE (SA) KEY...........................................................................................6 3.5 CALL SWITCH.................................................................................................................7 3.6 OLED DISPLAY...............................................................................................................7 3.7 MENU SWITCH...............................................................................................................8 3.7.1 MICROPHONE GAIN................................................................................................8 3.7.2 MICROPHONE PHANTOM POWER...........................................................................8 3.7.3 MICROPHONE EXTRA GAIN....................................................................................8 3.7.4 SIDETONE GAIN ADJUSTMENT..............................................................................9 3.7.5 CHANNEL LISTENING BALANCE............................................................................9 3.7.6 VIBRATOR ON/OFF..................................................................................................9 3.7.7 HEADSET BEEP REGULATION................................................................................9 3.7.8 CHANGING THE BELTPACK NAME.......................................................................10 3.7.9 OLED CONTRAST ADJUSTMENT..........................................................................10 3.7.10 LED BRIGHT ADJUSTMENT................................................................................10 3.7.11 KEYBOARD LOCK CONFIGURATION...................................................................10 3.7.12 KEYBOARD LOCK...............................................................................................11 3.7.13 TWIN MODE.........................................................................................................11 3.7.14 STAND BY MODE.................................................................................................11 3.7.15 BELTPACK REGISTRATION................................................................................11 3.7.16 BELTPACK DEREGISTRATION............................................................................12 3.8 ON/OFF SWITCH...........................................................................................................12 3.9 VOLUME UP/DOWN SWITCHES....................................................................................13 3.10 SELECT SWITCH........................................................................................................13 3.11 USB DC-IN CONNECTOR............................................................................................13 4. SPECIAL OPERATIONS .........................................................................................14 4.1 AUXILIARY BATTERY...................................................................................................14 4.2 RESET BUTTON............................................................................................................14 5. SPECIAL RECOMMENDATIONS.............................................................................14 6. TROUBLESHOOTING GUIDE..................................................................................15 7. BATTERY CHARGER ALTAIR WBPC-210...............................................................16 7.1 CHANGING THE FUSE..................................................................................................16 7.2 CONNECTING TO THE MAINS......................................................................................16 7.3 BELTPACK BATTERY CHARGE....................................................................................17 8. TECHNICAL SPECIFICATIONS...............................................................................18 9. WARRANTY ..........................................................................................................19 WBP-212 WIRELESS DUAL CHANNEL MANAGER 4 1. INTRODUCTION Congratulations on your purchase of the ALTAIR single channel wireless beltpack WBP-212 of the WB-200 series wireless intercom system. There are a lot the characteristics that make of the ALTAIR WB-200 series one of the most highlighted in the audio professional market, some are enumerated here: Dual channel Manager beltpack allowing simultaneous or private conversation with 2 different wireless or wired intercom channels. Stage Announce (SA) function, allowing direct messages to the PA system. Dual pre-amble diversity antenna system detects and selects the higher radio signal ensuring better coverage and minimum dropouts. Digital encryption process allows high security conversations. Beltpack uses internal antennas for a more comfortable belt fitting. As a battery dependent device, special care has been taken as battery status indication, low consumption “call receive” mode and general low power circuitry. Out of range indication, helps the user to understand radio coverage and anticipate to possible communication failures. More than 15 HOURS battery life in full duplex. Secondary battery (AA alkaline), provides extra time: 4-6 hours. Before beginning operation it is important to read this manual. This manual will help you to install and use your new beltpack. It is very important to read it carefully, mainly the paragraphs marked as NOTE, PRECAUTION and DANGER, for your security. Save the original packing, you can re-use it to transport the unit. NEVER SHIP THE ALTAIR WBP-212 WITHOUT ITS ADDECUATE PACKAGE. WBP-212 WIRELESS DUAL CHANNEL MANAGER 2. SWITCHES, CONTROLS, ADJUSTMENTS AND CONNECTORS Switches, controls, adjustments and connectors that you can find in your ALTAIR intercom beltpack. The description and explanation of each one will be found in the corresponding section. 2.1 UPPER PANEL - MIC SWITCH. - CHANNEL SELECT / STAGE ANOUNCE SWITCH 2.2 FRONT PANEL - CALL SWITCH. - OLED DISPLAY. - MENU SWITCH. - SELECT SWITCH. - ON/OFF SWITCH. - VOLUME UP/DOWN SWITCHES. 5 WBP-212 WIRELESS DUAL CHANNEL MANAGER 6 - USB BATTERY CHARGER CONNECTOR. - HEADSET CONNECTOR. - HEADSET CONNECTOR. 3. OPERATION The WB-200 series intercom system are designed to allow maximum easy communications operation between the different control areas in music or theatre live performances, television, cinema, conference halls, and whatever broad events where multiple and fast communications are required, by means of its simultaneous listeningspeaking operation system. The Dual Channel Manager Beltpack WBP-212 unit was designed for intensive use in portable applications. An unbreakable plastic belt clip enables easy and secure suitability. Call signalling is Triple, visual, audible and with a vibration for improving adaptability. The unit can be configured for dynamic or electret microphones enabling the use of different types of headsets and hands-free earpieces in the market. This beltpack is designed for operation under the new Altair WBS-202 dual channel base station in order to obtain full operation functionalities. A maximum number of 1 WBP-212 unit per Radio 1 and another unit per Radio 2 is allowed. New performances are incorporated to ease the use in stress conditions: Headset connector by standard size XLR-4 for a higher durability and compatibility, long life Li-Ion battery, secondary battery supply for emergency uncharged main batteries, keyboard lock to prevent inadvertent operations, bigger illuminated switch buttons, and many others. Internal preset configurations, battery remaining time, coverage and another information is provided by a helpfull colour screen. General keyboard operation is enabled by direct keystrokes in both upper and front panels. Other general specifications are maintained over the classic WBP-200/202 beltpacks: internal dual diversity antennas, high listening level, number of beltpacks per base station, coverage, etc. This new beltpacks can be combined with the classic size WBP200/202 on the same installation. In order to begin to use its new beltpack ALTAIR WBP-212, turn on the base station on which the beltpack is registered (if it is not registered to any base, goes to the registry section). Once turn on the base station, push and hold the on/off switch of the beltpack for two seconds. All the beltpack leds light on and last a little while it will sound the buzzer (if buzzer is turn on) and will vibrate (if the vibrator is turn on), indicating that it is operative. If the base on which it is registered finds within its range, the led of the ON/OFF switch will begin to blink, the range indicator placed at the upper left corner of the OLED display will begin to blink and the audio will be opened. At this moment you can begin to use your beltpack ALTAIR WBP-212. WBP-212 WIRELESS DUAL CHANNEL MANAGER 7 If the beltpack ALTAIR WBP-212 remains turned on during a period of ten minutes without connection to the base station (the base station is turned off, outside range, or the beltpack is not registered to any base station), it will be turned off automatically to conserve batteries. 3.1 HEADSET CONNECTION A TINY Q-G and a standard XLR-4 connectors allows to connect a headset to the beltpack. The headset impedance must be of 200 or higher (up to 2 K) and the microphone may be dynamic or electret type. For the electret microphone type it is necessary to enable the phantom power of 9 VDC with a key combination or with a MENU selection. The next list shows the TINY Q-G and the XLR-4 pins correspondence: PIN PIN PIN PIN 1 2 3 4 HEADSET 0 V (MICROPHONE) SIGNAL (MICROPHONE) 0 V (HEADPHONES) SIGNAL (HEADPHONES) NOTE: Headphones could be with a double or single muff. In case of using a double muff headphone, the two speakers should be wired in parallel mode. 3.2 MIC ON/OFF/PUSH TO TALK SWITCH (TALK) The MIC switch allows to enable/disable the microphone, so that we are able to speak with other units connected to the same intercom channel. If the microphone is activated, its associated LED will light up and this icon, will show in the display: ,and on the other hand, if it is disabled, its associated LED will turn off and will not show the icon in the display. The MIC switch has two operation modes. When this switch is pressed quickly the microphone changes its state, if it was enabled, upon being pressed it gets disabled and turns off the associated LED, and if it was disabled, upon being pressed gets enabled and turns on the associated LED. When the MIC switch is pressed and held, the unit will enter in the special function PUSH TO TALK, this means that the microphone will be enabled until the switch is released. The unit provides a MIC-KILL (turns off the MIC) system, so that when the mic is enabled it is possible to muted it by the MIC-KILL function of the base station ALTAIR WBP-200 or a master station EF-200, connected to the base station. This MIC-KILL system is compatible with other intercom systems of the market. The state of the MIC (on/off), it is stored in the unit. 3.3 CHANNEL SELECTION SWITCHES WBP-212 WIRELESS DUAL CHANNEL MANAGER 8 The main function of this switch is to select the operation channel you want to communicate. Selected channel is indicated on the indicator lamps A/B and the OLED Display: . Pressing this switch, if it was selected, deselected and vice versa, with the condition that should always be selected a channel (A or B, or both at the same time), so if you only have selected A and press A, not deselect as always should be selected at least one channel. Channel selection affects the beltpack functions as described: MIC: The beltpack mic signal is feed to the selected channel indicated by the lamps. You can adjust your mic level by menu or by pressing the mic switch and change its gain with the up-down arrows. listening channel depends also of the selected channel indicated LISTENING The by the lamps and by the OLED display: . By selecting AB, you can listen both channels simultaneously. A balance listening between channels is allowed in each of the 3 possible selections A, AB and B. By using this balance, you can listening the opposite channel at a small, say 20 % level, helping management of both channel crews at a time. CALL The sending Call channel is the indicated on the lamps and in the OLED display. When AB is selected, a Call is sent to both channels. The receiving channel Call is also shown on the AB lamps by flashing accordingly. As the selected channel is obviously not automated, you must go to that channel if you are in the opposite channel in order to communicate with him. 3.4 STAGE ANOUNCE (SA) KEY With this function, you can send a message to the PA (Public Address) system from your beltpack at any time. Press and hold the Channel Select switch and when the AB lamps flashes (wait 2 seconds), start your message from the headset microphone. When done, release the switch. On the WBS-202 base station, the front panel SA led will glow for the time you are depressing this switch and the message is carried out from the SA output to the external PA equipment. This function is very useful for timing events, fire alarms, or general announces. Intercom mic signal is not interrupted in this mode and remains in the selected channel. 3.5 CALL SWITCH switch is signal is and to which it station. The call signal makes the LED associated with the switch to start blinking; the OLED display WBP-212 WIRELESS DUAL CHANNEL MANAGER 9 lights in red with the word CALL showed intermittently and the number associated with the wireless beltpack that is calling at this time (if the call is from the base station does not indicate any number associated); if the vibrator is enabled (see vibrator on/off section for more information) will be vibrate; if the buzzer is enabled (see buzzer on/off section for more information) an intermittent sound takes place during about three seconds, the same as in all the units (wireless beltpacks, beltpacks, base stations, desk stations, master stations, etc.), connected to the same intercom channel. If the CALL switch is pressed continuously, the duration of the call signal will be higher (the time that the switch is pressed, and approximately 3 seconds more). If a call signal is generated in an external unit (wireless beltpacks, beltpacks, base stations, desk stations, master stations, etc.), the LED associated with the CALL switch will start blinking, the OLED display lights in red with the word CALL showed intermittently and the number associated with the wireless beltpack that is calling at this time (if the call is from the base station does not indicate any number associated), if the vibrator is enabled (see vibrator on/off section for more information) will be vibrate, and if the buzzer is enabled (see buzzer on/off section for more information) an intermittent sound will take place during about three seconds. 3.6 OLED DISPLAY The wireless beltpack has a colour OLED display of 96x64 pixels to show the messages and the configuration of the unit at a glance. The display, in idle mode, indicating the base station coverage , the time that the beltpack remain on , the battery level of the trunk , if it is on the microphone , phantom power , microphone extra gain , buzzer , the registration number of the beltpack , the name of the beltpack , the beltpack selected channel , the vibrator and the volume level of the headphones . After thirty seconds of inactivity, the display and the LEDs of the wireless beltpack, lower its brightness to save power, and after another thirty seconds the display goes off and the LEDs down light intensity again. If you press any key, receive a call or plug the wireless beltpack charger, the display will switch back on and the LEDs will return to their scheduled light intensity. 3.7 MENU SWITCH When the MENU switch is pressed and there isn't active any message on the wireless beltpack, appears the menu of the beltpack, with which various parameters of the beltpack can be configured. If any beltpack message or the beltpack menu are active, the system return to normal mode. When the beltpack menu is activated, the VOLUME switches move the cursor up/down the options, the MENU WBP-212 WIRELESS DUAL CHANNEL MANAGER 10 (ESCAPE) switch exit the MENU and the SELECT (ENTER) switch access the parameter that is currently selected. 3.7.1 MICROPHONE GAIN The microphone gain adjustment menu allows attenuating or amplifying the mic signal, from 1 (minimum value) to 16 (maximum value). The microphone gain can be adjust directly (without menu), pressing the MIC ON/OFF switch and at the same time the UP (to increase the gain) or DOWN (to decrease the gain) VOLUME switches. The MIC GAIN, it is stored in the unit. Press again to switch on if necessary. FACTORY PRESET: to MAX position (Dynamic mic.) 3.7.2 MICROPHONE PHANTOM POWER The microphone PHANTOM power could be activated or disabled with the beltpack MENU. If an electret microphone is used, the PHANTOM power must be enabled and if a dynamic microphone is used, the PHANTOM power must be disabled. The microphone PHANTOM power is 9 VDC. The microphone phantom power can be enable/disable directly without accessing the beltpack menu, pressing the MIC ON /OFF switch , and at the same time the channel A selection switch . If the microphone phantom power is enabled, this icon: appears near to the microphone icon . When using electret type mics, MIC level must be set to around 5 steps higher than minimum position as general recommendation. Set also the SIDE TONE setting accordingly. The state of the microphone phantom power, it is stored in the unit. FACTORY PRESET: OFF (Dynamic mic.) 3.7.3 MICROPHONE EXTRA GAIN The wireless beltpack has an additional 6 dB microphone gain, so if it is necessary an additional micro-phone gain, we can activate the microphone extra gain. This extra gain can be enabled/disabled via the appropriate menu, or directly without accessing the beltpack menu, pressing the MIC ON/OFF switch, and at the same time the channel B selection switch . If the microphone extra gain is enabled, this icon: appears near to the microphone icon . The state of the microphone extra gain, it is stored in the unit. FACTORY PRESET: OFF (Microphone extra gain disabled). 3.7.4 SIDETONE GAIN ADJUSTMENT 11 WBP-212 WIRELESS DUAL CHANNEL MANAGER The sidetone gain adjustment allows attenuating or amplifying the own mic signal that we listen in our headphones. The sidetone gain can be adjust with the appropriate menu, or directly without accessing the beltpack menu, pressing the SELECT (BUZZER) switch and at the same time the VOLUME switches (UP to increase the gain or DOWN to decrease the gain). The SIDETONE GAIN, it is stored in the unit. Press again to switch on the buzzer. FACTORY PRESET: 7. 3.7.5 CHANNEL LISTENING BALANCE You can adjust the listening balance between channels A and B in all the 3 possible selections, A, B and A+B. The system saves the configuration of the three settings independently. This channel listening balance can be can be adjust with the appropriate menu, or directly without accessing the beltpack menu, pressing one of the channel selection switches and at the same time the VOLUME switches. If it is selected a single channel (A or B), we can adjust the listening balance from the selected channel (A or B) to A + B, if instead it is selected A + B, the listening balance can be regulated from A to B. FACTORY PRESET: Channel A: Listen channel A only. Channel B: Listen channel B only. Channel A+B: Listen both channels A+B. 3.7.6 VIBRATOR ON/OFF This beltpack vibrator can be enabled/disabled via the appropriate menu, or directly without accessing the beltpack menu, pressing the MIC ON/OFF switch, and at the same time the SELECT (BUZZER) switch (changing the vibrator state, if it is turn to off mode and if the vibrator it is turned off, turn to on mode). If the vibrator it is turned on, when a call is received, the unit vibrates. If the beltpack vibrator is enabled, this icon: appears. The state of the VIBRATOR (on/off), it is stored in the unit. on, 3.7.7 HEADSET BEEP REGULATION Each time you depressed a key, the beltpack emits a beep onto the headsets to confirm keystroke operation. Depending of the ambient noise or personal preferences you can adjust or cancel out that beeps. This headset beep volume can be changed via the appropriate menu, or directly without accessing the beltpack menu, pressing at the same time both UP and DOWN front panel VOLUME switches to select between 3 possible adjustments: HIGH, LOW, OFF. This headset beep volume adjustment will remain on memory. FACTORY PRESET: LOW WBP-212 WIRELESS DUAL CHANNEL MANAGER 12 3.7.8 CHANGING THE BELTPACK NAME With the Name MENU, the user can change the beltpack name that appears on the display , under the beltpack registration number, this name has 7 characters, selected by the user. With the VOLUME switches, we can change the character currently selected (in black) with the SELECT (ENTER) switch, the beltpack select the next character (if we are in the last character, the beltpack name edition finished) , and with the MENU (ESCAPE) switch, the beltpack select the previous character (when we are in the first character, the beltpack cancel the edition). The beltpack name appears below the beltpack registration number: . This name is stored in the unit FACTORY PRESET: ALTAIR1. 3.7.9 OLED CONTRAST ADJUSTMENT The display contrast can be changed using this menu, between the values 1 and 10, to adapt to different ambient light conditions. The OLED display it is visible from any angle, and the contrast level does not affect the display viewing. The display contrast is adjusted to its maximum intensity, and if the beltpack remain quiet for thirty seconds, the display contrast level will fall, and if remain quiet for another thirty seconds, the display shut off automatically, turning on when any key, or an external event occurs. This contrast display adjustment will remain on memory. FACTORY PRESET: 5. 3.7.10 LED BRIGHT ADJUSTMENT The beltpack LEDs bright can be adjusted on three levels, HIGH, MEDIUM and LOW, to suit all ambient light conditions, with this menu. The LED bright is adjusted to its maximum intensity, and if the beltpack remain quiet for thirty seconds, the LED bright will fall to medium level (if it is adjusted to high level), and if remain quiet for another thirty seconds, the LED bright will fall to low level (if it is adjusted to medium or hight levels), turning to the level adjusted when any key, or an external event occurs. This LED bright adjustment will remain on memory. FACTORY PRESET: MEDIUM. 3.7.11 KEYBOARD LOCK CONFIGURATION With this menu, it is possible configure the keys (TOP, FRONT or ALL) that the beltpack lock when activate 13 WBP-212 WIRELESS DUAL CHANNEL MANAGER this feature (see section 3.7.12). This means that when lock the keys in the wireless beltpack, the beltpack lock the keys configured in this section of the menu. This keyboard lock configuration will remain on memory. FACTORY PRESET: ALL. 3.7.12 KEYBOARD LOCK The keyboard lock is useful to prevent unwanted use and to avoid unwanted key press. With this menu option you can lock the keys configured in the keyboard lock configuration (see section 3.7.11) TOP Panel, FRONT panel or all. The keyboard lock can be enabled via the appropriate menu, or directly without accessing the beltpack menu, pressing the ON/OFF switch, and at the same time the MIC ON/OFF switch (changing the vibrator state, if it is on, turn to off mode and if the vibrator it is turned off, turn to on mode). It can only be disable by pressing the ON/OFF switch, and at the same time the MIC ON/OFF switch unless the keyboard lock configuration will be only the TOP panel keys, in which case it can be disabled by menu. Whenever the keyboard will be locked, the following icon appears on the display: . 3.7.13 TWIN MODE Twin mode allows any two wireless beltpacks to talk privately between them. In order to keep the conversation between two wireless beltpacks, the two beltpacks with witch we want to talk between privately, must be configured in TWIN mode, and wait a few seconds they find one to the other, then starts a private conversation between the two beltpacks. The beltpack configured in TWIN mode lock for another beltpack in configured in TWIN mode, and set a private communication with the first one it finds. In TWIN mode don't work the CALL switches, and the base station coverage. This TWIN operating mode do not need wireless base station. We can enter or leave this TWIN operation mode through the menu, or pressing at the same time the ON/OFF switch and the front panel VOLUME UP switch. 3.7.14 STAND BY MODE In this mode, the beltpack can receive CALLs, but the audio it is disconnected. This mode is useful to save battery, since the beltpack consumes 5 times less than in full We can enter this STAND BY mode through the menu, or same time the ON/OFF switch and the front panel switch. duplex state. pressing at the VOLUME DOWN WBP-212 WIRELESS DUAL CHANNEL MANAGER 14 To exit from STANDBY mode, press the ON/OFF switch briefly. 3.7.15 BELTPACK REGISTRATION Each beltpack can be registered in two different base stations, so that if it loses the range of one, changes the operation to the other base station. Each base station can register a maximum of four beltpacks. See the WBS-200 owners manual for details. With the base station turned on, press and hold the REGISTER base station switch during six seconds. At this moment the base station will sound (if the buzzer is turned on) and will blink the IN-RANGE (1-2-3-4) leds corresponding where is going away to register the new beltpack. If the base station has registered four beltpacks already, the function will be reset, and new beltpacks will not be able to be registered until the deregistration of some beltpack is made or deregister all the beltpacks registered in the base station (consult the base station WBS-200 manual for more information). If we do not do anything during 60 seconds the function will be reset. If we pressed key REGISTER again the function will be reset. The beltpack registration can be made through the menu, in witch we select the base station that we want to register the beltpack (FIRST or SECOND), or with the beltpack that we want to register turned off, turn on pressing the ON/OFF switch maintaining pressed the VOLUME UP/DOWN switches (to register it the FIRST base station) or maintaining pressed the VOLUME UP/DOWN and the SELECT (BUZZER) switches (to register it the SECOND base station). If you press the MENU (ESCAPE) switch, the register procedure will be cancelled. If everything goes well, the base station base will sound (if the buzzer it is turned on) and the beltpack also (if the buzzer it is turned on), the corresponding base station IN RANGE led will turn on and the ON/OFF switch LED of the wireless beltpack start blinking, the base station range indicator on the display will stop blinking , indicating the range level. If the procedure fails, turn off the base station and the beltpack and start again. Registering process must be near the base station and is not allowed during battery charging. 3.7.16 BELTPACK DEREGISTRATION Turn on the base station that you want to deregister the wireless beltpack. The beltpack deregister can be made through the menu, and with the wireless beltpack connected to the base station on which you want to delete the registration, the beltpack ask if you're WBP-212 WIRELESS DUAL CHANNEL MANAGER 15 sure to delete the register, and once confirmed the register will be deleted immediately, or turning on the beltpack pressing the ON/OFF switch maintaining pressed the MENU and the SELECT switches, the beltpack will start normally, but when it is connected to the base station, this one will be reset and the beltpack will be deregistered. We can cancel the deregistration procedure, before the wireless beltpack connect with the base station, by pressing the MENU (ESCAPE) switch. If the procedure fails, turn off the base station and the beltpack and start again. 3.8 ON/OFF SWITCH When the beltpack is power off, and the beltpack’s ON/OFF switch it is pressed and hold for two seconds, all the beltpack LEDs light on and last a little while it will sound the buzzer (if buzzer is turn on) and will vibrate (if the vibrator is turn on), and the display will turn on, indicating that it is operative. If the base on which it is registered finds within its range, the ON/OFF switch LED will begin to blink, the base station range indicator in the display will stop to blink and the audio will be opened. At this moment you can begin to use your ALTAIR WBP-212 wireless beltpack. To turn off the beltpack, press and hold two seconds the ON/OFF switch when the beltpack is turned on. In this moment will sound the buzzer (if the buzzer is turn on), a GOODBYE message appears in the display and when the ON/OFF switch it is depressed, the beltpack it is turned off. If the wireless beltpack is turned on, and you press the ON/ OFF button for a while, the beltpack shows the battery status. The battery level indicator is displayed by default in the display: . 3.9 VOLUME UP/DOWN SWITCHES The volume switches allows attenuating or amplifying the signal sent to the headphones. This switches adjusts the listen level to the headphones as you wish. When volume UP/DOWN switches are pressed, appears the volume level indication allow us change this volume steps of volume (1-10), and this is indicated in the OLED next icon: . The VOLUME, it is stored in the unit. FACTORY PRESET: 7. in the OLED display level. There are 10 display with the 3.10 SELECT SWITCH This switch , in normal mode, enables/disables the buzzer sound when the unit receives a call and when the user press a key. Whenever this switch is pressed, and the buzzer is enabled, it will be disabled, and the LED indicator will turn off. On the other hand, if the buzzer was disabled, it will be enabled and the LED indicator will lighten up, and appears this icon in the display. WBP-212 WIRELESS DUAL CHANNEL MANAGER 16 The buzzer also sounds when any switch is pressed, emitting a short hoot, when it is enabled. The unit provides a BUZZER-KILL (turns off the BUZZER) system, so that when the buzzer is enabled it is possible to muted it by the BUZZER-KILL function of the base station ALTAIR WBS-202 or a master station ALTAIR EF-200, connected to the base station. This BUZZER-KILL system is compatible with other intercom systems of the market. The BUZZER could be disabled with an internal preset. In order to obtain more information, consult the special operation section. The state of the BUZZER (on/off), it is stored in the unit. 3.11 USB DC-IN CONNECTOR The Li-Ion 1800 mA/h battery of the wireless beltpack must be charged with the ALTAIR WBPC-210 charger by the USB connector. Charging time is four hours with the batteries empty. The estimated battery life, in full duplex mode is 15 hours and 100 hours in standby mode, with full charged batteries. The Li-Ion batteries have a protection system that disconnects the load when a short circuit or when the battery down a voltage level, to re-enable the battery it is necessary plug it to the charger. The battery is discharging even with the beltpack off, so for extended periods without using the wireless beltpack, the battery may enter into a self-protection state, and start charging very slowly (the LED charger does not turn yellow), showing a critical battery message, do not worry, leave the unit charging until it starts to charge normally (approximately 10 minutes). As a general rule, charge the unit before using the system. WBP-212 WIRELESS DUAL CHANNEL MANAGER 17 4.1 AUXILIARY BATTERY The wireless beltpack has a battery holder to place an alkaline battery, Ni-MH battery 2500 mA/h or lithium battery of AA size, which gives us a range of 3/4/5 hours respectively with the main battery discharged. Be very careful, do not insert the battery in reverse polarity, as it may break the circuitry of the wireless beltpack. Always remember to remove the empty battery. 4.2 RESET BUTTON The unit has a RESET button near the auxiliary battery holder in order to reset the unit in case of malfunction NOTE ON ENVIRONMENTAL PROTECTION: After the implementation of the European Directive 2002/96/EU in the national legal system, the following applies: Electrical and electronic devices may not be disposed of with domestic waste. Consumers are obliged by law to return electrical an electronic devices at the end of their service lives to the public collecting points set up for this purpose or point of sale. Details to this are defined by the national law of the respective country. This symbol on the product, the instruction manual or the package indicates that a product is subject to this regulations. By recycling, reusing the materials or other forms of utilising old devices, you protecting our environment. 5. SPECIAL RECOMMENDATIONS Don’t place the unit in close proximity to metallic surfaces and/or other electronic equipment in order to avoid interferences. In case of lose of range, reorient your body position to face up the base unit position. Take special attention to the placement of the base station when trying to reach all the possible placements of the beltpacks specially when concrete walls or other absorbing materials are in between. In order to have the units ready to operate, it is a good practice to make a full charge of all the units every two month. 6. TROUBLESHOOTING GUIDE WHEN: POSSIBLE CAUSES AND SOLUTIONS 1) Abnormal low range. a) With the beltpacks on, switch off the base station, wait for 30 seconds and then switch on to reorganize links. 2) Beltpack switch on but does not link with the base station. a) Beltpack is not registered. If the base station have free registers, register it normally. b) If you have more than a system it is possible that this beltpack WBP-212 WIRELESS DUAL CHANNEL MANAGER 18 correspond to another system. c) When beltpack comes from a service, it is possible that the registers are changed so it is necessary to register the whole system again. Refer to manual. 3) Beltpack switch off immediately after switch on. a) Batteries are low. Check battery status. Charge it. 4) Beltpack refuse to switch off. a) Reset the beltpack with the reset switch. 5) Poor charge. a) Disconnect the charger and try it again. Check charge time to be around 4 hours. 6) Suddenly Beltpack switch off. Very sensitive to lateral strikes. a) Base unit has been switched off or base out of range. b) Batteries can be low, check beltpack battery status. Charge it if necessary. 7) Charger led always is green when charging. a) Check charger plug contacts. Try with another plug. Try to charge another beltpack verifying charger. b) Batteries are so low that the unit is not able to start charging. Wait for 10 minutes connected on charger and try it again. 8) Unit refuse to charge a) Wait for 10 minutes connected on the charger to verify charging after a long period of not in normally. use. 9) Bad coverage in some areas. a) Try another better position of the base unit. b) Study the possibility of installing a higher gain directional antenna on the base unit. 10) Mic or headphone failure. a) Check volume or mic gain settings. b) Check beltpack with another headset. 11) Mic failure. a) When using headsets with electret microphones it is necessary to enable the phantom power and configure mic gain accordingly. Refer to the manual. 12) Vibrator does not run. a) Press simultaneously Mic and Select keys to activate it. 13) Buzzer does not work. a) Check the base station is on Buzzer Kill mode 7.1 CHANGING THE FUSE The battery charger ALTAIR WBPC-200 is set to operate from 100 VAC, 50-60Hz to 240VAC, 50-60Hz. Make sure that the unit is disconnected of the mains. In the unit rear panel, is placed the mains connector, and the fuse holder. The box bellow this mains connector is called fuse holder. Take out the fuse holder. Upon extracting the fuse holder, the fuse will appear, take out it and change for the new one. Insert the fuse holder into the mains connector again. Make sure that the fuse is the right one for the selected voltage: FUSE T2A/250VAC. CAUTION: Always make sure upon changing the fuse, that this is the adequate for the selected mains voltage (T2A/250VAC). 7.2 CONNECTING TO THE MAINS The connection of the battery charger ALTAIR WBPC-210 power supply to the mains takes place by the cord included in the box. Make sure that the beltpack are disconnected from the battery charger. Insert the female I.E.C. connector of the tripolar cable into the unit power supply male connector, placed at the rear panel Insert the male connector of the tripolar cable into the mains plug. WBP-212 WIRELESS DUAL CHANNEL MANAGER 20 In that moment the charge LEDs indicators will light in green colour, indicating that the unit is turned on. CAUTION: Make sure that the mains voltage is the correct as well as their fuse is the adequate. 7.3 BELTPACK BATTERY CHARGE The battery charger ALTAIR WBPC-210 has four connectors to allow the charge up to four wireless beltpacks at the same time. Take any of the battery charger connector and insert it in a wireless beltpack connector. If the battery charger is connected, the connector associated LED of the battery charger will change from green to orange, indicating that the wireless beltpack batteries are charging. The internal battery bargraph indicator on the beltpack display top left will begin to move from right to left indicating the connection of the charger. After about four hours if the batteries are fully discharged, otherwise less time, the beltpack indicate that the battery is charged. If a problem appears in one of the connectors, and the consumption increases, the battery charger ALTAIR WBPC-210 will protect itself, and the LED associated to this connector will turn to red colour. WBP-212 WIRELESS DUAL CHANNEL MANAGER 8. TECHNICAL SPECIFICATIONS PREAMPLIFIER MICROPHONE TYPE: INPUT IMPEDANCE: NOMINAL LEVEL: PHANTOM VOLTAGE: Dynamic or electret. 4K7. -45 dBu. +9 VDC (internal preset ). 200 (nominal), 2K (maximum). OUTPUT POWER: FREQUENCY RESPONSE: 200 mW (200 ). 250 Hz - 3500 Hz. 1900 MHz band. GFSK/TDMA +22 dBm typically. -92 dBm typically. Li-Ion, 3,7 Volts, 1800 mAh. 4 hours. Fast charging mode. External charger WBPC-210. SIDETONE CANCELLATION BUZZER Adjustable –12 – 30 dB @ 1 KHz 90 dBA. CONTROLS HEADSET AMPLIFIER IMPEDANCE: MAXIMUM LEVEL: 14 Vpp (200 ). RADIO FREQUENCY: MODULATION: TRANSMIT POWER: RECEIVE SENSITIVITY: BATTERY TYPE: CHARGING TIME: CHARGER: INDICATORS CALL SYSTEM DIMENSIONS WEIGHT Call, Volume level, Mic On/Off/PTT, Buzzer On/Off, Vibrator On/Off. Call, Battery status, Low Batt, Mic On/Off, Buzz On/Off, In range led. Light, Vibration and Buzzer. 145x95x35 mm. 300 gr. Net. NOTE: Technical specifications are subject to variation without previous notice. 21 WBP-212 WIRELESS DUAL CHANNEL MANAGER 22 9. WARRANTY This unit is warranted by Equipos Europeos Electrónicos to the original user, against flaws in the manufacturing and in the materials, for a period of two years (one year depending on some countries), starting from the date of sale. Flaws due to wrong use of the unit, internal modifications or accidents, are not covered by this warranty. There is no other warranty expressed or implicit. Any faulty unit must be sent to the dealer or the manufacturer. The serial number of the unit must be included for any request to the technical service. Equipos Europeos Electrónicos reserves the right to modify the prices or the technical specifications without further notice. BELTPACKS: SERIAL NUMBER ................................................... SERIAL NUMBER ................................................... SERIAL NUMBER ................................................... SERIAL NUMBER ................................................... BELTPACK CHARGER: SERIAL NUMBER ................................................... WBP-212 WIRELESS DUAL CHANNEL MANAGER 23 European Union Waste Electronics Information Unión Europea Información sobre residuos electrónicos Waste from Electrical and Electronic Equipment (WEEE) directive The WEEE logo signifies specific recycling programs and procedures for electronic products in countries of the European Union. We encourage the recycling of our products. If you have further questions about recycling, contact your local sales office. Directiva sobre Residuos de Aparatos Eléctricos y Electrónicos (RAEE) El logotipo de la Directiva RAEE se refiere a los programas y procedimientos específicos de reciclaje para aparatos electrónicos de países de la Unión Europea. Recomendamos el reciclaje de nuestros productos. Si tiene alguna consulta, póngase en contacto con su Distribuidor. Information based on European Union WEEE Directive 2002/96/EC Información basada en la Directiva de la unión europea RAEE 2002/96/EC y el Real Decreto 208/2005 AUDIO AUDIOELECTRONICS ELECTRONICSDESIGN DESIGN EQUIPOS EQUIPOSEUROPEOS EUROPEOSELECTRÓNICOS, ELECTRÓNICOS,S.A.L S.A.L Avda. de la Industria, 50. 28760 TRES Avda. de la Industria, 50. 28760 TRESCANTOS-MADRID CANTOS-MADRID(SPAIN). (SPAIN). 34-91-761 34-91-76165658080 34-91-804 34-91-80443435858 [email protected] [email protected] www.altairaudio.com www.altairaudio.com