1
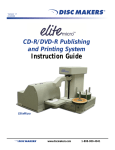
User Guide
Includes key information about the
operation and use of your
Elite Series duplicator
Elite_Series_User_Guide_lp03.indd 1
2/21/06 9:05:48 AM
Copyright and contact details
Support information
This document and related materials are provided
“as is” with no warranties, express or implied,
including but not limited to any implied warranty
or merchantability, fitness for a particular purpose,
non-infringement of intellectual property rights,
or any warranty otherwise arising out of any
proposal, specification, or sample. Disc Makers
assumes no responsibility for any errors contained
in this document and has no liabilities or obligations for any damages arising from or in connection with the use of this document.
Each Elite series duplicator includes a variety of
technical support options that are available as
long as you own the equipment.
Many common problems can be resolved quickly
by consulting the Troubleshooting FAQ in this
guide. Try this option first if you encounter difficulties.
Elite and ElitePRO are trademarks of Disc Makers.
For prompt technical support by email, send your
questions to [email protected].
*Other names and brands may be claimed as the
property of others.
Disc Makers®
7905 North Route 130
Pennsauken, NJ 08110-1402
1-888-800-4041 (Toll-free)
1-856-661-3457 (Fax)
www.discmakers.com
You can access details about software upgrades,
updated product information, and other helpful
owner information at www.dmelite.com.
Toll-free technical support can be obtained from
9:00 am to 5:00 pm Eastern time Monday through
Friday. Call 1-888-800-4041 for telephone support on any duplicator-related issues.
For replenishing your supply of recordable discs,
visit www.discmarket.com. Elite series duplicators have been tuned for optimal results with Disc
Makers blank CDs and DVDs, helping ensure
error-free recording and maximum recording
speeds. Samples of CD or DVD media from Disc
Makers are included with your purchase. Keep an
ample supply of blank media and ink cartridges
available so that your duplication system will
always be ready for use.
Registration entitles you to additional benefits,
including prompt notification of software and
firmware upgrades. Register your duplicator by
visiting www.dmelite.com/register.
Elite_Series_User_Guide_lp03.indd 2
2/21/06 9:05:48 AM
Contents
Chapter 1: Automating Disc Duplication . . . . . . . . . . . . . . . . . . . . . . . . . 1
System overview . . . . . . . . . . . . . . . . . . . . . . . . . . . . . . . . . . . . . . . . .2
ElitePRO components . . . . . . . . . . . . . . . . . . . . . . . . . . . . . . . . . .2
Standard Elite requirements . . . . . . . . . . . . . . . . . . . . . . . . . . . . .2
Disc duplicator capabilities . . . . . . . . . . . . . . . . . . . . . . . . . . . . . . . . .3
Powering on the Duplication System . . . . . . . . . . . . . . . . . . . . . . . . .3
To power on the duplication system . . . . . . . . . . . . . . . . . . . . . . .3
To power down the duplication system . . . . . . . . . . . . . . . . . . . . .3
Tips on media use . . . . . . . . . . . . . . . . . . . . . . . . . . . . . . . . . . . . . . .5
Configuration considerations . . . . . . . . . . . . . . . . . . . . . . . . . . . . . . .5
Best practices for duplication . . . . . . . . . . . . . . . . . . . . . . . . . . . . . . .5
Chapter 2: Getting the Best Duplication Results . . . . . . . . . . . . . . . . . 5
Dedicated System use . . . . . . . . . . . . . . . . . . . . . . . . . . . . . . . . . . . .6
Working with masters . . . . . . . . . . . . . . . . . . . . . . . . . . . . . . . . . . . . .7
Format considerations . . . . . . . . . . . . . . . . . . . . . . . . . . . . . . . . . . . .7
Image storage issues . . . . . . . . . . . . . . . . . . . . . . . . . . . . . . . . . . . . .7
Organizing projects . . . . . . . . . . . . . . . . . . . . . . . . . . . . . . . . . . . . . .7
Chapter 3: Using FlexWare . . . . . . . . . . . . . . . . . . . . . . . . . . . . . . . . . . . . . . 7
Using wizards . . . . . . . . . . . . . . . . . . . . . . . . . . . . . . . . . . . . . . . . . . .8
To run a wizard . . . . . . . . . . . . . . . . . . . . . . . . . . . . . . . . . . . . . . . .8
Duplicating from disc to disc . . . . . . . . . . . . . . . . . . . . . . . . . . . . . . .8
To duplicate from disc to disc . . . . . . . . . . . . . . . . . . . . . . . . . . . .8
Duplicating multiple masters . . . . . . . . . . . . . . . . . . . . . . . . . . . . . . .9
To create duplicates in relay mode . . . . . . . . . . . . . . . . . . . . . . . .9
Creating images from disc . . . . . . . . . . . . . . . . . . . . . . . . . . . . . . . .10
To create an image from disc. . . . . . . . . . . . . . . . . . . . . . . . . . . .10
Duplicating discs from images . . . . . . . . . . . . . . . . . . . . . . . . . . . . .11
To create a disc from an image . . . . . . . . . . . . . . . . . . . . . . . . . .11
Purging images from the system . . . . . . . . . . . . . . . . . . . . . . . . . . .11
Printing individual disc labels . . . . . . . . . . . . . . . . . . . . . . . . . . . . . .12
To print an individual disc label . . . . . . . . . . . . . . . . . . . . . . . . . .12
Setting the cache size . . . . . . . . . . . . . . . . . . . . . . . . . . . . . . . . . . . .12
To set the cache size . . . . . . . . . . . . . . . . . . . . . . . . . . . . . . . . . .13
Choosing a burn setting . . . . . . . . . . . . . . . . . . . . . . . . . . . . . . . . . .13
Viewing the log. . . . . . . . . . . . . . . . . . . . . . . . . . . . . . . . . . . . . . . . .13
To view the log. . . . . . . . . . . . . . . . . . . . . . . . . . . . . . . . . . . . . . .13
Elite_Series_User_Guide_lp03.indd 3
2/21/06 9:05:49 AM
Chapter 4: Using Discus . . . . . . . . . . . . . . . . . . . . . . . . . . . . . . . . . . . . . . . . 15
Specifying print regions . . . . . . . . . . . . . . . . . . . . . . . . . . . . . . . . . .15
To adjust print regions in Discus . . . . . . . . . . . . . . . . . . . . . . . . .15
Creating disc labels . . . . . . . . . . . . . . . . . . . . . . . . . . . . . . . . . . . . .16
To import user graphics . . . . . . . . . . . . . . . . . . . . . . . . . . . . . . . .16
To add text to an image. . . . . . . . . . . . . . . . . . . . . . . . . . . . . . . .17
Adjusting printer settings for best results . . . . . . . . . . . . . . . . . . . . .18
Chapter 5: Using Utilities . . . . . . . . . . . . . . . . . . . . . . . . . . . . . . . . . . . . . . . 19
Running diagnostics . . . . . . . . . . . . . . . . . . . . . . . . . . . . . . . . . . . . .19
To print your own disc label . . . . . . . . . . . . . . . . . . . . . . . . . . . . .19
To print a test label . . . . . . . . . . . . . . . . . . . . . . . . . . . . . . . . . . .20
To run diagnostics . . . . . . . . . . . . . . . . . . . . . . . . . . . . . . . . . . . .20
To run diagnostics without the printer . . . . . . . . . . . . . . . . . . . . .20
To position the Disc Pick arm for shipping . . . . . . . . . . . . . . . . .20
Updating the firmware . . . . . . . . . . . . . . . . . . . . . . . . . . . . . . . . . . .21
To update the firmware . . . . . . . . . . . . . . . . . . . . . . . . . . . . . . . .21
Setting positions . . . . . . . . . . . . . . . . . . . . . . . . . . . . . . . . . . . . . . . .21
To set positions . . . . . . . . . . . . . . . . . . . . . . . . . . . . . . . . . . . . . .22
Using manual controls . . . . . . . . . . . . . . . . . . . . . . . . . . . . . . . . . . .22
To use the manual controls . . . . . . . . . . . . . . . . . . . . . . . . . . . . .22
Changing the Configuration . . . . . . . . . . . . . . . . . . . . . . . . . . . . . . .22
To change the enabled drives . . . . . . . . . . . . . . . . . . . . . . . . . . .22
Upgrading the system . . . . . . . . . . . . . . . . . . . . . . . . . . . . . . . . . . .23
To upgrade the duplicator for new drives . . . . . . . . . . . . . . . . . .23
Defragmenting the hard drive . . . . . . . . . . . . . . . . . . . . . . . . . . . . .23
To defragment the hard drive . . . . . . . . . . . . . . . . . . . . . . . . . . .23
Cleaning the disc drive and printer trays . . . . . . . . . . . . . . . . . . . . .23
To clean the disc and printer trays . . . . . . . . . . . . . . . . . . . . . . . .23
Replacing the printer filter . . . . . . . . . . . . . . . . . . . . . . . . . . . . . . . .24
To replace the printer filer . . . . . . . . . . . . . . . . . . . . . . . . . . . . . .24
Keeping the duplicator running well . . . . . . . . . . . . . . . . . . . . . . . .24
Chapter 6: Troubleshooting FAQ . . . . . . . . . . . . . . . . . . . . . . . . . . . . . . . 25
System problems . . . . . . . . . . . . . . . . . . . . . . . . . . . . . . . . . . . . . . .25
Software problems . . . . . . . . . . . . . . . . . . . . . . . . . . . . . . . . . . . . . .25
Printer problems . . . . . . . . . . . . . . . . . . . . . . . . . . . . . . . . . . . . . . . .25
Autoloader problems . . . . . . . . . . . . . . . . . . . . . . . . . . . . . . . . . . . .25
Additional problems . . . . . . . . . . . . . . . . . . . . . . . . . . . . . . . . . . . . .25
Elite_Series_User_Guide_lp03.indd 4
2/21/06 9:05:49 AM
Elite Series User Guide
1
Chapter 1: Automating Disc Duplication
Disc Makers Elite series duplicators bring a broad
range of disc publishing capabilities to your home
or business. Engineered to deliver consistent,
reliable performance for many years, the Elite
series provides automated duplication and label
printing of discs, handling a variety of formats
and sizes of CDs, CD-ROMs and DVDs. You can
create up to 175 discs during a single operation.
The FlexWare software that is included simplifies
everyday duplication tasks and provides a number of built-in wizards to guide you through the
individual steps of common tasks.
Elite Series duplicators are designed for ease of
use and trouble-free operation. This user guide
is organized by tasks. Before starting any of the
tasks in the guide, complete the setup proce-
Elite_Series_User_Guide_lp03.indd 1
dures in the Getting Started Guide included with
your shipment. These setup procedures cover
the steps necessary to connect and power-on the
components, prepare the software for initial use,
and ensure that the duplicator is ready for use.
If you encounter any problems during the initial
setup, refer to the Troubleshooting FAQ near the
end of this guide.
We want you to be fully satisfied with your
purchase from Disc Makers. If at any time you
require help on issues that are not covered in this
guide, the Getting Started Guide, or the Disc
Makers Web site, please contact us by email at
[email protected] or call us at
1-888-800-4041 for toll-free support. You can
obtain support throughout the life of the product.
2/21/06 9:05:52 AM
Automating Disc Duplication
2
SYSTEM OVERVIEW
Elite series duplicators feature all of the hardware
and software tools that you need to publish and
print CDs or DVDs, either from an existing disc
master or an image created from a disc-ready
set of files. These capabilities let businesses or
individuals experience the benefits of cost-effective disc duplication to distribute information to
current and prospective customers, staff members
in different locations, trading partners, and other
audiences.
The duplicator design favors ease of use and requires minimal attention during copy operations.
By automating and coordinating the duplication
and printing tasks, you can save time and effort
while achieving polished, professional results.
This User Guide covers both the ElitePRO and
Elite 2 duplicators. Where procedures or information are specific to only one of the duplicator
models, they are labeled as such.
Note: Do not violate copyright laws by duplicating materials for which you do not have copyright
ownership. This equipment should only be used
for legal duplication tasks consistent with the
license requirements that apply to the source materials. Be aware of these requirements to avoid
prosecution under current copyright laws.
ElitePRO components
The self-contained ElitePRO duplicator includes
an integral computer system with these specifications:
•
•
•
•
•
•
The ElitePRO also features a built-in disc printer
that coordinates with the duplicator robotics for
automated operation. The disc printer can print
high-quality labels on recordable media with a
printable surface.
Standard Elite requirements
The minimum computer system requirements to
support operation of the Elite 2 duplicator are:
•
•
•
•
•
2.00GHz Intel* Celeron* processor
512MB of RAM
40GB hard disk drive, with 7200 rpm spindle
speed and 70 percent space availability
Microsoft Windows XP Professional or Home,
Version 2002, Service Pack 2 or above; or
Microsoft Windows 2000.
Two available USB 2.0 ports (USB 1.x ports
do not have sufficient throughput to support
duplicator operations; upgrade to a USB
2.0 interface card to provide the required
performance.)
Note: Faster hard drives with 10,000 rpm spindle
speeds deliver better results for demanding duplicator operations. We recommend that for optimal
duplicator throughput a system with a high-performance SATA or SCSI hard drive is used.
The Elite 2 also features a built-in disc printer
that coordinates with the duplicator robotics for
automated operation. The disc printer can print
high-quality labels on recordable media with a
printable surface.
2.00GHz Intel* Celeron* processor
504MB of RAM
Microsoft Windows XP Professional, Version
2002, Service Pack 2
2 or 4 DVD+R DL drives
USB serial port
80GB hard disk drive
Elite_Series_User_Guide_lp03.indd 2
2/21/06 9:05:52 AM
Elite Series User Guide
3
DISC DUPLICATOR CAPABILITIES
Elite series duplicators can:
•
•
•
•
•
Produce up to 175 discs from a master or an
image during a single session.
Automatically perform a series of duplication
operations from a number of different disc
masters placed on the input spindle (referred
to as relay mode).
Support all common CD and DVD formats,
including DVD double layer (DL).
Perform essential tasks—such as Disc to Disc
copies and Print Label—through keyboard
hotkeys.
Create and store a virtually unlimited library
of disc labels that can be accessed on
demand and used in combination with any
duplication project to automate printing.
POWERING ON THE DUPLICATION
SYSTEM
PRO The ElitePRO has a power switch on the
rear of the cabinet that supplies power to
the overall duplication system. There is also
a power switch for the integral computer
system inside the unit on the left side of the
cabinet and a separate power switch for the
printer.
To power down the duplication system
1
2
Exit all applications, including FlexWare.
3
Click the Turn Off button in the dialog box
that appears. The internal computer system
powers down.
4
Press the printer power button once to turn
off printer power. The green light goes out.
Select Turn Off Computer from the Windows
Start menu.
Optionally, when you have powered down the
system and printer, you can turn off the power
switch on the rear of the cabinet. This shuts down
power to all the components in the cabinet,
except for the printer, which uses its own separate
power input.
Note: The system will not power down with
FlexWare tasks running. Always exit FlexWare
before powering down.
To power on the duplication system
1
Ensure that the power cables are properly
connected to the duplication system cabinet
and that the separate printer power cable is
connected.
2
Turn the power switch at the rear of the cabinet on.
3
Press the power switch on the printer once. A
green light indicates power.
4
Press the power switch on the left of the cabinet once to power on the internal computer.
The system powers up and the Elite series
banner appears onscreen.
Elite_Series_User_Guide_lp03.indd 3
2/21/06 9:05:52 AM
Automating Disc Duplication
4
Elite_Series_User_Guide_lp03.indd 4
2/21/06 9:05:53 AM
Elite Series User Guide
5
Chapter 2: Getting the Best Duplication Results
High-speed disc duplication requires very high
quality media, a dedicated host computer, fast
hard drives, and a well-tuned system. Follow the
guidelines in this section to get optimal results
from your Elite series duplication system.
TIPS ON MEDIA USE
High-speed duplicators, such as the Elite series
models, work best with very high quality media
that supports optimal recording speeds (we
recommend Disc Makers Ultra media). Although
these duplicators can record on earlier generation media with lower recording speeds, the best
results are obtained by using current generation
disc media, which allows the disc recorders to
operate at their maximum performance levels.
For the best duplication results, load the input
spindle with a single type of recordable media.
Mixing recordable discs of two or more types for
a single project (such as 8x and 16x rated blank
CDs) may cause duplication problems.
CONFIGURATION CONSIDERATIONS
Successful disc recording requires a significant
amount of system resources and typically you
should not run other applications at the same
time FlexWare is duplicating discs. To ensure
that the disc recording process proceeds without
interruption, keep these system configuration tips
in mind:
Shut down any background applications—such
as virus protection programs or system monitoring programs—before starting a duplication job.
We do recommend, however, that you scan the
source files in your duplication project for viruses,
malware, or worms using a utility such as McAfee*
VirusScan* or Norton* AntiVirus* before burning files to disc to avoid passing infected files to
customers or clients.
Elite_Series_User_Guide_lp03.indd 5
Allocate the maximum amount of system RAM,
128MB, to serve as a cache region during duplication. This setting is made in FlexWare by selecting Settings>Cache>128MB.
Avoid running any processor-intensive applications while the disc duplicator is running. To
minimize the chance that any interruptions will
occur during recording (that could result in rejected, improperly recorded discs), do not use the
computer system that is hosting the duplication
for other activities during the entire job.
BEST PRACTICES FOR DUPLICATION
Follow these practices to achieve the best results
with your duplicator:
•
•
•
•
•
•
•
•
Always use clean, scratch-free masters and
blanks to ensure successful duplication.
Don’t mix media of different recording
speeds in the same job. Never mix CD and
DVD media in a single project.
When burning audio discs, the optimal
recording speed for quality results is 16x.
Don’t run other applications—either in
the foreground or the background—when
performing a duplication job.
Operate your duplicator on a stable surface
away from sources of shock and vibration.
Keep the duplicator surfaces, particularly
the trays and spindles, clean and free of
contaminants. Remove dust or debris
regularly, particularly before beginning a
large disc run.
Do not operate your duplicator in direct
sunlight or in a room with very bright lights.
Intense lighting may affect the optical
sensors that are necessary to operation.
Always load discs on the input spindle with
the label side up and shiny (recordable) side
down.
2/21/06 9:05:53 AM
Getting the Best Duplication Results
6
DEDICATED SYSTEM USE
If you have an ElitePRO duplicator, it may be
tempting to consider using the duplicator as an
additional computer system within your group
or department, since it has the full capabilities of
a typical desktop system. While this is certainly
a possibility, we recommend that you use the
ElitePRO only as a dedicated system for duplication use. If you install additional applications or
utilities, particularly background utilities, you may
interfere with the processes and tasks performed
by the duplicator. This can result in unsatisfactory
performance and unpredictable behavior if application conflicts are created.
Elite_Series_User_Guide_lp03.indd 6
2/21/06 9:05:53 AM
Elite Series User Guide
7
Chapter 3: Using FlexWare
FlexWare unlocks the potential of your Elite series
duplicator, providing access to duplication, printing, image management, and utility tasks. The
shortcut for FlexWare appears on the upper left
portion of the screen. Double-click the shortcut
to start the program or select the program from
the Windows Start menu. The opening FlexWare
program screen appears.
image from it, and uses that image for the duplication process. Always use a clean, high quality
master, free from scratches and dust, to gain the
best results during duplication.
FORMAT CONSIDERATIONS
The Elite series duplicator supports the majority
of standard CD and DVD formats, ranging from
basic audio CDs to DVD-Video and DVD-ROM
formats. The standard Elite series duplicators use
conventional 120mm discs for jobs. Special kits
are available from Disc Makers to accommodate
different disc sizes, such as the business-card size
discs.
Note: DVDs that have been produced using
encrypted copy protection schemes cannot be
duplicated. Do not attempt to copy commercial
discs with Elite series duplicators.
IMAGE STORAGE ISSUES
Moving the cursor over each of the options on
the right side of the screen displays the tasks
you can perform with that option. To familiarize yourself with the available options, move the
cursor over each item in turn. FlexWare includes
wizards for the primary tasks. You can use these
wizards to learn more about the program and
how the duplicator operates. The full functionality
of FlexWare can also be accessed from the main
program window. You can enter the full FlexWare
program by clicking one of the tasks shown on
the opening program screen, such as Duplicate
Disc from Image.
WORKING WITH MASTERS
A master is a disc that you use as the basis for
duplication. In a typical duplication job, FlexWare
takes the first disc—the master—from the input
spindle, moves it to a DVD-RW drive, creates an
Elite_Series_User_Guide_lp03.indd 7
You can store commonly needed disc images on
the ElitePRO hard drive, but be aware that the
available storage space is limited. The duplicator can quickly create an image for a job from a
master, so the time saved by storing images on
the hard drive is negligible. We recommend that
you keep a minimal number of stored images on
the drive and load new images from a master as
required when performing duplication jobs.
ORGANIZING PROJECTS
The details of each duplication job that you
perform can be stored under a project name.
You can retrieve saved projects and use the prior
specifications—such as the type of duplication
and the print label to use—to initiate a new job.
When FlexWare initially starts, it displays a list
of the most recently stored projects if you place
the cursor over the Saved Projects icon. Click the
name of a project file to load the settings of that
project and launch FlexWare.
2/21/06 9:05:54 AM
Using FlexWare
8
As you complete a duplication project using values that you may want to access again for a later
project, use the Save As option on the File menu
in FlexWare to choose a name and destination for
the stored file.
Similarly, using Discus, the label printing program
that works with FlexWare, you can create and
store labels for reuse—either using graphics provided in Discus or your own imported graphics.
Clicking the Create Disc Labels option opens the
starting screen for Discus.
2
Follow the steps shown in the dialog boxes
to complete the task.
3
Once you complete the wizard, give the
project you completed a name and save the
project file if you want to recall the details for
later use.
DUPLICATING FROM DISC TO DISC
One of the simplest duplication tasks is to make
one or more disc copies from an existing master.
This procedure provides a useful means to check
your system and ensure that it is working properly.
To duplicate from disc to disc
As you create labels for discs, store those labels
in Discus before quitting the program. You can
then open the Old Projects tab to view previously
created labels and open them for immediate use
or to modify for a new project.
USING WIZARDS
FlexWare features wizards that guide you through
the steps involved in a duplication task. If a
particular task has a wizard associated with it, you
will see a link at the top of the window labeled
Wizard. Wizards are available for these tasks:
•
•
Create Image from Disc
Duplicate Disc from Image
To run a wizard
1
Select Create Image from Disc or Duplicate
Disc from Image from the FlexWare menu
bar.
Elite_Series_User_Guide_lp03.indd 8
1
Place the disc that will be the master in one
of your available DVD+RW drives. Insert one
or more blank discs in the input spindle. If
you set the Copies setting to Auto, FlexWare
will continue to make copies of the master
until all the blank discs in the input spindle
have been used.
2
Select the drive that contains the master from
the drop-down list in the Source area.
3
Choose an appropriate Read Speed from the
list of options. If you select Auto, FlexWare
will set the read speed at an appropriate
level.
4
If the master is a DVD, check the DVD checkbox.
5
If you want to also print a disc label for each
copy, select the Print checkbox and choose a
print label file with a .PRN extension.
6
In the Copies list, select the number of
duplicate discs you want to produce. If you
select Auto, FlexWare will continue to make
duplicates as long as there are available
blank discs in the input spindle.
7
Select the Write Speed from the drop-down
list. Auto allows FlexWare to determine the
optimal speed. For older media, you may
want to reduce the recording speed to match
the media capabilities. The Audio HQ (highquality) setting is a slower recording speed
2/21/06 9:05:55 AM
Elite Series User Guide
9
that minimizes disc errors for improved audio
fidelity on CDs.
•
•
•
•
Make any custom settings using the options
under Advanced, if required. The Advanced
settings let you determine if each copied
disc will be verified and also let you perform
a Test Write or Test Print operation before
initiating the full-scale duplication.
RAW write performs a bit-by-bit copy
operation without enabling error correction.
R-W (CD+G) lets you copy discs in Karaoke
format.
The TAO (Track at Once) write setting
enables audio discs to be written a track at
a time (as compared to Disc at Once, which
involves a continuous, uninterrupted write
operation).
choose a storage location. If you use the default Jobs file, FlexWare will display the job
under Saved Projects list for quick access.
DUPLICATING MULTIPLE MASTERS
A feature of FlexWare known as relay mode lets
you perform a series of disc to disc copies from
multiple masters inserted on the input spindle. To
do this, you interleave the masters with the number of blank discs (underneath each master) that
you want to duplicate. With the number of copies
set to Auto, FlexWare will work through the stack,
select each new master, and perform as many
copies of it as there are blank discs until it detects
the next master.
Note: You cannot mix CD and DVD masters in this
type of operation; all master discs (and corresponding blanks) must be either CDs or DVDs.
To create duplicates in relay mode
8
9
Click the arrow beside the Write Speed options to start the job. FlexWare displays the
progress of the individual tasks in the Event
Log window. The program first reads the
disc, creates a working image, unloads the
master, puts a blank disc in the drive tray and
begins the write operation.
If FlexWare detects bad media during the
write, the media will be automatically unloaded from the drive and deposited in the
reject area on the platform below the drives.
10 Select Save As at the end of the copy to
store the details of the disc-to-disc copy
operation. Assign a name to the job and
Elite_Series_User_Guide_lp03.indd 9
1
Load the input spindle with a combination of
blank discs and masters. Underneath each
master you should place the number of copies of that master that you want recorded.
For example, if you want 8 copies of a particular master, place 8 blank discs in the input
spindle and place the master on top of them.
2
For the next master to be duplicated, place
the appropriate number of blank discs on
top of the previous master. Then, place the
second master on the top of the blank discs.
3
Continue in this manner until you have
loaded the input spindle with the combination of masters and blanks needed for the
operation. You can load as many masters and
blanks as required up to the 175 disc capacity of the input spindle.
4
5
6
Remove any discs present in the drive trays.
Select Duplicate Disc from Disc in FlexWare.
Choose Auto for the Read Speed, unless you
have more specific requirements.
2/21/06 9:05:55 AM
Using FlexWare
10
7
Check the DVD box if your relay mode operation consists of DVDs to be copied.
8
Set the Copies setting to Auto. Auto must be
selected for relay mode to be used.
9
Ensure that the Print checkbox is deselected
(unless you want to use the same label for
each of the discs being duplicated; if so,
select the Print checkbox and choose a print
label file with a .PRN extension.
10 Select the Write Speed from the drop-down
list. Auto allows FlexWare to determine the
optimal speed. For older media, you may
want to reduce the recording speed to match
the media capabilities. The Audio HQ (highquality) setting is a slower recording speed
that minimizes disc errors for improved audio
fidelity on CDs.
Note: Make any custom settings using the options under Advanced, if required. The Advanced
settings let you determine if each copied disc will
be verified and also let you perform a Test Write
or Test Print operation before initiating the fullscale process.
CREATING IMAGES FROM DISC
Any non-copy-protected CD or DVD can be used
to generate an image file. Image files represent
a byte-by-byte replica of the contents of a disc.
These images can be written directly to recordable discs from the hard drive faster than if you
attempted to make a copy from one disc drive to
another.
4
Choose a destination for the image file.
The default destination (C:\Documents and
Settings\ElitePRO\My Documents\FlexWare
Files\Images\flex_image.cdi) is overwritten
each time a temporary image for duplication
is created, so choose a different filename
or location if you want to use the image for
subsequent jobs. The Choose button brings
up a file selection dialog box for selecting a
destination.
5
6
Choose a different Read Speed, if necessary.
7
Click the forward arrow button to proceed.
FlexWare queries if you want to use the disc
in the drive for the image. If you click OK,
the program immediately begins to generate
the image file. The progress is shown in the
Drive Information graph and Event Log.
8
When complete, FlexWare unloads the disc
from the drive tray and deposits it on the
output spindle. The image can now be accessed using the Duplicate Disc from Image
option on the FlexWare menu.
Select the DVD checkbox if you are creating
a DVD image.
Note: FlexWare can produce an image from a
disc that is already inserted in the drive tray or it
can load the top disc from the input spindle to
start the process. You can use either technique for
this task. Place the disc in either location to start
and FlexWare will find it.
To create an image from disc
1
Place the disc that you want to use for the
image in the disc drive.
2
Open the Create Image from Disc option
from the FlexWare program menu.
3
Select the drive in which you inserted the
disc for the image creation.
Elite_Series_User_Guide_lp03.indd 10
2/21/06 9:05:55 AM
Elite Series User Guide
11
DUPLICATING DISCS FROM IMAGES
You can start a duplication job from any valid disc
image that has been pre-stored on your system.
To create a disc from an image
1
Choose the Duplicate Disc from Image option from the FlexWare program menu.
2
In the Image selection area, choose the filename and location for the image to be used
for the disc write operation.
3
If you want to print a label on the disc, select
the Print checkbox and choose the appropriate .PRN file to use for the label image.
4
Select the number of Copies to produce and
the Write Speed for the operation.
5
If the image represents a DVD, select the
DVD checkbox.
6
Click the forward arrow to start the disc creation. FlexWare retrieves a blank disc, loads
it in a drive, and begins the write operation.
If you have specified Auto as the number of
copies, FlexWare will load each available
Elite_Series_User_Guide_lp03.indd 11
drive and continue writing until the input
spindle is empty.
7
At the conclusion of the write operation,
FlexWare unloads the completed discs and
places them on the output spindle. The individual steps of the operation can be viewed
in the Event Log.
Note: If FlexWare detects bad media during the
disc burning operation, the disc pick arm will
deposit the media in the discard region in front of
the disc drives.
PURGING IMAGES FROM THE
SYSTEM
FlexWare normally creates a single disc image
for a DVD or CD duplication that is stored on the
hard disk drive. Unless stored in a different location or with a different filename, this image, called
flex_image.cdi, is overwritten by subsequent copy
operations. You can continue to perform ongoing duplication jobs if you use this default image
name without adding large image files to your
hard disk drive.
2/21/06 9:05:56 AM
Using FlexWare
12
An image for a double-layer DVD duplication,
for example, can require nearly 8GB of storage
space.
If you regularly save image files to the hard drive,
you should periodically purge those that are not
routinely required. Otherwise, you hard drive will
soon fill to capacity.
5
An event log of the completed operation is
shown in the program window. You can save
the job if you want to use the same .PRN file
and settings later by selecting Save As from
the File menu and choosing a name and
location for the Job File.
PRINTING INDIVIDUAL DISC LABELS
FlexWare gives you the option to print disc labels
individually outside of a normal duplication job.
This procedure assumes that you have previously
set up and tested the printer as described in
the Getting Started procedure. The appropriate
Mask Settings and standard print areas should be
selected in the Disc Printer Printing Preferences
control panel tab before beginning label printing.
Note: FlexWare uses print files with a .PRN extension. These files can be created with the Discus
program included with the Elite series duplicator
or through another compatible application designed to produce disc labels. Source files used
by FlexWare for printing must have the .PRN extension to be recognized and must also be valid
files, properly masked, for the disc type selected.
To print an individual disc label
1
From the initial FlexWare screen, move the
cursor over the Duplicate and Print Discs
option and select Print Labels on Disc Only
from the choices displayed. FlexWare displays the main application window.
2
Choose the name of the .PRN print file to use
to produce the label.
3
Place the disc to be printed in the input
spindle.
4
Press the forward arrow button to proceed
with the printing. FlexWare gets a blank disc
from the input spindle, loads it in the printer,
completes the print job, removes the disc,
and places it on the output spindle.
Elite_Series_User_Guide_lp03.indd 12
Note: You can also print an individual disc label
directly from within Discus, although to do this
you must individually load each disc to be printed
into the printer tray (rather than relying on the
disc pick arm to get the disc from the input
spindle). Make sure that the template for the
Autograph VII printer is selected
SETTING THE CACHE SIZE
The size of the selected cache determines the
amount of system RAM that is used temporarily during a write operation. The cache helps
ensure that each write operation is continuous by
buffering a certain amount of data and delivering it to the disc drive at a constant rate. If the
cache becomes empty and the data flow during
the write operation is slowed or interrupted, an
under-run error may occur and the resulting disc
will be unusable.
A larger cache size allows more data to be buffered, helping ensure error-free write operations. If
your system has limited RAM available, however,
2/21/06 9:05:57 AM
Elite Series User Guide
13
you may want to experiment with smaller cache
sizes.
•
To set the cache size
1
Select the Cache option on the Settings
menu.
2
Choose a cache size (or No Cache) by selecting one of the available settings. A check
mark appears beside your selection and the
new value is immediately applied.
CHOOSING A BURN SETTING
Under the Settings menu, FlexWare gives you
the option to select a technique for controlling
the burn technique used during duplication: Burn
Safe or Burn Smart.
•
The Burn Safe option uses conservative
settings to minimize the chances of discs
being improperly recorded so that they must
be discarded. Select this option if you are
using older media or if you want to ensure
error-free recording of an important project.
Elite_Series_User_Guide_lp03.indd 13
The Burn Smart option makes intelligent
decisions based on the detected media
qualities and current system values to burn
discs as rapidly as possible. Use this setting
if you want to reduce the overall time of the
duplication operation.
VIEWING THE LOG
FlexWare maintains a log of each event that takes
place while the program is running. Viewing this
log can be helpful to determine if duplication
jobs were performed as expected or if problems
were encountered that caused a job to pause or
stop.
To view the log
1
2
Select the Log item on the Settings menu.
3
Print or save the log if you want to refer to
it later or maintain an ongoing record of
events.
FlexWare displays a copy of the current log in
the Windows Notepad application.
2/21/06 9:05:57 AM
Using FlexWare
14
Elite_Series_User_Guide_lp03.indd 14
2/21/06 9:05:57 AM
Elite Series User Guide
15
Chapter 4: Using Discus
Discus makes it easy to use your own graphics
for disc labels or to choose from a wide selection
of existing images, fonts, and design options to
create striking graphics for your discs. The Discus
program can be run directly from FlexWare and
the printer control settings can be accessed from
the Print tab within Discus.
By default, Discus is configured to operate with
the Disc Makers Autograph VII printer and it includes a template that matches these Disc Printer
characteristics. If you are using a different printer
with your Elite series duplicator, refer to the
instructions provided with that printer.
SPECIFYING PRINT REGIONS
Printable disc media from different sources may
have print regions—in other words, the area that
the printable surface covers may extend different
distances from the hub (inner diameter) and from
the outer edge of the disc (outer diameter). To
ensure that the disc printer only prints an image
on the printable surface (and not bare plastic), use
the controls available in Discus before printing to
specify the settings.
To adjust print regions in Discus
1
Start the Discus program and select the Print
tab. The screen that appears should show
the Disc Makers Autograph VII printer selected. If it doesn’t, use the Select template
button to choose the Autograph VII template.
2
Place the cursor over control knob on the
top slide bar, which adjusts the distance that
printing will extend toward the outer edge
of the disc. A pop-up box shows the current
print region measurements. The default is
118 mm. Set the slide bar adjustment to 117
mm, as shown in the figure, to set the outer
limits of printing (this corresponds to typical
disc media from Disc Makers).
Through the setup options available through the
Print Setup dialog box, you can make a number
of adjustments, including:
•
Selecting the print quality for a job, from
draft quality to high resolution
•
Choosing the media type (Plain Disc, by
default)
•
Varying the color attributes and color space
for a print job
•
Setting up a print mask to correspond with
different media sizes and types
Disc printer properties can be accessed by means
of:
•
•
•
From the Print Setup control panel,
accessible from the Windows Start menu
(Start menu> Control Panel>Printers and
Faxes>Disc Printer>Printing Preferences).
From Discus (select the Print tab and click the
Setup button).
From the Printers and Faxes dialog box
(Start menu>Printers and Faxes). Select
the appropriate printer from the Printers
and Faxes dialog box and choose Printing
Preferences or Properties to configure the
printer as required.
Elite_Series_User_Guide_lp03.indd 15
2/21/06 9:05:58 AM
Using Discus
16
3
Place the cursor over the control knob on the
lower slider bar. The pop-up box shows the
measurements. The default is 42 mm. You
can check your recordable media print surface dimensions by measuring from the open
area of the hub to where the print surface
begins. Set this adjustment to correspond
with the media that you’re using.
4
Open the printer tray by pressing the lower
button on the printer cabinet and place a
blank disc in the tray.
5
Click the Test Print button. Discus prints a
disc with a series of concentric circles printed
on the outer edge and the inner edge of
the disc surface. You can use these circles
to determine whether further adjustments
are needed to properly specify the printable
region and center the print area. Use the
arrow keys below the slider bars, if necessary,
to make small adjustments to center the print
image. The concentric circles on the test
print disc will indicate whether the center
point needs to be shifted in any direction.
In most cases, very small changes of one or
two tenths of a millimeter will be sufficient to
center the print area.
6
ate disc labels. As with other Discus labels, these
custom creations can be stored in a library as
print files for later use.
Discus can import all standard bitmapped graphics, including BMP, GIF, JPEG, and PCT, and the
program makes it easy to scale images of varying
size to the disc area. This allows you to use pressquality versions of your corporate logo, product
packaging shots, high-resolution photographs,
and so on, to achieve very smooth and consistent
images when printing to disc.
To import user graphics
1
From the Discus application window, select
the Photo tab. The window that appears
shows an image area on the right with the
disc region to be printed outlined in dotted
red circles.
2
Click the New button to select an image for
the background. You can browse through all
the local or networked folders to locate one
or more photographs to use for the background. Click Open to confirm the selections. Discus displays your selected images
in the image browser at the bottom of the
screen, as well as in the image editing area
at the right.
3
Once you have selected an image, Discus
displays the control sliders to modify the
image size, orientation, contrast, sharpness,
Continue to modify the slider bar settings
and arrow control centering until your Test
Print produces a disc with the inner circle
marking the edge of the printable area and
the farthest outer circle showing the outer
rim of the printable area. All circles should be
centered on the disc.
Note: The Disc Printer Properties dialog box includes a tab that provides Mask Settings. You do
not need to enable the mask settings if you have
set up the print regions properly in Discus.
CREATING DISC LABELS
Discus includes a collection of high-quality
graphic images that you can use as backgrounds
for disc printing, but you can also add your own
images—photographs or bitmap images—to cre-
Elite_Series_User_Guide_lp03.indd 16
2/21/06 9:05:59 AM
Elite Series User Guide
17
and other properties of the selected graphic.
Adjust these settings until you have the image positioned and processed the way that
you want it.
4
You can create a composite image by importing two or more graphics and then positioning them to occupy different areas on the
disc surface. The eye symbol on the image
browser selections determines whether or
not an image is displayed. You can also
shuffle the relative order of images shown
in the browser to determine their position
in the layering, as indicated by the numbers
in the image pane (images to the right are
uppermost in the layering with number 1 assigned to the image at the top).
5
When you have composed the image to your
satisfaction, you can add text to it by clicking
the Text tab (as described in the next section)
or output it by clicking the Print tab.
6
Save the image for later use by choosing
Save from the File menu and storing the label in an appropriate location. If you choose
to store the label in the Print Files folder in
the FlexWare Files folder, the label will appear in the options under Old Projects when
you next open Discus.
Elite_Series_User_Guide_lp03.indd 17
To add text to an image
1
With a background image or Paint background displayed on the image area within
Discus, click the Text tab. The Text window
appears with options for creating straight
and curved text entries in a variety of fonts,
colors and effects.
2
Click the New button to begin text entry. A
dialog box appears, which will accept your
typed text.
3
Enter the text for the label in the text box. If
you want to enter symbols or foreign characters, click the Symbols button and make your
choices from the symbols that appear. Once
you have finished the text entry, click OK.
Discus displays your entry in the center of
the disc image area.
4
Click and drag the text to the approximate
area where you want it to appear. If the text
is hard to read against the image background, change the color for greater contrast
by using the color options at the bottom of
the window.
5
Make any additional changes to the size,
color, effects, font selection, or paths followed by the text. The intuitive controls
provided by Discus let you immediately view
the results of your changes.
2/21/06 9:06:01 AM
Using Discus
18
6
When you are satisfied with the appearance
of the label, you can save it for later use.
Select Save from the File menu and choose
a suitable location. If you select a destination
under My Documents, FlexWare Files, Print
Files, your label will appear among the option under Old Projects when you first start
Discus.
7
If you want to print the label from FlexWare,
click the Print tab and make any quality setting adjustments. Then press the Print to File
button and specify a filename and destination. Do not change the .prn file extension;
FlexWare relies on this extension to recognize valid print files. The next time you run
FlexWare, you can select this file by name for
disc printing operations.
Note: Unlike disc images, labels don’t take up a
tremendous amount of hard drive space so you
can effectively store your labels on the system
and create very large libraries of available print
images for use in duplication jobs.
ADJUSTING PRINTER SETTINGS FOR
BEST RESULTS
The disc printer included with Elite series duplicators can be configured to accommodate a variety
of printing tasks. Use the printer settings that
match your intended project goals.
•
If you’re printing routine discs for distribution
within your organization, you might want
to lower the print quality settings to speed
printing operations.
•
For corporate presentations and customeroriented discs, the highest quality settings
are more likely to meet your goals.
In all cases, using high-quality media with a
smooth, consistent printing surface, such as Disc
Makers Ultra, can improve your results.
Elite_Series_User_Guide_lp03.indd 18
2/21/06 9:06:01 AM
Elite Series User Guide
19
Chapter 5: Using Utilities
Use the FlexWare utilities, available through the
Utilities icon in the main program or the initial
easy access icons that appear when FlexWare first
starts, to perform a number of useful operations.
You can diagnose operational problems, update
your equipment, align the automated mechanisms for the duplicator robotics, manually control
the unit, as well as calibrate and configure the
duplicator.
To print your own disc label
1
Place a blank printable disc in the input
spindle, label side up.
2
Open the Utilities option and click the Print
MY Disc Label button within the Diagnostics
tab. A file selection dialog box appears.
3
Select the print file to use for the label
printing. Valid print files have a PRN extension. Once you click OK to confirm the file
selection, the Diagnostics start the printing
process by retrieving a disc from the input
spindle.
4
When the printing is complete, the Diagnostics unload the printed disc onto the output
spindle.
RUNNING DIAGNOSTICS
Elite series duplicators include built-in diagnostic
routines to confirm the operation of the autoloader, printer, and drive loading. Use these diagnostics whenever you want to make sure the equipment is operating correctly. This is particularly
useful before you begin a large duplication job.
Elite_Series_User_Guide_lp03.indd 19
2/21/06 9:06:02 AM
Using Utilities
20
To print a test label
1
Place a blank printable disc in the input
spindle, label side up.
2
Open the Utilities option and click the Print
Test Label button.
3
The Diagnostics load the printable disc into
the printer and print a test pattern on the
surface.
4
The completed test print disc is unloaded
onto the output spindle.
To run diagnostics
1
2
3
4
Unload any discs from the printer and drives.
Click the Run Diagnostics button.
Note the status of the numbered indicators
on the duplicator display. Green circles illustrate the functions being tested. A red circle
indicates a failure at the indicated point. You
can also follow the progress of the testing
by reading the log entries on the status line
above the duplicator figure.
Once complete, the status line displays either
a failure condition or the message Diagnostic
Complete.
To run diagnostics without the printer
1
Open a drive tray and place a disc on the
input spindle.
2
3
Click the Run Diagnostics button.
4
The status line displays the progress of the
test. Green circles on the duplicator display
show successful tests. Red circles indicate
points of failure.
Note: Depending on the nature of any problems
that are detected during the diagnostics, you may
be able to resolve the issues by consulting the
Troubleshooting FAQ or following the procedures
under other Utility tabs, such as the tab to Set
Positions. In cases where the problem can’t be
eliminated by normal means, contact a technical
support representative at Disc Makers by calling
1-888-800-4041.
To position the Disc Pick arm for
shipping
The disc pick arm should be moved to the safe
(parked) position each time the duplicator is
prepared for shipping or whenever the unit is
physically transported to a different location.
1
Remove all discs from the input and output
spindles.
2
3
Open the Utilities option.
4
Ensure that the arm moves into the parked
position resting on the plastic bumper.
5
Complete the packing and transport of the
unit.
6
When the unit is again set up and powered
on, the pick arm automatically returns to its
normal operating position.
Under the Diagnostics tab, click the button
titled Pack Pick Arm for Shipping.
The Diagnostics pick a disc from the input
spindle, drop it into the open drive, retrieve
the disc from the drive tray, and deposit it on
the output spindle.
Elite_Series_User_Guide_lp03.indd 20
2/21/06 9:06:02 AM
Elite Series User Guide
21
UPDATING THE FIRMWARE
The firmware for the autoloader controller and the
printer controller should be updated periodically
when new releases are available. This ensures that
your duplicator will continue to operate efficiently
and eliminates any known problems with autoloader or printer controls.
To update the firmware
1
If you have received a notice that a firmware
update is available or if you have checked
the Disc Makers site (www.dmelite.com) and
found indication of a new firmware release,
download the latest firmware. Store the
hexadecimal file (with an extension of .s19
or .s2) in an accessible location on your hard
drive.
2
Open the Utilities option and select the Firmware tab.
3
Click the Get Current Version button. The
program displays the currently installed
Elite_Series_User_Guide_lp03.indd 21
version of the firmware. Confirm that the version you have downloaded is more recent.
4
Click the Set Firmware File. The Open File
dialog box appears.
5
Navigate to the newly released firmware file
and click Open to select it.
6
Click Reprogram Printer to update the printer
controller firmware.
7
Click Reprogram AutoLoader to update the
autoloader firmware.
8
FlexWare displays the status of the firmware
update operation and indicates when the
process is complete.
SETTING POSITIONS
This utility adjusts the swing of the pick arm to
fine tune automated operations, ensuring that the
trays and spindles are properly aligned with the
arm to receive discs. Under most circumstances,
you should not need to make adjustments to
these positions.
2/21/06 9:06:02 AM
Using Utilities
22
Caution: If performed improperly, this procedure
can cause problems with the duplicator operations. Consult with Disc Makers support if you
need assistance with this procedure.
To use the manual controls
1
Open the Utilities option and select the
Manual Control tab.
2
Click the Calibrate button to gain access to
the single-step controls. FlexWare displays
the available buttons.
3
Use the buttons to test individual functions.
The program displays a message indicating
the status of the operation—whether successful or not.
4
Take any corrective actions necessary according to how these single-step functions are
performed. For example, if an error message
appears “Error Getting CD,” the Set Positions controls may be able to realign the pick
arm movement to better retrieve a disc.
To set positions
1
Open the Utilities option and select the Set
Positions tab. The Set Positions dialog box
appears.
2
Click the Retrieve Current button to display
the existing settings.
3
Use the slider bar for the Printer, Drive, Input,
and Output positions. On the Printer and
Drive side, a negative value repositions the
arm closer to the printer. A positive value
moves the arm away from the printer. On
the Input and Output side, a negative value
moves the arm further left; a positive value,
further right. A value that is plus or minus 10
may be necessary to physically see a change
in the movement of the arm.
4
Click the Submit button to apply the position
settings.
5
Click the Test Positions button to cycle
through the positions and check the new
alignment.
6
Repeat the adjustments as required until you
have each position properly calibrated.
Note: To use the Insert to Drive control, you must
first manually open the appropriate drive tray using the front-panel button. To use the Print from
Drive control, the program prompts you to first
open the drive tray and place a disc in the tray.
CHANGING THE CONFIGURATION
The Configuration tab under Utilities lets you
enable or disable the disc recorders and printer
available to FlexWare. You can also update the
configured autoloader as required.
Correct setting of the positions is essential to
smooth operation of the duplicator. If you do
not have the positions correctly set, the pick arm
may drop media while loading or unload it in the
wrong position on the printer or disc trays, jamming operations.
To change the enabled drives
1
2
Select the Configuration tab under Utilities.
USING MANUAL CONTROLS
3
Click the Update button to confirm your
changes and update the configuration according to the new settings.
The Manual Control tab under Utilities offers a
means to operate the individual components of
the autoloader using single-step commands. This
provides a valuable tool for isolating problems
with the automated mechanisms and pick arm.
Elite_Series_User_Guide_lp03.indd 22
Check or uncheck the drives shown in the
dialog box to set up the appropriate configuration.
Note: For most duplication tasks, at least one
drive must be available to FlexWare to perform an
operation. Do not disable all drives if you intend
to perform a duplication job.
2/21/06 9:06:03 AM
Elite Series User Guide
23
UPGRADING THE SYSTEM
and your image files are stored (usually
Volume C:) and click the Analyze button. Disk
Defragmenter provides a visual indication of
the fragmented files on the hard drive volume and offers a recommendation in a popup box as to whether you should defragment
the volume or not.
If you make hardware additions to your duplicator, you must use the Upgrade dialog box to
register the change to the system.
To upgrade the duplicator for new
drives
1
Complete the installation of the approved
upgrade kit.
2
3
Open the Upgrade tab under Utilities.
4
Click the Submit button to confirm the code
and complete the upgrade process.
4
Click the Defragment button to proceed
with the operation. Disk Defragmenter immediately begins relinking fragmented files
in contiguous order, displaying the results
of the operation graphically. If you have
not defragmented the hard drive volume
recently, the operation could take an hour or
more (depending on the size of the volume
and the speed of the processor). If you need
to perform other tasks on the system while
defragmenting is taking place, you can Pause
or Stop the operation using the buttons in
the dialog box.
5
When done, the Disk Defragmenter displays
the state of the volume, which will be primarily sets of blue bars showing contiguous files.
These repositioned, defragmented files will
be easier for FlexWare to access and burn to
disc.
Enter the Upgrade Code that was supplied
when you obtained your upgrade kit.
DEFRAGMENTING THE HARD DRIVE
A few simple maintenance tasks help keep your
duplicator operating smoothly.
One of the most important activities you can
perform to keep your duplication system running
effectively is to regularly defragment the hard
drive. This operation aligns all files in adjacent
areas on the hard disk, eliminating a common
problem where files are separated into a number
of disconnected segments, which can make it
difficult to access and assemble the complete file
for disc recording. A defragmented hard drive
makes it easy for FlexWare to transfer complete
files to the disc drives, maximizing throughput
and minimizing any chance that recording will be
interrupted.
Perform a complete defragmenting of the hard
drive at least once a week and more frequently if
you are using the duplicator several times a day.
To defragment the hard drive
1
2
Exit all applications.
3
Select the drive volume on which FlexWare
From the Windows Start Menu select
Accessories>System Tools>Disk Defragmenter. The Disk Defragmenter dialog box
appears.
Elite_Series_User_Guide_lp03.indd 23
CLEANING THE DISC DRIVE AND
PRINTER TRAYS
Over time, dust and debris will accumulate on
the disc drive and printer trays. Disc duplication
is a precision operation that works best when all
components are clean. Clean the disc drive and
printer trays whenever you notice any debris on
the surfaces or at least once a week.
To clean the disc and printer trays
1
Press the button on the face of the disc drive
to extend the tray.
2
Using a clean, lint-free cloth, wipe away any
dust or debris from the tray surfaces and surrounding areas.
3
Press the button again to close the drive tray.
2/21/06 9:06:03 AM
Using Utilities
24
4
Press the lower button on front of the printer
cabinet to extend the tray.
5
6
Clean the surface with a lint-free cloth.
Press the button again to close the printer
tray.
Note: Avoid using any harsh cleaners or abrasive
materials on the drive trays. A cloth moistened
with a mild soap solution can be used for stronger
cleaning as long as the surface is dried thoroughly
and no moisture is allowed to enter the interior of
the drive.
Note: A clogged filter can impede air circulation
to the printer and lead to printer problems and
overheating. Replace the filter regularly to avoid
difficulties.
KEEPING THE DUPLICATOR RUNNING WELL
Elite series duplicators require minimal maintenance and operate efficiently for many years if
you follow a few basic guidelines.
•
REPLACING THE PRINTER FILTER
The filter on the back of the printer cabinet
should be replaced after every 2000 disc printings. We recommend that you keep additional
filters available and maintain a log so that you will
know when it is time to replace the filter.
To replace the printer filer
1
2
Turn off power to all equipment.
3
4
Remove and dispose of the old filter.
Remove the plastic filter housing from the
back of the printer cabinet by gently prying it
away from the enclosure.
Insert a fresh filter into the filter housing and
snap the housing back into place on the
printer cabinet.
•
•
The Disc Makers ordering information for this
item is:
Printer Dry Ink Filter, Part number 21202
•
•
Elite_Series_User_Guide_lp03.indd 24
Keep the duplicator clean and use it within
normal office temperature ranges to ensure
optimal operation. This equipment is not
designed for heavy industrial use in an
environment such as a factory floor, machine
shop, or other setting where it could be
exposed to excess particulates or airborne
contaminates. A small, battery-powered
vacuum cleaner designed for computer
system use can be used to clear fan openings
and ventilation slots, as well as the pick arm
and duplicator cabinet.
While Elite series duplicators are rugged and
durable, for trouble-free duplication they
should be set up on a solid operating surface
away from potential sources of shock and
vibration.
We recommend the use of an Uninterruptible
Power Supply (UPS) with built-in surge
protection to isolate the duplicator from
varying voltage levels and power outages.
For best results, use a UPS unit with the
capacity to handle the computer system,
printer, and monitor.
Operate your Elite series duplicator away
from strong electrical fields, such as those
generated by copy machines, industrial
vacuum cleaners, or refrigerators.
Avoid operating your Elite series duplicator
near bright sunlight or very bright indoor
lighting. Optical sensors may not be able to
control robotic movements if the ambient
light sources are too bright.
2/21/06 9:06:04 AM
Elite Series User Guide
25
Chapter 6: Troubleshooting FAQ
Many common duplicator problems can be
quickly solved by referring to the following list of
Frequently Asked Questions.
SYSTEM PROBLEMS
My system won’t shut down while FlexWare is
active.
Finish all current duplication tasks and close
the FlexWare application before shutting down
your system. If FlexWare is performing any tasks,
shutdown is prevented to avoid the possibility of
inadvertently interrupting a duplication job.
SOFTWARE PROBLEMS
When I try to run FlexWare, an error message appears and the program won’t start.
FlexWare must detect the presence of the autoloader unit before it can run. Recheck all connections to the autoloader and ensure that the
USB drivers (provided on an installation disc) are
properly installed.
FlexWare sometimes fails to complete a duplication job or performs erratically.
If you are running other programs while FlexWare
is active, you may be experiencing conflicts with
other software. FlexWare performs most effectively when other applications are closed, including
background utilities that may require frequent
attention by the processor.
PRINTER PROBLEMS
How can I avoid running out of ink during the
middle of a duplication project?
Use the Ink Warning Settings under the Settings
menu in FlexWare to indicate an ink level at
which you want to receive a warning message.
To be very conservative and avoid running out of
ink during long duplication jobs, set the warning level at less than 20 percent. If you typically
perform shorter duplication runs, you may want to
Elite_Series_User_Guide_lp03.indd 25
choose a lower level.
My printer is not available or visible in FlexWare.
Check the separate printer power cable at the
back of the duplicator cabinet to make sure the
AC adapter is securely engaged and connected
to a power outlet. Also check to be sure that the
power button on the front of the printer enclosure
has been powered on (if so, a green light glows
beside the button). The printer power switch is
separate from the duplicator power switch.
AUTOLOADER PROBLEMS
I’m having a problem with discs sticking together
and causing problems with the duplicator robotics.
Excess humidity sometimes causes disc media to
stick together. Try storing your discs in a climatecontrolled environment or using desiccants in the
storage area to lower the moisture content in the
air. Use of higher quality media, such as Disc Makers Ultra, can often help alleviate sticking (visit for
www.discmarket.com for more information).
The pick arm keeps dropping discs from the input
spindle as it tries to load them?
The robotics that control the pick arm rely on
calibrated positions that were preset before the
duplicator was shipped. In some instances, the
positions will need to be adjusted slightly to
compensate for changes that occurred during
shipping. Use the Set Positions feature under
Utilities to make adjustments to the position the
pick arm uses when retrieving blank discs. Similarly, if necessary, adjust any other positions in the
automated process with Set Positions. You can
use the Manual Control buttons in Utilities to view
the motions from point to point individually.
ADDITIONAL PROBLEMS
For a list of additonal problems that you may
encounter when using an Elite series duplicator,
please visit: www.dmelite.com.
2/21/06 9:06:04 AM
Elite_Series_User_Guide_lp03.indd 26
2/21/06 9:06:04 AM