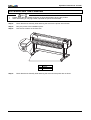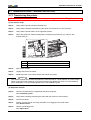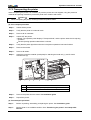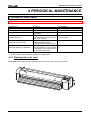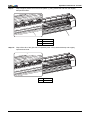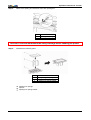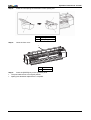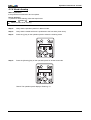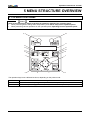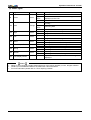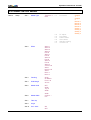
1
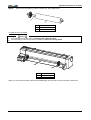
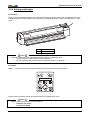
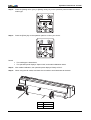
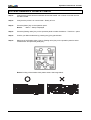
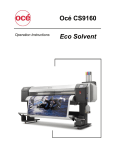
Operation Instructions English VJ-1204 Eco-Solvent Ultra Printer FOR EUROPE ONLY! Operation Instructions VJ-1204 This page is intentionally left blank 2 AP-77170, Rev. 2.0, 2/04/2007 Operation Instructions VJ-1204 COPYRIGHT NOTICE COPYRIGHT © 2007 Mutoh Europe N.V. All rights reserved. This document may not be reproduced by any means, in whole or in part, without written permission of the copyright owner. This document is furnished to support the Mutoh Eco-Solvent Ultra Printer VJ-1204. In consideration of the furnishing of the information contained in this document, the party to whom it is given, assumes its custody and control and agrees to the following: The information herein contained is given in confidence, and any part thereof shall not be copied or reproduced without written consent of Mutoh Europe N.V. This document or the contents herein under no circumstances shall be used in the manufacture or reproduction of the article shown and the delivery of this document shall not constitute any right or license to do so. This manual is intended for the European, Middle East and African (EMEA region) markets only. April 2007 Published: Mutoh Europe N.V., Archimedesstraat 13, B-8400 Oostende, BELGIUM www.mutoh.eu www.mutoh.be WEEE regulations Environmental information Disposal of your old product Your product is designed and manufactured with high quality materials and components, which can be recycled and reused. When this crossed-out wheeled bin symbol is attached to a product it means the product is covered by the European Directive 2002/96/EC Please inform yourself about the local separate collection system for electrical and electronic products. Please act according to your local rules and do not dispose of your old products with your normal household waste. The correct disposal of your old product will help prevent potential negative consequences for the environment and human health. 3 AP-77170, Rev. 2.0, 2/04/2007 Operation Instructions VJ-1204 This page is intentionally left blank 4 AP-77170, Rev. 2.0, 2/04/2007 Operation Instructions VJ-1204 TABLE OF CONTENT 1 Safety instructions....................................................................................................................... 7 1.1 Warnings, cautions and notes................................................................................................. 7 1.2 Important safety instructions ................................................................................................... 8 1.3 Warning labels ...................................................................................................................... 10 1.3.1 Handling the operation procedure labels ....................................................................... 10 1.3.2 Locations and types of warning labels ........................................................................... 10 2 Installation Procedure ............................................................................................................... 13 2.1 Installation environment ........................................................................................................ 13 2.1.1 Environmental conditions for installation........................................................................ 13 2.1.2 Installation space ........................................................................................................... 14 2.2 Unpacking the boxes ............................................................................................................ 15 2.2.1 Unpacking the printer box .............................................................................................. 15 2.2.2 Unpacking the stand box................................................................................................ 15 2.3 Verifying the bundled items................................................................................................... 16 2.3.1 Items in the printer box................................................................................................... 16 2.3.2 Items in the starter kit..................................................................................................... 16 2.3.3 Items in the stand box .................................................................................................... 17 2.4 Name of the parts and functions ........................................................................................... 18 2.4.1 Front section .................................................................................................................. 18 2.4.2 Rear section ................................................................................................................... 19 2.5 Assembling ........................................................................................................................... 20 2.5.1 Assembling the stand..................................................................................................... 20 2.5.2 Mounting the stand to the printer ................................................................................... 22 2.5.3 Removing protective materials....................................................................................... 24 2.6 Levelling the printer............................................................................................................... 25 2.7 Transfer and transportation................................................................................................... 26 2.7.1 Transferring the printer................................................................................................... 26 2.7.2 Transporting the printer.................................................................................................. 27 3 Preparing for a job ..................................................................................................................... 29 3.1 Connecting the power cables................................................................................................ 29 3.2 Switching the power ON / OFF ............................................................................................. 30 3.2.1 Switching the power ON................................................................................................. 30 3.2.2 Switching the power OFF............................................................................................... 30 3.3 Connecting the printer to the workstation.............................................................................. 31 3.4 Installing the ink cassettes .................................................................................................... 32 3.5 Media Handling ..................................................................................................................... 34 3.5.1 Installing roll media ........................................................................................................ 34 3.5.2 Loading roll media.......................................................................................................... 35 3.5.3 Replacing roll media....................................................................................................... 36 3.5.4 Setting media type ......................................................................................................... 40 3.6 Performing a nozzle check.................................................................................................... 42 3.7 Head height adjustment ........................................................................................................ 43 3.8 Step adjustment .................................................................................................................... 45 5 AP-77170, Rev. 2.0, 2/04/2007 Operation Instructions VJ-1204 4 Periodical Maintenance ............................................................................................................. 49 4.1 Done by end user.................................................................................................................. 49 4.1.1 Cleaning the outer case ................................................................................................. 49 4.1.2 Cleaning inside the printer ............................................................................................. 50 4.1.3 Replacing the spitting box absorbent ............................................................................. 52 4.1.4 Head cleaning ................................................................................................................ 55 4.1.5 Cleaning the wiper ......................................................................................................... 56 4.2 Done by Authorized Mutoh Technician ................................................................................. 59 4.2.1 Periodical replacement of parts...................................................................................... 59 4.2.2 Periodical Inspection Part List........................................................................................ 59 5 Menu structure overview........................................................................................................... 61 5.1 Operation panel .................................................................................................................... 61 5.2 Panel Setup menu ................................................................................................................ 64 6 AP-77170, Rev. 2.0, 2/04/2007 Operation Instructions VJ-1204 1 SAFETY INSTRUCTIONS 1.1 WARNINGS, CAUTIONS AND NOTES The contents of alarm displays included in this User’s Guide and warning labels stuck on the main body of the printer are classified into three categories, according to degree of danger. Understand the meaning of the following warning terms and follow the contents (instructions) in this guide. Warnings Important Caution Notes Meaning If ignored, it would lead to dangerous situations where death or serious injury may be caused. If ignored, it would lead to a dangerous situation, causing slight or middle class illness, or damage to the product or parts of the product. Used for a special caution and for information which needs to be emphasized 7 AP-77170, Rev. 2.0, 2/04/2007 Operation Instructions VJ-1204 1.2 IMPORTANT SAFETY INSTRUCTIONS Symbol Meaning Indicates ‘prohibited’ operations. Indicates required operations. Important Do not install the printer places where there is a possibility that the printer may be damaged or might fall by chance. • On a shaky stand • Slanting location • Places where vibration of other machines etc. is transmitted Do not stand on the printer or do not place heavy things on top of it. The printer may be damaged or might fall by chance. When not in use, cover the printer with a blanket and do not close the vent. If the vent is closed, the printer could accumulate heat inside and may cause fire. Do not install the printer in places where the humidity is high and in a dusty environment. It could lead to electric shock and fire. Do not use a damaged power cable. It could lead to an electric shock and fire. Do not take out or insert the power plug with wet hands. This could lead to an electric shock. Do not connect earth cables in the following areas : • Gas pipes. Doing so may cause fire or an explosion. • Earth terminals for telephone lines or lightning rods. Doing so may cause a large flow of voltage if lightning occurs. • Water pipes or faucets. If there is a plastic part in the pipe, the grounding will not work correctly. Do not store combustible materials on the print platform. It could lead to fire when raising the temperature. Do not insert or drop metal or objects which are easily combustible through the openings such as fresh air inlet into the printer. It could lead to an electric shock and fire. When foreign substances or liquids such as water entered the printer, do not use the printer. It could lead to an electric shock and fire. Immediately switch off the power, disconnect the power plug from the electric socket, and contact your local MUTOH dealer. While installing optional items, be sure to switch OFF the power of the printer and pull out the power plug. It could lead to an electric shock. Wire the various codes (cable) as explained in the User’s Guide. Wrong wiring could cause fire. Be sure to use the power cable supplied with the printer. If other power cables are used, it could cause an electric shock or fire. Make sure to use only the specified power supply (AC 100 V - 120 V or AC 220 V - 240 V). If a power supply other than the specified voltage is used, it could cause an electric shock and fire. Take power for the printer directly from the power socket (AC 100 V - 120 V or AC 220 V - 240 V). Do not use complex multiple plugs on the same socket. This could generate heat and might cause fire. Be sure to use a dedicated power socket with earth wire for the power supply, and connect it to the earth wire. If the earth wire is not connected, an electric shock or fire may occur. The waste fluid from the printer should be considered as industrial waste. Proper waste fluid disposal according to industrial waste disposal laws of your local governments are required. Consign disposal of waste fluids to specialized processor. 8 AP-77170, Rev. 2.0, 2/04/2007 Operation Instructions VJ-1204 Caution Pay attention to the following points, while handling the power cable. • Do not place or keep heavy objects on the power cable. • Do not bend, twist or pull the power cable by force. • Do not route the power cable near heating appliances. Pay attention to the following points while handling the power supply plug. Any mishandling of the power cable could cause a fire. • Make sure that no foreign substances such as dust etc. are stuck to the power plug. • Make sure that the power plug is firmly inserted to the edge of the power socket. While handling the ink cassettes, pay attention so that the ink does not get into your eyes or stick to your skin. If the ink gets into your eyes or sticks to your skin, immediately wash off with water. It might possibly cause irritation and light inflammation of your eyes. In cases of any abnormality, consult a physician immediately. Do not disassemble the ink cassettes. If disassembled, there is a possibility that the ink might come into contact with your eyes or skin. Be careful to see that your fingers are not caught in-between opening and closing the media cover. Do not operate the media set lever during printer initialization. If the carriage portion and the pressurizing roller portion touch each other, there is a possibility that the printer may break down. Do not touch the media guide during printing. It is hot and may cause burns. Do not touch the media feed slot, platen or media guide while heaters are operating. They are hot and may cause burns. Do not use volatile solvents such as thinner, benzene, or alcohol on the printer. These could damage the paint. Be careful that moisture does not enter the printer. There is a possibility that the electric circuits inside the printer might get short circuited. Do not open covers attached with screws under any circumstance. This could cause an electric shock or printer breakdown. While cleaning with the wiper • Do not touch the wiper and head cap unit. Head cleaning may not be executed correctly because of the grease attached. • Make sure to wipe the print head with a dry poly-knit wiper. Do not make the main body of the printer slanting or place it in a vertical position or do not keep the printer upside down. There is a possibility that ink inside the printer may leak. Moreover, normal operation after shifting (to these positions) cannot be guaranteed. Opening and moving the printer to the installation place should be done by : • VJ-1204: 2 or more persons While taking out the printer from the container box, make sure to remove the vinyl sheet and hold the handles on the printer side. If the printer is lifted with the vinyl sheet attached, there is a possibility that it might fall and might be damaged. Installation of the stand to the printer should be done by : • VJ-1204: 2 or more persons While installing the stand, be sure to switch OFF the printer power and to pull out the power plug. It could lead to an electric shock. If the printer is not used for a longer period, make sure to pull out the power plug from the power socket for safety reasons. Make sure to connect an earth wire to the earth connection which meets the following standards : • Earth terminal of power socket • Earth wire with copper plate which is buried at a depth of 650 mm or more. Set the roll media on an even surface such as a desk etc. If the roll media is set in such a way that the scroller is standing vertically, there is a possibility that the scroller might get damaged. Keep the working area well-ventilated. When printing is finished, the media guide is at high temperature. Wait until the media guide cools off. Pay attention to the following points when you cut roll media. Mishandling the razor blade may cause an injury on your finger or hand. • When you hold media, do not place your finger on the media cut groove. • Move the razor blade along the media cut groove. Be sure to switch OFF the power, and disconnect the power plug when cleaning the printer. Move the printer maintaining it in a horizontal position. Transfer the printer maintaining the horizontal position. Do not make the main body of the printer slanting or place it in a vertical position, nor keep the printer upside down. There is a possibility that the ink inside the printer may leak. Moreover, normal operation after shifting to these positions cannot be guaranteed. 9 AP-77170, Rev. 2.0, 2/04/2007 Operation Instructions VJ-1204 1.3 WARNING LABELS In this section, the handling, location and types of warning labels are explained. A warning label is used on parts of the printer which especially need caution. Understand the locations and the descriptions of the danger associated with each label before operating the printer. 1.3.1 Handling the operation procedure labels • • • Notes Check whether all the warning labels can be read. If the letters or illustrations on the label are not clear, remove the dirt from the label. Use cloth, water and neutral detergent for removing dirt from a warning label. Avoid using either organic solvents or gasoline. It is necessary to replace the labels if they are damaged, lost or illegible. If the warning labels have to be replaced, contact your local MUTOH dealer. 1.3.2 Locations and types of warning labels Locations of the warning labels are shown in the following figures. 2 1 3 4 5 6 10 AP-77170, Rev. 2.0, 2/04/2007 Operation Instructions VJ-1204 No. Types of warning label 1 2 3 4 5 6 11 AP-77170, Rev. 2.0, 2/04/2007 Operation Instructions VJ-1204 This page is intentionally left blank 12 AP-77170, Rev. 2.0, 2/04/2007 Operation Instructions VJ-1204 2 INSTALLATION PROCEDURE 2.1 INSTALLATION ENVIRONMENT Be sure to read and understand the safety warnings before handling the printer. 2.1.1 Environmental conditions for installation Floor strength of installation place Power Specifications Power Supply Frequency Range Power Capacity Environmental conditions Operative Condition Guaranteed range of printing accuracy Change rate Archiving environment More than 2940 Pa (300 kg/m²) AC90V – 132V/198V – 264V 50/60Hz ± 1Hz More than 10 A Temperature: 20°C to 32°C Humidity: 40% to 60%, no condensation Temperature: 20°C to 30°C Humidity: 40% to 60% Temperature: within 2°C per hour Humidity: within 5% per hour Temperature: -20°C to 60°C Humidity: 5% to 85% (No Condensation, Ink unfilled) Notes • Concerning temperature and humidity, avoid following locations : o Places where temperature or humidity may rapidly change, even though within the required conditions. o Places that receive direct sunlight, increased illumination or direct air, for example from an air conditioner. • To keep the temperature and humidity constant, install this product in a location where the air condition is adjustable. 13 AP-77170, Rev. 2.0, 2/04/2007 Operation Instructions VJ-1204 2.1.2 Installation space Install on a level floor which meets the following conditions. It has enough strength to support the weight of the printer and the stand • Notes For the weight of the printer and the stand, refer to the Operation Manual. A B C D 500 mm 1000 mm 1000 mm 1000 mm E F G 14 1440 mm 3000 mm 2660 mm AP-77170, Rev. 2.0, 2/04/2007 Operation Instructions VJ-1204 2.2 UNPACKING THE BOXES Be sure to read and understand the safety warnings before handling the printer. 2.2.1 Unpacking the printer box Step 1 : Carry the box to where you will unpack it. Step 2 : Remove the bands. Step 3 : Open the box and take out the following components: • Accessories box • Scroller No. 1 2 3 4 Name Printer box Scroller Packing material Starter kit 2.2.2 Unpacking the stand box Step 1 : Carry the box to where you will unpack it. Step 2 : Open the box and take out the components. 15 AP-77170, Rev. 2.0, 2/04/2007 Operation Instructions VJ-1204 2.3 VERIFYING THE BUNDLED ITEMS After unpacking, please verify that the product is not damaged and that no components are missing. • • Notes After unpacking, please verify that the product is not damaged and that no components are missing. If so, Please contact your local MUTOH dealer. 2.3.1 Items in the printer box No. 1 2 Name Printer body A0 Scroller 2”-3” compatible Quantity 1 1 No. 1 2 3 4 5 Name Power Cable Europe Power Cable UK User’s Guide CD with Mutoh manuals Ink starter set 4 cleaning cassettes 4 ink cassettes Polyknit wipers Quantity 1 1 1 1 2.3.2 Items in the starter kit 6 16 1 30 AP-77170, Rev. 2.0, 2/04/2007 Operation Instructions VJ-1204 2.3.3 Items in the stand box No. 1 2 3 4 5 6 7 8 17 Name Left support Right support Caster section (left, right) Central beam Book holder Hexagon socket head cap screw Butterfly bolt Hexagonal wrench Quantity 1 1 2 1 1 8 2 1 AP-77170, Rev. 2.0, 2/04/2007 Operation Instructions VJ-1204 2.4 NAME OF THE PARTS AND FUNCTIONS 2.4.1 Front section 3 9 10 2 7 1 8 4 5 6 N° 1 2 Name Media hold lever Operation panel 3 Front cover 4 5 6 Waste fluid tank Stand Book holder 7 Media guide 8 9 Media cut groove Pressurizing lever 10 Platen Function To fix and release media. To set the operation conditions and various function settings. To protect the user from coming in contact with the driving mechanism during operation. To collect the printer’s waste ink. To install the printer on a levelled floor. To store printer documentation. To guide the media smoothly through the printer. The printer also has an incorporated heater to dry the ink on the media. To guide a knife straightly when cutting off the media. Press and hold the media when printing. To guide the media smoothly through the printer. The printer also has an incorporated rest heaters to fix the ink on the media. 18 AP-77170, Rev. 2.0, 2/04/2007 Operation Instructions VJ-1204 2.4.2 Rear section 7 5 1 4 K C M Y 6 No. 1 3 4 5 6 Name AC inlet Network interface connector USB connector Scroller receiver Media feed slot Ink cassette slots 7 Media guide 2 4 3 2 Function To connect the power cable. To connect the network interface cable. To connect the USB cable. To install the scroller with roll media. To insert roll media. To install the ink cassettes. Used for smoothly feeding through media when the media is set or printed. The ValueJet 1204 printer also incorporates a pre-heater element to warm up the installed media before printing. 19 AP-77170, Rev. 2.0, 2/04/2007 Operation Instructions VJ-1204 2.5 ASSEMBLING Be sure to read and understand the safety warnings before handling the printer. 2.5.1 Assembling the stand Step 0 : • • Follow the steps shown below to assemble the right leg of the stand. Attach the right support (1) to the caster section (3). Fasten two hexagon head cap screws (4) with the hexagonal wrench. No. 1 2 3 4 Step 0 : Assemble the left leg of the stand in the same way as step 1. No. 1 2 3 4 Step 0 : Name Right support Caster lock Caster section Hexagon head cap screws Name Left support Caster lock Caster section Hexagon head cap screws Mount the central beam (1) with four hexagon head cap screws (4) to the left and right legs. 20 AP-77170, Rev. 2.0, 2/04/2007 Operation Instructions VJ-1204 Step 4 : Fasten the hexagon head cap screws (4) with the hexagonal wrench. No. 1 2 3 4 Step 0 : Name Central beam Left leg Right leg Hexagon head cap screws Attach the book holder to the right side of the stand as shown below. No. 1 2 Step 0 : Name Leg (right) Book holder Verify that each component is fastened firmly by gently shaking the stand. 21 AP-77170, Rev. 2.0, 2/04/2007 Operation Instructions VJ-1204 2.5.2 Mounting the stand to the printer Step 0 : Lock the two casters on the front side of the stand as shown on the image below. No. 1 2 Step 0 : • Name Casters Caster locks Lift the printer main body by way of the hand grips (1), and align the rear side rubber feet (3) with the holes of the stand. Notes On top of each leg as well as on the underside of the printer body there are arrows pictured. To correct install, make sure that the arrows of the legs point in the same direction of the arrow on the body. No. 1 2 3 4 22 Name Hand grips Rubber grips Rubber feet Media guide AP-77170, Rev. 2.0, 2/04/2007 Operation Instructions VJ-1204 Step 3 : Place the product on the stand so that the rear rubber leg tips fit into the holes on the stand. No. 1 2 Step 0 : Fix the printer to the stand by fastening the two butterfly bolts. Step 0 : Secure the printer to the stand by bolting the butterfly bolts. No. 1 23 Name Printer main body Holes on the stand Name Butterfly bolts AP-77170, Rev. 2.0, 2/04/2007 Operation Instructions VJ-1204 2.5.3 Removing protective materials The printer has protective materials in the places shown below. Step 5 : Remove all tapes from each cover. Step 5 : Open the front cover, unscrew the butterfly screw (2) and remove the metal plate (1) fixing the head unit. • Notes Do not throw away this metal plate, you will need it again if you ever want to transfer or transport your printer. No. 1 2 24 Name Metal plate Butterfly screw AP-77170, Rev. 2.0, 2/04/2007 Operation Instructions VJ-1204 2.6 LEVELLING THE PRINTER • • Notes Please check that the butterfly bolts are not loose before/after carrying this product. When transferring or carrying outside, separate the printer and the stand. Step 2 : Check that the two butterfly bolts attaching the stand to the printer are not loose. Step 2 : Carry the printer to the installation place. Step 2 : Lock the two casters on the front side. 1 No. 1 2 Step 2 : Name Caster Caster lock Check that the two butterfly bolts attaching the stand and the printer are not loose. 25 AP-77170, Rev. 2.0, 2/04/2007 Operation Instructions VJ-1204 2.7 TRANSFER AND TRANSPORTATION 2.7.1 Transferring the printer Be sure to read and understand the safety warnings before handling the printer. (1) Pre-transfer steps Step 0 : Verify that the printer has been switched OFF. Step 0 : Verify that the butterfly bolts attaching the stand with the printer, are not loosened. Step 0 : Verify that the printer head is in the rightmost position. Step 0 : Attach the protective material (metal plate) for attaching the head unit (1), and fix it with thumbscrews (2). 1 2 No. 1 2 Name Protective material (metal plate) for attaching the head unit Thumbscrew Step 0 : Remove the scroller. Step 0 : Unplug and remove all cables. Step 0 : Release the lock of the caster wheels and transfer the printer. • Notes The casters supplied with the dedicated stand are manufactured for a small transfer on a plain surface. When moving the printer outdoors, and in places with big step differences, then move the stand and printer separately. For further details please refer to the Installation guide. (2) Steps after transfer Step 0 : Choose a suitable place for installation and place the printer. See “Installation guide” Step 0 : Verify that the butterfly bolts fixing the stand with the printer are not loosened. Step 0 : Connect all cables. Step 0 : Perform a nozzle check, and verify that there is no clogging in the printer head. See “Nozzle check” Step 0 : Perform a head alignment. See “Adjust print” 26 AP-77170, Rev. 2.0, 2/04/2007 Operation Instructions VJ-1204 2.7.2 Transporting the printer When transporting the printer, it is necessary to pack the printer as it was shipped, using the protective materials and packing materials to protect the printer from vibration and shocks. • Notes When transporting the printer, consult your MUTOH product dealer. (0) Pre- transport procedure Step 0 : Switch ON the printer. Step 0 : Verify that the printer is in Normal mode. Step 0 : Remove all ink cassettes. Step 0 : Switch OFF the printer. • Result: The operation panel displays "Transport Mode", and the printer starts the ink rejecting operation. • The ink rejecting operation takes about 2 minutes. Step 0 : Verify that the power light faints when the ink rejection operations has been finished. Step 0 : Remove the scroller. Step 0 : Remove all cables. Step 0 : Attach the protective material (metal plate) for attaching the head unit (1), and fix it with thumbscrews (2). 1 2 No. 1 2 Name Protective material (metal plate) for attaching the head unit Thumb screw Step 0 : Remove the printer from the stand. See Installation guide Step 0 : Repack the printer. (0) Post-transport procedure Step 1 : Perform unpacking, assembling, and placing the printer. See Installation guide Step 1 : Set the printer in an available condition. See “Transferring the printer” and “Steps after transfer” 27 AP-77170, Rev. 2.0, 2/04/2007 Operation Instructions VJ-1204 This page is intentionally left blank 28 AP-77170, Rev. 2.0, 2/04/2007 Operation Instructions VJ-1204 3 PREPARING FOR A JOB 3.1 CONNECTING THE POWER CABLES Be sure to read and understand the safety warnings before handling the printer. Step 4 : • Make sure that the power key is Switched OFF. Notes The power is switched ON when the [Power] key of the operation panel is pressed. In that case, press the key once again to switch OFF the power. Step 4 : Plug the power cable to the AC inlet at the back of the printer. 1 2 No. 1 2 Step 4 : Name AC inlet Power cable Correctly insert the power cable plug into the power socket. 29 AP-77170, Rev. 2.0, 2/04/2007 Operation Instructions VJ-1204 3.2 SWITCHING THE POWER ON / OFF 3.2.1 Switching the power ON Step1: Press the [Power] key on the operation panel to power ON the printer. Step2: The Power lamp on the operation panel lights up in green. Step3: The printer starts initial operation. Step4: When the initial operation is complete, the printer enters the normal status. 3.2.2 Switching the power OFF Step1: Regarding the operation of the printer, verify the following: • printing or other operations are not in progress • the operation panel is in normal status Step2: Press the [Power] key on the operation panel to power OFF the printer. The Power lamp on the operation panel goes out. • • Notes If the operation panel is in the following status, the power is ON. o The [Power] key is pressed. o The Power lamp lights up in green Press the key once again to power off the printer. Step3: The printer starts operating to turn the power OFF. - • The operation panel displays “Power Off”. All the lamps on the operation panel and the LCD monitor are turned OFF. The printer automatically powers OFF. Notes After Switching OFF the printer, wait for 10 seconds or longer to power it ON again. When not using the printer for a long period, push the media lever to the back. 30 AP-77170, Rev. 2.0, 2/04/2007 Operation Instructions VJ-1204 3.3 CONNECTING THE PRINTER TO THE WORKSTATION • Switch OFF both the printer and the workstation. • Plug the network interface cable (1) into the network interface connector (2) located at the back of the printer. 2 1 No. 1 2 • Name Network interface cable Network interface connector Secure the network interface cable (1) with the cable clip (2). See image below. 2 No. 1 2 1 Name Network interface cable Cable clip • Plug the other end of the network interface cable into your workstation. • • Notes Refer to the Operation Manual of your workstation for the connection to your workstation. For network settings on the side of the printer, refer to the MUTOH Eco-Solvent Ultra Printer VJ-1204 series User’s Guide. 31 AP-77170, Rev. 2.0, 2/04/2007 Operation Instructions VJ-1204 3.4 INSTALLING THE INK CASSETTES Be sure to read and understand the safety warnings before handling the printer. Step 3 : Switch ON the printer. • The printer initializes. • After the initial operation, the operation panel displays “Insert CleaningCart”. Step 3 : Take out the cleaning cassette from the solvent resistant blister. Step 3 : Install the 4 cleaning cassettes into the ink cassette slots. Install the cleaning cassette with the arrow mark “▲” face-up and pointing to the rear of the printer. Insert the cassette as far as possible. The product starts filling cleaning liquid now. • • 1 2 No. 1 2 Step 3 : Name Cleaning cassette Ink cassette slots After the cleaning liquid is filled, take out the cleaning cassettes. • • The operation panel displays “during washing” and the printer starts head cleaning. After the head cleaning, the operation panel displays “Insert Ink cartridge”. 32 AP-77170, Rev. 2.0, 2/04/2007 Operation Instructions VJ-1204 After the head cleaning, take out the ink cassette from the solvent resistant blister and shake each cassette gently two or three times before installing. Step 5 : • • • The slots for ink cassettes are specified depending on colours of the ink cassettes. Match the colour marked at the front of the slots with the colour of the ink cassette. Install the ink cassette with the arrow mark “▲” face-up and pointing to the rear of the printer. Insert the cassettes as far as possible. The printer starts filling ink now. 1 2 3 4 5 No. 1 2 3 4 5 • • • Step 3 : Name Ink cassette Ink cassette Ink cassette Ink cassette Ink cassette slot K slot C slot M slot Y “Ink refill **%” is displayed on the operation panel and ink replenishment starts. The ink replenishment takes about five minutes. Initial Ink replenishment and pause operation are repeated during initial filling. When “100%” is displayed, the ink replenishment is complete. After the ink replenishment is completed, the operation panel displays “Media End”. Notes After an initial ink fill, the following can occur : • Printed lines become blurred. • White lines appear in the prints. If this is the case, perform a head cleaning, two to three times, as described in the User’s Guide, and check the results. If the quality of the printed image has not improved, even after performing head cleaning, then leave the printer unused for more than one hour. After that, perform a head cleaning again and check the printed image. If the quality still hasn’t improved, then contact your local MUTOH dealer. 33 AP-77170, Rev. 2.0, 2/04/2007 Operation Instructions VJ-1204 3.5 MEDIA HANDLING 3.5.1 Installing roll media Step 2 : Remove the movable flange from the scroller. Step 2 : Install the optional three-inch core adapters : • If using media on a 2 inch core: Don’t use the three-inch core adapters, go to step 3. • If using media on a 3 inch core : Click a three-inch core adapter (3) on the fixed flange (2) and the movable flange (1) as shown on the image below. No. 1 2 3 Name Movable flange Fixed flange Three-inch core adapter Step 2 : Put the roll media on the scroller. Step 2 : Push the roll media (2) on the scroller and slide it over the fixed flange (1). No. 1 2 1 Name Fixed flange Roll media 2 Move the movable flange (1) over the scroller and firmly press the flange inside the roll media core. See image below. Step 2 : 2 1 No. 1 2 Name Movable flange Roll media Put the scroller (1) on the printer’s scroller receiver (4) so that the fixed flange (2) is facing the ink cassette slot side. See image below. Step 2 : 1 2 3 No. 1 2 3 4 4 Name Scroller Fixed flange Ink cassettes Scroll receiver 4 Make sure to attach or detach the scroller bar horizontally 34 AP-77170, Rev. 2.0, 2/04/2007 Operation Instructions VJ-1204 3.5.2 Loading roll media The following sizes of media can be used with the printer: VJ-1204 · Maximum media width: 1300 mm · Maximum print width: 1200 mm · Maximum media length: 50 m · Maximum print length: 18 m Switch ON the printer. Result: · The printer initializes. · The operation panel displays “Media End”. Be sure to read and understand the safety warnings before handling the printer. Step 6 : Push the media hold lever (1) backward as indicated on the image below. 1 No. Name Media hold lever 1 Result: The operation panel displays "Lever Up". Step 6 : Slide the roll media (1) into the media feed slot (2) as shown on the image below. No. 1 2 Name Roll media Media feed slot 1 2 Step 6 : Open the front cover (1), and pull out the roll media (2) about 0,5 m. 1 No. 1 2 Name Front cover Roll media 2 35 AP-77170, Rev. 2.0, 2/04/2007 Operation Instructions VJ-1204 Wind back the roll media (1) with the scroller (2) while pressing down the media at the front side of the printer. This will reduce bending and avoid slant of the media. See images below. Step 4 : No. 1 2 2 Step 6 : 1 Name Roll media Scroller 2 Pull the media hold lever (1) forward and close the front cover as shown below. 1 No. 1 • Name Media hold lever Notes If the front edge of the roll media is not straight, cut it straight. For the cutting method, see User’s Guide. 3.5.3 Replacing roll media (1) Replacement time Replace roll media if... …the roll media runs out. • The operation panel displays "End of Roll". • If the media runs out during printing, the plotter stops printing. …you want to change the media type. (2) Replacement steps To replace roll media, follow the procedure below. Note that the procedure consists of 2 parts. Be sure to read and understand the safety warnings before handling the printer. 36 AP-77170, Rev. 2.0, 2/04/2007 Operation Instructions VJ-1204 1. Remove the installed roll media. Step 2 : Verify that • the printer has been switched ON, • the printer is in Normal mode, and • the printer does NOT print Step 2 : Push the media hold lever (1) backward (lever up). See image below. 1 Nr. 1 Step 2 : Name Media loading lever Lift both ends of the scroller (2) and gently wind up the roll media (1). 2 1 Nr. 1 2 2 Name Roll media Scroller 37 AP-77170, Rev. 2.0, 2/04/2007 Operation Instructions VJ-1204 Step 4 : Remove the scroller (1) from the scroller receiver as illustrated below, and place it on a horizontal surface. 1 Nr. 1 Step 5 : name Scroller Hold the movable flange, and tap the scroller as illustrated below to remove the movable flange. 1 Nr. 1 2 • 2 name Movable flange Scroller Notes When removing roll media, do not drop it. Doing so may damage the scroller. 38 AP-77170, Rev. 2.0, 2/04/2007 Operation Instructions VJ-1204 Step 6 : Remove the roll media (1) from the scroller (2). See image below. 2 1 Nr. 1 2 Name Roll media Scroller 2. Install the new roll media • • Notes For loading the roll media, refer to Handling and installing media For roll media you do not use, store it according to Notes on storing media 1 2 Nr. 1 2 name Movable flange Scroller When you do not set roll media, attach the movable flange to the scroller to set the scroller to the printer. 39 AP-77170, Rev. 2.0, 2/04/2007 Operation Instructions VJ-1204 3.5.4 Setting media type Introduction: When you have loaded the media in the ValueJet, you’ll have to set the media type. The Media setup menu is displayed after the media hold lever is pushed from the backward position to the forward position. (= lever down) 1 No. 1 • Name Media hold lever Notes The printer starts the media initialization without setting the media type when o The [Cancel] key of the operation panel is pressed. o No key operations are performed on the operation panel for 10 seconds. Procedure: Step 1 : Verify that the printer has been switched ON, and the media has been loaded. Result: After the media is loaded, the display shifts to the Media setup menu. • Notes Refer to the following topics for media loading: o Installing roll media o Loading roll media 40 AP-77170, Rev. 2.0, 2/04/2007 Operation Instructions VJ-1204 Step 2 : Press the [Setting value +] key or [Setting value-] key on the operation panel to select the correct media type. Step 3 : Press the [Enter] key on the operation panel to confirm your choice. Result: • • The media type is determined The operation panel displays "Paper Initial", and media initialisation starts. Step 4 : After media initialization, the operation panel displays "Ready to Print". Step 5 : When using the roll media, wind back the roll media to avoid slackness at the back. 2 1 No. 1 2 2 Name Roll media Scroller 41 AP-77170, Rev. 2.0, 2/04/2007 Operation Instructions VJ-1204 3.6 PERFORMING A NOZZLE CHECK Step 5 : Verify that the printer has been switched ON and that media -roll or sheet- more than A3 size has been loaded. Step 5 : Verify that the printer is in normal mode – Ready to Print. Step 5 : Press the [Menu] key on the operation panel. Result: · Menu1 – Setup is displayed Step 5 : Press the [Setting value-] key on the operation panel to select the Menu2 – Test Print > option Step 5 : Confirm your Menu2 selection by pressing the [>] key panel button. Step 5 : Make use of the [Setting value +] key or [Setting value-] key on the operation panel to select ‘NozzleCheck’ and press the [Enter] key. Result: Printing of the Nozzle check pattern starts. See image below. 42 AP-77170, Rev. 2.0, 2/04/2007 Operation Instructions VJ-1204 3.7 HEAD HEIGHT ADJUSTMENT When used? Use the head height adjustment feature to prevent the print head from touching the media, when printing at high speeds or when using strongly curved media. • • • Notes If the head height adjustment lever is raised, high print quality will not be guaranteed. Do not open the front cover nor change the head height during printing. If the head height is changed, the head alignment will be changed and high print quality will not be guaranteed. To perform a head alignment, refer to “Head height alignment” Procedure: Step 2 : Open the front cover (1). See image below. 1 No. 1 Name Front cover 43 AP-77170, Rev. 2.0, 2/04/2007 Operation Instructions VJ-1204 Step 2 : Change the head height by moving the head height adjustment lever (1). See images below. High Normal 1 1 Head height: Normal No. 1 Result: Step 2 : Head height: High Name Head height adjustment lever · The High indication light on the operation panel lights up in green Close the front cover (1). See image below. 1 No. 1 Name Front cover 44 AP-77170, Rev. 2.0, 2/04/2007 Operation Instructions VJ-1204 3.8 STEP ADJUSTMENT After every printed swat, the media is fed a certain distance. Depending on the kind of media (weight, backing) another media feed compensation has to be set. This to avoid the following phenomenon: • • Printed swats overlap. White lines between every swat. In such cases, follow the procedure below and adjust the media feed compensation value. Step 0 : Display the step adjustment menu on the operation panel. Step 0 : Press the [Menu] key on the operation panel. • Shift to the Setup menu display. • The operation panel displays "Menu 1: Setup>". Step 0 : Press the [>] key on the operation panel. • The operation panel displays "Set1: MediaType". Step 0 : Press the [Enter] key on the operation panel. The operation panel displays "Media: Type 1". Step 0 : Press the [+] key or [–] key to select the media type you wish to use. Step 0 : Press the [Enter] key on the operation panel. • The operation panel displays "**>1: Print Mode". • Notes The selected media (Type 1-30) is displayed in "**". Please refer to “Media Type menu” • Press the [+] key or [–] key to select "**>2: PF Adjust>". • Press the [>] key on the operation panel. o The operation panel displays "PF1: Init.Adj.Print". 45 AP-77170, Rev. 2.0, 2/04/2007 Operation Instructions VJ-1204 Step 7 : Perform the initial adjust print. • • • Press the [Enter] key on the operation panel. o The operation panel displays "Feed Length: 250 mm". Notes The length that media is fed (feeding length) for initial adjustment printing is normally set at 250 mm. If you make the feeding length longer, the accuracy of the Media feed compensation improves. If you want to change the feeding length, press the [+] key or [–] key and change the set value. • Press the [Enter] key on the operation panel. o The operation panel displays "Printing". o Start Initial adjustment printing. 1 No. 1 2 o • 2 Name Feed length Media feeding direction When the initial adjustment printing is complete, the printer enters the normal status After the initial adjustment printing, cut the media. See “Cutting media” Step 1 : Measure the distance between two pluses in the initial adjustment print using a measurement tool, such as a ruler. Step 1 : Set up Initial Adjust Change. • Press the [+] key or [–] key to select "PF2: Init.Adj.Change". • Press the [Enter] key on the operation panel. o The operation panel displays "Init: 250.0/250mm". • Press the [+] key or [–] key and enter the measured value in step 3. • Press the [Enter] key on the operation panel o The initial adjustment value is saved. o The operation panel displays "PF2: Init.Adj.Change". 46 AP-77170, Rev. 2.0, 2/04/2007 Operation Instructions VJ-1204 Step 10 : Perform the Confirm Print. • • • Press the [+] key or [–] key to select "PF3: Confirm Print". • Press the [Enter] key on the operation panel. o The operation panel displays "Feed Length: 250 mm". Notes The length that media is fed (feeding length) for confirmation adjustment printing is normally set at 250 mm. If you make the feeding length longer, the accuracy of the Media feed compensation improves. If you want to change the feeding length, press the [+] key or [–] key and change the set value. • Press the [Enter] key on the operation panel. o The operation panel displays "Printing". o Start Confirmation adjustment printing. 1 No. 1 2 • Step 1 : 2 Name Feed length Media feeding direction After the confirmation adjustment printing, cut the media. See “ Cutting media” Measure the distance between two pluses in the confirmation adjustment print using a measurement tool, such as a ruler. Then, confirm that the distance matches the feeding length when printing. • If the distance does not match the feeding length, follow the procedure from 1 to 5 and readjust. • If the distance matches the feeding length, proceed to step 7. 47 AP-77170, Rev. 2.0, 2/04/2007 Operation Instructions VJ-1204 Step 12 : Perform Micro adjustment printing. • Display the Media feed compensation menu on the operation panel as in step 1. • Press the [+] key or [–] key to select "PF4: Micro Adj. Print". • Press the [Enter] key on the operation panel. o The operation panel displays "Printing". o Start Micro adjustment printing. 2 1 Current adjustment value 0 1 2 • Step 1 : After the micro adjustment printing is completed, the operation panel displays "PF4: Micro Adj. Print". Refer to the illustrations below and check the printing result. Input the adjustment value Step 1 : Set up the Micro Adjustment Change. • • Press the [+] key or [–] key to select "PF5: Micro Adj.Change". Press the [Enter] key on the operation panel. • The operation panel displays "Micro: 0pulse". • Press the [+] key or [–] key and enter the micro adjustment value according to the printing result in step 7. Press the [Enter] key on the operation panel. o The micro adjustment value is saved. o The operation panel displays "PF5: Micro Adj.Change". o The Media feed compensation is complete. 48 AP-77170, Rev. 2.0, 2/04/2007 Operation Instructions VJ-1204 4 PERIODICAL MAINTENANCE 4.1 DONE BY END USER Be sure to read and understand the safety warnings before handling the printer. maintenance Outer case Inside the printer Head cleaning Cleaning the wiper Replacing waste fluid tank Replacing spitting box absorbent frequency Daily Daily If print become blurred or incomplete Once a week or when blurs or incompleteness in printing remain after head cleaning Replace if “NearFullWasteInkTank” is displayed on the operation panel. When the spitting box absorbent becomes deformed, when smears of ink appear on the media or two months after replacement Parts needed Soft cloth soft brush / soft cloth ----Poly-knit wiper *** *** ***: Please contact your local Mutoh reseller for ordering parts. 4.1.1 Cleaning the outer case Instruction: Wipe off the dust and possible dirt from the outer case by using a soft cloth. 49 AP-77170, Rev. 2.0, 2/04/2007 Operation Instructions VJ-1204 4.1.2 Cleaning inside the printer To clean inside the printer, follow the 4 steps below. Step 14 : Open the front cover (1). 1 No. 1 Name Front cover Step 14 : Remove paper powder and dust from the pressure rollers (1), using a soft brush. 1 No. 1 • Name Pressure rollers Notes Do not blow paper powder and dust from the pressure rollers (1), remove media while cleaning. 50 AP-77170, Rev. 2.0, 2/04/2007 Operation Instructions VJ-1204 Step 3 : Wipe off paper powder and ink from the platen (1) using a dust-free and soft cloth slightly damped with water. 1 2 No. 1 2 Name Platen Media Guide Step 14 : Wipe off the dirt of the grid roller’s unpainted (silver colour) area with damp and a tightly squeezed soft cloth. 1 No. 1 Name Grid roller 51 AP-77170, Rev. 2.0, 2/04/2007 Operation Instructions VJ-1204 4.1.3 Replacing the spitting box absorbent (1) Pre- transport procedure Replace the spitting box absorbent in the following situations. • • • When the spitting box absorbent becomes deformed. When smears of ink appear on the media Two months after replacement. (1) Replacing steps Step 2 : If the printer is turned ON, make sure that: • Printing or other operations are not in progress. • The operation panel display is Normal. Step 2 : Perform the CR maintenance. • The display enters the CR maintenance menu. • “CR Mainte.: Start” is displayed on the operation panel. Step 2 : Press the [ENTER] key on the operation panel. • Maintenance starts • The print head moves on the platen. • “CR Mainte.: END” is displayed on the operation panel. Step 2 : Open the front cover. 1 No. 1 Step 2 : Name Front cover. Lift the spitting box sponge hook and release the hook. Then, remove the spitting box sponge holder. No. 1 2 Name Spitting box sponge Spitting box sponge holder 52 AP-77170, Rev. 2.0, 2/04/2007 Operation Instructions VJ-1204 Step 2 : Remove the spitting box absorbent from each spitting box. No. 1 2 Name Spitting box sponge Spitting box Be sure to read and understand the safety warnings before handling the printer. Step 2 : Assemble the following parts: No. 1 2 3 • • • Name Spitting box sponge Spacer Spitting box sponge holder Spitting box sponge Spacer Spitting box sponge holder 53 AP-77170, Rev. 2.0, 2/04/2007 Operation Instructions VJ-1204 Step 8 : Install the new spitting box absorbent to each spitting box. No. 1 2 Step 2 : Name Spitting box holder Spitting box Close the front cover. 1 No. 1 Name Front cover Step 2 : Press the [ENTER] key on the operation panel. • The print head returns to its original position. • Spitting box absorbent replacement is complete. 54 AP-77170, Rev. 2.0, 2/04/2007 Operation Instructions VJ-1204 4.1.4 Head cleaning When to perform? If the prints become blurred or are incomplete. How to perform? To perform a head cleaning, follow the steps below. Notes • Remove media while cleaning. Step 4 : Verify that the operation panel is in Normal mode. Step 4 : Verify that the media hold lever is positioned to the front side. (lever down) Step 4 : Press the [>] key on the operation panel to select the cleaning mode. Step 4 : Press the [Cleaning] key on the operation panel for at least 2 seconds. Result: The operation panel displays “Cleaning **%. 55 AP-77170, Rev. 2.0, 2/04/2007 Operation Instructions VJ-1204 Step 11 : Start the head cleaning. • • • • Notes Pressing the [Cleaning] key again after the first head cleaning is done, performs a strong cleaning. If you fail to remove blurs or incompleteness of printing in one head cleaning, you should perform the strong cleaning. If you fail to remove blurs or incompleteness of printing with several head cleaning, refer to Troubleshooting, and perform the adequate process. Notes If when you are cleaning, the ink level reaches its end, an ink end indication will be displayed to warn you. 4.1.5 Cleaning the wiper (1) Cleaning time Once a week or when blurs or incompleteness in printing remain after head cleaning. (2) Cleaning steps Follow the steps below to clean the wiper. • Notes Use the poly-knit wiper when cleaning the wiper. Step 1 : If the printer is switched ON, make sure that: • Printing or other operations are not in progress. • The display on the operation panel is in the normal state. Step 1 : Press the [Enter] key on the operation panel. • The printer starts cleaning the wiper. • The operation panel displays "CR Maintenance: End". 56 AP-77170, Rev. 2.0, 2/04/2007 Operation Instructions VJ-1204 Step 3 : Open the front cover. 1 No. 1 Name Front Cover Be sure to read and understand the safety warnings before handling the printer. Step 1 : Use the poly-knit wiper, and remove the ink and dust on the wiper. • Wiper front side: Wipe horizontally. 2 3 1 No. 1 2 3 • Name Cleaning wiper Poly-knit wiper Head cap unit Wiper back side: Wipe vertically. 2 3 1 No. 1 2 3 Name Cleaning wiper Poly-knit wiper Head cap unit 57 AP-77170, Rev. 2.0, 2/04/2007 Operation Instructions VJ-1204 Step 1 : Press the [Enter] key on the operation panel. • • • Step 1 : The print head section returns to the original position. The wiper returns to the original position. The operation panel displays "CR Maintenance: Start". Press the [Cancel] key on the operation panel. • • The printer enters normal status. Cleaning the wiper is complete. 58 AP-77170, Rev. 2.0, 2/04/2007 Operation Instructions VJ-1204 4.2 DONE BY AUTHORIZED MUTOH TECHNICIAN This section describes the periodical part replacements and the periodical inspections required for this printer. These periodical services ensure the stable printing quality of the printer. 4.2.1 Periodical replacement of parts Perform periodical replacements according to the table below. These replacements should be executed by an authorized Mutoh technician. These replacements are necessary to ensure the best printing quality output. Part Maintenance station Wiper Damper Timing Once year Once year Once year 4.2.2 Periodical Inspection Part List Perform periodical inspections according to the table: “Periodical Inspection Part List” and perform cleaning and part replacement as necessary. Part Timing Media guide L Sub platen front surface Once year Timing fence (CR encoder detection slit plate) Once year Rail on the CR guide frame Once year P_REAR sensor front surface Once year • • • • • • • • • 59 Check point Media dust accumulation Foreign objects Damages Media dust accumulation Foreign objects Damages Foreign objects Media dust accumulation Foreign object AP-77170, Rev. 2.0, 2/04/2007 Operation Instructions VJ-1204 This page is intentionally left blank 60 AP-77170, Rev. 2.0, 2/04/2007 Operation Instructions VJ-1204 5 MENU STRUCTURE OVERVIEW 5.1 OPERATION PANEL Notes Refer to the following for details regarding the operation method of the operation panel. • When performing menu settings from the operation panel: Menu setup on the operation panel • When performing various operations on the operation panel: Operating from the operation panel 8, 9 10 17 13 14 15 16 6 11 12 1 3 5 7 4 2 The operation keys have 2 different functions, depending on the printer mode: Mode Normal mode Menu mode Key functions Various functions for printing can be performed on the operation panel. Various setup items (e.g. IP address, etc…) can be set on the operation panel. For details on the printer mode, refer to “Printer mode”. 61 AP-77170, Rev. 2.0, 2/04/2007 Operation Instructions VJ-1204 (1) Operation keys in the Normal mode No. 1 2 3 4 5 6 7 8 Key Function [Menu] Changes to Menu mode. [Enter] -- [Cleaning] Cleans the printer head when pressed for two seconds or more. [<] [Nozzle Check] [>] During printing: Printing is terminated and the remaining data is deleted. During receiving/analysis: Data that has been received and analysed already is deleted and the data which is being received of the next print file is ignored. Ink dry timer wait: Ink dry timer wait is cancelled and the media is ejected. -Press and hold this key for two seconds or more to print a nozzle check Sets Cleaning Mode. The indication lights of Cleaning mode light up in green. [Backward feed↑] Feeds the media in reverse direction. [Setting value +] -- [Forward feed↓] Feeds the media in forward direction. [Setting value-] -- [Power] Switches the printer ON / OFF. [Cancel] (2) Operation keys in the Menu mode. No. Key Function [Menu] 3 [Cancel] 4 [Back] Shifts from Menu mode to Normal mode. Selects a specific menu or submenu. The value is entered and saved. -Returns to the previous level in the menus structure. Changes in the setup value will not be saved. Shifts from the Menu mode to Normal mode. Goes to the previous menu. 5 [Next] Goes to the next menu. [Backward feed↑ ] -- [Setting value +] The numerical value is increased. [Forward feed↓ ] -- [Setting value-] The numerical value is decreased. [Power] Switches the printer ON / OFF. 1 2 [Enter] [Cleaning] 6 7 8 • Notes For details on how to work with the operation panel, refer to the following topics : o When working in the Menu mode. Refer to: “Menu setup on the operation panel”. o When working in the Normal mode. Refer to: “Operating from the operation panel”. 62 AP-77170, Rev. 2.0, 2/04/2007 Operation Instructions VJ-1204 (3) Status lights No. Light Colour 9 Power Green Status Light ON Light blinks Light OFF Light ON 10 • • • Data Orange 11 High Green 12 Low Green 13 Wave Green 14 Fine & Super Fine Green 15 Strong Green 16 Normal Green 17 LCD display section -- Description Power ON. An error has occurred. The error message is displayed on the LCD. Power OFF. Analyzing received data. Printing. Light blinks Light OFF Light ON Data is not received / analyzed. Height of head is set to High Light OFF Height of head is set to Low Light ON Height of head is set to Low Light OFF Light ON Light OFF Light ON Light OFF Light ON Light OFF Light ON Light OFF Height of head is set to High Printing effect is set to Wave. Printing effect is set to Fine & Super Fine. Printing effect is set to Fine & Super Fine. Printing effect is set to Wave. Cleaning mode is set to Strong Cleaning mode is set to Normal Cleaning mode is set to Normal Cleaning mode is set to Strong Operation status of the printer or error message is displayed. -- Receiving data. Notes When an error requiring a restart (fatal malfunction of the printer operation) occurs, all lights will blink. Contact your local MUTOH dealer if the malfunction cannot be solved. For more information please refer to: “Error requiring a restart”. 63 AP-77170, Rev. 2.0, 2/04/2007 Operation Instructions VJ-1204 5.2 PANEL SETUP MENU Menu1 Setup Set 1 Media Type Type from 1 to 30 Set 2 Effect Wave 1 Wave 2 Wave 3 Wave 4 Fine & Wave 1 Fine & Wave 2 Fine & Wave 3 Fine & Wave 4 A-S Fine & Wave B-S Fine & Wave None 1 None 2 Set 3 Flushing Set 4 Side Margin Origin On Media From 3 to 25 mm Set 5 Media Initial Set 6 Media Width Set 7 Take-Up Set 9 Origin Set 10 Prev. Stick 1>1 Print mode 1>2 1>3 1>4 1>5 1>6 1>7 PF Adjust Pre Heater Platen Heater After Heater Standby Heating Vacuum Fan Graphic 1 Graphic 2 Banner 1 Banner 2 Banner 3 Banner 4 Quality 1 Quality 2 Quality 3 Quality 4 OFF Width Top & Width Width Confirm --mm ON OFF 64 AP-77170, Rev. 2.0, 2/04/2007 Operation Instructions VJ-1204 Menu2 Test Print Set 11 Head Fan Set 12 CR Movement Set 13 Over Write Cnt Data Machine From 1 to 9 cut Set 14 Over Write Wait From 0.0 to 5.0 sec Set 15 Slant Check Set 16 Auto Cleaning Set 17 Ink Status KCYM /--/--/--/--/ Set 18 Roll Length Roll kind OFF Roll 1 to Roll 3 ON OFF OFF From 1h to 24 h Set 19 Head Wash Start / Stop Set 20 CR maintenance Start / Stop Set 21 Initialization All Media type Except Media Type Set 22 Life Time Head Pump CR motor PF motor Set 23 IP Address 0.0.0.0 to 255.255.255.255 Set 24 Subnet Mask 0.0.0.0 to 255.255.255.255 Set 25 Gate Way 0.0.0.0 to 255.255.255.255 Set 26 temporary Test1 Nozzle Check Test2 Mode Print Test3 Set List Test4 All Set List Test5 Palette 65 From 1 to 99 mm E*****F E*****F E*****F E*****F AP-77170, Rev. 2.0, 2/04/2007 Operation Instructions VJ-1204 Menu3 Adjust Print Adj.1 Confirm Adj.2 Adj.3 Adj.4 Menu4 Menu5 Cleaning Selection Adj.5 BI-D Quality Adj.6 BI-D Normal Clean Economy Clean Normal Clean Strong Clean Little Charge 1 [*] Media Type 2 [*] Effect 3 [*] Flushing 4 [*] Side Margin 5 [*] Media Initial 6 [*] Media Width 7 [*] Take-Up 8 [*] Feed-Up 9 [*] Origin 10 [*] Prev. Stick 11 [*] Head Fan 12 [*] CR Movement 13 [*] Overwrite Cnt 14 [*] Overwrite Wait 15 [*] Slant Check 16 [*] Auto Cleaning 17 [*] Ink Status 18 [*] Roll Length 19 [*] Head Wash 20 21 [*] CR maintenance [*] Initialization 22 [*] Life Time 23 [*] IP Address 24 [*] Subnet Mask 25 [*] Gate Way 26 [*] Temporary 66 AP-77170, Rev. 2.0, 2/04/2007