1
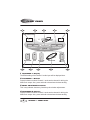
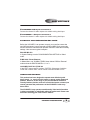
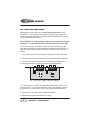
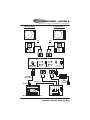
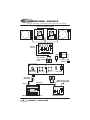
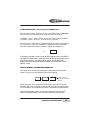
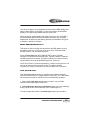
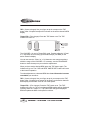
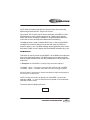
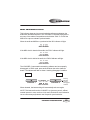
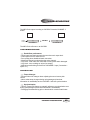
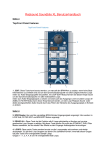
INTRODUCTION ........................................................ 2
FRONT PANEL ........................................................... 3
REAR PANEL ............................................................... 5
EXT. MIDI SEQUENCER SETTINGS ................ 6
OPERATING CRITERIA ........................................... 6
INPUT LEVEL SETTINGS ...................................... 7
CONNECTIONS - OPTION A ..............................8
CONNECTIONS - OPTION B ..............................9
OPERATION
Getting started / Powering Up ........................10
BPM Displays .............................................................11
Selecting the Active Channel .............................11
Controlling The MIDI Clock ..................................12
Run/Pause ..................................................................13
Beat One Re-Set ..................................................... 14
Tap (Stop) .....................................................................14
Cue ...................................................................................16
Beat Tracking Indicator .........................................18
Background Channel ..............................................18
Switching Channels .................................................19
TROUBLESHOOTING /HINTS & TIPS........20
SPECIFICATION ...................................................... 21
1
VOYAGER 1 - CONTENTS
INTRODUCTION
Thank you for buying the RED VOYAGER 1 Beat Xtractor. The product you
have purchased is the essential, creative DJ re-mix product of the decade.
Described by DJ magazine's Daniel Duffel as 'The missing link between
audio and MIDI', the VOYAGER 1 analyses audio signals from vinyl or CD/
tape and calculates the tempo or 'BPM' of the tracks.
The BPM's are displayed but, more importantly, the beat information from
one of the channels is used to generate a MIDI Clock signal which runs in
synchronisation with the audio track enabling any connected MIDI
sequencer/tone module such as **Roland's MC303/ MC505, EMU's Orbit /
Planet Phatt, QuasiMidi's latest Rave-o-lution 309 or in fact any computer
/sequencer software setup to automatically lock-in and track the tempo of
the audio.
The VOYAGER 1's intelligent software constantly monitors and corrects the
relative audio / MIDI beat synchronisation to keep the beats locked together
and also follows any tempo changes in real-time if vinyl/CD deck pitch
controls are adjusted.
Now, for the first time, the tempo of patterns & songs programmed into your
MIDI sequencer can be controlled directly from the audio leaving you free
to add or 'tweak' your own MIDI music / percussion parts and produce the
ultimate, individual DJ performance.
Please read the following sections of this manual carefully to understand
the full potential of your VOYAGER 1 Beat Xtractor.
Ready for launch!
TM
REDVOYAGER
1
Beat Xtractor
** Trademarks of E-MU Systems / Roland Corp. Japan / Quasimidi
VOYAGER 1 MISSION GUIDE
2
FRONT PANEL
1
2
3
4
5
www.redsound.com
RED VOYAGER 1
Beat Xtractor
CH 1 BPM
CH 2 BPM
SELECT
CHANNEL 1
PULL
OK
CHANNEL 2
PUSH
BEAT TRACKING
- / Down
+/ Up
Tempo Edit
Beat One
RUN/PAUSE
6
7
CUE
BEAT ONE
RE-SET
MIDI CLOCK
8
TAP
(STOP)
9
10
1 CHANNEL 1 Display
The BPM reading of the Channel 1 audio input will be displayed here.
2 CHANNEL 1 Button
Press this button to select Channel 1 as the active channel for driving the
MIDI Clock output. Also, press and hold to de-activate the beat tracking.
3 BEAT TRACKING Indicator
This 3-way indicator shows any internal synchronisation adjustments.
4 CHANNEL 2 Button
Press this button to select Channel 2 as the active channel for driving the
MIDI Clock output. Also, press and hold to de-activate the beat tracking.
3
VOYAGER 1 - FRONT PANEL
FRONT PANEL
5 CHANNEL 2 Display
The BPM reading of the Channel 2 audio input will be displayed here.
6 RUN/PAUSE Button
Press this button to Run and Pause your MIDI sequencer.
7 CUE Button
Press this button to set the 'Cue Paused' and 'Cue Ready' modes - see
page16 for further information.
8 BEAT ONE RE-SET Button
Press and release this button to re-align the start point (beat1/bar1) of the
current pattern or song in your MIDI sequencer with any chosen point in the
audio track.
9 MIDI CLOCK Display
This 8 indicator display 'rotates' at the detected BPM speed when the
VOYAGER 1 is in RUN mode (MIDI Clock running). As the display rotates,
the 'Beat One' indicator flashes brighter to show each beat of the bar. The
Beat One indicator also flashes at the detected BPM when the
VOYAGER 1 is in PAUSE mode.
10 TAP (STOP) Button
'Tap' this button to manually enter a tempo if there is no audio signal
present or when the regular patterns and beats in the audio track become
unavailable. When used in conjunction with the '- / Down' and '+/ Up'
buttons (Tempo Edit mode - LED on) the tempo can be set more accurately
in single BPM steps. The MIDI Clock will run at the set BPM.
Also, when this button is pressed and held for approx.1 second the MIDI
Clock will stop.
VOYAGER 1 MISSION GUIDE
4
REAR PANEL
1
2
3
4
5
6
7
www.redsound.com
CHANNEL 2
MIDI CLOCK
CHANNEL 1
PHONO
CD/LINE
R
R
OUT
Beat Xtractor
ON
L
L
CD/LINE
VOYAGER 1
POWER
PHONO
+
9v DC
OFF
MADE IN ENGLAND
IN
OUT
IN
OUT
RED Sound Systems Ltd
8
CAUTION: DO NOT OPEN CASE
REFER TO QUALIFIED SERVICE PERSONNEL
NO USER SERVICEABLE PARTS INSIDE
9
1 MIDI OUT Connector
Use a suitable MIDI cable to connect the MIDI 'IN' of your MIDI sequencer
to this connector .
2 CHANNEL 2 Input select switch
This selects the Channel 2 input signal level. NOTE: The setting of this
switch must always match the input channel on your mixing desk. i.e if
'PHONO' input is selected on the VOYAGER 1 use a 'PHONO' level input
on your mixing desk. Nominal input levels - CD/Line 2.0V - Phono 5mV
3 CHANNEL 2 Input connectors
Connect the left (L) and right (R) output of the Channel 2 sound source
(CD, phono, tape etc.) to these connectors.
4 CHANNEL 1 Input select switch
This selects the Channel 1 input signal level - see NOTE at 2 above.
5 CHANNEL 1 Input connectors
Connect the left (L) and right (R) output of the Channel 1 sound source
(or the mixing desks MASTER outputs (see Option B) to these connectors.
6 DC POWER IN connector
Only use the AC/DC adaptor supplied with this product - 'RED PSU'.
7 POWER switch
This turns the power on/off.
5
VOYAGER 1 - REAR PANEL
MIDI SETTINGS
8 CHANNEL 2 Output connectors
Connect the channel 2 audio outputs to a suitable mixing desk input.
9 CHANNEL 1 Output connectors
Connect the channel 1 audio outputs to a suitable mixing desk input.
EXTERNAL MIDI SEQUENCER SETTINGS
Before the VOYAGER 1 can operate correctly you must first ensure that
your MIDI sequencer is set to respond to External MIDI Clock commands.
Please consult the manufacturers operation manual to make the necessary
settings. Here are some typical examples:
ROLAND MC-303
In System Settings, set the 'SYNCHRONIZATION SETTING' to 'Slave'
mode.
E-MU Orbit / Planet Phatt etc.
In Master Menu, set 'GLOBAL TEMPO' down below 1 BPM to 'External'
mode and set the 'BEATS MODE to 1, 2 or 3.
QUASIMIDI RAVE-O-LUTION 309
In the 'EDIT' page press F3 to select 'SYSTEM'. Select page 3 with the
'PAGE' dial. Use the 'EDIT VALUE' wheel to set MIDI SYNC to 'EXT'.
OPERATING CRITERIA
This product has been designed to operate most effectively with
dance music - i.e. music which is based on strong regular beats and
patterns. However, as the range of pre-recorded dance material is
virtually limitless (and the audio mix of individual tracks unknown) we
cannot guarantee the performance of the VOYAGER 1 with every
dance track.
The VOYAGER 1 may operate unsatisfactorily if the beat information
is either unavailable or indefinable within the audio track. Please note
this when selecting your audio source material.
VOYAGER 1 MISSION GUIDE
6
INPUT LEVELS
CD/LINE LEVEL SETTINGS
Selecting the correct input level is critical to the performance of the
VOYAGER 1. If the incorrect range setting is used you may experience
problems with the VOYAGER 1's ability to detect the BPM (due to internal
low or overloaded signal levels).
The VOYAGER 1 is shipped with it's CD/Line levels preset for 'DJ' type
CD players. i.e. those which have a nominal output level of 2V 0dB.
If you wish to use the VOYAGER 1 with a Hi-Fi type CD player (or any
other player which has a nominal output level between 100 to 350mV) you
must first make changes to the jumper links for that channel within the
product.
1. Turn off the power and remove all the connectors from the back panel.
2. Turn the product over and remove the 4 screws holding the rear panel.
3. Lift off the rear panel and identify the 8 'jumper' links located on the
circuit card behind the rear panel connectors as detailed below.
CHANNEL 2
CHANNEL 1
J5 J6
J8
DJ
J9
LOW
J7
J11
J10
CH 2
DJ
LOW
J12
CH 1
'DJ' = 1V to 2.5V 'LOW' = 140mV to 350mV
5. To set Channel 1 to 'LOW ' level operation remove the two links J7, J8
and re-fit to J11, J12. To set Channel 2 to 'LOW ' level operation remove
the two links J5, J6 and re-fit to J9,J10. Press links firmly into position.
6. Check that no loose parts are left inside the product.
7. Replace the rear panel and refit the 4 screws.
7
VOYAGER 1 - INPUT LEVELS
CONNECTIONS - OPTION A
2 channel / 2 x sound source operation
SOUND SOURCE 2
SOUND SOURCE 1
VINYL TURNTABLE
OR
VINYL TURNTABLE
OR
CD / TAPE etc.
CD / TAPE etc.
R
L
R
L
www.redsound.com
CHANNEL 2
MIDI CLOCK
CHANNEL 1
PHONO
POWER
L
L
CD/LINE
CD/LINE
R
R
OUT
VOYAGER 1
Beat Xtractor
ON
PHONO
+
9v DC
OFF
MADE IN ENGLAND
IN
OUT
IN
OUT
RED Sound Systems Ltd
L
R
L
RED PSU
R
CAUTION: DO NOT OPEN CASE
REFER TO QUALIFIED SERVICE PERSONNEL
NO USER SERVICEABLE PARTS INSIDE
SUITABLE
MIDI CABLE
TO
AC WALL
SOCKET
AUDIO OUT
MIDI IN
MIDI SEQUENCER / TONE MODULE
MIXING DESK
VOYAGER 1 MISSION GUIDE
8
CONNECTIONS - OPTION B
Single channel / multiple sound source operation
MULTIPLE SOUND SOURCE'S
CD / TAPE etc.
CD / TAPE etc.
VINYL TURNTABLE
VINYL TURNTABLE
RED PSU
MASTER
OUTPUT
MAIN MIXING DESK
USE 'CD/LINE'
LEVEL SETTING R
ONLY
TO
AC WALL
SOCKET
L
www.redsound.com
CHANNEL 2
MIDI CLOCK
CHANNEL 1
PHONO
POWER
CD/LINE
L
CD/LINE
Beat Xtractor
OUT
IN
OUT
RED Sound Systems Ltd
R
AUDIO OUT
MIDI SEQUENCER / TONE MODULE
9
+
9v DC
OFF
MADE IN ENGLAND
IN
SUITABLE
MIDI CABLE
MIDI IN
R
R
OUT
VOYAGER 1
ON
PHONO
L
VOYAGER 1 - CONNECTIONS
CAUTION: DO NOT OPEN CASE
REFER TO QUALIFIED SERVICE PERSONNEL
NO USER SERVICEABLE PARTS INSIDE
L
MIXED AUDIO + MIDI
AUDIO TO POWER AMP
SUB MIXING DESK
OPERATION
GETTING STARTED
Connect the VOYAGER 1 to your system using either connection OPTION
A or B as detailed on pages 8 / 9.
If you choose Option B, avoid changing the volume and/or tone controls on
the mixing desk during a performance as this will greatly affect the
VOYAGER 1's input signal (Example: a Bass tone control turned down
could eliminate all the bass drum beat information from the track).
Also, a sub-mixer must be used to eliminate any MIDI driven audio feeding
back into the VOYAGER 1 from the main mixers MASTER OUTPUT (this
would cause the VOYAGER 1 to follow it's own tempo rather than the audio
track's).
Make sure the correct input signal level(s) have been selected to match
your sound source(s) and mixing desk.
NOTE: When a channel is not in use (e.g. no physical input/output
connections) always set it's level switch to the 'CD/LINE' position (this will
avoid any random BPM readings being displayed).
EXTREMELY IMPORTANT - When using vinyl record decks as the
sound source always check the individual earth lead connections are
in good condition and firmly secured to the grounding post on the
mixing desk. If the earth lead(s) is broken or disconnected, the
resultant low noise hum will not only degrade the audio quality of
your system but also greatly affect the BPM detection performance of
the VOYAGER 1.
POWERING-UP
Press the rear panel 'Power' on/off switch to the ON position (in). The
software version will be shown briefly on the displays as in the following
example:
Software version =1.01
CH 1 BPM
CH 2 BPM
VOYAGER 1 MISSION GUIDE
10
OPERATION
Afterwards the displays should look like this:
CH 1 BPM
CH 2 BPM
Three static centre
bars indicate a 'no
audio beat detected'
condition
With no audio signal present the centre bars show that both channels are
currently inactive.
BPM Displays
The VOYAGER 1 features two audio input channels, each having a 3 digit
BPM display. When a tempo is detected on either input the BPM reading
will be shown on the relevant display.
NOTE: Although the displayed BPM has a resolution of I BPM, the internal
working resolution is much higher, enabling the VOYAGER 1 to track to an
accuracy of 0.01 of a BPM.
When audio is present on both channels simultaneously, the BPM readings
can be used to visually align the tempo's of two separate audio tracks.
THE MIDI CLOCK - Selecting The Active Channel
Check that the MIDI sequencer is set to respond to external MIDI Clock
commands - see page 6.
The audio input from channel 1 or 2 can be selected to drive the MIDI clock
output. The selected channel is called the 'ACTIVE CHANNEL'.
To select Channel 1 as the active channel, press the Channel 1 button. The
indicator will light to show Channel 1 is the active channel.
To select Channel 2 as the active channel, press the Channel 2 button. The
indicator will light to show Channel 2 is the active channel.
NOTE : The channel selection process within the VOYAGER 1 will not
affect the audio signal fed to the mixing desk in any way.
11
VOYAGER 1 - OPERATION - THE MIDI CLOCK
OPERATION
THE MIDI CLOCK - Controlling the MIDI Clock
With the active channel selected you can run the MIDI Clock. In Example 1
we will assume the following set up using connection OPTION B:
CHANNEL 1 Input = Mixer's Master Output with audio track @ 126 BPM
CHANNEL 2 Input = No Input - set level switch to CD/Line
Select Channel 1 as the active channel and start the audio track playing on
the sound source. When the VOYAGER 1 detects the tempo from beat
information within the track the Channel 1 display will change from:
to...
CH 1 BPM
The display may briefly show a range of BPM readings as the VOYAGER 1
calculates the exact tempo. When the correct BPM has been locked-in, the
'Beat One' indicator in the 'MIDI CLOCK' display and 'RUN/PAUSE'
indicator will flash at the detected BPM speed (126) to indicate 'PAUSE
READY' mode.
INPUT SIGNAL OVERLOAD DISPLAY
If the input levels are setup incorrectly the internal signal may overload
(distort). If this occurs, the display will show the following:
CH 1 BPM
CH 1 BPM
CH 1 BPM
3 rising centre bars
indicate 'input overload'
condition
NOTE: the audio track monitored from the mixing desk will NOT sound
distorted. The overload display is only used to warn that the signals within
the VOYAGER 1 are overloading and that it's performance will be affected.
If the overload display comes on, check the settings of the rear panel
switch and internal jumpers to ensure they match the sound source.
VOYAGER 1 MISSION GUIDE
12
OPERATION
RUN/PAUSE Button
Select a suitable pattern on your MIDI sequencer. To Run the MIDI
sequencer, press the 'RUN/PAUSE' button once.
NOTE: To set the initial alignment of the MIDI sequence and audio track,
press this button accurately on the desired beat. Any misalignment error at
this stage will be automatically corrected during the first few seconds of
operation.
The 'RUN/PAUSE' indicator will stay on and the 'MIDI CLOCK' display will
'rotate' in synchronisation with the detected BPM to indicate 'RUN' mode.
Your MIDI sequencer's pattern should now be playing in synchronisation
with the audio track.
To Pause the MIDI sequencer at any time, press the 'RUN/PAUSE' button
once. The 'MIDI CLOCK' display will stop rotating and the 'RUN/PAUSE' /
'Beat One' indicators will flash to indicate 'PAUSE' mode . The MIDI
sequencer's pattern or song will be held at the pause position and will only
continue from that point when the 'RUN/PAUSE' button is pressed again.
If you want to start the pattern or song from the begining (beat 1/bar1) and
not the paused point, press the 'BEAT ONE RE-SET' button before
pressing the 'RUN/PAUSE' button again.
IMPORTANT NOTE: The VOYAGER 1 has been designed to continue
running the MIDI Clock indefinitely at the last detected BPM if the strong
regular beats in the audio track become unavailable. This feature allows
your MIDI sequencer to fill in parts during quite passages of the audio track
without interuption or to continue playing after the track has finished.
If the strong regular beats in the audio track become unavailable at any
time, the active channel's 3 decimal point indicators will flash continuously
as shown:
CH 1 BPM
13
3 flashing decimal points indicate
'free-wheeling' condition
VOYAGER 1 - OPERATION - RUN/PAUSE BUTTON
OPERATION
This will occur approx. 5 seconds after the last detected BPM reading was
taken to warn that the VOYAGER 1 is now 'free-wheeling' and the BPM
display is no longer being updated from the audio track.
When the strong regular beats in the audio track return, the VOYAGER 1
will automatically detect the BPM information and make any necessary
adjustments, at which time the flashing decimal point indicators will go out
to indicate a 'locked-in' condition.
BEAT ONE RE-SET Button
This button is used to re-align the start point of the MIDI pattern or song
(beat1/bar1) with any chosen beat in the audio track. Press the 'RUN/
PAUSE' button to run your MIDI sequencer.
Press and hold down the 'BEAT ONE RE-SET' button. The MIDI
sequencer will stop and reset to beat1/bar1. When the button is released
the MIDI sequencer will restart. This feature allows you to set the relative
synchronisation of the audio and MIDI sequencer "on the fly".
NOTE: If this button is pressed momentarily, a minimum reset period of 1/4
second will elapse before automatic restart. This allows all MIDI
sequencers to respond correctly to the series of MIDI clock commands.
TAP (STOP) Button
This dual function button allows you to either enter / adjust a tempo by
hand (TAP/TEMPO EDIT) or stop the MIDI clock (STOP). The 'TAP' feature
can be used to set and run the MIDI Clock in the following conditions:
1. If there is no audio input present and you want to run your MIDI
sequencer before starting the audio track.
2. If beat information becomes unavailable and the unit is 'free-wheeling
during a quite section of an audio track (intro, middle eight etc.).
To enter a tempo when there is no audio input present you can either:
VOYAGER 1 MISSION GUIDE
14
OPERATION
TAP - (Coarse changes) Use your finger to tap in a tempo on the 'TAP'
button. After 3-4 taps the tempo will be shown on the active channel's BPM
display.
Tempo Edit - (Fine changes) Press the 'TAP' button once. The 'TAP'
indicator will come on.
- / Down
+/ Up
Tempo Edit
Tap indicator
ON indicates
'Tempo Edit'
mode
CUE
BEAT ONE
RE-SET
TAP
(STOP)
The VOYAGER 1 is now in 'Tempo Edit' mode. Pressing either the '-/Down'
or '+/ Up' button once will bring up the default tempo (120 BPM) on the
active channel's display.
You can now use the '-/Down' or '+/ Up' buttons to set a tempo anywhere
within the range of the VOYAGER 1. If necessary, use the 'RUN/PAUSE'
button to check the tempo as you make the adjustments.
When you have set the desired BPM, press the 'TAP' button again. The
indicator will go out. The 'CUE' and 'BEAT ONE RE-SET' buttons will revert
to their normal operation.
To make adjusments to a detected BPM when beat information becomes
unavailable you can either:
TAP - (Coarse changes) Use your finger to tap in your tempo on the 'TAP'
button. After 3-4 taps the new tempo will be shown on the active channel's
BPM display and the MIDI clock will run at that speed.
Tempo Edit - (Fine changes) Press the 'TAP' button once. The 'TAP'
indicator will come on. The current detected BPM reading will be displayed.
Pressing either the '-/Down' or '+/ Up' buttons will change the displayed
BPM and update the MIDI clock speed in real-time.
15
VOYAGER 1 - OPERATION - TAP (STOP) BUTTON
OPERATION
NOTE: Beat information detected from the audio track will override any
BPM changes made with the 'Tempo Edit' function.
The manual 'TAP' function can be used to assist the VOYAGER 1's initial
BPM detection of more complex rhythm tracks. Tapping along with the
tempo of the track can help the software to recognise patterns within the
music and so lock-in and adjust the BPM and/or beat tracking.
The Stop function is used to stop the MIDI Clock or 'clear' incorrect BPM
readings from the active channel. Press and hold down the 'TAP(STOP)'
button for approx.1 sec. The BPM readings will be replaced by three centre
bars and the 'MIDI CLOCK' display and 'RUN/PAUSE' indicators will go out.
CUE Button
This button is used to pre-set the VOYAGER 1 to the BPM of an audio track
prior to the actual performance. The MIDI sequencer and audio track can
then be started simultaneously from any predetermined cue point within the
audio track.
In Example 2 the VOYAGER 1 is setup using connection Option A:
CHANNEL 1 Input = CD player connected with audio track @ 106 BPM
CHANNEL 2 Input = Turntable connected with audio track @ 133 BPM
Select Channel 2 as the active channel and start the audio track playing on
the Channel 2 sound source.
NOTE: For the Cue function to operate, the VOYAGER 1 must first be
detecting a BPM - i.e. the Cue function will not operate if a 'no audio beat
detected' condition exists.
The active channel's display will show:
CH 2 BPM
VOYAGER 1 MISSION GUIDE
16
OPERATION
When you are satisfied with the BPM reading, press the 'CUE' button once.
The 'CUE', 'RUN/PAUSE' and 'Beat One' indicators will flash to indicate
Cue Pause mode.
Flashing indicator
CUE
The VOYAGER 1 is now held in Cue Pause mode and will not respond to
any further audio signals which appear on the active channel input. You can
now find a suitable cue point on the audio track using the cue facilities on
the playback device without activating the VOYAGER 1.
NOTE: the Cue function will work most effectively from a strong cue point
on the audio track. For the best results, always try to find a cue point
fractionally before a well defined bass drum.
Once you have set the cue point on the audio playback device, press the
'CUE' button again. The 'CUE' indicator will stay on (stop flashing) to
indicate Cue Ready mode. The 'RUN/PAUSE' and 'Beat One' indicators
will continue to flash.
Cue indicator ON indicates
'Cue Ready'mode
CUE
The VOYAGER 1 is now waiting for the same audio track to start again.
Ensure that you have selected a suitable pattern or song on your MIDI
sequencer.
Start the audio track playback on the Channel 2 sound source. The MIDI
sequencer will immediately run in synchronisation with the audio track. The
MIDI Clock display will start to rotate and the 'CUE' indicator will go out.
The 'RUN/PAUSE' indicator and BPM display will stay on to indicate 'RUN'
mode.
To cancel either 'Cue Pause' or 'Cue Ready' modes at any time simply use
the 'STOP' function - press and hold the 'TAP(STOP)' button for 1 second.
17
VOYAGER 1 - OPERATION - CUE BUTTON
OPERATION
BEAT TRACKING Indicator
This indicator shows any beat synchronisation adjustments between the
audio track and MIDI sequence. The VOYAGER 1 constantly analyses the
accuracy of the relative beat positions and will either 'PULL' or 'PUSH' the
MIDI clock output to maintain synchronisation.
When the audio and MIDI are synchronised the 'OK' indicator will light.
PULL
OK
PUSH
BEAT TRACKING
If the MIDI clock is ahead of the audio, the 'PULL' indicator will light.
PULL
OK
PUSH
BEAT TRACKING
If the MIDI clock is behind the audio, the 'PUSH' indicator will light.
PULL
OK
PUSH
BEAT TRACKING
The VOYAGER 1's automatic beat tracking software can be temporarily
disengaged. In 'RUN' mode, press and hold down the active channel's
button. The indicator will flash to show a 'tracking disengaged' condition.
CH 1 BPM
CH 2 BPM
SELECT
CHANNEL 1
PULL
OK
PUSH
CHANNEL 2
BEAT TRACKING
Flashing
indicates
'tracking
disengaged'
condition
When released, the beat tracking will automatically take over again.
NOTE: This feature allows the VOYAGER 1 to ignore any erratic, offbeat
material present in some sections of the audio track which would otherwise
cause unnecessary adjustments and disrupt the synchronisation.
VOYAGER 1 MISSION GUIDE
18
OPERATION
BACKGROUND CHANNEL OPERATION
As previously explained in 'Selecting The Active Channel' on page 11,
only one channel at a time can be selected to drive the MIDI Clock i.e. the
'ACTIVE CHANNEL'.
The channel which is NOT selected at any time is called the
'BACKGROUND CHANNEL' (in example 2 this would be Channel 1).
The background channel's function is solely to detect and display current
BPM readings from the connected audio source. It will only display a BPM
reading if it detects a strong regular beat in the audio track. If the beats
become unavailable at any time, the background channel's display will flash
three times and change from:
3 flashes indicates
'BPM lost' mode
to...
CH 1 BPM
When a valid BPM reading is detected, the display will again show:
CH 1 BPM
SWITCHING BETWEEN CHANNELS
You can switch the 'ACTIVE CHANNEL' at any time, providing both
channels are detecting a BPM reading. If Channel 1 and 2 are receiving
audio tracks with different BPM values, the MIDI Clock will 'jump' to the new
tempo. Using Example 2's set-up, the 'ACTIVE CHANNEL' is currently
Channel 2.
CH 1 BPM
CH 2 BPM
SELECT
CHANNEL 1
19
CHANNEL 2
VOYAGER 1 - SWITCHING BETWEEN CHANNELS
Active
Channel
TROUBLESHOOTING
The MIDI Clock output is running at 133 BPM. Press the 'CHANNEL 1'
button.
CH 1 BPM
Active
Channel
CH 2 BPM
SELECT
CHANNEL 2
CHANNEL 1
The MIDI Clock will now run at 106 BPM.
TROUBLESHOOTING
Erratic/Poor performance
* Check input level settings match the sound source's output level.
* Low output level from sound source.
* Poor quality phono leads/bad earth connection.
* Monitored channel not selected as the active channel.
* Vinyl deck - earth cable not connected to mixing desk and/or damaged.
* Vinyl deck - worn cartridge or stylus (low output).
* MIDI driven audio being fed back into VOYAGER 1 input ( Connection option - B ).
HINTS & TIPS
Tempo Changes
* Always make slow changes when adjusting the sound source pitch
control.
* Never make tempo changes during quite passages (when beat
information is unavailable) as the VOYAGER 1 will lose synchronisation.
Synchronisation
* Use the 'Tempo Edit' feature to manually adjust any synchronisation error
during quite passages (when beat information is unavailable).
* Disengage the beat tracking prior to breaks which contain erratic beats.
VOYAGER 1 MISSION GUIDE
20
SPECIFICATION
SPECIFICATION
Performance
BPM Range = 90 to 180 BPM
Lock-in time = 2 to 4 sec's (from introduction of readable beat information)
Input Levels
CD/ Line 'DJ' = 1V to 2.5V
CD/ Line 'LOW' = 140mV to 350mV
Phono = 1.5 to 15 mV
Level setting = AGC (automatic gain control) circuitry
Displays
2 x 7 Segments, 3 character (LED)
MIDI Clock rotating display (8xLEDs), Beat Tracking display (3xLEDs)
Controls
Channel 1 select, Channel 2 select, Run/Pause, Cue, Beat One Re-Set,
Tap(Stop)
MIDI Implementation
System Real Time / Clock commands = Transmitted
Connectors
Channel 1 Input/Output, Channel 2 Input/Output, MIDI Clock Out,
AC adaptor
Power Supply
9vDC, 250mA (RED PSU)
Dimensions/Weight
180(W)x132(D)x50(H)mm, 1.65 Kg
NOTE: channel 1-2 crosstalk occurs if the VOYAGER 1's power is turned
off with the sound sources still connected. (Audible on the mixing desk
output - i.e. Low level audio from channel 1 will be heard on channel 2 and
vice-versa)
21
VOYAGER 1 - SPECIFICATION
For the USA
FEDERAL COMMUNICATIONS COMMISSION
RADIO FREQUENCY INTERFERENCE STATEMENT
This equipment has been tested and found to comply with the limits listed for a Class B digital
device, pursuant to Part 15 of the FCC Rules. These limits are designed to provide reasonable
protection against harmful interference in a residential installation. This equipment generates,
uses, and can radiate radio frequency energy and, if not installed and used in accordance with
the instructions, may cause harmful interference to radio communications. However, there is
no guarantee that interference will not occur in a particular installation. If this equipment does
cause harmful interference to radio or television reception, which can be determined by turning
the equipment off and on, the user is encouraged to try to correct the interference by one or
more of the following measures:
- Reorient or relocate the receiving antenna.
- Increase the separation between the equipment and receiver.
- Connect the equipment into an outlet on a circuit different from that to which the receiver is
connected.
- Consult the dealer or an experienced radio/TV technician for help.
Unauthorized changes or modifications to this system can void the users authority to operate
this equipment.
This equipment requires shielded interface cables in order to meet FCC class B limit.
For Europe
This product complies with the requirements of European Directive 89/336/EEC
For Canada
CLASS B
NOTICE
This digital apparatus does not exceed the Class B limits for radio noise emissions set out in
the Radio Interference Regulations of the Canadian Department of Communications.
CLASSE B
AVIS
Cet appareil numerique ne depasse pas les limites de la Classe B au niveau des emissions de
bruits radioelectriques fixes dans le Reglement des signaux parasites par le ministere
Canadien des Communications.
* Specifiction and / or appearance subject to change without prior notice
due to product improvement.
Copyright / Software Copyright / Design Right RED Sound Systems Ltd. 1997
Printed in England
RED
TM
MUSIC,MIND,BODY&SOUL
RED Sound Systems Ltd., Chancery Court Business Centre
Lincolns Inn, Lincoln Road, High Wycombe, Bucks. HP12 3RE England
Phone : +44 (0)1494 429321
Fax : +44 (0)1494 446321
www.redsound.com