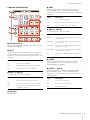
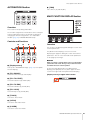
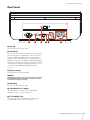
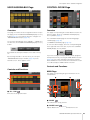
1
NUAGE MASTER CONTROL SURFACE Ncs500-CT Operation Manual Using this manual This operation manual supports keyword searching and linking as follows. Keyword searching Searching for keywords is performed using your pdf viewer’s search function. If you are viewing this manual using Adobe Reader, type the term you wish to find into the Find toolbar and then press your computer’s [Enter] key. Jumping between pages If using Adobe Reader, you can jump forwards and backwards to various pages in this manual. This provides a convenient way to return to your original page after clicking a page link. EN Contents Introduction ..........................................................................................3 How to Read the Manual .................................................................................... 3 Description of the Device ....................................................................4 Top Panel ........................................................................................................... 4 Front Panel ....................................................................................................... 26 Rear Panel ........................................................................................................ 27 Description of the Software Programs.............................................28 Pages Shown on the Multi Function Display .................................................... 28 NUAGE MASTER Setup ................................................................................... 44 NUAGE Workgroup Manager........................................................................... 46 Troubleshooting (in operation).........................................................47 Appendix.............................................................................................47 Contents of the Getting Started Manual ........................................................... 47 Replacing Square-button Labels ..................................................................... 47 Pro Tools Control .............................................................................................. 48 Information • The illustrations and LCD screens as shown in this manual are for instructional purposes only, and may appear somewhat different from those on your device. • Windows is a registered trademark of Microsoft® Corporation in the United States and other countries. • Apple, Mac and Macintosh are trademarks of Apple Inc., registered in the U.S. and other countries. • The company names and product names in this manual are the trademarks or registered trademarks of their respective companies. NUAGE MASTER Operation Manual 2 Introduction Introduction How to Read the Manual Types and Contents • Screens This manual predominantly uses screenshots of Windows. However, Mac screenshots are used when instructions of the function apply only to the Mac. Also, this manual uses screenshots of Nuendo 6. If you are using another version of Nuendo, the actual screenshots might not be the same. For details, refer to the Nuendo manuals (PDF) opened from the “Help” menu. • Getting Started This is the manual included with the device. Read this manual when setting up the device. • Operation Manual This is the PDF manual downloaded from the website. Read this manual when needing information about the functions and how to use the device. Nuendo References For brevity, the descriptions of Nuendo functions in this manual have been kept simple and basic. For details on Nuendo functions, refer to the Nuendo manuals (PDF) opened from the “Help” menu. Conventions • Brackets and quotation marks Brackets ([ ]) and quotation marks (“ ”) around names and phrases in this manual are used to indicate the following. Mark Indication target [] • Buttons, switches, indicators, terminals, etc. on the device. • Keys on a computer keyboard. ““ • Menus, buttons, tabs, areas, windows, etc. on a computer window, software window, and touch screen. • Excerpts of messages, function names, terms in the manual, etc. • Windows or Mac When the procedures or explanations are specific to only one of the platforms, Windows or Mac, this is properly indicated in the manual. When the platforms do not appear, procedures or explanations are for both Windows and Mac. • Procedures “” appears on some procedures in the manual. For example, the string “Devices” “Device Setup” “Control Panel” indicates that you should perform the procedures in the following order. 1. Click the “Devices” menu. 2. Select the “Device Setup” option. 3. Click the “Control Panel” button. • Keyboard Shortcuts [Windows modifier key]/ [Mac modifier key] + [key] shows the shortcut keys. For example, [Ctrl]/ [command] + [Z] means “press [Ctrl] under Windows or [command] under Mac, then press [Z].” NUAGE MASTER Operation Manual 3 Description of the Device Description of the Device Top Panel DAW SELECT Section (page 24) TALKBACK MIC Section (page 25) MULTI FUNCTION DISPLAY Section (page 22) MONITOR SOURCE Section (page 6) CONTROL ROOM Section (page 5) AUTOMATION Section (page 22) CUES Section (page 8) USER ASSIGNABLE Section (page 21) TRANSPORT Section (page 10) COMMUNICATION Section (page 9) NUMERIC PAD Section (page 16) EDIT Section (page 11) GENERAL CONTROL Section (page 14) MODIFIER Section (page 15) JOG WHEEL Section (page 12) NUAGE MASTER Operation Manual 4 Description of the Device CONTROL ROOM Section 1 [Display access] Calls up the “CONTROL ROOM Page” (page 38) in the [Multi function display]. When the CONTROL ROOM page is shown, you can toggle among the tabs of the CONTROL ROOM page. 2 [DOWNMIX 1] – [DOWNMIX 4] Selects the Downmix presets. Lamp Description Lit Downmix preset has been selected. Dim Downmix preset has not been selected. 3 [MONITOR A] – [MONITOR D] Selects the desired Monitor. Lamp Description Lit Monitor has been selected. Overview Dim Monitor has not been selected. This section is for operating the Control Room features. To operate it, make sure that Control Room is turned on in Nuendo and the channels you need have been created, then configure the input/output routing for those channels. Off Monitor has not been configured yet. The [DOWNMIX 1] – [DOWNMIX 4] buttons are for selecting the Downmix presets 1 – 4. The [MONITOR A] – [MONITOR D] buttons are for selecting Monitors A – D. • [CONTROL ROOM LEVEL knob] The [CONTROL ROOM LEVEL] knob is for adjusting the Control Room level. However, when [PHONES] is on, you can adjust the Phones level with this knob. 4 [PHONES] Assigns operation of the following controls to “Phones.” • [EXT] (page 7) in the MONITOR SOURCE Section • [MIX] (page 7) in the MONITOR SOURCE Section • [CUE 1] – [CUE 4] (page 7) in the MONITOR SOURCE Section Lamp Description If you have configured multiple DAW software programs and operate them by selecting the “DAW SELECT Section” (page 24), this section will always operate the Control Room of DAW A. In other words, the Control Room section is not affected by the DAW software selection. Lit The controls above are assigned to Phones. Dim The controls above are assigned to Control Room. Off Phones settings have not been configured yet. Controls and Functions 5 [CONTROL ROOM display] Displays the assigned function and level, adjustable with the [CONTROL ROOM LEVEL knob]. 1 5 2 8 6 9 7 The level indication can be switched between the setting value of Nuendo (dB) and SPL value. To change this, select the MAIN page (page 38) in the CONTROL ROOM page shown on the [Multi function display]. You can set the SPL value in the “Setup Page” (page 29) shown on the [Multi function display]. This value changes, maintaining the difference with the value set in Nuendo. ) 3 4 NUAGE MASTER Operation Manual 5 Description of the Device 6 MONITOR SOURCE Section [REF] Sets the Control Room level to the Reference level. When this is on (lit), the level is reset to the Reference level. When you turn this is off (dim), the level is set back to the previous setting. The button goes dim when you change the level after turning this on. When you press [REF] while holding down the appropriate button(s) in the “MODIFIER Section” (page 15), the function changes as follows. Modifier button Function [ALT] Resets the Reference level to the current Control Room level setting. 7 [DIM] Turns “DIM” on (lit) or off (dim). When this is on, the Control Room level is lowered. When this is off, the previous level is restored. You can set the desired “DIM” level in Nuendo. 8 [SOLO CLEAR] Turns off Solo or Listen for all channels. The button lights while it is being held down. Lamp Description Flashing One or more channels in Mixer have Solo or Listen turned on. Off 9 Solo and Listen are already off for all channels. [MUTE] Turns Mute of the Control Room on (lit) and off (dim). ) [CONTROL ROOM LEVEL knob] Adjusts the Control Room level. However, when [PHONES] is on, you can adjust the Phones level with this knob. To adjust the level more finely (fine mode), simultaneously hold down the knob and turn it. Overview This section lets you select the source of the Control Room. To operate it, make sure that Control Room is turned on in Nuendo and the channels you need have been created, then configure the input/output routing for those channels. The [EXT], [MIX], [CUE 1] – [CUE 4] buttons are for selecting the source of the Control Room. However, when [PHONES] (page 5) in the CONTROL ROOM section is on, you can select the source for Phones with these buttons. The [EXT 1] – [EXT 6] buttons are for selecting the “EXT” source, and [MIX 1] – [MIX 8] are for selecting the “MIX” source. If you have configured multiple DAW software programs and operate them by selecting the “DAW SELECT Section” (page 24), this section will always operate the Control Room of DAW A. In other words, the Control Room section is not affected by the DAW software selection. NUAGE MASTER Operation Manual 6 Description of the Device Controls and Functions 5 [MIX] Switches to the “MIX” Control Room sources. However, when [PHONES] (page 5) in the CONTROL ROOM section is on, you can set the Phones source to “MIX” with this button. 1 3 2 4 Lamp Description Lit The source is set to “MIX.” Dim One or more sources have been set to “MIX.” Off No sources have been set to “MIX” yet. 5 6 6 [MIX 1] – [MIX 8] Selects the specific sources for “MIX.” 7 Lamp Description Lit (green) The source has been assigned as an input source of “MIX.” Dim (green) The source has not been assigned as an input source of “MIX.” Lit (orange) The source has been assigned as an output or group source of “MIX.” Dim (orange) The source has not been assigned as an output or group source of “MIX.” Off The source for “MIX” has not been configured yet. 8 1 [Display access] Calls up the “MONITOR SOURCE Page” (page 40) in the [Multi function display]. 2 [EXT] Switches to the “EXT” Control Room sources. However, when [PHONES] (page 5) in the CONTROL ROOM section is on, you can set the Phones source to “EXT” with this button. 7 Lamp Description Lit The source is set to “EXT.” Dim One or more sources have been set to “EXT.” Off No sources have been set to “EXT” yet. [SUM] Switches between multiple selection (lit) or single selection (dim) when the source of “MIX” has been specified to [MIX 1] – [MIX 8]. 8 [CUE 1] – [CUE 4] Selects the specific sources for “EXT.” Sets the source of the Control Room to “CUE.” However, when [PHONES] (page 5) in the CONTROL ROOM section is on, you can set the Phones source to “CUE” with this button. Lamp Description Lamp Description Lit The source for “EXT” has been selected. Lit The source is set to CUE. Dim The source for “EXT” has not been selected. Dim The source is not set to CUE. Off The source of the Control Room has not been configured to “EXT” yet. Off CUE has not been set. 3 4 [EXT 1] – [EXT 6] [E7]/[E8] Not applicable. NUAGE MASTER Operation Manual 7 Description of the Device CUES Section 2 [SIG Indicators] Roughly indicates the CUE 1 – CUE 4 levels. Lamp Description Lit (red) Overload Lit (orange) -18 dB or more, but less than 0 dB Lit (green) -40 dB or more, but less than -18 dB Off Less than -40 dB 3 [MUTE 1] – [MUTE 4] Turns Mute of CUE 1 – CUE 4 on and off. Lamp Description Lit Mute of CUE is turned on. Dim Mute of CUE is turned off. Off CUE has not been configured yet. Overview This section is for turning Mute of CUE 1 – CUE 4 in the Control Room on and off. To operate it, make sure that Control Room is turned on in Nuendo and the channels you need have been created, then configure the input/ output routing for those channels. If you have configured multiple DAW software programs and operate them by selecting the “DAW SELECT Section” (page 24), this section will always operate the Control Room of DAW A. In other words, the Control Room section is not affected by the DAW software selection. Controls and Functions 1 2 1 3 [Display access] Calls up the “CUES Page” (page 40) in the [Multi function display]. NUAGE MASTER Operation Manual 8 Description of the Device COMMUNICATION Section 2 [C1]/[C2] Executes the assigned function. The button lights while held down. To assign the function, edit it from the “Communication Page” (page 45) in NUAGE MASTER Setup. Lamp Description Dim The function has been assigned. Off The function has not been assigned yet. 3 [TALK BACK] Turns “Talkback” on (lit) and off. Each short press (of about 0.2 seconds) toggles this function on or off. Holding down the button keeps it in the “on” state until released. Overview This section is for using Control Room’s Talkback feature and for executing assigned functions. To operate it, make sure that Control Room is turned on in Nuendo and the channels you need have been created, then configure the input/output routing for those channels. Press the [TALK BACK] button to turn Talkback on and off. If you have configured multiple DAW software programs and operate them by selecting the “DAW SELECT Section” (page 24), this section will always operate the Control Room of DAW A. In other words, the Control Room section is not affected by the DAW software selection. Controls and Functions 1 2 3 1 [Display access] Calls up the “COMMUNICATION Page” (page 41) in the [Multi function display]. NUAGE MASTER Operation Manual 9 Description of the Device TRANSPORT Section 7 [SYNC ONLINE] Turns Synchronization on and off. Lamp Description Lit Synchronization is on. Dim Synchronization is off. Flash Synchronization is on; however, Nuendo has not yet received external time code or clock. 8 [LEFT] Moves the Project Cursor to the Left Locator position. To set the current Project Cursor position to the Left Locator position, press [LEFT] while the pop-up window for the Set mode is shown after you’ve pressed [SET] (page 20) in the NUMERIC PAD section. Overview This section is for operating the transport functions. Controls and Functions 3 4 5 6 To move the Left Locator position, simultaneously hold down [LEFT] and turn the [Jog wheel] (page 13) in the JOG WHEEL section. 7 1 2 9 ) ! 8 # To set the selected area or range of the selected event to the Right and Left Locators position, press [SET] (page 20) in the NUMERIC PAD section to call up the popup window for the Set mode in [Multi function display], then simultaneously press [LEFT] and [RIGHT]. @ 9 [RIGHT] The same as [LEFT], except that the target is the Right Locator. $ % ^ & * ) 1 [Display access] Calls up the “TRANSPORT Page” (page 41) in the [Multi function display]. When the TRANSPORT Page is shown, you can toggle among the tabs of the TRANSPORT Page. 2 [PRE ROLL] Turns “Pre-roll” on (lit) and off (dim). 3 [POST ROLL] Turns “Post-roll” on (lit) and off (dim). 4 [PUNCH IN] Turns “Punch In” on (lit) and off (dim). 5 [PUNCH OUT] Turns “Punch Out” on (lit) and off (dim). 6 [PREV EVENT] Moves the Project Cursor to the start position of the event under the Project Cursor, or the end position of the event previous to the Project Cursor in the selected channels. To move the Project Cursor continuously, hold down [PREV EVENT]. [CYCLE] ! [NEXT EVENT] Moves The Project Cursor to the end position of the event under the Project Cursor, or the start position of the event next to The Project Cursor in the selected channels. To move the Project Cursor continuously, hold down [NEXT EVENT]. @ [MEM] Whenever pressed (for 0.5 seconds or longer), this button will store the current display condition of the Project Window. The lamp will turn on when a display condition is stored. Only one view can be memorized to this button. You can recall the memorized view by pressing [ZAP]. Turns “Cycle” on (lit) and off (dim). NUAGE MASTER Operation Manual 10 Description of the Device # EDIT Section [ZAP] Recalls the memorized Project Window view, set by [MEM]. Pressing it again restores the view to the previous one. The button lights while being held down. Lamp Description Dim The memorized Project Window view can be recalled. Off The Project Window view has not been memorized to [MEM] yet. $ [] (fast rewind) Operates Fast Rewind. % [] (fast forward) Operates Fast Forward. Overview This section contains Edit and Tools operations. ^ [] (stop) Operates Stop. & Controls and Functions [] (play) 1 Operates Play. If pressed with a range or event selected and [ALT] held down, playback will begin from the start of the range or event. 3 4 2 * [] (record) 6 Operates Record. 7 5 8 1 9 ) [Display access] Calls up the “EDIT Page” (page 43) in the [Multi function display]. When the EDIT Page is shown, you can toggle among the banks of the EDIT Page. 2 [OBJECT SELECT] Selects the Object Selection Tool. To change the resizing type, press the button repeatedly. 3 [RANGE SELECT] Selects the Range Selection Tool. Pressing the button toggles between “Range Selection A” and “Range Selection B.” 4 [MOVE] Refer to [MOVE] (page 13) in the JOG WHEEL section. NUAGE MASTER Operation Manual 11 Description of the Device 5 JOG WHEEL Section [CUT] Executes the Cut operation. The button lights while held down. Lamp Description Dim The Cut operation can be executed. Off No events have been selected yet. 6 [COPY] Executes the Copy operation. The button lights while held down. Lamp Description Dim The Copy operation can be executed. Off No events have been selected yet. Overview 7 [PASTE] Executes the Paste operation. The button lights while held down. Lamp Description Dim The Paste operation can be executed. Off No events have been selected yet. This section is for using the [Jog wheel] to operate various parameters. The particular parameter which [Jog wheel] affects changes depending on the mode or function of the [Jog wheel]. [Jog wheel] has the following modes. The buttons used for selecting the respective modes are indicated in parentheses. • Jog mode 8 [SNAP] Turns Snap on (lit) and off (dim). • Shuttle mode ([SHUTTLE]) • Scroll mode ([SCROLL]) • Zoom mode ([ZOOM]) 9 [AUTO SCROLL] Turns Auto-Scroll on (lit) and off (dim). ) [AUTO SELECT] Turns Auto Select Events Under Cursor on (lit) and off (dim). • Level mode ([VOLUME]) • Move mode ([MOVE]) The initial, default mode of the [Jog wheel] is the Jog mode, in which the wheel can be used to move the Project Cursor. When the Jog mode is enabled, the lamps of the buttons for selecting the mode are dim. To change the mode, press and release the desired mode button (the lamp lights). When you press a lit button, the lamp goes dim and the mode changes back to the Jog mode. You can temporarily select a different mode by holding down the button (the mode changes), and return to the previous mode by releasing the button. The [Jog wheel] has the following functions. The buttons used for selecting the respective functions are indicated in parentheses. • Select function ([SELECT]) • Fade In function ([FADE IN]) • Fade Out function ([FADE OUT]) • Trim Head function ([TRIM HEAD]) • Split function ([SPLIT]) • Trim Tail function ([TRIM TAIL]) • Quick Zoom function ([QUICK ZOOM]) For details on a particular mode or function, refer to the description of the corresponding button for operating the function and selecting the mode. NUAGE MASTER Operation Manual 12 Description of the Device Controls and Functions 6 8 9 ) ! 5 3 $ # @ 4 6 [SELECT] Operates the Select function. The operation of the Select function differs depending on the selected Tools, Object Selection or Range Selection. To switch between Object Selection and Range Selection, use [OBJECT SELECT] (page 11) and [RANGE SELECT] (page 11) in the EDIT section, or do this within Nuendo, etc. When the Object Selection Tool is selected, you can select the event under the Project Cursor position in the selected channel. When the Range Selection Tool is selected, you can select the range with the [Jog wheel]. The following steps illustrate by example. 1. Select the channel(s) for which you want to specify the range. 2 1 7 1 % 2. Press [RANGE SELECT] in the Edit section [Jog wheel] Operates various parameters. The particular parameter which [Jog wheel] affects changes depending on the mode or function of the [Jog wheel]. to switch to the Range Selection Tool. [RANGE SELECT] lights. 3. Select the desired start position and press [SELECT] to fix it. 2 [INC +]/[DEC -] Increases or decreases the [Jog wheel]-controlled parameter incrementally. Holding down [INC +]/[DEC -] continuously increases/decreases the parameter. 3 [SELECT] lights. 4. Turn the [Jog wheel] to set the end position. In this condition, you can set the end position by turning the [Jog wheel] clockwise, or set the start position (to before the position specified in step 3 above) by turning the [Jog wheel] counterclockwise. [SHUTTLE] Switches [Jog wheel] operation to the Shuttle mode. While the Shuttle mode is active, Scrubbing is always on. Keep in mind that the Shuttle mode cannot be selected during recording. In the Shuttle mode, you can use the [Jog wheel] to change playback speed from a complete stop to four times faster. The [Jog wheel] is an “infinite” controller with no defined positions. When enabled, the current wheel position is at 0 or stop. Turning it roughly 135 degrees to the right fast-forwards playback by four times normal; turning it 135 degrees to the left fast-reverses by four times. Between these two positions, playback speed can be continuously and smoothly adjusted. 5. Press [SELECT] to select the range. When you press [ZOOM] in step 3, the [Jog wheel] operates Zoom In and Zoom Out temporarily. When you press [ZOOM] again, the [Jog wheel] function returns back to the previous one. Also, when you press [PREV EVENT] or [NEXT EVENT] in step 3, the Project Cursor moves to the start position or end position of the range. 7 4 [SCRUB] Turns Scrubbing on (lit) and off (dim). 5 [SCROLL] Switches [Jog wheel] operation to the Scroll mode. In the Scroll mode, you can scroll through the current Project by using the [Jog wheel]. [ZOOM] Switches [Jog wheel] operation to the Zoom mode. In the Zoom mode, you can control Zoom In and Zoom Out by using the [Jog wheel]. 8 [MOVE] Switches [Jog wheel] operation to the Move mode. In the Move mode, you can move the selected events or range by using the [Jog wheel]. NUAGE MASTER Operation Manual 13 Description of the Device 9 GENERAL CONTROL Section [FADE IN] Operates the Fade In function. The following steps illustrate by example. 1. Select the desired event for applying Fade In. 2. Move the Project Cursor to the desired end, and press [FADE IN] to set it to that point. 3. Set the Fade In position by pressing [FADE IN]. In step 3 above, you can adjust the Fade In position more finely or to a different position by simultaneously holding down [FADE IN] and turning the [Jog wheel]. Overview ) [VOLUME] Switches [Jog wheel] operation to the Level mode. In the Level mode, you can adjust the entire level of the selected events by using the [Job wheel]. ! [FADE OUT] Operates the Fade Out function. To adjust the length of the Fade Out, simultaneously hold down [FADE OUT] and use the [Jog wheel]. The operating procedure is the same as [FADE IN]. @ [TRIM HEAD] Operates the Trim Head function. Pressing this once sets the Start position of the selected events or selected range (depending on whether the Object Selection Tool or Range Selection Tool has been enabled) to the current cursor position. To adjust this point, simultaneously hold down [TRIM HEAD] and use the [Jog wheel]. This section is for file saving operations, the Undo function, and cursor movement. The [SAVE] button is for saving a Project File as a new file, and adds an incremental number to the file name. The []/[]/[]/[] buttons let you move the cursor or select the pages. The [ENTER] button is used in essentially the same way as a (left) mouse click: for fixing or executing an entered value or selected item, and also for focusing on a parameter before inputting a value. The []/[]/[]/ [] and [ENTER] buttons operate the same as the [Arrow keys] and [Enter] on the computer keyboard. Controls and Functions 1 2 Lamp Description Dim (green) The Object Selection Tool is enabled. Dim (orange) The Range Selection Tool is enabled. # 3 4 [SPLIT] Operates the Split function. When you press [SPLIT], the selected events will be split at the Project Cursor position. 1 $ [TRIM TAIL] The same as [TRIM HEAD]. However, this button is for adjusting the End position. % [SAVE] Operates Save New Version. This button is for saving a Project File as a new file, and adds an incremental number to the file name. The button lights while held down. [QUICK ZOOM] Operates the Quick Zoom function. When you press [QUICK ZOOM] (lit), you can zoom in at the Project Cursor position. When you press [QUICK ZOOM] again (dim), the zoom status reverts to the previous one. NUAGE MASTER Operation Manual 14 Description of the Device 2 MODIFIER Section [UNDO] Executes Undo. The button lights while held down. To execute Redo, simultaneously hold down [SHIFT] (page 15) in the MODIFIER section and press [UNDO]. The button lights while held down. Overview Lamp Description Dim (green) Undo can be executed. Dim (orange) Redo can be executed (when [SHIFT] is pressed). Off Neither Undo nor Redo can be executed. 3 This section contains the modifier buttons. The buttons are used in the same way as [Shift], [Ctrl]/[Command], and [Alt]/[Option] on the computer keyboard. Controls and Functions [ENTER] For fixing or executing an entered value or selected item, and also for focusing on a parameter before inputting a value. 1 1 4 []/[]/[]/[] (up/left/down/right) Selects the channel or event, or moves the selected range. When you hold down one of the []/[]/[]/[] buttons, the channel or event/selected range will be selected/moved continuously. 2 3 [CTRL] Operates the Ctrl/Command function. 2 [SHIFT] Operates the Shift function. 3 [ALT] Operates the Alt/Option function. NUAGE MASTER Operation Manual 15 Description of the Device NUMERIC PAD Section Controls and Functions 1 2 3 4 5 6 7 Overview [LOCATE] This section is for inputting various parameters by the [Input keys] — which include [0] – [9], [ENTER], [NEXT +], etc. The input parameter changes depending on the selected [Input keys] mode, all of which are listed below. The buttons used for selecting the respective modes are indicated in parentheses. 1 • Locate mode ([LOCATE]) The Locate mode has the following three functions. • Marker mode ([MARKER]) • Locate function (page 16) • Parameter mode ([PARAM]) • Subtraction function (page 17) • DAW mode ([DAW]) • Addition function (page 17) Sets the [Input keys] mode to Locate. In the Locate mode, you can set the Project Cursor position by using the [Input keys]. The time format of the Project Cursor position changes depending on the Nuendo configuration. • Wheel mode ([WHEEL]) • Set mode ([SET]) For details on a particular mode or function, refer to the description of the corresponding button for operating the function and selecting the mode. Locate Function In the Locate function, you can set the Project Cursor position by inputting the desired number. When you press any one of the buttons [0] – [9], []/[], [BACK SPACE], [CLEAR], [CYCLE .], and [ENTER] in the Locate mode, the pop-up window for the Locate function is shown on the [Multi function display]. 1 2 3 1 Current Position Displays the current Project Cursor position. NUAGE MASTER Operation Manual 16 Description of the Device 2 Offset for addition/subtraction function Not applicable. 3 3 Locate To Displays the Project Cursor position including the subtraction value. Locate To Inputs Project Cursor position. When the Subtraction function pop-up window is shown, the [Input keys] have the following functions. When the pop-up window for the Locate function is shown, the [Input keys] have the following functions. [Input keys] Function [0] – [9] For inputting numbers to the input position. []/[] Moves the input digit right and left. [BACK SPACE] Deletes the number at the input position. [CLEAR] Deletes all input numbers. [SET] Selects the Set mode (the button lights). [PREV -] Sets the Project Cursor position by inputting the subtraction value. To adjust the value continuously, hold down the button. [Input keys] Function [0] – [9] For inputting numbers to the input position. []/[] Moves the input digit right and left. [BACK SPACE] Deletes the number at the input position. [CLEAR] Deletes all input numbers. [SET] Selects the Set mode (the button lights). [PREV -] Selects the Subtraction function (the button lights). [NEXT +] Selects the Addition function (the button lights). Selects the Addition function (the button lights). [CYCLE .] Moves the input digit to the right. [ESC] Cancels the input then closes the pop-up window. [ENTER] Determines the input then closes the pop-up window. [NEXT +] [CYCLE .] If a number is present at the input position, moves the input digit right. If no number is present at the input position, sets the number to 0 and moves the input digit right. [ESC] Cancels the input then closes the pop-up window. [ENTER] Determines the input then closes the pop-up window. Subtraction Function In the Subtraction function, you can set the Project Cursor position by inputting a subtraction value. When you press [PREV -] in Locate mode, the pop-up window for the Subtraction function is shown on the [Multi function display]. Addition Function In the Addition function, you can set the Project Cursor position by inputting an addition value. To call up the Addition function in the [Multi function display], press [NEXT +] in the Locate mode. 1 2 1 3 2 1 3 Displays the current Project Cursor position. 2 1 Current Position Displays the current Project Cursor position. 2 Offset for subtraction function Current Position Offset for addition function Inputs the addition value. 3 Locate To Displays the Project Cursor position including the addition value. Inputs the subtraction value. NUAGE MASTER Operation Manual 17 Description of the Device When the Addition function pop-up window is shown, the [Input keys] have the following functions. When the MARKER page is called up in the [Multi function display] [Input keys] Function [0] – [9] For inputting numbers to the input position. []/[] Moves the input digit right and left. [BACK SPACE] Deletes the number at the input position. [CLEAR] Deletes all input numbers. [SET] Selects the Set mode (the button lights). [PREV -] Selects the Subtraction function (the button lights). [NEXT +] Sets the Project Cursor position by inputting the addition value. To adjust the value continuously, hold down the button. [CYCLE .] Moves the input digit to the right. [ESC] Cancels the input then closes the pop-up window. 3 Determines the input then closes the pop-up window. Displays the Marker position of the Marker ID input to Locate To Marker. 2 1 2 [MARKER] Sets the [Input keys] to Marker mode. In the Marker mode, you can set the Project Cursor to the desired Marker position with the [Input keys]. The Marker mode has the following two functions. Current Position Displays the current Project Cursor position. 2 [ENTER] 4 Locate To Marker Inputs the Marker ID. Marker Position 4 Marker Name Displays the Marker name of the Marker ID input to Locate To Marker. When the Marker Jump pop-up window is shown, the [Input keys] have the following functions. • Marker Jump function (page 18) [Input keys] Function • Cycle Marker Jump function (page 19) [0] – [9] Inputs the Marker ID to the input position. []/[] When the Marker window is open, moves the marker selection. [BACK SPACE] Deletes the Marker ID from the input position. [CLEAR] Deletes all input Marker IDs. [SET] Selects the Set mode (the button lights). [PREV -] Adds -1 to the input Marker ID. [NEXT +] Adds +1 to the input Marker ID. [CYCLE .] Selects the Cycle Marker Jump function (the button lights). [ESC] Cancels the input then closes the pop-up window. [ENTER] Determines the input then closes the pop-up window. Marker Jump Function In the Marker Jump function, you can set the Project Cursor to the Marker position by inputting the Marker ID. When you press any one of the buttons [0] – [9], [BACK SPACE], [CLEAR], [PREV -], [NEXT +], [CYCLE .], and [ENTER] in the Marker mode, the pop-up window for the Marker Jump function is shown on the [Multi function display]. However, when the MARKER Page (page 42) in the TRANSPORT page is called up in the [Multi function display], the pop-up window is shown on the Label Pane area. When a page other than MARKER is called up in the [Multi function display] 1 2 3 4 NUAGE MASTER Operation Manual 18 Description of the Device Cycle Marker Jump Function In the Cycle Marker Jump function, you can set the Project Cursor to the Cycle Marker position by inputting the Marker ID of the Cycle Marker. When you press [CYCLE .] in the Marker mode, [CYCLE .] is lit, and the Cycle Marker Jump pop-up window is shown on the [Multi function display]. However, when the MARKER Page (page 42) in the TRANSPORT page is called up in the [Multi function display], the pop-up window is shown on the Label Pane area. When a page other than MARKER is called up in the [Multi function display] [Input keys] Function []/[] When the Marker window is open, moves the marker selection. [BACK SPACE] Deletes the number at the input position. [CLEAR] Deletes all input numbers. [SET] Selects the Set mode (the button lights). [PREV -] Adds -1 to the input number. [NEXT +] Adds +1 to the input number. [CYCLE .] Selects the Marker Jump function (the button is unlit). [ESC] Cancels the input then closes the pop-up window. [ENTER] Determines the input then closes the pop-up window. 1 2 3 3 4 When the MARKER page is called up in the [Multi function display] 2 1 4 Current Position Displays the current Project Cursor position. 2 Locate To Cycle Marker Inputs the Marker ID. 3 In the Parameter mode, the [Input keys] have the following functions. [Input keys] Function [0] – [9] For inputting numbers to the input position. []/[] Moves the input digit right and left. [BACK SPACE] Deletes the number at the input position. [CLEAR] Deletes all input numbers. [SET] Selects the Set mode (the button lights). [PREV -] Inputs “-.” [NEXT +] Inputs “+.” [CYCLE .] Inputs a decimal point. [ESC] Cancels the input. [ENTER] Determines the input. Marker Position Displays the Marker position of the Marker ID input to Locate To Cycle Marker. 4 [PARAM] Sets the [Input keys] mode to Parameter. In the Parameter mode, you can directly input a number value to the parameter in the page called up in the [Multi function display]. In the Parameter mode, the parameter is focused before inputting a value when you touch a valid parameter for editing. To input the parameter value, enter it with the [Input keys] then press [ENTER]. Marker Name Displays the Marker name of the Marker ID input to Locate To Cycle Marker. When the Cycle Marker Jump pop-up window is shown, the [Input keys] have the following functions. [Input keys] Function [0] – [9] For inputting numbers to the input position. NUAGE MASTER Operation Manual 19 Description of the Device 4 [DAW] Sets the [Input keys] mode to DAW. In the DAW mode, you can input values to parameters on the DAW software, using the [Input keys] instead of the numeric keys on the computer keyboard. In the DAW mode, the [Input keys] have the following functions. When you press any one of the buttons [0] – [9], []/[], [BACK SPACE], [CLEAR], [PREV -], [NEXT +], [CYCLE .], [ENTER] in the Wheel mode, the pop-up window for inputting the parameter is shown on the [Multi function display]. However, in the case of the Fade In function, Trim Head function, etc., simultaneously hold down the relevant function’s button and use the [0] – [9] buttons. [Input keys] Function When the pop-up window is shown, the [Input keys] have the following functions. [0] – [9] Operates as [0] – [9]. [Input keys] Function []/[] Operates as [Arrow Key] (right/left). [0] – [9] For inputting numbers to the input position. [BACK SPACE] Operates as [Backspace]. []/[] Moves the input digit right and left. [CLEAR] Operates as [Delete]. [BACK SPACE] Deletes the number at the input position. [SET] Selects the Set mode (the button lights). [CLEAR] Deletes all input numbers.? [PREV -] Operates as [-]. [SET] Selects the Set mode (the button lights). [NEXT +] Operates as [+]. [PREV -] Inputs “-.” [CYCLE .] Operates as [.]. [NEXT +] Inputs “+.” [ESC] Operates as [Esc]. [CYCLE .] Inputs “.” [ENTER] Operates as [Enter]. [ESC] Cancels the input then closes the pop-up window. [ENTER] Determines the input then closes the pop-up window. 5 [WHEEL] Sets the [Input keys] mode to Wheel. In the Wheel mode, you can input values to parameters operated by using the [Jog wheel] (page 13) in the JOG WHEEL section. The input parameter changes depending on the mode or the function of [Jog wheel]. The following chart indicates the relation between the mode or the function of [Jog wheel] and the input parameter. Mode or function of Input parameter [Jog wheel] Jog mode Inputs the Project Cursor position. Select mode Inputs the start position of the selection. Level mode Inputs the volume value. Move mode Inputs the offset value of the selected event. Fade In function Inputs the Fade In end position. Fade Out function Inputs the Fade Out start position. Trim Head function Inputs the Trim Head position. Trim Tail function Inputs the Trim Tail position. 6 [SET] Sets the [Input keys] mode to the Set mode. In the Set mode, you can set the Marker to the current Project Cursor position, and set the Cycle Marker to the current Left/Right Locator with the [Input keys]. When you press [SET], the pop-up window for setting the Marker or Cycle Marker is shown on the [Multi function display]. Touch the desired number (field) on the pop-up window to select it for editing. NUAGE MASTER Operation Manual 20 Description of the Device When the pop-up window is shown, the [Input keys] have the following functions. USER ASSIGNABLE Section [Input keys] Function [0] – [9] For inputting numbers to the input position. []/[] Moves the input digit to right and left. [BACK SPACE] Deletes the number at the input position. [CLEAR] Deletes all input numbers. [SET] Cancels the input then closes the pop-up window. [PREV -] Adds -1 to the input number. [NEXT +] Adds +1 to the input number. Overview [CYCLE .] Selects the type of Marker to be set. When off, this indicates Marker, and when lit indicates Cycle Marker. This section is used to execute assigned functions. For details on assigning functions, see “User Assignable Settings” (page 44) in NUAGE FADER Hardware Setup. [ESC] Cancels the input then closes the pop-up window. Controls and Functions [ENTER] Determines the input then closes the pop-up window. 1 You can set the locator position by [SET] and [LEFT]/ [RIGHT] in the TRANSPORT section. For details, refer to the description of [LEFT] (page 10) in the TRANSPORT section. 2 7 [Input keys] Inputs the parameter. The input parameter changes depending on the [Input keys] mode. For details, refer to the description of the buttons for changing the mode, such as [LOCATE], [MARKER], etc. 1 [Display access] Calls up the “USER ASSIGNABLE Page” (page 38) in the [Multi function display]. When the USER ASSIGNABLE Page is shown, you can toggle among the banks of the USER ASSIGNABLE Page. 2 [U1] – [U12] Executes the assigned function. The button lights while held down. Lamp Description Dim A function can be used. Off A function cannot be used. NUAGE MASTER Operation Manual 21 Description of the Device AUTOMATION Section 9 [TRIM] Turns Trim on (lit) and off (dim). MULTI FUNCTION DISPLAY Section Overview This section is for operating Automation. The function assignments of the buttons can be changed to other Automation functions as desired. For details on changing the function assignments, see “Automation window” (page 45) in NUAGE MASTER Setup. Controls and Functions 2 3 4 5 Overview This section is for displaying and editing the section and channel parameters. 1 The [Multi function display] is a touch screen for displaying the page for editing the section and channel parameters. You can select and edit certain parameters on the page by touching it. NOTICE 6 1 7 8 9 [Display access] Calls up the “AUTOMATION Page” (page 37) in the [Multi function display]. 2 To open the page displayed on the [Multi function display], press [Display access] at the upper left of the section or the right side of the [Multi function display]. [FILL PUNCH] Turns Fill To Punch on (lit) and off (dim). 3 Never use a sharp or pointed object such as your fingernail to operate the touch screen. Doing so may scratch the screen and render the touch screen inoperable [Display access] at upper left of section [FILL TO START] Turns Fill To Start on (lit) and off (dim). 4 [FILL TO END] Turns Fill To End on (lit) and off (dim). 5 [FILL LOOP] Turns Fill Loop on (lit) and off (dim). 6 [TOUCH] Selects the Touch mode. 7 [LATCH] Selects the Auto-Latch mode. 8 [X-OVER] Selects the Cross-Over mode. NUAGE MASTER Operation Manual 22 Description of the Device [Display access] at right side of the [Multi function display] The following chart indicates the relation between the “Label Pane” and the controllable parameters of the [Multi function knob]. Lit by touching knob Knob parameter value Functions on button A/B Knob Button A/B Depending on the page shown on the [Multi function display], the [Multi function knob] has the following functions. The [Multi function knobs] are touch-sensitive knobs for adjusting various parameters. The [Multi function knob] has four separate control operations: touching (which brightens the corresponding parameter indication), turning, pressing, and simultaneously holding down and turning. The [Multi function A and B buttons] are directly below each [Multi function knob]. These buttons are for turning functions on and off or for selecting the controllable parameters of the [Multi function knobs]. The controllable parameters of the [Multi function knobs] change depending on the page shown on the [Multi function display]. The parameter information of the [Multi function knobs] appears on the Label Pane area at the bottom of the page shown on the [Multi function display]. Operation Function Touching • Highlights the parameter. • Shows the pop-up window. Turning • Adjusts the parameter. • Selects the parameter. • Moves the cursor. Pressing • Shows the pop-up window. • Sets the selected parameter. • Opens and closes the folder. Simultaneously Adjusts the parameter finely (fine mode). holding down and turning When you operate the [Multi function knob] while holding down the appropriate button(s) in the “MODIFIER Section” (page 15), the function changes as follows. Operation Function Simultaneously holding down [SHIFT] and turning knob Adjusts the parameter finely (fine mode). Simultaneously holding down [CTRL] and pressing knob Resets the parameter to the default value. For details on the various pages of the [Multi function display], refer to “Pages Shown on the Multi Function Display” (page 28) in the description of the software programs. NUAGE MASTER Operation Manual 23 Description of the Device DAW SELECT Section Controls and Functions 1 4 5 6 7 8 9 1 2 Overview 3 This section is for selecting the target DAW software for operation. This section allows you to select the particular DAW software when you have connected and configured multiple DAW software programs. For details on connecting and settings, refer to the NUAGE Workgroup Manager manual (page 46; PDF). [Multi function display] Displays pages for editing parameters in various sections, or pages for editing channel parameters. 2 [Multi function knob] Controls and Functions Adjusts the various parameters. The color of the LED on the [Multi function knob] changes depending on the type of the controllable parameter. 3 [Multi function button A]/[Multi function button B] 1 Selects and turns on/off the controllable parameters of the [Multi function knobs]. 4 [SETUP] Calls up the “SETUP Page” (page 29) in the [Multi function display]. 5 [TRACK LIST] Calls up the “TRACK LIST Page” (page 30) in the [Multi function display]. When the TRACK LIST page is shown, you can select one of the tabs of the TRACK LIST page. 6 [CHANNEL] Calls up the “CHANNEL CONTROL Page” (page 32) to the [Multi function display]. When the CHANNEL CONTROL page is shown, you can select one of the tabs of the CHANNEL CONTROL page. 7 1 [DAW A] – [DAW C] Selects the target DAW software for operation. Lamp Description Lit The DAW software has been selected. Dim The DAW software has not been selected yet. Dark The DAW software has not been configured yet. [PLUG-IN] Calls up the “PLUG-IN Page” (page 36) to the [Multi function display]. 8 [DYNAMICS] Calls up the “DYN Page” (page 34) to the [Multi function display]. 9 [EQ] Calls up the “EQ Page” (page 34) to the [Multi function display]. NUAGE MASTER Operation Manual 24 Description of the Device TALKBACK MIC Section Overview This is a section for the talkback microphone. Controls and Functions 1 1 [TALKBACK microphone] Microphone for Talkback operation. The audio signal input to the [TALKBACK microphone] is output from the [TALKBACK OUT +4dBu] jack (page 27) on the rear panel. NUAGE MASTER Operation Manual 25 Description of the Device Front Panel 1 1 2 [PHONES A/B] For connection to headphones. Audio input via [TO PHONES L/R] (page 27) on the rear panel is output here. 2 [LEVEL] Adjusts the output signal level of [PHONES A/B]. NUAGE MASTER Operation Manual 26 Description of the Device Rear Panel 1 1 2 3 4 5 6 [AC IN] For connection to the power cable. 2 [RS-232C] For connection to an RS-232C cable. Connect this port to the RS-232C port on the KVM switch. When you switch between multiple DAW applications using the DAW SELECT section with KVM switches connected and the data to be sent to them configured in NUAGE Workgroup Manager, the display content, active keyboard, and active mouse will also change accordingly. For details, refer to the PDF manual of NUAGE Workgroup Manager (page 46). 3 [Power switch] Turns the power on ( I ) and off (P). NOTICE Rapidly turning the unit on and off in succession can cause it to malfunction. After turning the unit off, wait for at least 6 seconds before turning it on again. 4 [Network] For connecting an Ethernet cable. 5 [TALKBACK OUT +4dBu] This jack outputs the signal from the [TALKBACK microphone] (page 25) on the top panel. 6 [TO PHONES L/R] The signal input to [TO PHONES L/R] is output from [PHONES A/B] (page 26) on the front panel. NUAGE MASTER Operation Manual 27 Description of the Software Programs Description of the Software Programs Pages Shown on the Multi Function Display To select the pages, press [Display access] in each section, or press the buttons at the right side of the MULTI FUNCTION DISPLAY section (page 22), or touch the tabs or buttons at the top of the pages. Each page has the following four areas. Title area Tool area Main area Label Pane area NOTE The icon ( ) at the side of the button name or area name indicates that you can control the corresponding button or area by touching it. Also, the icon ( [PARAM] ) at the side of the parameter name indicates that you can input number values to the corresponding parameter by touching it (if you’ve turned on [PARAM] (page 19) in the NUMERIC PAD section. The page title and the tabs for selecting other pages are shown on the Title area. Buttons unique to the selected page or buttons for selecting the page views are shown on the Tool area. The parameters or the configuration windows are shown on the Main area. The parameter currently assigned for control with the [Multi function knob] is indicated on the Label Pane area. When you touch the top border of the Label Pane area in certain pages, the window for selecting parameters (in banks or groups of eight) for control with the [Multi function knob] appears. Overview The following pages are shown on the [Multi function display]. • SETUP page (page 29) • TRACK LIST page (page 30) • CHANNEL CONTROL page (page 32) - MAIN page (page 33) - EQ page (page 34) - DYN page (page 34) - SENDS page (page 34) - CUES page (page 34) - PAN page (page 35) - INSERT page (page 35) - PLUG-IN page (page 36) • AUTOMATION page (page 37) • USER ASSIGNABLE page (page 38) • CONTROL ROOM page (page 38) - MAIN page (page 38) - SPEAKER CONTROL page (page 39) • CUES page (page 40) • MONITOR SOURCE page (page 40) • COMMUNICATION page (page 41) • TRANSPORT page (page 41) - MAIN page (page 41) - MARKER page (page 42) - OVER VIEW page (page 42) A single horizontal row indicates a bank. When you touch a bank, the controllable parameters of the [Multi function knobs] change to the corresponding bank, and then the window closes. • EDIT page (page 43) NUAGE MASTER Operation Manual 28 Description of the Software Programs To input parameter values (which allow number input) in the page, use the Parameter mode in the NUMERIC PAD section (page 16). To do this: 1. Press [PARAM] (page 19) in the NUMERIC PAD section to select the Parameter mode. 2. Touch the parameter (which allows number input) shown on the [Multi function display] to select it. 3. Input the number with the [Input keys] (page 21) in the NUMERIC PAD section. 3 Fader Adjusts the touch sensitivity of the [Fader] on Nuage Fader. The larger the number, the higher the sensitivity. 4 LCD Adjusts the touch sensitivity of the [Multi function display]. The larger the number, the higher the sensitivity. 5 LED Low Adjusts the brightness of the LEDs on the buttons or knobs (when dimmed). The larger the value, the brighter the LED. 6 LED High Adjusts the brightness of the LEDs on the buttons or knobs (when fully lit). The larger the value, the brighter the LED. SETUP Page 7 OLED Adjusts the brightness of the [CONTROL ROOM display] and the [Channel name display] on Nuage Fader. The larger the value, the brighter the LED. 8 LCD Adjusts the brightness of the [Multi function display]. The larger the number, the brighter the display. 9 Overview This page is for configuring general settings, such as touch sensitivity or LED brightness. To open it, press [SETUP] (page 24) in the MULTI FUNCTION DISPLAY section. Touching a column in this page enables that column’s parameter for control with the [Multi function knob]. Follow Slider Scroll Turns on and off the function which causes the [Fader] position on Nuage Fader to follow scrolling through the channels when you use the [Touch slider bar] on Nuage fader. When this function is off, the [Fader] position changes only after you stop scrolling. ) Motor Turns the motor power of [Fader] on Nuage Fader on and off. Controls and Functions ! 1 2 3 4 5 6 7 8 Ch Select Turns on and off the function which allows you to select channels by touching [Fader] on Nuage Fader. @ OLED Off Time Configures the period of time that elapses before the [CONTROL ROOM display] and the [Channel name display] on Nuage Fader are automatically darkened. # 9 1 ) ! @ # $ Knob Adjusts the touch sensitivity of the [Multi function knob]. The larger the number, the higher the sensitivity. Smart Switch Delay When you press then release the following buttons, the lamps of the buttons turn on when they are pressed. This control adjusts the time that elapses before the buttons light. • [SHUTTLE] (JOG WHEEL section) • [SCROLL] (JOG WHEEL section) • [SELECT] (JOG WHEEL section) 2 Slider Adjusts the touch sensitivity of the [Touch slider bar]. The larger the number, the higher the sensitivity. • [ZOOM] (JOG WHEEL section) • [MOVE] (JOG WHEEL section) NUAGE MASTER Operation Manual 29 Description of the Software Programs • [VOLUME] (JOG WHEEL section) • [CYCLE] (TRANSPORT section) To scroll through the view of the Main area, touch “u”/“d” on the Tool area. • [] (record) (TRANSPORT section) • [TALK BACK] (COMMUNICATION section) When you set this to off, lighting of the buttons while they are held is disabled. $ SPL dB Sets “SPL dB.” By adjusting the value using the [Multi function knob] and then pressing [Multi function button A] (SET), you can set the value. The TRACK LIST page has the following three display styles. • Overview display • Stratum display • Track display To select the display style, touch the buttons at the left side of the Tool area. TRACK LIST Page Overview Display The Overview display shows up to twelve blocks, each of which represent a group of thirty-two different tracks. Overview This page is for operating the Select, Mute, Solo/Listen, and Record Enable functions for the tracks. To open this page, press [TRACK LIST] (page 24) in the MULTI FUNCTION DISPLAY section. The TRACK LIST page has the following views. When you touch a block, the tracks in the block are shown in the Track display. Please note that in the Overview display, you cannot operate the Select, Mute, Solo/Listen, and Record Enable functions for the tracks. • Track Select view (page 31) • Mute view (page 31) • Solo view (page 32) • Track Arming view (page 32) Stratum Display The Stratum display shows up to thirty-two tracks and folder tracks contained in the selected stratum. To select the view, touch the corresponding tabs at the middle of the Tool area, or touch the buttons in the Label Pane area, or press the [Multi function knob]. The tabs at the middle of the Tool area: The buttons in the Label Pane area: NUAGE MASTER Operation Manual 30 Description of the Software Programs When you touch the upper left of a folder track icon, the window changes to show the contents of the folder track. Controls and Functions Track Select View This view is for selecting tracks. 1 1 Tracks For selecting the tracks. You can select multiple tracks by simply dragging across the tracks. In the first column, the selected folder track and a “Return” control is shown. Touching “Return” changes back to the previously selected window. The tracks in the folder track (up to a maximum of twentyfour) are shown below the second column. When you touch “Track” while holding down the appropriate button(s) in the “MODIFIER Section” (page 15), the function changes as follows. Modifier button Function [ALT] Selects only the last channel touched. Mute View This view is for operating “Mute” for the tracks. Track Display 1 In the Track display, a maximum of thirty-two tracks are shown. 1 Track Turns “Mute” on (lit) and off. You can turn Mute on/off for multiple tracks by simply dragging across the tracks. When you touch “Track” while holding down the appropriate button(s) in the “MODIFIER Section” (page 15), the function changes as follows. Modifier button Function [ALT] Turns Mute on for only the last channel touched. NUAGE MASTER Operation Manual 31 Description of the Software Programs Solo View 3 This view is for operating Solo or Listen for the tracks. Turns Record Enable on (lit) and off. You can turn Record Enable on/off for multiple tracks by simply dragging across the tracks. 1 2 3 Track When you touch “Track” while holding down the appropriate button(s) in the “MODIFIER Section” (page 15), the function changes as follows. 4 1 Function [ALT] Turns Record Enable on for only the last channel touched. Solo CHANNEL CONTROL Page Selects Solo. 2 Modifier button AFL Selects Listen of AFL. 3 PFL Selects Listen of PFL. 4 Track Turns Solo or Listen on (lit) and off. You can turn Solo or Listen on/off for multiple tracks by simply dragging across the tracks. When you touch “Track” while holding down the appropriate button(s) in the “MODIFIER Section” (page 15), the function changes as follows. Modifier button Function [ALT] Turns Solo or Listen on for only the last channel touched. Overview This page is for operating the functions EQ, Dynamics, Sends, Cues, Pan, and Insert for the selected channel. To open this page, press [CHANNEL] (page 24) in the MULTI FUNCTION DISPLAY section. The CHANNEL CONTROL page has the following pages. • MAIN page (page 33) Track Arming View • EQ page (page 34) This view is for enabling recording of the tracks. • DYN page (page 34) • SENDS page (page 34) 1 2 • CUES page (page 34) • PAN page (page 35) • INSERT page (page 35) • PLUG-IN page (page 36) To select the desired page, touch the corresponding tab in the Title area, or press [CHANNEL] in the MULTI FUNCTION DISPLAY section. 3 1 All Turns Record Enable on (lit) for all tracks. 2 All To open the PLUG-IN page, touch “e” in the SENDS page or the INSERT page. To select the selected channel, touch “Channel information” in the Title area. Turns Record Enable off for all tracks. NUAGE MASTER Operation Manual 32 Description of the Software Programs When you touch “Channel information,” the channel selection window is shown. By touching “Nuendo” in the Tool area, you can open the channels configuration window on the screen. However, in the PLUG-IN page, the plug-in effect window is opened. Touch again to close. Controls and Functions MAIN Page This page is for operating Routing, Phase, Low Cut, etc. for the selected channel. 6 9 ) 1 To scroll through the window, touch “u” or “d.” When you touch the channel, the channel is selected and the window closes. 2 3 4 5 ! 7 When you touch “” in the Title area, the window indicating the output level of the selected channel is shown. 1 8 @ # Input Routing Calls up the Input Routing pull-down menu, letting you select the port. 2 HC [PARAM] Adjusts the frequency of High Cut. 3 LC [PARAM] Adjusts the frequency of Low Cut. 4 Gain [PARAM] Adjusts Input Gain. 5 Phase Turns phase inversion on (lit) and off. 6 Summing Mode Turns Summing Mode on (lit) and off. When this is on, you can output the audio signal of multiple ports at the same time. In this condition, you can adjust the output level by the rightmost [Multi function knob]. To close the window, touch “.” 7 On/Off Turns Direct Routing on (lit) and off. 8 Direct Routing Selects the port for Direct Routing. 9 M Turns Mute on (lit) and off. NUAGE MASTER Operation Manual 33 Description of the Software Programs ) S or L 1 Turns Solo or Listen on (lit) and off. ! Level Meter 2 Displays the channel level. @ BYP Turns Bypass on (lit) and off. Mon 3 Turns Monitor on (lit) and off. # Dynamics Graph Displays the parameters as a graph. Preset Opens the preset selection window. Rec 4 Level Meter Turns Record Enable on (lit) and off. Displays the channel level. EQ Page SENDS Page This page is for operating EQ for the selected channel. Touching a column in the Label Pane area enables that column’s parameter for control with the [Multi function knob]. This page is for controlling the Sends of the selected channel. 6 2 3 1 5 4 1 2 3 4 1 1 EQ Graph Send Level [PARAM] Adjusts the send level. Displays the parameters as a graph. 2 2 BYP On/Off Turns Send on (lit) and off. Turns Bypass on (lit) and off. 3 3 Preset PRE Turns Pre Fader on (lit) and off. Opens the preset selection window. 4 4 Level Meter e (edit) Opens the “PLUG-IN page” (page 36). The plug-in effect which is opened is the one assigned to the first slot in the channel routed to “Send routing.” Displays the channel level. DYN Page 5 This page is for operating Dynamics for the selected channel. Send Routing Selects the Send Routing port. 2 3 6 BYP Turns Bypass on (lit) and off. 1 4 NUAGE MASTER Operation Manual 34 Description of the Software Programs CUES Page When Mix Convert is selected 5 This page is for controlling the Cues of the selected channel. 6 5 2 1 2 When a Stereo channel is selected 5 3 4 1 Cue Send Level 6 [PARAM] Adjusts the Cue send level. 2 Cue Send Pan 1 4 [PARAM] Adjusts the Cue send pan. 3 3 On/Off Turns Cue on (lit) and off. 4 PRE 1 Turns Pre Fader on (lit) and off. 5 Pan Graph Displays the parameters as a graph. BYP 2 Mix Convert Turns Bypass on (lit) and off. Operates Mix Convert. PAN Page 3 This page is for controlling Pan for the selected channel. The view of the Main area in this page changes depending on the particular channel selected. Selects the Pan mode: Stereo Combine Pan and Stereo Balance Pan. • Surround channel 4 • Mix Convert Displays the channel level. • Stereo channel 5 When a Surround channel is selected 5 Stereo Mode Level Meter BYP Turns Bypass on (lit) and off. 6 6 Preset Opens the preset selection window. 1 4 NUAGE MASTER Operation Manual 35 Description of the Software Programs 1. Touch the desired parameter in the Main INSERT Page area to select it. This page is for controlling Inserts for the selected channel. The parameter is temporarily assigned to an “empty” [Multi function knob] (one which does not yet have a locked parameter). 6 NOTE If a parameter has already been locked, press the corresponding [Multi function button B] to unlock it. 2. Press [Multi function button B] of the 1 desired [Multi function knob] to lock the parameter. 2 3 4 The locked parameters are memorized for other plug-ins as well. To unlock the parameter, press [Multi function button B] again. 5 1 1 2 3 4 5 6 7 8 Insert Displays the assigned plug-in effects. When you touch this, the plug-in selection window is opened. 9 1 Return Changes back to the previously selected window. 2 To scroll through the window, touch “u” or “d.” 2 Preset Opens the preset selection window. 3 On/Off Turns “Insert” on (lit) and off. 4 BYP Turns “Bypass” on (lit) and off. 5 e (edit) Selects the “PLUG-IN Page” (page 36) corresponding to the Insert-assigned plug-in effect. Turns the plug-in effect on (lit) and off. 3 BYP (All) BYP Turns Bypass on (lit) and off. 4 R Turns Read Automation on (lit) and off. 5 W Turns Write Automation on (lit) and off. 6 Preset Name Displays the selected preset. 7 6 On/Off Preset Opens the preset selection window. Turns Bypass on (lit) and off all Insert effects. 8 PLUG-IN Page This page is for controlling the plug-in effect parameters. In the PLUG-IN page, you can assign and lock a specific plug-in effect parameter to a [Multi function knob]. To do this: u/d Scrolls through the window. 9 Parameter [PARAM] Selects the parameter. Can be pressed while [PARAM] (page 19) from the NUMERIC PAD section is on in order to enter parameter values. NUAGE MASTER Operation Manual 36 Description of the Software Programs AUTOMATION Page 7 R Turns on Read Automation for all tracks. 8 R Turns off Read Automation for all tracks. 9 W Turns on Write Automation for all tracks. ) W Turns off Write Automation for all tracks. ! Overview This page is for controlling the Automation features. The functions of this page are the same as in the Nuendo Automation Panel. To open this page, press the AUTOMATION [Display access] button (page 22). Touching the “Nuendo” icon in the Tool area calls up the Automation Panel within Nuendo. Touching once again closes it. Touch Sets Automation Mode to “Touch.” @ Auto Latch Sets Automation Mode to “Auto Latch.” # Cross Over Sets Automation Mode to “Cross Over.” $ Trim Operates Trim. Controls and Functions 1 1 7 8 9 ) ! @ # 2 4 3 5 $ 6 Join Operates Join function. 2 Fill Operates Fill function. 3 Preview Operates Preview function. 4 Suspend Read Operates Suspend Read function. 5 Suspend Write Operates Suspend Write function. 6 Show Operates Show function. NUAGE MASTER Operation Manual 37 Description of the Software Programs USER ASSIGNABLE Page CONTROL ROOM Page Overview Overview This page is used to execute assigned functions. To open this page, press the USER ASSIGNABLE [Display access] button (page 21). To assign the function, configure it in “NUAGE MASTER Setup” (page 44). This page is for operating the Control Room functions. To open this page, press the CONTROL ROOM [Display access] button (page 5). To select the desired bank, touch “BANK 1” – “BANK 4” in the Title area, or the USER ASSIGNABLE [Display access] button. • MAIN page (page 38) The CONTROL ROOM page has the following pages. • SPEAKER CONTROL page (page 39) To select the desired page, touch the corresponding tab in the right side of the Title area, or press the CONTROL ROOM [Display access] button. Each bank has twenty-four buttons, for a total of ninetysix. By touching “Nuendo” in the Tool area, you can open “NUAGE MASTER Setup” window (page 44) on the Nuendo screen. Touch again to close. If you have configured multiple DAW software programs and operate them by selecting the DAW SELECT Section (page 24), this section will always operate the Control Room of DAW A. In other words, the Control Room section is not affected by the DAW software selection. Controls and Functions Controls and Functions MAIN Page This page is for operating the general functions in the Control Room. 6 8 1 ) 1 2 3 4 1 U1 – U24 Executes the assigned function. ! @ 5 7 1 9 CLICK Turns Metronome on (lit) and off. 2 CLICK Level [PARAM] Adjusts Metronome level. Adjusts Metronome level. NUAGE MASTER Operation Manual 38 Description of the Software Programs 3 SPEAKER CONTROL Page LE Turns Listen on (lit) and off. 4 LE Level This page is for operating the Speaker Controls in Control Room. [PARAM] 5 2 1 Adjusts Listen level. 4 On/Off Turns the channel on (lit) and off. 6 5 Level Meter Displays the channel level. 7 Level Indicator [PARAM] Displays the channel level. 8 3 Reference Level When turned on (lit), this resets the Control Room level to the Reference level. When this is off (dim), the previous level setting is restored. The button goes dim when you change the level after turning this on. When you touch Reference Level while holding down the appropriate button(s) in the “MODIFIER Section” (page 15), the function changes as follows. Modifier button Function [ALT] Resets the Reference level to the current Control Room level setting. 9 DIM Turns Dim on (lit) and off (dim). When this is on, the Control Room level is lowered. When this is off, the previous level is restored. You can set the Dim level on Nuendo. ) Down Mix Selects the Downmix preset. 2 Monitor Select Selects Monitor. 3 Bass Management Turns Bass Management on (lit) and off. This function is available when connecting a Nuage I/O unit and creating a surround output bus (such as 5.1 channels) in the Nuendo menu “Devices” “VST Connection.” Also, make sure to assign the ports in one Nuage I/O to the ports of this output bus. 4 Mix Convert Operates Mix Convert. To turn the output on and off, touch the speaker icon. 5 SOLO Selects Solo or Listen of AFL, and Listen of PFL. ! 1 Level Meter Displays the channel level. Listen Active/Deactive All Listen Lights if Solo or Listen is on for one or more channels. Touching this while it is lit turns Solo or Listen off for all channels. @ Listen Dim Level [PARAM] Adjusts the level of the Main Mix or Monitor Source when you use Listen. NUAGE MASTER Operation Manual 39 Description of the Software Programs CUES Page MONITOR SOURCE Page Overview Overview This page is for operating Cue functions in the Control Room. To open this page, press the CUES [Display access] button (page 8). This page is for operating Monitor Source in the Control Room. To open this page, press the MONITOR SOURCE [Display access] button (page 7). Controls and Functions Controls and Functions 2 9 1 2 3 4 5 6 7 8 1 1 3 4 5 6 EXT 1 Sets the source to “EXT.” External Input Source Selects the source of the external inputs. 2 CUES Sets the source to “CUES.” 3 2 Multiple Monitor Source Switches between multiple selection (lit) and single selection (off) when you select the monitor source. MIX Sets the source to “MIX.” 3 4 Monitor Source Selects the monitor source. CLICK Turns the Metronome on (lit) and off. 4 5 CLICK Level [PARAM] CUE Selects the source of the CUE. Adjusts Metronome level. 5 6 Phones Selects the source of the Phones. TE Enables (lit) or disables (off) the Talkback function. 6 7 TE Level [PARAM] Control Room Selects the source of the Control Room. Adjusts the Talkback level. 8 Activate Monitor Turns the channel on (lit) and off. 9 Level Meter Displays the channel level. NUAGE MASTER Operation Manual 40 Description of the Software Programs COMMUNICATION Page TRANSPORT Page Overview Overview This page is for operating the communication functions in the Control Room. To open this page, press the COMMUNICATION [Display access] button (page 9). This page is for operating the Transport functions. To open this page, press the TRANSPORT [Display access] button (page 10). By touching “Nuendo” in the Tool area, you can open “NUAGE MASTER Setup” window (page 44) on the Nuendo screen. Touch again to close. The TRANSPORT page has the following pages. • MAIN page (page 41) • MARKER page (page 42) • OVER VIEW page (page 42) To select the desired page, touch the corresponding tab in the right side of Title area, or press the TRANSPORT [Display access] button. Controls and Functions Controls and Functions 1 MAIN Page 2 3 This page is for operating the Transport related functions. 1 1 2 Function Button 3 Executes the assigned function. To assign the function, configure it from the “Communication Window” (page 45) in “NUAGE MASTER Setup.” 4 5 6 2 Talk Back Enable 7 Enables (lit) or disables (off) the Talkback function. 3 Talk Back Touching this turns Talkback on. 1 Left Locator [PARAM] Sets the Left Locator position (“Pre Roll,” “Auto Punch In,” etc.). 2 Right Locator [PARAM] Sets the Right Locator position (“Post Roll,” “Auto Punch Out,” etc.). 3 CLICK Turns the Metronome on (lit) and off. NUAGE MASTER Operation Manual 41 Description of the Software Programs 4 TEMPO 7 Selects the Tempo mode. 5 SYNC 8 Turns Synchronization on (lit) and off. 6 Time Display u/d Scrolls through the Main area view. [PARAM] OVER VIEW Page Sets the Project Cursor position. 7 Function Operates the Marker functions from the Marker window. This page is for operating the Overview functions. Transport 2 3 4 5 Operates the basic Transport functions. MARKER Page This page is for operating the Marker Track functions. 1 3 4 5 6 7 8 1 1 2 Overview Displays the overview of the project. The blue area indicates the range which is shown in the Project Window. 2 Move Lets you move the displayed area by dragging it. 1 Marker Overview Displays the Marker Track overview. The “” arrow indicates the selected Marker. The white line indicates the Project Cursor. 2 3 Move & Zoom Lets you move the displayed area by dragging it right and left. You can Zoom In or Zoom Out the displayed area by dragging it up and down. Marker Displays the Marker information. The information includes the ID, name, position, and bar graph. You can select Marker or move the Project Cursor to the Marker position by touching it. To switch this function, touch the buttons in the Label Pane area or press the [Multi function knob]. 4 Left Lets you move the start position of the displayed area by dragging it. 5 Right Lets you move the end position of the displayed area by dragging it. 3 Nuendo Opens the Marker Track in the Nuendo window. 4 Track Selects the active Marker Track. 5 Type Selects the type of Marker shown. 6 Sort Sorts the Markers. NUAGE MASTER Operation Manual 42 Description of the Software Programs EDIT Page Overview This page is used to execute assigned functions. To open this page, press the EDIT [Display access] button (page 11). To assign the function, configure it from “EDIT window” (page 44) in “NUAGE MASTER Setup.” To select the desired bank, touch “BANK 1” – “BANK 4” in the Title area, or press the EDIT [Display access] button. Each bank has twenty-four buttons, for a total of ninetysix. When selecting an event, information from “Info Line” in Nuendo is displayed in the Label Pane area. Parameters can be adjusted using [Multi function knobs] at this time. By touching “Nuendo” in the Tool area, you can open “NUAGE MASTER Setup” window (page 44) on the Nuendo screen. Touch again to close. Controls and Functions 1 1 E1 – E24 Executes the assigned function. NUAGE MASTER Operation Manual 43 Description of the Software Programs NUAGE MASTER Setup Controls and Functions 1 1 Overview This software is for configuring the general settings of Nuage Master from Nuendo. You can configure settings such as the user assignable buttons on the device or “USER ASSIGNABLE page” (page 38). To open this window, click the Nuendo menu “Devices” “NUAGE MASTER Setup.” NUAGE MASTER Setup has the following windows. User Assignable Settings Assigns functions to the buttons. First, click “Category” to select the category. Next, click “Command” to select the command. When you check the “Repeat” box for the function, the corresponding function will operate continuously by holding down the button. You can input the desired function name to “Title.” Edit Window • User Assignable window (page 44) • Edit window (page 44) Overview • Automation window (page 45) This window is for configuring the function of the buttons in the “EDIT page” (page 43). • Communication window (page 45) To select the desired window, click the corresponding tab on the upper side of the window. To select the desired bank, click one of “BANK 1” – “BANK 4.” Controls and Functions User Assignable Window Overview This window is for configuring the function of the buttons in the “USER ASSIGNABLE section” (page 21) or “USER ASSIGNABLE page” (page 38). To configure the buttons in the USER ASSIGNABLE section, click “Panel.” To configure the buttons on the USER ASSIGNABLE page, click “Touch panel.” 1 To select the desired bank when selecting “Touch panel,” click one of “BANK 1” – “BANK 4.” NUAGE MASTER Operation Manual 44 Description of the Software Programs 1 Edit Settings Assigns functions to the buttons. Click “Command” to select the command. When you check the “Repeat” box for the function, the corresponding function will operate continuously by holding down the button. You can input the desired function name to “Title.” Automation Window Communication Window Overview This window is for configuring the function of the buttons in the “COMMUNICATION section” (page 9) or “COMMUNICATION page” (page 41). Controls and Functions Overview This window is for configuring the function of the buttons in the “AUTOMATION section” (page 22). Controls and Functions 1 1 1 Communication Settings Configures the functions of the buttons. First, click “Category” to select the category. Next, click “Command” to select the command. When you check the “Repeat” box for the function, the corresponding function will operate continuously by holding down the button. You can input the desired function name to “Title.” 1 Automation Settings Configures the function of the buttons. Click “Command” to select the command. NUAGE MASTER Operation Manual 45 Description of the Software Programs NUAGE Workgroup Manager Overview NUAGE Workgroup Manager is an application that allows control over devices and DAW software programs as a Workgroup on a NUAGE system. For details on NUAGE Workgroup Manager, refer to the NUAGE Workgroup Manager manual (PDF). NOTE To open the NUAGE Workgroup Manager manual, double-click the NUAGE Workgroup Manager icon on the task tray (Windows) or menu bar (Mac) for opening the window, then click the “Manual” icon. NUAGE MASTER Operation Manual 46 Troubleshooting (in operation) Troubleshooting (in operation) Appendix Contents of the Getting Started Manual A connection cannot be established with Pro Tools. • Ensure that the steps described in “Settings for Pro Tools” (page 48) have been completed. • If using a wireless LAN adaptor, try turning it off. PRECAUTIONS NOTICE Information Introduction A Message from the Development Team Included Accessories Values cannot be entered by touching parameters shown on the [Multi function display]. • Ensure that [PARAM] (page 19) from the NUMERIC PAD section has been turned on for the parameters in question. Items to Have Ready How to Read the Manual Setup Overall Process Setting and Connecting Setting up the Power Supply Installing TOOLS for NUAGE Configuring the Workgroup on NUAGE Troubleshooting (in setting up) Appendix Contents of the Operation Manual Firmware Updates Adjusting the Touch Sensitivity Specifying the Brightness Calibrating Detection Point of the Touch Screen Resetting to the Factory Default Condition Dimensions Specifications Replacing Square-button Labels The labels from the square buttons can easily be replaced. These replacements can be made by cutting a transparent or semi-transparent sheet into 10 x 10 mm pieces. To install, simply remove the button’s cap, swap out the current label, and replace the cap. NUAGE MASTER Operation Manual 47 Appendix Pro Tools Control Setting Pro Tools MIDI Controllers 1. Start up Pro Tools. Introduction In addition to Nuendo and Cubase, Nuage Fader and Nuage Master devices can also be used to control Pro Tools (Mac only; basic functions only). NOTE • When working with Pro Tools, up to two Nuage Faders together with an optional Nuage Master can be connected. 2. Choose “Setup” “Peripherals” to open the “Peripherals” dialog. 3. Click the “MIDI Controllers” tab. 4. Set the parameters on the “MIDI Controllers” window as shown below. • Nuendo must also be used in order to control Pro Tools. In addition, Nuendo must be set as the main DAW (i.e., DAW A) using NUAGE Workgroup Manager. The following sections will describe the connections and settings that must be made in order to control Pro Tools, in addition to the functions of the various buttons. For the purpose of these descriptions, it is assumed that the Nuage Fader and Nuage Master devices and Nuendo have already been fully set up. Only “#1” should be set for the following configuration: • One Nuage Master only “#1” and “#2” should be set for the following configurations: Making Connections Connect the Mac computer running Pro Tools to the network containing the Nuage Fader and Nuage Master devices to be used. • One Nuage Fader only • One Nuage Fader and one Nuage Master “#1” through “#4” should be set for the following configurations: • Two Nuage Faders NOTE • Two Nuage Faders and one Nuage Master If the Mac computer in question is equipped with multiple Ethernet ports, use the first one to connect to the network. Settings Installing NUAGE PT Bridge NUAGE PT Bridge is an application that makes it possible to control Pro Tools (Mac only) using Nuage Fader and Nuage Master devices. This application should be installed on the Mac running Pro Tools. It can be selected for installation as part of the TOOLS for NUAGE package. If necessary, download TOOLS for NUAGE from the following web site and use it to install NUAGE PT Bridge. http://www.yamahaproaudio.com/downloads/ Adding to NUAGE Workgroup Manager When MIDI ports have been set correctly as described above, Pro Tools will appear in NUAGE Workgroup Manager. Add Pro Tools to the same Workgroup as Nuendo. This completes the setup procedure for controlling Pro Tools. The buttons in the DAW SELECT section of the Nuage Fader and Nuage Master devices can be used to select the DAW application to be controlled. The following section describes the functions performed by Nuage Master buttons when controlling Pro Tools. NUAGE MASTER Operation Manual 48 Appendix Button Functions TRANSPORT Section [Display access] This button is used to open and close the Transport window. Its indicator lights up while the Transport window is open. [PRE ROLL] This button is used to turn on and off pre-roll. [POST ROLL] This button is used to turn on and off post-roll. [PUNCH IN] This button is used to turn quick punch on and off (same as the Quick Punch command in the Options menu). Its indicator lights up when quick punch is on. [PUNCH OUT] Same as above. [CYCLE] This button is used to turn loop playback on and off (same as the Loop Playback command in the Options menu). Its indicator lights up when loop playback is on. [SYNC ONLINE] This button is used to take Pro Tools online and offline (same as the Online command in the Options menu). When taken online, the button’s indicator will flash until a synchronization signal is received. Once a signal has been received, it will stay lit. [LEFT] This button is used to set in points during playback. [RIGHT] This button is used to set out points during playback. [PREV EVENT] Not applicable. CONTROL ROOM Section [Display access] [REF] These controllers are used to operate the DAW A Nuendo.*1 [SOLO CLEAR] [MUTE] [DIM] [DOWNMIX 1] – [DOWNMIX 4] [MONITOR A] – [MONITOR D] [PHONES] [CONTROL ROOM LEVEL knob] [CONTROL ROOM display] MONITOR SOURCE Section [Display access] [EXT] These controllers are used to operate the DAW A Nuendo.*1 [MIX] [SUM] [CUE 1] – [CUE 4] [EXT 1] – [EXT 6] [E7]/[E8] These buttons are not used. [MIX 1] – [MIX 8] These controllers are used to operate the DAW A Nuendo.*1 [NEXT EVENT] [MEM] [ZAP] CUES Section [Display access] [MUTE 1] – [MUTE 4] These controllers are used to operate the DAW A Nuendo.*1 [] (fast rewind) This button rewinds from the current cursor position (it’s non-latching). [] (fast forward) This button fast forwards from the current cursor position (it’s nonlatching). [] (stop) This button stops playback and recording. [] (play) This button starts playback from the current cursor position. [] (record) This button arms Pro Tools for recording ([REC] button indicator flashing), recording is started by pressing the [PLAY] button ([REC] button indicator lit continuously). [SIG indicator] COMMUNICATION Section [Display access] [C1]/[C2] [TALK BACK] These controllers are used to operate the DAW A Nuendo.*1 NUAGE MASTER Operation Manual 49 Appendix EDIT Section [Jog wheel] [Display access] This button is used to switch between the Edit and Mix windows. It is lit when the Edit window is active and is dim when the Mix window is active. [SNAP] Not applicable. [AUTO SCROLL] GENERAL CONTROL Section []/[]/[]/[] (up/left/down/right) These buttons can be used to scroll the Mix and Edit windows, navigate the Edit window, zoom waveforms, and to make fine adjustments to the selected region. Their exact operation depends on the currently selected cursor mode. [ENTER] This button works the same as the Enter key on your computer keyboard. Pressing it opens the New Memory Location dialog box. While a dialog box is open, pressing it performs the same action as clicking the OK button. [UNDO] This button is used to undo and redo the last operation. Its indicator lights up when the last operation can be undone, and it flashes when the last operation can be redone. A redo is performed by pressing the button with the [SHIFT] and [ALT] buttons held down. [SAVE] This button is used to save the current session (same as Save command in the File menu). Its indicator lights up when there are unsaved changes, and goes out when there are no unsaved changes. When pressed, the indicator flashes and you can press it again to go ahead and save the current session, or press [ESC] to cancel. [AUTO SELECT] [OBJECT SELECT] This button is used to switch the Edit mode. [RANGE SELECT] Not applicable. [MOVE] This button is used to separate the selection into a new region or regions. [CUT] This button is used to cut the selection to the clipboard (same as Cut from the Edit menu). [COPY] This button is used to copy the selection to the clipboard (same as Copy from the Edit menu). [PASTE] This button is used to paste from the clipboard to the selection (same as Paste from the Edit menu). JOG WHEEL Section [SCRUB] This button is used to select the Scrub modes. This button is mutually exclusive with the [PUNCH IN], [PUNCH OUT], and [CYCLE] buttons. Also, the cursor in the window on the computer monitor disappears. [SHUTTLE] This button is used to select the Shuttle modes. This button is mutually exclusive with the [PUNCH IN], [PUNCH OUT], and [CYCLE] buttons. Also, the cursor in the window on the computer monitor disappears. [SCROLL] [ZOOM] This button is used to select the following cursor modes: Navigation, Zoom, and Select. [QUICK ZOOM] Same as above. [FADE IN] Not applicable. [FADE OUT] [SPLIT] MODIFIER Section [CTRL] This button is used in conjunction with other buttons to modify function operation. This corresponds to the Control modifier key found on Mac keyboards. [SHIFT] This button is used in conjunction with other buttons to modify function operation. This corresponds to the Shift modifier key found on Mac keyboards. [ALT] This button is used in conjunction with other buttons to modify function operation. This corresponds to the Command modifier key found on Mac keyboards. Not applicable. [SELECT] This wheel is used for shuttling and scrubbing. It’s also used for making fine adjustments to the selected region. [VOLUME] [TRIM HEAD] [TRIM TAIL] [INC +] [DEC -] NUAGE MASTER Operation Manual 50 Appendix NUMERIC PAD Section [LOCATE] Not applicable. MULTI FUNCTION DISPLAY Section [Multi function display] [MARKER] [SETUP] [PARAM] [TRACK LIST] [DAW] [CHANNEL] [WHEEL] [PLUG-IN] [0] – [9] These buttons correspond to keys [0] to [9] found on Mac keyboards. [CLEAR] This button corresponds to the [Clear] key found on Mac keyboards. [CYCLE .] This button corresponds to the [.] key found on Mac keyboards. [PREV -] This button corresponds to the [-] key found on Mac keyboards. [NEXT +] This button corresponds to the [+] key found on Mac keyboards. [BACK SPACE] Not applicable. [ENTER] This button works the same as the Enter key on your computer keyboard. Pressing it opens the New Memory Location dialog box. While a dialog box is open, pressing it performs the same action as clicking the OK button. [ESC] For the most part, this button works the same as the Esc key on your computer keyboard. While a dialog box is open, pressing it performs the same action as clicking the Cancel button. []/[] (left/right) Not applicable. These controllers are used to operate the DAW A Nuendo.*1 Not applicable. [DYNAMICS] [EQ] [Multi function knob] [Multi function button A] / [Multi function button B] These controllers are used to operate the DAW A Nuendo.*1 DAW SELECT Section [DAW A] – [DAW C] These buttons perform the same tasks as when working with Nuendo. TALKBACK MIC Section [TALKBACK microphone] These controllers are used to operate the DAW A Nuendo.*1 *1: Control Room functions normally control Nuendo as the main DAW (i.e., DAW A). In order, therefore, to output Pro Tools audio signals from the Nuage system, the Pro Tools audio interface’s outputs must be connected to the Nuage system audio interface’s inputs, and the appropriate input and output settings must be made on Nuendo’s VST Connections window (selected from the Devices menu). [SET] USER ASSIGNABLE Section [Display access] Not applicable. [U1] – [U12] AUTOMATION Section [Display access] Not applicable. [FILL PUNCH] [FILL TO START] [FILL TO END] [FILL LOOP] [TOUCH] [LATCH] [X-OVER] [TRIM] NUAGE MASTER Operation Manual 51 Yamaha Pro Audio Global Web Site http://www.yamahaproaudio.com/ Yamaha Manual Library http://www.yamaha.co.jp/manual/ C.S.G., PA Development Division © 2013 Yamaha Corporation 310MW-B0