1
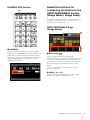
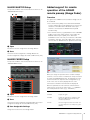
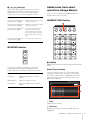
NUAGE MASTER NUAGE FADER CONTROL SURFACE Ncs500-CT CONTROL SURFACE Ncs500-FD V1.1 Supplementary Manual This supplementary manual explains features and functions that have been added or changed in TOOLS for NUAGE V1.1.0. Please read it together with the Nuage Fader Operation Manual and the Nuage Master Operation Manual. Main changes • Added the ADR mode (Nuage Master) page 2 • Added the functions for configuring the buttons in the USER ASSIGNABLE section (Nuage Master, Nuage Fader) page 3 • Added support for remote operation of the AD8HR remote preamp (Nuage Fader) page 4 • Added the display in the [Channel name display] (Nuage Fader) page 6 • Added display channels on the LCD (Nuage Fader) page 6 • Added some track select operations (Nuage Master) page 7 • Added some Zoom In and Zoom Out operations (Nuage Master) page 8 • Added some editing operations (Nuage Master) page 9 • Added other various functions (Nuage Master) page 9 EN Added the ADR mode (Nuage Master) ADR Page 1 2 Added the ADR mode corresponding to the ADR function of Nuendo 6. 5 3 TRANSPORT Section Press [Display access] repeatedly to display an “ADR page” (shown on the right), and then touch “Transport Switch” in the [Multi function Display] to select the ADR mode. The [Display access] indication flashes while the ADR mode is active. To cancel the ADR mode, touch “Transport Switch” again. 6 4 7 1 Nuendo Opens the Marker Window in the Nuendo window. 2 User Assign Turns the function assignments for ADR on (lit) and off. Turns on this icon, and functions for ADR are assigned to the [U1] – [U12] buttons in the USER ASSIGNABLE section. Turns off this icon, and the functions return to their previous assignments. 1 2 The function assignments can be changed in the “User Assignable” window of “NUAGE MASTER Setup.” 3 U1 – U12 1 [R] (Rehearse) Plays back the take, according to the “ADR Setup” options in Nuendo. If you simultaneously hold down [J] and press [R], the take is played back as “Review.” The button indicator flashes continuously during “Review.” Displays the function assignments for ADR. By touching these buttons, you can execute the function assignments. 4 Time Display [PARAM] Displays and sets the Project Cursor position. 5 Marker Information 2 [I] (Record) Displays the Marker information. Plays back the take, according to the “ADR Setup” options in Nuendo, and the overdubbing performance by the artist is recorded. 6 Pre-Roll / Post-Roll During “Rehearse,” “Record,” and “Review” playback, the [Jog wheel] cannot be used. Displays “Pre-roll” and “Post-roll” information. 7 CUE 1 – CUE 4 Selects the “CUE” that you want to control with the [Multi function knob]. NUAGE V1.1 Supplementary Manual 2 NUMERIC PAD Section 1 Added the functions for configuring the buttons in the USER ASSIGNABLE section (Nuage Master, Nuage Fader) The function assignments can be saved, and the saved assignments can be recalled. The functions can be assigned to each Nuage Fader. USER ASSIGNABLE Page (Nuage Master) 1 2 1 [MARKER] Selects the Marker designation. Pressing the button toggles between “MARKER ID” and “Take Number” (for ADR) while the pop-up window for the Marker Jump function or Cycle Marker Jump function is shown on the [Multi function display]. This button flashes before inputting “Take Number.” 1 User Assign Turns the assigned functions on (lit) and off. If the left icon is turned on, functions assigned to U1 – U12 on the display are assigned to the [U1] – [U12] buttons. If the right icon is turned on, functions assigned to U13 – U24 on the display are assigned to the [U1] – [U12] buttons. If this icon is turned off, the functions return to their previous assignments. 2 PANEL: U1 – U12 Displays the function assignments of the [U1] – [U12] buttons in the USER ASSIGNABLE section. NUAGE V1.1 Supplementary Manual 3 NUAGE MASTER Setup To open this window, click the Nuendo menu “Devices” “NUAGE MASTER Setup.” 1 2 Added support for remote operation of the AD8HR remote preamp (Nuage Fader) Overview The gains of the AD8HR connected to the Nuage I/O can be controlled. • Press and release [PRE] on the SECTION CONTROL section, and then press [Sub parameter 2]. This lets you control the “HA GAIN” and “HA TRIM” of the input channels connected to the AD8HR with the [Multi function knob]. • Press and release the [e] (edit) button on the CHANNEL STRIP section of the input channel connected to the AD8HR, and then press [PRE] in the SECTION CONTROL section. This lets you control the “HA GAIN,” “HA TRIM,” “HA HPF,” and “HA +48V” of the channels connected to the AD8HR with the [Multi function knob]. 1 Open Recalls the function assignments of Nuage Master. 2 Save Saves the function assignments of Nuage Master. The function assignment settings are saved as XML format (.xml). NUAGE FADER Setup To open this window, click the Nuendo menu “Devices” “NUAGE FADER Setup.” 1 2 3 When you assign an input bus which contains multiple channels, such as stereo or surround, to an input channel to control the AD8HR parameters, the parameters of the channel listed on the top of the bus configuration (e.g., “Left” in the case of stereo) displayed in the “VST Connections” window of the Nuendo are displayed. When the parameters of all channels contained in the same bus are not set to the same value, “*” is added to the end of parameter name (e.g., “HA GAIN*”). Operation Function 1 Open HA GAIN Adjusts the gain. Recalls the function assignments of Nuage Fader. HA TRIM Adjusts the gain trim. To adjust the gain trim, press [Multi function button A] to unlock the parameter. HA HPF Turns the High Pass Filter on and off. You can also adjust the cut-off frequency [20 – 600 Hz]. 2 Save Saves the function assignments of Nuage Fader. The function assignment settings are saved as XML format (.xml). 3 User Assignable Settings Assign the functions for each Nuage Fader. NUAGE V1.1 Supplementary Manual 4 Setting up the Nuage I/O Operation Function HA +48V Turns +48 V phantom power on and off. To turn on phantom power, hold down the [Multi function button A] for longer than two seconds. Open the “Nuage I/O Properties” from the NUAGE Workgroup Manager, and then set the “ID” number of the AD8HR. To use this function, make sure to perform the following: • Hardware connections • Setting up the serial port • Setting up the Nuage I/O Hardware connections Nuage I/O Computer AES/EBU RS-232C AD8HR Connect the AD8HR and Nuage I/O by AES/EBU, and connect the AD8HR and a computer by the RS-232C (cross cable). Use a USB to Serial converter if there is no serial port in your computer. Setting up the serial port The AD8HR can also be set up in NUAGE HA Remote Setup. To open NUAGE HA Remote Setup, click the Nuendo menu “Devices” “NUAGE HA Remote Setup.” Make the following serial port settings on your computer: Parameter Value Bits per second: 38400 Data bits: 8 Parity: None Stop bits: 1 Flow control: None Instructions for making serial port settings are depend on your particular computer (in Windows 7, for example, right-click an applicable serial port on the “Device Manager” to open the properties). Refer to the manual of your computer for details. NUAGE V1.1 Supplementary Manual 5 Added the display in the [Channel name display] (Nuage Fader) Added display channels on the LCD (Nuage Fader) The whole name of the channel strip can be scrolled and displayed, and the display format can be changed. When there is a long undisplayed portion of a channel strip name, the whole name of the selected channel strip can be scrolled and displayed only once if the channel strip is selected or the channel is scrolled using the [Touch slider bar]. NUAGE FADER Setup The previous view can be called up after using the Agent function ([SEL CH], etc.), and you can scroll through and display the selected channels when the desired channel is not shown on the exterior of LCD. Also, you can select whether to display a channel from the left of the end of the console(s), or to display from the right of the end of the console(s). CHANNEL VIEW CONTROL Section To open this window, click the Nuendo menu “Devices” “NUAGE FADER Setup.” 1 1 2 3 1 Disp Mode Selects the display format of a [Channel name display]. 1 [EVENT ON TR] / [EVENT CYCLE] / [PLAYING CH] / [SEL CH] / [EXPAND] / [ALL CH] “Disp Mode” can also be set up in the “SETUP page” of Nuage Master (page 9). If the same button is pressed once again while displaying the channel corresponding to each button, the display will return to the previous view. However, while the Project Cursor is moving, even if you press [EVENT CYCLE] or [PLAYING CH], the display does not return, but an agent function is performed again instead. If you press one of these buttons to return while holding down [ALT], the leftmost channel is displayed there even after returning. This function is convenient when you are looking for a specific channel using an agent function. 2 [SEL CH] If you press [SEL CH] while holding down [ALT], the selected channel is displayed when the channel is not displayed on the exterior of LCD. NUAGE V1.1 Supplementary Manual 6 3 [L] / [R] (left/right) If you use the following functions when the channels displayed are fewer than the number of faders of the Nuage Fader (e.g., when you are using the Agent function, etc.), you can operate adjacent channels. Operation Function Simultaneously holding down [SHIFT] and pressing [L] Displays channels from the left end of the console(s). Simultaneously holding down [SHIFT] and pressing [R] Displays channels from the right end of the console(s). Simultaneously holding down [ALT] and pressing [R] Selects the Free Scroll mode. In the Free Scroll mode, the channel which was fixed to the left end or the right end can also be moved by the [Touch slider bar]. Simultaneously holding down [ALT] and pressing [L] Cancels the Free Scroll mode. Added some track select operations (Nuage Master) Tracks can be selected by the NUMERIC PAD, and multiple tracks can be selected. NUMERIC PAD Section 1 MODIFIER Section 1 [PARAM] Added Track Select to the function switched in Parameter mode. The size of the “Mixer” window on the LCD can be changed by simultaneously holding down [SHIFT], [CTRL], and [ALT], and using the [Multi function knob]. Operation Function SCRN LEFT Adjusts the left position of a “Mixer” window. METER HEIGHT Adjusts the height of a meter. SCRN RIGHT Adjusts the right position of a “Mixer” window. Select Track function In the Select Track function, you can select tracks by inputting the track number. To input the track number, press any one of the buttons in NUMERIC PAD section (other than [ESC]) to call up a pop-up window on the [Multi function display]. 1 2 1 Track Inputs the track number. 2 Track List Displays the track list. Selected candidate tracks are highlighted. NUAGE V1.1 Supplementary Manual 7 When the Select Track pop-up window is shown, the [input keys] have the following functions. [Input keys] Function [0] – [9] Inputs the track number to the input position. [BACK SPACE] Deletes the number at the input position. [CLEAR] Deletes all input numbers. [SET] Selects the Set mode (the button lights). [PREV -] Selects the previous track number. [NEXT +] Selects the next number. [CYCLE .] To select the additional track, input the number continuously after pressing this button. [ESC] Cancels the input then closes the pop-up window. [ENTER] Determines the input then closes the pop-up window. Added some Zoom In and Zoom Out operations (Nuage Master) Some Zoom-related operations were added. JOG WHEEL Section GENERAL CONTROL Section 1 1 [ZOOM] If you turn the [JOG WHEEL] while holding down [SHIFT] and [ALT], you can zoom in/out of waveform displays. 1 If you turn the [JOG WHEEL] while holding down [CTRL] and [ALT], the selected track height changes. GENERAL CONTROL Section 1 []/[] (up/down) To select multiple tracks, simultaneously hold down [SHIFT] and press [] or []. 1 1 []/[] (up/down) If you press [] while holding down [CTRL], the selected track height becomes narrow. If you press [] while holding down [CTRL], the selected track height becomes large. NUAGE V1.1 Supplementary Manual 8 Added some editing operations (Nuage Master) The waveform offset can be changed, and the cut/copied event(s) can be pasted maintaining the position relative to the Project Cursor. 2 Numeric Pad Input Selects the input format when you set the Project Cursor position in the Locate function. If you set this to “Right,” you can input the Project Cursor position as a text. DYN Page EDIT Section 1 2 1 2 1 Title Bar Turns the “Bypass” switch that you touch on (lit) and off. 2 Parameters 1 [MOVE] When the Object Selection Tool is selected, if you turn the [JOG WHEEL] while holding down [SHIFT] and [ALT], the waveform offset of the selected track can be changed. 2 [PASTE] When the Object Selection Tool is selected, if you press [PASTE] while holding down [SHIFT], the cut/copied event(s) can be pasted maintaining the position relative to the Project Cursor. Displays each processor's parameters. The parameters that you touched can be controlled with the [Multi function knob]. If you press the rightmost [Multi function knob] when “Comp” is selected, the related parameters are displayed in graph form. To return to the previous view, press the [Multi function knob] again. TRANSPORT Page MAIN Page Added other various functions (Nuage Master) 1 SETUP Page 1 Lock/Unlock Lock (lit) or unlock “CLICK” and “TEMPO.” If you lock these parameters, they cannot be controlled. 1 2 1 Disp Mode Selects the display format of a [Channel name display]. NUAGE V1.1 Supplementary Manual 9 Yamaha Pro Audio global web site: http://www.yamahaproaudio.com/ Yamaha Manual Library http://www.yamaha.co.jp/manual/ C.S.G., Pro Audio Division © 2013 Yamaha Corporation 307MW-A1