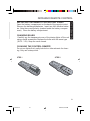
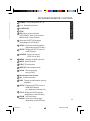
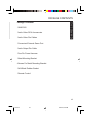
1
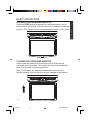
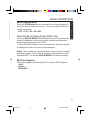
WARNING
The Clarion OHMD102 overhead monitor system is designed
strictly for rear-seat entertainment. Viewing the monitor while
operating a motor vehicle can result in serious injury and/or
property damage. Clarion is not responsible for any injury and/or
property damage as a result of the improper use or viewing of the
monitor.
English
O H�������
MD102
INTRODUCTION
Welcome!
Thank you for purchasing the Clarion OHMD102 overhead monitor
system. This monitor is engineered with advanced technological
designs and components for the best picture quality and convenience.
Features:
• 10.2” Wide-Screen Flip Down Monitor with TFT Active
Matrix Display with 16:9/4:3 format
• Selectable screen modes: Normal, Zoom, Full, and Wide Screen
• Built-in 1 channel Audio/Video input source selector
• Audio/Video Game Port
• Video output for additional monitors
• Front panel menu, picture, source, and DVD controls
• OSD (On-Screen Display)
• Built-in IR transmitter for WH104 wireless headphone
(2 headphones included)
• Built-in dome lights
• IR remote control
• Supports both NTSC and PAL video formats
2
ohmd 102
2
3/16/05, 6:35 AM
monitor
ogical
nvenience.
e Screen
The Clarion OHMD102 is a full-featured overhead entertainment
center featuring 10.2 Wide-Screen Flip Down Monitor with TFT
Active Matrix Display with 16:9/4:3 format. This system combines
flexibility, reliability, and expandability all in one. Designed
primarily for rear seat entertainment, the audio from the OHMD102
can be enjoyed privately through wireless headphones and/or
incorporated into any head unit. And with the ability to access all
the features and functions through an IR remote control, the rear
passengers wont have to leave the comfort and safety of their seat.
English
O H�������
MD102
OHMD102
ed
le
r
and/or
of the
INTRODUCTION
Since Clarion has always been an innovator in the mobile entertainment
industry, a lot of responsibilities follow suit. One of the major
emphasizes incorporated into the OHMD102 is reliability. This was
achieved by using high-grade electronic components and heightened
electronic connections. As the mobile environment is extremely harsh,
these technological advances insure years of unrelenting operation.
Given that the OHMD102 is the centerpiece of the entertainment
center, it features a built-in A/V switcher allowing for multiple A/V
sources to be added. Included with the OHMD102, is a Game Port
Station, which also can be used for a temporary device, such as a
camcorder or game station, to be enjoyed in the vehicle.
With everything that Clarion has to offer with the OHMD102, it truly
lives up to Clarion’s motto, BE HEARD, BE SEEN!
3
ohmd 102
3
3/16/05, 6:35 AM
The Clarion OHMD102 have been tested and found to comply
within the limits of a Class B digital device, pursuant of Part
15 of the FCC rules. These limitations are designed to provide
reasonable protection against harmful interference in a
residential installation. This equipment generates and uses radio
frequency energy and if not installed and used in accordance
with the instructions, may cause harmful interference to radio
communications.
There is no guarantee that interference will not occur in a particular
installation.
If this equipment does cause harmful interference to a radio or
television reception, turn off the equipment and contact a local
Clarion dealer for assistance. Changes or modifications to this
product not approved by the manufacturer will void the warranty
and violate FCC Approval.
4
ohmd 102
4
3/16/05, 6:35 AM
English
O H�������
MD102
FCC Approval
OVERHEAD DVD PLAYER and BUTTONS
6-7
GENERAL INFORMATION
6-13
BASIC OPERATIONS
14-21
ADVANCED OPERATIONS
22-26
START-UP MENU SETTINGS
27-30
REMOTE CONTROL
31-33
HEADPHONE FUNCTIONS
34
INSTALLATION
35-42
PACKAGE CONTENT
43
TROUBLESHOOTING
44-45
GLOSSARY
46-49
SPECIFICATIONS
50
WARRANTY INFORMATION
51-52
English
O H�������
MD102
OHMD102
TABLE OF CONTENTS
5
ohmd 102
5
3/16/05, 6:35 AM
English
O H�������
MD102
OVERHEAD DVD PLAYER
OVERHEAD DVD SYSTEM
1
2
1
Switch for interior lighting
2
POWER Turns system power on /off
6
ohmd 102
6
3/16/05, 6:35 AM
English
O H�������
MD102
OHMD102
OVERHEAD DVD PLAYOVERHEAD DVD SYSTEM
1
2
3
4
5
6
7
8
12
�������
English
11
10
9
1
2
3
EJECT button
DVD: previous chapter;
VCD/CD/MP3: previous track
menu:move cursor downward
DVD: next chapter
VCD/CD/MP3: next track menu
move cursor upwards
4
PLAY/ PAUSE button
5
MENU button
6
Fastreverse for playback
7
Fastforward for playback
8
SOURCE button
9
10.2 TFT display
10
DVD player disc slot
11
Monitor Autopower ON/OFF
(Located on the base)
12
RESET button (Located on the base)
7
ohmd 102
7
3/16/05, 6:35 AM
Precautions and Safety Notices
• This overhead monitor system is designed for use in 12V DC
negative ground vehicles.
• Do not operate the overhead monitor system in ways other than
described in this manual. Doing so may result in damage to the
monitor system and/or the vehicle, voiding the warranty of this
product.
•
SAFETY FIRST! This overhead monitor system is designed
for rear-seat entertainment ONLY. Do not install in/on dashboard or
anywhere else that would allow the operator of the vehicle to view
the monitor.
• Do not attempt to disable or modify the overhead monitor system.
Doing so may damage the monitor system, and void the warranty.
Do not attempt to dis- mantle the monitor you could suffer electric
shock as a result.
• Keep all liquids away from the overhead monitor system.
• Do not leave the overhead monitor system open when not in use.
Direct sunlight can cause the monitor not to function properly.
• In extreme cold temperatures, the movement of the picture may
appear to move slow and dark. The overhead monitor system will
function properly once the temperature rises.
• Do not hang or hang items from overhead monitor system.
• Prior to Installation Disconnect the negative and positive
terminals of the battery.
• When doing so, please observe the safety notices provided by
the vehicle manufacturer.
• Before drilling the holes necessary for mounting the equipment
for laying cables, please make sure that concealed cables, the fuel
tank and lines can not be damaged in the process!
If you have any questions or problems concerning the monitor that
are not cover in this manual, please consult a local Clarion dealer
for assistance.
Before installing this overhead monitor system, please check your
local traffic laws and regulations.
8
ohmd 102
8
3/16/05, 6:35 AM
English
O H�������
MD102
GENERAL INFORMATION
Care And Maintenance
English
O H�������
MD102
OHMD102
GENERAL INFORMATION
Keep all liquids away from the OHMD102 overhead monitor system.
Liquids inside the monitor will damage the electronics, and can
result in electrical shock or fire. In the event that the unit should
become wet, turn off the power and contact a local Clarion dealer
for assistance. To clean the monitor, use a clean soft cloth and
gently wipe the screen. If possible, use specially designed “monitor
wipes” to clean the screen.
Handling and Cleaning DVDs and CDs
• Avoid leaving fingerprints on the discs when handling it, never
handle a disc by its edges.
• Always store discs in their protective cases.
• Always ensure that discs are clean and dry before inserting.
• Protect discs from heat and direct sunlight. Dirt, dust, scratches
and warped discs will cause unit malfunction.
• DO NOT PUT LABELS ON DISCS.
Disc Cleaning
Use a dry soft cloth to wipe the surface of a disc. If a disc is
especially dirty use a soft cloth slightly moistened with rubbing
alcohol. Never use solvents such as benzine, or conventional
record cleaners as they may mar the surface of the disc.
9
ohmd 102
9
3/16/05, 6:35 AM
Preparing a New Disc
New disc may have some roughness around the edge. The DVD
player may not work properly or the video/sound reproduction may
skip if such discs are used. Use a ballpoint pen or pencil to remove
roughness from the edges of the disc.
NOTE:
NEVER USE A KNIFE OR A SHARP OBJECT TO REMOVE
THE ROUGHNESS AROUND THE EDGES YOU MAY HARM
YOURSELF OR THE DISC!
Servicing the OHMD102 Overhead Monitor System
In the event a problem arises with the OHMD102 overhead
monitor system, do not attempt to disassemble or repair the
monitor yourself. Opening or attempting to service the monitor
will void the warranty; instead, contact a local Clarion dealer for
assistance. The internal parts are not serviceable by the user.
The OHMD102 is a class I laser product, using a laser which could
cause hazardous radiation exposure if improperly disassembled.
All warranty service should be performed by an authorized Clarion
service center.
CAUTION! Changes or modifications to this product not
approved by the manufacturer will void the warranty and will violate
FCC approval.
10
ohmd 102
10
3/16/05, 6:35 AM
English
O H�������
MD102
GENERAL INFORMATION
Temperature and Moisture
If the player is used while the interior of the vehicle is very cold,
condensation may form on the disc or on the internal optical pickup
system and prevent proper playing of the disc. If you suspect that
condensation is an issue, eject the disc and inspect the playing
surface. If necessary, remove the condensation with a clean soft
cloth as described above. If you still experience problems with
playback, you will need to wait for approximately one hour to allow
the OHMD102 to warm up, and for the condensation to evaporate.
If playback issues continue, please see your authorized Clarion
dealer.
English
O H�������
MD102
OHMD102
GENERAL INFORMATION
Discs Compatible with OHMD102
This OHMD102 is designed and manufactured to play DVD discs
with region code 1.
Supported Discs Formats
• DVD video 5, 9, 10, and 18
• Video CD
• Super Video CD
• CD Audio
• MP3 (CD-ROM)
• JPEG image CD 1 and 0
Unsupported Formats
• DVD-ROM
• DVD-RW/DVD-RAM
• CDV
• CD-G
• DVDs with Region code
• Kodak photo CD (previously
CDI format)
NOTE:
As a rule, even self-burned CDs are supported. However
depending on the blank discs and burning program used,
playback difficulties may arise.
11
ohmd 102
11
3/16/05, 6:35 AM
CAUTION: Any inappropriate use of the device may expose the
user to visible/invisible laser rays which exceed the limits for Class
1 laser products. Do not attempt to repair it yourself refer servicing
it to a trained Clarion authorized dealer.
Copyright Protection
This product incorporates copyright protection technology that
is protected by method claims of certain U.S. patents and other
intellectual property rights owned by Macro vision Corporation and
other rights owners. Use of this copyright protection technology
must be authorized by Macro vision Corporation, and is intended
for home and other limited viewing uses only unless other wise
authorized by Macro vision Corporation. Reverse engineering or
disassembly is prohibited.
English
O H�������
MD102
GENERAL INFORMATION
FILE and S
The folder na
MP3 play. Ho
alphabetical
respectively (
numerals tha
with a folder
conflict with M
impossible. A
number of file
excess of tha
files in each f
recorded ont
displayed on
SOUND QU
“Dolby”Digital
Manufactured license from Dolby Laboratories. “Dolby” and
double-Dsymbolare trademarks of Dolby Laboratories. Confidential
unpublished works. 1992-1997 Dolby Laboratories All rights
reserved.
Some noise m
coder softwa
OHMD102.
BIT RATES
The OHMD10
48kHz, and 9
bit rate), the
different from
VBR ranges
ID3V1 and
Both ID3V1 a
characters pe
12
ohmd 102
12
3/16/05, 6:35 AM
FILE and STRUCTURE
The folder name and file name can be displayed as the title during
MP3 play. However, the title must be within 31 and 27 single-byte
alphabetical letters and numerals for the folder name and file name,
respectively (not including an extension). Entering more letters or
numerals than specified may cause an incorrect display. A disc
with a folder having more than 8 hierarchical levels will
conflict with MP3 system requirements and playback will be
impossible. A total of 255 files and folders are allowed. When the
number of files and folders is more than 255, playback of tracks in
excess of that number is impossible. There is a maximum of 31
files in each folder. File tracks are played in the order that they were
recorded onto a disc. (Files might not always be played in the order
displayed on the PC.)
English
O H�������
MD102
OHMD102
GENERAL INFORMATION
SOUND QUALITY
Some noise might be audible - this depends on the type of encoder software used while recording. It is not noise created by the
OHMD102.
BIT RATES
The OHMD102 supports the following bit rates: 32kHz, 44.1kHz,
48kHz, and 96kHz. In case of a track recorded at VBR (variable
bit rate), the display for the play time of the track may be slightly
different from the actual playtime. Also, the recommended value for
VBR ranges from 32 kbps to 320 kbps.
ID3V1 and ID3V2 TAGS SUPPORTS
Both ID3V1 and ID3V2 tags are supported. These allow up to 30
characters per song name and 30 characters per artist name.
13
ohmd 102
13
3/16/05, 6:35 AM
OPENING THE OVERHEAD MONITOR
Press the OPEN button to release the overhead monitor. Gently
push down on the bottom of the monitor until it reaches the desired
position. The monitor will turn on automatically when it is fully open.
OPEN POSITION
CLOSING THE OVERHEAD MONITOR
Gently push the backside of the monitor until it clicks into the
overhead monitor housing. The monitor will turn off automatically
when it is returned to the closed position.
Note: Do not place any objects between the monitor and the
monitor housing, this can result in serious damage to the monitor.
14
ohmd 102
14
3/16/05, 6:35 AM
English
O H�������
MD102
BASIC OPERATIONS
DISPLAY SETTINGS
• Press the Monitor Setup button once or several times to call up
the display settings.
• Press the
or
buttons to change the value of the settings. Press the OK button to exit the display mode.
Brightness
• Set the brightness between 0 and 32
Color Saturation (AV1 only)
• Set the color saturation 0 and 32
Contrasts
• Set the contrasts between 0 and 32
Hue Balance (AV1 only)
• Set the Color balance between 0 and 32
Image Sharpness (AV1 only)
• Set the sharpness between 0 and 32
TV Type
• Set the TV standard appropriate to the connected AV source.
The options are AUTO, PAL, and NTSC.
Display Mode
• Set the Display mode according to the current video media.
Choose between NORMAL (4:3), FULL (16:9) and WIDE1 (extended 16:9).
Mount Mode
• Set the installation position to NORMAL (overhead).
Note: The Desktop “settings is not supported by the DVD player.
English
O H�������
MD102
OHMD102
BASIC OPERATIONS
15
ohmd 102
15
3/16/05, 6:35 AM
User Settings
This function allows the display settings, brightness, contrast, color,
tint sharpness to be saved for a specific user and then subsequently restored.
• Set the desired values for the display settings.
• Select LOADED by pressing the
button to save the values
as user settings.
• Select STORED button pressing the
button to restore the
values user settings.
Default Settings
• Select DEFAULT and press the
the display to its default settings.
and
buttons to return
Start/Stopping and Playback
• Press the button to stop playback. The player will store the current disc position.
• Press the
button to resume playback at the stored position.
• Press the
button twice to stop the play back to the initial track/
chapter of the inserted disc.
Pause (Still Picture)
• Press the
button during playback.
• Press the
button once again to resume normal playback.
Fast Forward/Reverse
Press the
or the
button during playback.
DVD Speeds
DVD:
Normal 2x-4x-6x-8x-20x
VDC/CD/MP3:
Normal 2x-4x-6x-8x
16
ohmd 102
16
3/16/05, 6:35 AM
English
O H�������
MD102
BASIC OPERATIONS
Skipping Chapters/Tracks
• Press one of the
buttons during playback.
• Press the
button to jump to the next chapter (DVD) or track
(VCD/CD).
• Press the
button to jump to the previous chapter (DVD) or
track (VCD/CD).
English
O H�������
MD102
OHMD102
BASIC OPERATIONS
Repeating Chapters/Tracks
• Press the REPEAT button once, or more than once to select the
REPEAT MODE. The menu will follow in this order.
DVD Functions
• CHAPTER REPEAT ON
The current chapter is repeated.
• TITLE REPEAT ON
The current title is repeated.
• REPEAT OFF
The repeat function is switched off.
VCD/CD Functions
• REP-ON
The current track is repeated.
• REP-ALL
All tracks of the inserted disc will be repeated.
• REP-OFF
The repeat function is switched off.
17
ohmd 102
17
3/16/05, 6:35 AM
Time Display Functions
Press the DISP button during playback to display different time
information on the screen of the disc that is playing.
DVD
• Press the DISP button once the following information will be
shown on the screen.
TITLE 02 / 05
01 : 14 : 39
CHAPTER 001 / 027
Current title number and total number of titles. Current chapter
number and total number of chapters, and elapsed total time.
Press DISP button again.
TITLE REMAIN
01 : 14 : 39
Press DISP button for a third time.
CHAPTER ELAPSED
00 : 12 : 24
18
ohmd 102
18
3/16/05, 6:35 AM
English
O H�������
MD102
BASIC OPERATIONS
Press DISP button for a fourth time.
English
O H�������
MD102
OHMD102
BASIC OPERATIONS
CHAPTER ELAPSED
00 : 12 : 24
Press DISP button for the fifth time: The message on the screen
will be cleared.
CD/VCD Functions
Each time the DISP button is pressed, the time displayed changes
in the following order:
• SINGLE ELAPSED (track/chapter)
• SINGLE REMAIN (track/chapter)
• TOTAL ELAPSED (CD)
• TOTAL REMAIN (CD)
• OFF
MP3 Functions
Each time the DISP button is pressed, the time displayed changes
in the following order:
• CHAPTER ELAPSED
• CHAPTER REMAIN
MENU button
• Press the MENU button during playback. The basic menu of the
DVD is displayed. If different menu options are available, move the
cursor to the desired menu option with the cursor buttons
or
• Confirm your selection by pressing the ENTER button.
19
ohmd 102
19
3/16/05, 6:35 AM
Title Button
If the DVD has multiple titles recorded, you can select the preferred
title from the title menu to start playback.
• Press the TITLE button during playback.
• The title menu is displayed.
• Move the cursor to the desired title with the cursor
buttons
or
• Confirm your selection by pressing the ENTER button.
English
O H�������
MD102
BASIC OPERATIONS
Selecting Audio Language DVD:
• Press the AUDIO button once or more than once during playback to select the desired audio sound track language.
Notes: The number of audio languages is dependent on the
inserted DVD. Some DVDs only contain one audio language. If
the inserted DVD only contains one audio language, a hand icon
will appear in the left top corner of the screen when pressing the
AUDIO button.
VCD/CD
• Press the AUDIO button once or more than once during playback to select between the following modes:
• Stereo (L & R)
• L only
• R only
Selecting Subtitle Language (DVD only)
Press the SUBTITLE button once or several times during playback
to select the required language for subtitles.
Notes: The number of subtitle languages is dependent on the inserted DVD. Some discs only contain one subtitle language. If only
one language is available on the disc "SUBTITLE OFF" will appear in the
left top corner of the screen when pressing the SUBTITLE button.
20
ohmd 102
20
3/16/05, 6:35 AM
Zoom (magnification)
Press the ZOOM button once or several times during playback to
select the required amount of zoom. The zoom selection will be in
the following order
• OFF >1.5X >2X >3X >OFF.
Selecting the Viewing Angle (DVD only)
When the ANGLE MARK (camera angle) function is activated, the
symbol is displayed on the screen when a scene with alternative
camera angles is played from a DVD.
• Press the ANGLE button once or several times while the symbol
is displayed to select the various camera angles.
English
O H�������
MD102
OHMD102
BASIC OPERATIONS
Notes: This function only works with discs having scenes recorded
at different angles. The number of viewing angles depends on the
individual DVD. To activate ANGLE MARK see General settings.
MP3 Disc Playback
This player supports the following CD formats for MP3 playback:
• Joliet
• Romeo
• ISO966019
21
ohmd 102
21
3/16/05, 6:35 AM
Advanced MP3 Operations
Make sure that the MP3 files have a file format designation of .mp3
two different modes of MP3 playback are available:
• WITH MENU
• NO MENU
The playback mode can be set in the SETUP menu under PREFERENCES WITH MENU . In this mode the display shows all the
MP3 folders of the disc on the left, and the file names of the folder
currently opened on the right.
• In STOP mode: Use the
and
buttons to select between
the left and right column.
• Use the
and
buttons to select the desired item or folder.
• Press the ENTER or
button to playback the selected item.
NOTE: The screen will show the following.
00 : 02 : 58
SMART NAVI
ROOT
ROOT
ACID
ACID-- JAZZ
JAZZ
CHILL
CHILL OUT
OUT
INDEPENDANT
INDEPENDANT
LATIN
LATIN
POP
POP
..
2PAC - Cali
ANASTACIA BABYL ON ZOO
BRA NDY MONI
CULTURE BEA
0
1
2
3
4
5
Notes: The FOLDER can only be selected in STOP mode. During
playback, the screen will display the MP3-ID3 tags instead of the
REPEAT mode.
22
ohmd 102
22
3/16/05, 6:35 AM
English
O H�������
MD102
ADVANCED OPERATIONS
Without Menu
When the SMART NAV function is set to NO MENU, only the track
(file) number and the elapsed time for the current file are displayed
on the screen. All the tracks (files) of the MP3 CD inserted are
played sequentially.
NOTE: The folder cannot be selected in this mode.
Repeat File/Directory (REPEAT)
English
O H�������
MD102
OHMD102
ADVANCED OPERATIONS
Press the REPEAT button once or more than once to select one of
the following repeat modes:
With Menu
• REP-ONE
Repeat the current MP3 file.
• FOLDER REPEAT
Repeats all MP3 files in the current directory in sequence.
• NO REPEAT
The REPEAT function is switched off.
Without Menu
• REP ONE
The current track is repeated.
• REP ALL
All the tracks on the MP3 CD are repeated.
• REPEAT OFF
The REPEAT function is switched off.
23
ohmd 102
23
3/16/05, 6:35 AM
NEXT/PREVIOUS FILES
During playback
• Press the
button to select the previous MP3 file.
• Press the
button to select the previous MP3 file.
Fast Forward/Reverse
• Press the
or
button during playback. Each time the
button is pressed, the speed of fast forward/reverse changes in
the following order. Normal playback, 2x, 4x, 6x, 8x.
JPEG IMAGE CDs
The DVD player supports the display of JPEG images. Ensure that
the JPEG images have a file format designation .jpg
JPEG image CD playback
Insert a disc with JPEG images in the player. The navigation menu
appears on the display as follows:
SMART NAVI
..
ROOT
DSC_04050001
DSC_04050002
DSC_04050003
DSC_04050004
DSC_04050005
0
1
2
3
4
5
REPEAT : OFF
In STOP Mode
• You can switch between the left and right-hand columns using
the
and
buttons. You can select the desired file or the
desired directory using the
and
buttons.
• Press the ENTER
or button in order to start a slide show,
beginning with the selected file.
• All the images in the current directory are displayed in sequence
for approximately 5 seconds each.
24
ohmd 102
24
3/16/05, 6:35 AM
English
O H�������
MD102
ADVANCED OPERATIONS
• Press the
button in order to pause or resume the slide show.
• In order to start the slide show with a particular image from the
folder currently selected, enter the number which appears after the
image in the navigation menu using the numeric key buttons and
press the ENTER button.
Notes: JPEG images can be recognized by the camera symbol
to the left of the filename. The directory can only be selected in
STOP mode. Volume, color, contrast and brightness cannot be
adjusted during image CD playback.
Next/Previous image
• During playback Press
• During playback Press
English
O H�������
MD102
OHMD102
ADVANCED OPERATIONS
to select the next JPEG file.
to select the previous JPEG file.
Repeat File/Directory (REPEAT)
• Press the REPEAT button briefly once or several times to set the
REPEAT mode as follows.
• REP-ONE
The current JPEG file is displayed again.
• FOLDER REPEAT
All the JPEG files in the current directory are displayed again.
• REPEAT OFF
The REPEAT function is switched of.
25
ohmd 102
25
3/16/05, 6:35 AM
Image Overview (Digest Mode)
• Press MENU.
• Up to nine thumbnail JPEG images are displayed on the screen.
• The images are assigned to the numeric key buttons on the
remote control as follows:
1
2
3
4
5
6
7
8
9
• You can select the next/previous nine thumbnail images in the
current directory using the << and >> buttons.
• Press one of the numeric key buttons (1 to 9), in order to see the
image in full screen image mode.
• Digest mode is automatically ended and the slide show resumes
beginning with the current image.
26
ohmd 102
26
3/16/05, 6:35 AM
English
O H�������
MD102
ADVANCED OPERATIONS
SETUP MENU
Main page In STOP mode
• Press the SETUP button.
• The initial SETUP menu is displayed.
• Select the preferred item by using the
/
buttons.
• Press the ENTER button to confirm your selection.
The following options will be available:
English
O H�������
MD102
OHMD102
SET-UP MENU SETTINGS
GENERAL SET-UP
• This includes TV display TV Type For details please refer
to the General set-up menu.
SPEAKER SETUP
• This output is stero only.
AUDIO SET-UP
• This selects all other AUDIO functions. Please refer to Audio
set-up menu
PREFERENCES
• This configures the system. For details please refer to Preferences set-up menu
GENERAL SET-UP MENU
TV Display This selects the appropriate screen ratio(4:3 or 16:9)
according to the video source.
• NORMAL/PS (For 4:3 Viewing) Played back in the PAN & SCAN
style. (If connected to a wide-screen video source, the left and
right edges are cut off.)
• NORMAL/LB (For 4:3 Viewing) Played back in letterbox style. (If
connected to a wide-screen video source, black bands appear at
top and bottom of the screen.)
• WIDE (For 16:9 Viewing) Select when a wide-screen video
source is connected.
27
ohmd 102
27
3/16/05, 6:35 AM
SETTINGS
TV TYPE
This system can play discs recorded in either PAL or NTSC formats.
• Select MULTI format, if the video source supports PAL and
NTSC.
• Select NTSC format, if the video source supports NTSC only. •
• Select PAL format, if the video source supports PAL only.
English
O H�������
MD102
SET-UP MENU SETTINGS
SPEAKER
DOWN/MIX
• Designed fo
Audio set-u
• The operat
changed. The
PIC MODE
DUAL MONO
• Select the
programs.
If you select AUTO, the system PIC mode will depend on the DVD
disc.
• Select HI-RES format for best image resolution.
• Select N-FLICKER format if flickering noise appears.
STEREO
• Stereo-rep
right channel
ANGLE MARK
• Select ON, if you want to display the angle icon when a multiangle DVD disc is playing.
• Select OFF, if you do not wish to display the angle icon.
OSD LANG
• Select the desired language for the On-Screen Display.
CAPTIONS
CH1 MONO
• CH1 Mono
output. CH2
Right output.
MIX MONO
• Mix monoRight output.
PCM OUTPU
• Select the
• Activate the CAPTIONS feature by selecting ON.
DRC
• Dynamic ra
of a Dolby Di
and full comp
28
ohmd 102
28
3/16/05, 6:35 AM
SPEAKER SET-UP MENU
DOWN/MIX
• Designed for stero output only.
Audio set-up menu OP MODE
• The operating mode for the Dolby Digital decoder cannot be
changed. The mode is always set to LINE MODE.
DUAL MONO
• Select the desired Dual mono mode for 1+1 coded Dolby Digital
programs.
English
O H�������
MD102
OHMD102
SPEAKER SET-UP MENU SETTINGS
STEREO
• Stereo-reproduction 1+1 program. CH1 for left channel, CH2 for
right channel.
CH1 MONO
• CH1 Mono-reproduction.CH1 Left.
output. CH2 MONO: CH2 Mono-reproduction. CH2
Right output.
MIX MONO
• Mix mono-reproduction. CH1+CH2 are combined in both Left/
Right output.
LPCM OUTPUT
• Select the sampling rate for the D/A converter: 48 kHz to 96 kHz.
DRC
• Dynamic range Control Select DRC to adjust the dynamic range
of a Dolby Digital encoded program. There are 8 steps between off
and full compression.
29
ohmd 102
29
3/16/05, 6:35 AM
PREFERENCES SET-UP MENU
AUDIO
• Select the initial audio sound track language you prefer.
SUBTITLE
• Select the initial subtitle language you prefer.
DISC MENU
• Select the initial disc menu language you prefer.
LOCAL
• Select the region in which the system is to be operated (e.g.
UNITED STATES). This setting affects the parental control function
(parental guidance level for films).
PARENTAL
• Select the desired parental guidance level from the list. The factory default password for changing the parental guidance is 3308.
• PASSWORD Select CHANGE to change the factory set password for parental control. Key in the initial factory password of
3308. Then key in a new 4 digit password. Confirm the new password by re-entering it.
• SMART NAVI This is used to set the display mode for MP3
playback.
• Select NO MENU to play MP3 files without folder/file display.
• Select WITH MENU to show the disc contents in folder/file style.
• DEFAULTS Select RESET to return the player to the factory
defaults.
30
ohmd 102
30
3/16/05, 6:35 AM
English
O H�������
MD102
PREFERENCE SET-UP MENU SETTINGS
REPLACING THE REMOTE CONTROL BATTERIES
Open the battery compartment on the back of the remote control.
Remove the discharged batteries. Insert two AAA Alkaline batteries. Note the correct polarity (marked inside the battery compartment). Close the battery compartment.
CHANGING BULBS
Carefully pry the transparent cover of the interior lights off the unit
using a small screwdriver Replace the bulbs with the same type
(12V/2 - 3 W). Snap the cover closed.
English
O H�������
MD102
OHMD102
INFRARED REMOTE CONTROL
CLEANING THE CONTROL REMOTE
Do not use lighter fluid, methyl alcohol or other solvents for cleaning. Only use a damp cloth.
STEP 1
STEP 2
31
ohmd 102
31
3/16/05, 6:35 AM
1
12
2
13
9
3
4
14
5
15
16
6
17
7
18
8
19
11
20
10
32
ohmd 102
32
3/16/05, 6:35 AM
English
O H�������
MD102
INFRARED REMOTE CONTROL
1
English
O H�������
MD102
OHMD102
INFRARED REMOTE CONTROL
POWER Turn systempower on / off
2
0 - 9 Numerickey buttons
3
PLAY/PAUSE
4
STOP
5
DVD: Next / previous chapter
VCD/CD/MP3: Next / previous track
MENU mode: Cursor up/down
6
Select the SUBTITLE language
(dependingon the DVD disc)
7
AUDIO Select the audio soundtrack
(depending on the DVD disc)
8
SETUP Display the SETUP menu of
the DVD player
9
SOURCE Selects AV source
(DVD, AV1 or AV2)
10
MENU Displays the DVD root menu
11
MUTE Mutes the audio
12
EJECT Ejects the disc
13
REPEAT Selects repeat mode
14
SLOW Slow motion play
(onlyfor DVD)
15
Fastforward / fast reverse
16
OK Confirms selection
17
DISP Display time information (during
playback)
18
SETUP Display the SETUP menu of
MONITOR Settings
(e.g. brightness,contrast,etc.)
19
TITLE Display the DVD title menu
(depending on the DVD disc)
20
ZOOM Set Zoom mode
ANGLE Select the viewing angle
(depending on the DVD disc)
ohmd 102
33
33
3/16/05, 6:35 AM
OPERATING HEADPHONES
Power switch
Press to activate the headphones. The power on the headphones
will turn off automatically if an audio signal is not detected for over
a minute.
Volume adjustment switch
Adjusts the volume of the sound
in the headphones.
1
2
Note:
• Headphones are not to be worn by the operator of the vehicle
when driving.
• Do not leave the headphones in a place subject to direct sunlight
or extreme temperatures.
• If the headphones are exposed to direct sunlight for an extended
period of time, the sensitivity of the IR receiver maybe affected
causing poor sound quality. Allow headphones to cool off before
using.
Battery Installation
• Slide the battery cover door downwards.
• Insert new “AAA” batteries into battery holder
• following diagram inside the battery holder.
• Slide the battery cover door back onto the headphones.
Note
When the batteries become weak
in the headphones, the audio can
sound distorted or cut in and out.
AAA
Battery
+
34
ohmd 102
34
3/16/05, 6:35 AM
English
O H�������
MD102
HEADPHONES
ABOUT INSTALLATION
English
O H�������
MD102
OHMD102
INSTALLATION
The installation of the OHMD102 overhead monitor system requires
experience in both mechanical and electrical procedures. If you
do not posses the necessary experience or tools to attempt this
installation, contact a local Clarion dealer for assistance. Improper
installation can result damage to the monitor and/or the vehicle.
This manual provides basic installation tips and techniques to aid
in the installation of the OHMD102 overhead monitor system. The
installation instructions are not vehicle specific, it’s a guideline on
how to perform the installation.
Prior to Beginning Installation
• Verify that all of the functions of the vehicle work properly (i.e.:
power windows, power door locks, air conditioning, lights, etc.)
• Verify the monitor will not interfere with the operation of the
sunroof, if applicable.
• Test fit the location of the overhead monitor system to ensure it
will not interfere with the safe operation of the vehicle.
• Determine the location of the AV source (s).
• This unit is exclusively for vehicles with a negative ground, 12v
power supply.
• Do not open the case, there are no serviceable parts inside. If
you drop anything into the unit during installation, consult with your
dealer or an authorized Clarion service center.
WARNING!
Be sure to disconnect the battery (-) negative terminal
before starting. This is to prevent short circuits during the
installation.
35
ohmd 102
35
3/16/05, 6:35 AM
INSTALLATION PROCEDURE
1. Identify the polarity of the dome light circuit and set the switch
on the bottom of the overhead monitor housing.
2. Test fit the overhead monitor system on the ceiling of the vehicle,
verifying it is not going to interfere with the safe operation of the
vehicle.
3. Once the mounting location of the overhead monitor system has
been determined, carefully mark the location with masking tape.
4. Lower the vehicle’s headliner down to see if a roof support
beam is available to screw the mounting bracket to. If a support
beam is not available to screw into, use a 3⁄4” piece of plywood
cut to the appropriate size. Attach the plywood to the roof of the
vehicle using silicone allowing adequate drying time.
5. Screw the mounting bracket in the vehicle. DOUBLE CHECK
THE LENGTH OF THE SCREWS PRIOR TO MOUNTING THE
BRACKET.
6. Cut a 1” hole in the headliner along the backside of the
mounting bracket for the cables to pass through.
7. Route cables through the hole to the predetermined location of
the AV source (s).
8. Identify the dome light wires in the vehicle and connect them
to the corresponding dome light wires on the overhead monitor
system.
9. Plug in the AV cables and power harness into the overhead
monitor system.
36
ohmd 102
36
3/16/05, 6:35 AM
English
O H�������
MD102
INSTALLATION
10. Carefully hold the overhead monitor system to the mounting
bracket . Align the mounting holes while screwing in the screws.
Make sure the wires are not in the way while mounting the monitor.
11. Connect the Red wire of the power harness to the Accessory
wire in the ignition harness.
12. Ground the Black wire of the power harness to a clean ground
spot.
English
O H�������
MD102
OHMD102
INSTALLATION
Note: Make sure you keep the ground wire of the OHMD102
and video source as short as possible to prevent any type of
unwanted vehicle noise
37
ohmd 102
37
3/16/05, 6:35 AM
CONNECTING DIAGRAM
If you are uncertain as to what the proper connections are please
contact a qualified Clarion technician for further installation assistance.
A/V Input
8-Pin DIN
CONNECTOR
Audio Cable
8-Pin DIN
CONNECTOR
AV CABLE INPUT CONNECTOR
AV Input 8-Pin Connector
Pin
Function
1
Audio Left Input
2
AGND
3
Audio Right Input
4
AGND
5
Video Input
6
NC
7
IR Output
8
NC
GND
A/V GND Shielding
GROUND
�
�
�
�
�
�
�
�
38
ohmd 102
38
3/16/05, 6:35 AM
English
O H�������
MD102
INSTALLATION
AV Input 8-Pin Connector
Pin
Function
1
Audio Left Output
2
AGND
3
Audio Right Output
4
AGND
5
NC
6
Audio Left Output
7
NC
8
Audio Right Output
GND
AGND Shielding
GROUND
�
�
�
�
�
�
�
English
O H�������
MD102
OHMD102
INSTALLATION
AUDIO OUT CABLE
�
Wiring the OHMD102
Read the following precautions before wiring your system.
• Disconnect the negative battery terminal before making any wiring connections.
• Be particularly careful where you route wires. Keep them away
from the engine, exhaust system, etc. Heat may damage wires.
If the fuse should blow, make sure all connections are correct and
no wires are damaged before replacing the fuse. Always use fuses
that are the same amperage value as the original. When replacing
a fuse, never let the battery side touch any metal part or any other
wire.
WARNING!
Always use great care when attaching anything to a vehicle!
Visually inspect all sides of any potential screw location, to
insure no damage will occur. If you have questions about this
process, see your authorized Clarion dealer.
39
ohmd 102
39
3/16/05, 6:35 AM
SAMPLE INSTALLATION
English
O H�������
MD102
OHMD102
INSTALLATION
Roof Beam Support
Optional Spacer Material
(Installer Provided)
Metal
Bracket
Screws
( NOT included)
IR Transmitter
Screws
(included)
Warning!
Make sure that the screws you use to mount the
bracket, monitor, or optional spacers are not to long!
If the screws are to long, they will damage the
roof of the vehicle. Take great care when planning this part
of the installation.
41
ohmd 102
41
3/16/05, 6:36 AM
English
O H�������
MD102
INSTALLATION
MOUNTING PLATE
self-tapping screws
M4.0METAL SCREW
RUBBER CAPS
42
ohmd 102
42
3/16/05, 6:36 AM
Package Contents
English
O H�������
MD102
OHMD102
PACKAGE CONTENTS
1 OHMD102
1 Audio Video RCA Accessories
1 Audio Video Din Cables
1 Convenient External Game Port
1 Audio Output Din Cable
1 Four Pin Power Harness
1 Metal Mounting Bracket
4 Screws For Metal Mounting Bracket
1 Soft Black Rubber Gasket
1 Remote Control
43
ohmd 102
43
3/16/05, 6:36 AM
TROUBLESHOOTING
English
O H�������
MD102
TROUBLESHOOTING SYMPTOMS
In rare cases, your DVD system may not function the way you
expect it to. Before calling for service please read the operating
instructions and go through the following check list.
1. Player does not work when switching on ignition and pressing the
POWER button.
2. The remote control does not work.
3. Discs skips during playback, distorted sound, frozen picture,
Interference in the picture, player does not read disc at all.
4. Player does not recognize the inserted disc.
5. DVD Player hangs up (picture freezes).
6. No FOLDER/FILE display when playing MP3 disc.
Wrong Language for AUDIO, DVD menu or subtitles is selected
when inserting a DVD.
7. Color saturation is too weak/strong during DVD/VCD/SVCD
playback.
44
ohmd 102
44
3/16/05, 6:36 AM
POSSIBLE REMEDY
1. Check fuses (unit and vehicle) and connections (see mounting
instructions). Press the REST button.
2. Change the batteries in the remote control. Replace the batteries with two AAA Alkaline batteries. The infrared on the remote
control or the unit is covered by objects or dirt. Clean the infrared
lenses with a damp cloth.
3. Player cannot read the inserted disc due to disc damage or dirt
on the surface. Clean the disc and attempt to replay.
4. Inserted disc type is not compatible with the player (see specifications). In cold weather conditions , condensation may occur on
the laser. Wait at least 5 minutes until the condensation evaporates.
5. Switch the player off and on to resume normal operation. Press
the RESET button.
6. Set the SMART NAVI option to WITH MENU in the preferences
set-up menu. Check initial language settings in the PREFERENCES set-up menu.
7. Remove disc. Set the required color value using the or buttons
and re-insert the disc. Reset default with the disc removed, and
press the DISP button.
English
O H�������
MD102
OHMD102
TROUBLESHOOTING
45
ohmd 102
45
3/16/05, 6:36 AM
Dolby Surround
Dolby Laboratories audio encoding technology that combines the
information for two additional channels (Center Surround) in a
standard stereo signal. The Dolby Surround signal can be played
on any stereo equipment, however a Dolby Surround Decoder is
needed to separate the Center and Surround channels from the
stereo channels.
Dolby Surround Pro Logic
An optimized decoder technology for Dolby Surround encoded
signals.
DRC (Dynamic Range Control)
DRC lets you limit the dynamic range of a Dolby Digital encoded
program.
DTS
An audio compression system for cinemas developed by Digital
Theater Systems, Inc.
DVD (Digital Versatile Disc)
The DVD disc is a 12 cm disc, containing two layers of digital information. The maximum amount of data on a single-layer, singlesided DVD can be up to 4.7 Gigabytes. A two-layer double-sided
DVD can be up to 18 Gigabytes.
46
ohmd 102
46
3/16/05, 6:36 AM
English
O H�������
MD102
GLOSSARY
JPEG
(Joint Photographic Expert Group) JPEG images are bit-mapped
images that use a compression method in order to save memory
space.
Macro vision
Copyright protection technology developed by Macro vision
Corporation. Copyright owners can protect their videocassettes
from unauthorized recording on VCRs by using Macro vision technology.
English
O H�������
MD102
OHMD102
GLOSSARY
MP3
Digital audio data compressed in MPEG1 Layer 3 format. MP3
files are approximately ten times smaller than the non-compressed
PCM data.
OSD (On Screen Display)
Information about the disc and player status are displayed directly
on the monitor screen.
Parental guidance function
Frequently Termed Parental Control or Parental Management Level
this function is based on a movie rating assigned by the MPAA
(Motion Picture Association of America). Depending on the DVD
player setting, this classification enables entire DVDs to be blocked
for viewing by children and teenagers. Note not all DVD manufacturers support this rating system. Currently the following levels are
officially recognized by the MPAA:
G (General audience)
Suitable for all members of the general public including children
PG (Parental Guidance)
Allowed for general viewing but with parental supervision
47
ohmd 102
47
3/16/05, 6:36 AM
PG-13 (Parental Guidance 13)
Allowed for viewing by children over 13 with parental supervision.
R (Restricted)
Parental supervision or the accompaniment by an adult is mandatory.
NC-17
Contents unsuitable for children under 17 Other.
Adult
Only suitable for adults
NR (Not Rated)
No classification.
PBC (Playback Control)
Some VCD 2.0 Video CDs are encoded with playback control, allowing you to navigate through the disc contents with a menu.
SVCD (Super Video CD)
This is an East Asian standard for video data on a standard 12 cm
CD. The data is stored in MPEG2 format. The maximum bit rate for
video is 2264 kbps. Two different stereo audio soundtracks can be
recorded on a SVCD.
VCD (Video Compact Disc)
A world wide standard for digital video on a standard 12 cm CD.
The data is stored in MPEG1 format. The maximum bit rate for
video is 1150 kbps. Only one stereo audio track can be recorded
on a VCD.
48
ohmd 102
48
3/16/05, 6:36 AM
English
O H�������
MD102
GLOSSARY
VFD (Vacuum Fluorescent )
Display) This DVD player is equipped with a multi-color display
with adjustable brightness.
TFT (Thin Film Transistor)
A technology for manufacturing large, high resolution LCD flatscreen displays (e.g. computer monitors, LCD TVs, etc.).
English
O H�������
MD102
OHMD102
GLOSSARY
49
ohmd 102
49
3/16/05, 6:36 AM
SPECIFICATIONS
Model
OHMD102
Screen size (Diagonal): 10.2"TFT Monitor
Screen resolution: 800 (H) x 3 (RGB) x 480(V)
Active area: 216.0 (H) x 129.6 (V)
Signal system: Dual system NTSC/PAL
Brightness: 300 cd/m2
Contrast ratio: 400:1(Typ.)
Viewing angle: Left/right: 55/55 degrees
Up/down: 35/50 degrees
Video input level: 1.0 Vpp � 10 %
Audio input level: 0.3 Vrms
Humidity for normal operation: 10%~75%
Carrier frequency for IR sensor: L-CH: 2.3 MHz
R-CH: 2.8 MHz
Operating voltage (direct current): 10-16V
Current consumption(Max): 2.0 A (at +12V)
Current consumption: Off 3 mA (at +12V)
Operating temperature: -4F~158F(-20Cto+70C)
Storage temperature: -22F~176F(-30Cto+80C)
Dimensions: 10 5/8 x 2 5/16 x 11 5/16 in
(273 x 64 x 275mm)
Weight: <6.5 lbs (2948g)
SUBLECT
TO CHANGES!
Subject
to changes!
50
ohmd 102
29
50
3/16/05, 6:36 AM
English
O H�������
MD102
SPECIFICATIONS
WARRANTY INFORMATION
This product is warranted against all defects in material
workmanship for a period of one year from the date of original
purchase. Clarion ProAudio products, except for speakers, are
covered by a two year limited warranty when installed by an
authorized Clarion dealer. The conditions of this limited warranty
and the extent of responsibility of Clarion Corporation of America
(“Clarion”) under this limited warranty are as follows:
English
O H�������
MD102
OHMD102
WARRANTY INFORMATION
1. PROOF OF DATE OF PURCHASE WILL BE
REQUIRED FOR WARRANTY SERVICE OF
THIS PRODUCT. IN THE CASE OF THE TWO
(2) YEAR LIMITED WARRANTY FOR CLARION
PROAUDIO PRODUCT, PROOF OF INSTALLATION
BY AN AUTHORIZED DEALER IS REQUIRED.
INFORMATION ABOUT CLARION AUTHORIZED
WARRANTY SERVICE CENTERS MAY BE OBTAINED
BY CONTACTING OR WRITING CLARION AT THE
ADDRESS LISTED BELOW.
2. This limited warranty will become void if service performed by
anyone other than an approved Clarion Warranty Service Center
results in damage to the product.
3. This limited warranty does not apply to any product which has
been subject to misuse, neglect or accident, or which has had the
serial number altered, defaced or removed, or which has been
connected, installed, adjusted or repaired, other than in accordance
with the instructions furnished by Clarion.
4. This limited warranty does not cover car static or other electrical
interferences, tape head or laser pick-up cleaning or adjustments,
or labor costs for the removal or reinstallation of the unit for repair
51
ohmd 102
51
3/16/05, 6:36 AM
5. The sole responsibility of Clarion under this limited warranty shall
be limited to the repair of the product or replacement of the product,
at the sole discretion of Clarion.
6. Product must be shipped in its original carton or equivalent
carton, fully insured, with shipping charges prepaid. Clarion will
not assume any responsibility for any loss or damage incurred in
shipping.
7. ALL IMPLIED WARRANTIES EXCEPT TO THE EXTENT
PROHIBITED BY APPLICABLE LAW SHALL HAVE NO GREATER
DURATION THAN THE WARRANTY PERIOD SET FORTH
ABOVE. UNDER NO CIRCUMSTANCES SHALL CLARION
BE LIABLE FOR ANY LOSS OR DAMAGE, DIRECT OR
CONSEQUENTIAL, ARISING OUT OF THE USE OR INABILITY
TO USE THE PRODUCT. BECAUSE SOME STATES DO NOT
ALLOW LIMITATIONS ON HOW LONG AN IMPLIED WARRANTY
LASTS OR EXCLUSIONS OR LIMITATIONS OF INCIDENTAL OR
CONSEQUENTIAL DAMAGES, THE ABOVE LIMITATIONS OR
EXCLUSIONS MAY NOT APPLY TO YOU.
8. THIS LIMITED WARRANTY GIVES YOU SPECIFIC LEGAL
RIGHTS, AND YOU MAY ALSO HAVE OTHER RIGHTS WHICH
VARY FROM STATE TO STATE.
9. Should you have any difficulties with the performance of this
product during the warranty period, please call or visit our web site
for a listing of Authorized Warranty Service Centers in your area.
You may also contact the Clarion Customer Service at the address
listed below for any service help you may need with Clarion
products.
CLARION CORPORATION OF AMERICA
ATTN: CUSTOMER SERVICE MANAGER
661 WEST REDONDO BEACH BLVD.
GARDENA, CA 90247
1 - 800 - GO - CLARION
(310) 327 - 9100
www.clarion.com
52
ohmd 102
52
3/16/05, 6:36 AM
English
O H�������
MD102
WARRANTY INFORMATION
English
O H�������
MD102
OHMD102
NOTES
53
ohmd 102
53
3/16/05, 6:36 AM