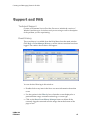
1
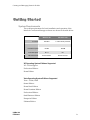
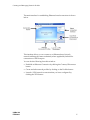
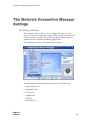
USBw 100
Series
MOTOROLA and the Stylized M Logo are registered in the US Patent & Trademark Office.
All other product or service names are the property of their respective owners.
© 2009 Motorola, Inc.
Table of Contents
Introduction .............................................................................................................. 1
Introduction .................................................................................................................. 1
Getting Started ......................................................................................................... 3
System Requirements .................................................................................................. 3
XP Operating System Editions Supported ..........................................................3
Vista Operating System Editions Supported ......................................................3
Additional Requirements: .....................................................................................4
Installing the Motorola Connection Manager Software ......................................... 4
The Motorola Connection Manager Interface ........................................................ 5
Controls for the Main Window .................................................................................. 8
The File Menu ............................................................................................................... 8
Enable/Disable WiFi Adapter ..............................................................................8
Enable/Disable WiMAX Adapter ........................................................................8
Enable/Disable Ethernet Adapter........................................................................8
Exit ............................................................................................................................8
The Tools Menu............................................................................................................ 9
User Info...................................................................................................................9
WiMAX Info ............................................................................................................9
WiFi Info ..................................................................................................................9
Ethernet Info............................................................................................................9
WiMAX ReScan for Networks ..............................................................................9
Always on Top ........................................................................................................9
Transparency...........................................................................................................9
Zoom.........................................................................................................................9
Settings ...................................................................................................................10
The Help Menu........................................................................................................... 10
Help ........................................................................................................................10
Event Manager History........................................................................................10
About the Motorola Connection Manager ........................................................10
Establishing WiMAX Connections........................................................................ 11
How to Connect to a WiMAX Network.................................................................. 11
WiMAX Device Information..................................................................................... 11
MAC Address........................................................................................................11
Firmware Version .................................................................................................11
Baseband Chip ......................................................................................................11
Calibration Status .................................................................................................12
Antenna Gain Diff ................................................................................................12
MAC Version.........................................................................................................12
Library Version .....................................................................................................12
USBw 100
FEB 2009
i
Driver Version.......................................................................................................12
RF Chip Version....................................................................................................12
Antenna Calib .......................................................................................................12
Antenna Gain Diff ................................................................................................12
WiMAX Profiles.......................................................................................................... 13
Establishing Wi-Fi Connections ........................................................................... 15
Automatically connect to network in future .......................................................... 16
Prompt me before connecting to this network....................................................... 16
Save settings for manual connections ..................................................................... 16
Do not save settings ................................................................................................... 16
How to Access a Closed Network ........................................................................... 17
The List of WiFi Networks........................................................................................ 18
Connect ..................................................................................................................18
Preferred ................................................................................................................18
Network .................................................................................................................18
Mode.......................................................................................................................19
BSSID ......................................................................................................................19
Channel ..................................................................................................................19
AP Vendor .............................................................................................................19
Encryption .............................................................................................................19
Signal Strength ......................................................................................................19
Beacon Period........................................................................................................19
Supported Rates....................................................................................................20
Time First Seen......................................................................................................20
Time Last Seen ......................................................................................................20
Disabling Windows XP's Native WiFi Client......................................................... 21
Manually Disabling XP's WiFi Management....................................................21
Is this a problem on Windows Vista as Well? ..................................................21
Wi-Fi Network Security............................................................................................. 22
How to Access an Encrypted Network .............................................................22
What is an Encryption Key?................................................................................22
How to Change an Encryption Key ...................................................................22
Enabling 802.1x Authentication..........................................................................23
Establishing Ethernet Connections ..................................................................... 25
Vendor Description.................................................................................................... 25
MAC Address ............................................................................................................. 25
Driver Version ............................................................................................................ 25
Firmware Version....................................................................................................... 25
IP Address ................................................................................................................... 26
Gateway....................................................................................................................... 26
DNS Server.................................................................................................................. 26
DHCP Server............................................................................................................... 26
WINS Server................................................................................................................ 26
ii
USBw 100
FEB 2009
Virtual Private Networks (VPNs) ........................................................................... 27
Automatically Launching a VPN Connection........................................................ 27
Configuring a VPN Connection ............................................................................... 28
Connecting to a Virtual Private Network (VPN)................................................... 29
Supported VPN Clients ............................................................................................. 29
Using the CheckPoint VPN Client ........................................................................... 29
Using the NetMotion VPN Client............................................................................ 30
Creating and Managing Network Profiles ............................................................ 31
Creating a Profile for a WiFi Network .................................................................... 31
Creating an Ethernet Network Profile .................................................................... 32
How to Edit a Network Profile ................................................................................ 33
How to Remove a Network Profile ......................................................................... 34
Profile Icons................................................................................................................. 35
Profile Properties: WiMAX ....................................................................................... 35
Profile Properties: Ethernet....................................................................................... 35
DNS Suffix .............................................................................................................35
IP Subnet ................................................................................................................36
NT Domain ............................................................................................................36
Must Match all Associations ...............................................................................36
Profile Properties: WiFi ............................................................................................. 36
Profile Properties: WiMAX ....................................................................................... 37
Profile Properties: General........................................................................................ 37
Profile Name..........................................................................................................37
Connection Options..............................................................................................37
VPN Auto Launch ................................................................................................37
Enable Application Launcher .............................................................................38
Disable IE's Manual Proxy Settings....................................................................38
Launch Browser Window on Connect...............................................................38
Profile Properties: IP .................................................................................................. 38
Profile IP Address.................................................................................................38
Profile DNS server ................................................................................................39
Profile Properties: Security ....................................................................................... 39
The Motorola Connection Manager Settings....................................................... 41
The Settings Window................................................................................................. 41
Settings: Application.................................................................................................. 42
User interface is always on top ...........................................................................42
Enable splash screen.............................................................................................42
Automatically run this application... .................................................................42
Display connection timer.....................................................................................42
Reset all warning messages.................................................................................42
Settings: Hardware..................................................................................................... 43
The Device List......................................................................................................43
Allow simultaneous connections........................................................................43
USBw 100
FEB 2009
iii
Prompt before switching connections ...............................................................43
Include support for other network connections...............................................43
The Profiles Button ...............................................................................................44
Settings: Sounds.......................................................................................................... 44
Connected ..............................................................................................................44
Lost Connection ....................................................................................................44
Hot Spot Authentication......................................................................................44
Settings: Updates........................................................................................................ 44
Automatically download and install .................................................................45
Prompt me to download and install ..................................................................45
Manually download and install..........................................................................45
Update Now ..........................................................................................................45
Settings: VPN .............................................................................................................. 45
Support and FAQ ................................................................................................... 47
Technical Support ...................................................................................................... 47
Event History .............................................................................................................. 47
Frequently Asked Questions .................................................................................... 48
Which operating systems does the Motorola Connection Manager
support? .................................................................................................................48
The Motorola Connection Manager launched, but no card is detected........48
Why can't the Motorola Connection Manager find a network?.....................48
How do I connect to a network?.........................................................................48
How do I stop the client from launching every time I restart my PC? .........48
Why do I keep losing my connection?...............................................................49
Why am I unable to connect to a signal that I can see in the Motorola
Connection Manager Mobile? .............................................................................49
Does the Motorola Connection Manager support WEP Encryption? ...........49
Does the Motorola Connection Manager support VPN? ................................49
Who can I contact if need assistance with the Motorola Connection
Manager?................................................................................................................49
iv
USBw 100
FEB 2009
Creating
Network
Profiles
Creatingand
andManaging
Managing
Network
Profiles
Introduction
Introduction
The Help system is designed to answer users' questions on how to perform
specific tasks and to explain the Motorola Connection Manager's functions.
The menu system to the left allows users to browse help topics while the
Index and Search tabs provide other mechanisms to access available help
topics.
If you need additional assistance, contact your Internet Service Provider.
USBw 100
FEB 2009
1
Creating and Managing Network Profiles
2
USBw 100
FEB 2009
Creating and Managing Network Profiles
Creating and Managing Network Profiles
Getting Started
System Requirements
The system requirements for basic installation and operation of the
Motorola Connection Manager software are shown in the table below.
Windows XP
Windows Vista
Processor
300 MHz
1.0 GHz 32-bit processor
RAM
256 MB
1GB
Hard Drive Space
60 MB
100 MB
Internet Explorer
IE 5.5
IE 7
OS Service Pack
Service Pack 2
Service Pack 0,1
XP Operating System Editions Supported
XP – 32-bit Support
Professional Edition
Home Edition
Vista Operating System Editions Supported
Vista – 32-bit, 64-bit
Starter Edition
Home Basic Edition
Home Premium Edition
Professional Edition
Small Business Edition
Enterprise Edition
Ultimate Edition
USBw 100
FEB 2009
3
Creating and Managing Network Profiles
Additional Requirements:
• Windows Vista operation requires a DirectX 9.0 (or better) graphics
accelerator
• CD-ROM drive
• Compatible WiFi device (for WiFi function)
• Ethernet device for Ethernet connections
Installing the Motorola Connection Manager Software
Installing the Motorola Connection Manager is easy. You will need the
software CD to install the software, follow these steps:
1. Insert CD into CD-ROM drive.
2. If your computer automatically starts running the CD follow the on
screen instructions for installation and configuration.
If your PC does not automatically install the software from the CD, follow
these steps:
a) Open the My Computer folder by double clicking the icon on your
desktop.
b) Find the CD-ROM drive where the Motorola Connection Manager is
located; double-click the icon to access the CD in the CD-ROM drive.
c) Double click on the Setup executable file to begin installation.
Follow the on-screen instructions for installation and configuration
of the Motorola Connection Manager software.
4
USBw 100
FEB 2009
Creating
Network
Profiles
Creatingand
andManaging
Managing
Network
Profiles
The Motorola Connection Manager
Interface
The main interface for establishing WiMAX-based wireless connections is
shown below.
This window will display details about the WiMAX network you are
currently connected to. If you are not currently connected to a WiMAX
Network, it will choose the network to display in the following order:
1. The last network you connected to (if available)
2. Any "preferred" network (networks for which you have a profile)
3. The network with the strongest signal strength
You can do the following from this window:
• Connect to the displayed network (if any) by clicking the
Connect/Disconnect button.
• Launch a VPN network connection that you have configured by
clicking the VPN button.
USBw 100
FEB 2009
5
Creating and Managing Network Profiles
The main interface for establishing WiFi based wireless connection is
shown below.
This window will display details about the network you are currently
connected to. If you are not currently connected, it will choose the
network to display in the following order:
1. The last network you connected to (if available)
2. Any "preferred" network (networks for which you have a profile)
3. The network with the strongest signal strength
You can do the following from this window:
• Connect to the displayed network (if any) by clicking the
Connect/Disconnect button.
• Click the "networks available" text to display the entire list of WiFi
networks available in the area. Use this list to select a different
network to connect to.
• Search for WiFi hotspots by clicking on the Location Finder button.
• Create and edit network profiles by clicking on the Profiles button.
• Launch a VPN network connection that you have configured by
clicking the VPN button.
6
USBw 100
FEB 2009
Creating and Managing Network Profiles
The main interface for establishing Ethernet-based connections is shown
below.
This interface allows you to connect to an Ethernet-based (wired)
network utilizing the same credentials (where applicable) utilized for
connections to WiFi hotspots.
You can do the following from this window:
• Establish an Ethernet Connection by clicking the Connect/Disconnect
button.
• Create and edit network profiles by clicking on the Profiles button.
• Launch a VPN network connection that you have configured by
clicking the VPN button.
USBw 100
FEB 2009
7
Creating and Managing Network Profiles
Controls for the Main Window
The buttons in the upper-right corner of the main window control the
appearance and location of the window.
Click this button to convert the window to a miniature toolbar version of
itself like the window below.
Click this button (which only appears on the mini toolbar version of the
main window) to restore the window to full size.
Click this button to reduce the window to a button on the task bar at the
bottom of the screen.
Click this button to close the window.
The File Menu
Clicking File in the menu bar of the Motorola Connection Manager's
main window produces a short menu with the following options:
Enable/Disable WiFi Adapter
Select this option to enable and disable your WiFi adapter.
Enable/Disable WiMAX Adapter
Selecting this option shall enable and disable the WiMAX adapter.
Enable/Disable Ethernet Adapter
Select this option to enable and disable your Ethernet adapter.
Exit
Exit the Motorola Connection Manager application.
8
USBw 100
FEB 2009
Creating and Managing Network Profiles
The Tools Menu
Clicking Tools in the menu bar of the Motorola Connection Manager's
Main window produces a short menu with the following options:
User Info
Opens the User Name and Password Logon window.
WiMAX Info
Opens the WiMAX window, this window displays some technical
information about the WiMAX network and the WiMAX device.
WiFi Info
Opens the WiFi Window, this window displays some technical
information about the WiFi network you are connected to and your
current WiFi device.
Ethernet Info
Opens the Ethernet window, this window displays some technical
information about the Ethernet network and the Ethernet device.
WiMAX ReScan for Networks
The Motorola Connection Manager will rescan all WiMAX networks.
Always on Top
The Motorola Connection Manager will always be on top of all other
applications.
Transparency
Allows you to see varying degrees of your desktop.
Zoom
Allows you to increase the size of the Motorola Connection Manager
application
USBw 100
FEB 2009
9
Creating and Managing Network Profiles
Settings
Opens the Settings window allowing you to configure a number of
personal preference features.
The Help Menu
Clicking Help in the menu bar of the Motorola Connection Manager's
Main window produces a short menu with the following options:
Help
Opens this help system.
Event Manager History
Select this item to display a list of the most recent The Motorola
Connection Manager events (network connections, network
disconnection, errors, etc.).
About the Motorola Connection Manager
Displays version information for the Motorola Connection Manager
software.
10
USBw 100
FEB 2009
Creating and Managing Network Profiles
Creating and Managing Network Profiles
Establishing WiMAX Connections
How to Connect to a WiMAX Network
To connect to a WiMAX network, follow these steps:
1. Navigate to the WiMAX Main Window in the Motorola Connection
Manager software by clicking the WiMAX button on the right side of
the main window.
2. If there are WiMAX networks available for connection, The Motorola
Connection Manager will display the name of one of the detected
networks as well as the total number of networks detected.
3. To connect the network whose name is displayed, click Connect.
To view information about a WiMAX network you are currently connected
to or the WiMAX device you are using to connect to that network, select
WiMAX Info from the Tools menu. This produces a window with two tabs.
• The Network tab contains information about the IP Settings for and the
amount Activity on your current WiMAX connection.
• The Device tab contains information about your current WiMAX Device.
WiMAX Device Information
This tab contains information about the WIMAX device you are currently
using. Fields include the following:
MAC Address
The hardware address of the device.
Firmware Version
The version of the device's on-board operating software.
Baseband Chip
The WiMAX chipset for the device.
USBw 100
FEB 2009
11
Creating and Managing Network Profiles
Calibration Status
Device Calibration Status is reported by the Firmware on the device.
Antenna Gain Diff
The amount of Antenna Gain provided on the device with the current
signal.
MAC Version
Version of the MAC chipset on the device.
Library Version
Version of the WiMAX Library used by this device's driver.
Driver Version
The version of the device driver currently installed on your computer.
RF Chip Version
The version of the RF chip used on the device.
Antenna Calib
The value of the calibration setting for the antenna on the device.
Antenna Gain Diff
The programmed Antenna gain differential used on the device.
12
USBw 100
FEB 2009
Creating and Managing Network Profiles
WiMAX Profiles
WARNING! This is not recommended for the User to complete. Please
contact your Internet service provider for assistance.
The Motorola Connection Manager will have a default WiMAX profile. It is
possible for your Internet Service Provider to create a new WiMAX profile.
To return your WiMAX Adapter to the original profile, re-install the
software CD provided with your USB Device.
USBw 100
FEB 2009
13
Creating and Managing Network Profiles
14
USBw 100
FEB 2009
Creating and Managing Network Profiles
Establishing Wi-Fi Connections
To connect to a WiFi network, follow these steps:
1. Navigate to the WiFi Main Window in the Motorola Connection
Manager software by clicking the WiFi button on the right side of the
main window.
2. If there are WiFi networks available for connection, the Motorola
Connection Manager will display the name of one of the detected
networks as well as the total number of networks detected. If you want
to connect the network whose name is displayed, click Connect.
If you want to connect to a different network, click the text that indicates
the number of network available (or the large globe icon next to this
text). This produces a list of all available networks. Select the network
you want to connect to by double-clicking on this network or clicking
once on the associated connect button.
Note: If you see a *closed* item in the networks list, this indicates the
presence of one or more Closed networks. Connecting to such a network
requires the creation of a profile for that network. See How to access a
closed network for more information.
3. If the network is encrypted, you will now be prompted to enter an
encryption key. If this is the case and you know the required encryption
key, enter it and click OK. If you don't know the encryption key for an
encrypted network, you must click Cancel and select a different
network. See How to access an encrypted network for more information
on connecting to encrypted networks. Once you have completed this
procedure, the Motorola Connection Manager will attempt to establish a
connection to the selected network.
4. When connecting to a network for the first time, the Motorola
Connection Manager may prompt the user with the New Network
Options dialog box. Using this dialog box, users can instruct the
Motorola Connection Manager to automatically connect to a network in
the future or to prompt the user when that network is available.
5. Once you are connected, the Motorola Connection Manager will
maintain a timer on how long you have been connected.
If Prompt me... is selected Automatic Profile Creation window, you will see
a dialog offering four options each time you connect to a new network for
USBw 100
FEB 2009
15
Creating and Managing Network Profiles
the first time. The option selected specifies the type of profile that will be
created for this network. By choosing to automatically add network
connection parameters to a Network Profile, a user can facilitate automated
access to networks in the future.
You must choose one of the options shown below:
Automatically connect to network in future
If this option is selected, the Motorola Connection Manager will create a
profile for this network. The profile created will specify that the Motorola
Connection Manager should automatically establish a connection to this
network whenever it is detected.
Note that when multiple networks that have been configured for autoconnection are detected, the Motorola Connection Manager will choose
which network to connect to based on the ranking of profiles in the
Network Profiles Window.
Prompt me before connecting to this network
If this option is selected, the Motorola Connection Manager will create a
profile for this network. The profile created will specify that the Motorola
Connection Manager should offer to connect to this network whenever this
network is detected.
Save settings for manual connections
If this option is selected, the Motorola Connection Manager will create a
profile to save the settings you used to connect to this network. This allows
the Motorola Connection Manager to automate the details of establishing a
connection to this network. However, you must still initiate connections to
this network manually by selecting the network and then clicking the
Connect button.
Do not save settings
Choosing this option will allow the user to connect to the network this
time, but will not save any parameters for future connections.
Closed networks are private networks that do not choose to broadcast their
existence. The Motorola Connection Manager can detect when there are
closed networks present simply because it "sees" unidentified broadcasts in
the WiFi frequency band. When this happens, it will display the word
*closed* in the WiFi networks list.
16
USBw 100
FEB 2009
Creating and Managing Network Profiles
However, the Motorola Connection Manager cannot detect the actual name
of or establish a connection to a closed network unless you create a profile
for that network. For more information, see the following:
How to access a closed network
How to create a WiFi Network Profile
How to Access a Closed Network
To access a closed network with the Motorola Connection Manager, you
must set up a Profile for that network. Follow these steps to create a closed
Network Profile:
1. Click the on the Profiles button. The Network Profiles window will
now be displayed.
2. Select the WiFi heading in the left pane of the network profiles
window.
3. Click the Add button. The first page of properties for the new profile
appears.
4. Enter the name of the network you want to add in the SSID field. Be
aware that the network name is case sensitive and must be entered
exactly as provided by the administrator of the closed network to
which you want to connect.
5. Check the This is a non-broadcasted network (closed) box to identify
this as a closed network.
6. Fill out the remaining fields on this window as instructed by the
administrator of the closed network.
7. Click Next. The IP Settings page appears.
8. The default selections on the IP Properties page are correct for most
networks. If, however, this particular network requires specific IP
address and/or DNS server settings, you can specify them here.
9. Click Next. The General page appears.
10. Configure the settings on the General page as desired and then click
Finish to exit the profile wizard.
USBw 100
FEB 2009
17
Creating and Managing Network Profiles
The List of WiFi Networks
Clicking the next to the Globe in the WiFi main window opens the
Available Networks list.
To connect to a network on the list either select the network and then click
the Connect button or double-click on the network in the list. The
information displayed for each network will include some (if not all) of the
items shown below. Right-clicking anywhere in the window will produce a
menu that controls which columns are displayed.
Connect
This column provides connection/disconnection buttons for each available
network.
Preferred
A check mark is presented for any WiFi network that is currently listed in
the Network Profiles window. This includes network profiles that have
been pre-defined, WiFi networks for which you have created Network
Profiles and WiFi networks that you have saved using the New Network
Options dialog.
Network
This is the Network Signal Set Identifier (SSID). Essentially this is just a
name that is broadcast by a WiFi access point to identify the network.
If you see a *closed* item in this column, this indicates the presence of one
or more Closed networks. Connecting to such a network requires the
creation of a profile for that network. See How to access a closed network
for more information.
18
USBw 100
FEB 2009
Creating and Managing Network Profiles
Mode
This column displays two possible entries:
Indicates that this network is in infrastructure mode. You will be
connecting to a network through a dedicated wireless access
point.
Indicates that this network is in ad hoc mode. You will be
connecting directly to another PC through its wireless network
interface card.
BSSID
This is the MAC address of the Access Point’s Wireless Network Interface
Card.
Channel
The channel on which the wireless network is broadcasting.
AP Vendor
The manufacturer of the wireless access point.
Encryption
icon in this column. The
Networks that are encrypted will have the
accompanying text indicates the encryption method. See How to access an
encrypted network for instructions on connecting to encrypted networks.
Signal Strength
Displays the strength of the signal being broadcast from each network.
Stronger signals tend to produce more reliable connections.
Beacon Period
Wireless access points periodically broadcast a packet called a "beacon"
which helps to synchronize communications with connected systems. The
number in this column indicates how often (in milliseconds) the beacon is
transmitted.
USBw 100
FEB 2009
19
Creating and Managing Network Profiles
Supported Rates
A list of all the transmission rates supported by this network.
Time First Seen
The time of day when the Motorola Connection Manager first detected this
network. Note that this value represents the current session only. It will be
reset when you restart the Motorola Connection Manager.
Time Last Seen
The time of day when the Motorola Connection Manager last detected this
network.
To view information about a WiFi network you are currently connected to
or the WiFi device you are using to connect to that network, select WiFi
Info from the Tools menu. This produces a window with two tabs.
• The Network tab contains information about the IP Settings for and the
amount Activity on your current WiFi connection (if any).
• The Device tab contains information about your current WiFi Device (if
any).
20
USBw 100
FEB 2009
Creating and Managing Network Profiles
Disabling Windows XP's Native WiFi Client
By default, Windows XP attempts to manage any wireless network
connections it detects. However, this conflicts with the management
functions provided by the Motorola Connection Manager software. For this
reason, the Motorola Connection Manager will report the Windows XP
wireless network management tool as a conflicting application. Like other
conflicting applications, the client can automatically disable Windows XP's
native WiFi management feature while it runs and restart it when it shuts
down. However, the feature can also be manually disabled if you desire.
Manually Disabling XP's WiFi Management
You can tell Windows to disable its wireless network management
functions manually. Follow these steps:
•
Right click on any network connection icon that appears in the system
tray.
• Select Open Network Connections from the menu that appears.
• The Windows XP Network Connections window appears.
• Right click on the icon that corresponds to your wireless network
connection.
• Select Properties from the menu that appears.
• Select the Wireless Networks tab.
• Uncheck Use Windows to configure my wireless network settings.
• Click OK to close the window.
Is this a problem on Windows Vista as Well?
No. Although Windows Vista also manages WiFi connections, the Vista
architecture allows the Motorola Connection Manager to work with Vista's
native WiFi management facility. So, there is no conflict.
USBw 100
FEB 2009
21
Creating and Managing Network Profiles
Wi-Fi Network Security
How to Access an Encrypted Network
The steps required to connect to an encrypted WiFi network are the same
as those required to connect to a non-encrypted WiFi network — until you
click Connect. When you click the Connect button, the client will display a
dialog that prompts you to enter a network encryption key. In order to
proceed, you must do one of the following:
• Enter a network encryption key obtained from the administrator of the
network you are trying to access.
• Configure 802.1 x authentications according to the instructions of the
network's administrator.
• When you are finished, click the Connect button to proceed.
Note: If you create a profile for this network containing the appropriate
encryption parameters, you will not see this dialog when you attempt to
connect.
What is an Encryption Key?
An encryption key is a code key used to encrypt data exchanged between
an encrypted network and the Motorola Connection Manager. You cannot
exchange data with an encrypted network without having the appropriate
encryption key.
There are two ways to obtain an encryption key:
• Obtain a key from the administrator of the network you are trying to
access.
• Configure 802.1x authentication according to the instructions of the
network's administrator. A key will be provided automatically as part of
the login process.
How to Change an Encryption Key
When a network is added to the Network Profile list, all encryption
information is saved with it. Therefore, you will not be asked for
encryption information again when connecting. For security purposes, the
network administrator may find it necessary to change the encryption key
for the network. When this happens, you will need to update the
encryption keys in the appropriate network profile to match the new keys
specified by the network administrator. Follow these steps:
22
USBw 100
FEB 2009
Creating and Managing Network Profiles
•
Click the Profiles button in the main window of the Motorola
Connection Manager software. The Network Profiles window appears.
•
Select the network for which you wish to edit the encryption keys.
•
Click the Edit button.
•
Switch to the WiFi tab.
•
Enter the new encryption key in both the Network Key box and the
Confirm Network Key box.
•
Click the OK button.
Enabling 802.1x Authentication
The Motorola Connection Manager software allows you to use to
authenticate against your corporate network or other domain. The
Motorola Connection Manager will allow you to use any authentication
method that is installed on your computer. (Please note that authentication
is only available on Windows XP and on Windows Vista.
To enable automatic 802.1x authentication:
1. Create a network profile for the WiFi network that you wish to
authenticate.
2. Open the Network Profile window by clicking the Profiles button.
3. Select the Network Profile you wish to edit.
4. Click the Edit button.
5. Select the WiFi tab.
6. Check the Enable data encryption box.
7. If you selected a WEP method, you will also have to check Enable
802.1x authentication. (If you selected WPA, this box was checked
automatically).
8. From the EAP type dropdown, select the type of authentication you
wish to enable.
USBw 100
FEB 2009
23
Creating and Managing Network Profiles
24
USBw 100
FEB 2009
Creating and Managing Network Profiles
Creating and Managing Network Profiles
Establishing Ethernet Connections
Follow these steps to establish a connection to an Ethernet network.
1. Connect the Ethernet port on your computer to an Ethernet jack
belonging to the network to which you wish to connect.
2. Navigate to the Ethernet Main Window by clicking the Ethernet
button on the right side of the main window.
3. Click the Connect button.
Note: a message stating "No Cable Connected" will be displayed if the
Ethernet Main Window is accessed when your computer has not been
attached to an Ethernet network via an Ethernet jack.
Once you have connected to an Ethernet network, the screen will be
updated to display a "Connected" status message.
This box displays the number of packets of data that your computer has
sent and received over the Ethernet connection since it was established.
This box contains information about the Ethernet device you are currently
using. Fields include the following:
Vendor Description
This is the name of your Ethernet network interface card.
MAC Address
The hardware address of the device.
Driver Version
The version of the driver for this device that is currently installed on your
computer.
Firmware Version
The version of the devices on-board operating software.
To view information about an Ethernet network you are currently
connected to or the Ethernet device you are using to connect to that
USBw 100
FEB 2009
25
Creating and Managing Network Profiles
network, select Ethernet Info from the Tools menu. This produces a
window with two tabs.
• The Network tab contains information about the IP Settings for and the
amount Activity on your current WiFi connection (if any).
• The Device tab contains information about your current Ethernet Device
(if any).
This box displays your computer's current network configuration. It
includes the following information:
IP Address
The Internet address your computer is using for the current network
Ethernet connection.
Gateway
The address of the device that is responsible for routing all of your network
traffic onto the Internet.
DNS Server
The address of the server your computer is using to translate verbal
Internet addresses into numerical addresses (and vice versa).
DHCP Server
The address of the server that assigned your computer's network
configuration for the current wireless connection.
WINS Server
The address of the server (if any) that your computer is using to find the
names of computers on a Windows network.
26
USBw 100
FEB 2009
Creating and Managing Network Profiles
Creating and Managing Network Profiles
Virtual Private Networks (VPNs)
Virtual Private Networks (VPNs) are private networks that can be accessed
over a public backbone network (like the Internet) without compromising
their privacy. Typically, they maintain their privacy by forming secure
(encrypted) "tunnels" directly to users who access them.
Automatically Launching a VPN Connection
You can configure any network profile to automatically connect to a Virtual
Private Network whenever you connect using that profile. Follow these
steps:
1. If you have not already done so, configure the connection settings for
the VPN you wish to connect to. (See Configuring a VPN Connection).
2. Open the Network Profiles window.
3. In the left pane, select the profile for which you want to automate
VPN connection.
4. Click the Edit button. The properties sheet for the selected profile
appears.
5. If the General tab is not already selected, select it now.
USBw 100
FEB 2009
27
Creating and Managing Network Profiles
6. Check the Auto Launch box in the VPN section.
7. Click OK to exit the window.
8. Repeat steps 3 through 7 for any additional profiles that you want to
auto-launch your VPN connection with.
Configuring a VPN Connection
Follow these steps to configure a VPN connection:
1. Consult the administrator of the VPN you wish to access. The
administrator will provide you with VPN client software and
instructions for establishing VPN connections using that software.
2. If the VPN client software is not already installed on your system,
install it now. (Microsoft's VPN client is pre-installed on most versions
of Windows).
3. Open the Motorola Connection Manager software.
4. Access the VPN settings tab by selecting the Settings option from the
Tools drop-down menu and then clicking the 'VPN' tab.
5. If the VPN client software you are using is supported by the Motorola
Connection Manager and you want to manually specify your
connection information, select Define VPN login info and then enter
the VPN profile information in the provided fields.
6. If the VPN client software you are using is supported by the Motorola
Connection Manager and you already have a connection profile
configured for that VPN client, select Use existing VPN profile. Then,
specify the client software and the login profile that you want to use.
7. If the VPN client software you are using is NOT supported by the
Motorola Connection Manager, select Use third party VPN client.
Then, click the Browse button to specify the location of the client
software that you are using.
8. Click OK to exit the Settings window.
28
USBw 100
FEB 2009
Creating and Managing Network Profiles
Once your VPN settings are configured, there are two ways to start your
VPN connection.
• Automatically start your VPN upon connection by configuring your
connection profile to do so.
• One click manual launch of the VPN by pressing the VPN button on the
main interface.
Connecting to a Virtual Private Network (VPN)
There are two ways to connect to a Virtual Private Network:
• Configure a network profile to automatically launch a VPN connection
when you connect to the network (see automatically launching a VPN
connection).
• Whenever you are connected to the Internet, you can launch a
configured VPN connection by pressing the VPN button in the Main
Window.
Supported VPN Clients
The Motorola Connection Manager currently supports VPN clients from
the following vendors:
• Microsoft
• Cisco
• Nortel
• Checkpoint (please see Using the Checkpoint VPN Client for important
caveats)
• NetMotion (please see Using the NetMotion VPN Client for important
caveats)
Using the CheckPoint VPN Client
Although CheckPoint's VPN client provides a command line interface that
applications such as the Motorola Connection Manager can use to establish
connections, the user cannot access other modes of the CheckPoint VPN
client while the client is in command line mode.
What does this mean for CheckPoint VPN users? Essentially, you should
keep the Motorola Connection Manager open only when you have an
active connection managed by the Motorola Connection Manager open. If
you want to establish another type of connection with the CheckPoint VPN
client, you MUST shut down the Motorola Connection Manager first.
USBw 100
FEB 2009
29
Creating and Managing Network Profiles
When the Motorola Connection Manager shuts down, it will put the VPN
client back into a mode that users can access.
Using the NetMotion VPN Client
NetMotion's VPN client takes complete control of all data communication
to and from a PC. This forces all data communication applications to go
through the "tunnel" it creates. The Motorola Connection Manager needs to
bypass this tunnel in order to establish connections. The Motorola
Connection Manager will accomplish this in one of the following ways:
• The NetMotion VPN client maintains a list of applications that are
allowed to bypass its VPN tunnel. If your VPN administrator has added
the Motorola Connection Manager to this list, the Motorola Connection
Manager can establish connections without interrupting the operation of
the NetMotion client.
• If the Motorola Connection Manager has not been added to NetMotion's
bypass list, the Motorola Connection Manager will detect that the
NetMotion client is interfering with its operations when it attempts to
establish a connection. When this happens, it will instruct the NetMotion
client to enter bypass mode (which allows all applications to bypass its
tunnel) while the connection is being established. Once the connection
has been successfully established, the Motorola Connection Manager
will return the NetMotion client to its normal operating mode.
30
USBw 100
FEB 2009
Creating and Managing Network Profiles
Creating and Managing Network Profiles
Creating and Managing Network
Profiles
Network Profiles are networks that you have saved at connection time
using the auto-connect options or have manually added to the Network
Profiles network list.
Creating Network Profiles have the following advantages:
You can configure the client to automatically connect to a Network Profile
whenever that network is available.
If the last network you connected to is not available at a particular location,
the Motorola Connection Manager software will display a network from
your list of network profiles in the main window. This allows the same
easy, one click connecting to an alternate network.
You can automate steps in the connection process like entering an
encryption key or logging into a VPN so that you don't have to perform
these actions each time you connect.
You must have a profile for the following:
• You cannot connect to a closed WiFi network unless you create a "closed
network" Network Profile.
• You must have a network profile for each WiFi, WiMAX or Ethernet
network that you wish to connect to.
Creating a Profile for a WiFi Network
Follow these steps to create a WiFi Network Profile:
1. Click the Profiles button in the main window of the Motorola
Connection Manager software. The Network Profiles window will now
be displayed.
2. Click on the WiFi heading in the left pane of the window.
3. Click the Add button to bring up the WiFi page of the new profile
wizard.
4. In the SSID field, enter the broadcast name of the network profile.
Note that the name entered here must match the SSID (Service Set
Identifier) used by the network exactly.
USBw 100
FEB 2009
31
Creating and Managing Network Profiles
5. If you are configuring a profile for a closed network, check this is a
non-broadcast network.
6. If the network whose profile you are configuring does not use WEP or
WPA encryption, no further security configuration is necessary, the
Enable data encryption box should remain unchecked and no further
configuration is necessary on this page.
7. If the network does use WEP or WPA encryption, check the Enable
data encryption box and configure the WiFi data encryption settings
(see Enabling WiFi Data Encryption for instructions).
8. Click Next. The General page appears.
9. Configure the settings on the General page and then click Finish.
Creating an Ethernet Network Profile
Follow these steps to create an Ethernet Network Profile:
1. Click the Profiles button in the main window of the Motorola
Connection Manager software. The Network Profiles window will now
be displayed.
2. Click on the Ethernet heading in the list of profiles on the left side of
the window.
3. Click the Add button. The Ethernet page of the Add Profile Wizard
appears.
4. In the fields provided, enter the criteria that the Motorola Connection
Manager should use when attempting to match this profile to Ethernet
networks that you connect to. You must enter a value in at least one
of these fields (it does not matter which). Additional fields are
optional.
5. Click Next to continue to the IP Properties page.
6. The default selections on the IP Properties page are correct for most
networks. If, however, this particular network requires specific IP
address and/or DNS server settings, you can specify them here.
7. Click Next. The General page appears.
32
USBw 100
FEB 2009
Creating and Managing Network Profiles
8. The settings on the General page are largely personal preference.
Configure these as desired.
9. Click Finish.
How to Edit a Network Profile
Follow these steps to edit an existing network Profile:
1. Click the Profiles button in the main window of the Motorola
Connection Manager software. The Network Profiles window appears.
2. In the left pane, select the network you wish to edit.
3. Click the Edit button. A tabbed interface showing all the user-editable
settings of the selected profile appears. Depending on the type of
profile you are editing, the following tabs may be displayed:
USBw 100
FEB 2009
•
WiFi
•
WiMAX
•
Ethernet
•
Security
•
IP
•
General
33
Creating and Managing Network Profiles
Note: If the profile you are editing was created for you by your
service provider, you may not be allowed to edit some of its settings.
Some of the tabs may not be present for this profile.
4. Make the desired changes.
5. Click the OK button when you are finished.
How to Remove a Network Profile
Follow these steps to remove a network from the Network Profiles
window:
1. Click the Profiles button in the main window of the Motorola
Connection Manager software. The Network Profiles window will now
be displayed.
2. Select the network that you want to remove from the list in the left
pane of the window.
3. Click the Remove button.
4. Click Close to exit the Profile Properties window.
Use this window to add a Network Profile and to edit existing Network
Profile settings.
34
USBw 100
FEB 2009
Creating and Managing Network Profiles
Profile Icons
Each profile listed in the Network Profiles window will have only an icon
next to the name. This icon indicates the technology that this profile uses to
establish connections.
WiMAX
WiFi
Ethernet
Profile Properties: WiMAX
The Motorola Connection Manager will have a default WiMAX profile.
Profile Properties: Ethernet
This window contains the Ethernet-specific settings for Network Profiles.
In the fields provided, enter the criteria that the Motorola Connection
Manager should use when attempting to match this profile to Ethernet
networks that you connect to. You must enter a value in at least one of
these fields (it does not matter which). Additional fields are optional.
DNS Suffix
The name of the DNS domain that this network belongs to. For example,
motorola.com.
USBw 100
FEB 2009
35
Creating and Managing Network Profiles
IP Subnet
Specify possible IP addresses that may be assigned to your Ethernet
interface when you are connected to this network. To specify a range of
addresses, enter only the beginning of the IP address. For example:
172
The profile will be used if the Ethernet interface is assigned
any IP address that begins with 172
172.77
The profile will be used if the Ethernet interface is assigned
any IP address that begins with 172.77
172.77.64
The profile will be used if the Ethernet interface is assigned
any IP address that begins with 172.77.64
172.77.64.5
The profile will be used only if the Ethernet interface is
assigned 172.77.64.5
NT Domain
Specify the Windows NT domain that you will belong to when attached to
this network.
Must Match all Associations
When this box is checked, a network you are connecting to must match
ALL of the values entered above in order to use this profile.
When this box is NOT checked, only one matching value must be found.
Profile Properties: WiFi
This window contains the security settings for WiFi Network Profiles.
Follow these steps to configure WiFi network security.
In the SSID field, enter the broadcast name of the network profile. Note
that the name entered here must match the SSID (Service Set Identifier)
used by the network exactly.
If the network you are configuring is a closed network, check This is a
non-broadcast network.
If the network whose profile you are configuring does not use WEP or WPA
encryption, no further security configuration is necessary, the Enable
36
USBw 100
FEB 2009
Creating and Managing Network Profiles
data encryption box should remain unchecked and no further
configuration is necessary on this page.
If the network does use WEP or WPA encryption, check the Enable data
encryption box and configure the WiFi data encryption settings (click here
for instructions).
Profile Properties: WiMAX
The Motorola Connection Manager will have a default WiMAX profile.
Profile Properties: General
This tab contains settings that apply to all types of Network Profiles.
Note: Some of these options may not be available if you are configuring a
profile created by your network service provider.
Profile Name
Enter a name for this network profile. This is how the network profile will
be displayed in the Network Profiles window.
Connection Options
This setting controls what the Motorola Connection Manager will do when
it detects the network you are configuring. There are three options:
• Select Automatic if you want the Motorola Connection Manager to
automatically connect to this network whenever it is detected.
• Select Prompt me if you want the Motorola Connection Manager to ask
you whether to connect to this network each time the network is
detected.
• Select Manual if you only want to connect to this network manually (by
selecting it from the list of networks and clicking Connect).
VPN Auto Launch
Check this box if you would like to automatically launch your default VPN
profile when you establish a connection to this network.
USBw 100
FEB 2009
37
Creating and Managing Network Profiles
Enable Application Launcher
If this box is checked, the Motorola Connection Manager software will
launch the applications listed on the App Launcher tab of the Settings
window whenever it establishes a connection to the network whose profile
you are configuring.
If this box is not checked, the specified applications will not be launched.
Disable IE's Manual Proxy Settings...
If you normally connect to the Internet through a proxy server (this is
common on corporate LANs), you may experience difficulty connecting to
the Internet with Internet Explorer when you are traveling. This is because
Internet Explorer is trying to connect through a proxy server that is on your
home network rather than on the network to which you are connected.
If this is the case, you may wish to disable Internet Explorer's proxy
settings while you are connected to other networks. Check this box to
disable proxy settings while you are connected using this profile.
Launch Browser Window on Connect
Check this box to automatically launch your browser each time you connect
to this network. If you want the browser to start at a particular web page
each time you connect to this network, enter the address of the desired web
page in the box below.
Profile Properties: IP
The IP Settings page allows you to configure the Internet Protocol (IP)
addressing to be used with this Profile. You will not need to alter these
values unless specifically instructed to by your administrator.
Profile IP Address
The top group of settings specifies the IP address that your system will use
when connected to this network. The default selection, Obtain IP address
automatically, instructs the Motorola Connection Manager to ask the
network to assign it an appropriate address each time it connects. This is
the correct setting for most network profiles.
If the network does not support automatic address assignment, you can
enter appropriate values manually by clicking Use the following IP
address. Contact the administrator of the network whose profile you are
configuring to obtain appropriate values for these fields.
38
USBw 100
FEB 2009
Creating and Managing Network Profiles
Profile DNS server
Obtain DNS server address automatically, instructs the Motorola
Connection Manager to ask the network to provide the address of a server
each time it connects. This is the correct setting for most network profiles.
Use the following DNS server address, contacts the administrator of the
network whose profile you are configuring to obtain appropriate values for
these fields.
Advanced Button, will configure detailed settings for DNS and WINS
servers.
Profile Properties: Security
This page specifies which protocols your mobile device can use to send
your password to the Mobile network. Your Mobile device will be
permitted to use any of the protocols that are checked on this page. If
multiple boxes are checked, your device will negotiate with the Mobile
network to select the best protocol to use out of those that you have
checked.
USBw 100
FEB 2009
39
Creating and Managing Network Profiles
40
USBw 100
FEB 2009
Creating and Managing Network Profiles
Creating and Managing Network Profiles
The Motorola Connection Manager
Settings
The Settings Window
The "Settings" window allows you to configure the behavior of the
Motorola Connection Manager software. These settings control how the
client connects to networks, the sounds it produces, when it retrieves
updates and how it handles conflicting applications.
Select Settings from the Tools menu as shown below:
For information on the individual settings tabs, see the following:
• App Launcher Tab
• Application Tab
• Sounds Tab
• Updates Tab
• VPN Tab
• Hardware Tab
USBw 100
FEB 2009
41
Creating and Managing Network Profiles
Settings: Application
The Application tab contains general settings for the Motorola Connection
Manager.
User interface is always on top
The Motorola Connection Manager will always appear on top of other
application windows.
Enable splash screen
The Motorola Connection Manager will display a splash screen while it
loads. If you don't want the splash screen to be displayed, remove the
check mark from this box.
Automatically run this application...
The Motorola Connection Manager will be automatically launched each
time you start Windows.
Display connection timer
This box controls whether the connection timer will be displayed in the
main window. When the box is checked (default), the timer will be
displayed. When the box is unchecked, the timer will not appear.
Reset all warning messages
The Motorola Connection Manager provides various warning messages
that can be disabled if you do not want to see them. For example, the
connection software will warn you that you will lose network connectivity
if you close the application. These warning dialogs provide you with a
method to turn off the warning. You can turn these warning messages back
on by pressing the Reset button.
The list of applications on this tab will be automatically launched when
connections are established with particular network profiles. In addition to
adding and removing applications from this list, you can specify their
launch options and how the Motorola Connection Manager should respond
if one of these applications is shut down.
42
USBw 100
FEB 2009
Creating and Managing Network Profiles
Settings: Hardware
The Hardware tab displays information about the devices connected to
your computer. The following items can be found on this tab:
The Device List
This four column table takes up most of the tab's area. It is a list of all the
devices connected to your computer that may be used to establish network
connections. You can do the following here:
Enable and disable individual devices.
Choose which device to use.
For more information, see The Device List.
Allow simultaneous connections
If this box is checked, the Motorola Connection Manager will allow you to
establish more than one connection at a time (you could be connected to
both WiFi and WiMAX concurrently).
If this box is NOT checked, the Motorola Connection Manager will prompt
you to disconnect before allowing you to establish a second connection.
Prompt before switching connections
The Motorola Connection Manager software can automatically switch to a
higher priority network if one becomes available. The original connection is
shut down when the new connection is fully established, this has the
potential to disrupt any activity that was relying on the original connection.
The Motorola Connection Manager will prompt you for permission to
switch networks before it actually does so.
Include support for other network connections
When this box is checked, the Motorola Connection Manager will monitor
devices listed in the "Other Devices" group. When it detects that a device
listed in this group has established a connection, it can respond by shutting
down its own connections. For example, it can shut down a wireless
connection it has established when you connect to an Ethernet network. For
a disconnection to occur, both of the following must also be true.
In the Device List, the "other" device which has established a connection
must be selected in the "Other Devices" group (to see which devices are
currently selected, set the menu in the Selected column to "Manual").
USBw 100
FEB 2009
43
Creating and Managing Network Profiles
In the Network Profiles window, "Other Connections" must be listed above
the profile for the network to be disconnected. See Profile Priorities for
more information.
When this box is not checked, the Motorola Connection Manager will not
respond to connections established by "Other Devices."
The Profiles Button
Click this button to open the The Network Profiles Window.
Settings: Sounds
The Sounds Tab allows you to instruct the Motorola Connection Manager
to play a sound when various events occur. It also allows you to specify the
sounds that the Motorola Connection Manager plays. To enable this
feature, check the Enable sounds box. Once the feature is enabled, the
playing of an individual tone can be enabled by checking the box that
corresponds to the tone you wish to play. Click Browse to select the sound
file that you wish to play (a Windows .WAV file). You can specify sounds
for the following events:
Connected
Enables the playing of a tone when the Motorola Connection Manager
successfully connects to a WiFi network.
Lost Connection
Enables the playing of a tone when the Motorola Connection Manager
disconnects from or loses its connection to a WiFi or Ethernet network.
Hot Spot Authentication
Enables the playing of a tone when the Motorola Connection Manager
associates with and connects to a Hot Spot.
Settings: Updates
The Updates tab allows you to specify how often the Motorola Connection
Manager attempts to retrieve updates to its software and its databases.
44
USBw 100
FEB 2009
Creating and Managing Network Profiles
Automatically download and install
The Motorola Connection Manager will automatically download and install
product updates at regular intervals.
Prompt me to download and install
The Motorola Connection Manager will periodically prompt you to
download and install product updates.
Manually download and install
Product updates will be downloaded only when you manually initiate the
download process using the Update Now button below.
Update Now
The Motorola Connection Manager will check for available updates now.
Settings: VPN
The VPN tab specifies how the Motorola Connection Manager accesses
Virtual Private Networks. The top item, Do Not Use VPN, disables the
Motorola Connection Manager's capacity to log into VPNs. This is the
correct setting if you do not wish to establish connections to Virtual Private
Networks.
You must choose one of the other three options and fill in the
corresponding fields if you wish to do either of the following things:
Connect to a VPN by clicking the VPN button in the main window.
Automatically log into a VPN when you connect to a specific network (see
Automatically Launching a VPN Connection).
If the VPN client software you are using is supported by the Motorola
Connection Manager and you want to manually specify your connection
information, select Define VPN login info and then enter the VPN profile
information in the provided fields.
If the VPN client software you are using is supported by the Motorola
Connection Manager and you already have a connection profile configured
for that VPN client, select Use existing VPN profile. Then, specify the
client software and the login profile that you want to use.
If the VPN client software you are using is NOT supported by the Motorola
Connection Manager, select Use third party VPN client. Then, click the
Browse button to specify the location of the client software that you are
USBw 100
FEB 2009
45
Creating and Managing Network Profiles
using. Users may also connect to any other 3rd party VPN client using a
command line interface. Please note that when this command line interface
is used, the Motorola Connection Manager application shall be unable to
display and track VPN status information as is possible with preconfigured VPN clients.
46
USBw 100
FEB 2009
Creating and Managing Network Profiles
Creating and Managing Network Profiles
Support and FAQ
Technical Support
Contact your Internet Service Provider. Be sure to include the version of
Windows and the type of wireless card you are using as well as description
of the problem you are experiencing.
Event History
The event history is available from the Help Menu from the main window.
Click Help > Event Manager History to see the client events that have been
logged. The window shown below will appear.
You can do the following in this window:
• Double-click on any item in the list to see more information about that
event.
• Use the options in the Filter by box to limit the events displayed to a
particular date range, connection technology or event type.
• Click on the Reset Event History Manager button to delete all the
currently-logged events and reset the usage data at the bottom of the
page to zero.
USBw 100
FEB 2009
47
Creating and Managing Network Profiles
Frequently Asked Questions
Which operating systems does the Motorola Connection Manager
support?
The Motorola Connection Manager supports Windows XP (Home Edition/
Professional). Windows Vista Ultimate, Home Premium, Home Basic,
Business, and Enterprise are also supported (32 and 64 bit versions). See
System Requirements for more information on supported system
configurations.
The Motorola Connection Manager launched, but no card is detected.
Please verify that your WiFi/WiMAX card or USB client is on the
supported hardware list. Check the drivers and firmware.
Why can't the Motorola Connection Manager find a network?
The Motorola Connection Manager will continue to scan until it finds one
or more available networks or Hot Spots. Wireless providers can easily
update a user's local database of WLAN Hot Spots.
How do I connect to a network?
When The Motorola Connection Manager finds one or more available
networks, click on the Connect button. If more than one network is found,
click on the menu button and select a network by double-clicking on the
network, or click on the Connect button.
How do I stop the client from launching every time I restart my PC?
Follow these steps:
1. Select Settings from the Tools menu.
2. Select the Application tab.
3. Remove the check from the Automatically run this application on
machine startup box.
4. Click OK.
48
USBw 100
FEB 2009
Creating and Managing Network Profiles
Why do I keep losing my connection?
This may be due to interference caused by other devices like cordless
phones, microwave ovens and other 2.4 GHz band devices.
Why am I unable to connect to a signal that I can see in the Motorola
Connection Manager Mobile?
Signal strength from the wireless access point may not be strong enough to
allow reliable connections.
It may not be a publicly available access point. Many companies or
campuses will use wireless networking within their buildings, but will not
grant public access.
Does the Motorola Connection Manager support WEP Encryption?
The Motorola Connection Manager supports ASCII 64, 128 and HEX 64,
128.
Does the Motorola Connection Manager support VPN?
The Motorola Connection Manager's VPN auto-launch allows users to
automatically initiate secure wireless connections using their existing
security mechanisms.
Who can I contact if need assistance with the Motorola Connection
Manager?
If you need assistance with the Motorola Connection Manager, contact your
Internet Service Provider.
USBw 100
FEB 2009
49