1
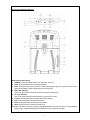
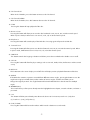
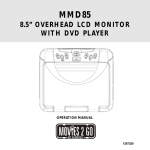
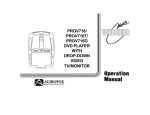
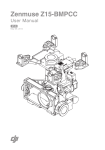
Important Notice
It is unlawful in most jurisdictions for a person to drive a motor vehicle which is equipped with a television
viewer or screen that is located in the motor vehicle at any point forward of the back of the driver's seat, or
that is visible, directly or indirectly, to the driver while operating the vehicle. In the interest of safety, the
VOD1048 should never be installed where it will be visible, directly or indirectly, by the operator of the motor
vehicle.
Patent NOS. 5,775,762 and 5,927,784
Warnings
Do not use any solvents or cleaning materials when cleaning the video monitor.
Do not use any abrasive cleaners, they may scratch the screen. Use only a lightly dampened lint free cloth
to wipe the screen if it is dirty. Lock the LCD screen in the fully closed position when not in use. Before
putting on headphones always adjust the volume setting to the lowest position. Remember to leave the
dome light switch in the off or auto positions when the vehicle is unattended, as the dome lights, if left on,
can drain the vehicle•s battery. Do not put pressure on the screen. Caution children to avoid touching or
scratching the screen, as it may become dirty or damaged.
Television Reception
This entertainment system is designed primarily for viewing prerecorded movies or playing video games.
Television reception in a moving vehicle will be limited and in some areas will not be possible due to weak
and variable signal strength. Television viewing in a stationary vehicle will result in an improvement, but
may still be marginal due to signal strength. The quality of the picture will not be consistent with home TV
reception. Reception may be affected by weather and distance from TV station. A weak signal may cause
the picture to roll, be snowy, or cause some color loss.
Congratulations on your purchase of the Audiovox VOD1048 Overhead TV/Monitor with DVD Player. The
VOD1048 has been designed to give you and your family many years of video entertainment in the mobile
environment. Please read the directions that follow to familiarize yourself with the product and to ensure
that you obtain the best results from your equipment.
Please NOTE: Installation options vary; see the individual owner's manuals for each component in your
system to obtain a full understanding of each components operation.
Safety Precaution
For safety reasons, when changing video media it is recommended that the vehicle is not in motion, and
that you do not allow children to unfasten seat-belts to change video media or make any adjustments to the
system. System adjustments can be accomplished using the remote control unit, while seat belts remain
-1-
fastened. Enjoy your Audiovox entertainment system but remember-safety of all passengers remains the
number one priority.
Features
· 10.4 Inch (4:3) TFT (Thin Film Transistor) Active Matrix LCD Monitor
· Built-in DVD Player
· Built-in TV Tuner
· AUX Input (for Game/Camcorder)
· OSD (On Screen Display)
· Audio Video Output Jacks
· Two Channel Infrared Transmitter for IR Wireless Headphones
· IR Repeater Sensor
· Headphone Jacks (DVD / TV / Monitor)
· Forward and Rear Remote Sensor
· Dome Lights with Switch
· Backlit Controls for Low Light Operation
· Last Position Memory for DVD
· DVD-R & CD-R/RW Compatible
· Anti-Shock Buffer Memory
· Multi-Angle Support
· Multi-Subtitle Support
· Full Function Remote Control
-2-
Controls and Indicators Diagram
Main Function Descriptions
1. POWER; Press the POWER button to turn the power on and off
2. STOP: Press the STOP button to stop disc playback
3. PLAY: Press the PLAY button. The DVD or Audio CDs will begin to play. If you press the PLAY button
again while the DVD or Audio CDs playing, the DVD will pause.
4. DVD L.E.D. Indicator
This L.E.D. indicator will be illuminated when you select the DVD mode.
5. TV L.E.D. Indicator
This L.E.D. indicator will be illuminated when you select the TV mode.
6. Previous: Pressing this button will select the previous chapter.
7. Exit: Pressing this button will exit the DVD menu.
8. Next: Pressing this button will select the next chapter.
9. Menu: Press this button to access the DVD menu.
10. Enter: This button is used to choose the highlighted selection from the OSD menu. (If the highlighted
selections are numbered the appropriate number key on the remote may be used.)
-3-
11. Eject
DVD disc is stopped and ejected by pressing this button.
12. DVD Disc Insertion Slot
With the label surface up, gently insert the disc into the slot until the loading mechanism engages
and the DVD disc is pulled into the unit.
13. Infrared Transmitter and Sensor
Used to transmit audio to wireless headphones. Also allows the remote control to operate the
VOD1048 and to control other accessories in the system
14. Dome Lights
Provides additional interior illumination.
15. Three Position Dome Light Switch
· Auto Automatically switches on the dome lights in conjunction with the vehicle's interior illumination.
· Off … The dome lights will not turn on in this position.
· On … Turns on the dome lights. Do not leave the switch in this position as it will drain the vehicle
battery.
16. Screen Release
Slide in direction of the arrow to release the drop down screen.
17. Side Remote Sensor Eye
Allows the remote control to operate the VOD1048 and control the other accessories.
18. Headphone Jack
Allows the use of wired headphones with a 1/8" plug for listening to video program audio.
19. Aux input jack
Auxiliary Audio input (Right and Left Channel) and Video input
20. Headphone jack
Allows the use of wired headphones with a 1/8" plug for listening to video program audio.
NOTE: Audiovox recommends the use of the Audiovox HP275 Headphones when using wired headphones.
B A T T E R Y IN S T A L L A T ION
Before attempting to operate your Remote Control, install the batteries as described below.
1) You can use your remote controller within a distance of 7~10m and an angle of 30 degrees from the left
and right sides of the remote Sensor Eye of VOD1048.
2) Install two "AA" batteries as shown. Make sure that proper polarity (+ or -) is observed.
3) The remote control will operate the VOD1048 and most Audiovox VCP's. It is not a universal remote
control and will not control equipment from other manufacturers.
-4-
REMOTE CONTROL OPERATION
-5-
REMOTE CONTROL FUNCTION DESCRIPTIONS
1. POWER ON/OFF
Press this button to turn the VOD1048 on. The selected video source (DVD/TV/AUX) will be displayed on
screen and the picture will appear in a few seconds. Press the button again to turn the VOD1048 off.
2. SOURCE (DVD/TV/AUX/MONITOR) Button
Video equipment connected to the AUDIO/ VIDEO inputs can be selected and displayed on the LCD
display screen by pressing the button. Each time the button is pressed, the Audio / Video source will
change in the following order DVD, TV, AUX and MONITOR.
3. AUDIO
This button allows you to select the language you prefer from the menu. Note that not all DVDs support
this function.
4. MENU
Pressing this button will enable user to select the DVD main menu.
5. TITLE
Pressing this button will go to the DVD root menu.
6. EJECT/LOAD
Pressing this button will eject or load a disc.
7. LEFT
Use this button to navigate through the menu selections.
8. UP
Use this button to navigate through the menu selections.
9. RIGHT
Use this button to navigate through the menu selections.
10. DOWN
Use this button to navigate through the menu selections.
11. SELECT
Use this button to select the highlighted menu selection.
12. ZOOM
Pressing this button will allow you to enlarge the picture by x2, x3, x4, or reduce by x1/2, x1/3, x1/4.
You may then pan the display by pressing the four arrow buttons (7, 8, 9 and 10).
13. VOLUME UP
Use this button to increase the volume level of the headphone jacks.
14. VOLUME DOWN
Use this button to decrease the volume level of the headphone jacks.
15. MUTE
Pressing this button will mute the audio output.
-6-
16. T V C hannel UP
When in the T V Mode, pres s this button to increas e the T V channel.
17. T V C hannel DOWN
When in the T V Mode, P res s this button to decreas e the T V channel.
18. S T OP
P res s ing this button will s top playback of the dis c.
19. R evers e S c an
P res s ing this button will allow you to s can the dis c backwards at x2, x4, x8, x16, x32 the normal s peed.
When in paus e mode, it will revers e s can at x1/2, x1/4, 1/8, x1/16 the normal s peed.
20. P lay/P aus e
P res s ing this button will s tart the play of the DV D dis c. P res s ing again will paus e the DV D dis c.
21. F orward S c an
P res s ing this button will allow you to s can the dis c forwards at x2, x4, x8, x16 x32 the normal s peed. When
in paus e mode, it will forward s can at x1/2, x1/4, 1/8, x1/16 the normal s peed..
22. S UB T IT L E
T his button controls the language s election and allows you to choos e whether the s ubtitles are on or off.
23. S E T UP
P res s ing this button will allow for player s ettings s uch as G eneral, Audio, V ideo, P references and P as s word
s et up.
24. DIS P L A Y
T his button turns the s creen dis play on and off. T his will dis play various playback information of the dis c.
25. A NG L E
If the DV D dis c contains s equences recorded from different camera angles , pres s ing the button caus es the
angle icon to appear and will s how you the number of camera angles available and allows you to
change the angle if you wis h. T he angle function will not work with DV D dis cs that do not have multiple
angles .
26. NUMB E R (0-9)
T hes e numeric keys allow you to directly enter the highlighted menu chapter, or track s election, and enter a
pas s word.
27. +10
T his button will allow you to directly enter the tracks above 10. F or ins tance, track 17 is (+10), then
(7). T rack 21 is (+10), (+10), then (1).
28. C L R (C L E A R )
P res s ing this button will clear track numbers while in track s election or s earch mode.
-7-
29. VCP POWER (A/B)
When in VCP Mode, Press this button to turn the VCP on.
When in DVD Mode, Multiple presses of this button will allow you to repeat a sequence A to B audio or A
to B video. To set the starting point, press once, and to set the ending point, press a second time. To
cancel the repeat sequence, press a third time.
30. STOP (RETURN)
When in VCP Mode, Pressing this button will stop playback of the Video Cassette.
When in DVD Mode, This button will allow you to go back to last playing position from Menu screen.
31. REPLAY (PROGRAM)
When in VCP Mode, Pressing this button will replay the Video Cassette.
When in DVD Mode, Pressing this button will allow you to make a favorite program list with program
button on CD or on MP3 disc.
32. (REVERSE SCAN)
When in VCP Mode, Pressing this button will play fast reverse.
When in DVD Mode, this button will allow you to select the time display mode.
33. ( PLAY)
When in VCP Mode, Pressing this button will play the Video Cassette.
When in DVD Mode, This button selects TV type such as NTSC, PAL and Auto.
34. (FORWARD SCAN)
When in VCP Mode, Pressing this button will play fast forward.
When in DVD Mode, This button will select repeat mode such as Repeat disc, Repeat track, and Repeat
off.
35. PREVIOUS
Pressing this button will select the previous track or chapter.
36. NEXT
Pressing this button will select the next track or chapter.
Overhead Dome Lights
The lights integrated into the VOD1048 are
controlled
by aintegrated
three-position
slide switch.
The lights
into the
Sliding
the switch
to the on position
will turn
VOD1048
are controlled
by a threeSliding
the position
lights on.slide
Theswitch.
off position
willthe
prevent the
switch
the onon
position
will turn
lights
fromto
turning
at all times,
andthe
the
Dome Li ght
on. The
off position
will to
prevent
autolights
position
will allow
the lights
turn on
Switch
from
turni' oninterior
at all times,
andthe
off lights
with the
vehicle's
lighting.
andtothe
positionManual
will allow
Refer
theauto
Installation
forthe
the wire
lights to turn
off the
withvehicle
the
connections.
Do on
notand
leave
vehicle•swith
interior
Refer
to the
unattended
the lighting.
dome light
switch
in the
Installation
forresult
the wire
on position,
as Manual
this could
in a
connections.
Do not leave the vehicle
discharged
battery.
-8-
Remote Sensor
Remote Sensor
Eyes
The VOD1048 incorporates two Infrared sensors, which relay signals from the remote control to allow the
unit to be controlled simply by pointing its remote control at the remote sensor eye. The repeater function
allows control of auxiliary equipment such as an Audiovox Video Cassette Player. The infrared sensor can
relay signals from most manufacturers’ remote controls to its respective component connected to the Video
1 input. In this case you must use the remote control supplied with the component.
Wireless Headphones (Optional)
The VOD1048 includes a built-in dual channel infrared transmitter for use with Audiovox wireless
headphones (Audiovox Part Number IR2CHS-Dual channel). The volume can then be adjusted using the
controls on each headset. The wireless headphones must be used within a line of sight from the transmitter,
as infrared transmissions, like visible light travel only in a straight line. See the documentation
accompanying your Audiovox wireless headphones.
Wireless Headset Special Features (Optional)
• Automatic Level Control prevents input signal overloading.
• Uses high frequency infrared light to assure a clean signal for clear reception.
IR2 Input
Any line level audio source may be connected to this input (Satellite Radio, CD Changer etc). The audio
program connected to the IR2 input can be received on the B channel of the dual channel wireless
headphones (Audiovox Part Number IR2CHS).
-9-
Wired Headphones
Any standard wired headphones with a 1/8 jack can be connected to the headphone jacks.
Wired FM Modulator
The VOD1048 is equipped with audio output jacks that can be connected to an optional FM Modulator
(Part Number FMM100A) to allow the audio to play through the vehicle radio.
DVD OPERATION
Playing a Disc
1 Press the DVD button on your remote control and insert the disc it will automatically begin playback
2 If you have stopped a disc that was playing, you can restart a disc by pressing the Play/Pause button on
the faceplate or your remote control.
Pausing a Disc
To pause a disc that is playing, press the Play/Pause button.
Stopping a Disc
1 To stop a disc that is playing, press the Stop button on your remote control.
2 The disc can be restarted in the same place by pressing the Play/Pause button.
Selecting a Chapter Using the DVD Menu
Most DVDs contain a root menu that, among other options allows you to select a specific chapter
to play. To use the DVD menu to select a chapter to play, follow the stops below:
1. Press the Menu button on either the remote control or the front panel. The DVD menu is displayed.
2. Use the direction arrows to highlight the chapters option in the menu and press SELECT.
3. Use the direction arrows to highlight the chapter that you want to play and press SELECT. The menu is
closed and the chapter is immediately played.
Playing from a Specific Time in a Title or Track
This feature is available for audio discs and other discs that support the ability to move to a specific time in
a track or title. For example, if a track is 5 minutes and 38 seconds long you can select to start playing
from 5 minutes and 8 seconds so that you only listen to the last 30 seconds of the track.
-10-
1. Press the DISPLAY button on your remote control until the Time option is displayed in the top left
corner of the screen (CD) or the Main Menu screen is displayed (DVD).
2. Use the number buttons on your remote control to enter the time that you want to move to in the
format: mm:ss.
3. When you have finished entering the time, the Time option is closed and the track or title is played
from the time entered.
Playing a Specific Track or Chapter and Title
1. Press the DISPL AY button on your remote control until either the Track or Title and Chapter option is
displayed or the Main Menu screen is displayed.
2. Use the cursor button to highlight "Chapter" and then press the Enter button.
3. Use the number buttons on your remote control to enter the track or title and chapter that you want to
play and then press Enter.
Skipping Through the Chapters or Tracks
As you are playing a disc you can skip to the next or to a previous chapter (on a DVD) or track (on a audio
disc). This is carried out using the Next and Previou s buttons as follows:
To skip to the beginning of the next chapter or track, press the Next button .
To skip to the beginning of the current chapter or track, press the Previous button.
To skip to the beginning of the previous chapter or track, press the Previous button twic e.
Using the Repeat Features
The repeat feature allows you to repeat a section of a disc once it has finished playing. The following items
can be repeated:
The entire disc
A single track
A single chapter
A single title
A section of the disc between two selected points
Repeating a Track, Chapter, or Title
1 Play the track, chapter, or title that you want to repeat.
2 Press the REPEAT MODE button on your remote control until the required repeat mode is displayed in
the top left corner of the screen. This can be Repeat Track, Repeat Chapter, or Repeat Title. When the
disc reaches the end of the selected track, chapter, or title, it will start playing it again.
3 To stop track repeat, press the REPEAT MODE button again until Repeat Off is displayed in the
top left corner of the screen.
Repeating a Section of any Disc
1 Press A > B once to start selection to select the starting point A.
2 Press A > B again to finish selection to select the ending point B.
3 To cancel selection press A > B again.
Playing a Disc at Different Speeds
1 You may play a disc at different speeds in both forward and reverse directions.
2 To play the disc at different speeds in a forward direction use the Forward scan button on your remote
control. The speeds that can be achieved are:
X2, X4, X8, X16 and X32 for DVDs and video CDs.
X2, X4, X8, X16 and X32 for audio discs and mp3s. The audio can be heard at all speeds.
-11-
3 To play the disc at different speeds in reverse use the Reverse scan button on your remote
control.
The speeds that can be achieved in reverse are:
X2, X4, X8, X16, X32
Changing Main Menu with Display Key
1. To display the Main Menu for the disc that is playing, press DISPLAY on your remote control.
2. The Main Menu is available to change the way the disc is playing.
Changing a Title, Chapter to play
Changing Audio Language
Selecting to view Subtitle
Changing the Angle of View
Entering a Time to Play
Setting a Item to Repeat
Changing the Time Display
Select/the
Enter
button.
3. Select
options
by highlighting the desired option using the cursor buttons then press the
Using the Setup Menu
Once the initial settings have been completed, the player can always operate under the same conditions
whenever the power is switched on. These settings are called SETUP data that are easily modified and
stored using the SETUP menu. The SETUP menu includes the information for GENERAL, AUDIO,
VIDEO, PREFERENCES and PASSWORD controls.
1. Press the STOP button twice, if the disc is being played.
2. To display the SETUP menu, press the SETUP button.
3. Use the Cursor buttons to highlight the desired item.
5. Press
To exitenter
the SETUP
menu,
press the SETUP
4.
to select
the highlighted
item. button again
GENERAL SETUP
TV DISPLAY You can
select the aspect ratio according to your TV. If the TV on which the
(LetterBox)
movie
is played is 16:9 "WIDE". If it is 4:3 type, choose NORMAL/PS (Pan & Scan) or NORMAL/LB
ANGLE MARK You can set up so that the angle mark appears on scenes that contain angle options.
OSD LANGUAGE …You can select an OSD language such as English, French, Spanish, etc .
CAPTIONS … Adjust caption options.
SCREEN SAVER … Adjust Screen Saver options.
LAST MEMORY … Adjust Last Memory selections
AUDIO SETUP
SPEAKER… You can select various speaker settings.
DOLBY DIGITAL… Choose Stereo or Mono mode and adjust Dynamic range.
EQUALIZER … Choose the desired preset equali ze r mode.
3D PROCESSING …Use this option to make a reverb effect if you prefer.
HDCD… Adjust the desired Filter frequency.
VIDEO SETUP
Quality… Adjust Video quality controls such a s Sharpness, Brightness, Contrast, Gamma, Hue and
Saturation etc.
-12-
PREFERENCE SETUP
You can select a preference Setup such as:
TV Type: You can select TV Type (PAL, MULTI, NTSC)
PBC: You can select PBC ON and OFF.
AUDIO: Choose the desired language.
SUBTITLE: Choose the desired language.
DISC MENU: Choose the desired language.
PARENTAL Setting: You can select the rating level.
DEFAULT Reset: Setup Menu can be reset to DEFAULT Value.
PASSWORD SETUP
Select the Password option.
Enter your old password and pres s enter. E nter a new password and pres s E nter.
Re-enter your new password to confirm then press the ENTER button.
Note: T he Default P as s word is 3308. T his pas s word is always effective even after you have s elected
your own pas s word and changed it. T o avoid the pos s ibility of others us ing the default pas s word
to s et the parental level and change the pas s word, you can record this default pas s word in another
area and delete it from this manual. S ome dis cs can be limited depending on the age of us ers while
s ome dis cs cannot.
-13-
SOUND AND PICTURE SETUP
Adjusting the sound settings
The sound settings can be adjusted to suit your personal preference: TREBLE, BASS, BALANCE.
Press the MENU button.
The PICTURE menu is displayed.
1. Use the (7) or (9) button to move to the SOUND menu.
2. Use the (8) or 10) button to select one of the following options:
TREBLE
BASS
BALANCE
3. Press the SEL (11) button.
4. Press the (7) or (9) button to adjust the setting to suit your
personal preference.
5. Press the MENU button repeatedly until the menu disappears.
-14-
CONTRAST, BRIGHTNESS, SHARPNESS, COLOR, TINT
1. Press the MENU button. The PICTURE menu is displayed.
2. Press the SEL button.
3. Adjusting the picture settings
Use the (8) or (10) button to select one of the following options:
CONTRAST
BRIGHTNESS
SHARPNESS
COLOR
TINT
4. Press the (7) or (9) button to adjust the setting to your personal preference.
5. Press the MENU button repeatedly until the menu disappears.
-15-
[MEMO]
-16-
TROUBLESHOOTING
Symptom
Possible Cause
Unit does not turn on
• Main Power Switch
turned off
• No Power
Disc does not play
Solution
• Press in Main Power Switch
• Check fuses and that the ACC power is on
• Disc is loaded
• Load disc label-side up
Improperly
• Incorrect disc type
• Check to see that disc is CD, CD-R, CD-RW,
VCD, MP3-CD, DVD-R, DVD-RW or DVD Movie : Other types
will not play.
• Invalid Region Code
• Use Region 1 disc only.
• Rating is above
• Enter password to override or change
parental preset
rating settings
• Dirty disc
• Make sure the disc is free from scratches
and dirt
No picture
• Intermittent connections • Check all video connections
• Wrong input on monitor • Check input selection of TV or receiver
No sound
• Intermittent connections • Check all audio connections
• DVD disc is in fast or
• There is no audio playback on DVD discs
slow mode
during fast or slow modes
Picture is distorted or
• MPEG-2 decoding
jumps during fast forward
or reverse
• Some functions are prohibited by the DVD
software.
Some remote buttons
do not operate during
DVD play : prohibited
symbol appears (see
next page)
• MPEG-2 decoding
The OSD menu is in a
foreign language
• Incorrect OSD language • Change OSD language selection
The symbol appears
• Requested function not • Some functions are prohibited by the DVD
available at this time
software.
Picture is displayed in the • Incorrect match of
wrong aspect ratio
aspect-ratio settings to
disc
• It is a normal artifact of DVD playback for
pictures to jump or show some distortion
during rapid play
• Change aspect ratio settings
Remote control
Inoperative
• Weak batteries
• Sensor is blocked
• Change both batteries
• Clear path to sensor
The picture has
occasional distortion
• Damaged disc
• Make sure the disc is free from scratches
and dirt.
MP3 discs won’t read or
they skip
• Incorrect record format
• Make sure CD is not recorded with variable
bit rate
• Re-record the CD at a slower rate
-17-
12 MONTH -LIMITED WARRANTY
Copyright 2004 Audiovox Corp. 150 Marcus Blvd. Hauppauge, NY 11788
128-7069A