1
If you leave the BHT with the battery cartridge discharged or with no battery cartridge
loaded or if you replace the battery cartridge in a wrong way, the BHT may lose the
data stored in it.
Before cold booting (refer to "Warm and Cold Booting" on page 22), it is recommended
that important data be saved into the FLASH folder or uploaded to the host computer.
Cold booting will erase all data stored in the RAM.
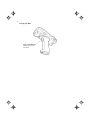
The shape of the projected area marker differs according to the original target market.
This hand-held scanner with built-in area marker should not be used in the United
States and Canada as it does not meet the specifications required for use there.
All products and company names mentioned in this manual are trademarks or
registered trademarks of their respective holders.
The latest precision manufacturing technology yields LCD panels whose pixels are 99.99%
defect free. The downside, note, is that up to 0.01% of the pixels can remain permanently dark
or lit on today's state-of-the-art panels.
Thin Newton's rings (rainbow-like patterns) may appear on the touch screen.
This does not necessarily indicate a problem with the touch screen.
The shape of the projected area marker differs according to the original target market.
This hand-held scanner with built-in area marker (five-point) is designed for use in the United
States and Canada only and should not be used in any other country.
● DENSO WAVE INCORPORATED does not assume any product liability arising
out of, or in connection with, the application or use of any product, circuit, or
application described herein.
● If it is judged by DENSO WAVE INCORPORATED that malfunction of the product
is due to the product having been dropped or subjected to impact, repairs will be
made at a reasonable charge even within the warranty period.
● Intellectual Property Precaution
DENSO WAVE INCORPORATED ("DENSO WAVE") takes reasonable
precautions to ensure its products do not infringe upon any patent of other
intellectual property rights of other(s), but DENSO WAVE cannot be responsible
for any patent or other intellectual property right infringement(s) or violation(s)
which arise from (i) the use of DENSO WAVE's product(s) in connection or in
combination with other component(s), product(s), data processing system(s) or
equipment or software not supplied from DENSO WAVE; (ii) the use of DENSO
WAVE's products in a manner for which the same were not intended nor
designed; or (iii) any modification of DENSO WAVE's products by other(s) than
DENSO WAVE.
Related Publications
BHT-202Q-CE/BHT-202QW-CE User's Manual (This manual can be downloaded from
our Web site given below.)
Instructions for using the handy terminal (BHT-202Q-CE/BHT-202QW-CE) and
optical communication unit (CU-200).
BHT-200-CE API Reference Manual (This manual can be downloaded from our Web site
given below.)
Description for developing application programs for the handy terminal in Microsoft
eMbedded Visual C++ 4.0.
DENSO WAVE INCORPORATED
http://www.denso-wave.com/
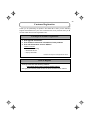
Equipment Check
Ensure that none of the following items are missing prior to use. Please contact
your dealer if any of the items are missing or damaged.
Please refer to previous page for details of related manuals such as the User’s
Manual.
Unit (BHT-202Q-CE, BHT-202QW-CE)
Operator’s Guide
(This manual)
Hand strap
Grip style unit
User’s Manual (for BT-20LB)
Touch-pen (Stylus)
Rechargeable battery: BT-20LB
(Lithium-ion battery) (1)
1
Contents
SAFETY PRECAUTIONS...........................................................................................................2
Components and Functions........................................................................................................7
Operating the Touch Screen ..................................................................................................... 11
Windows Desktop on the LCD.................................................................................................. 11
Reading 2D Codes and Bar Codes ..........................................................................................12
Using Radio Link.......................................................................................................................14
Using Infrared Link....................................................................................................................15
Loading the Battery Cartridge...................................................................................................16
Calibrating the Touch Screen....................................................................................................19
BHT Turning-off Notes ..............................................................................................................20
Battery Replacement Notes......................................................................................................21
Warm and Cold Booting............................................................................................................22
About Status Indicators.............................................................................................................24
Setting the Backlight .................................................................................................................26
Adjusting the Beeper Volume, Switching the Beeper & Vibrator, Calibrating the Touch Screen,
and Setting the Backlight ..........................................................................................................28
Error Messages ........................................................................................................................33
Proper Care of the BHT ............................................................................................................35
Handling Notes .........................................................................................................................36
US and Canada Regulations ....................................................................................................37
Customer Registration ..............................................................................................................39
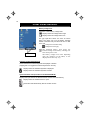
2
SAFETY PRECAUTIONS
Be sure to observe all these safety precautions.
Strict observance of these warnings and cautions is a MUST for preventing
accidents which could result in bodily injury and substantial property damage. Make
sure you fully understand all definitions of these terms and symbols given below
before you proceed to the text itself.
Alerts you to those conditions which could cause
serious bodily injury or death if the instructions are not
followed correctly.
Alerts you to those conditions which could cause
minor bodily injury or substantial property damage if
the instructions are not followed correctly.
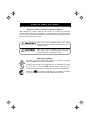
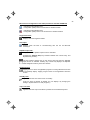
Meaning of Symbols
A triangle ( ) with a picture inside alerts you to a warning of danger.
Here you see the warning for electrical shock.
A diagonal line through a circle ( ) alerts you to something you should
not do; it may or may not have a picture inside. Here you see a
screwdriver inside the circle, meaning that you should not disassemble.
A black circle ( ) with a picture inside alerts you to something you MUST
do. This example shows that you MUST unplug the power cord.
3
Handling the battery cartridge
• Never disassemble or heat the rechargeable battery cartridge, nor
put it into fire or water; doing so could cause battery-rupture or
leakage of battery fluid, resulting in a fire or bodily injury.
• Do not carry or store the battery cartridge together with metallic
ballpoint pens, necklaces, coins, hairpins, etc.
Doing so could short-circuit the terminal pins, causing the batteries to
rupture or the battery fluid to leak, resulting in a fire or bodily injury.
• Avoid dropping the battery cartridge or letting it undergo any shock or
impact.
Doing so could cause the batteries to break, generate heat, rupture or
burn.
• Never charge the rechargeable battery cartridge where any
inflammable gases may be emitted; doing so could cause fire.
• Only use the dedicated charger for charging the rechargeable battery
cartridge.
Using a different type of charger could cause battery-rupture or
leakage of battery fluid and result in a fire, bodily injury, or serious
damage to property.
4
Handling the BHT
• The BHT uses a laser light for indicating the scanning range. The
intensity of the laser light might be too low to inflict bodily injury.
However, do not look into the laser beam.
The BHT complies with IEC 60825-1:1993+A2:2001 and 21 CFR
1040.10, 1040.11 except for deviations pursuant to laser notice No.
50, dated July 26, 2001.
In accordance with Clause 8 and 9, IEC 60825-1, the following
information is provided to the user:
LASER LIGHT
DO NOT STARE INTO BEAM
CLASS 2 LASER PRODUCT
Caution - Use of controls or adjustments or performance of
procedures other than those specified herein may result in
hazardous laser light exposure.
• Do not look into the light source through the reading window or point
the light source towards the eyes.
The light emitted through the reading window is harmful to the eyes.
• Do not poke at the eyes with the stylus that comes with the BHT.
5
Handling the rechargeable cartridge
• Never charge a wet or damp rechargeable battery cartridge.
Doing so could cause the batteries to break, generate heat, rupture or
burn.
Handling the BHT
• If smoke, abnormal odors or noises come from the BHT, immediately
turn off the power, pull out the battery cartridge, and contact your
nearest dealer.
Failure to do so could cause smoke or fire.
• If foreign material or water gets into the BHT, immediately turn off the
power, pull out the battery cartridge, and contact your nearest dealer.
Failure to do so could cause smoke or fire.
• If you drop the BHT so as to damage its housing, immediately turn off
the power, pull out the battery cartridge, and contact your nearest
dealer.
Failure to do so could cause smoke or fire.
• Do not use batteries or power sources other than the specified ones;
doing so could generate heat or cause malfunction.
• When using the hand strap, hand belt or neck strap, exercise due
care to avoid getting them caught in other objects or entangled in
rotating machinery.
Failure to do so could result in accident or injury.
Never
disassembly
• Never disassemble or modify the BHT; doing so could result in an
accident such as break or fire.
6
• Never put the BHT in places where there are excessively high
temperatures, such as inside closed-up automobiles, or in places
exposed to direct sunlight.
Doing so could affect the housing or parts, resulting in a fire.
• Avoid using the BHT in extremely humid or dusty areas, or where
there are drastic temperature changes.
Moisture or dust will get into the BHT, resulting in malfunction, fire or
electrical shock.
• Do not apply excessive force when inserting or removing the
rechargeable battery cartridge.
Doing so will result in damage.
• In environments where static electricity can build into significant
charges (e.g., if you wipe off the plastic plate with a dry cloth), do not
operate the BHT.
Doing so will result in malfunction or machine failure.
• Touch (tap) the LCD only with the stylus that comes with the BHT.
Using the tip of a pen or any pointed object will result in a damaged
or broken LCD.
Limited Warranty on Software Products
In no event will DENSO WAVE INCORPORATED be liable for direct, indirect,
special, incidental, or consequential damages (including imaginary profits or
damages resulting from interruption of operation or loss of business information)
resulting from any defect in the software or its documentation or resulting from
inability to apply the software or its documentation.
7
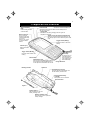
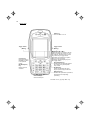
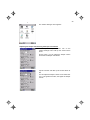
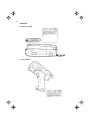
Components and Functions
Synchronization
LED*
*Provided on the BHT-202QW-CE.
Indicator LED
Illuminates in blue when the BHT has successfully read a
2D code or bar code.
Flashes during wireless
communication.
Charge LED
Illuminates in red during charging and turns green at
completion of charging.
Built-in antenna*
Do not cover this
antenna section with
metal-deposited tape
or by hand.
Doing so may result
in communications
failures.
Touch screen LCD (liquid crystal display)
Shows the characters and graphic patterns. You
may directly tap the screen with the stylus for data
entry.
Trigger switch (M4 key)
Press this switch to start code
reading.
Interface port
USB and RS-232C
Interface
Trigger switch (M3 key)
Press this switch to start code
reading.
Hand strap
Be sure to put your
hand through this
strap to prevent you
from dropping the
BHT accidentally.
Reset button
IrDA interface port
Used to exchange data/programs with the
host computer via its integrated IR port or
via the optical communication unit CU-200.
Charge terminals
Hand belt
Reading window
CompactFlash card slot
Insert an optional CompactFlash card
into this memory extension slot.
Rechargeable battery
cartridge
Main power source of the BHT.
Release button
Stylus
Release button
Slide this button to open the
battery cartridge cover.
Battery cartridge cover
Remove this cover to replace the
battery cartridge.
8
Grip style BHT
Trigger switch (M5 key)
Press this switch to start
code reading.
9
30-key pad
Power key
Turns the BHT on or off.
Trigger switch
(M3 key)
Trigger switch
(M4 key)
Magic keys (M1 to M5*)
These keys may be used as an SF key,
ENT key, CLEAR key, CTRL key, ALT
key, TAB key, backlight function on/off
key, marker key or trigger switch
depending upon definition in System
Menu or in user programs.
By default, the [M3] to [M5]* keys act as
a trigger switch.
C (Clear)/
BS (Backspace)
key
Moves back one
character.
Pressing this key
with the SF key held
down in BHTSHELL
returns to the
previous screen.
SF (Shift)/ALP (Alphabet) key
Used in combination with numerical
keys for special input procedures.
Holding down this key for 1.5
seconds or more switches between
the numeric entry and alphabet
entry modes.
Numerical keys
Used for data input.
ENT (Enter) key
Finalizes the inputted data or
operations, and starts the
corresponding processing.
*Provided on the grip style BHT only.
10
26-key pad
Power key
Turns the BHT on or off.
Trigger switch
(M4 key)
Trigger switch
(M3 key)
Magic keys (M1 to M5*)
These keys may be used as an SF key,
ENT key, CLEAR key, CTRL key, ALT
key, TAB key, backlight function on/off
key, marker key or trigger switch
depending upon definition in System
Menu or in user programs.
By default, the [M3] to [M5]* keys act
as a trigger switch
C (Clear) key
Pressing this key in
BHTSHELL returns
to the previous
screen.
BS (Backspace)
key
Moves back one
character.
ALP (Alphabet) key
Pressing this key switches between
the numeric entry and alphabet
entry modes.
SF (Shift) key
Used in combination with other
keys for special input procedures.
Numerical keys
Used for data input.
ENT (Enter) key
Finalizes the input data or operations,
and starts the corresponding
processing.
*Provided on the grip style BHT only.
11
Operating the Touch Screen
You can perform tasks by tapping the elements on the touch screen LCD with the
stylus that comes with the BHT.
Action
Description
Tap
Refers to touching the LCD once.
(Functionally equivalent to "click" with a mouse on a PC.
Double-tap
Refers to quickly touching the LCD twice.
(Functionally equivalent to "double-click" with a mouse on a PC.
Drag
Refers to moving the stylus to the object while touching the
LCD.
(Functionally equivalent to "drag" with a mouse on a PC.
* Always use the stylus to operate the touch screen. Do not use your fingernails or any
pointed or hard object or apply a strong pressure or impact to the LCD.
* Before operation, clean the LCD surface and stylus if dirty. Using dirty ones will scratch
the LCD surface or prevent the stylus from sliding smoothly.
Windows Desktop on the LCD
The Windows desktop in the screens in this operator's guide may be a little different
from that in the actual screens on the LCD.
(Windows desktop sample)
This task tray also may be a little different from
that in the actual screens.
12
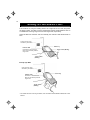
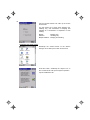
Reading 2D Codes and Bar Codes
Turn the BHT on, bring the reading window to a target 2D or bar code, and press
the trigger switch. The BHT turns the marker beam (laser) and illumination LED on
to indicate the scanning range and scan the target code, respectively.
When the BHT has read the code successfully, the indicator LED will illuminate in
blue.
Code scanning range
indicated by the marker
Indicator LED
Illuminates in blue when the
BHT has successfully read the
target code.
Power key
Trigger switch (M4 key)
Trigger switch
(M3 key)
Grip style BHT
Code scanning range
indicated by the marker
Power key
Indicator LED
Illuminates in blue when the
BHT has successfully read the
target code.
Trigger switch
(M5 key)
* For details about the scanning conditions, refer to the BHT-202Q-CE/BHT-202QW-CE User's
Manual.
13
• If the BHT fails to read due to specular effects or
other factors, change the scanning angle of the
reading window or the distance from codes as
shown at right, and try it again. (Specular effects
occur when the reflection of the light from the code
becomes excessively strong. This can easily
happen when the illumination LED lights codes
perpendicularly or due to the angle of ambient
intense lighting to codes.)
• The actual scanning range is narrower than the marker range. The scanning
range is approx. 2.4" (6 cm) wide by 1.6" (4 cm) high when the scanning distance
is approx. 4" (10 cm).
• Allow only a single code to come within the scanning range. If two or more codes
lie within the scanning range at the same time, the scanner may fail to read or
continue reading those codes alternately.
• The scanner can read codes omnidirectionally. Note that a target code plus its
margin should lie within the scanning range.
• The marker beam range should be used merely as a guide. It does not assure
that a code within the marker beam range can be read.
• The code reading procedure may differ depending upon the application used, so
follow the application’s manual.
• Before reading labels, clean them if stained.
• Avoid using the BHT in direct sunlight. The BHT might fail to read
correctly.
• To read codes on curved surfaces, apply the reading window to the center
of each code at a right angle.
The light intensity of the marker beam or illumination LED will vary
depending upon the scanning conditions and variation of its elements.
14
Using Radio Link
The BHT-202QW-CE supports spread spectrum communication.
• If there are too many communications errors, first make sure that the
BHT-202QW-CE points directly at an access point because the 2.4-GHz band
requires a more or less straight line path. Note also that the low-power radio
waves have trouble passing through human bodies and other obstacles along that
path.
• This link will not operate properly in the vicinity of microwave ovens, industrial
heaters, high-frequency medical equipment, and other sources of radio waves in
the 2.4-GHz band.
• Electromagnetic noise from personal computers, refrigerators, and other home
appliances can also interfere with link operation.
• Environmental factors that can also interfere with link operation include large
metallic objects, metallic dust, or metallic walls in the vicinity of the path and
vibration at either end.
To System Designers:
• Before developing the application, make sure that the intended
environment is free of the interference factors above and thus actually
capable of supporting link operation.
• Assume that there will be communications failures requiring robust retry
capabilities in the software.
• When introducing the BHT link operation into an environment where
equipment using radio waves in the 2.4-GHz band operates or when
introducing such equipment after the introduction of the BHT link
operation, be sure to confirm that the BHT radio link operates properly
with all equipment being in operation beforehand.
• If the environment of the radio communications system is changed after
the introduction (e.g., newly installed household appliances and
movement/addition of shelves or objects), then confirm that the radio link
operates properly again before the actual use.
15
Using Infrared Link
CU-200
Make sure that the BHT is securely in the CU-200.
Grip style BHT
Shield the IrDA interface from direct sunlight, ambient intense lighting
(inverter-driven fluorescent lighting, in particular), and other potential
sources of infrared radiation. Sources to watch out for include remote
control units for television sets and the like.
16
Loading the Battery Cartridge
Before the first use of the BHT, be sure to load the battery cartridge as shown below.
The battery cartridge is not loaded in the BHT when shipped from the factory.
Into the BHT body
(1) Turn the BHT upside down.
(2) Slide the release buttons in the direction shown below and remove the battery
cartridge cover.
(3) Push the battery cartridge into the BHT.
(To remove it, first make sure that the BHT is turned off. Slide the release
buttons, remove the battery cartridge cover, and pull up the battery pull strap.)
(4) Set the battery cartridge cover back into place and slide the release buttons to
the original position.
(5) Place the BHT on the CU-200 to charge the rechargeable battery cartridge.
Release button
Battery cartridge
cover
Release button
Battery pull strap
Battery cartridge
Battery pull strap
17
Into the grip
(1) Take the bottom cover off the grip by removing the screw.
Grip
Screw
Bottom cover
(2) Pull the lock in the direction of the arrow and insert the battery cartridge into the
grip with the boss facing as shown below.
Boss
Battery cartridge
Lock
(3) Secure the bottom cover to the grip with the screw.
Bottom cover
Screw
18
• The BHT integrates a rechargeable backup power source which backs up
the memory and calendar clock in the BHT when no battery cartridge is
loaded or the voltage level of the battery cartridge drops below the
specified level. The backup power source is automatically charged by the
battery cartridge.
When you first load the battery cartridge after purchase or you load it
after leaving the BHT unused for a long time, do not remove the battery
cartridge for at least 48 hours after that loading. This is for charging the
memory backup source integrated in the BHT.
• For handling notes to be observed at the time of battery replacement, refer
to the "Battery Replacement Notes" on page 21.
19
Calibrating the Touch Screen
At the first use of the BHT, you need to calibrate the touch screen and set up the
calendar clock. Press the power key to turn on the BHT. The calibration screen
appears, so follow the on-screen instructions. If nothing appears, first perform a
"cold boot" (described on the "Warm and Cold Booting" on page 22).
Calibration screen
The "+" appears first at the center of the screen as
shown at left.
Tap the center of the "+" with the stylus for one
second, and the "+" moves to the upper left. Tap its
center, and it moves to the bottom left.
This way, tapping the center of the "+" moves it,
starting from the center of the screen to the upper
left, bottom left, bottom right and upper right in this
sequence.
⇓
During calibration, the power key is
disabled. After completing the calibration,
press the power key.
After completion of the above calibration, press the
ENT key or tap the screen. The calendar clock
setup screen will appear below at left.
⇓
Set the date, time, and time zone. Then tap the OK
button.
20
BHT Turning-off Notes
If you press the power key to turn off the BHT, the BHT displays the following
message and starts preparation for shutdown.
When the above message is displayed, do not remove the battery cartridge.
If you do so, the data stored in the BHT may be lost.
21
Battery Replacement Notes
When is battery replacement needed?
If the "Charge the battery!" appears on the LCD, replace the rechargeable battery
cartridge with a fully charged one.
If you leave the BHT without replacing the rechargeable battery cartridge, the
integrated calendar clock and data stored in the BHT can no longer be backed up.
The calendar clock may stop and the data may be lost.
Grip style BHT
If "Charge the battery!" appears on the LCD when battery cartridges are loaded in
both the BHT body and grip, replace both battery cartridges. (As long as the voltage
level of either one of battery cartridges is higher than the specified level, this
warning message will not appear.) Always remove both battery cartridges, even if
you only have one fully-charged replacement battery cartridge on hand.
• Be sure to turn the BHT off before battery replacement.
• Replace the battery cartridge quickly. Load a charged battery cartridge
within 3 minutes after the removal to avoid data loss.
• After battery replacement, turn the BHT on and check the BHT operation.
• If you leave the BHT with no battery cartridge loaded for a long time, the
contents of the memory may no longer be backed up so that the data
stored in the BHT may be lost. It is recommended that important data be
saved into the FLASH folder or uploaded to the host computer.
• The battery cartridge will gradually deteriorate during the repeated cycles
of charging and discharging due to its properties. When the battery
operation period becomes shortened due to its deterioration even if it has
been charged for the specified hours, replace the battery cartridge with a
new one.
• Use only DENSO WAVE-authorized battery cartridges and chargers.
• Never dispose of battery cartridges into a fire. They should be recycled
properly. Do not throw them in a trash.
22
Warm and Cold Booting
Warm-booting the BHT
In any of the following cases, warm-boot the BHT:
• The BHT makes no response to entry from the touch screen or keys.
• The programs in the BHT malfunction due to any problems.
Warm-booting the BHT will not erase data stored in the RAM, but it will
erase data being edited and not be saved.
Warm booting procedure
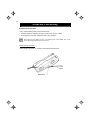
When the BHT is turned on, press the reset button with the stylus.
Stylus
Reset button
23
Cold-booting the BHT
If a problem persists even after warm-booting the BHT, cold-boot the BHT.
Cold-booting the BHT will erase all data stored in the RAM. It is
recommended that important data be saved into the FLASH folder or host
computer.
Cold booting procedure
Turn the BHT off. While holding down the reset button with the stylus, press the
power key and then release both buttons. Press the power key again, and the BHT
cold-boots.
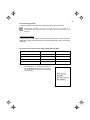
Contents of the memory after warm-/cold-booting the BHT
After warm booting
After cold booting
Data in the FLASH folder
Retained
Retained
Data in other folders
Retained
Erased
Contents of the Registry
Retained
Erased (Note)
Data being edited
(Note)
Erased
Erased
If the Registry has been backed up*, that backup will apply after cold booting.
* When the BHT is on, pressing the power key
with the SF/ALP (SF) key held down displays
the screen shown at right and starts backing
up the Registry.
24
About Status Indicators
Battery voltage level
Shows the current battery voltage level.
Displays when the voltage level is high.
Displays when the voltage level is low.
The grip style BHT shows two icons as shown
below. The upper one is for the battery cartridge
loaded in the BHT body and the lower one for that
in the grip.
(Voltage level in the BHT body)
(Voltage level in the grip)
Status indicators
The displayed battery level shows the
terminal voltage of the battery cartridge, not
how much power is left.
The battery voltage level varies depending
upon the operation of the BHT, so the
displayed level also may vary.
Software keyboard display/hide
Shows whether the software keyboard is displayed or hidden.
(Tapping this icon toggles the software keyboard on and off.)
Displays when the software keyboard is displayed.
Displays when the software keyboard is hidden.
Synchronization state (Provided on the BHT-202QW-CE)
Displays the open state of the wireless device and the radio field intensity.
Displays when the wireless device is open.
Shows the radio field intensity with the number of bars.
25
Wireless Zero Configuration radio state (Provided on the BHT-202QW-CE)
Indicates that the Wireless Zero
Configuration (WZC) radio is connected to a wireless network.
Indicates that the Wireless Zero
Configuration (WZC) radio is not connected to a wireless network.
Keypad shift state
Displays when the keypad is shifted.
ActiveSync
Displays when the BHT is communicating with the PC via Microsoft
ActiveSync.
Alphabet input state
Displays when the alphabet input function is activated.
(Pressing the SF/ALP (ALP) key switches between the numeric entry and
alphabet entry modes.)
The ALP window appears only on the 26-key pad type when the alphabet
input function is activated. Pressing any numeric key displays the alphabet
letter assigned to that key in this ALP window.
Desktop display
Tapping this icon when an application program is running switches the screen
to the desktop display. Tapping it again returns to the application execution
screen.
Standby state
Appears when the CPU comes to be on standby.
(This icon does not appear by default. You can display it by changing the
setting in System Menu or in user programs.)
Caps Lock state
Appears when the Caps Lock switch is pressed on the software keyboard.
26
Setting the Backlight
30-key pad
Pressing the right-hand trigger switch (M4 key) with the SF/ALP key held down
activates or deactivates the backlight function.
Backlight Off or Dim
(The backlight function is
Disable when you turn the
BHT power on.)
Press the right-hand
trigger switch while
holding down SF/ALP.
Right-hand
trigger switch (M4)
Backlight On
If no key is
pressed within 3
seconds.*
SF/ALP key
Press the right-hand
trigger switch while
holding down
SF/ALP.
Press any key (except for the
simultaneous depression of
the right-hand trigger switch
and SF/ALP) or tap the touch
screen.
Backlight Off or Dim
(The backlight function
is Enable.)
Press the right-hand
trigger switch while
holding down SF/ALP.
*Within one minute if the BHT is placed on the CU.
In user programs, you can select the key to be used for activating or
deactivating the backlight function (instead of the initial setting:
combination of SF/ALP key and right-hand trigger switch (M4)), as well as
modifying the on-duration of the backlight before the automatic turning-off.
You can enable or disable the backlight function on the Backlight menu,
instead of pressing the backlight function on/off key.
27
26-key pad
Pressing the right-hand trigger switch (M4 key) with the SF key held down activates
or deactivates the backlight function.
Backlight Off or Dim
(The backlight function is
Disable when you turn the
BHT power on.)
Press the
right-hand trigger
switch while
holding down SF.
Right-hand
trigger switch (M4)
Backlight On
Press the right-hand
trigger switch while
holding down SF.
If no key is
pressed for 3
seconds.*
SF key
Press any key (except for the
simultaneous depression of
the right-hand trigger switch
and SF) or tap the touch
screen.
Backlight Off or DIm
(The backlight function is
Enable.)
Press the right-hand
trigger switch while
holding down SF.
*For one minute if the BHT is placed on the CU.
In user programs, you can select the key to be used for activating or
deactivating the backlight function (instead of the initial setting:
combination of SF key and right-hand trigger switch (M4)), as well as
modifying the on-duration of the backlight before the automatic turning-off.
You can enable or disable the backlight function on the Backlight menu,
instead of pressing the backlight function on/off key.
28
Adjusting the Beeper Volume,
Switching the Beeper & Vibrator,
Calibrating the Touch Screen, and
Setting the Backlight
You can adjust the beeper volume, switch the beeper and vibrator on and off,
calibrate the touch screen, and set the backlight according to the procedure below.
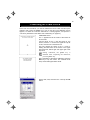
Double-tap the "BhtShell" icon on the desktop to
call up the "System Menu. "
⇓
Tap the "3:System Properties."
29
⇓
The "Device Settings" menu appears.
Adjusting the beeper and switching the beeper and vibrator
Double-Tap the "Beeper/Vibration" icon on the
"Device settings" menu calls up the screen shown
at left.
On this menu, you can adjust the beeper volume
and switch the beeper and vibrator.
Tap the "Volume" tab calls up the screen shown at
left.
You can adjust the beeper volume to six levels from
0 to 5. The greater the value, the higher the beeper
volume.
30
Tap the "Rumble Device" tab calls up the screen
shown at left.
You may select any of three ways--beeping only,
vibrating only, and combination of beeping and
vibrating as a confirmation of completion of code
reading.
Beeper:
Beeping only
Vibration:
Vibrating only
Beeper/Vibration: Beeping and vibrating
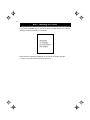
Calibrating the touch screen
Double-tap the "Control Panel" on the "Device
settings" menu calls up the screen shown at left.
Scroll the screen, double-tap the "Stylus" icon on
the "Control Panel" calls up the "Stylus Properties."
Tap the "Calibration" tab.
31
Tap the "Recalibrate".
Follow the instructions on the screen. Refer to the
"Calibrating the Touch Screen."
32
Setting the backlight
Double-tap the "Control Panel" icon on the "Device
settings" menu, and double-tap the "Backlight" icon
calls up the "Backlight" settings screen.
( 1)
- Backlight function *
"Enable" or "Disable" the backlight function. If it is
"Enable", the backlight comes on when you press
any key or tap the touch screen.
- Backlight on-duration
Set the on-duration of the backlight that comes on
when you press any key or tap the touch screen.
Battery Power: On-duration when the BHT is not
placed on the CU.
External Power: On-duration when the BHT is
placed on the CU.
- Brightness Level
Select the desired brightness level from the
following four choices:
(Dark)
Power Save
↑
Low Bright
|
Mid Bright
|
High Bright
↓
(Bright)
- Power Save Mode
Change the settings for turning off the backlight
after the BHT has not been used for a specified
period time:
Off:
The backlight turns off immediately.
Dim: The backlight remains on very dimly.
( 1)
*
Pressing the backlight function on/off key (the initial
setting: the simultaneous depression of the SF/ALP
(SF) key and right-hand trigger switch (M4 key))
toggles between enabled and disabled states,
regardless of the backlight function setting made on
this screen.
33
Error Messages
If some error occurs when the power is turned on or during program execution, one
of the following error messages will appear on the LCD.
System Program error
Problem
A System Program error has occurred.
Solution
Contact your system administrator.
Low battery warning
Problem
When the BHT is turned on or off or during
execution of program, the battery output level has
dropped below a specified lower limit.
If low battery is detected, the BHT displays
this message for approx. 2 seconds and
beeps three times (for 0.1 second per beep).
After that, it will resume previous regular
operation.
Solution
The battery cartridge will need to be recharged
before long. Replace or recharge the battery
cartridge.
If the grip style BHT is loaded with battery
cartridges both in the BHT body and the grip,
replace or recharge both battery cartridges. Always
remove both battery cartridges, even if you only
have one fully-charged replacement battery
cartridge on hand.
34
Shutdown due to low battery
Problem
When the power is turned on or off or during
execution of programs (System Mode or
applications), the battery output level has lowered
to the extent the BHT can no longer operate.
If lower battery is detected, the BHT beeps
five times (for 0.1 second per beep) and
then turns itself off. Depending upon the
battery level, the beeper may not sound five
times.
Solution
Replace or recharge the battery cartridge.
If the grip style BHT is loaded with battery
cartridges both in the BHT body and the grip,
replace or recharge both battery cartridges. Always
remove both battery cartridges, even if you only
have one fully-charged replacement battery
cartridge on hand.
Service life warning for backup battery
Problem
The backup battery has been charged/discharged
by the specified number of times so that the battery
capacity lowers below the specified level.
Solution
Replace the backup battery. For the replacement
procedure, refer to the User's Manual.
35
Proper Care of the BHT
Wipe the BHT's charge terminals and battery cartridge terminals with a cotton swab
or the like periodically. Clean the BHT housing with a dry, soft cloth. Before cleaning,
be sure to turn the BHT off.
• Never use benzene, alcohol, or other organic
solvents. The housing may be marred or the
paint may come off.
• Never rub or strike the liquid crystal display
(LCD) with anything hard. The LCD surface will
be easily scratched or broken.
• When cleaning the keypad, do not scrub the
surface too hard or pull on the keys. Doing so
may break the keys.
• If the BHT becomes smudged, wipe it with a soft cloth that has been moistened in
soapy water (always use neutral detergent) and wrung out thoroughly.
Dust or dirt accumulating on the clear plate of the reading window will affect reading
performance. If you use the BHT in dusty areas, therefore, periodically check the
clear plate of the reading window and clean it if dusty.
• To clean the plate, first blow the dust away with an airbrush. Then wipe the plate
with a cotton swab or the similar soft one gently.
• If sand or hard particles have accumulated, never rub the plate; doing so will
scratch or damage it. Blow the particles away with an airbrush or a soft brush.
36
Handling Notes
• An early upload of gathered data is recommended, since the data stored in the
RAM might be affected by the so-called "soft error" or other environmental
phenomena. In some cases, the "Contact your administrator." will appear on the
LCD.
• Do not use the BHT in the vicinity of radio equipment. The BHT may malfunction.
• Avoid storing the battery cartridge in a hot place. The battery capacity may be
decreased.
• Do not touch the battery cartridge terminals or BHT's charge terminals by hand or
stain them. Doing so could result in BHT's malfunction or cartridge charging
failure.
• When connecting or disconnecting cables, do not plug or unplug at an angle and
do not pull them strongly. Doing so will result in a machine failure.
• If the BHT has been stored in a hot (50°C to 60°C, 122°F to 140°F) and humid
place, allow it to sit at room temperature and humidity for at least one day before
use. Using the BHT with its inside being hot will fail to scan or result in a machine
failure.
• If the stylus wears so that its tip becomes sharpened, replace it.
• In environments where static electricity can build into significant charges, do not
operate the BHT. Doing so will result in malfunction or machine failure.
• Avoid dropping the BHT or letting it undergo any shock or impact. Doing so will
break or damage the BHT.
• If the "Replace the batteries!" or "Charge the battery!" message appears after the
BHT undergoes any shock or impact, turn the BHT off and on and then check the
battery output level. The battery may not have run out.
• Battery cartridges should be recycled properly in conformity with local codes and
regulations.
37
US and Canada Regulations
This device complies with Part 15 of the FCC Rules, Canadian ICES-003 and
RSS-210 Rules.
Operation is subject to the following two conditions:
(1) this device may not cause harmful interference, and
(2) this device must accept any interference received, including interference that
may cause undesired operation.
NOTE: This equipment has been tested and found to comply with the limits for a
Class A digital device, pursuant to Part 15 of the FCC Rules. These limits are
designed to provide reasonable protection against harmful interference when the
equipment is operated in a commercial environment. This equipment generates,
uses, and can radiate radio frequency energy and, if not installed and used in
accordance with the instruction manual, may cause harmful interference to radio
communications. Operation of this equipment in a residential area is likely to cause
harmful interference in which case the user will be required to correct the
interference at his own expense.
NOTE: This Class A digital apparatus complies with Canadian ICES-003.
Cet appareil numérique de la classe A est conforme à la norme NMB-003 du
Canada.
FCC WARNING: Changes or modifications not expressly approved by the party
responsible for compliance could void the user’s authority to operate the equipment.
CAUTION: Radio Frequency Radiation Exposure
This device is approved for hand held use only and, to comply with applicable FCC
radio frequency exposure regulations, must be used with a distance of at least 20
cm (7.9 inches) between the antenna and the body of any person at all times during
use.
This transmitter and its antenna should not be placed next to other antennas or
similar radiating structures.
38
LABELING:
Regular style BHT
Grip style BHT
39
Customer Registration
Thank you for purchasing our product. We would like to offer you the following
support and assistance for your more convenient use of our products when you fill
out and submit the customer registration form.
Privileges of customer registration
1. Free upgrade information
2. Free exhibition and event information of new products
3. Free web-information service "QBnet."
"QBnet" Contents
●
●
●
Information searching
Download service
Inquiry with email
※These are subject to change without notice.
How to Register
Through Internet at the following address
http://www.denso-wave.com/en/adcd/support/
After going into Internet, please access the above-mentioned URL address.
4-2-12, Toranomon, Minato-ku, Tokyo, Japan 105-0001
http://www.denso-wave.com/
496996-0401
This manual uses recycled paper.